Home Blog Page 497

Polkast: Remotely Access Desktop Files Form iOS, Kindle and Android.
0
Polkast: Remotely Access Desktop Files Form iOS, Kindle and Android.

Feel insecure while keeping your files on Cloud Storage, especially after all the hullabaloo the National Security Agency’s PRISM project has managed to cause. But that Does not mean you should stop Accessing your Cloud storage, well Cloud services are not the only way to remote access your files stored on your PC on your Mobile device. Polkast is another Application that allows you to Remotely access your desktop, it acts as a Personal Cloud Services and let you access the Files Stored in PC, Linux or any other device from iOS, Kindle Fire and Android device.

Polkast_SignUp

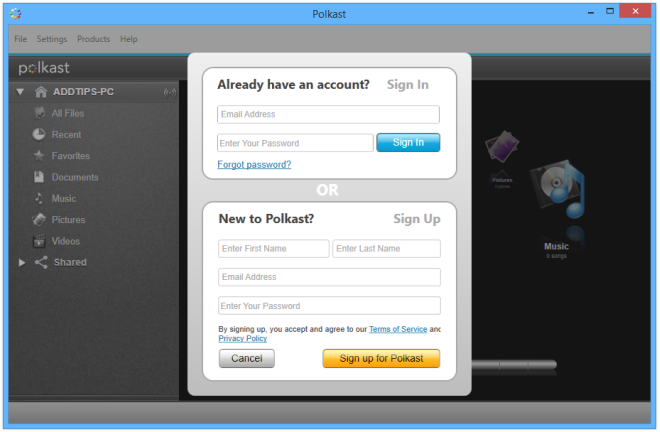
The First thing is to download its main PC application from where the files will be accessed, which Polkast calls your HomeBase. When you run it for the First time, you will need to create the account from the app, done, now Sign-in using the E-mail and Password.
Polkast

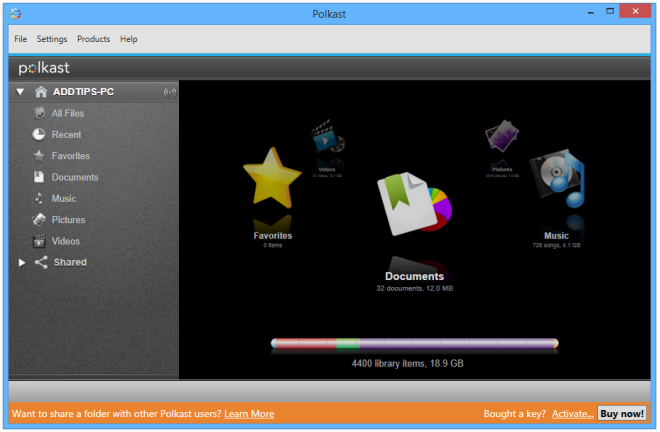
Polkast supports multiple HomeBase, though free account holder, you can only access one account at one time. Upon Signed-in you will be presented on the main interface, you can call your Dashboard, where you can manage files and folders you want to share. There is a Sidebar on left that allows you to navigate between, Documents, Music, Pictures, Videos, Favorites, Recent and Shared Items.
Manage-Access

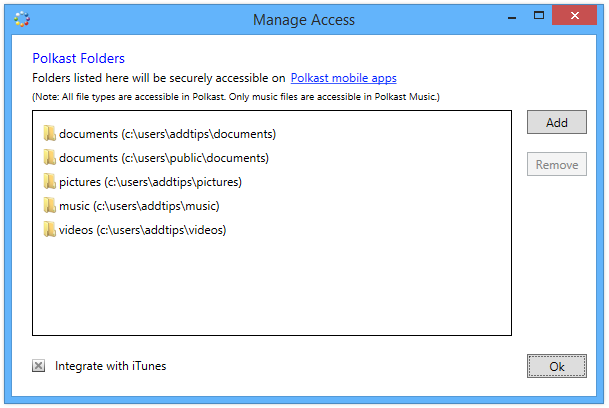
To manage the files you want to access from Mobile app, Click settings > Manage Access from Menu bar and a Small window will appear where you can add or Remove items. It also allows you to access iTunes Library Remotely.

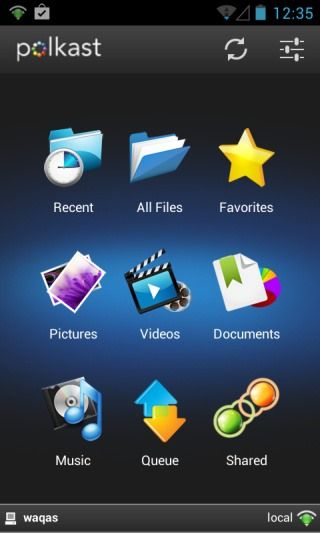
When you have your Dashboard Configured, it is time to hit the Mobile app. Launch Polkast app on Mobile and Sign-in and Choose your default homebase, and the Mobile app will be linked with Polkast. You can now access the files you shared from your Computer, over a Connected Wi-Fi. The Interesting this is that it will tell you when your files are inaccessible over the internet and suggest you to use a Local network.
Polkast_Android_Main

How To Boot and Install Multiple ROMs on Nexus 5 With Multi ROM.

0
How To Boot and Install Multiple ROMs on Nexus 5 With Multi ROM.

We have already showed you how to Multi boot LG Nexus 4, and LG Nexus 5 seems to be coming up with the same power as Nexus 4. Developers have put a lot of Custom Power in Nexus 5 and with the Landing of Multi ROM for this device, things are taking an interesting turn. For those who are not Familiar with Multi ROM, it is an application that allows you to Boot Multiple ROMs on your Android device. So, Far Nexus 7, Nexus 4 and Nexus 5 have supported this. For now you can boot your Nexus 5 with most Awesome ROMs available for it.

Screenshot_9

Furthermore, you are not restricted by only Android Based ROMs, you can even install Ubunt Touch or FireFox OS as your secondary OS on Nexus 5, as soon as they are available for Nexus 5 you can install them, till then you can do good with Android based ROMs. Installing the ROMs on it is as same as installing on Nexus 4. Follow the Link to find out how.

How To Triple Boot Your Nexus 4 On Android, Ubuntu Touch and FireFox OS.

Again if you want to install Ubuntu Touch and FireFox Os on your Nexus 5, you will need to wait for their official release. Till then you can wait or follow the Guide to install Multi ROM on your Nexus 4 or using the same tutorial, you can install Android Based ROMs on your Nexus 5 as Secondary OS.

Update Sony Xperia Z1 C6906 to Latest Android 4.3 Jelly Bean 14.2.A.0.290 Firmware

11
Update Sony Xperia Z1 C6906 to Latest Android 4.3 Jelly Bean 14.2.A.0.290 Firmware

Xperia Z1 has another variant modeled as C6906, other variants include C6902/3/943, basically the difference is only between the LTE connectivity or the band frequencies while the phones sport the same hardware and software specifications e.g 5.0 inches full Hd display with 441 ppi, 20.7 MP camera at the back and a 2 MP on the front, 2.2 GHz Qualcomm Snapdragon 800 Quad Core chipset, 2 GB RAM and 3000 mAh battery under the back.

Sony has recently pushed an update in the device, initially Xperia Z1 ran on Android 4.2.2 Jelly Bean but the device is now updated to Android 4.3 Jelly Bean. In the latest firmware Sony has fixed a lot of bugs, specially the bootloader unlocked bug that caused the camera to crash. You can unlock your phone’s bootloader safely now, there are performance enhancements, camera app is improved, new themes are added and a lot more that you may check out once you update.xperia-Z1-hero-purple-1240x840-31e80ee340f8a0170e3dd9fa35b66e33

The device can be updated via Over The Air updates but the OTA updates take some time to reach different regions as the rollout is always region specific, perhaps if you are one of those who can’t wait and want to get your hands on the latest and greatest firmware of Android, then we have the solution right here for you. In the following post I have explained the method to install Android 4.3 Jelly Bean 14.2.A.0.290 latest firmware in Sony Xperia Z1 6906. Let’s move a little forward.

Here are some pre-requisites:

Pre Requisites:

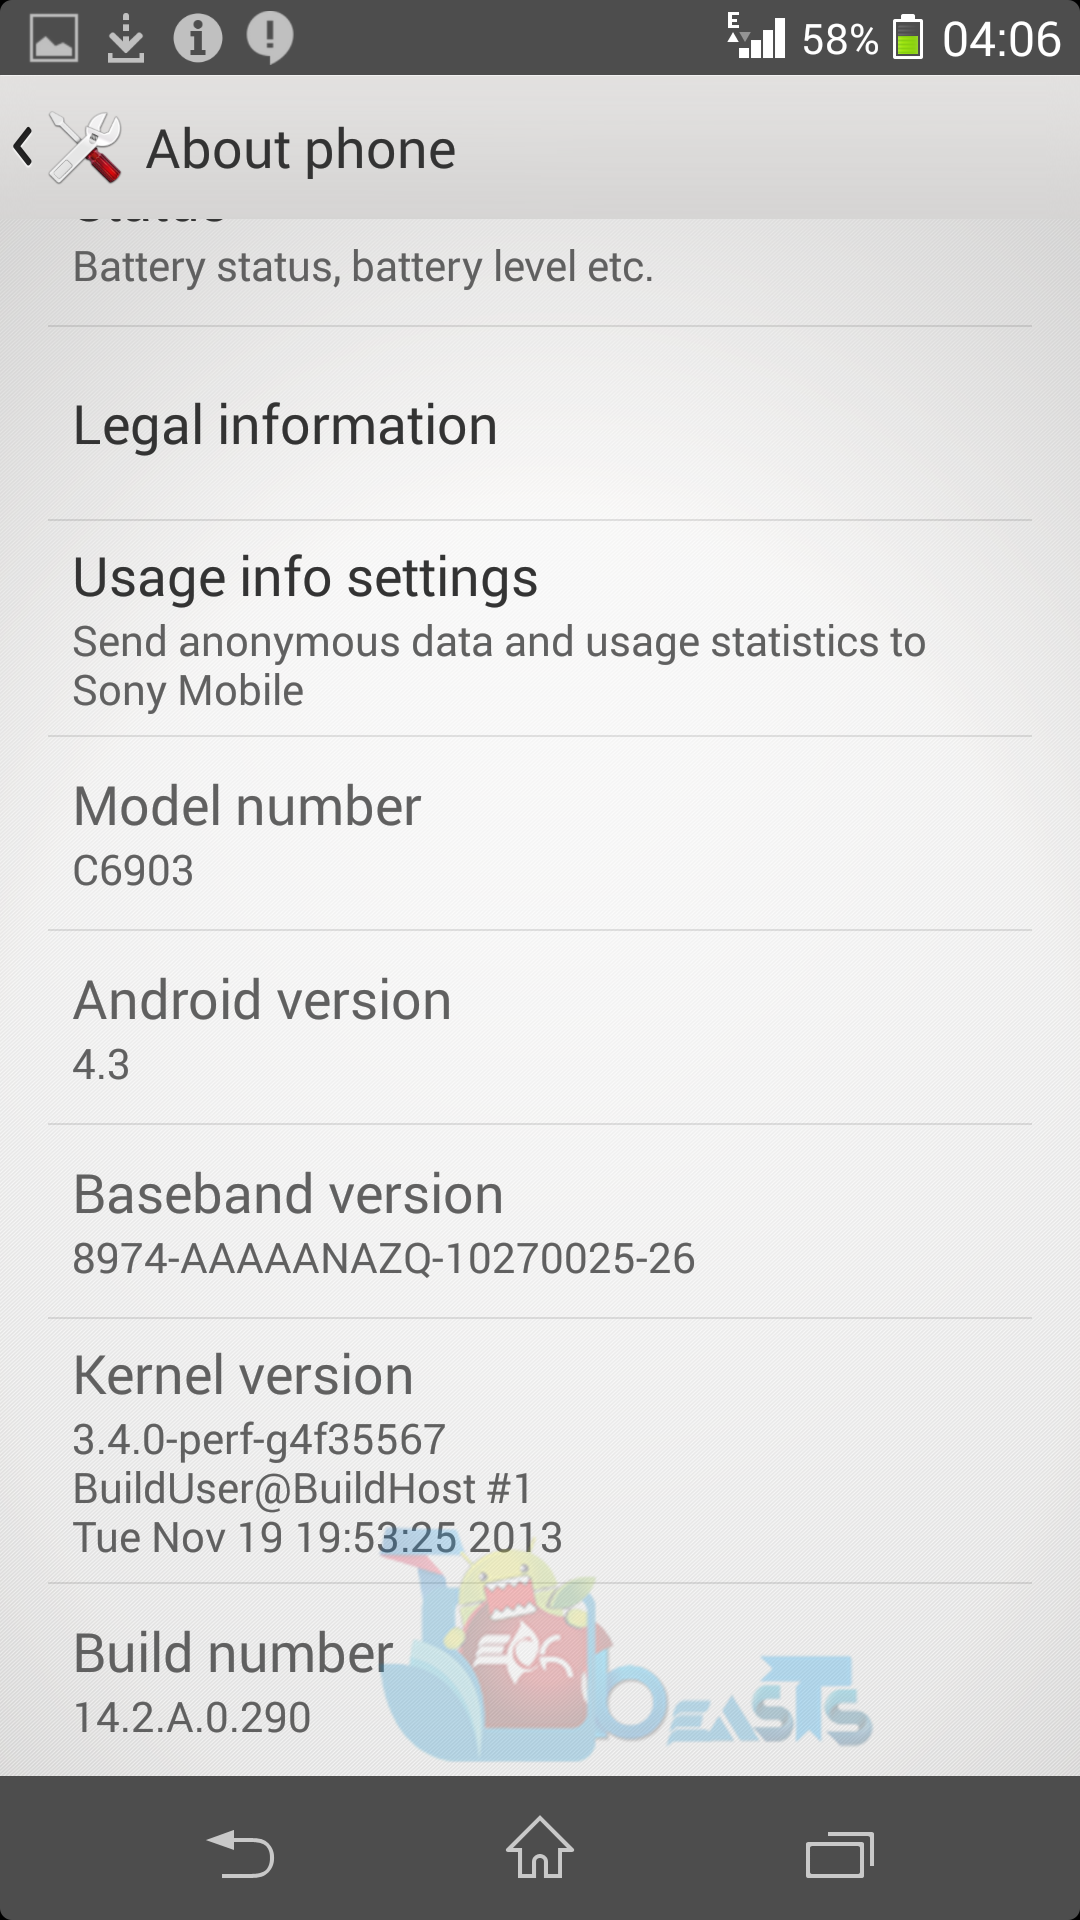
      1. As mentioned, this firmware is only for Xperia Z1 C6906. Do not try this on any other phone, that may result in bricking your device. Check your device’s model number in Settings > About device.
      2. You must have installed Sony Flashtool. Find the full guide here.
      3. After installing Sony Flashtool, open the Flashtool folder from the drive where you installed it.
      4. Now open Flashtool>Drivers>Flashtool-drivers.exe and install the Flashtool, Fastboot & Xperia Z1 drivers from the list. [Important]
      5. Your phone must be charged at least over 60%. This is highly recommended in order to prevent any power issues during the flashing process.
      6. Enable USB debugging mode on your device. To do so, tap settings>developer options>USB debugging. If you can’t find developer options in settings, then tap settings > about device and tap “Build Number” for 7 times and you’ll get em’ activated under settings.
      7. Make sure that you back up all your important media content,  contactscall logs and text messages. This is highly recommended and important in case something goes wrong during the flashing process or in case you select the data wipe option before flashing. You can easily restore whenever you need.
      8. To flash this firmware, you do not need to root your device, you do not need to unlock the bootloader. All you need is, your device must be the one mentioned and must be running on Android 4.2.2 Jelly Bean.
      9. Download the firmware file properly.
      10. Use the OEM data cable to connect your phone to your PC. Using any other data cable might cause connection problems.
      11. Alright! Follow this guide to the letter in order to prevent any mishap.


For other Xperia Z1 variants, Check out:

How to Install Android 4.3 Jelly Bean 14.2.A.0.290 on Xperia Z1 C6906:

      1. Before moving forward, please make sure that you’ve read the pre requisites and ensure that you are set to go ahead.
      2. Download the latest firmware Android 4.3 Jelly Bean 14.2.A.0.290 FTF file.
      3. Copy the file and paste in Flashtool>Firmwares folder.
      4. Open Flashtool.exe now.
      5. Hit the small lightening button on the top left corner and select Flashmode.
      6. Select the FTF firmware file that you placed in the Firmware folder. 
      7. From the right side, select what do you want to wipe. Data, cache and apps log, all wipes are recommended, perhaps you may select if you don’t want.
      8. Click on OK, and it will start preparing the firmware for flashing. This may take a little while to load.
      9. As soon as the firmware is loaded, it will prompt you to attach the phone by turning it off and keeping the back key press.
      10. For Xperia Z1Volume Down key will do the job of back key, just turn off your phone, keep the Volume Down key pressedand plug in the data cable.
      11. As soon as the phone is detected in Flashmode, the firmware will start flashing, Do not leave the Volume Down key until the process is complete.
      12. As soon as you see “Flashing ended or Finished Flashing” leave the Volume Down key, plug the cable out and reboot.
      13. That’s All! Congrats! You’ve installed latest Android 4.3 Jelly Bean on your Xperia Z1 C6906. Enjoy
      14. Screenshot_2013-12-18-04-08-52Screenshot_2013-12-18-04-08-31Screenshot_2013-12-18-04-07-26Screenshot_2013-12-18-04-08-15Screenshot_2013-12-18-04-06-43Screenshot_2013-12-18-04-06-49Screenshot_2013-12-18-04-06-53Screenshot_2013-12-18-04-07-00

That’s all for now, in case you got any queries, suggestions or face any difficulties regarding this post, please feel free to stop by the comment box below. We will try our best to sort it out for you.

How to Update Sony Xperia Z1 C6943 to Latest Android 4.3 Jelly Bean 14.2.A.0.290 Firmware

0
How to Update Sony Xperia Z1 C6943 to Latest Android 4.3 Jelly Bean 14.2.A.0.290 Firmware

Sony’s Xperia Honami, modeled as Xperia Z1 is branded under different variants, and one of the variants is C6943. Recently, Sony has pulled out the Android 4.3 Jelly Bean update for some of its devices and Xperia Z1 is one of those lucky devices. Latest firmware based on Android 4.3 Jelly Bean with the build number 14.2.A.0.290 is available for Xperia Z1 C6943 and can be installed via OTA update or by flashing manually. The new update comes with a lot of bug fixes, performance enhancements, new themes, the camera bug upon unlocking the bootloader is also fixed in this update.

In the following post, we’re going to have a look on how to install the latest firmware Android 4.3 Jelly Bean on your Xperia Z1 C6943 manually using the Flashtool. In case you  have not received the OTA update yet, and its getting hard for you to wait, then this guide is surely for you as you can easily install the latest and greatest version of Android on your Z1 without wasting any time.. Let’s move forward to the process.xperia-Z1-hero-white-1240x840-f9b9916d16a90faba4e6e2fc3de5e289

Here are some pre-requisites for flashing the firmware:

Pre Requisites:

      1. As mentioned, this firmware is only for Xperia Z1 C6943. Do not try this on any other phone, that may result in bricking your device. Check your device’s model number in Settings > About device.
      2. You must have installed Sony Flashtool. Find the full guide here.
      3. After installing Sony Flashtool, open the Flashtool folder from the drive where you installed it.
      4. Now open Flashtool>Drivers>Flashtool-drivers.exe and install the Flashtool, Fastboot & Xperia Z1 drivers from the list. [Important]
      5. Your phone must be charged at least over 60%. This is highly recommended in order to prevent any power issues during the flashing process.
      6. Enable USB debugging mode on your device. To do so, tap settings>developer options>USB debugging. If you can’t find developer options in settings, then tap settings > about device and tap “Build Number” for 7 times and you’ll get em’ activated under settings.
      7. Make sure that you back up all your important media content,  contacts, call logs and text messages. This is highly recommended and important in case something goes wrong during the flashing process or in case you select the data wipe option before flashing. You can easily restore whenever you need.
      8. To flash this firmware, you do not need to root your device, you do not need to unlock the bootloader. All you need is, your device must be the one mentioned and must be running on Android 4.2.2 Jelly Bean.
      9. Download the firmware file properly.
      10. Use the OEM data cable to connect your phone to your PC. Using any other data cable might cause connection problems.
      11. Alright! Follow this guide to the letter in order to prevent any mishap.


For other Xperia Z1 variants, Check out:

How to Install Android 4.3 Jelly Bean 14.2.A.0.290 on Xperia Z1 C6943:

      1. Before moving forward, please make sure that you’ve read the pre requisites and ensure that you are set to go ahead.
      2. Download the latest firmware Android 4.3 Jelly Bean 14.2.A.0.290 FTF file.
      3. Copy the file and paste in Flashtool>Firmwares folder.
      4. Open Flashtool.exe now.
      5. Hit the small lightening button on the top left corner and select Flashmode.
      6. Select the FTF firmware file that you placed in the Firmware folder. 
      7. From the right side, select what do you want to wipe. Data, cache and apps log, all wipes are recommended, perhaps you may select if you don’t want.
      8. Click on OK, and it will start preparing the firmware for flashing. This may take a little while to load.
      9. As soon as the firmware is loaded, it will prompt you to attach the phone by turning it off and keeping the back key press.
      10. For Xperia Z1Volume Down key will do the job of back key, just turn off your phone, keep the Volume Down key pressedand plug in the data cable.
      11. As soon as the phone is detected in Flashmode, the firmware will start flashing, Do not leave the Volume Down key until the process is complete.
      12. As soon as you see “Flashing ended or Finished Flashing” leave the Volume Down key, plug the cable out and reboot.
      13. That’s All! Congrats! You’ve installed latest Android 4.3 Jelly Bean on your Xperia Z1 C6943. Enjoy
      14. Screenshot_2013-12-18-04-08-52Screenshot_2013-12-18-04-08-31Screenshot_2013-12-18-04-07-26Screenshot_2013-12-18-04-08-15Screenshot_2013-12-18-04-06-43Screenshot_2013-12-18-04-06-49Screenshot_2013-12-18-04-06-53Screenshot_2013-12-18-04-07-00

That’s all for now, in case you got any queries, suggestions or face any difficulties regarding this post, please feel free to stop by the comment box below. We will try our best to sort it out for you.

Where Are iPhone Firmwares Stored On Any computer.

0
Where Are iPhone Firmwares Stored On Any computer.

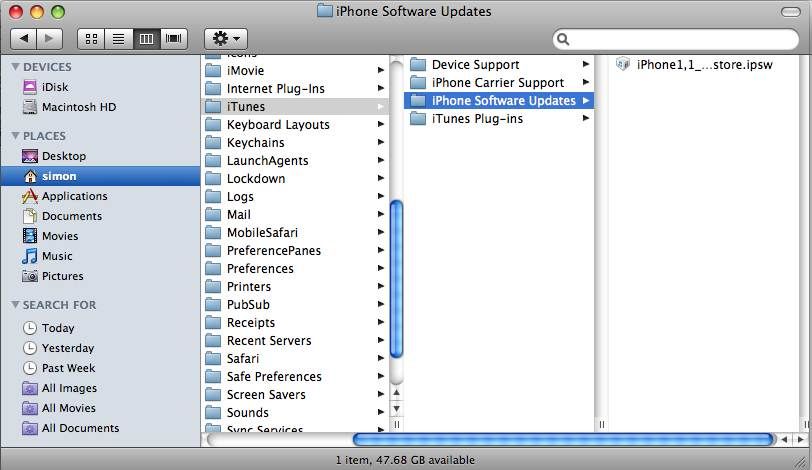
If you have ever downloaded iDevice Firmware to your computer using iTunes, that firmware is saved in your PC, but not to any general download section. Once you have downloaded the Firmware, copy it from the download folder and save it anywhere else. If you haven’t found where all the downloaded .ipsw files are, and of course Apple won’t go out of it’s way to tell you where iTunes have saved the iDevice firmware files, we will tell you.

iphone-firmware-files-300x300

iDevices Firmware files have extension of .ipsw and they can be find in the following locations:

On Windows Xp:

Documents and Settings\<User>\Application Data\Apple Computer\iTunes\iPhone Software Updates

On Windows 7:

Users\<User>\AppData\Roaming\Apple Computer\iTunes\iPhone Software Updates

On Mac OS X:

~/Library/iTunes/iPhone Software Updates

Screenshots:

On Windows XP:

firmware


On Windows 7:

Screenshot_8


On Mac OS X:

itunes_software_update_folder

Update Sony Xperia Z1 C6902 to Latest Android 4.3 Jelly Bean 14.2.A.0.290 Firmware

5
Update Sony Xperia Z1 C6902 to Latest Android 4.3 Jelly Bean 14.2.A.0.290 Firmware

Sony’s latest flagship has waged the war against the flagships of other Smartphone Giants, sporting a 5 inch Full HD display with 441 ppi, a 20.7 MP camera having 1/2.3 inches sensor size at the back, that gives the phone the credit of having the world’s best camera, a 2.1 MP camera sensor is fixed on the front. To power up the device, Sony has used Qualcomm’s Snapdragon 800 Quad Core CPU clocked at 2.2 GHz with Adreno 330 GPU. A RAM of 2GB is set inside as well while under the hood it has a massive 3000 mAh battery that outdates all other Xperia devices. Out of the box, Xperia Z1 runs on Android 4.2.2 Jelly Bean. Sony announced its plans to update some of its devices to Android 4.3 Jelly Bean and Android 4.4 KitKat, and finally Jelly Bean update has arrived. The update has arrived with a lot of bug fixes, performance enhancements, stability and some new features added, one of the major bugs, the broken camera upon unlocking the bootloader has been fixed. Xperia Z1’s bootloader can now be unlocked without causing any damage to the phone’s hardware.

Are you waiting to receive the OTA update for Android 4.3 Jelly Bean on your Xperia Z1 and still can’t find any chances? Well, In case you still don’t know, Sony has updated Xperia Z1 to Android 4.3 Jelly Bean firmware, the update is on a slow roll out and reaching different regions, while it may take some time to hit your region, we have the complete guide to update it to the latest and greatest version of Android manually right here for you.

Xperia Z1

As Xperia Z1 devices are branded under different variants, We’ll be having a look at the method for C6902. You may also find the update methods for other Models on our site as well. Before we head towards the method, here are some pre requisites and some pre cautions.

Pre Requisites:

      1. As mentioned, this firmware is only for Xperia Z1 C6902. Do not try this on any other phone, that may result in bricking your device. Check your device’s model number in Settings > About device.
      2. You must have installed Sony Flashtool. Find the full guide here.
      3. After installing Sony Flashtool, open the Flashtool folder from the drive where you installed it.
      4. Now open Flashtool>Drivers>Flashtool-drivers.exe and install the Flashtool, Fastboot & Xperia Z1 drivers from the list. [Important]
      5. Your phone must be charged at least over 60%. This is highly recommended in order to prevent any power issues during the flashing process.
      6. Enable USB debugging mode on your device. To do so, tap settings>developer options>USB debugging. If you can’t find developer options in settings, then tap settings > about device and tap “Build Number” for 7 times and you’ll get em’ activated under settings.
      7. Make sure that you back up all your important media content, contacts, call logs and text messages. This is highly recommended and important in case something goes wrong during the flashing process or in case you select the data wipe option before flashing. You can easily restore whenever you need.
      8. To flash this firmware, you do not need to root your device, you do not need to unlock the bootloader. All you need is, your device must be the one mentioned and must be running on Android 4.2.2 Jelly Bean.
      9. Download the firmware file properly.
      10. Use the OEM data cable to connect your phone to your PC. Using any other data cable might cause connection problems.
      11. Alright! Follow this guide to the letter in order to prevent any mishap.

For other Xperia Z1 variants, Check out:

How to Install Android 4.3 Jelly Bean 14.2.A.0.290 on Xperia Z1 C6902:

      1. Before moving forward, please make sure that you’ve read the pre requisites and ensure that you are set to go ahead.
      2. Download the latest firmware Android 4.3 Jelly Bean 14.2.A.0.290 FTF file.
      3. Copy the file and paste in Flashtool>Firmwares folder.
      4. Open Flashtool.exe now.
      5. Hit the small lightening button on the top left corner and select Flashmode.
      6. Select the FTF firmware file that you placed in the Firmware folder. 
      7. From the right side, select what do you want to wipe. Data, cache and apps log, all wipes are recommended, perhaps you may select if you don’t want.
      8. Click on OK, and it will start preparing the firmware for flashing. This may take a little while to load.
      9. As soon as the firmware is loaded, it will prompt you to attach the phone by turning it off and keeping the back key press.
      10. For Xperia Z1, Volume Down key will do the job of back key, just turn off your phone, keep the Volume Down key pressed and plug in the data cable.
      11. As soon as the phone is detected in Flashmode, the firmware will start flashing, Do not leave the Volume Down key until the process is complete.
      12. As soon as you see “Flashing ended or Finished Flashing” leave the Volume Down key, plug the cable out and reboot.
      13. That’s All! Congrats! You’ve installed latest Android 4.3 Jelly Bean on your Xperia Z1 C6902. Enjoy!
      14. Screenshot_2013-12-18-04-08-52Screenshot_2013-12-18-04-08-31Screenshot_2013-12-18-04-08-21Screenshot_2013-12-18-04-06-43Screenshot_2013-12-18-04-06-49Screenshot_2013-12-18-04-06-53Screenshot_2013-12-18-04-07-00Screenshot_2013-12-18-04-07-26

In case you got any queries, suggestions or you face any difficulties regarding this post, please feel free to stop by the comment box below and drop us a message. We will try our best to sort it out. Thanks All!

Install Android 4.3 Jelly Bean 14.2.A.0.290 Firmware on Sony Xperia Z1 C6903

7
Install Android 4.3 Jelly Bean 14.2.A.0.290 Firmware on Sony Xperia Z1 C6903

It’s been 2 months now since Sony has pulled the curtains off from its latest flagship Xperia Z1, While Google already announced the Android 4.4 KitKat, it was expected that Xperia Z1 will at least run on Android 4.3 Jelly Bean, perhaps keeping the 4.3 aside, Sony pushed in 4.2.2 and 4.3 update was to roll out soon. Sony has already announced its plan for Android 4.4 KitKat, while still no 4.3 update was available, and finally Sony has rolled out 4.3 update today, chances are that 4.4 KitKat will be following it very soon.

A while ago I updated by Xperia Z1 to Android 4.3 Jelly Bean and thought why not to share with you guys right here. In the following post, I’ve explained the method to installed the latest firmware based on Android 4.3 Jelly Bean with the build number 14.2.A.0.290 on Sony Xperia Z1 C6903. You just got to follow this guide to the letter, but before we begin let’s have a look on what’s new in this update.sony-xperia-Z1

    • New Xperia Themes
    • Camera App enhanced.
    • New Ringtones.
    • Black Notification Drawer
    • New Baseband with improved WiFi.
    • Stability and performance improvements.

Pre-requisites and Pre-cautions:

    1. This method is only for Sony Xperia Z1 C6903. Do not try this on any other device, check your device’s model in Settings > About Device.
    2. You need to have installed Sony Flashtool, Flashtool drivers, and Sony Drivers. Follow the full Flashtool Guide here.
    3. Make sure that you’ve backed up all your important media content, contactscall logs and text messages. This is highly recommended in case you need to wipe your phone during the installation process or something goes wrong.
    4. Make sure that you enable USB debugging options before connecting your device.  In case you can’t find the developer options in settings, then you’ll have to enable them. To do so, open Settings > About device > tap build number for 7 times and you should have enabled the developer options in settings. Now enable USB debugging mode under dev options.
    5. If you have already rooted your phone, it is highly recommended that you use the Titanium Backup to backup all your data so that in case you have to wipe your phone, you can still restore each and everything.
    6. Use only OEM data cable to connect your device to your PC in order to prevent any connection issues.
    7. You do not need root access for flashing this firmware, neither you need a custom recovery.

For other Xperia Z1 variants, Check out:


How to Install Android 4.3 Jelly Bean on Xperia Z1 C9603: 

      1. Download the latest firmware Android 4.3 Jelly Bean 14.2.A.0.290. Please download the firmware carefully.
      2. In case you are confused between which firmware to download, download a Generic/Unbranded firmware if your phone is not a carier branded, download a branded firmware only if your phone is carier/variant specified.
      3. After you install the Flashtool, open the Flashtool folder from the drive where you installed it..
      4. Place the downloaded firmware.ftf file in Firmware folder under Flashtool folder.
      5. Open Drivers folder under the Flashtool, and run the Flashtool-drivers and install Flashtool, Fastboot and drivers from Xperia Z1 from the list.
      6. Now run the Flashtool.
      7. In Flashtool, click on the small lightening button, and select Flashmode.
      8. Select the ftf file that you downloaded and placed under the Firmwares folder in Flashtool.
      9. From the right side, select/unselect the options to wipe cache, data and apps log.
      10. As soon as you select the firmware, it will start preparing the files for flashing.
      11. As soon as the preparation is done, it will prompt you to turn off your phone  and then connect it  keeping the back key pressed.
      12. For Xperia Z1, Volume Down key will do the job of back key. Turn off your phone completely, now press the Volume Down key and while keeping it pressed plug in the data cable.
      13. As soon as data cable is plugged in, Flashtool will start flashing the firmware and will complete it in a while. Do not leave the Volume Down key until the flashing process is done.
      14. As soon as its completed, plug out the cable.
      15. Phewwww! That’s It. You have the latest Android 4.3 Jelly Bean installed on your Xperia Z1! Enjoy!
      16. Screenshot_2013-12-18-04-06-43Screenshot_2013-12-18-04-06-53 Screenshot_2013-12-18-04-06-49  Screenshot_2013-12-18-04-07-26 Screenshot_2013-12-18-04-08-52 Screenshot_2013-12-18-04-07-00 Screenshot_2013-12-18-04-08-31 Screenshot_2013-12-18-04-08-21

In case you got any queries / suggestions or you face any difficulties regarding this post, please feel free to stop by the comment box below. Thanks All.

How To Unlock Bootloader Motorola Moto G.

0
How To Unlock Bootloader Motorola Moto G.

For all those who don’t know what is the importance of an Unlocked Bootloader, allow me to explain. Bootloader is like a Factory restriction, it is the very program that load the OS when you boot the device. When you first buy the brand new device it will come with a locked Bootloader. To install Custom Tweaks or Mods you need to Unlock the Bootloader first, so it can understand that you device is trying to boot a Custom Firmware. So, if you want to learn a lot about your device performance and other stuff, the first is to Unlock the Bootloader.

Motorola-Moto-G-front

In Case of Moto G, Unlocking Bootloader is not a very difficult task, it is quite simple, but you will need to get prepared before you unlock the Bootloader. Since unlocking the Bootloader will erase all your data on the device, not the Media, data like Apps and Messages etc. but still in case of any mishap, Back-up all your Important data.

Back-up ContactsCall Logs & Messages.

First of all Configured the ADB and Fastboot in your PC. HOW? Follow:How to Install Android Adb & Fastboot Drivers on Your Windows PC [Guide].

Enable USB debugging mode. Go to Settings > Developer Options > Enable USB Debugging. If you don’t see the developer options then go to Settings > About and tap the build number 5 or 6 times.

Make sure that you have battery charged over 60 %.

This Tutorial is Only For Motorola Moto G.

How To Unlock Bootloader Motorola Moto G.

  • Once the ADB and Fastboot is configured, Continue.
  • Turn Off your Moto G.
  • Press and Hold Power + Volume Down button to open into Fastboot mode.
  • Connect your device with PC.
  • Now go to the Fastboot folder.
  • Now Open Command prompt in Fastboot Folder, How? Hold Shift Key and Right Click anywhere in the Fastboot folder.
  • Now in cmd, Type fastboot oem get_unlock_data.
  • Now Open This Page: Link
  • Sign-in and Continue.
  • Now in cmd windows, you will have something like this displayed:


(bootloader) 0A40040192024205#4C4D3556313230; (bootloader) 30373731363031303332323239#BD00; (bootloader) 8A672BA4746C2CE02328A2AC0C39F95; (bootloader) 1A3E5#1F53280002000000000000000; (bootloader) 0000000.

  • Copy and Paste it ( Without “bootloader”) to the Motorola Web-Site and select can my device be unlocked.
  • Press request unlock key and click I Agree.
  • A unique code will be sent to your E-Mail, check it in 3-5 minutes.
  • Go to cmd again and Type: fastboot oem unlock and paste the code after unlock.
  • Now Check your Motorola Moto G, whether Bootloader is unlocked or not.


How To Root Galaxy Note 2 N7100 Running Android 4.3 XXUEMK9 Jelly Bean.

2
How To Root Galaxy Note 2 N7100 Running Android 4.3 XXUEMK9 Jelly Bean.

Now that you have updated your Galaxy Note 2 to Android 4.3 Jelly Bean, the next step? Explore the new features in it, my personal opinion is to root it. Why? I don’t know the same reason why you rooted your device on the Android 4.1.2, you didn’t! Then try rooting it now and beside those who once used a Rooted device can never live a day with a Non-Rooted one. You can Root your Samsung Galaxy Note 2 again by following our Tutorial Below, make sure to read the whole tutorial before applying it  to your device.

Galaxy-Note-ii1-1024x768

In this Article, we will show you How To Root Galaxy Note 2 N7100 Running Android 4.3 XXUEMK9 Jelly Bean.But before we begin, Make sure that you have battery charged over 60 % and have backed up all your important ContactsCall Logs & Messages .It is highly recommended in case of any mishap or data loss to back up all your important data.

Disclaimer: The methods involved in flashing custom roms and rooting your phone is highly custom and may result in bricking your device,and has nothing to do with Google or the device manufacturers which is Samsung in our case. In case of any mishap we may not be held responsible. Follow these instructions to the letter to avoid any mishap or bricking. Make sure that whatever you do, you are doing it at your own responsibility.

Important things:.

How To Root Galaxy Note 2 N7100 Running Android 4.3 XXUEMK9 Jelly Bean.

odin_explained

  • Download Android 4.3 Rooting Package for Galaxy Note 2 to your computer and extract the zip file.
  • Download Odin.
  • Turn off your Phone and Turn it On While Pressing, Power + Volume Down + Home button until you see some text on-screen, Press Volume Up to continue.
  • Make Sure that the USB drivers are installed.
  • Open Odin in Computer and connect your device to PC, while it is in the Download mode.
  • If your Phone is successfully connected to PC, the Odin port will turn Yellow with COM port number.
  • Now Click on PDA and select the File ‘CF-Auto-Root-t03g-t03gxx-gtn7100.tar.md5 the one who has the biggest size.
  • In Odin, Check Auto reboot and F.Reset Options.
  • Now Click the start button and wait for the process to complete.
  • After the installation is complete you device will restart and once you see the Home Screen, unplug the cable.

That;s it your Samsung Galaxy Note 2 has been Rooted on XXUEMK9 Android 4.3 Jelly Bean. Go to Settings > About To verify.

How To Set a Song on Your iPhone as Ringtone.

0
How To Set a Song on Your iPhone as Ringtone.

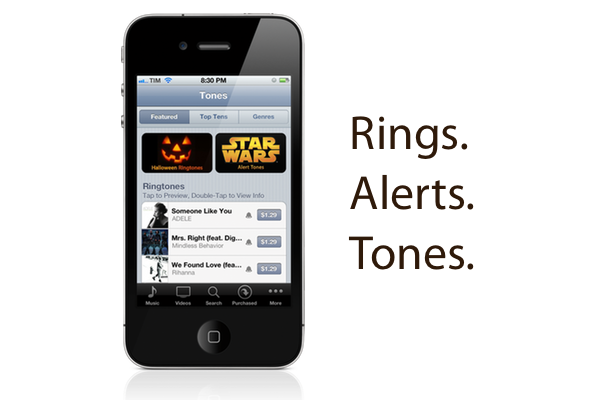
There are many apps that allows you to set your Songs as Ringtone of iPhone, but none of them gives the accurate access to the folders that have those songs to appear in the Tones List. Instead you have to save the .m4r file to your PC and Sync them with iPhone using iTunes. The one way is to follow the Rule of Gargaband, which can create and save ringtones to your iPhone. 26915_TonesBanner We will show you how to use Gargaband to make a Ringtone and save it to your iDevice running iOS 6. It is easy to use iTunes to make tone, Sync your iPhone to import tunes.

How To Use Garageband to Make a Ringtone on an iDevice Running iOS 6.

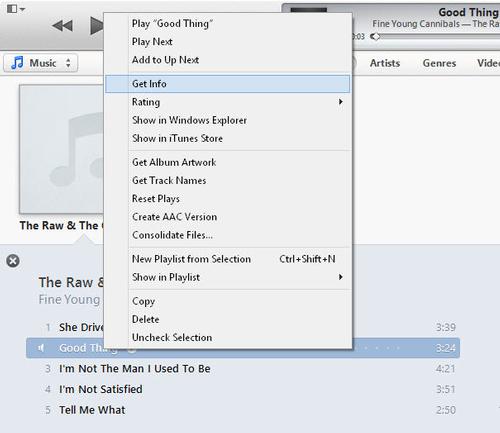
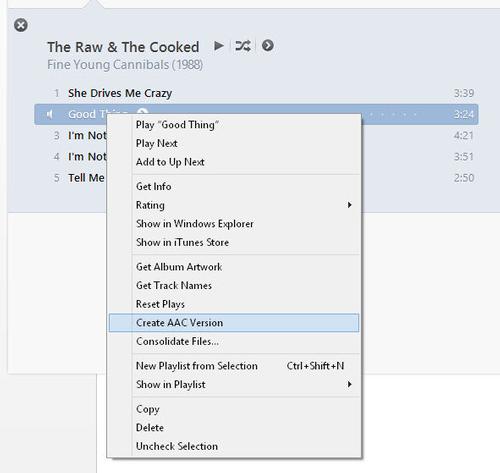
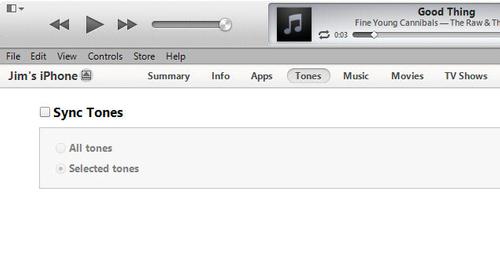
Open iTunes. From the Library, Right-Click the Song you want to choose as Tone, then Select Get-info. iPhone_ringtone_1_thumb Select the Options Tab and Tick the Start and Stop time. You might have to listen the track to set the Start and Stop time. The Time limit is 30-seconds. iPhone_ringtone_2_thumb Click OK, now Right-Click the Track again and select Create ACC version, iTunes will then convert the song. It will appear as a Duplicate link, you can identify it because of the Track Length. iPhone_ringtone_3_thumb Right-Click on the Original Track > Getinfo and return the start and stop points of the Track back to original, Otherwise the original track will be edited too. Right-Click the short track and Click to show in Windows Explorer, now rename it to .m4r for .m4a. iPhone_ringtone_4_thumb Double Click the file to add it to iTunes Library. Then in iTunes, click the Drop-Down arrow to select the Tone section of our Library. iPhone_ringtone_6_thumb Connect your iDevice with PC and Click on iPhone, when it appears on left side. Make sure the tone is set to Sync with your iPhone. iPhone_ringtone_7_thumb When the Sync is Finished, on iPhone Tap Settings > Sounds > Ringtone and select the New Tone. It should appear at the Top of List, above the Default ringtones.

Download Torrents on Android Device Using Vuze Official Downloader.

0
Download Torrents on Android Device Using Vuze Official Downloader.

Vuze is an application that allows you to download Torrents from different platforms. Vuze Remote is another app that allows you to remotely control your Vuze actions on Computer, but if you don’t want to download Torrents on your computer but straightly to your Android device. There are plenty of options available, like uTorrent and aTorrent, though you want to use Vuze on your Android device, just because you like it too much. There is a good new for all of those lovers, Developers have created the Full Torrent Client for Android device. Vuze Torrent Downloader might not be Rich with features but it will get the Job done.

Vuze_logo

Once the Downloading and Installation is done, you will be on an Empty interface, it is normal since you haven’t added any Torrent yet. To Add any Torrent, tap the Search button in bottom bar, Type the desired Keyword and tap search. Once you find the Torrent, download it like any-other normal file, once the file is downloaded, you can add it to Vuze to download the Complete thing.

Screenshot_3

If you have any Magnet URL or Torrent Hash, enter it in the Field an Tap OK. If you want to use a Torrent file instead, tap Browse and you will be able to open a Torrent file saved in your device. You can use Tabs above to switch between torrent, the Torrent you loaded on Vuze will be shown in the Main Interface. You can see all the torrents, whether they are finished or currently downloading. The Pause and Resume button allows you to quickly pause and Resume the torrent. Tap any torrent to bring up a menu that allows you to Pause , Resume, Delete or open its storage location.

Screenshot_4

Tap the Menu icon on Top allows you to, Search For Torrents, Add a Torrent, Pause or Resume all torrents or remove them all, Settings or Quit Vuze. In Settings, you can Enforce Download or Upload Speed, toggle the option to download torrent, via Wi-Fi only, Set-up auto start on Start-up, Choose Refresh Interval or Choose an action after the Torrent has finished downloading.

Other Features Include:

  • Simple torrent search and discovery
  • Manage torrent downloads
  • Control torrent download/upload speed
  • Straightforward interface
  • Works for Android phones and tablets
  • Wi-Fi only setting
  • Task completion alerts
  • Auto-start on device reboot
  • Ad-free experience

Download Vuze Downloader For Android

How to Disable the Annoying Sony Demo Video on Xperia Devices

28
How to Disable the Annoying Sony Demo Video on Xperia Devices

Yesterday I bought Xperia Z1 from a friend and didn’t check it at the time of buying. As soon as I came home and plugged in the charger, a demo video came up and started running, at first I thought this will stop after first run, but the video kept on running repeatedly and this was quite annoying, furthermore the video also kept running as soon as I pressed the lock key without having the charger plugged in, along with the video, it also turned on NFC and Bluetooth on phone again and again that kept eating the battery… this was annoying + much strange as well.

xl_Sony-Xperia-Z1-11-624

The demo video is basically the phone’s demo, that tells you about the features of that specific device and what’s new in that. It is activated by default or using some code or whatever, perhaps disabling it might give you a tough time. After googling for about 2 hours, I finally found the solution and got it working, so decided to share it with you guys in order to save your time.So here is the method.

    • First you need to make sure that there are no charging enabled apps. Check it in Sony Live Ware manager or in Sony Smart Connect. If there is nothing enabled then the code will work for you.
    • If you are facing the demo video issue upon locking your device and having unplugged the charger, then simply open the Dialler on your phone and type the following code:

*#*#73556673#*#* 

  • In case the issue comes up when the charger is plugged in, then don’t unplug the charger and open the Dialler and enter the above code having the charger unplugged.
  • As soon as you enter the code, the video will vanish! Phewww you’ve fixed it up.
  • If you type the same code again after disabling it, the video will get enabled again and disabled when you type it once again.

I hope that the short tutorial has saved your time and helped you to get rid of this annoying demo video. In case you still can’t fix it, let us know through the comment box below. We will try our best to sort it out for you.