Home Blog Page 479

How To Solve Status 7 Error While Installing a Custom ROM

7
How To Solve Status 7 Error While Installing a Custom ROM

Android is the Greatest Ecosystem for Mobile Devices, while there are so many WOWs in this System so are many dangers for your Mobile of course. The biggest beauty in this System is its open source feature and also the greatest danger, it can give you the full control over your device and also it can take all the control of your device, simply means bricking it. The huge collection of Custom ROMs for Android devices is also a thing that is not available for most Mobile OS and that also put your device in grave danger. Simply Put there is a lot of Beauty in Android along with Grave Danger, if you don’t have the full knowledge about what you are doing you can end up with a Brick device in your hand.

IMAG0071

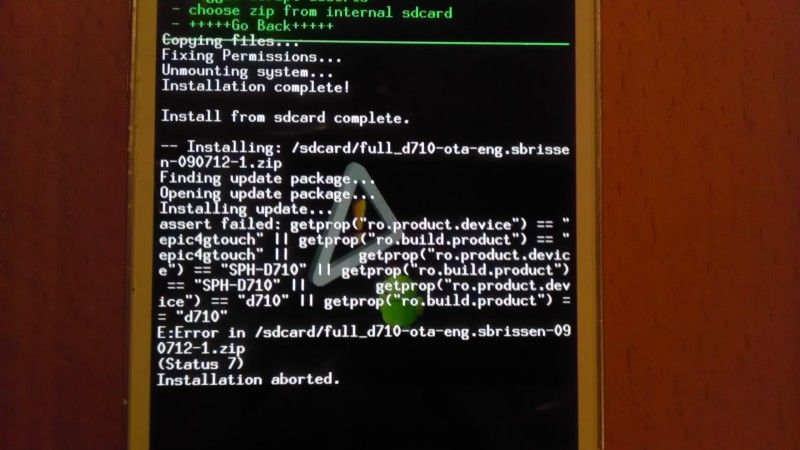
While we are talking about Custom ROMs, there is something that rarely occurs but it is a part that you should learn if you want your device to be clean. The Error I am talking about is Status 7, it occurs if you are using CWM recovery for the installation of Custom ROM. The installation will be aborted and all you can do is to try another ROM if you like or follow this guide to learn how to Remove it.

How To Solve Status 7 Error

First Thing First, Update your current recovery using ROM Manager, in most cases updating the recovery solves such problem. But even after updating the recovery if you can’t able to solve it, follow the Second method.

  • First extract your ROM (for example using 7-zip)
  • Go to the folder META_INF > COM > GOOGLE > ANDROID
  • Here you will find a file “updater-script”

Untitled-1

  • Rename this file as updater-script.doc use notepad++ (preferably)
  • Double click to open it.

Screenshot_9

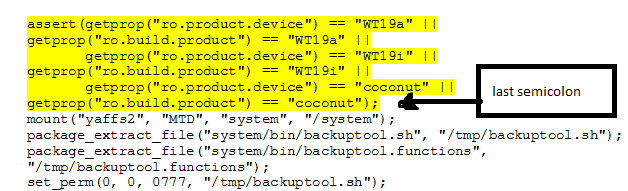
  • Delete text, starting from “assert ……. till the semicolon of the last getprop command.

lines_to_delete

  • Now save the file
  • Again rename the file, and delete the .doc extension
  • Now go back to the main rom folder where you extracted the 3 files. zip these files again. and you will get a zipped rom

Screenshot_10

  • Install the Newly Zipped file and everything will be fine.

Train Crisis For PC – Free Download

0
Train Crisis For PC – Free Download

There are 100 of puzzle games in play stores but not all are addictive. If you want to use your brain and play a game which give you a level of excitement then try Train Crisis. This amazing game lets you play in four different railroad environments, where your goal is to overcome all the obstacles that appear on each level and guide each colored train toward its corresponding destination.Download Train Crisis now! A puzzle and addictive strategy game with HD graphics where you have to prove your quick mind and reflexes in full 3D environment.Train Crisis promises hours of challenging fun. Today i will tell you how you can download Train Crisis for pc.

Train Crisis For PC

Main Features of Train Crisis For PC:

– 7 Eras of rail-road history (Industrial Era, Far West Era, Modern Era and Future Era).
– Spectacular High-definition 3D environments that recreate perfectly the three eras with many details as vegetation, animals, mountains, rocks, tunnels, banks, portals, etc.
– Train Crisis provides 168 challenging levels for players to conquer.
– In-game tool to help you solve puzzles more easily.
– Social features with Google Play Game Services: leaderboard, achievements, shared friends progress
– Cloud saving: share your progress across multiple devices and restore it upon reinstallation
– You must interact with several elements to get past the level: changing junctions; timed traffic lights; trap tunnels; transportation of money; ghost trains and parts of the track obstructed with rocks you must blow up.
– Spectacular colorful graphics effects with explosions of trains and rocks.
– Support for Android 4.4 (Kitkat) inmersive mode.

How to Download and Install Train Crisis on PC:

    1. You need an Android emulator to run this game on your Windows PC or MAC. We recommend using Bluestacks. Use our guide to install it on your PC.
    2. After downloading and installing Bluestacks, Download Train Crisis.
    3. Open the downloaded APK file now, and let Bluestacks install it.
    4. Open BlueStacks now > All Apps > Train Crisis.
    5. The game will start now, follow the on screen instructions.
    6. Follow the initial screen,  you’ll be able to play it.
    7. Tap the screen by clicking inside the game frame.
    8. Enjoy the most tough game ever!
    9. Don’t forget to let us know about your high score.
    10. That’s All!

Root Sony Xperia SP Running Latest 12.1.A.0.266 Firmware [How to – Guide]

8
Root Sony Xperia SP Running Latest 12.1.A.0.266 Firmware [How to – Guide]

Recently we posted the guide to install CWM recovery on Xperia SP running latest Android 4.3 Jelly Bean 12.1.A.0.266 firmware but missed the guide to root it. Those of you looking for a guide to root Xperia SP can get it done using the following detailed guide.

Before we head towards the rooting process, I assume that many of you are the first timers and need to know what is root access and why you should root your device. To make it clear, here’s a brief introduction of root.

Rooting your phone gives you complete access over all the data which is apparently locked by the manufacturers. This includes removal of the factory restrictions and making changes to the internal system and the operating system. Gaining the root access gives you the privileges to install various applications to enhance the performance of your device, allows you to remove the built-in applications/programs, helps you to upgrade the battery life of your device & install the apps which require the root access for the proper functionality and modify your device in so many other ways e.g using mods and custom roms. By installing custom recovery, you can flash custom roms in the phone easily. Custom recovery also let’s you backup your current rom and restore it in case of any mishap. There is a laundry list of things you can do after having your device rooted and installed the custom recovery, now once you’re rooted and have installed custom recovery, go ahead and enjoy it on your phone. Here’s our collection of 10 Best Root Apps.

Here are installation instructions:

    1. This guide is only for Sony Xperia SP C5303 or C5302. Do not try this on any other model, please check your device’s mode in Settings > About Device.
    2. The Root instructions are only for Sony Xperia SP C5303 or C5302 running latest Android 4.3 Jelly Bean 12.1.A.0.266 firmware. Check your firmware version in Settings > About Device and make sure that it matches the one mentioned here.
    3. Please make sure that your phone’s battery is charged at least over 60%. This is highly recommended in order to prevent any power issues during the recovery flashing process.
    4. Backup each and everything on your Android phone as follows:
    5. Backup all your important contacts, find the full guide here.
    6. Backup all your important sms messages, find the full guide here.
    7. Backup all your important call logs, find the full guide here.
    8. Backup all your important media content manually. (Copy to your PC.)
    9. Backup all your apps / data. If you’ve rooted your device, use Titanium Backup to do so. Follow the full guide here.
    10. Backup your current system using a custom recovery (CWM or TWRP) if you’ve flashed one. This is recommended in case something goes wrong with rooting your phone, you can use the custom recovery and return to the old working state of your system.
    11. Make sure that you read the instructions carefully and applied all precautionary measures. Let’s go ahead.

Disclaimer: The methods involved in flashing custom roms and rooting your phone is highly custom and may result in bricking your device, and has nothing to do with Google or the device manufacturer that is SONY in our case. Also rooting your device will void its warranty and you will be no longer eligible for any kind of free device services by the manufacturers/warranty providers. In case of any mishap we may not be held responsible. Follow these instructions to the letter to avoid any mishap or bricking. Make sure that whatever you do, you are doing it at your own responsibility.

How to Root Xperia SP Running Latest Android 4.3 12.1.A.0.266 Firmware:

    1. You need to install CWM recovery first. Follow our full guide here to install it on your device.
    2. Download Supersu.zip file now.
    3. Place the downloaded Supersu.zip file on your phone’s sd card.
    4. Now boot into CWM recovery on your phone. To do so, turn off your device first. Now turn it on, as soon as you see the Pink LED, press the Volume Up Key rapidly.
    5. You should see the CWM recovery interface shortly.
    6. Once in CWM, select “Install Zip > Choose Zip from SDcard > Select SuperSu.zip > Yes”.
    7. This will flash SuperSu.zip file, once flashing is complete, reboot your device.
    8. Find SuperSu in app drawer now. You can also install Root Checker app from Play Store to check root.
    9. Congrats! You’re rooted now!

That’s All! Let us know if the tutorial worked fine for you. In case you got any queries or face any issues regarding this post, please feel free to stop by the comment box below and drop us your words. We will get back to you as soon as possible. Thanks all.


Use Paranoid Floating Window Feature On Any Android Device

0
Use Paranoid Floating Window Feature On Any Android Device

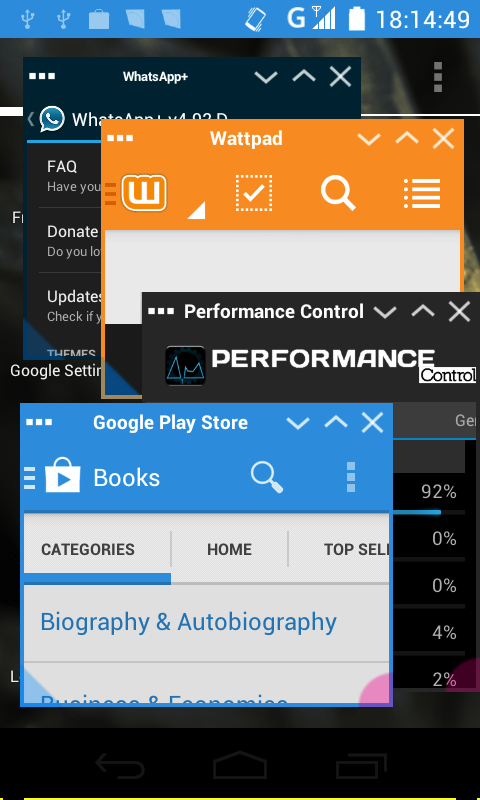
You must have heard about Multi-Window concept in Samsung Devices, where you can open Two Applications at the same time. Well developers of Paranoid ROM took it to another level, they created Floating Window, where you can open as much applications as you want and they all will be open like a pop-up like Facebook Messenger. You can operate the whole app via that pop-up and even use another application while one is running or you can set it up, so that the application in background will pause if the above one is running.

device-2014-01-26-181453

But how you can get it on your Android device, Since the release of Xposed Framework, users who were afraid of installing Custom ROMs on their device can install Custom Mods without any need of a Custom ROM and the same is happening here. Halo ))) is available on Google Play Store which will give you the power to open apps in pop-ups and XHaloFloatingWindow allows you to open apps in different windows which will float on your Home Screen or App Drawer and let you control them as you like. XHaloFloatingWindow can be installed on any Android device running Android 4.0 or High.

Screenshot_3

Halo ))) basically Is Not HALO Itself. This is a simple convenience function for those who want to launch any app in floating mode on the Paranoid Android rom. It might not be what you’re looking for. On the Other side, XHloFloatingWindow will prove the following features:

  1.  Floating Windows from Paranoid Android
  2. Customizable Transparency, Size and Gravity for Halo Windows.
  3. Some System Options like enabling back bottom-app pause
  4. Resizable/Movable Windows Option

Downloads Required:

You can Download Halo ))) from Google Play Store and install it and use it like normal app.

To use XHaloFloatingWindow you need to install Xposed Framework on your device, Follow:

Xposed Framework, A Unique Way To Customize Your Android Device

How To Install XHaloFloatingWindow Module On your Device.

  1. Open Xposed Module.
  2. Search for XHaloFloatingWindow .
  3. Download It and then Activate it.
  4. Restart your device to take effects.
  5. After the Reboot, Open XHaloFloatingWindow Module to start Customizing.

Hungry Shark Evolution For PC – Download Here.

1
Hungry Shark Evolution For PC – Download Here.

Ever visited a Beach, well me neither, but one thing is for sure that Tourist there doesn’t actually care what type of danger awaiting for them in the water. They have no idea that a sudden turn in waves can cause death from below, mostly by Sharks. Hungry Shark Evolution is exactly providing the same message, only that you need to attack people as a shark in this game, spread terror in seas, eat men and women. In Hungry Shark Evolution, it is you job to stay in the sea and attack people as long as you can and make as high score as possible, gain abilities, increase level. There will be various goals for you to become the greatest predator of the water. This game is available for Both Android and iOS and now you can play in on PC too. Just Follow our Guide and All is Well. But remember this is not an official release for PC, it is just being run on PC using a Third Party Emulator.

hungry-shark-evolution

Before We Go Any Further, Let’s look at the Features of Hungry Shark Evolution:

  • Console quality 3D graphics
  • 5 Shark species to grow & upgrade
  • Unlock Baby Sharks & other awesome extras!
  • A huge free-roaming world to terrorise
  • Intuitive touch or tilt controls
  • Sunken treasure to discover
  • Many weird & wonderful creatures to eat
  • 45 missions to complete
  • A clockwork robot gibbon
  • Facebook social features
  • Google Play Games achievements & hi-scores leaderboards
  • Regular updates on the way – new features, content and challenges to keep you coming back for more!

All read and Done, let’s go  see how to install Hungry Shark Evolution on PC.

How to Download and Install Hungry Shark Evolution on PC:

BlueStacks-app-player

    1. You need an Android emulator to run this game on your Windows PC or MAC. We recommend using Bluestacks. Use our guide to install it on your PC.
    2. After downloading and installing Bluestacks, Download Hungry Shark Evolution Apk
    3. Open the downloaded APK file now, and let Bluestacks install it.
    4. Open BlueStacks now > All Apps > Hungry Shark Evolution
    5. The game will start now, follow the on screen instructions.
    6. Follow the initial screen,  you’ll be able to play it.
    7. Tap the screen by clicking inside the game frame.
    8. Enjoy the most tough game ever!
    9. Don’t forget to let us know about your high score.
    10. That’s All!

Install CWM 6 Recovery on Xperia SP Running 12.1.A.0.266 Firmware [How to – Guide]

Install CWM 6 Recovery on Xperia SP Running 12.1.A.0.266 Firmware [How to – Guide]

Xperia SP’s current firmware is Android 4.3 Jelly Bean based on the build number 12.1.A.0.266. The newest firmware needs a new method to obtain a CWM recovery as well, the old methods may not work with this firmware. In case you’re Xperia SP owner and you’re looking for a method to install ClockworkMod 6 recovery your device on the latest Android version that your device is running on at the moment, then you’ve spotted the right place. In the following post we’ll go through a step by step guide that will help you to install it Sony Xperia SP C5303 and C5302 running Android 4.3 Jelly Bean 12.1.A.0.266  firmware.

Before we move forward, some of you might be the first timers with installing a custom recovery on Xperia SP that is CWM recovery in our case. To make it more precise, we’ll first go through a brief intro of the CWM recovery and the root access.

A custom recovery allows you to install custom roms, mods etc. Along with these, you can make a Nandroid backup, this helps you a lot as you can move back to the previous working state of your phone at any time you want if you have backed up your current system. In some cases, to root the phone you need to flash SuperSu.zip file in the custom recovery, having installed the recovery may help you while in some cases to install the recovery easily, you need to have the phone rooted. You can also wipe cache and dalvik cache of your phone using a custom recovery.

Here are important installation instructions:

    1. This guide is only for Sony Xperia SP C5303 or C5302. Do not try this on any other model, please check your device’s mode in Settings > About Device.
    2. The Root instructions are only for XSony Xperia SP C5303 or C5302 running latest Android 4.3 Jelly Bean 12.1.A.0.266 firmware.
    3. Your device’s bootloader must be unlocked. Follow the full guide here to unlock it.
    4. You must have installed Sony Flashtool – Get the full guide here. Also Install drivers using Flashtool > Drivers > Flashtool-drivers > Flashmode, Xperia SP, Fastboot, select all these and install.
    5. Please make sure that your phone’s battery is charged at least over 60%. This is highly recommended in order to prevent any power issues during the recovery flashing process.
    6. Backup each and everything on your Android phone as follows:
    7. Backup all your important contacts, find the full guide here.
    8. Backup all your important SMS messages, find the full guide here.
    9. Backup all your important call logs, find the full guide here.
    10. Backup all your important media content manually. (Copy to your PC.)
    11. Use only on OEM data cable to establish a connection between your PC and your phone.
    12. Make sure that your laptop is charged enough to complete the process. If you’re using a PC, make sure that you’ve an appropriate power connection.
    13. Backup all your apps/data. If you’ve rooted your device, use Titanium Backup to do so. Follow the full guide here.
    14. Backup your current system using a custom recovery (CWM or TWRP) if you’ve flashed one. This is recommended in case something goes wrong with rooting your phone, you can use the custom recovery and return to the old working state of your system.
    15. Make sure that you read the instructions carefully and applied all precautionary measures. Let’s go ahead.

Disclaimer: The methods involved in flashing custom roms and rooting your phone is highly custom and may result in bricking your device, and has nothing to do with Google or the device manufacturer that is SONY in our case. Also rooting your device will void its warranty and you will be no longer eligible for any kind of free device services by the manufacturers/warranty providers. In case of any mishap we may not be held responsible. Follow these instructions to the letter to avoid any mishap or bricking. Make sure that whatever you do, you are doing it at your own responsibility.

How to Install CWM 6 Recovery on Xperia SP Running Android 4.3 Jelly Bean 12.1.A.0.266 Firmware:

    1. Download  Doomlord’s Advanced Stock Kernel with CWM Recovery
    2. Place the downloaded Kernel.elf file in the Minimal ADB & Fastboot folder that you created using our ADB & Fastboot Quick Setup Guide.
    3. If you are using Android ADB & Fastboot full package, you can place the downloaded Kernel.elf file in the Fastboot folder or in the Platform-tools folder.
    4. Open the folder where you placed the Boot.img or Kernel.elf  file. E.g Minimal ADB & Fastboot or Fastboot or Platform Tools.
    5. Press and hold the shift key and right click on an empty area within the folder, and click on “Open Command Window Here”.
    6. Turn off your Xperia SP completely.
    7. Now press the Volume Up Key and while keeping it pressed plug in the USB cable.
    8. You should see a blue light in the notification light of your phone, that means your device is now connected in Fastboot mode.
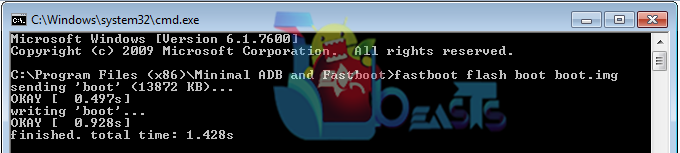
    9. Now type the following command: fastboot flash boot Kernelname.elf
    10. Hit Enter and it will quickly flash CWM 6 recovery on your Xperia SP.
    11. Once recovery is flashed, now issue this command “Fastboot Reboot” or unplug your device and reboot it.
    12. Your device will reboot now, as soon as you see the Sony logo,  and the pink LED, press Volume Up key to enter recovery.
    13. Congrats! You should now see the custom recovery.
    14. Once you’re in recovery, clear Cache and Dalvik Cache and reboot.
    15. That’s All! Your device has CWM 6 Recovery now.
Screenshot_1

That’s All with the recovery installation on your Xperia SP on the .266 firmware. In case you got any queries or face any difficulties regarding this post, please feel free to stop by the comment box below and let us know. We will get back to you as soon as possible. Thanks all.
TouchPal X Keyboard,The Best Keyboard For Android

0
TouchPal X Keyboard,The Best Keyboard For Android

The reason why there are so many apps available for Android, is because of its open source. It open source nature and great response from users encourage the developers to create best apps for it. There is a custom Mod for every stock app in Android, thus you ca replace anything you want even the most important part of OS, Kernel. But there are some apps which are paid and you need to use money to get either the whole app or to unlock all the features of app. When it comes to 3rd Party Keyboard app, Swiftkey is the best one available till now, 15 days of free trail and after a payment of $3.99 you can get it for a life time.

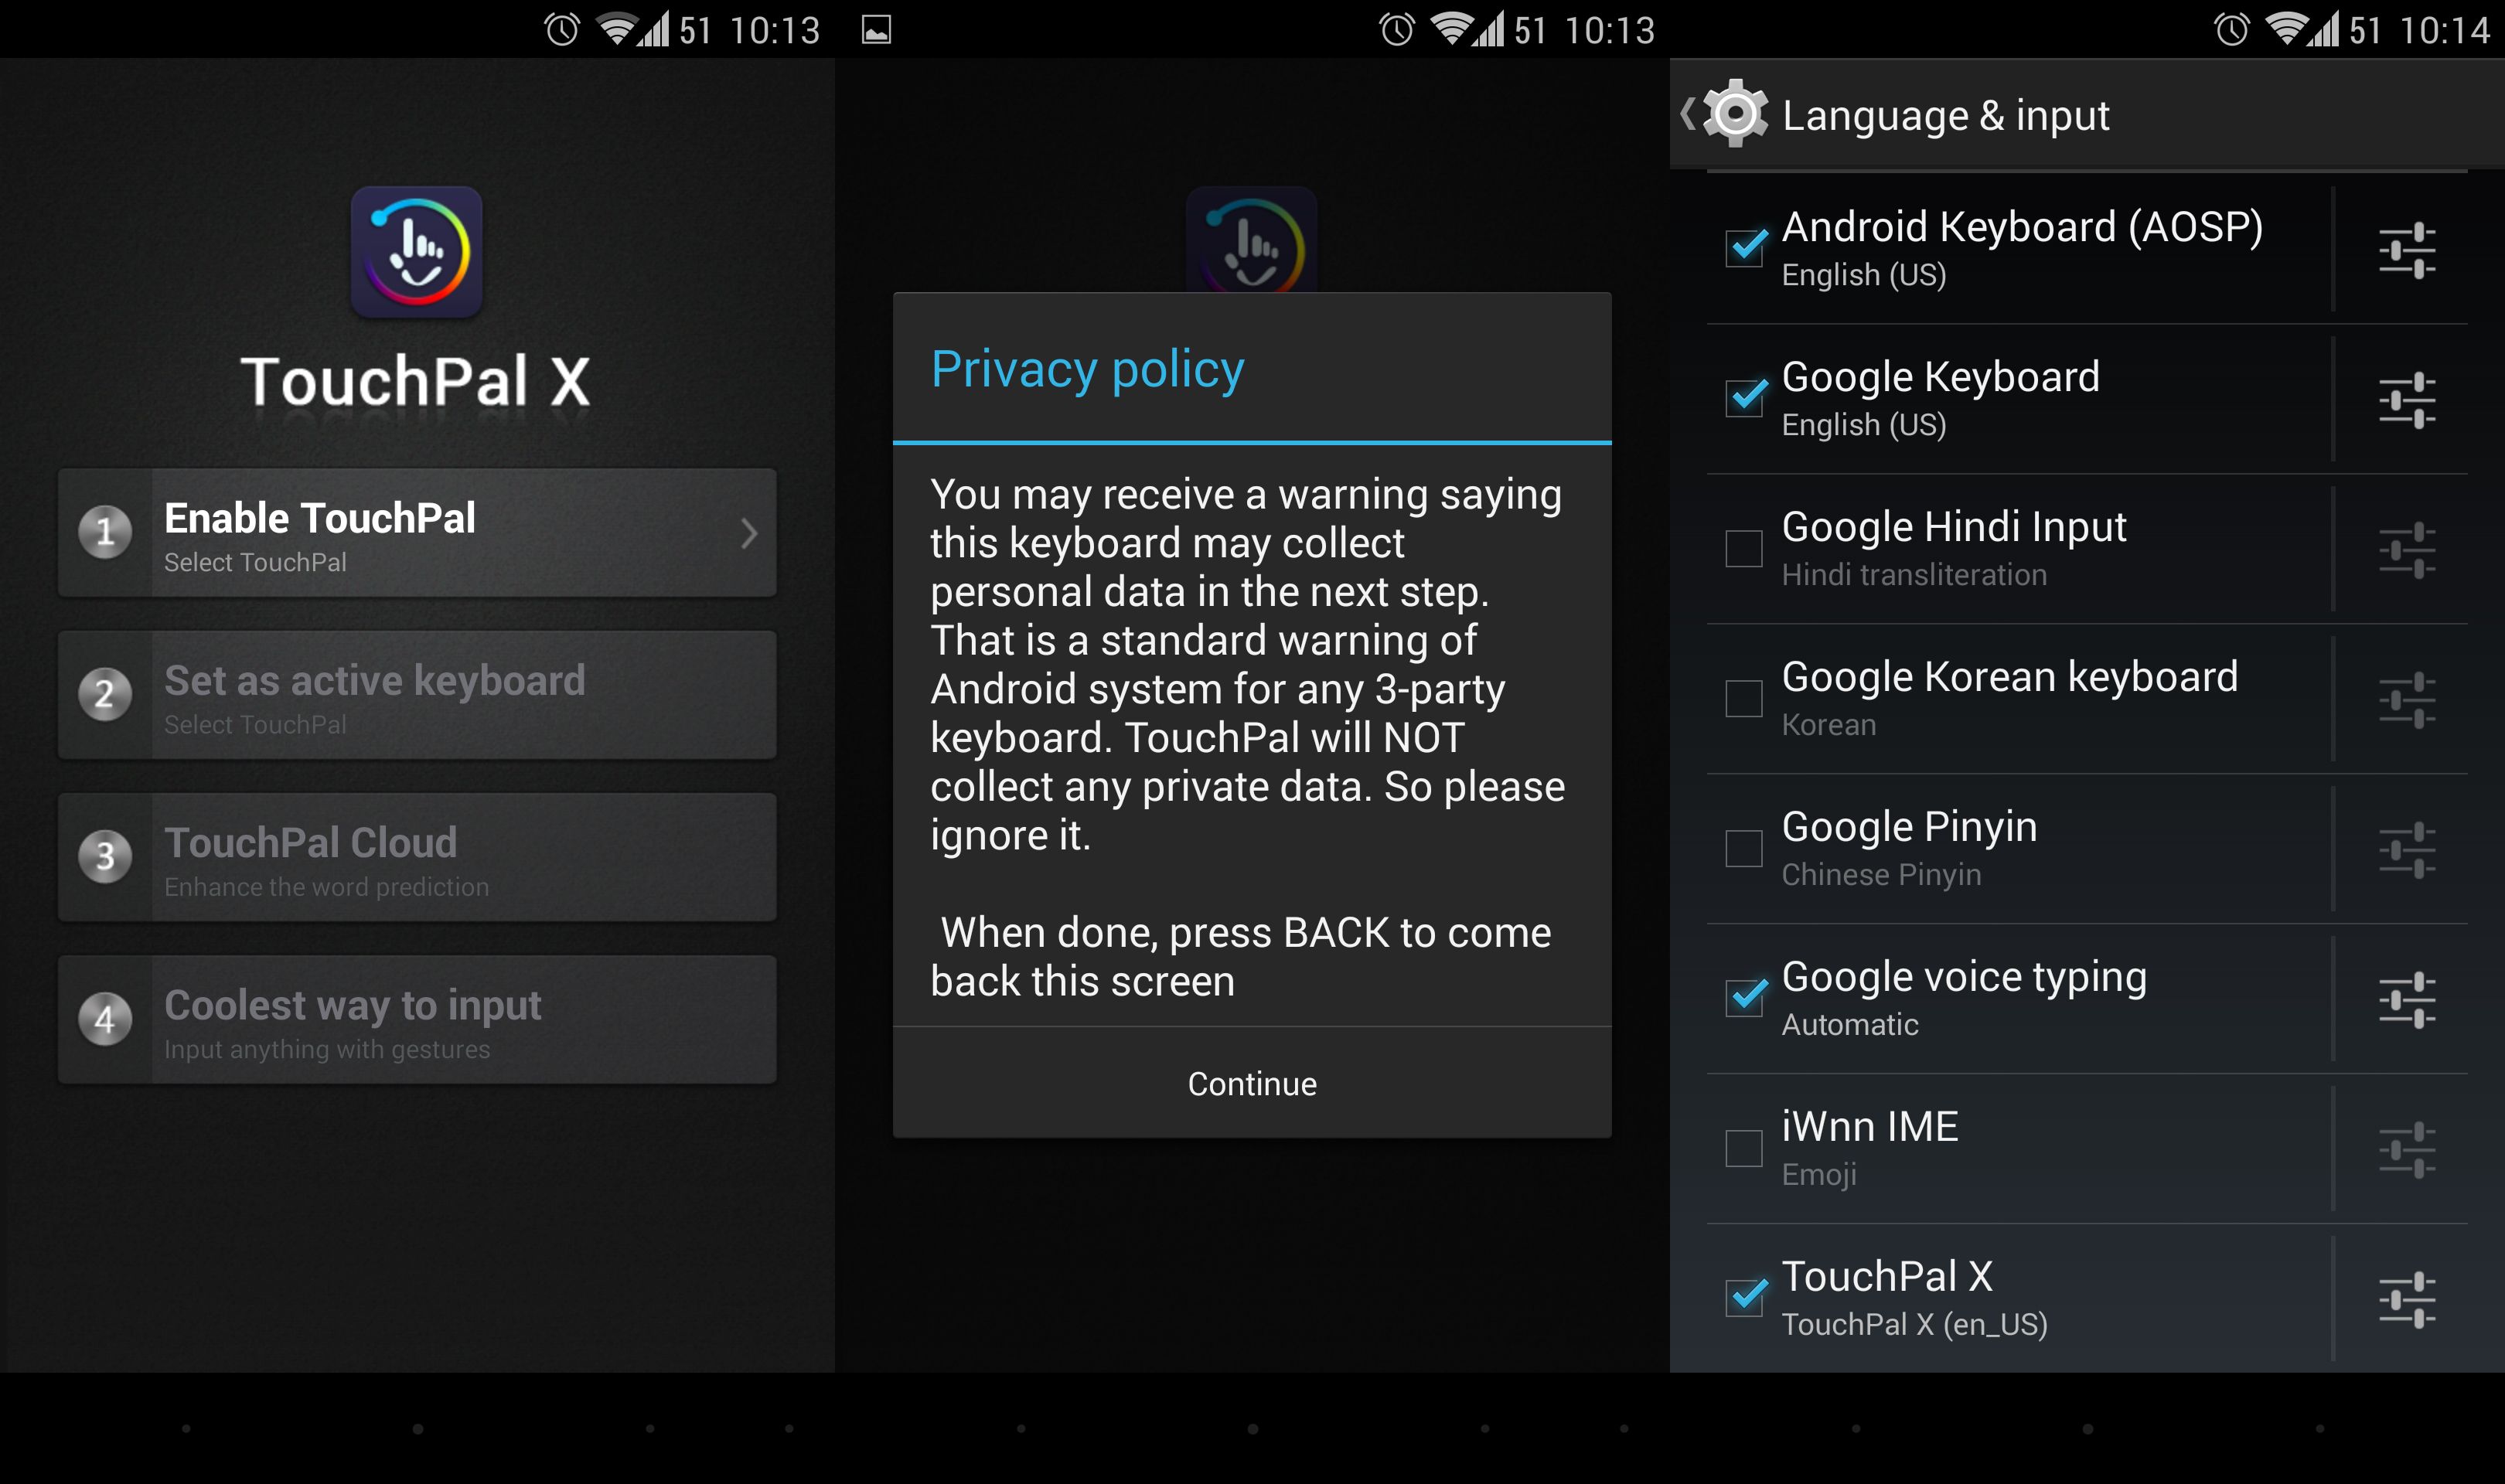
Screenshot_2014-03-02-22-13-38

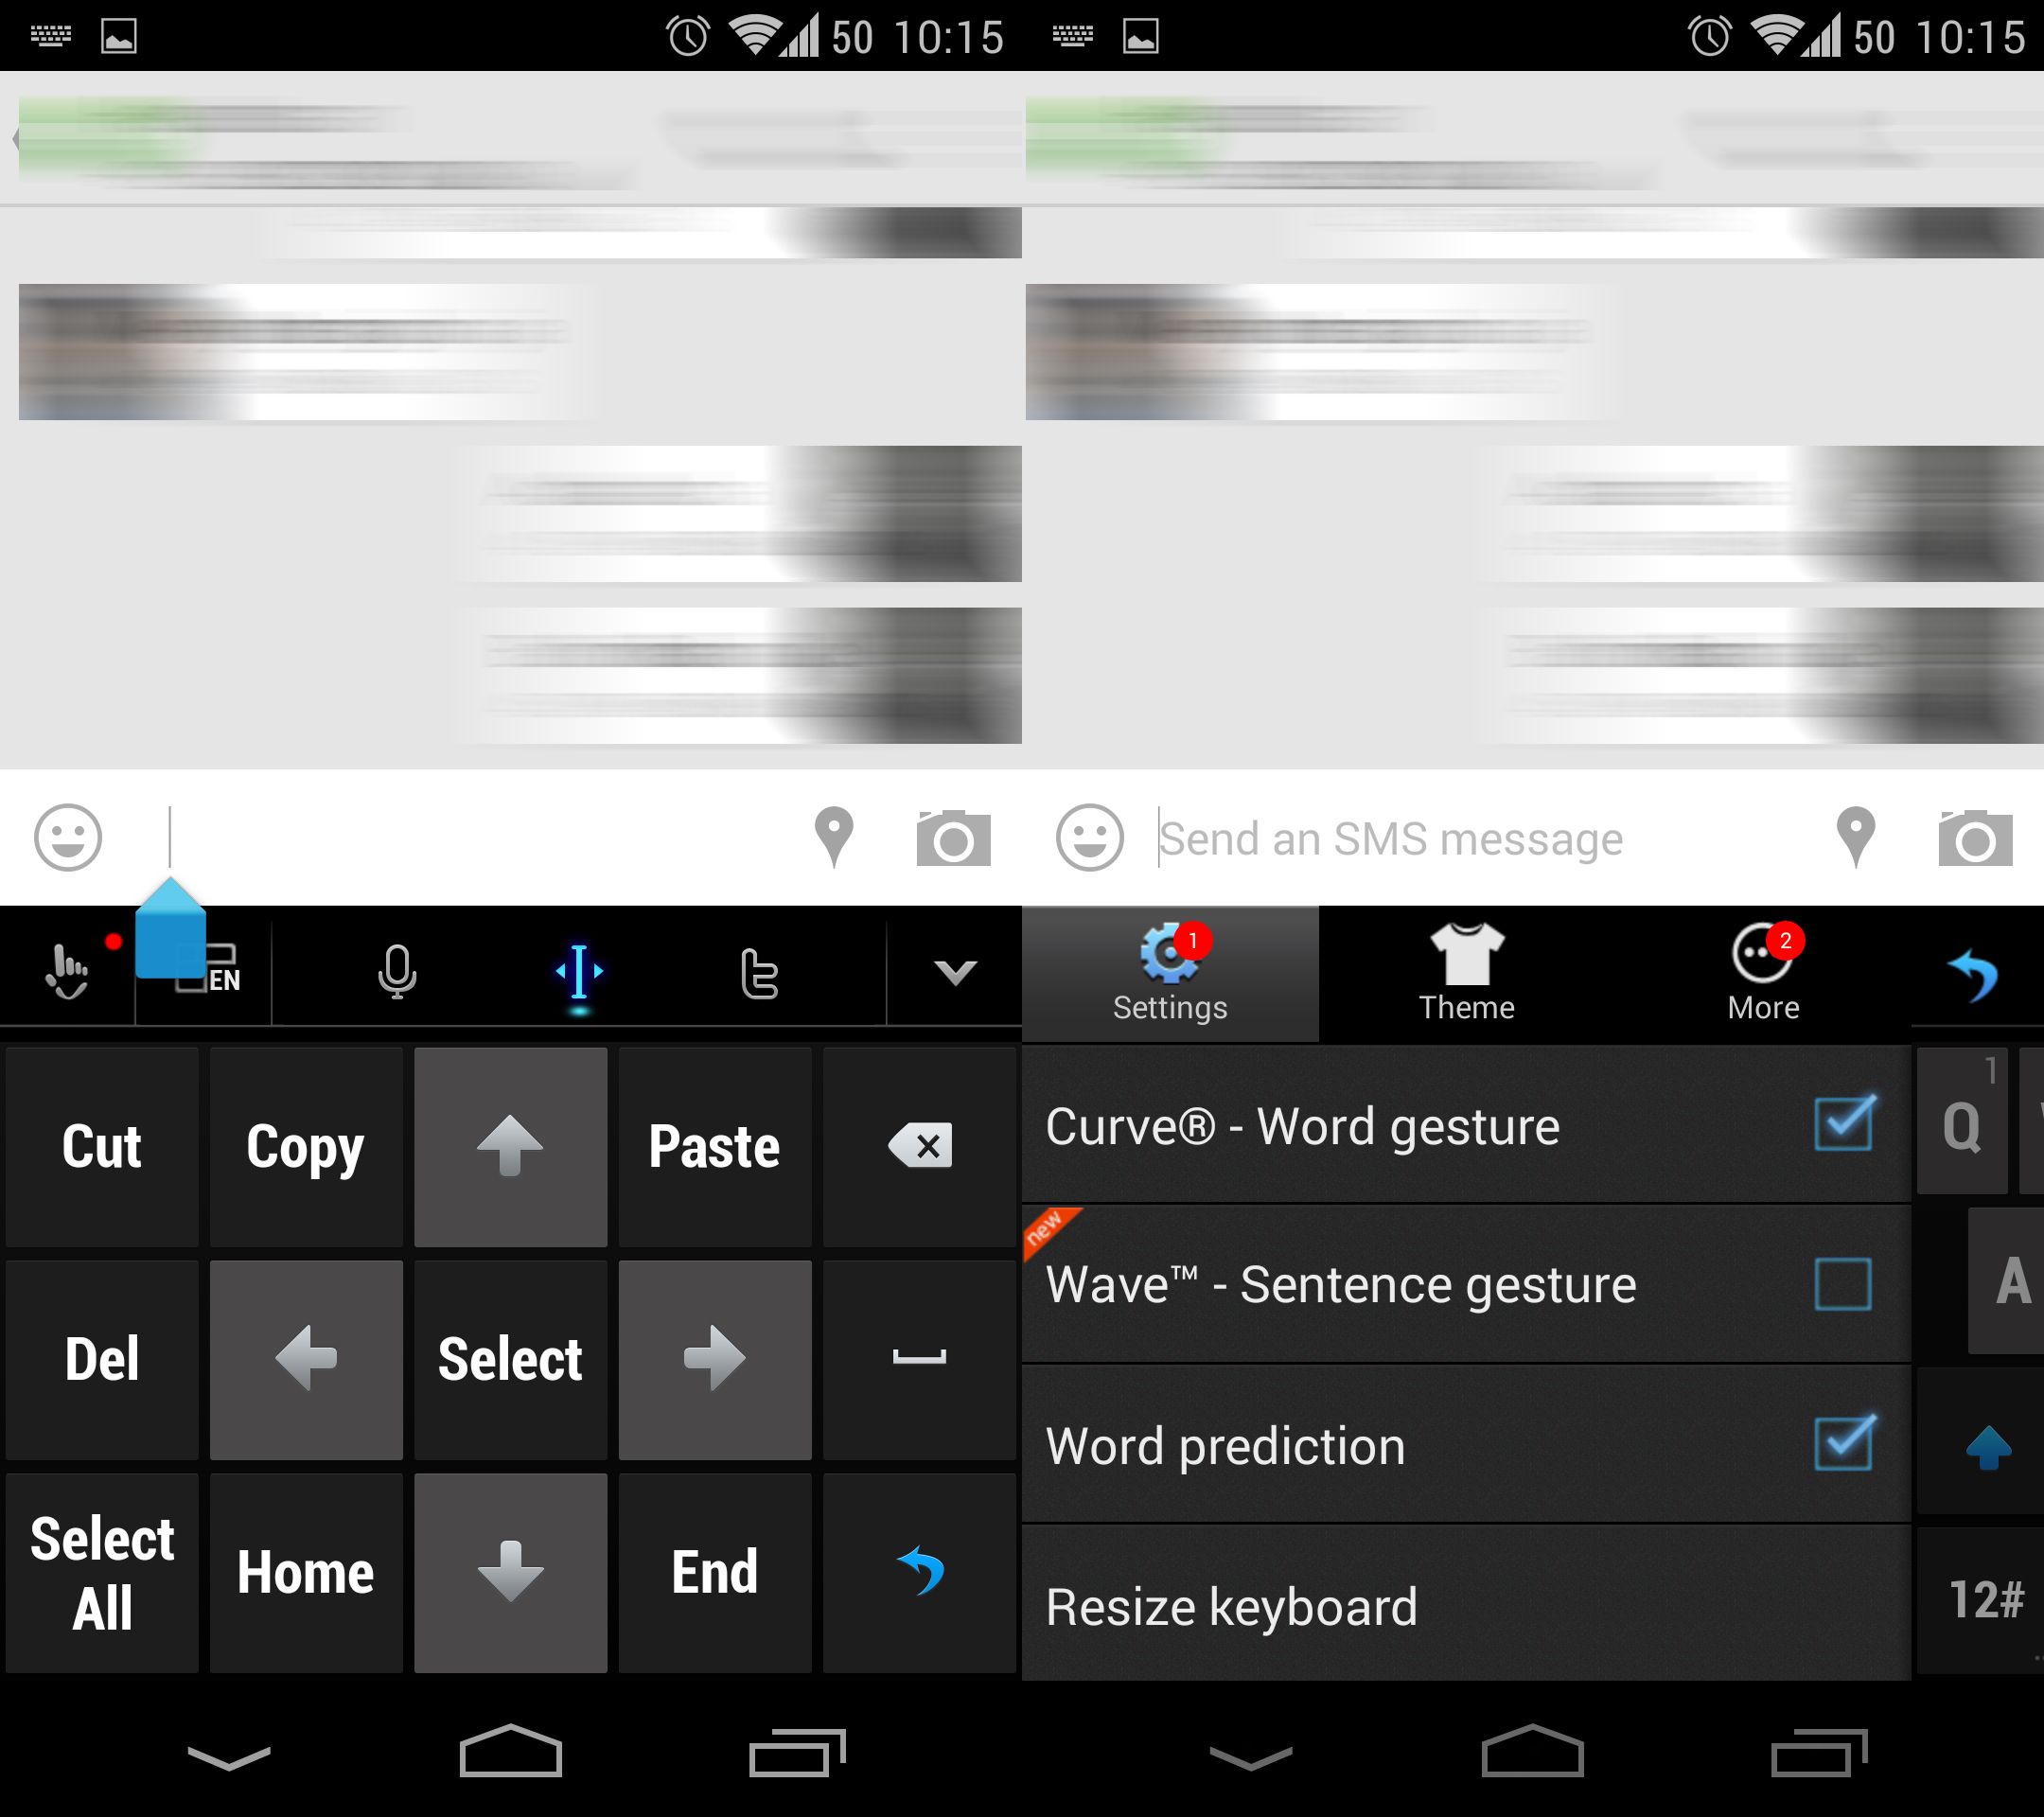
Today we will show you another Keyboard that is being considered the best among all Keyboard apps. TouchPal X Keyboard is reaching towards the top because of its unique and amazing features and the best, it is totally free. I, Myself was the fan of SwiftKey Keyboard for more than a 16 months, but then I heard about TouchPal X from a Friend and thought to give it a try and I loved it, it perfectly match with Hangouts and the theme I am using on My Phone.

Untitled-1

One of the best features of TouchPal X is that it doesn’t only give you the suggestion on top but also on different letters to create the best word for you. Other features include:

  • Support more than 70 languages
  • Toolbar plugins (Twitter plugin)
  • Mixed language prediction
  • Keyboard meter and speed statistics tracker
  • Multiple themes available
  • One-hand keyboard layout for large touchscreen

Untitled-2

Highlights that will give you the main idea why TouchPal X Keyboard is the best:

  • Emoji X: Flip up Space for emoji & smileys, 500+ extended emojis
  • TouchPal Cloud
    • Cloud Backup & Sync – Backup user words & input habit on Cloud and sync across devices
    • Cloud Prediction – Enhance next word prediction and other prediction with TouchPal Cloud
    • Word Trends –Update trending words, phrases and language model automatically
  • TouchPal Wave – Sentence gesture, use simple gestures to input commonly used phrases/sentences
  • TouchPal Curve® – Word gesture
  • Sliding up or down gesture to input number or symbol
  • Contextual prediction, • Save > 90% of keystrokes
  • Learns your Tweets/messages/contacts to personalize candidate outputs
  • Walkie-Talkie style voice input
  • T+ dual-letter layout: Bigger keys than QWERTY

I believe I have told you enough, now it is all up to you to find out other hidden features of TouchPal X Keyboard.

Download TouchPal X Keyboard

Update Sony Xperia SP C5303/C5302 to Official Android 4.3 Jelly Bean 12.1.A.0.266 Firmware [How To – Guide]

4
Update Sony Xperia SP C5303/C5302 to Official Android 4.3 Jelly Bean 12.1.A.0.266 Firmware [How To – Guide]

Sony has recently updated a number of it’s devices to Android 4.3 Jelly Bean and Xperia SP is one of them as well. Xperia SP came out back in May, 2013. Sporting a nice 4.6 inches display with 319 ppi, Xperia SP powered up with Qualcomm’s Snapdragon Dual Core CPU clocked at 1.7 GHz accompanied by Adreno 320 GPU and a RAM of 1 GB is also placed in there while Sony fixed an 8 mp shooter at the back and a VGA cam on the front. Xperia SP ran on Android 4.1.2 Jelly Bean initially and Sony had announced the planned upgrades to Android 4.3 Jelly Bean and Android 4.4 KitKat.

Earlier this month, Android 4.3 Jelly Bean updates for Xperia SP started rolling out based on the build number 12.1.A.0.266. The new update packs up a lot of bug fixes, performance enhancements, some minor UI changes here and there and new camera features. Sony has also improved the battery in the new updates for all of it’s Xperia line up. While these updates are region specific and reach out to the poeple via OTA or via Sony PC companion, not all the regions are lucky enough to receive this update quickly. So, if you’re one of those waiting for this update to hit their region and tasting the latest and greatest version of Android for Xperia SP, you may have to do it manually using the method we’re going to have a look on in a few minutes. Let’s go through some important installation instructions first.

Pre-requisites and installation instructions:

    1. This guide is only for Sony  Xperia SP C5303 and C5302. Please check your device model first in Settings > About Device > Model.
    2. You must have installed Sony Flashtool – Get the full guide here. Also Install drivers using Flashtool > Drivers > Flashtool-drivers > Flashmode, Xperia SP, Fastboot, select all these and install.
    3. Your phone’s battery must be charged at least over 60%. This is highly recommended in order to prevent any power issues during the process.
    4. Flashing this firmware will wipe all your apps, apps data, system data, contacts, call logs & messages. It will not wipe the internal storage (media) data. Proceed after you’ve backed up, in the next step the guides are linked in.
    5. Make sure that you backup your media content,contactscall logs and text messages.  This is important and recommended so that in case you decide to wipe your phone during the flashing process, you can get all of your data back using the backup.
    6. Enable USB debugging mode on your device. To do so, tap settings>developer options>USB debugging. If you can’t find developer options in settings, then tap settings > about device and tap “Build Number” for 7 times and you’ll get em’ activated under settings.
    7. To flash this firmware, you do not need to root your device, you do not need to unlock the bootloader. All you need is, your device must be the one mentioned and must be running on Android 4.2.2 Jelly Bean or 4.1.2 Jelly Bean.
    8. Download the firmware file properly.
    9. Use the OEM data cable to connect your phone to your PC. Using any other data cable might cause connection problems.
    10. You need enough confidence to perform this custom method.
    11. Alright! Follow this guide to the letter in order to prevent any mishap.

How to Install Android 4.3 12.1.A.0.266 Official Firmware on Xperia SP:

    1. Download Stock Android 4.3 Jelly Bean 12.1.A.0.266 Firmware for Xperia SP: C5303  Link2 | C5302
    2. Copy the file and paste in Flashtool>Firmwares folder.
    3. Open Flashtool.exe now.
    4. Hit the small lightening button on the top left corner and select Flashmode.
    5. Select the FTF firmware file that you placed in the Firmware folder. 
    6. From the right side, select what do you want to wipe. Data, cache and apps log, all wipes are recommended, perhaps you may select if you don’t want.
    7. Click on OK, and it will start preparing the firmware for flashing. This may take a little while to load.
    8. As soon as the firmware is loaded, it will prompt you to attach the phone by turning it off and keeping the back key press.
    9. For Xperia SPVolume Down key will do the job of back key, just turn off your phone, keep the Volume Down key pressed and plug in the data cable.
    10. As soon as the phone is detected in Flashmode, the firmware will start flashing, Do not leave the Volume Down key until the process is complete.
    11. As soon as you see “Flashing ended or Finished Flashing” leave the Volume Down key, plug the cable out and reboot.
    12. That’s All! Congrats! You’ve installed latest Android 4.3 Jelly Bean on your Xperia SP Enjoy.

That’s all. We hope that you find this guide helpful. In case you got any queries or face any difficulties, please feel free to stop by the comment box below. We will get back to you immediately. Thanks all.

Root & Install CWM 5 Recovery on Sony Xperia Sola Running 6.1.1.B.1.54 Firmware [How To – Guide]

Root & Install CWM 5 Recovery on Sony Xperia Sola Running 6.1.1.B.1.54 Firmware [How To – Guide]

For Xperia Sola owners out there looking for a custom recovery, we’ve found a working ClockworkMod recovery and in the following post we’ll be going through a method that will help you to install this recovery on your device. While some of you might be first timers with flashing a custom recovery or coming across it, to make it more clear we’ll first go through a brief introduction of the custom recovery that is CWM [ClockworkMod] in our case.

A custom recovery allows you to install custom roms, mods etc. Along with these, you can make a Nandroid backup, this helps you a lot as you can move back to the previous working state of your phone at any time you want if you have backed up your current system. In some cases, to root the phone you need to flash SuperSu.zip file in the custom recovery, having installed the recovery may help you while in some cases to install the recovery easily, you need to have the phone rooted. You can also wipe cache and dalvik cache of your phone using a custom recovery.

Here are some important installation instructions.

    1. This guide is only for Sony Xperia Sola MT27i. Do not try this on any other model, please check your device’s mode in Settings > About Device.
    2. Your device must be running latest Android 4.0.4 6.1.1.B.1.54 Firmware.
    3. You must have installed Android ADB & Fastboot drivers. Follow the quick guide here.
    4. Your device must have an unlocked bootloader. Follow our full guide here in order to unlock.
    5. Please make sure that your phone’s battery is charged at least over 60%. This is highly recommended in order to prevent any power issues during the recovery flashing process.
    6. Backup each and everything on your Android phone as follows:
    7. Backup all your important contacts, find the full guide here.
    8. Backup all your important sms messages, find the full guide here.
    9. Backup all your important call logs, find the full guide here.
    10. Backup all your important media content manually. (Copy to your PC.)
    11. Backup all your apps / data. If you’ve rooted your device, use Titanium Backup to do so. Follow the full guide here.
    12. Backup your current system using a custom recovery (CWM or TWRP) if you’ve flashed one. This is recommended in case something goes wrong with CWM installation, you can use the custom recovery and return to the old working state of your system.
    13. Enable USB debugging mode on your device.  Get it in Settings > Developer Options > USB Debugging mode.
    14. Use only OEM data cable to establish connection between your PC and Phone.
    15. Alright! Follow this guide to the letter now.
Disclaimer: The methods involved in flashing custom roms and rooting your phone is highly custom and may result in bricking your device, and has nothing to do with Google or the device manufacturer that is SONY in our case. Also rooting your device will void its warranty and you will be no longer eligible for any kind of free device services by the manufacturers/warranty providers. In case of any mishap we may not be held responsible. Follow these instructions to the letter to avoid any mishap or bricking. Make sure that whatever you do, you are doing it at your own responsibility.


How to Root & Install CWM Recovery on Xperia SOLA:

    1. Download  The BrainsKernel with CWM Recovery & Root
    2. Extract the downloaded .zip folder on your PC, you will get a Boot.img file.
    3. Place the extracted Kernel.elf file in the Minimal ADB & Fastboot folder that you created using our ADB & Fastboot Quick Setup Guide.
    4. If you are using Android ADB & Fastboot full package, you can place the downloaded Kernel.elf file in the Fastboot folder or in the Platform-tools folder.
    5. Open the folder where you placed the Boot.img or Kernel.elf  file. E.g Minimal ADB & Fastboot or Fastboot or Platform Tools.
    6. Press and hold the shift key and right click on an empty area within the folder, and click on “Open Command Window Here”.
    7. Turn off your Xperia Sola completely.
    8. Now press the Volume Up Key and while keeping it pressed plug in the USB cable.
    9. You should see a blue light in the notification light of your phone, that means your device is now connected in Fastboot mode.
    10. Now type the following command: fastboot flash boot Kernel.elf
    11. Hit Enter and it will quickly flash CWM 5 recovery in your Xperia Sola.
    12. Once recovery is flashed, now issue this command “Fastboot Reboot” or unplug your device and reboot it.
    13. Your device will reboot now, as soon as you see the Sony logo,  and the pink LED, press Volume Up key to enter recovery.
    14. Congrats! You should now see the custom recovery.
    15. Once you’re in recovery, clear Cache and Dalvik Cache and reboot.
    16. + Your device is rooted as well. Find SuperSu in app drawer.

Screenshot_1

That’s All with the recovery installation and rooting your Xperia Sola on the .54 firmware. In case you got any queries or face any difficulties regarding this post, please feel free to stop by the comment box below and let us know. We will get back to you as soon as possible. Thanks all.

Credits:  thebrainkafka

Install VIRGINITY V9 Custom ROM on Galaxy S3 Mini

2
Install VIRGINITY V9 Custom ROM on Galaxy S3 Mini

Galaxy S3 Mini is still running on the Android version that it brought up out of the box, Android 4.1.2 Jelly Bean. The device is in que to receive any further Android updates, but the best you can do for now is to have some nice stock based custom ROM or a complete custom ROM to enhance the functionality of your Mini S3. We’ve found something similar today, it’s a stock based custom ROM named as VIRGINITY and is currently it’s V9 is available. Thanks to XDA senior member joelalmeidaptg for developing this great ROM and giving an enhanced life to the Galaxy S3 Mini.

As we move forward, we’ll go through the ROM features, installation pre-requisites and installation instructions. What you should keep in mind is this is a stock based custom ROM as said above, and is based on the i8190XXANA2 stock firmware. The ROM packs up smoothness, is responsive, battery life is amazing and also packs up some nice apps ported from S4. Installation is AROMA installer supported and is fully customizable. Although it is a proper, stable and smooth custom ROM but we still recommend that you should only flash this ROM if you’re familiar with custom ROMs and you actually know that what are you going to do. Let’s go through VIRGINITY ROM V9’s features now.

 Features:

  • Based on stock i8190XXANA2 firmware
  • Fully deodexed and zipaligned
  • Debloated from every single Samsung bloatware and Google Play install-able apps
  • Pre-rooted with Chainfire’s SuperSU
  • Pre-installed busybox
  • Every single app was updated to its latest version to spare memory from updates
  • Init.d support
  • Initial host file ad-blocking
  • GPS fast lock
  • Zipalign on boot
  • Amazing battery life
  • Buttery smoothness
  • MOD: Advanced reboot menu
  • MOD: Volume keys skip tracks when screen is off
  • Custom wallpapers (launcher and lockscreen) at first boot
  • Scroll cache disabled for faster scrooling
  • S4 icons on apps
  • Latest Google bootanimation
  • Back-light notifications support (needs Virginity kernel or other that supports it)
  • Samsung Galaxy S4 lockscreen + sounds from Koulis2000
  • Lots of S4 apps from amitnv
  • AC!D Audio Engine featuring Sony ClearAudio+, Beats Audio Engine, Dolby Digital Plus and Sony xLoud from Rizal Lovins for a perfect audio
  • AROMA Installer with the following options:
  • Kernels: Stock ANA2 Kernel with init.d support, Stock AMJ3 Kernel with init.d support, Virginity Kernel V4
  • Apps:
  • S4 Music Player
  • Video Player
  • Voice Recorder
  • FM Radio
  • Calculators:
  • Stock calculador
  • S4 Calculator Light
  • S4 Calculator Dark
  • S4/S3 Widgets
  • Browser
  • S Planner
  • AccuWeather
  • S4 Yahoo News
  • S4 Yahoo Finance
  • S4 S Health
  • S4 MyFiles
  • S4 S voice
  • S4 TripAdvisor
  • Samsung Fonts:
  • Choco cooky
  • Cool jazz
  • Helvetica S
  • Rosemary
  • Samsung Sans (S4)
  • S4 Memo
  • Stock Email & Exchange
  • SIM card menu
  • Adaway
  • Galaxy Lockscreen
  • Boot animations:
  • Google Nexus 5
  • Stock Samsung
  • Keyboards:
  • Xperia Honami Keyboard
  • Galaxy S4 Keyboard
  • Stock keyboard
  • Mods:
  • AC!D Engine
  • Crossbreeder
  • Zipalign on boot
  • Fly On Mod


Here are some important pre-requisites and installation instructions:

  1. This ROM works for all the variants of the Galaxy S3 Mini i8190 or i8190L. Do not try this on any other device. Check your device’s model under settings > About device > Model.
  2. Your device must be charged over at least 60%. This is highly recommended in order to prevent any mishap during the installation process.
  3. It is highly recommended that you make a nandroid backup of your device using a custom recovery. This is handy in case something goes wrong and you want to get your older system back immediately.
  4. Use the OEM data cable to establish connection between your PC and Phone.
  5. Backup each and everything on your Android phone as you may have to go through data wipes during installation process. Here are the backup procedures.
  6. Backup all your important contacts, find the full guide here.
  7. Backup all your important sms messages, find the full guide here.
  8. Backup all your important call logs, find the full guide here.
  9. Backup all your important media content manually. (Copy to your PC.)
  10. Backup all your apps / data. If you’ve rooted your device, use Titanium Backup to do so. Follow the full guide here.
  11. Your device must have a CWM or TWRP Recovery installed. Follow the full guide here to install one.
  12. Make sure that you read all the important instructions carefully. Once done, you may go ahead.

Disclaimer: The methods involved in flashing custom roms and rooting your phone is highly custom and may result in bricking your device, and has nothing to do with Google or the device manufacturer that is SAMSUNG in our case. Also rooting your device will void its warranty and you will be no longer eligible for any kind of free device services by the manufacturers/warranty providers. In case of any mishap we may not be held responsible. Follow these instructions to the letter to avoid any mishap or bricking. Make sure that whatever you do, you are doing it at your own responsibility.

How to Install VIRGINITY V9 Custom ROM on Galaxy S III Mini:

  1. Download VIRGINITY V9 Custom ROM.zip file and place it on your phone’s sd card.
  2. Boot into CWM recovery. To do so turn off your device completely, now turn it on by pressing and holding Volume Up + Home Button + Power Key.
  3. Once in CWM, wipe factory data reset. This will wipe your device for ROM installation.
  4. Now in CWM recovery, select “Install Zip>Choose Zip form SD / ext SD card>Select the VIRGINITY V9” and then select Yes to proceed.
  5. This will start Aroma Installer now.
  6. The installer is self explanatory, proceed with the ROM installation.
  7. Make the selections you want.
  8. Finish the installation.
  9. Reboot!
  10. Phewww! You’re done installing VIRGINITY V9 ROM on your phone.

Here are some screenshots from this ROM:

  14uyv6a29opfyh10qcdav282m49l

How To Root Nokia X Using Framaroot And Install Google Apps.

0
How To Root Nokia X Using Framaroot And Install Google Apps.

Ok, so while I was on XDA Developer, i came Across a very interesting topic, How to use Google Apps on Nokia X, since Google Play Store is not available in Nokia X instead Nokia Store is there for you to install Apps from there. We all know that Nokia has recently shifted to Android means we can use Android Apps on Nokia X, but the only problem is that no Google Play Store is yet there and installing only Apk of it won’t gonna work. You need to do a little extra for this.

2014-02-28_17.38.15

You need to change the permissions according to the instructions given, but you also needed a rooted device in this matter and there is no rooting method of Nokia X is available till now. According to XDA Member Kashamalaga, he tried to root his Nokia X using Framaroot and it worked and then he installed Google Apps on it and it worked too. So, today we are sharing how to install Google Apps on your Nokia X after Rooting it.

  • Framaroot is a simple application that allows you to root your device without any difficulty, just install it, Follow the On Screen Instruction and all is well. To learn how to Download And install Framaroot, Follow:

Download Framaroot 1.9.1 APK

  • How to install and run Framaroot on Nokia X check our guide [ Here ]
  • After Rooting your device you need to Download Google Apps for Nokia X, Follow:

NokiaX_Gapps_KashaMalaga_28.02.2014.zip

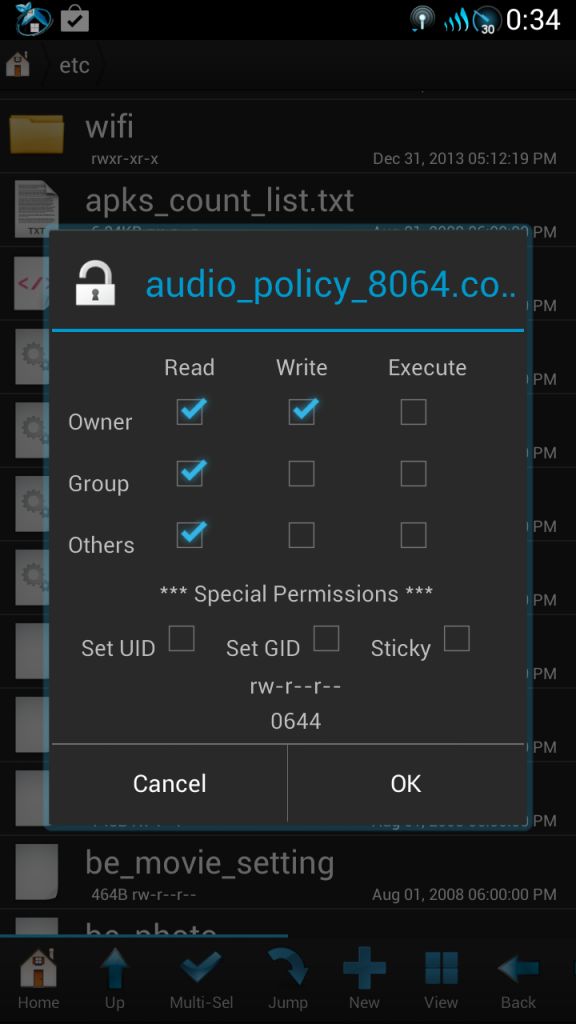
  • Copy all the Apk Files to system/apps and Change the Permissions, To learn how to Fix/Change Permissions Follow:

Set/Fix Permissions On Android Devices

  • All the permission should be like what is shown in Picture Below.

Screenshot_2014-01-02-00-34-02-576x1024

  • Reboot your device.
  • Now Install all the Apks like Normal Apks.
  • Once everything installed, Launch Google Play Store and if it asks for your Google Account then everything went better than expected.

Source: XDA Credit: XDA Member Kashamalaga

Samsung Galaxy S5 HD Wallpapers For Free – Download Here

0
Samsung Galaxy S5 HD Wallpapers For Free – Download Here

Samsung is on the top in Smartphones world and few days back they released their new flagship Samsung Galaxy S5 with this new device Samsung is again top on smartphones race. Samsung Galaxy S5 comes with Super AMOLED capacitive touchscreen, 16M colors, 1080 x 1920 pixels, 5.1 inches (~432 ppi pixel density) with Fingerprint sensor (PayPal certified). They have added new features like Water resistant up to 1 meter and 30 minutes, Accelerometer, gyro, proximity, compass, barometer, temperature, humidity, gesture, heart rate. So when you purchase device like this then you need HD Wallpapers to enjoy the HD display so today i am giving you the Samsung Galaxy S5 HD Wallpapers For Free.

Abstract Samsung Galaxy S5 Wallpapers 96

samsung_galaxy_s5_wallpaper_by_shimmi1-d77uvxz

Samsung-Galaxy-S4-Wallpapers-400x250

Samsung-Galaxy-S4-Wallpapers-1

fhd_04

fhd_02

Samsung-Galaxy-S5-Wallpapers-Blue