Home Blog Page 464

4 Steps To Check the iPhone for Unflod Baby Panda Malware

0
4 Steps To Check the iPhone for Unflod Baby Panda Malware

Yesterday there was a news about some Malware attacked iPhones. Many big forum like Reddit , iPhone hacksiClarified and more have posted about Unflod Baby Panda Malware. There are no officials words out yet because baby panda malware was found on Jailbreak devices, may be this is the reason we are facing so much crashes on iOS 7.

ifile-dynamiclibraries

Cydia creator Saurik say’s:

A piece of malware has shown up on a few jailbroken devices – it’s almost certainly installed via something on a non-default repository (such as a pirate repository), and it’s probably installed via a less-popular package, since it’s not very common. It’s usually called Unflod.dylib, and it’s a malicious piece of software that tries to steal your Apple ID and password; nobody has figured out yet exactly where it comes from. You can read analysis by i0n1c here, and discussion in these two threads: what is it? and beware of it.

Everybody is looking possible working os that they don’t have to face such kind of issue. While i was working on it on my iPhone i have checked didn’t find anything :). So i thought not everybody know what to do so i making this guide to help you all.

Note: This guide is only for Jailbreak devices those who are running official iOS 7 they don’t need to worry play frontline commando 2 and enjoy!

Check the iPhone for Unflod Baby Panda Malware:

  1. You need to install iFile form cydia. After installing goto following directory.
  2. /Library/MobileSubstrate/DynamicLibraries/.
  3. Now scroll down carefully and check files Unflod.dylib and Unflod.plist. As show above in the picture.
  4. Once you locate these files swipe left and delete each unfold file.
  5. After deleting all the Unfold malware files are deleted reset you Apple id password.

Hope so it works for you and your Apple id is not compromised.

How To Uninstall an iPhone AppStore application?

0
How To Uninstall an iPhone AppStore application?

It’s a mostly commonly asked question form iPhone user’s ” How Delete or Uninstall iPhone AppStore Application ”  either you have purchased from Appstore, install through Installer or Cydia. If you are using Android it  is easy to delete or Uninstall Applications but for iPhone everything is different. All Android users have to do is that go-to setting -> Application Manager, tap on the app you want to delete or Uninstall, for iPhone there are two methods. If your device is Jailbreak then the method is different and for non-jailbreak device its different. I will tell you both the process in steps with images and video.

How do I uninstall an iPhone AppStore application?

1926875_759372880759841_989831750739291993_nFollowing are the method for iPhone users on how they can uninstall or delete Appstore applications on jailbreak device or on non-jailbreak device.

Method 1: How to Uninstall Applications on Jailbreak Device:

On Jailbreak iPhone , iPad or iPod application are installed through Cyida or Installer. So to delete one you have to goto package manger from here you can uninstall or delete an application. Check out he following video tutorial for iPhone users who have jailbreak devices.

Method 2: How to Uninstall Application on Non-Jailbreak Device:

All you have to do is hold finger on the icon or application until the icons on your screen start shaking, then you’ll see a (X) on top left on every icon tap on (x) done your application is delete. Check out the following video.

How to Uninstall Application is Android Devices:

Hitman GO Finally Released For iOS 7, Here Is How You Can Download It

0
Hitman GO Finally Released For iOS 7, Here Is How You Can Download It

Upon Hearing the name “Hitman”, our mind directly imagine a Cold heart, besuited and inhuman character, whose job is to kill people, innocent and criminals, for only money. This is after all, what we have seen in movies and games, and otherwise the role of Hitman, even if we look in the past, the collection of Hitman series also based on a story of a contract killer, but now in Hitman Go, things are about to be changed, Square Enrix has decided to take an alternate approach, thus turning a killing game into a Puzzle game of Turn Based Strategy, well on first look, anyone can simply understand that they have disgraced the name of Hitman, but going with a whole new idea, sometimes lead to that, for example, 300: Rise of Empire, was expected to be a better movie than the first movie, but it was not, since they tried to bring a whole new story, instead of sticking to the old one.

Turn Based puzzle games are something of a revelation in Mobile world, it is not a surprised that Square Enrix decided to go after it. However, as I said earlier that seeing Hitman spending time to solve puzzles instead of straightforward killing, is an eyebrow raising scenario, but the combination of “violence-meets-placid-board-game” really turns out to be a huge fun, stepping away from becoming a disaster. Don’t worry characters are still the same.

screen568x5682

You are, as always, the Agent 47, but instead of sneaking on a person with a Pistol and waiting for an opportune moment to kill him, you are this time bound to move on the board, moving so silently that the guards there won’t feel anything suspicious. If you are spotted, you have no power to start a fight with them, instead you have failed the level and must start it again. You need to sharpen your stealth statistics in order to creep through without being spotted.

screen568x568-11

If you look closely into the game, despite that the game has its own signature and story line, it looks more like Splinter cell, even though Splinter Cell was classified as a Role Playing Game, where you have to run from the guards and enter without getting caught. Hitman GO is available of Apple store for only $4.99, compatible for both iPhone and iPad, So if you are after a little something different, then this game is the best for you.

RUN RUN 3D V1.7 – Download Here

0
RUN RUN 3D V1.7 – Download Here

Wanna play another type of Subway Surfer, Subway Surfer is the most accomplished endless running game in Android. It features a Kid spraying the walls of a Subway, or more like graffitiing those walls, an inspector with his Dog notices his work and attempt to capture him, upon realising the situation, the boy attempts to escape and then it is all upto you run and avoid all the obstacles and run as long as you can to save yourself from the Inspector, tipping only once will get you caught if you are slow.

RUN RUN 3D is the same type of game and as I said above it is the same as Subway Surfer, except there is no subway in it and instead of solid ground, this game features, Slides hovering over the water. It is your job to run and make sure not to trip on any point, otherwise you are floating over the water.You can download this app From Google Play store, but we are hearing a lot of people having problem with Google Play Store, so we are providing the link of Apk File of RUN RUN 3D.

Screenshot_7

Before We go any further, let’s look at the Features of RUN RUN 3D:

  • Excellent HD graphics
  • 3D fantasy gameplay
  • Best 3D environment!
  • Upgrade New characters
  • Unlock new powerups
  • Exciting and Fun PLAY!
  • New unique water surfers
  • Crazy run achievements
  • Share your best score on leader board
  • Compatible with all tabs and mobile devices
  • Best HD gameplay in tablets!
  • It’s a FREE game!

How To Install RUN RUN 3D Apk.

Pre-Requirements:

  1. Allows your device to Install from Unknown Sources. Go to Settings > Security and Tap Unknown Source.
  2. Download RUN RUN 3D Apk: LINK

How To Install RUN RUN 3D Apk.

  1. Download the Above file.
  2. Connect your Device with PC.
  3. Copy the Apk file to your device.
  4. Disconnect the Device.
  5. Install the Apk like normal and Run the app Online the First Time.
  6. While installing, if ask for any Installation Process, Choose “Package Installer and if there is a Pop-Up Choose Decline”

If you Have any problems, Feel free to comment in the comment section below.

How To Root Sprint Samsung Galaxy S5 SM-G900P

0
How To Root Sprint Samsung Galaxy S5 SM-G900P

Samsung’s new beast, the Galaxy S5 has already headed towards the markets, and is available for most of the US carriers now. Sprint’s Galaxy S5 is already up and can be purchased, the device is modeled as SM-G900P. Samsung has loaded the Galaxy S5 with enough features to empty your pockets, the device’s focus is on health and lifestyle, so you would love to get your hands on it and test it heart rate monitor and other cool sensors with awesome features on the device.

While you plan to buy the Galaxy S5, you surely would like to break it’ jails and get beyond the boundaries. This requires you to root your device first and then tweak it. If you’ve something similar on mind, then we have something to fulfill it right here. In the following post we are going to root Sprint Galaxy S5 SM-G900P. All you need is, you need to follow this comprehensive guide carefully. Before we proceed, I’m assuming that some of you’re already familiar with rooting an Android device,  but not all are the same. For newbies, we will first have a look on the brief introduction of the root access and also know that why you should root your Sprint Samsung Galaxy S5.

device_gs5

Rooting your phone gives you complete access over all the data which is apparently locked by the manufacturers. This includes removal of the factory restrictions and making changes to the internal system and the operating system. Gaining the root access gives you the privileges to install various applications to enhance the performance of your device, allows you to remove the built-in applications/programs, helps you to upgrade the battery life of your device & install the apps which require the root access for the proper functionality and modify your device in so many other ways e.g using mods and flashing custom recoveries and custom ROMs. There is a laundry list of things you can do after having your device rooted and installed the custom recovery, now once you’re rooted and have installed custom recovery, go ahead and enjoy it on your phone. Here’s our collection of 10 Best Root Apps.

Here are the pre-installation instructions:

  1. This guide is only for Sprint Samsung Galaxy S5 SM-G900P. Do not try this on any other device, please check your device’s model number in Settings > General > About Device.
  2. Your phone’s battery must be charged at least over 60%. This is highly recommended in order to prevent any power issues during the flashing process.
  3. Make sure that you backup your important media content, ContactsCall Logs & Messages. This is highly recommended just in case something goes wrong and you need to reset your phone.
  4. Use only OEM data cable to establish connection between your phone and PC. Turn off your Anti Virus and Firewall to prevent any connection issues. Also enable USB debugging mode on your phone if you face connection issues.
  5. Alright! Go ahead, follow this guide to the letter.
Disclaimer: The methods involved in flashing custom ROMs and rooting your phone are highly custom and may result in bricking your device, and has nothing to do with Google or the device manufacturer that is SAMSUNG in our case. Also rooting your device will void its warranty and you will be no longer eligible for any kind of free device services by the manufacturers/warranty providers. In case of any mishap we may not be held responsible. Follow these instructions to the letter to avoid any mishap or bricking. Make sure that whatever you do, you are doing it at your own responsibility.


Files you need to download: 

  1. Download and extract Odin PC – Get it here
  2. Download and Samsung USB Drivers – Get here
  3. Download & Unzip Cf Auto Root Package file once on your desktop, you will get a .tar.md5 file.

 How to Root Sprint Galaxy S5 SM-G900P:

  1. Open Odin3.exe from the extracted folder.
  2. Put your Sprint SGS 5 in download mode by pressing and holding Volume Down + Home + Power key at the same time, you should get a screen showing a warning and asking to continue, press Volume Up to continue.
  3. Now your phone should be in downloading mode. Connect your phone to your PC.
  4. As soon as Odin detects your phone the ID:COM box will turn light blue.
  5. Click on the PDA tab and select the CF-autoroot file that you extracted above.
  6. In case you’re using Odin v3.09, you will put the .tar.md5 file in the “AP” tab, rest of the settings should remain untouched in Odin v3.09 as well.
  7. Your Odin screen should look like exactly as shown below.
  8. odin_explained
  9. Click Start and the root process should start showing you a process bar in the first box above ID:COM.
  10. The process is quite fast and will finish in a few seconds, as soon as it ends, your phone will restart and you’ll see the CF Auto root installing SuperSu on your phone.
  11. Congratulations you have your Samsung Galaxy S5 SM-G900P rooted now!

How to check if the device is properly rooted or not?

  1. To do so, go to Google Play Store on your Galaxy S5.
  2. Find “Root Checker” and install it.
  3. Open Root Checker.
  4. Tap “Verify Root”.
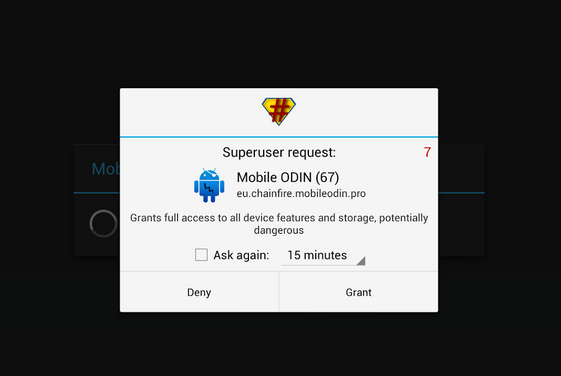
  5. It will ask you for SuperSu rights, tap “Grant”.
  6. It should show you Root Access Verified Now!
  7. That’s All!

1560688_10202529514651766_2061540064_n

Once you’re rooted, make sure that you Backup EFS Data on your Galaxy S5.

Also, Install CWM or TWRP Recovery on your Galaxy S5.

That’s all. In case you have some queries or you’re facing some issues regarding this post, feel free to stop by the comment box below and drop us your words. We surely will get back to you as soon as possible. Thanks all.

Auki, A Quick Message Composer For iOS 7

0
Auki, A Quick Message Composer For iOS 7

iOS messaging has been, from the introduction of iMessages,benefited greatly, but in terms of features, it has not evolved as it supposed to be. From the time of the first iPhone till now, the iMesssages app is still the same, you need to open the app to see and reply to anyone, instead we should have seen the Quick message option in it as you see in many Android messaging apps. iOS does not provide such facilities, until you are using a Jailbroken device, you can use Bitesms, but if you are interested in something, that can create an easy way for you to deal with messages without having to counter the message app again and again, you may need to check out a new tweak by the name of the Auki.

Auki provides almost everything you need, like Quick Compose with a few extra thrown to make even better for you. No matter how much iOS have evolved, we still need to go back from what we are using or playing, to reply to a message and if there is a conversation started, it becomes a serious pain to go back agin and again to reply to messages and especially if there is a multiplayer game, which needs continuous concentration during gameplay, will be ruin because of the replying.

auki-screenshot-640x657

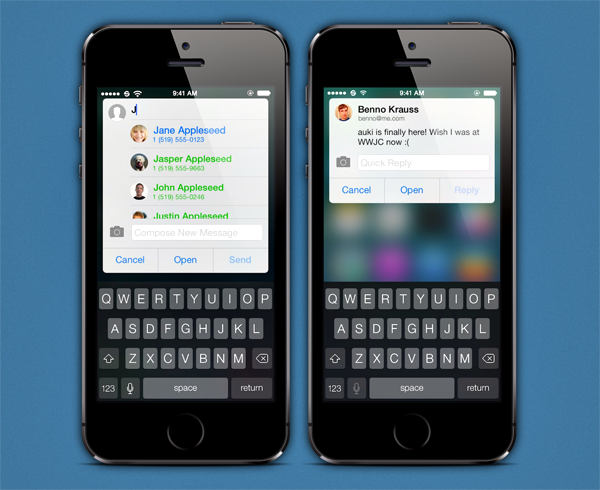
While using Auki, once you received a message, you will see a pop-up allowing you to send a message without going back and once the message is sent, you will hear a noise confirming that the message has been sent Or if you don’t want to see the pop-up, you can change the settings, and then you have the power to swipe down to see the message and the pop-up, thus replying from the same spot without getting disturbed even a little

This Tweak support, Images and Video and the best thing in this Tweak is that you can Silence people, if you do not want to talk to anybody at the current moment, you can swipe the conversation to the left to mute them, afterwards even if there is a pop-up, that will be the pop-up of a message you should read. Auki is available on Cydia Store for only $3.99 and after adding Bigboss Repo you should be able to install it.

Photo-Apr-15-2-08-59-AM1

Jailbreak your iOS Device.

Since the following tutorial needs an iOS device which is Jailbroken, you need to Jailbreak your device. If your device is still in its normal condition. Follow our Jailbreak Section to find out how to Jailbreak your device.

Add BigBoss Repo To Cydia:

  • BigBoss Repo can’t be add using the same old method.
  • Open iFile and Navigate to /etc/apt/sources.list.d/
  • Add a File name bigboss.list
  • Within the File Add the Following:

# do not edit this file to add your own custom sources
# this file is subject to be upgraded as part of a package
# either add your own .list file to /etc/apt/sources.list.d
# or add your entry to the global /etc/apt/sources.list file deb

http://apt.thebigboss.org/repofiles/cydia/ stable main

  • Close the iFile and Respring, Restart the device.
  • Open Cydia and Let it refresh.

Download Auki:

  1. Open Cydia.
  2. Search for Auki.
  3. Tap Auki once the search is over.
  4. Puchase the App and wait for install button to appear.
  5. Tap Install on the top right corner.
  6. Tap Confirm.
  7. Restart your device

Install CWM Recovery and Root Sony Xperia Z1 Running 14.3.A.0.757 Firmware

Install CWM Recovery and Root Sony Xperia Z1 Running 14.3.A.0.757 Firmware

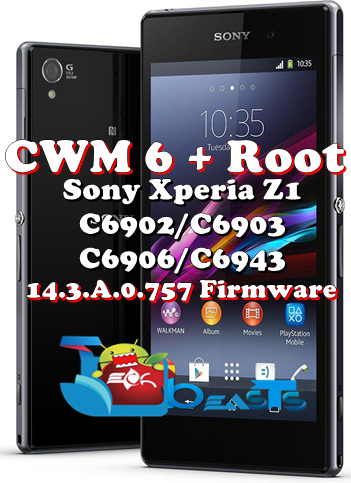
Xperia Z1 14.3.A.0.757 Root and CWM.jpgSony’s Xperia Z1 has got some new stability updates based on Android 4.4.2 KitKat having the build number 14.3.A.0.757. Earlier Android 4.4.2 KitKat updates had some performance issues and some annoying bugs including the sound bug that irritated the users and disappointed them, but the good thing here is, in the past few months, Sony has been quite fair with its customers, specially regarding the software updates. There has been a hefty list of device getting latest Android updates, and Sony is trying to keep the updates as stable as it can.

If you’ve already updated your Xperia Z1 C6903/C6902/C6906 or C6943 to latest Android 4.4.2 KitKat 14.3.A.0.757 firmware, you might be looking out for a method to get your device a custom recovery and also root it on this latest firmware. The previous methods are all firmware specified and will not work with this update, so you will have to follow a new one. In a few minutes, we will be installing CWM recovery and root all variants of Sony Xperia Z1, you just need to follow this guide carefully. Before we move forward, I’m assuming that some of you’re familiar with flashing custom recoveries and rooting, and some of you are not. In order to make it clear and remove the confusions, we will first have a look on a brief introduction of a custom recovery and rooting the device as well.

A custom recovery allows you to install custom roms, mods etc. Along with these, you can make a Nandroid backup, this helps you a lot as you can move back to the previous working state of your phone at any time you want if you have backed up your current system. In some cases, to root the phone you need to flash SuperSu.zip file in the custom recovery, having installed the recovery may help you while in some casesto install the recovery easily, you need to have the phone rooted. You can also wipe cache and dalvik cache of your phone using a custom recovery.

Rooting your phone gives you complete access over all the data which is apparently locked by the manufacturers. This includes removal of the factory restrictions and making changes to the internal system and the operating system. Gaining the root access gives you the privileges to install various applications to enhance the performance of your device, allows you to remove the built-in applications/programs, helps you to upgrade the battery life of your device & install the apps which require the root access for the proper functionality and modify your device in so many other ways e.g using mods and flashing custom recoveries and custom ROMs. There is a laundry list of things you can do after having your device rooted and installed the custom recovery, now once you’re rooted and haveinstalled custom recovery, go ahead and enjoy it on your phone. Here’s our collection of 10 Best Root Apps.

Here are the pre-installation instructions that you must follow:

    1. The CWM recovery is only for Xperia Z1 C6902/C6903/C6906/C6943 running latest Android 4.4.2 KitKat 14.3.A.0.757 Firmware. Check your firmware version in Settings > About Device and make sure that it matches the one mentioned here.
    2. You must have installed Android ADB & Fastboot drivers. Follow the quick guide here.
    3. Your device must have an unlocked bootloader. Follow our full guide here in order to unlock. While you unlock your phone’s bootloader, make sure that you read the guide and all the precautions carefully.
    4. Please make sure that your phone’s battery is charged at least over 60%. This is highly recommended in order to prevent any power issues during the recovery flashing process.
    5. Backup each and everything on your Android phone as follows:
    6. Backup all your important contacts, find the full guide here.
    7. Backup all your important sms messages, find the full guide here.
    8. Backup all your important call logs, find the full guide here.
    9. Backup all your important media content manually. (Copy to your PC.)
    10. Enable USB debugging mode on your device.  Get it in Settings > Developer Options > USB Debugging mode.
    11. Use only OEM data cable to establish connection between your PC and Phone.
    12. Alright! Follow this guide to the letter now.

If you want to root your device without unlocking the bootloader, check out this post.

Disclaimer: The methods involved in flashing custom roms and rooting your phone is highly custom and may result in bricking your device, and has nothing to do with Google or the device manufacturer that is SONY in our case. Also rooting your device will void its warranty and you will be no longer eligible for any kind of free device services by the manufacturers/warranty providers. In case of any mishap we may not be held responsible. Follow these instructions to the letter to avoid any mishap or bricking. Make sure that whatever you do, you are doing it at your own responsibility.

How to Install CWM 6 Recovery on Xperia Z1 C6902/C6903/C6906/C6943 Running 14.3.A.0.757 Firmware:

    1. Download Doomlord’s Advanced Stock Kernel with CWM Recovery.zip  file and extract it to get a .img file.
    2. Rename the downloaded .img file to boot.img
    3. Place the downloaded boot.img file in the Minimal ADB & Fastboot folder that you created using our ADB & Fastboot Quick Setup Guide.
    4. If you are using Android ADB & Fastboot full package, you can place the downloaded and renamed boot.img file in the Fastboot folder or in the Platform-tools folder.
    5. Open the folder where you placed the boot.img  file. E.g Minimal ADB & Fastbootor Fastboot or Platform Tools.
    6. Press and hold the shift key and right click on an empty area within the folder, and click on “Open Command Window Here”.
    7. Turn off your Xperia Z1 completely.
    8. Now press the Volume Up Key and while keeping it pressed plug in the USB cable.
    9. You should see a blue light in the notification light of your phone, that means your device is now connected in Fastboot mode.
    10. Now type the following command:

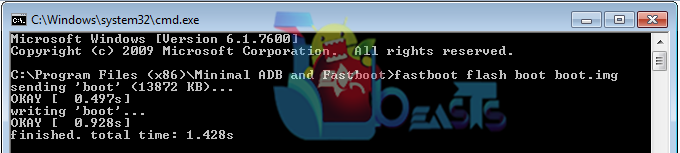
       fastboot flash boot boot.img

    11. Hit Enter and it will quickly flash CWM 6 recovery in your Xperia Z1.
    12. Once recovery is flashed, now issue this command

      “fastboot reboot”

    13. In case this doesn’t work, you may reboot the device manually.
    14. Your device will reboot now, as soon as you see the Sony logo,  and the pink LED, press Volume Up key to enter recovery.
    15. Congrats! You should now see the custom recovery.
    16. That’s all.

Screenshot_1


How to Root Xperia Z1 C6902/C6903/C6906/C6943 Running 14.3.A.0.757 Firmware:

  1. You need to install CWM recovery first using the above instructions.
  2. Download Supersu.zip file now.
  3. Place the downloaded Supersu.zip file on your phone’s external sd card.
  4. Now boot into CWM recovery on your phone. To do so, turn off your device first. Now turn it on, as soon as you see the Pink LED, press the Volume Up Key rapidly.
  5. You should see the CWM recovery interface shortly.
  6. Once in CWM, select “Install Zip > Choose Zip from SDcard > Select SuperSu.zip > Yes”.
  7. This will flash SuperSu.zip file, once flashing is complete, reboot your device.
  8. Congrats! You’re rooted now!
  9. SuperSu

How to check if the device is properly rooted or not?

    1. To do so, go to Google Play Store on your Xperia Z1.
    2. Find “Root Checker“ and install it.
    3. Open Root Checker.
    4. Tap “Verify Root”.
    5. It will ask you for SuperSu rights, tap “Grant”.
    6. It should show you Root Access Verified Now!
    7. That’s All!

1560688_10202529514651766_2061540064_n

That’s all. In case you have some queries or you’re facing some issues regarding this post, feel free to stop by the comment box below and drop us your words. We surely will get back to you as soon as possible. Thanks all.

Credits: Doomlord for CWM  | Chainfire for SuperSu.

How to Root T-Mobile Samsung Galaxy S5 SM-G900T

0
How to Root T-Mobile Samsung Galaxy S5 SM-G900T

The Next Big Thing, Samsung Galaxy S5’s variant has already come up for most of the carriers in the US and other countries. T-Mobile’s Galaxy S5 is modeled as SM-G900T and is already there, so if you’re planning to get your hands on T-Mobile Galaxy S5, you may want to break it’s boundaries and unleash the true power of Android OS installed on your latest Beast, the Galaxy S5. The famous developer, Chainfire has already come up with his wide-spread CF-Autoroot for almost all the variants of Galaxy S5, that means it won’t be a hitch anymore to root your T-Mobile Galaxy S5.

In the following post, we are going to root the T-Mobile Galaxy S5 SM-G900T. All you need to do is, follow this comprehensive guide carefully. Before we head towards the root instructions, I’m assuming that many of you are newbies and have no idea about what is root access and why you should root it, to make it clear, we will first have a look on the brief introduction of root access

Rooting your phone gives you complete access over all the data which is apparently locked by the manufacturers. This includes removal of the factory restrictions and making changes to the internal system and the operating system. Gaining the root access gives you the privileges to install various applications to enhance the performance of your device, allows you to remove the built-in applications/programs, helps you to upgrade the battery life of your device & install the apps which require the root access for the proper functionality and modify your device in so many other ways e.g using mods and flashing custom recoveries and custom ROMs. There is a laundry list of things you can do after having your device rooted and installed the custom recovery, now once you’re rooted and have installed custom recovery, go ahead and enjoy it on your phone. Here’s our collection of 10 Best Root Apps.

Here are the pre-installation instructions:

  1. This guide is only for T-Mobile Samsung Galaxy S5 SM-G900T. Do not try this on any other device, please check your device’s model number in Settings > General > About Device.
  2. Your phone’s battery must be charged at least over 60%. This is highly recommended in order to prevent any power issues during the flashing process.
  3. Make sure that you backup your important media content, ContactsCall Logs & Messages. This is highly recommended just in case something goes wrong and you need to reset your phone.
  4. Use only OEM data cable to establish connection between your phone and PC. Turn off your Anti Virus and Firewall to prevent any connection issues. Also enable USB debugging mode on your phone if you face connection issues.
  5. Alright! Go ahead, follow this guide to the letter.

Disclaimer: The methods involved in flashing custom ROMs and rooting your phone are highly custom and may result in bricking your device, and has nothing to do with Google or the device manufacturer that is SAMSUNG in our case. Also rooting your device will void its warranty and you will be no longer eligible for any kind of free device services by the manufacturers/warranty providers. In case of any mishap we may not be held responsible. Follow these instructions to the letter to avoid any mishap or bricking. Make sure that whatever you do, you are doing it at your own responsibility.

Files you need to download/Install:

Files you need to download: 

  1. Download and extract Odin PC – Get it here
  2. Download and Samsung USB Drivers – Get here
  3. Download & Unzip Cf Auto Root Package file once on your desktop, you will get a .tar.md5 file.

 How to Root T-Mobile Galaxy S5 SM-G900T:

  1. Open Odin3.exe from the extracted folder.
  2. Put your T-Mobile SGS 5 in download mode by pressing and holding Volume Down + Home + Power key at the same time, you should get a screen showing a warning and asking to continue, press Volume Up to continue.
  3. Now your phone should be in downloading mode. Connect your phone to your PC.
  4. As soon as Odin detects your phone the ID:COM box will turn light blue.
  5. Click on the PDA tab and select the CF-autoroot file that you extracted above.
  6. In case you’re using Odin v3.09, you will put the .tar.md5 file in the “AP” tab, rest of the settings should remain untouched in Odin v3.09 as well.
  7. Your Odin screen should look like exactly as shown below.
  8. odin_explained
  9. Click Start and the root process should start showing you a process bar in the first box above ID:COM.
  10. The process is quite fast and will finish in a few seconds, as soon as it ends, your phone will restart and you’ll see the CF Auto root installing SuperSu on your phone.
  11. Congratulations you have your Samsung Galaxy S5 SM-G900T rooted now!

How to check if the device is properly rooted or not?

      1. To do so, go to Google Play Store on your Galaxy S5.
      2. Find “Root Checker” and install it.
      3. Open Root Checker.
      4. Tap “Verify Root”.
      5. It will ask you for SuperSu rights, tap “Grant”.
      6. It should show you Root Access Verified Now!
      7. That’s All!

1560688_10202529514651766_2061540064_n

Once you’re rooted, make sure that you Backup EFS Data on your Galaxy S5.

Also, Install CWM or TWRP Recovery on your Galaxy S5.

That’s all. In case you have some queries or you’re facing some issues regarding this post, feel free to stop by the comment box below and drop us your words. We surely will get back to you as soon as possible. Thanks all.

“Firmware Upgrade Encountered An Issue” – (Fixed)

“Firmware Upgrade Encountered An Issue” – (Fixed)

Samsung reached the top in Mobile world, not only because of the amazing devices they manufactured but also because of the brilliant firmware support provided by them. All of the Samsung latest devices have Odin Mode that allows us to flash official Firmwares manually on the device, along with that you can also install rooting packages and Custom Recoveries using Odin Mod. To use Odin mode you must install Odin on PC too, then you can connect your device in Odin mode with PC and using the Odin installed on PC you can easily flash different modes and tweaks which includes Kernels, Firmwares, Rooting and Recoveries.

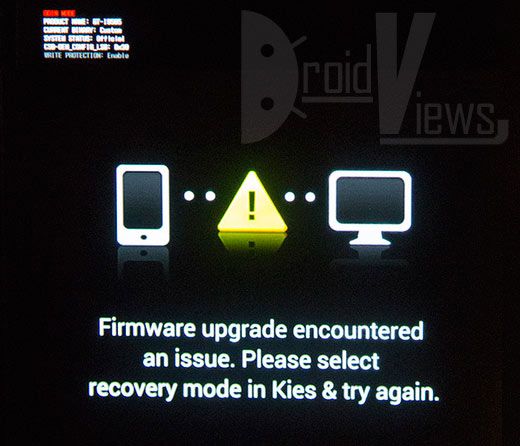
SamMobile is constantly engaged in brining all the Firmwares for all the regions to download and then flash via Odin. Since the database is so huge, users many time mistakenly installed a firmware of another device on another device, like I Flashed the Firmware of I9100 on I9100G and thought that this is the end for me. Now in such cases your device on the restart shows you a screen with a Yellow Triangle connected with PC on right and Device on Left and suggests you to connect your device with Samsung Kies and try recovery mode, that situation is called Soft Brick and there is nothing to worry about it as we are about to show you how it can be solved.

Firmware-upgrade-encountered-an-issue

Getting Prepared:

  • Download Samsung Kies.
  • Download Odin.
  • There is no need to download USB Drivers as Samsung Kies install them too.

How To Solve This Issue

Step 1: Pull out Battery Of your Device and wait for 10 seconds, while you wait note down the IMEI/Serial Number Of your device.

Step 2: Connect your device with PC.

Step 3: Open Samsung Kies and navigate to Tools -> Firmware Upgrade and Initialization.

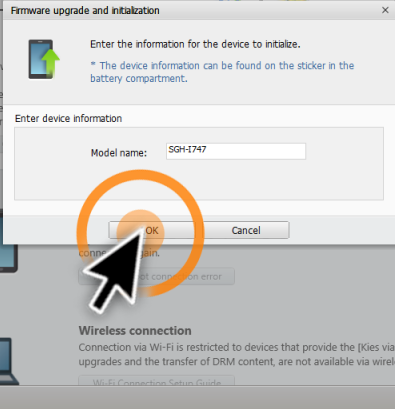
Step 4: Type your device mode number with Capital letters.

U_F_4

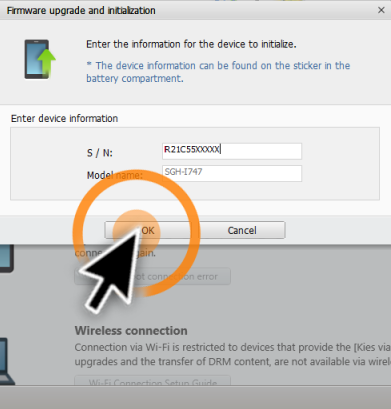
Step 5: Enter your Device Serial Number, that you noted in step 1.

U_F_5

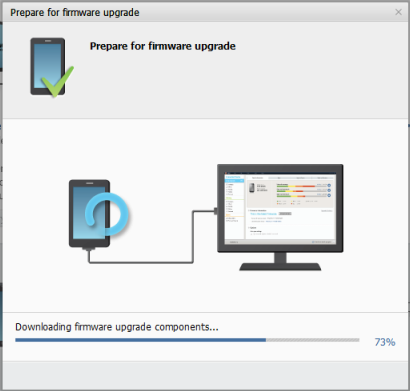
Step 6: Kies will then prepared for Firmware Upgrade, hit Ok and wait.

 U_F_8

Step 7: Kies will then download the Firmware.

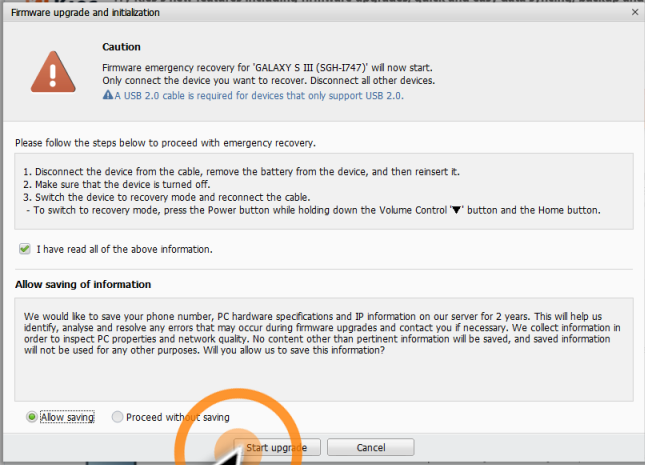
Step 8: After the download is over, Kies will prompt to Start the Upgrade, Click Start Upgrade.

U_F_9

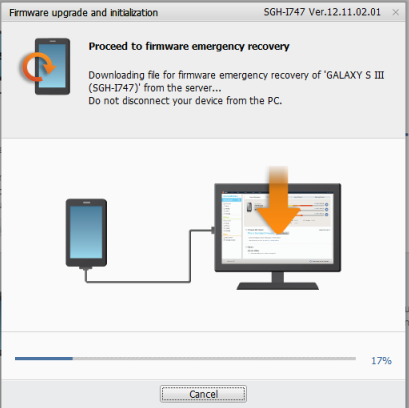
Step 9: Kies will once again start the Firmware upgrade, but this time it is for Emergence Recovery.

U_F_2 (1)

Step 10: If the firmware is installed and everything went successful, you will receive the following message.

U_F_3 (1)

Alternate Solution:

If the above process doesn’t work for you, Follow: How to Install Stock Firmware on Samsung Android Smartphones, to install Stock Firmware manually on your device, installing a Stock/Official Firmware usually solves this problem.

Backup & Restore EFS on Samsung Galaxy S5 All Variants [How To – Guide]

19
Backup & Restore EFS on Samsung Galaxy S5 All Variants [How To – Guide]

Samsung has just rolled out it’s latest flagship Samsung Galaxy S5 to over 125 countries few days back. The device, in all it’s glory, is available on the shelves now and offers some really nice and cool features that are enough to empty your pockets. Well, if you’re planning to buy one, you probably will not just keep it in the pockets for calls, messaging and other simple stuff, owning a device like Galaxy S5 will definitely urge you to go beyond the boundaries and check that how many hiccups your device can actually bear.

EFS Galaxy S5

The tweaks you can make to your device probably include flashing custom ROMs, mods, modifying your device the way you want. The only thing you need to keep in mind while making these changes or going beyond the boundaries is, Samsung’s Galaxy devices come with a worst issue that is Encrypting File System (EFS). It is highly vulnerable in Samsung’s Galaxy series, and flashing an invalid firmware, any invalid mod or any invalid custom recovery can cause this effect on your phone’s modem. You probably are not aware of the result if you’re coming across this for the first time, EFS issue will cause your phone’s IMEI to go null or it will or it will be completely messed up, the impact is, you won’t be able to use any SIM cards on your device and it won’t catch any signals from your carrier, that means your device is of no use, it’s just like a tablet without a SIM card.

There is no need to worry about it, but only when you have backed up EFS. It’s of a lot use actually, if your phone’s IMEI code gets messed up, you can immediately flash the backed up EFS and fix your phone. Galaxy S5 is set to occupy space in pockets of millions of users, so we’re going to have a look on the EFS backup method in the following post and you should give it sometime as soon as you get your device and back up EFS data immediately before making any tweaks.

XDA member Mr.W0lf has come up with a tool that backs up and restores EFS on all variants of the Samsung Galaxy S5, we’re going to have a look on the method how this tool works, but let’s first have a look on the variants of Galaxy S5 that are available around.

    • SM-G900F – International LTE
    • SM-G900H – International/Exynos
    • SM-G900T – T-Mobile
    • SM-G900P – Sprint
    • SM-G900R4 – US Cellular
    • SM-G900T1 – MetroPCS
    • SM-G900W8 – Canadian
    • SM-G900M – Vodafone
    • SM-G900A – At&t

How to Backup & Restore EFS on All Variants of Samsung Galaxy S5:

  1. Your Galaxy S5 must be rooted, if you haven’t rooted it yet, Root it from HERE.
  2. Download EFS Backup & Restore Tool and extract it on your desktop to get the EFS.bat file.
  3. On your Galaxy S5 now, enable USB debugging mode, to do so, go to Settings > General/More > About Device > Tap Build Number for 7 times to get the developer options enabled.
  4. Now get back to the General / More tab in settings and open Developer Options > Enable USB Debugging.
  5. After enabling USB debugging mode, connect your device to your PC using original data cable.
  6. Now open the EFS.bat file that you got after extracted the downloaded tool’s zip file.
  7. Now once the bat file opens up the tool, you will find 4 options as follows:
      • <1> [All LTE Variant] EFS Partition Backup
      • <2> [All LTE Variant] EFS Partition Restore
      • <3> [SM-G900H] EFS Partition Backup
      • <4> [SM-G900H] EFS Partition Backup
      • <5> Exit
  8. Having your device connected with enabled USB debugging mode, enter the numeric key according to your choice.
  9. You will press 1 or 2 for all the LTE variants, it may be kept in mind that except for the Exynos variant SM-G900H, all other variants are LTE. You will only make 3rd or 4th selection if your device’s model is SM-G900H, for rest you will use 1 or 2.
  10. Once you enter the key, it will quickly perform the action, keep an eye on your phone as it might prompt for the USB debugging permissions or root permissions.
  11. Once backed up, you can similarly restore it as well. The backup will be stored on your device’s storage or on your PC.
  12. That’s all with this tool!

Backup Restore EFS Galaxy S5

There is another method to backup and restore EFS on some variants of Samsung Galaxy S5 by using an Android app, that landed on the XDA developers forum by ricky310711, but as mentioned, the app works with only 3 variants of the device, however it is quite useful if you own Samsung Galaxy S5 SM-G900A/F/H or T.

Backup & Restore EFS on Samsung Galaxy S5 SM-G900A/F/H/T with Samsung Tool App:

image

      1. Your Galaxy S5 must be rooted, if you haven’t rooted it yet, Root it from HERE.
      2. Download Samsung Tool App.
      3. Copy the app’s APK file to your phone.
      4. Locate the copied APK and install it.
      5. Once installed access it from the app drawer and open it and give it the root permissions.
      6. Now select whether you want to backup or restore EFS.
      7. Select the storage and it will do the job.
      8. That’s All!

That’s it. We hope that you find this guide easy to use and helpful. In case you got any queries or you face any difficulties regarding this post, feel free to stop by the comment box below and let us know about it. We will get back to you as soon as possible. Thanks All


Install TWRP 2.7 Recovery On Samsung Galaxy S5 SM-G900F and SM-G900H

Install TWRP 2.7 Recovery On Samsung Galaxy S5 SM-G900F and SM-G900H

TWRP recovery is stated as far better than the old CWM Recovery as it has many advance features that can outrun the CWM Recoevry in seconds. TWRP is far easy to use and you don’t need to go back and again to flash different files in one time, TWRP allows you to select all the files in one shot and install them one-by-one, reducing your effort to go back again and again. It can also make the Back-up of your current ROM which can be restored using TWRP afterwards, if something happens to the ROM you have just installed. Other Features are the same as any other Recovery, except the interface which is far better than CWM Recovery.

Kcwx00f

TWRP 2.7 is available for Samsung Latest Falgship, Galaxy S5 SM-G900F/H and you can install it by following our tutorial below.If you are familiar with Odin and it’s working, then this tutorial might not be difficult for you. Otherwise read the whole tutorial first before trying it on your device. In this Article, we will show you How To Install TWRP 2.7 Recovery On Samsung Galaxy S5 G900F / G900H.But before we begin, Make sure that:

  1. Back-Up all your important ContactsCall Logs & Messages.It is highly recommended in case of any mishap or data loss to back up all your important data.
  2. Back-Up your Mobiles EFS Data. How To Restore and Back-Up EFS Data On Samsung Galaxy Devices.
  3. Check your device model, Go To Setting > About and Make sure that it is SM-G900F/ G900H.
  4. Do-not try it on SM-G900I, G900M , G900A , G900T and G900V 
  5. Enable USB Debugging Mode
  6. Download USB Driver For Samsung Devices: Link

Disclaimer:

The methods involved in flashing custom roms and rooting your phone is highly custom and may result in bricking your device,and has nothing to do with Google or the device manufacturers which is Samsung in our case. In case of any mishap we may not be held responsible. Follow these instructions to the letter to avoid any mishap or bricking. Make sure that whatever you do, you are doing it at your own responsibility.

Here you will find the Step-by-Step Guide On How To Install TWRP Recovery  Galaxy S5 SM-G900F/G900H. Before proceeding further, Let me Warn you that if you Get stuck in bootloop, after the installation(Possibilities are almost Zero), Here is the Process to get out of it.

If you stuck Into bootloop After the Installation Process.

  • Go to Recovery, Turn off your Phone and Turn it On While Pressing, Power + Volume Up + Home button until you see some text on-screen.
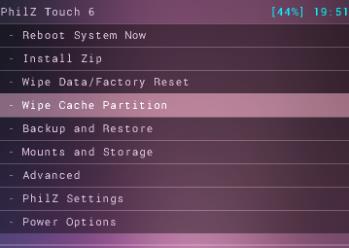
  • Navigate to Advance and Select Wipe Devlik Cache.

Screenshot_5

  • Go Back and Select Wipe Cache.

Screenshot_18

  • Select Reboot System Now.

How To Install TWRP Recovery On It.

odin_explained6

Download Appropriate Package For your Galaxy S5 to your computer and extract the zip file.

  • Samsung Galaxy S5 G900F (LTE): recovery-g900f-g900t.tar.md5
  • Samsung Galaxy S5 G900H (3G): (Under Testing) will be updated soon.
  1. Download Odin.
  2. Turn off your Phone and Turn it On While Pressing, Power + Volume Down + Home button until you see some text on-screen, Press Volume Up to continue.
  3. Make Sure that the USB drivers are installed.
  4. Open Odin in Computer and connect your device to PC, while it is in the Download mode.
  5. If your Phone is successfully connected to PC, the Odin port will turn Yellow with COM port number.
  6. Now Click on PDA and select the Recovery file according to your device.
  7. In Odin, Check Auto reboot  Option.
  8. Now Click the start button and wait for the process to complete.
  9. After the installation is complete you device will restart and once you see the Home Screen and get the “Pass” Message on Odin, unplug the cable.

Now all that is left is to see whether Custom Recovery is installed or not,Go to Recovery How? Turn off your Phone and Turn it On While Pressing, Power + Volume Up + Home button until you see some text on-screen. If you see the TWRP Recovery, then everything went better than expected.

How To Fix LG G2 Memory Error, If It’s Showing 16GB Instead Of 32GB

13
How To Fix LG G2 Memory Error, If It’s Showing 16GB Instead Of 32GB

Most of the OEMs release their device in different variations according to localization, network connectivity and also storage capabilities and obviously the more storage the smartphone has the higher the rate will be. LG G2 was released in 2013 and was released in 10 different variants and two models with 16 and 32 GB storage. Now if you have purchased a 32GB LG G2 and because of a Wrong firmware flash or due to any other problem, it is showing 16GB instead of 32GB, what will you do, first thing, Freak Out! next thing, install any other custom ROM and if that doesn’t work either, start looking for the solution.

If you are looking for a solution to such thing then you are on the right spot, last time we posted the same thing about Nexus 5 and it worked like a charm, it recovered the Nexus 5 from 16 to 32 GB again. It mostly happens, when you tired to install a 16GB model firmware on 32GB model, sometimes it happens because of a hard reset. Many times it can be solved by restoring the device to the original firmware, if still not then follow the tutorial below.

20140313T022425

Getting Prepared:


Download the Following Files:

How To Solve This Problem

  • Extract the sdparted-recovery-all-files.zip, and copy all the 9 files to your device.
  • Open Total Commander and copy all the 9 files to /system/ bin/ directory of your phone.
  • Now fix permissions of all the files.

Screenshot_4

  • Now Install minimal_adb_fastboot_v1.1.3_setup.exe on your PC
  • Launch Minimla Adb fastboot and type in the following command:

adb shell
su
cd /system
./parted /dev/block/mmcblk0 –

  • Press Enter.
  • When the Sequence is over, write the following lines and Press Enter.

adb shell
su
cd /system
./dd if=/system/bin/sgpt32g.img of=/dev/block/mmcblk0 bs=512 seek=61071327 conv=notrunc
./dd if=/system/bin/pgpt32g.img of=/dev/block/mmcblk0 bs=512 seek=0 conv=notrunc

  • Wait for it to finish and your LG G2 will be in Download mode.
  • Now you need to install the 32Gb firmware, Follow:Restore LG G2 to Stock Firmware.
  • Once the Firmware is installed, if it still shows you 10.8 GB, Go to Settings > Back-up and Reset > Factory Data Reset.
  • When it boots up, your LG G2 will show you 25GB in your SD card.