Home Blog Page 461

HTC One M8 HD Wallpapers Free – Download Here

0
HTC One M8 HD Wallpapers Free – Download Here

HTC released his new flagship HTC One M8 awesome in design and best in performance. This is first HTC device that i love to have although i don’t have it. But i have added HTC One M8 into my Wallpapers list, yes that means today i am giving you HTC One M8 HD wallpaper for free. All the Wallpaper are cool, awesome, Stylish and High Definition. Do check HD Wallpapers for Samsung Galaxy Note 3 and Samsung Galaxy S5.

Also See: Desktop Wallpapers HD

02-fyPNbbm

Full HD : Download Here

05-KDlSlha

Full HD: Download Here

06-p8CoTSV

Full HD: Download Here

07-PWTz39C

Full HD: Download Here

digital-wallpaper-17

Full HD: Download Here

HTC ONE M8 Wallpaper

Full HD: Download Here

htc-m8-wallpaper

HTC-One-M8-official-wallpapers

Full HD: Download Here

htc-one-m8-wallpaper-17

nexusae0_wallpapers_12

nexusae0_wallpapers_13

Full HD: Download Here

wallpapers_071

01-Znppn6x

Full HD: Download Here

Unlock Your iPhone With Just a Single Tap, Instead Of Sliding

0
Unlock Your iPhone With Just a Single Tap, Instead Of Sliding

Slide To Unlock is one of the most unique and old features in iOS devices, now if you are a true Apple fan, then you don’t want to change it at all but for the others, they might have gotten tired from it and might be looking for something new and fast, like tap or Swipe to unlock the screen, instead of sliding across. Apple on the other side, discourages all these things, as Steve Jobs presented it in 2007, why would Apple go against it, as in 2007 it was quite an achievement for Apple:

“To unlock the phone, I just take my finger and slide it across. Wanna see that again? We wanted something you couldn’t do by accident in your pocket. Just slide it across – BOOM.”

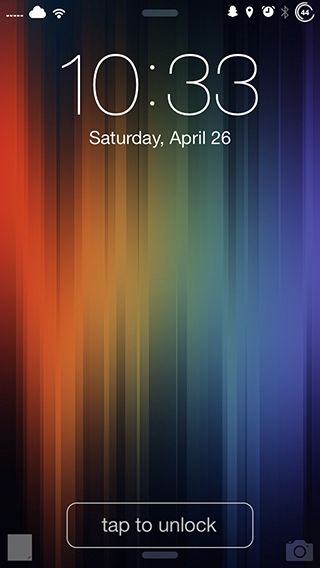
But as the time has passed, Apple remained at the old things, instead of adopting new things according to the Time.  But thanks to Jailbreak Tweaks, users of Apple can try different things that are not allowed by Apple on a regular base. TaptoUnlock 7 is another Jailbreak Tweak, that allows users to unlock their device just by a Single Tap. This tweak replaces the original Slide across screen, with a Single Tap screen. You will see a Tap button on the bottom, upon tapping that your device will be unlocked, quite easy and faster than Sliding across.

TapToUnlock1

It also offers, some other customizations, where you can tap anywhere on the screen to unlock, instead of the specific space. Well this Tweak is not useful for all the iPhone 5s users, where they have the option to unlock via Fingerprint scanner, but if you own any other iOS device, this is the best tweak to change the typical lock screen. TapToUnlock 7 is available on Cydia store for only $0.99,  Want to know, how you can get it, follow the rest.

Jailbreak your iOS Device.

Since the following tutorial needs an iOS device which is Jailbroken, you need to Jailbreak your device. If your device is still in its normal condition. Follow our Jailbreak Section to find out how to Jailbreak your device.

Download TapToUnlock 7:

  1. Open Cydia.
  2. Search for TapToUnlock 7.
  3. Tap TapToUnlock 7 once the search is over.
  4. Puchase the App and wait for the install button to appear.
  5. Tap Install on the top right corner.
  6. Tap Confirm.
  7. Restart your device


Don’t Miss A Single Reminder With Jailbreak Tweak Sticky

0
Don’t Miss A Single Reminder With Jailbreak Tweak Sticky

In the present time, where everyone is rushing towards their work and don’t even have time to leave that work  for tomorrow or for coming times, because mainly we forget about it and thus, that work remains uncompleted. Sometimes you just need a reminder for that purpose, even at times you want to say something to someone but on the spot you just black out and have no idea what was it, in such cases all you need is a Sticky Note, but you literally can’t keep a ‘Peper’ in your Pocket just because of a Single note, what you need is an application that can keep your Notes altogether at one place.

On Bot iOS and Android, Sticky notes are available for such an emergency, but on iOS a Jailbreak Tweak called Sticky, took it all to a whole new level, using this tweak, you can set a Sticky Note on the Lock -Screen, thus minimizing the time and effort to unlock the screen and look at the reminder app. Just take out the device, press the unlock button and there it is, in front of you telling you what you have to do in this moment of time.

Sticky3

Sticky is Available On Cydia for only $0.99 and it is quite simple to use, after the installation, you will see a new button on the Lock Screen, tap it and bring the Sticky Note up and write the words you need to be reminded. On the Top left of Sticky note is a Cross button, tap it delete the current note and start over. Tapping the cross won’t dismiss the Sticky note, instead you have to tap the bottom button, that looks like a folded page.

You can do a little customization on your own, you can change Size of note, Location, change the hide button, change the animation, Sticky Color, font size & font color. If you want to use this tweak, just follow the rest of the guide and you will get it.

Jailbreak your iOS Device.

Since the following tutorial needs an iOS device which is Jail-broken, you need to Jailbreak your device. If your device is still in its normal condition. Follow our Jailbreak Section to find out how to Jailbreak your device.

Download Sticky:

  1. Open Cydia.
  2. Search for Sticky.
  3. Tap Sticky once the search is over.
  4. Puchase the App and wait for the install button to appear.
  5. Tap Install on the top right corner.
  6. Tap Confirm.
  7. Restart your device
Dead Trigger 2 for PC – Windows 7/8/XP/Mac

Dead Trigger 2 for PC – Windows 7/8/XP/Mac

If you want to feel the real action adventure with HD graphics on your Smartphone then play ” Dead Trigger 2 “. Enter into the world of Zombies and save humanity, battle with deadly Zombie apocalypse. You will have to travel across 3 regions in the different parts of the globe. You will get 30 cool weapons to choose  that will help you along with the deadly adventurous Journey. Dead Trigger 2 get updates constantly, which makes it more addictive. Every update bring new content so that the war never ends.

Learn how to download and install Dead Trigger 2 for PC through our step by step guide. Then you can play Dead Trigger 2 on PC.

Also See: Retrcia for PC

Dead Trigger 2 for PC

Dead Trigger 2 for PC – Windows 7/8/XP/Mac Features:

MOUTH-WATERING GRAPHICS
You’ll be dazzled by cutting-edge graphics, including real time water reflections, dynamic vegetation and enhanced ragdolls.
Explore various locations and slaughter the undead in eerie Shanghai alleyways, abandoned mines or the African desert.REAL TIME STORY DEVELOPMENT
You are not alone.
Take part in the Global Resistance, tune into the Radio station to stay informed as the global gameplay develops, directly influenced by the participation of every single player.
Enjoy different types of missions such as story missions, global missions or side-quests.

REWARDS FOR EVERYONE
Participate in global missions and receive rewards. Complete achievements and meet challenges and receive exclusive in-game currency.

THE HIDEOUT
Explore your personal hide-out and encounter the Gunsmith, Medic, Scientist, Smuggler and Engineer, NPCs who will help you unlock incredible new weapons and gadgets.

How to Download and Dead Trigger 2  – Windows 7/8/XP/Mac:

  1. Running Android apps on PC is possible through an App Player / Android Emulator only. To do this, we recommend BlueStacks. Follow the full guide here and install it on your PC.
  2. Download Dead Trigger 2  file to your PC.
  3. Once downloaded, go to the downloaded file location.
  4. Double click the downloaded APK file now.
  5. Wait for the installation to get complete with BlueStacks.
  6. Once it complete, open BlueStacks now.
  7. Click on “All Apps” in the BlueStacks now and click on the app that you just installed.
  8. Use the app by following the on-screen instructions.
  9. That’s All! Enjoy!

How To Create Multiple User Profiles for Apps on iPhone, iPad or iPod touch

0
How To Create Multiple User Profiles for Apps on iPhone, iPad or iPod touch

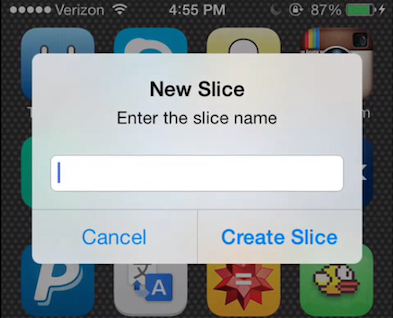
To create multiple profiles on apps is not that easy as it sounds, especially on any social media’s apps. Right now we can add multiple accounts on apps like Gmail or default emails app on devices. But we can also create multiple accounts on different apps like Facebook, Twitter, Instagram and many more. It will be fun when you can create Multiple User Profiles for Apps on iPhone, iPad or iPod touch, if you have a jailbreak device. Today, I will tell you how to create a Multiple User Profiles for Apps on iPhone. Recently a tweak got into Cydia named as Slices, using this tweak you can easily create and use multiple accounts on Apps.

Slices-02

Following is the video from the tweak developers in which you can easily see that how you can create multiple accounts on a App and on a game as well.

Now we don’t have buy new device for using other accounts on it. All we have to do is get an iPhone, iPad or iPod touch, Jailbreak our device and install ” Slices “. Right now it’s work is in the progress for Slices but as soon as its released i will give you a video tutorial for on how to use Slices.

Slices-01

After seeing this video I am pretty sure you all are waiting for this tweak, as you have seen not only we can make multiple Slices on Instagram but also we can create different slices to play the games. I hope we can use these Slices on our Facebook and Twitter accounts as well. So, that I don’t have to carry 3 devices at a time with me.

How to increase font and menu visibility with the darken colors option in iOS 7.1

0
How to increase font and menu visibility with the darken colors option in iOS 7.1

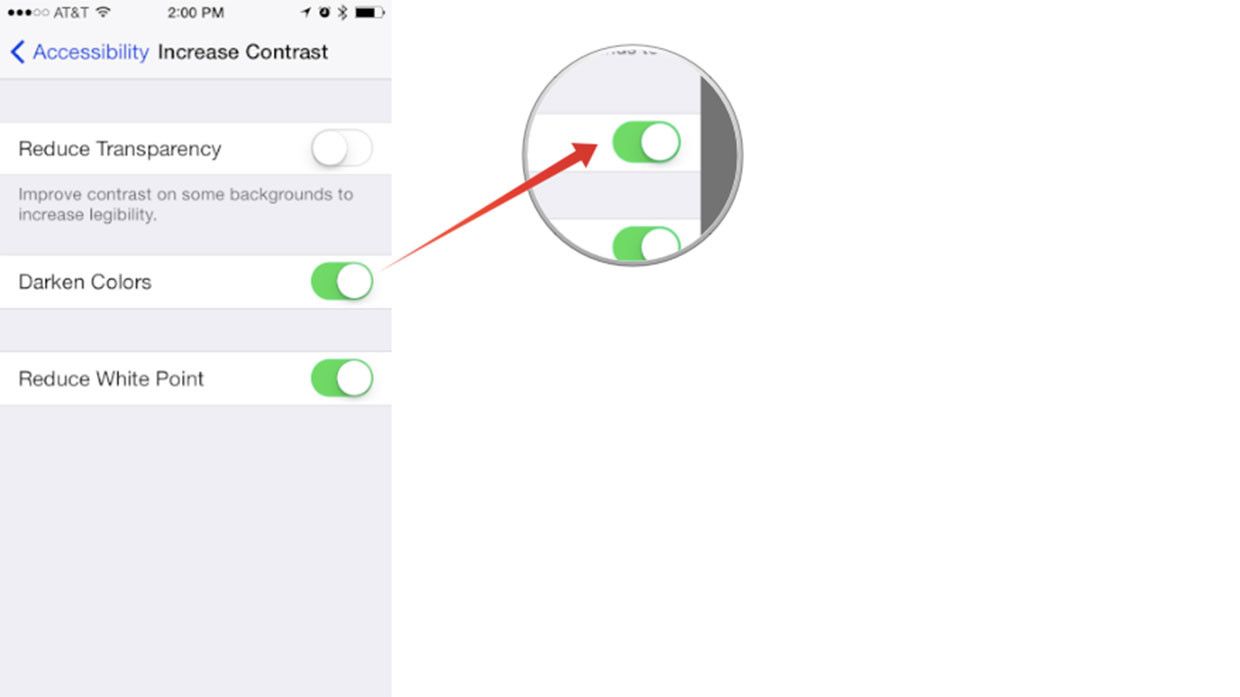
Frankly speaking iOS 7, is the not that good as users say it is. The white theme Apple has added in iOS 7, it’s so light that many a times I cannot read clearly and then I have to see more closely as well. But now Apple has done a splendid job and a better one, with Apple iOS 7.1 comes a lot of new and improved features including font and menu visibility, with the darken colors option. Many of you don’t know how to do so, that’s why I’ve prepared a step by step guide on how to increase  the font and menu visibility with the darken colors option in iOS 7.1.

Screen Shot 2014-04-27 at 02.34.08

Also See: how to reduce white point in iOS 7.1

How to darken colors for better visibility in iOS 7.1:

Open your settings on your iPhone or iPod Touch.

  • Tap on General.
  • Tap on Accessibility.
  • Tap on Increase Contrast.
  • Now Tap on Darken Colors.

darker_fonts_ios_7_howto1


darker_fonts_ios_7_howto2

WhatsApp Plus APK v5.45 – Download

1
WhatsApp Plus APK v5.45 – Download

WhatsApp+ is a modified version of WhatsApp that just adds charms to the messaging on your Android device. WhatsApp Plus comes with a hefty list of mods that are enough to make this messaging app look more than cool and might be enough to keep your hands on your device for hours as well on the beautiful modified screen. WhatsApp+ also sports a number of features that are not available in the original WhatsApp, so it becomes a good choice for those who can’t stay on the genuine application with its limitations and short list of features.WhatsApp Plus

WhatsApp plus is not available in the Google Play Store. The only way to get this application installed on your Android device is by downloading the APK and the install it manually on your device. We’ve been posting the previous versions of the application on our site, but the app has been updated to a new version now, it’s 5.45D. In the following post we have embed the download link with the installation instructions, just go ahead and install WhatsApp+ on your Android device and enjoy the WhatsApp messaging in a cool in interface.

Download & Install WhatsApp Plus APK:

  1. Download WhatsApp+ 5.45D APK.
  2. Copy the downloaded APK file to your phone or download it directly on your phone.
  3. Locate the downloaded APK file on your phone and tap it to begin the installation.
  4. Select “Package Installer” if prompted.
  5. All “Unknown Sources” if required.
  6. Complete the installation and access the app through app drawer.
  7. If you’ve already registered on WhatsApp and have it installed, WhatsApp+ will not ask you for registeration, it will just show you the chats.
  8. Enjoy modifying your messaging environment.
  9. That’s all!


Install ClockworkMod 6 Recovery on Samsung Galaxy Grand Duos GT-I9082

Install ClockworkMod 6 Recovery on Samsung Galaxy Grand Duos GT-I9082

Earlier, we posted the CWM recovery and root guide for the Galaxy Grand Duos GT-I9082 on our site, but a number of users reported compatibility issues. Latest version of the CWM recovery, packed inside well known philz advanced edition is available now and should resolve all the compatibility issues. We are going to install this CWM 6 on the Galaxy Grand Duos GT-I9082 in the post below, if you’ve been looking for CWM recovery, all you need is, follow this guide carefully. Before we move towards the installation instructions, I’ll assume that some of the users are not familiar with the custom recovery and don’t know why they should install it on their Android device. To remove any confusions, we will first go through a brief introduction of the recovery and then proceed with the method.samsung-galaxy-grand-gt-i9080

A custom recovery allows you to install custom roms, mods etc. Along with these, you can make a Nandroid backup, this helps you a lot as you can move back to the previous working state of your phone at any time you want if you have backed up your current system. In some cases, to root the phone you need to flash SuperSu.zip file in the custom recovery, having installed the recovery may help you while in some cases to install the recovery easily, you need to have the phone rooted. You can also wipe cache and dalvik cache of your phone using a custom recovery.


Here are the pre-installation instructions:

  1. This guide is only for  Samsung Galaxy Grand Duos GT-I9082. Do not try this on any other device, please check your device’s model number in Settings > General > About Device.
  2. Your phone’s battery must be charged at least over 60%. This is highly recommended in order to prevent any power issues during the flashing process.
  3. Make sure that you backup your important media content, ContactsCall Logs & Messages. This is highly recommended just in case something goes wrong and you need to reset your phone.
  4. Use only OEM data cable to establish connection between your phone and PC. Turn off your Anti Virus and Firewall to prevent any connection issues. Also enable USB debugging mode on your phone if you face connection issues.
  5. Your device must be running Android 4.1.2 or 4.2.2 Jelly Bean.
  6. Alright! Go ahead, follow this guide to the letter and get it done successfully.
Disclaimer: The methods involved in flashing custom ROMs, recoveries and rooting your phone are highly custom and may result in bricking your device, and has nothing to do with Google or the device manufacturer that is SAMSUNG in our case. Also rooting your device will void its warranty and you will be no longer eligible for any kind of free device services by the manufacturers/warranty providers. In case of any mishap we may not be held responsible. Also, if your device comes with Knox Security, you will result in voiding it after you root your device and the Knox counter cannot be reset. Follow these instructions to the letter to avoid any mishap or bricking. Make sure that whatever you do, you are doing it at your own responsibility. 

How Install CWM 6 Recovery on Samsung Galaxy Grand Duos:

Files you need to download: 

    1. Download and extract Odin PC – Get it here
    2. Download and Samsung USB Drivers – Get here
    3. Download CWM Recovery.tar file |
    4. For flashing Android 6.0.1 Marshmallow Resurrection Remix, download and flash this recovery instead: TWRP TWRP 3.0.2.0
    5. To flash Marshmallow AOSP ROM, download this recovery: recovery-20141213-odin.tar

Procedure:

  1. Open Odin3.exe from the extracted folder.
  2. Put your Galaxy Grand Duos in download mode by pressing and holding Volume Down + Home + Power key at the same time, you should get a screen showing a warning and asking to continue, press Volume Up to continue.
  3. Now your phone should be in downloading mode. Connect your phone to your PC.
  4. As soon as Odin detects your phone the ID:COM box will turn light blue.
  5. Click on the PDA tab and select the Recovery.zip.tar or recovery-odin.tar  file that you downloaded.
  6. In case you’re using Odin v3.09, you will put the .tar.md5 file in the “AP” tab, rest of the settings should remain untouched in Odin v3.09 as well.
  7. Your Odin screen should look like exactly as shown below.
  8. odin_explained
  9. Click Start and the flashing  process should start showing you a process bar in the first box above ID:COM.
  10. Congratulations you have successfully install CWM recovery on your Galaxy Grand Duos.

CWM 6.0.4.8 is also available for the device, if you wish to update the recovery, follow these few steps:

If you have flashed recovery for Marshmallow using the recovery-odin.tar file, do not flash this file.

  1. Download CWM 6.0.4.8 Recovery.zip file
  2. Copy the downloaded Recovery.zip file to your phone’s SD card.
  3. Boot into CWM recovery on your Galaxy Grand. To do so, turn off your device, now turn it on by pressing and holding Volume Up + Home + Power Key, you should be able to see the CWM recovery that you just installed.
  4. Now select “Install > Choose Zip from SDcard > Locate the Recovery.zip file > Yes”.
  5. Proceed and complete the installation. Once done, reboot your device.
  6. Boot into the recovery mode to check the latest version. [Step 3].
  7. That’s all.

Don’t forget to create a Nandroid Backup once you’ve installed CWM recovery.

How to Root:

  1. You need to install CWM recovery first using the above instructions.
  2. Download Supersu.zip file now.
  3. Place the downloaded Supersu.zip file on your phone’s external sd card.
  4. Now boot into CWM recovery on your phone.
  5. Once in CWM, select “Install Zip > Choose Zip from SDcard > Select SuperSu.zip > Yes”.
  6. This will flash SuperSu.zip file, once flashing is complete, reboot your device.
  7. Congrats! You’re rooted now!

Check out the best 10 root apps.

That’s all. In case you got any queries or facing any problems regarding this post, feel free to stop by the comment box below and reach us. We will respond you as soon as possible. Thanks all.

How to Root Samsung Galaxy Grand 2 SM-G7102

How to Root Samsung Galaxy Grand 2 SM-G7102

Another series of Samsung that was warmly welcomed by the audience and soon Samsung introduced the successor of the first smartphone of this series. We are talking about the Grand Series. Samsung Galaxy Grand 2 came out in November, 2013. The device has a beautiful  5.25 inches display with 280 ppi. Samsung upgraded the RAM to 1.5 GB, and the internal storage stays at 8 GB while the device also supports and external SD up to 64GB. Shooter used at the back is of 8 MPs while a 1.9 MP is also fixed on the front for the video calling and selfies (:P). To power up the device Samsung used Qualcomm Snapdragon 400 Quad Core CPU clocked at 1.2 GHz and the life to the device was added with a massive 2600 mAh battery and atop of all this, it runs on Android 4.3 Jelly Bean.Samsung-Galaxy-Grand-2-Images

As mentioned, Galaxy Grand series is widely used all across the world and there surely is a huge number of Galaxy Grand 2 users around as well. Although Samsung isn’t as bad as other manufacturers and keeps its device much comfortable, but the some Android enthusiasts might not be able to relax and willing to go across the boundaries, all the need to do so is, the root access. In case you’re on of the enthusiasts and you have been looking for a method to root your Galaxy Grand 2 SM-G7102, your search may come to an now. In the following post we are going to gain the root access on this device, before we go ahead, I’m assuming that not all you are familiar with rooting an Android device, So, to make it clear, we will first have a look on a brief introduction of root access.


Rooting your phone gives you complete access over all the data which is apparently locked by the manufacturers. This includes removal of the factory restrictions and making changes to the internal system and the operating system. Gaining the root access gives you the privileges to install various applications to enhance the performance of your device, allows you to remove the built-in applications/programs, helps you to upgrade the battery life of your device & install the apps which require the root access for the proper functionality and modify your device in so many other ways e.g using mods and flashing custom recoveries and custom ROMs. There is a laundry list of things you can do after having your device rooted and installed the custom recovery, now once you’re rooted and have installed custom recovery, go ahead and enjoy it on your phone. Here’s our collection of 10 Best Root Apps.


 

Here are the pre-installation instructions:

  1. This guide is only for  Samsung Galaxy Grand 2 SM-G7102. Do not try this on any other device, please check your device’s model number in Settings > General > About Device.
  2. Your phone’s battery must be charged at least over 60%. This is highly recommended in order to prevent any power issues during the flashing process.
  3. Make sure that you backup your important media content, ContactsCall Logs & Messages. This is highly recommended just in case something goes wrong and you need to reset your phone.
  4. Use only OEM data cable to establish connection between your phone and PC. Turn off your Anti Virus and Firewall to prevent any connection issues. Also enable USB debugging mode on your phone if you face connection issues.
  5. Your device must be running Android 4.3 Jelly Bean.

  6. Alright! Go ahead, follow this guide to the letter.
Disclaimer: The methods involved in flashing custom ROMs and rooting your phone are highly custom and may result in bricking your device, and has nothing to do with Google or the device manufacturer that is SAMSUNG in our case. Also rooting your device will void its warranty and you will be no longer eligible for any kind of free device services by the manufacturers/warranty providers. In case of any mishap we may not be held responsible. Also, if your device comes with Knox Security, you will result in voiding it after you root your device and the Knox counter cannot be reset. Follow these instructions to the letter to avoid any mishap or bricking. Make sure that whatever you do, you are doing it at your own responsibility. 

How To Root Samsung Galaxy Grand 2 SM-G7102:

Files you need to download: 

  1. Download and extract Odin PC – Get it here
  2. Download and Samsung USB Drivers – Get here
  3. Download CF-Root file – Get it here.

Procedure:

  1. Open Odin3.exe from the extracted folder.
  2. Put your Galaxy Grand 2 in download mode by pressing and holding Volume Down + Home + Power key at the same time, you should get a screen showing a warning and asking to continue, press Volume Up to continue.
  3. Now your phone should be in downloading mode. Connect your phone to your PC.
  4. As soon as Odin detects your phone the ID:COM box will turn light blue.
  5. Click on the PDA tab and select the CF-autoroot file that you extracted above.
  6. In case you’re using Odin v3.09, you will put the .tar.md5 file in the “AP” tab, rest of the settings should remain untouched in Odin v3.09 as well.
  7. Your Odin screen should look like exactly as shown below.
  8. odin_explained
  9. Click Start and the root process should start showing you a process bar in the first box above ID:COM.
  10. The process is quite fast and will finish in a few seconds, as soon as it ends, your phone will restart and you’ll see the CF Auto root installing SuperSu on your phone.
  11. Congratulations you have your Samsung Galaxy Grand 2 rooted now!

How to check if the device is properly rooted or not?

  1. To do so, go to Google Play Store on your Galaxy S5.
  2. Find “Root Checker” and install it.
  3. Open Root Checker.
  4. Tap “Verify Root”.
  5. It will ask you for SuperSu rights, tap “Grant”.
  6. It should show you Root Access Verified Now!
  7. That’s All!

1560688_10202529514651766_2061540064_n

That’s all. In case you have some queries or you’re facing some issues regarding this post, feel free to stop by the comment box below and drop us your words. We surely will get back to you as soon as possible. Thanks all.

Install One-Handed Mode From Galaxy Note 3 On Your Galaxy S4 I9500

0
Install One-Handed Mode From Galaxy Note 3 On Your Galaxy S4 I9500

Galaxy Note 3 sports a fabulous 5.7 inches full HD display, but the display might not be convenient for some users. To overcome the big-screen comfort issue, Samsung introduced a new feature named as One Handed Mode” in the Galaxy Note 3. The name says it all, One Handed Operation lets the users use their device using one hand. The mode simply converts the phone’s screen into a smaller one, and it’s up to the users whether they want to use the mode with their right hand or with the left hand. Earlier Samsung introduced one handed mode for keyboard and for some apps only, but the new mode in the Galaxy Note 3 converts the whole screen into a one handed phone.

Earlier their was a trend of small sized smartphones, but with time, the manufacturers just kept moving to a big size. What we are talking about is, although Galaxy S4 is a smartphone, but it’s 5.0 inch screen still might not be as convenient as a user wants. To make the lives of Exynos Galaxy S4 owners easier, XDA Senior Member Tamerlan2009 has ported the aforementioned feature to the device, but only for GT-I9500 users with deodexed ROMs at the moment.

In the following post we are going to install the One Handed Mode on Samsung Galaxy S4 Exynos GT-I9500. All you need is, follow the instructions very carefully and enjoy the feature on your phone.

Pre-requisites:

  1. Must have installed a custom recovery.
  2. Must have installed a deodexed ROM. Most of the custom ROMs are deodexed.
  3. Backup your important contacts, call logs and text messages.
  4. Backup your important media content.
  5. Backup EFS and do create a nandroid backup using the custom recovery.
  6. Follow the instructions carefully.

How to Install One Handed Mode on Samsung Galaxy S4 GT-I9500:

  1. Download OneHanded Mode.zip file and copy it to your phone’s SDcard.
  2. Boot into CWM or TWRP now. To do so, turn off your device first. Now turn it on by pressing and holding Volume Up + Home + Power Key. You should see the CWM or TWRP Interface now.
  3. Now in recovery, select “Install > Chose Zip from SDcard > Locate the OneHand Mode.zip > Yes” and proceed with the installation.
  4. Once done, reboot your device.
  5. Find the One Handed Mode in Settings > My Device > One-Handed Operation > Enable the options you want.
  6. To activate it on the screen, quickly backoff the screen in single try on the left side or right side.
  7. That’s all. Enjoy!


One Handed Mode S4 I9500 (2)One Handed Mode S4 I9500 (2)

One Handed Mode S4 I9500 (3)One Handed Mode S4 I9500 (1)


How to reduce the white point on your iPhone or iPad in iOS 7.1

0
How to reduce the white point on your iPhone or iPad in iOS 7.1

When iOS 7 came out, the most annoying thing was its white display, which made the reading so difficult. Now iOS 7.1 is out and Apple has taken care of this issue, they have introduced new accessibility features that will help you to reduce contrast and enhance usability. It will also help you to get rid of the whiteness and will even give its screen a light grey look.

Screen Shot 2014-04-27 at 00.12.28

How to reduce the white point on your iPhone or iPad in iOS 7.1:

Open setting on your iPhone or iPad running iOS 7.1.

  • Tap on general.
  • Tap on Accessibility.
  • Now tap on increase contrast.
  • Now turn the reduce white option on.

Check out the process in following images:

reduce_white_point_ios_71_howto1