Home Blog Page 417

Download iPod touch Firmware Files [ Direct Links ] [ All Generation ]

0
Download iPod touch Firmware Files [ Direct Links ] [ All Generation ]

Apple is not only famous in smartphones but they have another iPod Touch same like iPhone but you can not use sim. iPod Touch also gets iOS updates frequently but not like iPhone. To find only iPod touch firmware files, its a bit time consuming. There are hundreds of sites who are giving iPhone firmware files but not for iPod touch. Following are the all iPod touch Firmware files direct download links for every released firmware version.

187075

iPod touch Firmware Files:

Latest:
8.0.2 (5G): iPod5,1_8.0.2_12A405_Restore.ipsw

Full List:
1.1: iPod1,1_1.1_3A101a_Restore.ipsw
1.1.1: iPod1,1_1.1.1_3A110a_Restore.ipsw
1.1.2: iPod1,1_1.1.2_3B48b_Restore.ipsw
1.1.3: iPod1,1_1.1.3_4A93_Restore.ipsw
1.1.4: iPod1,1_1.1.4_4A102_Restore.ipsw
1.1.5: iPod1,1_1.1.5_4B1_Restore.ipsw
2.0.1: iPod1,1_2.0.1_5B108_Restore.ipsw
2.2.0 (1G): iPod1,1_2.2_5G77_Restore.ipsw
2.2.0 (2G): iPod2,1_2.2_5G77a_Restore.ipsw
2.2.1 (2G): iPod2,1_2.2.1_5H11a_Restore.ipsw
3.1.2 (3G): iPod3,1_3.1.2_7D11_Restore.ipsw
3.1.3 (3G): iPod3,1_3.1.3_7E18_Restore.ipsw
4.0.0 (2G): iPod2,1_4.0_8A293_Restore.ipsw
4.0.0 (3G): iPod3,1_4.0_8A293_Restore.ipsw
4.0.2 (2G): iPod2,1_4.0.2_8A400_Restore.ipsw
4.0.2 (3G): iPod3,1_4.0.2_8A400_Restore.ipsw
4.1.0 (2G): iPod2,1_4.1_8B117_Restore.ipsw
4.1.0 (3G): iPod3,1_4.1_8B117_Restore.ipsw
4.1.0 (4G): iPod4,1_4.1_8B117_Restore.ipsw
4.2.1 (2G): iPod2,1_4.2.1_8C148_Restore.ipsw
4.2.1 (3G): iPod3,1_4.2.1_8C148_Restore.ipsw
4.2.1 (4G): iPod4,1_4.2.1_8C148_Restore.ipsw
4.3.0 (3G): iPod3,1_4.3_8F190_Restore.ipsw
4.3.0 (4G): iPod4,1_4.3_8F190_Restore.ipsw
4.3.1 (3G): iPod3,1_4.3.1_8G4_Restore.ipsw
4.3.1 (4G): iPod4,1_4.3.1_8G4_Restore.ipsw
4.3.2 (3G): iPod3,1_4.3.2_8H7_Restore.ipsw
4.3.2 (4G): iPod4,1_4.3.2_8H7_Restore.ipsw
4.3.3 (3G): iPod3,1_4.3.3_8J2_Restore.ipsw
4.3.3 (4G): iPod4,1_4.3.3_8J2_Restore.ipsw
4.3.4 (3G): iPod3,1_4.3.4_8K2_Restore.ipsw
4.3.4 (4G): iPod4,1_4.3.4_8K2_Restore.ipsw
4.3.5 (3G): iPod3,1_4.3.5_8L1_Restore.ipsw
4.3.5 (4G): iPod4,1_4.3.5_8L1_Restore.ipsw
5.0 (3G): iPod3,1_5.0_9A334_Restore.ipsw
5.0 (4G): iPod4,1_5.0_9A334_Restore.ipsw
5.0.1 (3G): iPod3,1_5.0.1_9A405_Restore.ipsw
5.0.1 (4G): iPod4,1_5.0.1_9A405_Restore.ipsw
5.1.0 (3G): iPod3,1_5.1_9B176_Restore.ipsw
5.1.0 (4G): iPod4,1_5.1_9B176_Restore.ipsw
5.1.1 (3G): iPod3,1_5.1.1_9B206_Restore.ipsw
5.1.1 (4G): iPod4,1_5.1.1_9B206_Restore.ipsw
6.0.0 (4G): iPod4,1_6.0_10A403_Restore.ipsw
6.0.0 (5G): iPod5,1_6.0_10A406_Restore.ipsw
6.0.1 (4G): iPod4,1_6.0.1_10A523_Restore.ipsw
6.0.1 (5G): iPod5,1_6.0.1_10A523_Restore.ipsw
6.1.0 (4G): iPod4,1_6.1_10B144_Restore.ipsw
6.1.0 (5G): iPod5,1_6.1_10B141_Restore.ipsw
6.1.2 (4G): iPod4,1_6.1.2_10B146_Restore.ipsw
6.1.2 (5G): iPod5,1_6.1.2_10B146_Restore.ipsw
6.1.3 (4G): iPod4,1_6.1.3_10B329_Restore.ipsw
6.1.3 (5G): iPod5,1_6.1.3_10B329_Restore.ipsw
7.0.0 (5G): iPod5,1_7.0_11A465_Restore.ipsw
7.0.2 (5G): iPod5,1_7.0.2_11A501_Restore.ipsw
7.0.3 (5G): iPod5,1_7.0.3_11B511_Restore.ipsw
6.1.5 (4G): iPod4,1_6.1.5_10B400_Restore.ipsw
7.0.4 (5G): iPod5,1_7.0.4_11B554a_Restore.ipsw
6.1.6 (4G): iPod4,1_6.1.6_10B500_Restore.ipsw
7.0.6 (5G): iPod5,1_7.0.6_11B651_Restore.ipsw
7.1.0 (5G): iPod5,1_7.1_11D167_Restore.ipsw
7.1.1 (5G): iPod5,1_7.1.1_11D201_Restore.ipsw
7.1.2 (5G): iPod5,1_7.1.2_11D257_Restore.ipsw
8.0.0 (5G): iPod5,1_8.0_12A365_Restore.ipsw
8.0.1 (5G): iPod5,1_8.0.1_12A402_Restore.ipsw
8.0.2 (5G): iPod5,1_8.0.2_12A405_Restore.ipsw

This is How To Deal With a Bent iPhone 6 [ Video ]

0
This is How To Deal With a Bent iPhone 6 [ Video ]

After such a long time Apple finally announced iPhone with large display and people loved it. Apple has sold record breaking iPhone 6 in just 5 days but a new got viral that iPhone can easily be bent by applying a bit of pressure. After that we have seen tons of videos and image of bent iPhone 6 and iPhone 6 plus. But today some one found a way to Deal With a Bent iPhone 6 check out in the video.

bent iphone 6

Following is the video in which a guy found an insane way to Way to Deal With a Bent iPhone 6. After using a grinder to rid of iPhone 6 camera this guy discovered his iPhone was bent.

Also see more videos on iPhone 6 and iPhone 6 Plus got bent.

iphone-6-bendgate

Download Real Drift Car Racing Free 2.3 APK

0
Download Real Drift Car Racing Free 2.3 APK

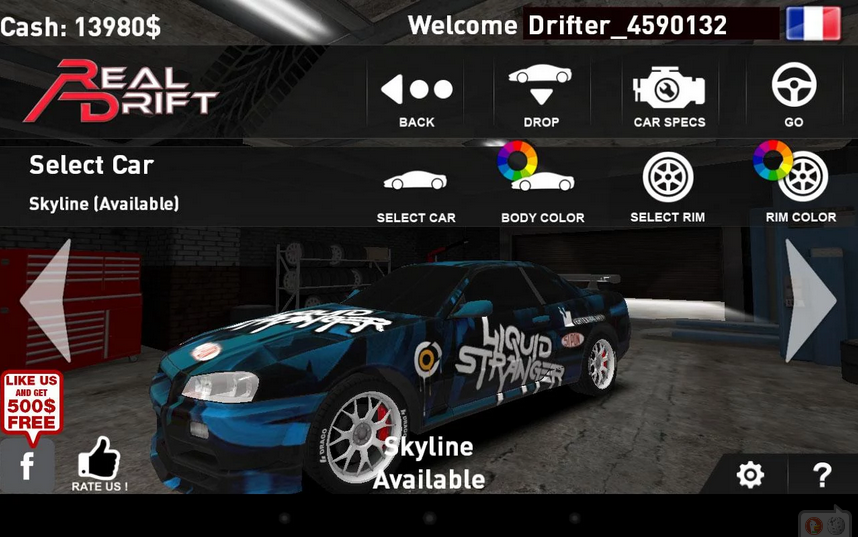
If you are fan of Drift racing then you can feel the realistic experience on your smartphone. All you have to do is download and install Real Drift Car Racing 2.3 apk or install it from Google Play Store. Real Drift Car Racing is all about drifting you have to drive car as fast as you can and then drift at high speed in tracks designed specifically for drift racing. Real Drift Car Racing has two version one is paid and other is free, the apk that I am providing is of the free version.

Real Drift Car Racing apk

 Real Drift Car Racing Main Features:

• The most realistic 3D drift racing simulation on mobile devices;
• Easy to control thanks to an innovative drift helper;
• Customizable drift helper: from full help to total in your control;
• Customizable gameplay;
• Customizable cars: you can change car body color, rims model and rims color;
• Realistic simulation of all aspect (engine, drivetrain, tires, etc) of the car;
• Specific engine sound for every car with turbo whistle and blow off valve;
• Backfire effects with sounds;
• Accurate points calculation: earn points by drifting at high speed, at high drift angle and, for the first time, by light touching walls during a drift;
• Online and local leaderboard to challenge your friends and people all over the world;
• Big training track included to improve your drifting and racing skills;
• High quality 3D graphics;
• Cool dubstep soundtrack by Liquid Stranger and Simplify Recordings.

What’s New in 2.3 Version:

– Gymkhana track now is available also in the free version;
– new social sharing feature: now you can share your race results with your friends;
– fixed “wheel shaking” issue during long curves;
– improved automatic gears: now gear changing is more reactive;
– some small bug fixing.

Real Drift Car Racing Free 2.3 APK Links:

Download Options and Mirrors:

Download APK from Zippyshare

Download APK from SendSpace

Download APK from Google Drive

Get it on Google Play

Real Drift Car Racing Free Version History:

How To Install TWRP 2.8/CWM 6.0.4.9 Recovery On Galaxy Tab 3 SM-T210/T210R

1
How To Install TWRP 2.8/CWM 6.0.4.9 Recovery On Galaxy Tab 3 SM-T210/T210R

Galaxy Tab 3 SM-T210 and SM-210R have been update to Android 4.4.2 KitKat, the new firmwares pack up so many new features and some great enhancements. If you’re an Android power user and you have a custom recovery and root access on your device, you will simply lose it upon upgrading to the new KitKat firmware and get the recovery and root again, you will need the compatible files. Just in case the fear of losing recovery and root access has been refraining you from update your device to the latest KitKat firmware, you may be able to flash it now and get the freedom back on your device.

Thanks to XDA recognized contributor gr8nole, who compiled up TWRP 2.8 and CWM 6.0.4.9 recoveries to cooperate with KitKat bootloaders on the Galaxy Tab 3 SM-T210 and SM-T210R. Although the purpose of both these recoveries is same, but differ in the user interface only. TWRP has a pretty much easy user interface while CWM is a bit opposite. You may pick up one according to your liking. We are going to install this TWRP 2.8 and CWM 6.0.4.9 recovery on our beloeved Samsung Galaxy Tab 3 SM-T210 and SM-T210R in the succeeding guide, you just need to follow this guide carefully in order to get it done without any hiccups here and there.SM-T2100ZWABTU-335229-0

Here are the early preparations

1. This guide is only for Samsung Galaxy Tab 3 SM-T210 & SM-T210R!

Make sure that your device is exactly as mentioned above. To check out what device you have, go to Settings > More/General > About Device or Settings > About Device and match the model number. Be careful about the device model number, flashing a file on a device not listed here might result in bricking it up.

2. Battery should be charged at least 60%!

Your device’s battery shouldn’t be weak. In case your device goes dead during the flashing process, your device may get soft bricked and you might be in need of flashing stock firmware and that will ultimately result in wiping up your data as well. So, make sure that you charge your device before you start the flashing process.

3. Use the OEM datacable to establish connection!

Always use the original data cable to establish connection between your Android device and your computer / laptop. Using ordinary data cables might interrupt the flashing process, so to avoid any mishap, you need to meet this requirement as well.

4. Backup everything!

Just to be on the safe side, you may consider backing up each and everything from your Android device. This is highly recommended so that in case anything goes wrong, you still have the access to all of your data and you can restore it immediately. You may backup everything as listed below.

  • Backup Media – Copy your files manually to your PC or Laptop.
  • Titanium Backup – If already rooted, use Titanium Backup to backup all of your apps, system data and other important content.
  • Backup Nandroid – If CWM  or TWRP installed previously, otherwise skip this step and perform this at the end of flashing.

5. Turn off Samsung Kies and other softwares while using Odin3!

Make sure that you turn off Samsung Kies while using Odin3 flashtool. Samsung Kies will interrupt Odin3 and will result in causing errors and may not let you flash your desired recovery or root file. Also, make sure that you turn off any antivirus software you’ve installed and also disable firewall to avoid any connection and flashing issues.

6. Disclaimer

The methods involved in flashing custom recoveries, roms and rooting your phone are highly custom and may result in bricking your device, and has nothing to do with Google or the device manufacturer that is SAMSUNG in our case. Also rooting your device will void its warranty and you will be no longer eligible for any kind of free device services by the manufacturers/warranty providers. In case of any mishap we may not be held responsible. Follow these instructions to the letter to avoid any mishap or bricking. Make sure that whatever you do, you are doing it at your own responsibility.

Downloads Required:

How To Install TWRP 2.8/CWM 6.0.4.9 Recovery On Galaxy Tab 3 SM-T210/T210R

  1. Download recovery.tar.md5  file from above according to your choice.
  2. Open Odin3.exe.
  3. Put your Galaxy Tab 3 in download mode. To do so, turn it off and wait for 10 seconds. Turn it on by pressing and holding Volume Down + Home Button + Power Key simultaneously, You should see a warning, press Volume Up to continue. In case this method doesn’t work for you, try one from this guide.
  4. Connect your device to your PC.
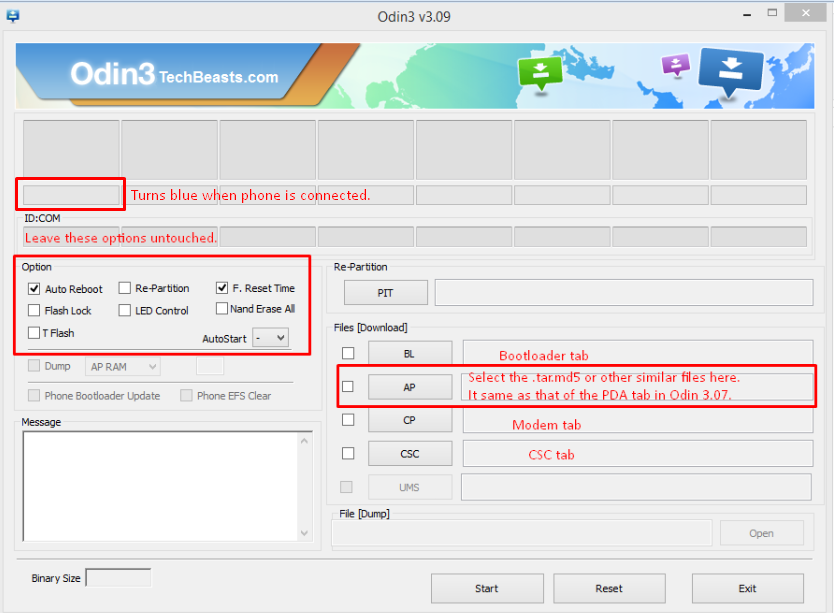
  5. As soon as Odin detects your phone, the ID:COM box should turn blue.  Make sure that you’ve installed Samsung USB drivers before connecting.
  6. For Odin 3.09 hit the AP tab. Select the recovery.tar.md5, that you downloaded and extracted above.
  7. If you’re using Odin 3.07, you will select “PDA” tab instead of the AP tab, rest of the options remain untouched.
  8. Make sure that the options selected in your Odin are exactly as shown in the pic.
  9. Odin 3.09 explained. (2)
  10. Hit start and wait till the recovery flashing process is complete, as soon as your device restarts, remove it from PC.
  11. you can now boot into the recovery mode using the method explained in step 3, but you will press Volume Up instead of Volume Down key in the combination this time.
  12. That’s all!


Want to Root your device as well? Here’s the method.

  1. Download android-armeabi-universal-root-signed.zip file.
  2. Copy it to your tab’s sd card.
  3. Boot your tab in to recovery mode.
  4. Flash the copied .zip file using Install zip > choose zip from sd card > .zip file > yes.
  5. As soon as it’s flashed, reboot your tab and find SuperSu in the appas.
  6. That’s all.

That’s all. Just in case you got any queries, feel free to drop em’ in the comment box below. We will get back to you immediately.

How To Install CWM Recovery on OnePlus One

0
How To Install CWM Recovery on OnePlus One

The flagship killer of 2014, OnePlus One, has already made its way to a lot of users, despite the purchasing method is not common like any other device. You need to either participate in Contest or promotional events hosted by OnePlus and get an E-Mail Invite, in that E-Mail invite you’ll see a Unique link, using that link you can claim the Process, you’ll then be redirected to the Site, log-in and Claim the invite. You’ll then be redirected to OnePlusOne page, where you can click Buy to purchase the Phone. You can even ask someone, who has the invite, to purchase this OnePlus device. Now that you have gotten your hands on this device, it is time to Customize it and XDA already has a lot of ROMs for it, but first let’s install Custom Recovery on it.

Both TWRP and CWM Recovery are available for it, choice is up-to you, However, TWRP requires a rooted device, if you have already rooted your device,then proceed with it, but if you are waiting for an easy process to root your device, installing Custom Recovery and then Flash Super SU using that recovery is the easiest option, we have already posted an Article on OnePlusOne regarding TWRP recovery, it is time for CWM Recovery. The rooting method is also available there, you can follow it to root your device.

composition-main

Pre-Installation Instructions:

  1. This guide is OnePlus One only. Do not try this on any other smartphone, you may result in bricking it.
  2. You must have installed Android ADB & Fastboot drivers. Follow the quick guide here.
  3. Please make sure that your phone’s battery is charged at least over 60%. This is highly recommended in order to prevent any power issues during the recovery flashing process.
  4. Backup each and everything on your Android phone as follows:
  5. Backup all your important contacts, find the full guide here.
  6. Backup all your important sms messages, find the full guide here.
  7. Backup all your important call logs, find the full guide here.
  8. Backup all your important media content manually. (Copy to your PC.)
  9. Enable USB debugging mode on your device.  Get it in Settings > Developer Options > USB Debugging mode.
  10. Use only OEM data cable to establish connection between your PC and Phone.
  11. Alright! Follow this guide to the letter now.
Disclaimer: The methods involved in flashing custom roms and rooting your phone is highly custom and may result in bricking your device, and has nothing to do with Google or the device manufacturer that is OnePlus in our case. Also rooting your device will void its warranty and you will be no longer eligible for any kind of free device services by the manufacturers/warranty providers. In case of any mishap we may not be held responsible. Follow these instructions to the letter to avoid any mishap or bricking. Make sure that whatever you do, you are doing it at your own responsibility.

How To Install CWM Recovery On OnePlus One:

  1. Download CWM Recovery and Super SU for OnePlus One.
  2. Rename the downloaded file to recovery.img
  3. Copy Super SU to the Root of your Sdcard
  4. Place the renamed Recovery.img file in the Fastboot folder that you created.
  5. Open the folder where you placed the Recovery.img  file.
  6. Press and hold the shift key and right click on an empty area within the folder, and click on “Open Command Window Here”.
  7. Connect your OnePlus One to your PC now.
  8. Now type the following commands: 

    adb reboot bootloader

    fastboot flash recovery recovery.img

    fastboot reboot

    adb reboot recovery

  9. Once done with all these, you should be in the CWM recovery.
  10. Now in CWM recovery, select “Install Zip > Choose Zip > Super SU and Tap Ok” .
  11. It will flash SuperSu and root your OnePlus One as well now.
  12. Go Back and Select Reboot System Now
  13. That’s all, Enjoy!

How to Open Links Within an Android App

0
How to Open Links Within an Android App

When ever you are using Whatsapp, Viber or Facebook messenger and some send you an external links that we have to open in our default browser of our device. I find this very annoying and so dose many others because we have to leave the current app in order to see the whats in the link. So what if we can open links within an Android app don’t have to leave the app ? . In the following guide I’ll explain you how to Open Links Within an Android App.

Open Links Within an Android App

How to Open Links Within an Android App Guide:

Screen Shot 2014-09-28 at 05.14.35

  • Now open the Flynx Browser for one time.
  • As you can see in the following photo i have some link sent from my friend on Facebook Messenger.

Screen Shot 2014-09-28 at 05.15.43

  • Now tap on the link and you’ll see a pop-up in which you have to choose the default browser choose Flynx Browser for just once.

Screen Shot 2014-09-28 at 05.16.18

  • Now you’ll see a small icon like chat head on your home screen while you are still in the Facebook messenger also you’ll see a blue line at the bottom of your home screen.

Screen Shot 2014-09-28 at 05.16.58

  • Once processing is complete you’ll see an Android icon in the chat head icon. Tap on it.

Screen Shot 2014-09-28 at 05.17.45

  • When you tap on the Flynx browser a new page will open in the same app. So now you don’t have to leave the app in order to open an external link.

How to make Find My iPhone work on a dead battery running iOS 8.

0
How to make Find My iPhone work on a dead battery running iOS 8.

There are alot of feature on an iPhone that people love but the one feature is more worth then others is Find My iPhone. Yet this is the only feature that separate iPhone from other devices. Basically Find My iPhone helps us to protect our data and device, means if your iPhone is stolen or misplaced and you cannot find it. Then find my iPhone works for you to erase and lock your device so no one can use it. But if the battery is dead on your iPhone then you cannot use Find My iPhone [ this is what you think ]. In my following guide I will tell you how to make Find My iPhone work on a dead battery running iOS 8.

findmyiphone

First let me tell you that this method don’t include a third party app or any software. Find My iPhone works on a running devices but Apple added a new feature on iOS 8 Send Last Location. 

Also See: how to fix no service on iOS 8

How to make Find My iPhone work on a dead battery running iOS 8.

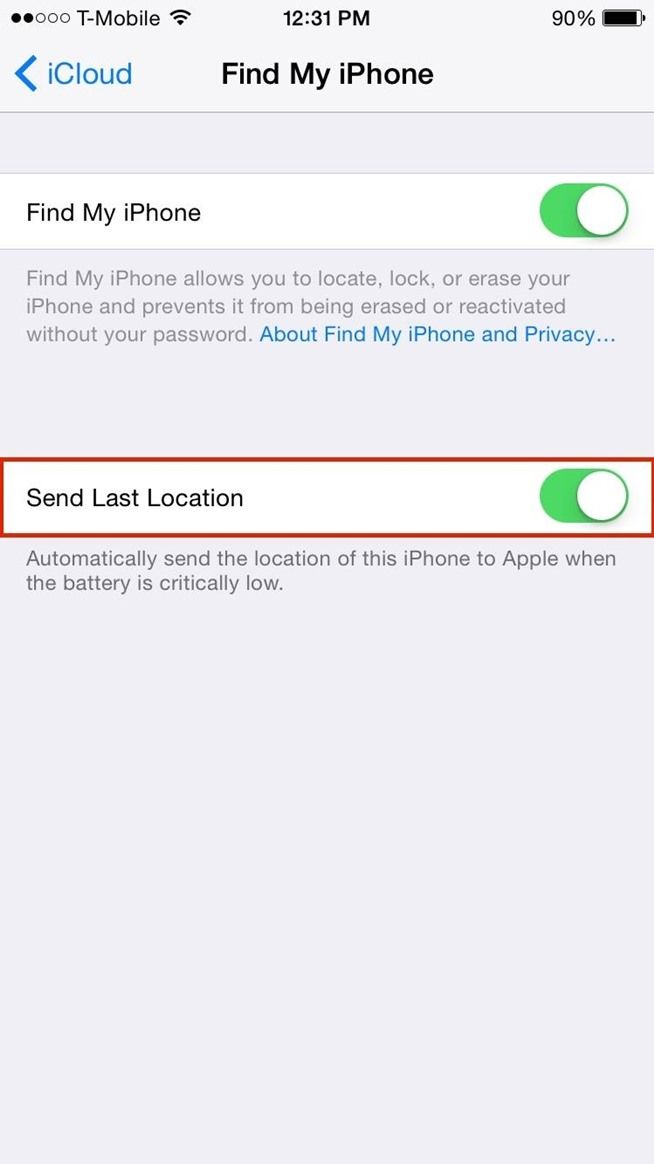
  • First goto settings.
  • Now tap on iCloud.
  • Select Find My iPhone.
  • Turn on Send Last Location.

 make-find-your-iphone-work-dead-battery-ios-8.w654make-find-your-iphone-work-dead-battery-ios-8.w654 (1)

Things to remember:

  1. If your device is manually turned off then this feature might not help.
  2. iCloud will only store the location for 24 hours.
  3. You’ll av only one day to locate your device.

Also See: Download iOS 8 Stock Wallpapers.

Install Android 4.4.2 KitKat On Samsung Galaxy Tab 3 SM-T210 & T210R

15
Install Android 4.4.2 KitKat On Samsung Galaxy Tab 3 SM-T210 & T210R

Samsung updated the LTE variant of the Galaxy Tab 3, SM-T211 to Android 4.4.2 KitKat recently and completely forgot the WiFi only variants SM-T210, T210R. This definitely brought the clouds for disappointment for the respective device owners, but Samsung didn’t let them stay for long and finally rolled out the Android 4.4.2 KitKat update for the Galaxy Tab 3 SM-T210 and T210R.

The noteable changes in this update include white icons atop of the transparent notification bar. Some applications have got a new user interface. There’s a camera shortcut key on the lockscreen, music widget on the lockscreen has got a new look. Alongside that, there are performance enhancements, the software is much more stable now. Battery life has been improved and a number of bugs has been fixed. The biggest change is the version number, that is Android 4.4.2 KitKat now. This update is rolling out to the users across different regions through Samsung Kies or through OTA, but just in case you do not happen to be the lucky user to get this update as yet, you may have to install this firmware manually using Odin3, that we are going to do in a few minutes.

As you move forward, you will come across a comprehensive guide that will explain how you can install Android 4.4.2 KitKat official firmware on your beloved Samsung Galaxy Tab 3 SM-T210 and SM-T210R. These firmwares are official, you don’t need to worry about your device’s warranty and etc. To avoid any mishap, you only need to follow the instructions carefully. Let’s go through the firmware details and flash them right away now.1367225364

Firmware for SM-T210

  • Device: Samsung Galaxy Tab 3 SM-T210 (WiFi)
  • OS: Android 4.4.2 KitKat
  • Region: ITV
  • Build Date: 21/8/2014
  • Changelist: 2432755

Firmware for SM-T210R

  • Device: Samsung Galaxy Tab 3 SM-T210 (WiFi – USA)
  • OS: Android 4.4.2 KitKat
  • Region: XAR
  • Build Date: 1/9/2014
  • Changelist: 2364900

Early Preparations

1. This guide is only for Galaxy Tab 3 SM-T210 and SM-T210R!

Make sure that your device is exactly as mentioned above. To check out what device you have, go to Settings > More/General > About Device or Settings > About Device and match the model number. Be careful about the device model number, flashing a file on a device not listed here might result in bricking it up. In that case, we may not be held responsible.

2. Battery should be charged at least 60%!

Your device’s battery shouldn’t be weak. In case your device goes dead during the flashing process, your device may get soft bricked and you might be in need of flashing stock firmware and that will ultimately result in wiping up your data as well. So, make sure that you charge your device before you start the flashing process.

3. Use the OEM data cable to establish connection!

Always use the original data cable to establish connection between your Android device and your computer / laptop. Using ordinary data cables might interrupt the flashing process, so to avoid any mishap, you need to meet this requirement as well.

4. Backup everything!

Just to be on the safe side, you may consider backing up each and everything from your Android device. This is highly recommended so that in case anything goes wrong, you still have the access to all of your data and you can restore it immediately. Also, clean install is always recommended, that means you will probably have to wipe your device to install the new firmware. So, you may backup everything as listed below.

5. Turn off Samsung Kies and other softwares while using Odin3!

Make sure that you turn off Samsung Kies while using Odin3 flashtool. Samsung Kies will interrupt Odin3 and will result in causing errors and may not let you flash your desired firwmrae. Also, make sure that you turn off any antivirus software you’ve installed and also disable firewall to avoid any connection and flashing issues.

How To Install Android 4.4.2 KitKat On Samsung Galaxy Tab 3 SM-T210 & T210R

Downloads Required:

  1. Download and extract Odin3 v3.09.
  2. Download and Install Samsung USB drivers .
  3. Download and extract firmware file
    1. ITV-T210XXBNH4-20140911201137.zip
    2. XAR-T210RUEU0CNI1-20140915160358.zip

Method:

  1. Wipe your device complete in order to attain a neat installation.
  2. Open Odin3.exe.
  3. Put your SM-T210/T210R in download mode. To do so, turn it off and wait for 10 seconds. Turn it on by pressing and holding Volume Down + Home Button + Power Key simultaneously, You should see a warning, press Volume Up to continue. In case this method doesn’t work for you, try one from this guide.
  4. Connect your device to your PC.
  5. As soon as Odin detects your phone, the ID:COM box should turn blue.  Make sure that you’ve installed Samsung USB drivers before connecting.
  6. For Odin 3.09 hit the AP tab. Select the firmware.tar.md5 or firmware.tar, that you downloaded and extracted above.
  7. If you’re using Odin 3.07, you will select “PDA” tab instead of the AP tab, rest of the options remain untouched.
  8. Make sure that the options selected in your Odin are exactly as shown in the pic.Odin-3.09-explained.-2
  9. Hit start and wait till the firmware  flashing is complete, as soon as your device restarts, remove it from PC.
  10. Wait for your device to reboot, as soon as it reboots check out the new firmware!
  11. That’s all!

You may want to learn How To Install TWRP 2.8/CWM 6.0.4.9 Recovery On Galaxy Tab 3 SM-T210/T210R.

Got any queries? Make sure that you drop em’ in the comment box below. Good Luck!

Download Chrome APK Packager v0.8

0
Download Chrome APK Packager v0.8

Running Android apps on a PC is much more easy with the modified version of ARC, named as ARChon. ARChon is a pretty much cool way to take the Android experience on a computer using Google Chrome Browser and there’s a number of compatible applications already available for the ARChon but just in case you don’t find your favorite application compatible with ARChon, you might want to convert it into a Google Chrome extension and make it compatible with ARChon, you may want to read all about ARC and ARChon here. Although there’s a way to convert applications using node and Chrome APK tool, but that’s not easy, a much more easy and convenient way to convert APKs into Chrome Extensions is available, and that’s possible using Chrome APK Packager.

Chrome APK Packager is a very nice application developed by XDA senior member Bpear96. The application runs on your Android device and lists all the applications installed in it. You can simply select the application you want to run on your Chrome Browser and convert into a chrome extension. The converted applications appear in zipped form in the ChromeAPK folder in your phone’s internal storage. Earlier, the application was available at XDA forums only, but the developer has uploaded it into the Google Play Store as well now. You can simply visit the Play Store and install it right away or you can just go ahead and download the APK file and install it using the method explained below.Screenshot_6

Download Chrome APK Packager v0.8 & Install It

  1. Download Chrome APK Packager v0.8 APK.
  2. Download the APK file to your phone or copy it to your phone.
  3. Allow unknown sources from Settings > Security if required on your phone.
  4. Locate the APK file on your phone now and tap it to begin installation.
  5. Select “Package Installer” if prompted.
  6. Proceed and complete the installation.
  7. Once done, access Chrome APK Packager from the App drawer.
  8. Select the applications you want to convert into Chrome extensions.
  9. Follow the on-screen instructions and find the zipped file in ChromeAPK folder in your phone’s storage.
  10. Now learn How To Run Any Android App On PC In Chrome Browser.

Here’s the app description by the developer

Chrome APK Packager is a convenient way to produce Chrome ARChon Custom Runtime packages directly from your phone.You can generate chrome packages from either APKs on your phones storage, or from apps installed on your phone (It will pull APK)

Open the App, select an APK or App from list. App Name and package name are both pulled from the APK and put into the manifest.json file. Everything is then zipped together in a ChromeAPK folder on your phones storage.


Download FIFA 15 Ultimate Team for Pc Free ( Windows 8.1, 8, 7, Mac )

3
Download FIFA 15 Ultimate Team for Pc Free ( Windows 8.1, 8, 7, Mac )

FIFA 15 Ultimate Team for Pc is available for but not in .exe file you can download and install FIFA 15 Ultimate Team on PC by using a third party emulator Bluestacks. Basically, FIFA 15 Ultimate Team is available for Android and iOS right now FIFA 15 is not available for PC. Before starting the guide let me give you an overview on FIFA 15 Ultimate Team.

FIFA 15 Ultimate Team for Pc


About FIFA 15 Ultimate Team:

FIFA 15 Ultimate Team by EA SPORTS features over 10,000 players from over 500 licensed teams. Plus, over 30 real leagues and stadiums! Build a dream squad of footballers and put them to the test. From the English Premier League, La Liga, and MLS, to the German Bundesliga and beyond. Take the thrills with you wherever you are with the most authentic soccer game on Google Play.

FIFA 15 Ultimate Team Features:

  • BUILD YOUR ULTIMATE TEAM
  • PLAY IN QUICK SIMULATION MODE
  • OR TAKE IT TO THE PITCH!
  • REAL WORLD MATCH UPS

For More Visit Google Play:

Download and Install  FIFA 15 Ultimate Team on PC:

  1. To download FIFA 15 Ultimate Team for PC, you will need an Android emulator like Bluestacks. If you do not have it already, you can download it from the website Bluestacks.com.
  2. Open Bluestacks and search for FIFA 15 Ultimate Team using search tool on the top of the homepage.
  3. Click on install button. The game will automatically download and install.
  4. Once the app has been installed, go to My Apps in Bluestacks homepage.
  5. The icon for the game will appear in My Apps.
  6.  Click on this icon to open FIFA 15 Ultimate Team.

Now, you can start playing the game any time on your Pc simply by opening it from My Apps. Get mesmerized by the amazing graphics of the game.

Hopefully, you will be able to install the game easily on your PC through this guide. If you still have any issues, please let us know and we will help you solve them. Enjoy !


Easily cool down a hot phone with Coolify [ How To ]

0
Easily cool down a hot phone with Coolify [ How To ]

Every smartphone gets hot not matter what you are using Apple, Samsung, HTC, Xperia and Nexus. This is a big issue and yet there is no perfect solution for this. There are hundreds of methods on the web and most of the help us but not in an effective way. But after such a long time an app [ Coolify ] can help you to cool down a hot phone easily. In the following guide i’ll tell you how to use Coolify and what are the features.

coolify-teaser

Coolify basically works on Rooted Android devices, it helps when you are not using them or your devices are charging in an original and unique way. Coolify helps you by monitoring your device and give you tips to prevent your device form overheating.

How Coolify work?

  • First you need to root your device. [ You can check our root guides of different Android devices.]
  • Now Goto Google Play Store and install Coolify.
  • After installation is done open Coolify.

coolify-01

  • Tap on Turn on Normal Temp Protection.
  • Now wait for Coolify Cooling Engine installation gets complete.
  • Once done Coolify start its working. Done.!

Coolify will give you the unique experience:

1. Keep your device Normal temperature
2. One-Click Optimization;
3. Coolify is nearly transparent! Set and forget!
4. The simple user interface and without major uncomfortable impact on user experience;
5. Never need to deal with the complexity and risk;
6. Support Immersive mode

For more info : Google Play.

Install Official Android 4.4.4 KitKat On Galaxy S3 LTE I9305N & Root It

3
Install Official Android 4.4.4 KitKat On Galaxy S3 LTE I9305N & Root It

The 4G LTE variant of the Galaxy S3, modeled as GT-I9305N happens to be one of the most luckiest Samsung devices as it has received the Android 4.4.4 KitKat update, since this  update is available for a very limited number of devices at the moment, so we consider this device to be a lucky one. Galaxy S3 family is still stuck on Android 4.3 Jelly Bean, due to hardware limitations, the international variant of the device GT-I9300 will stick to Android 4.3 for the rest of its life while Samsung did reveal the plans for upgrading rest of the variants to Android 4.4 KitKat and just yesterday the 4G LTE variant I9305N started receiving the latest and greatest version of Android.GT-I9305N-4GLTE-Android KitKat-Root

The update is a major one, the device didn’t taste Android 4.4.2, and it jumped to Android 4.4.4 from 4.3, so the users will be experiencing a great change on their device. Noteable changes include white icons atop of the transparent notification bar, some of the applications have got a new user interface. There’s a camera shortcut key on the lockscreen, music player widget for the lockscreen has been changed as well. There are numerous changes that you may experience once you update your device to this latest firmware. The firmware update, as usual, is on a slow roll out and will take quite a time to reach your region, but just in case you happen to be an Android enthusiast who is impatient to get hands on this firmware, you may want to update your device manually. If this is the case with you, you may have spotted the relevant place.

We are going to install official Android 4.4.4 KtiKat XXUFNI4 firmware on our beloved 4G LTE Samsung Galaxy S3 GT-I9305N using Odin3 in the following post. While this is an official firmware, you don’t really need to worry about anything. All you have to do is, you need to follow the instructions carefully and get it done flawlessly. Let’s go through the early preparations and then flash this firmware.

Here are the firmware details:

  • Device: 4G LTE Galaxy S3 GT-I9305
  • OS: Android 4.4.4 KitKat
  • Region: Finland
  • Build: I9305NXXUFNI4
  • Changelist: 2760029
  • Build Date: 12/9/2014

Early Preparations:

1. This guide is only for 4G LTE Samsung Galaxy S3 GT-I9505!

Make sure that your device is exactly as mentioned above. To check out what device you have, go to Settings > More/General > About Device or Settings > About Device and match the model number. Be careful about the device model number, flashing a file on a device not listed here might result in bricking it up. In that case, we may not be held responsible.

2. Battery should be charged at least 60%!

Your device’s battery shouldn’t be weak. In case your device goes dead during the flashing process, your device may get soft bricked and you might be in need of flashing stock firmware and that will ultimately result in wiping up your data as well. So, make sure that you charge your device before you start the flashing process.

3. Use the OEM datacable to establish connection!

Always use the original data cable to establish connection between your Android device and your computer / laptop. Using ordinary data cables might interrupt the flashing process, so to avoid any mishap, you need to meet this requirement as well.

4. Backup everything!

Just to be on the safe side, you may consider backing up each and everything from your Android device. This is highly recommended so that in case anything goes wrong, you still have the access to all of your data and you can restore it immediately. Also, clean install is always recommended, that means you will probably have to wipe your device to install the new firmware. So, you may backup everything as listed below.

5. Turn off Samsung Kies and other softwares while using Odin3!

Make sure that you turn off Samsung Kies while using Odin3 flashtool. Samsung Kies will interrupt Odin3 and will result in causing errors and may not let you flash your desired firwmrae. Also, make sure that you turn off any antivirus software you’ve installed and also disable firewall to avoid any connection and flashing issues.

How To Install Official Android 4.4.4 KitKat On Galaxy S3 LTE I9305N

Downloads Required:

  1. Download and extract Odin3 v3.09.
  2. Download and Install Samsung USB drivers .
  3. Download and extract firmware file NEE-I9305NXXUFNI4-20140924114057.zip

Method:

  1. Wipe your device complete in order to attain a neat installation.
  2. Open Odin3.exe.
  3. Put your GT-I9305N in download mode. To do so, turn it off and wait for 10 seconds. Turn it on by pressing and holding Volume Down + Home Button + Power Key simultaneously, You should see a warning, press Volume Up to continue. In case this method doesn’t work for you, try one from this guide.
  4. Connect your device to your PC.
  5. As soon as Odin detects your phone, the ID:COM box should turn blue.  Make sure that you’ve installed Samsung USB drivers before connecting.
  6. For Odin 3.09 hit the AP tab. Select the firmware.tar.md5 or firmware.tar, that you downloaded and extracted above.
  7. If you’re using Odin 3.07, you will select “PDA” tab instead of the AP tab, rest of the options remain untouched.
  8. Make sure that the options selected in your Odin are exactly as shown in the pic.Odin-3.09-explained.-2
  9. Hit start and wait till the firmware  flashing is complete, as soon as your device restarts, remove it from PC.
  10. Wait for your device to reboot, as soon as it reboots check out the new firmware!
  11. That’s all!

You may want to root your device as well now, here’s the method to do so.

How To Root Official Android 4.4.4 KitKat On Galaxy S3 LTE I9305N

  1. Download & extract CF-Auto-Root-m3-m3swexx-gti9305n.zip file, you will get a .tar or .tar.md5 file.
  2. Now open Odin3.exe.
  3. Now put your Galaxy S3 LTE I9305N in download mode using step 3 in the method explained above.
  4. Connect your phone with your PC now, the ID:COM box should turn yellow or blue.
  5. Now click on the “AP” tab if you’re using Odin 3.09, “PDA” tab if you’re using Odin 3.07 and select the extracted CF-Aut0-Root.tar.md5 file. You may have a look on  the picture above to get a better idea about Odin’s use.
  6. Click on start and sit back.
  7. Disconnect your phone as soon as the flashing is done, find SuperSu in the app drawer.
  8. That’s all, you’re rooted now. Here are 10 best apps for root users.

We hope that this guide worked perfectly for you. In case you are stuck with something or you are facing any issues regarding this post, make sure that you leave the comments below. We will get back to you immediately. Thank you.