Home Blog Page 415

How To Unroot & Restore Stock Firmware On Samsung Galaxy S5 Mini [All Variants]

0
How To Unroot & Restore Stock Firmware On Samsung Galaxy S5 Mini [All Variants]

Galaxy S5 Mini came out in July, 2014. The younger sibling of the Galaxy S5 sported a 4.5-inch Super AMOLED screen with a resolution of 720 x 1280 with 326 ppi. At the back, there’s an 8 MP shooter, and a 2.1 MP is fixed on the front. Under the hood, there’s a 1.5 GB RAM and 16 GB internal storage, a slot for external SD card is there as well. Galaxy S5 Mini is powered up with Samsung’s own Exynos 3 Quad 3470 1.4 GHz Cortex A-7 CPU accompanied by Mali-400MP4 GPU.  There’s a 2100 mAh battery placed inside to add life to this device. Galaxy S5 Mini runs on Android 4.4.2 KitKat out of the box. These specifications make the device a very nice choice to go with, the size is convenient, so are the specifications in the price tag it comes along. Galaxy S5 Mini seems to be a great upgrade over the Samsung Galaxy S3, as this device wins in a few departments.

Well that was all about the device. It’s time to get back to our topic and save some time. Besides having cool specifications, Galaxy S5 Mini is also a great device to play with, across the boundaries set by Samsung. That means, you can root this device and unleash the true power by flashing different tweaks, mods etc. But just in case something goes wrong and your device gets soft bricked, you might have to flash a stock firmware immediately to recover your device. Flashing a stock firmware will not only unroot your device, it will also restore your device back to it’s original software wiping up all the customization. You probably won’t be able to restore a stock firmware using Odin or through any OTA updates, the only way is to flash a stock firmware using its .tar.md5 file in Odin3, Samsung’s tool for flashing files.

Now the question is, how to flash the firmware using Odin3. Well, that’s what we are here for actually. In the succeeding guide we are going to learn how you can flash and restore stock firmware on your Galaxy S5 Mini, that will also result in unrooting it. You only need to go through the guidelines carefully and get it done without any hiccups here and there. Let’s go through some important pre-installation instructions now.

samsung_galaxy_s5_mini_duos

Early Preparations

1. This guide is only for Galaxy S5 Mini SM-G800H & SM-G800F

Make sure that your device is exactly as mentioned above. To check out what device you have, go to Settings > More/General > About Device or Settings > About Device and match the model number. Be careful about the device model number, flashing a file on a device not listed here might result in bricking it up. In that case, we may not be held responsible.

2. Battery should be charged at least 60%!

Your device’s battery shouldn’t be weak. In case your device goes dead during the flashing process, your device may get soft bricked and you might be in need of flashing stock firmware and that will ultimately result in wiping up your data as well. So, make sure that you charge your device before you start the flashing process.

3. Use the OEM data cable to establish connection!

Always use the original data cable to establish connection between your Android device and your computer / laptop. Using ordinary data cables might interrupt the flashing process, so to avoid any mishap, you need to meet this requirement as well.

4. Backup everything!

Just to be on the safe side, you may consider backing up each and everything from your Android device. This is highly recommended so that in case anything goes wrong, you still have the access to all of your data and you can restore it immediately. Also, clean install is always recommended, that means you will probably have to wipe your device to install the new firmware. So, you may backup everything as listed below.

5. Turn off Samsung Kies and other softwares while using Odin3!

Make sure that you turn off Samsung Kies while using Odin3 flashtool. Samsung Kies will interrupt Odin3 and will result in causing errors and may not let you flash your desired firwmrae. Also, make sure that you turn off any antivirus software you’ve installed and also disable firewall to avoid any connection and flashing issues.

How To Unroot/Restore Stock Firmware On Galaxy S5 Mini:

Downloads Required:

  1. Download and extract Odin3 v3.09.
  2. Download and Install Samsung USB drivers .
  3. Download and extract firmware file to get the .tar.md5 file.
    1. Download latest official firmwrae for SM-G800H
    2. Download latest official firmwrae for SM-G800F

Method:

  1. Wipe your device complete in order to attain a neat installation.
  2. Open Odin3.exe.
  3. Put your SM-G800H/F in download mode. To do so, turn it off and wait for 10 seconds. Turn it on by pressing and holding Volume Down + Home Button + Power Key simultaneously, You should see a warning, press Volume Up to continue. In case this method doesn’t work for you, try one from this guide.
  4. Connect your device to your PC.
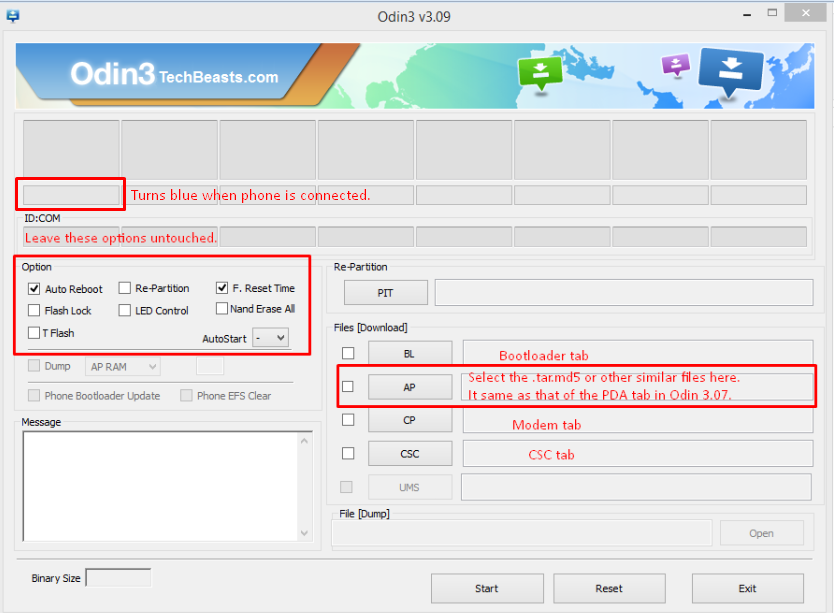
  5. As soon as Odin detects your phone, the ID:COM box should turn blue.  Make sure that you’ve installed Samsung USB drivers before connecting.
  6. For Odin 3.09 hit the AP tab. Select the firmware.tar.md5 or firmware.tar, that you downloaded and extracted above.
  7. If you’re using Odin 3.07, you will select “PDA” tab instead of the AP tab, rest of the options remain untouched.
  8. Make sure that the options selected in your Odin are exactly as shown in the pic.Odin-3.09-explained.-2
  9. Hit start and wait till the firmware  flashing is complete, as soon as your device restarts, remove it from PC.
  10. Wait for your device to reboot, as soon as it reboots check out the new firmware!
  11. Your device will be in the stock condition, and it will be unrooted as well.
  12. That’s all!

Got any queries? Make sure that you drop em’ in the comment box below. Good Luck!

How To Unlock iPhone 6 or iPhone 6 Plus [ Guide ]

0
How To Unlock iPhone 6 or iPhone 6 Plus [ Guide ]

Apple new flagship is rocking in many ways and millions of people have purchased iPhone 6 and iPhone 6 Plus. Today I am posting a guide on how to Unlock iPhone 6 or iPhone 6 Plus for free. This guide will help those who got iPhone 6 and iPhone 6 plus locked on a specific carrier.

Note: This unlocking method is free but in order to get it right your iPhone must be locked to a carrier. Make sure you buy it by paying the full price.You can do this by going to an Apple store.

images


How To Unlock iPhone 6 or iPhone 6 Plus Free:

Following is the unlocking guide for iPhone and iPhone 6 Plus, note this method will work on all the carriers. At the moment it is tested on AT&T, Sprint and T-Mobile.

AT&T iPhone 6 and iPhone 6 Plus Activation (Manual):

  • Put the AT&T Sim in your iPhone.
  • Now enter activation code e.g [ *123*(your ZIP code)*05# or *123*(your ZIP code)*06# ].
  • Press the call button on your iPhone screen.
  • Now turn off your device and wait for 10 minutes.
  • Turn on your device and you’ll receive a message with a new number.
  • Your AT&T iPhone 6 is unlocked you can now use it on other carrier.

T-Mobile iPhone 6 and iPhone 6 Plus Activation (Online):

  1. Activation code
  2. SIM card serial number
  3. Phone serial number.

Sprint iPhone 6 or iPhone 6 Plus Activation (Manual):

  • First you have to write down the serial number of your sim card.
  • Insert the Sim in your iPhone.
  • Call customer support and press 2 from the dial pad.
  • Now tell your serial number of your Sim to the Sprint representative.
  • Your Sim will be activated cheers.
  • Now your iPhone 6 and iPhone 6 plus is activated on a carrier.
  • Connect your iPhone with iTunes and restore your device. 
  • Once the process is done you’ll see the following message on your computer screen.

unlock-iPhone-6-1024x311

How To Fix WiFi Problems On iOS 8

0
How To Fix WiFi Problems On iOS 8

Apple rolled out the biggest iteration in the history of its operation system, iOS, on 17th of September, 2008. Called as iOS 8, the new operating system was big move by Apple as it includes a plethora of new features, for both, the developers and the users. There’s a number of new frameworks that will allow the developers to take the innovation to a new level and enhance the functionality of iOS 8 greatly. While for the users, the iOS 8 contained a new notification center, some of the applications got new icons and so many core changes have been made that you may experience upon installing the iOS 8 on your compatible device.

Although iOS 8 update happens to be the biggest update in the history of update, but it contained a number errors that are pretty much annoying. While this is the very first update for iOS 8, we can definitely expect the fixes and performance enhancements from Apple in next updates, but a fix for the current issues is necessary meanwhile Apple is busy cooking up a new update. One of the major issues, that the iOS 8 users are facing at the moment is not being able to connect to WiFi, or the WiFi stops working after a specific interval or time, issues with the browsing speed have been noticed as well.

Without WiFi, an iPhone will be quite useless, so it’s more than important to fix it right away. In order to sort it out, we’ve collected some methods, that have resolved this issue for some of the users. Let’s go through em’ and fix the WiFi connectivity issues with your iOS 8 powered device now.

Disable Wi-Fi Networking

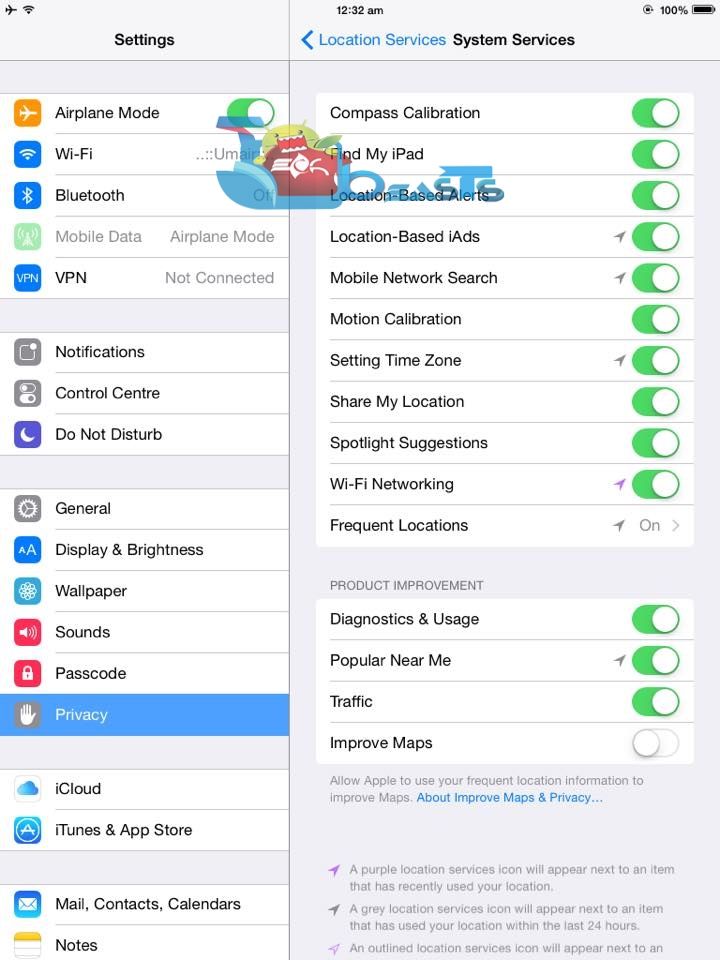
Disabling WiFi Networking worked out for some of the users. Basically, the concern of WiFi Networking is the location being used for your WiFi. Here’s how to disable it.

  1. On your iOS 8 device, go to Settings > Privacy > Location Services > System Services.
  2. Disable the WiFi Networking Service  from within this screen.
  3. Check out your WiFi connectivity now.

10719562_365876970241748_1175408588_n

Reset Network Settings

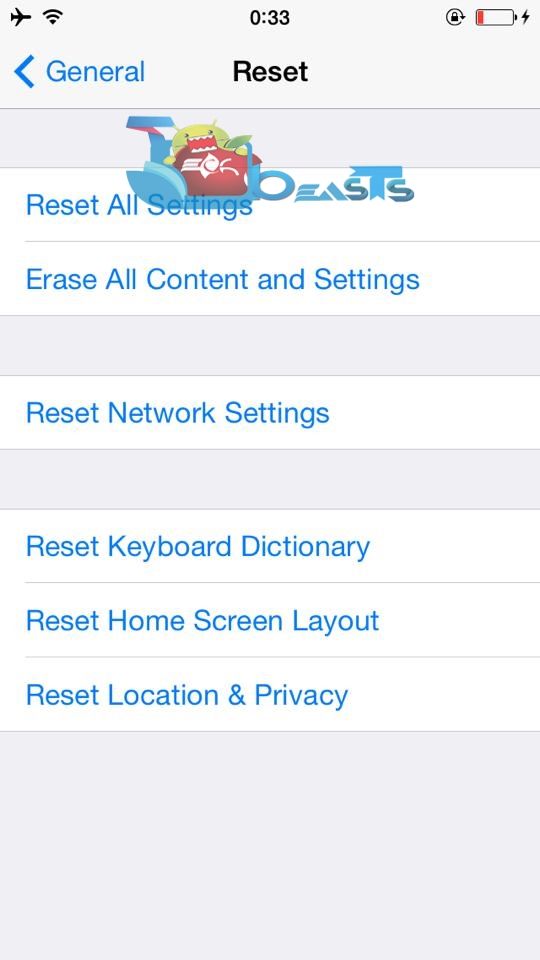
Resetting the network settings is a handy option when such issues occur. This wipes up the DHCP settings, cache, cookies and all other data related to the networks being used on your iPhone. Wiping up the network settings will simply reset each and everything to the new and clean state. Here’s how to reset the network settings.

  1. On your iOS 8 powered device, go to Settings > General > Reset > Reset Network Settings.
  2. Connect to your WiFi now.

10711392_10205183072205950_967837886_n

In case the issue isn’t resolved yet, check out the next solution.

Set Custom DNS

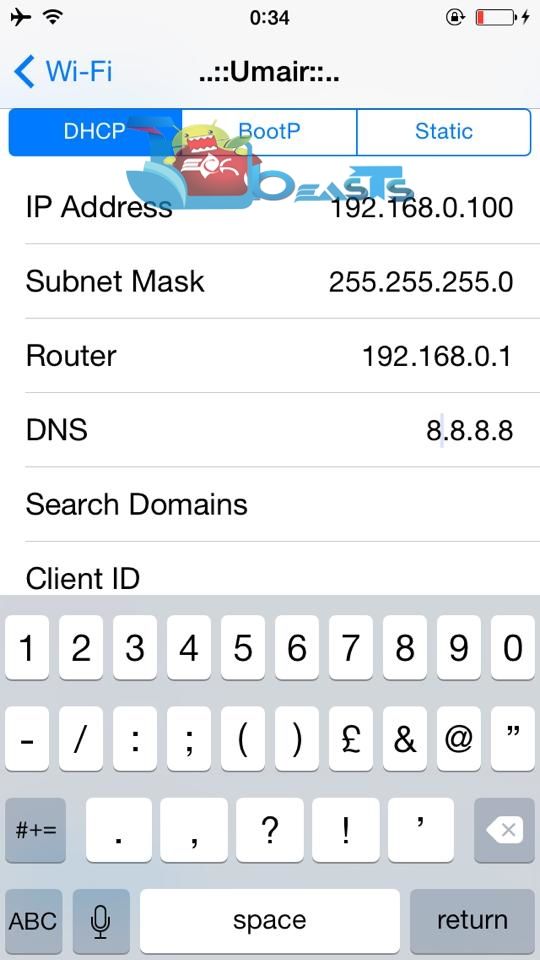
Changing the DNS is the best option when your ISP’s DNS have gone weird and they do not let you access the internet properly. In this case, Google’s DNS or the OpenDNS are of much help. Here’s how to set the custom DNS on your iOS powered device.

Go to Settings > WiFi on your iOS 8 device.

  1. Tap the small information ( i )button in front of the WiFi network you’re connected to.
  2. Scroll down and find the DNS field.
  3. Now add one of the following DNS
    1. Google’s DNS: 8.8.8.8 or 8.8.4.4
    2. OpenDNS: 208.67.222.222 or 208.67.222.220
  4. Tap on the WiFi button at the top now.
  5. Try surfing the web now.

10668745_10205183071725938_1900457077_n

If this fails too, then the last option might work for you.

Restore Your iOS 8 Device

The last choice, just in case all of the above fail. Connect your iOS 8 device to your PC running the latest version of iTunes and restore / reset it. Once your iOS 8 device gets restored, the WiFi should be in the previous working state once again.10435870_10205042755898130_6883284237758660532_n1

We hope that these solutions help you. Let us know what worked for you, in case you got any queries, drop them in the comment box below.

How To Fix Google Play Store RPC:S-3 Error [Retreiving Information From Server]

0
How To Fix Google Play Store RPC:S-3 Error [Retreiving Information From Server]

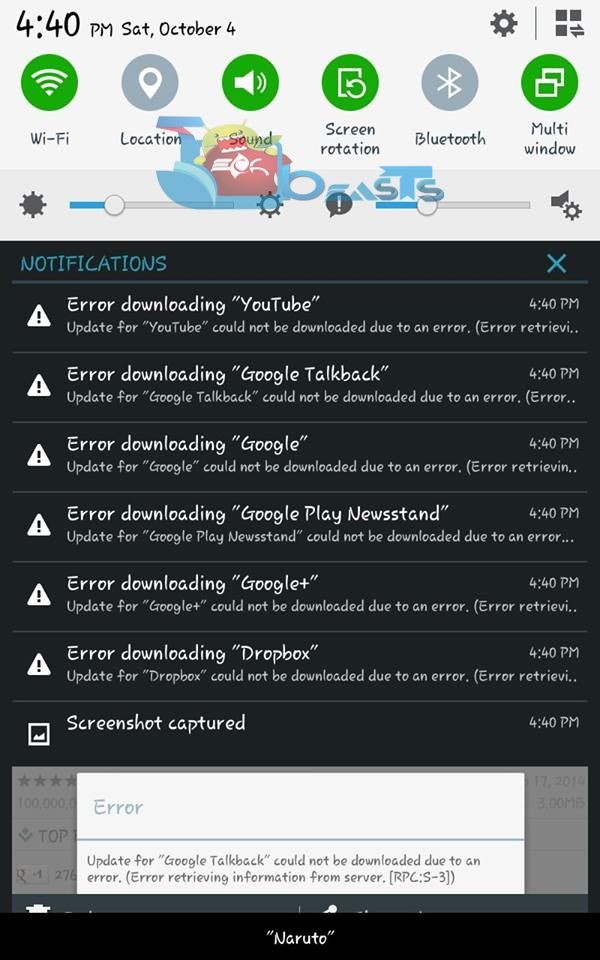
There’s a number of Google Play Store errors that can be easily resolved by touching up a few options in the Google Play Store and Google Play services applications, but the RPC:S-3 Error, that occurs when your Google Play Store cannot retrieve information from the server, happens to be the most annoying one you might ever come across. It doesn’t let you update any application, doesn’t let you download and install any application. As soon as you tap the update / download button, the error pop ups and also comes up in the notification bar. Just yesterday, this error came up on my Galaxy Tab 4, and it annoyed me while I wasn’t able to fix it by clearing up Play Store’s data, cache, removing and re-adding Google account, clearing the cache of Google Play services. After a little work around, I was able to get across this error and finally got my Google Play Store working, the culprit behind this problem was the outdated Google Play Services.

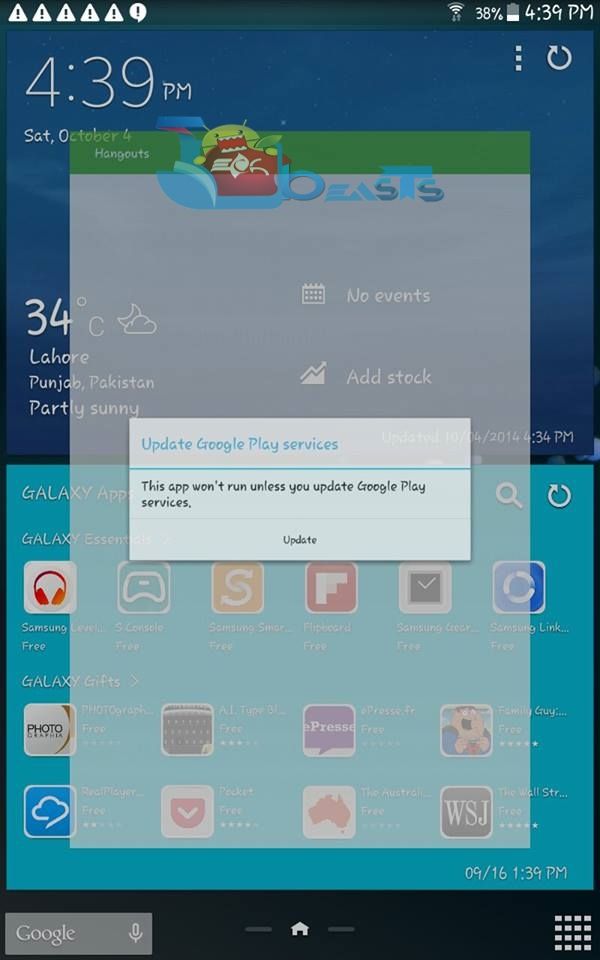
10699143_10204305651134068_732836313_n10695073_10204305650294047_941065537_n
Since the Google Play Services application outdated, as It couldn’t get updated due to some problem, it caused the disturbed the functionality of all other Google Applications on the device. While Play Store couldn’t work during this trouble, you won’t be able to update Play Services using it, the only solution is to install it manually and refresh everything. If you’re going through this annoying error at the moment and you just got here while looking for a solution, you’ve spotted the right place. As you scroll down, you will the method to resolve this RPC:S-3 [Error Retrieving Information From Server].10719512_10204305650654056_1302502595_n

How To Fix Google Play Store RPC:S-3 Error [Retreiving Information From Server]

  1. Download and install latest Google Play Services APK, current version is 6.1.11 – Find the guide to install here.
  2. Now on your Android device, go to Settings > Apps / Application Manager > All > Google Play Store > Clear Data
  3. Now on your Android device, go to Settings > Apps / Application Manager > All > Google Play Services > Clear Cache
  4. Now reboot your device, and check out the Google Play Store, the error should be resolve now.
  5. Just in case it still comes up, boot your device into recovery mode and clear the cache of your device.
  6. That’s all!

To resolve other issues with your Google Play Store, check out this guide.

If you’ve got any queries or require any further help, don’t forget to use the comment box below.

Download Google Play Services 6.1.11 APK

0
Download Google Play Services 6.1.11 APK

Google Play Services, the most essential part of the Android OS, that let’s the Google Apps to work properly on it and also allows the Apps to get installed / updated from the Google Play Store. Without Google Play Services, a number of applications might not work and result in crashing, not only that, you won’t be able to install or update any application as it will result in returning some error code. Google Play Services provides the core functionality to the components of the Android OS, it also enhances the user experience with certain applications.

Since Google Play Services has a great role to play in, Google keeps updating this application to make it work at its best and prevent any bugs / issues that might interrupt the proper functionality of this application. The latest update made to the Google Play Services was on 3rd of October, 2014, the version number however, isn’t changed it still is 6.1.11 with a number of enhancements on the core including bug fixes and stability.

Although the Google Play Services updates itself using the Play Store as soon as a new update lands in, but just in case you’re facing problems with updating it, or your Google Play Services is causing some trouble, you may have to update the Play Services manually by installing it through an APK file. To prevent your time from getting wasted while you look out for the APK file, we’ve already pulled out the latest one from the Google Play Store and embedded the download link right here. You may go ahead, grab the APK and install / update it using the instructions explained below.Play Services

  1. Download Google Play Services 6.1.11 APK.
  2. Copy the downloaded APK file to your phone or download it directly to your phone.
  3. Now go to Settings > Security > Unknown sources > Allow.
  4. Locate the downloaded APK file now and tap it to install.
  5. Follow the on-screen instructions, proceed with the installation and complete it.
  6. Once done, go to Settings > Applications / Application Manager > All > Google Play Services > Clear Cache.
  7. Restart your device.
  8. That’s all. The new Google Play Services should be working fine now.

You may want to learn now how you can fix the errors with your Google Play Store.

How To Change The Notification LED Color On Your Android Device

0
How To Change The Notification LED Color On Your Android Device

Notification LED in the Android devices is one of the most useful features, It informs you about unread notifications on your phone without turning the screen on, or simply lets you know that there’s something important you’re missing. Sony, HTC and some other manufacturers have been including the Notification LED in their devices for quite a long time now, while Samsung introduced the Notification LED in the Galaxy S3. Most of the new devices have a Notification LED atop of the screen,  by default this LED has some specific colors for missed calls, sms messages, emails and other similar notifications, the LED also works for some third party applications, but it doesn’t work for all the third party applications, nor there’s a choice to use different colors for a specific. You might wonder why would you use different LED colors for different applications,  and why would you use Notification LED for third party applications. To clarify this, we will first learn, how it can be of a little help.

Using different colors for different applications at first, will let you identify the application, the one having something pending for you to read. And then there might be some applications that do not blink up the Notification LED by default, but while you frequently use those apps, and you want to turn on the Notification LED for those applications, you will have to use a third party applications to do this job. There’s a number of applications available in the Google Play Store that can change the color of your phone’s Notification LED and can also light it up for certain applications, but a problem might come up once again when you’ve to choose one of the applications for this very purpose.Notification LED

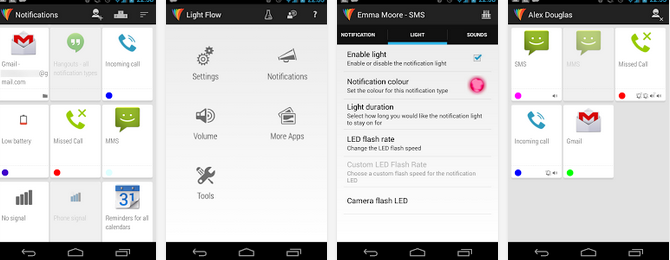
While trying to set the different colors for Viber, WhatsApp, Telegram, different Email apps, and turning on the Notification LED for different third party applications, I came across a few LED applications and got it done for myself using Light Manager – LED Settings, the same can be done using Light Flow Lite – LED Control. Both these applications have their very own pros and cons, but are good enough to do what we are after now right at the moment. Let’s learn now, how these applications work.

Set / Change the Notification LED Color Using Light Manager – LED Settings

Usually, the LED works only with applications, but you can also use it to identify whether your device’s WiFi is on, Mobile Data is on or if the Bluetooth is left on. This will remind you to turn the battery-draining features off, and you can also keep a check on your phone after putting it in ringer mode, vibrating mode or in flight mode. As long as the LED is blinking for the specific purpose, it won’t let you forget what’s going on, on your device. This is where Light Manager – LED Settings proves out to be the best application for this very purpose. Other applications I came across, didn’t allow to use the LED for these in-built features like Sound Mode, WiFi connectivity etc. Let’s go through the list of compatible features now.

Light Manager

Light Manager Compatible Apps
      – Miss call
      – SMS
      – MMS
      – Gmail
      – Calendar reminder
      – Hangouts
      – *Email
      – *Facebook
      – *Facebook Messenger
      – *Twitter
      – *WhatsApp
      – *BBM
      – *LINE
      – *GO SMS Pro
      – *Handcent SMS
      – *chomp SMS
      – *Textra SMS
      – *Verizon Messages
      – *Any 3rd party apps
      – Low battery
      – Battery charging
      – Battery charged
      – No signal
      – No 3G/4G
      – No Wifi
      – Airplane Mode On
      – Silent Mode On
      – Vibration Mode On
      – Ringer Mode On
      – Mobile Data On
      – Wifi On
      – Wifi Hotspot On
    – Bluetooth On


The applications followed by an Asterisk* mark will require root access on the devices having Android 4.1 or 4.2, however the devices having Android 4.3+ won’t require root access to make LED Manager work with these applications.

  1. Just go ahead and install Light Manager – LED Settings on your Android device
  2. Once installed, all access for the Light Manager app. To do so, go to Settings > Security > Notification Access > Select Light Manager.
  3. Access the installed app through App drawer now.
  4. Select the operating mode in the application first of all. Normal mode will make the LED blink for the most recent notification, while Alternating mode will make it blink randomly when there are multiple notifications.
  5. Now select the application / feature for which you want to turn on or change the color of the Notification LED.
  6. Turn on the LED for your desired app / feature and choose the color. You may use a custom color as well, as the option is available.
  7. Once done, close the application and check it out.
  8. That’s all!

Set / Change the Notification LED Color Using Light Flow Lite – LED Control

Quite similar to the LED Manager and serves the purpose very well. This app doesn’t require root access, but does have a pro version that’s loaded with tons of features. Here’s the compatibility list for Light Flow Lite.

Lightflow

Light Flow Compatibility
      * SMS messages,
      * MMS messages,
      * New Gmail messages
      * New e-mails
      * Calendar reminders
      * Missed calls
      * Low battery
      * Bluethooth
      * Google Talk notifications / Hangouts
      * Handcent
      * No signal
      * SMS Popup
      * ChompSMS
      * K9 mail
    * Silent mode

How to use:

  1. Install Lighflow LED Lite from the Google Play Store.
  2. Access the application from the App drawer now.
  3. Select the Application you want to enable / change the LED color for.
  4. Set it up according to your liking and save the settings.
  5. You can also set sounds and vibrations for the notifications using this application.
  6. Just go through the supported apps and utilize your Notification LED for those apps as well.
  7. That’s all.

We hope that you find this guide helpful. Let us know if you’ve any suggestions regarding this.

Q: Meizu m2 note led colour changer:

Enable the following option in your Meizu 2 settings:

meizu m2 note led colour changer

How To Install CWM Recovery On Xperia Z3 Compact D5803, D5833 And Root It [23.0.A.2.105 Firmware]

How To Install CWM Recovery On Xperia Z3 Compact D5803, D5833 And Root It [23.0.A.2.105 Firmware]

Sony Xperia Z3 Compact, the younger sibling of the Xperia Z3 won the IFA show as the device flaunted some very nice specifications in a perfect size, it shows that Sony has just done the justice with this device. On the front, there’s a 4.6 inches screen having a resolution of 720 x 1280 pixels and 319 ppi. There’s a 2.2  MP camera sensor fixed at the front, and a 20.7 MP shooter is fixed at the back, that’s same as that of the Xperia Z1, Z2 and the actual Z3. Under the hood, there’s a 2.5 GHz Quad-Core Qualcomm Snapdragon 801 CPU accompanied by Adreno 330 GPU. A RAM of 2 GBs is also placed inside, there’s a massive 2600 mAh battery placed inside to add life to this device. Out of the box, Xperia Z3 compact runs on Android 4.4.4 KitKat, that’s the highest Android OS available at the moment. These specifications surely make this device a great choice, and stand as the reason to make it the best smartphone of the IFA 2014 by some tech experts.

If you’re planning to get Xperia Z3 Compact, you would like to unleash the true power of your device and try out some powerful applications, perform some experiments to check how much capable your device is when it comes to tweaks and modifications. For this very purpose, you will need a custom recovery and the root access, while both these play an essential role for the Android power users, many start looking out for these right when they get their hands on the device. If you happen to be one of those Android power users, we won’t like to have your time wasted, so we’ve already compiled up the guide to install CWM 6 Recovery and gain the root access on the Sony Xperia Z3 Compact D5803 and D5833 running Android 4.4.4 KitKat with the build number 23.0.A.2.105.

Before we head towards the installation guide, we would like to thank the XDA recognized developer Doomlord, who always came up with his kernel for various Xperia devices, which allowed the users to load custom recoveries on their devices and take a step towards unveiling the true potential of the Android beasts. The current version of this ClockworkMod Recovery is 6.0.4.7 and is packed inside DoomLord’s Advanced Stock Kernel. Let’s go through the early preps now and begin with the flashing and rooting process.Sony-Xperia-Z3-Compact-Review-Photo1

Early Preparations:

1. This is only for Sony Xperia Z3 Compact D5803 & D5833!

This guide  is only for the devices mentioned above. Make sure that your model number matches the one listed above. To do so, go to Settings > About Device on your device and see your model number. Flashing these files on any other device will result in bricking it so make sure that you meet this requirement first of all.

2. Battery should be charged at least over 60%.

Make sure that your battery is charged enough to complete the flashing process. In case your battery is low and your device goes dead during the flashing process, you may end up soft bricking your device as it won’t complete the flashing process.

3. Backup everything!

Just to be on the safe side, you may consider backing up each and everything from your Android device. This is highly recommended so that in case anything goes wrong, you still have the access to all of your data and you can restore it immediately. You may backup everything as listed below.

4. Enable USB Debugging Mode on your device.

Enable USB debugging mode on your device. To do so, tap settings>developer options>USB debugging. If you can’t find developer options in settings, then tap settings > about device and tap “Build Number” for 7 times and you’ll get em’ activated under settings.

5. You must have Android ADB & Fastboot drivers installed

Android ADB & Fastboot drivers are essential for flashing Adv. Stock Kernel. That’s how you will load the .img file on your device. You may install em’ using the full guide here or use the Minimal ADB & Fastboot guide.

6. Your device’s bootloader must be unlocked

You can only flash Adv. Stock Kernel if your device has an unlocked bootloader. You can read all about unlocking your device’s bootloader and unlock it using this guide. Make sure that you do this carefully.

7. Use OEM data cable to establish connection.

Make sure that you use the phone’s original data cable to establish connection between your phone and the PC. Using a different data cable might result in interrupting the firmware installation.

Disclaimer: The methods involved in flashing custom roms and rooting your phone is highly custom and may result in bricking your device, and has nothing to do with Google or the device manufacturer that is SONY in our case. Also rooting your device will void its warranty and you will be no longer eligible for any kind of free device services by the manufacturers/warranty providers. In case of any mishap we may not be held responsible. Follow these instructions to the letter to avoid any mishap or bricking. Make sure that whatever you do, you are doing it at your own responsibility.

How to Install CWM Recovery On Sony Xperia Z3 Compact

Download Advanced Stock Kernel:

  1. Download  Advanced Stock Kernel.img from above.
  2. Place the downloaded .img file in the Minimal ADB & Fastboot folder that you created using our ADB & Fastboot Quick Setup Guide.
  3. If you are using Android ADB & Fastboot full package, you can place the downloaded Recovery.img file in the Fastboot folder or in the Platform-tools folder.
  4. Open the folder where you placed the Boot.img  file. E.g Minimal ADB & Fastboot or Fastboot or Platform Tools.
  5. Press and hold the shift key and right click on an empty area within the folder, and click on “Open Command Window Here”.
  6. Turn off your Xperia Z3 Compact completely.
  7. Now press the Volume Up Key and while keeping it pressed plug in the USB cable.
  8. You should see a blue light in the notification light of your phone, that means your device is now connected in Fastboot mode.
  9. Now type the following command:

     fastboot flash boot [filename].img

  10. Hit Enter and it will quickly flash the recovery in your Xperia Z3 Compact.
  11. Once recovery is flashed, now issue this command

    “fastboot reboot”

  12. Your device will reboot now, as soon as you see the Sony logo,  and the pink LED, press Volume Up & Down Key simultaneously to enter CWM recovery.
  13. Congrats! You should now see the custom recovery.

How To Root Your Xperia Z3 Compact

  1. Download latest SuperSu.zip file.
  2. Copy the downloaded .zip file to your phone’s sd card.
  3. Now boot your device into recovery mode using the step 12 explained above.
  4. Once you’re in CWM recovery, tap “Install > locate SuperSu.zip” and flash it.
  5. One done flashing, reboot your device and find SuperSu in app drawer.
  6. That’s all. You can install “Root Checker” from Play Store and verify root access.

That’s all. If you have any queries regarding this guide, make sure that you drop em’ in the comment box below. We will definitely get back to you as soon as we receive em’. Thank you all.

How to hide network name on the Moto X

0
How to hide network name on the Moto X

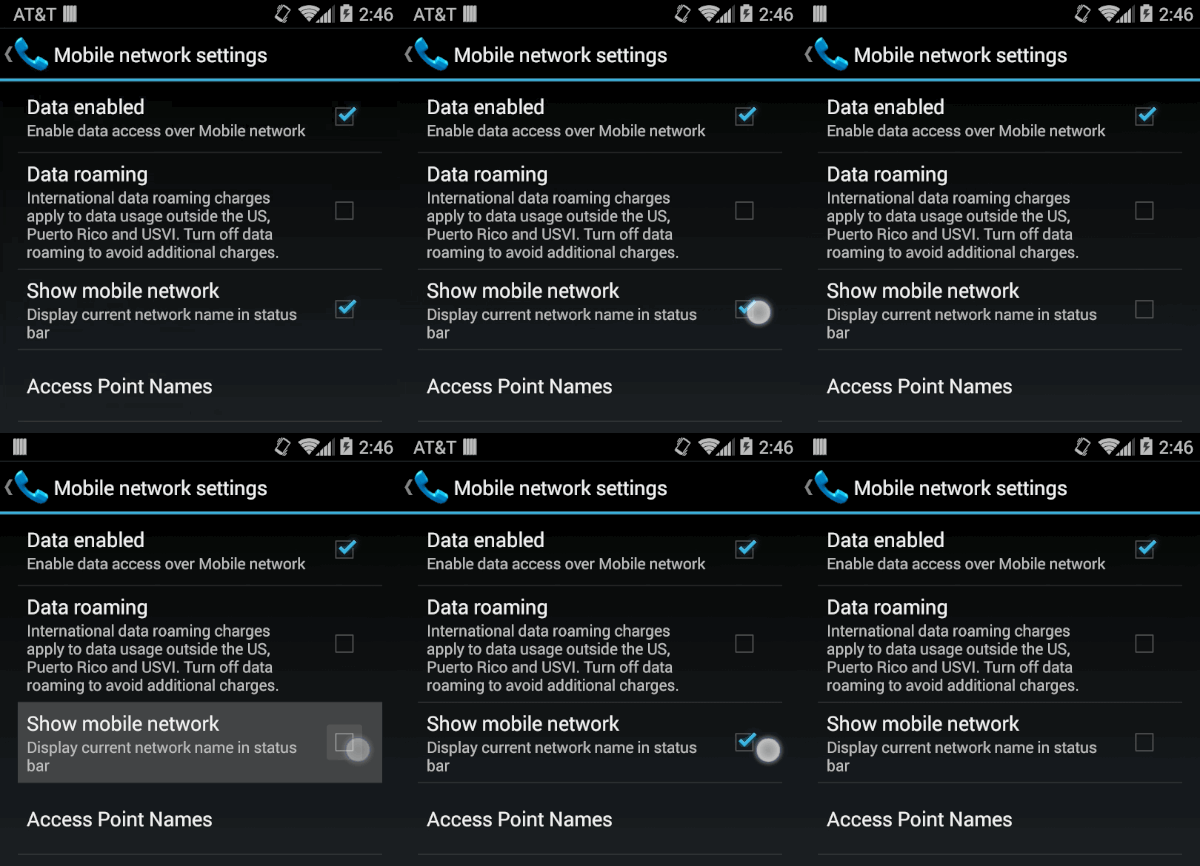
Moto X is best in many ways but there is one thing that annoys me so much and that is Network name. When you purchase a new Moto X and after the  first boot up you’ll see your network name on left corner on your device. Every one know which network you are on so why this annoying logo type name on your Moto X. In this guide I’ll tell you how to hide network name on Moto X.

hide network name on Moto X


How to hide network name on the Moto X:

motox-network

  1. Tap on App drawer from the home screen.
  2. Now open settings from the apps.
  3. Goto Wireless and Networks.
  4. Now Choose more.
  5. Select “Mobile Networks.”
  6. Uncheck “Show mobile network.”

All Commands for new Moto X to do everything with Voice

0
All Commands for new Moto X to do everything with Voice

New Moto X is really a handful device in mind range a new updated feature is voice command. Using voice command you can tell you Moto X what to do, its same like Google Now but with more improved features. Can you imagine that it will be so easy that all you have to do is give a voice command to your Moto X and it will do that task. You don’t need to use your finger and hold your device to do a specific task. Following are the all voice commands that you can use to tell your Moto X what to do.

20130802-MOTO-X-061edit

Moto X Voice Commands List:

  • Goodnight: Turns on the Sleeping do-not-disturb mode in Moto Assist.
  • Post to Facebook: Shares that oh-so-urgent status update that’s just burning a hole inside you.
  • Send WhatsApp message: Same, only over WhatsApp.
  • What’s Up? Tells you the time, and any unread notifications.
  • What’s this song? Listens to the beat. Tells you what’s rocking.
  • How far away is the moon? Just a basic Google search. (Answer: 238,900 miles.)
  • Navigate home: If you have a home location noted in Google and need to know how to get there, this will help guide you there. (Or you can obviously navigate other places.)
  • Take a selfie: We’re not saying you should, but this will fire up the front-facing camera and count down from three. Be sure to remember to use duckface.
  • When’s my next meeting? Uses Google Now to see what you’re about to be up to, or what it was your were supposed to be doing.
  • Find my phone: A great old feature. Finds your phone.
  • Remind me to pick up milk tonight: Sets a reminder to pick up milk. Or bread. Or cheese. Need anything else?
  • Play Beethoven on YouTube: Because if there’s one thing Beethoven had in mind all those years ago, it was being broadcast on the same medium as cat videos.
  • Talk to me: Will announce incoming calls and texts and for a half-hour.
  • Set alarm for 6 a.m. tomorrow: Boy, you sure do wake up early.
  • Take a photo: Fires up the rear camera.
  • Send text to Lisa Lewis: She’ll be glad to hear from you. Or text anyone else in your contacts.
  • Check voicemail: It’s your mom. Give her a call back.
  • Open Calendar: Because being late is for losers.
  • Good morning: Wake up, talk to your phone, learn your next appointment.
  • Get list of commands: This does what we just did here. Only not as funny.
  • What’s the weather? So you know what it’s like outside without having to go outside.
  • Call Lisa Lewis on mobile: That Lisa Lewis sure is popular. Or you could call anyone else.

Via: Androidcentral

Download iOS 8.1 Beta 1IPSW Firmware [ Direct Download ]

0
Download iOS 8.1 Beta 1IPSW Firmware [ Direct Download ]

Apple has released iOS 8.1 beta 1 for both the developers and general Public, since we are expecting the New iPad Air 2 and iPad Pro in coming weeks, Apple is making sure to release them both with iOS 8.1. Now if you have the developer ID, you can easily download iOS 8.1 Beta 1 from Apple official Page, however ,finding the device there is something that can become a little teasing. In iOS 8 Beta 1, Apple is finally understanding that users are looking for Customization in iOS and they are giving a little bit of Open Source in iOS 8.1 Beta 1.

iOS 8.1 arrived with a lot of new features, like 3rd Party Keyboard, Health Kit, Home Kit, one of the best feature, you can use Home Kit to control the Apple Home devices, New Notifications, New Features in Siri, New Options in Spotlight Search.Camer app has been improved along with the Gallery app, New Messaging app and Family Sharing too, all these features are sure to be there in iOS 8.1 Beta 1 and who knows they might be improved in coming versions too, as Apple has to save a little bit after loosing it all, all Because of iPhone 6.

ios7

We are providing you the download Links of iOS 8.1 Beta 1, so in case if you  have a Developer ID and wants to try out the iOS 8.1 Beat 1, you can download it and try it on your device. The iOS 8.1 Beta 1 will expire on December 4, 2014. You have the time till then, after that you have to wait for the Official release of iOS 8.1. Let’s Proceed.

Direct Download Links:

You need to have a developer ID to download them.

How To Switch To 2G, 3G or LTE in iOS 8.1 on iPhone

0
How To Switch To 2G, 3G or LTE in iOS 8.1 on iPhone

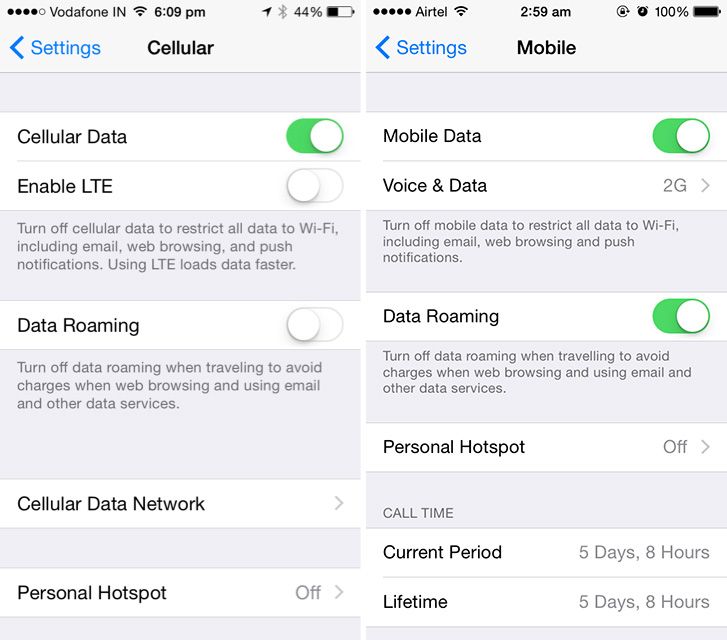
Yesterday Apple released the first seed of iOS 8.1 with few improvements as people were facing no service and many other issues after upgrading to iOS 8.0.2. Not only Apple has fixed few bugs also they added back the option to switch between 2G, 3G or LTE. This is really good option because there are still such countries in which 3g is not working properly so now they can switch to 2G and get the best out of Mobile data. Check out my guide in which I’ll tell you how to switch to 2G, 3G or LTE in iOS 8.1 on iPhone.

ios-8-cellular-settings

How To Switch To 2G, 3G or LTE in iOS 8.1 on iPhone:

Step 1: Open Settings.

Step 2: Select Cellular/Mobile.

Step 3: Now Voice & Data.

Step 4: You’ll get three option in a list. [ 2G, 3G, LTE ].

Step 5: Now choose what you want for your device.

ios-8-1-cellular-settings