Home Blog Page 414

How To Unroot & Restore Stock Firmware On Sony Xperia Devices

11
How To Unroot & Restore Stock Firmware On Sony Xperia Devices

Until a few years ago, Sony wasn’t doing so good with its Xperia lineup. Sony started improving the Xperia devices in 2011, and then it was Xperia Z that came out in 2013, the device brought enough spotlight on Sony and it won Sony a lot of respect, and right now, the flagship series has stopped on Xperia Z3 that came out a few days ago. Xperia’s very nice onboard specifications packed up at a very affordable price help it to become a first choice for the users.

Sony has a number of devices available under low-end, mid-range and high-end price tags, it’s quite easy to get a great Sony Xperia device in the pocket now. Since the recent past, Sony has been doing great with the Software updates for its Xperia devices and that becomes a plus point for going with Sony Xperia. Unlike other manufacturers, who forget their devices after rolling out a few updates, Sony is still updating some of its pretty old devices to the latest and greatest version of Android at the moment.

Apart from the software, Xperia devices have a great design, cool and attractive build quality, these devices usually have a great camera, there’s a number of exclusive features that these devices sport. All these are the reasons that are helping Sony to win some space in the pockets of Android users.

When to Unroot or Restore Sony Xperia?

That was a little about Sony Xperia devices, let’s get back to our purpose for being here now. Do you own any Xperia device? and you also happen to be an Android power user who loves to tweak the device to unleash its true power? Well, if that’s the case with you, you’ve probably rooted your device, flashed custom recoveries, tasted custom ROMs, a lot of mods and other tweaks.

While you experiment with your device, chances are, at times you end up soft-bricking it, or some annoying error comes up that’s hard to wipe off. And at times, you only need to unroot your device and get rid of the root access, stop the functionality of the root access on your device. To be precise, you need to get your device back in its stock condition.

The only way to revert back your device to its stock condition is to flash a stock firmware, while you have your device rooted, an OTA update or Sony PC Companion isn’t going to help you to get back to the stock condition, you will have to flash the firmware manually using Sony Flashtool. Although there’s a number of stock firmware guides posted on our site, and you may also find a complete guide on how to use Sony Flashtool, but a specific guide to flash the firmware is what we are going to cook in the succeeding post.

How To Unroot & Restore Stock Firmware On Sony Xperia Devices

Before we begin with the procedure, you may keep in mind that in case you’ve unlocked your device’s bootloader, then use this guide won’t re-lock it, nor it will revert back the warranty of your device, though it will wipe any custom recovery, custom kernel, root access or any mods you’ve flashed on your device. Users with the locked bootloaders will get the custom changes wiped off, and there device’s warranty remains unaffected. Let’s go through some pre-installation instructions and then unroot and install stock firmware on your Sony Xperia smartphone.

xperia-E1-play-it-loud-02-1240x840-262ec1e7823910d3a2302a4e9efcd677

Early Preparations:

1. This is only for Sony Xperia Smartphones!

This ROM is only for the device mentioned above. Make sure that your model number matches the one listed above. To do so, go to Settings > About Device on your device and see your model number. Flashing this firmware on any other device will result in bricking it so make sure that you meet this requirement first of all.

2. The battery should be charged at least over 60%.

Make sure that your battery is charged enough to complete the flashing process. In case your battery is low and your device goes dead during the flashing process, you may end up soft bricking your device as it won’t complete the flashing process.

3. Backup everything!

Just to be on the safe side, you may consider backing up each and everything from your Android device. This is highly recommended so that in case anything goes wrong, you still have the access to all of your data and you can restore it immediately. You may backup everything as listed below.

4. Enable USB Debugging Mode on your device.

Enable USB debugging mode on your device. To do so, tap settings>developer options>USB debugging. If you can’t find developer options in settings, then tap settings > about device and tap “Build Number” for 7 times and you’ll get em’ activated under settings.

5. Install and set up Sony Flashtool.

You must have installed Sony Flashtool. Find the full guide here. After installing Sony Flashtool, open the Flashtool folder from the drive where you installed it. Now open Flashtool>Drivers>Flashtool-drivers.exe and install the Flashtool, Fastboot & your Xperia device drivers from the list. [Important]

6. Download official Sony Xperia Firmware & create FTF file.

The next step is to get the FTF file for your desired firmware, in case you’ve already obtained the FTF, you may skip this step and just in case you haven’t, follow this guide to download official Sony Xperia Firmware & create the FTF file.

7. Use OEM data cable to establish the connection.

Make sure that you use the phone’s original data cable to establish the connection between your phone and the PC. Using a different data cable might result in interrupting the firmware installation.

Unroot & Restore Stock Firmware On Sony Xperia Devices

  1. Before moving forward, please make sure that you’ve read the prerequisites and ensure that you are set to go ahead.
  2. Download the latest firmware and create the FTF file using the guide linked above.
  3. Copy the file and paste in the Flashtool>Firmwares folder.
  4. Open Flashtool.exe now.
  5. Hit the small lightning button on the top left corner and select Flashmode.
  6. Select the FTF firmware file that you placed in the Firmware folder.
  7. From the right side, select what do you want to wipe. Data, cache and apps log, all wipes are recommended, perhaps you may select if you don’t want.
  8. Click on OK, and it will start preparing the firmware for flashing. This may take a little while to load.
  9. As soon as the firmware is loaded, it will prompt you to attach the phone by turning it off and keeping the back key press.
  10. For Xperia devices that came after 2011, Volume Down key will do the job of back key, just turn off your phone, keep the Volume Down key pressed and plug in the data cable.
  11. As soon as the phone is detected in Flashmode, the firmware will start flashing, Do not leave the Volume Down key until the process is complete.
  12. As soon as you see “Flashing ended or Finished Flashing” leave the Volume Down key, plug the cable out and reboot.
  13. That’s All! Congrats! You’ve installed latest official Android on your Xperia smartphone. Your smartphone is unrooted now and is it it’s official state. Enjoy!

In case you got any queries or face any problems regarding this guide, feel free to stop by the comment box below and let us know. We will get back to you as soon as possible. Thanks all!
How To Root Galaxy S5 Prime G906L,G906S & G906K With CF-Auto Root

0
How To Root Galaxy S5 Prime G906L,G906S & G906K With CF-Auto Root

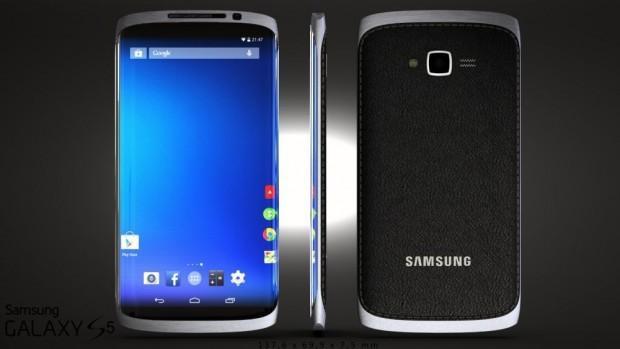
Galaxy S5 was rooted a long time ago, and it looks like the Prime version of Galaxy S5 wasn’t getting in the list of Rooted devices, although there are those who rooted it yet don’t want to share the rooting methods, because of any reason. However, Chainfire, in such matters is different, the developer behind the Super SU, the most famous tool to root the Android devices. CF-Auto Root is another tool released by Chainfire, which was there for Galaxy Not 4 and now Galaxy S5 Prime has it turn to be rooted by CF-Auto Root.The Galaxy S5 Prime is the revamped version of Galaxy S5, however, packed with more Powerful features. Galaxy S5 has Full HD display, which was updated in Galaxy S5 Prime as Vibrant Quad HD Resolution and more features are also added in it.

The device is not in the hands of Public yet, but its rooting method is now available, the same thing happened with LG G3. CF-Auto Root is available for Galaxy S5 Prime and the models supported by this tool are G906L,G906S & G906K. For those who are not familiar with the CF-Auto Root method, it is a simple One Click Root Mod, which will root your device without any problem or Special Skills. Without further ado, let’s continue.

Galaxy-S5-Prime-shows-its-metal-body


Early Preparations:

1. This guide is only for Galaxy S5 Prime(G906L,G906S & G906K)!

Make sure that your device is exactly as mentioned above. To check out what device you have, go to Settings > More/General > About Device or Settings > About Device and match the model number. Be careful about the device model number, flashing a file on a device not listed here might result in bricking it up. In that case, we may not be held responsible.

2. Battery should be charged at least 60%!

Your device’s battery shouldn’t be weak. In case your device goes dead during the flashing process, your device may get soft bricked and you might be in need of flashing stock firmware and that will ultimately result in wiping up your data as well. So, make sure that you charge your device before you start the flashing process.

3. Use the OEM data-cable to establish connection!

Always use the original data cable to establish connection between your Android device and your computer / laptop. Using ordinary data cables might interrupt the flashing process, so to avoid any mishap, you need to meet this requirement as well.

4. Backup everything!

Just to be on the safe side, you may consider backing up each and everything from your Android device. This is highly recommended so that in case anything goes wrong, you still have the access to all of your data and you can restore it immediately. Also, clean install is always recommended, that means you will probably have to wipe your device to install the new firmware. So, you may backup everything as listed below.

How To Root Galaxy S5 Prime With CF-Auto Root

  1. Download and extract Odin3 v3.09.
  2. Download and Install Samsung USB drivers .
  3. Download and extract CF-Auto Root file: G906K | G906L | G906S

Method:

  1. Open Odin3.exe.
  2. Put your Galaxy S5 in download mode. To do so, turn it off and wait for 10 seconds. Turn it on by pressing and holding Volume Down + Home Button + Power Key simultaneously, You should see a warning, press Volume Up to continue. In case this method doesn’t work for you, try one from this guide.
  3. Connect your device to your PC.
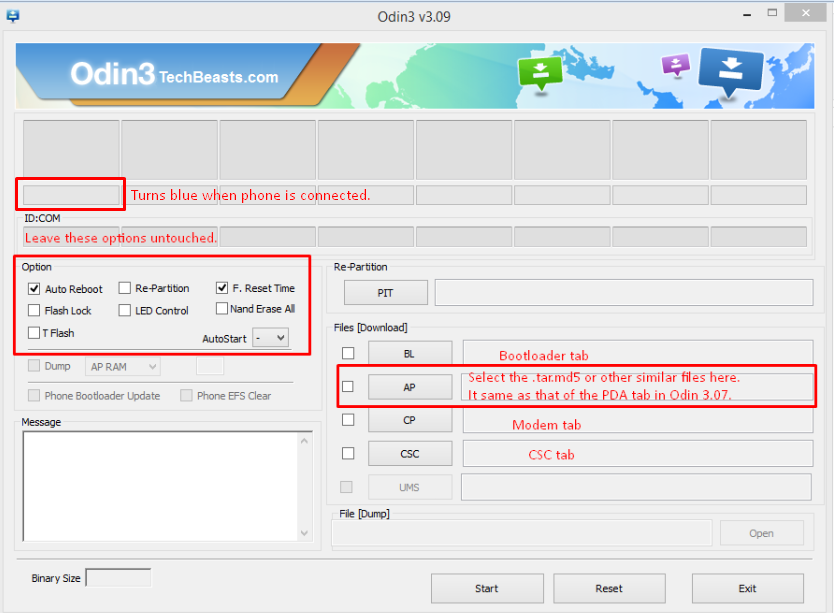
  4. As soon as Odin detects your phone, the ID:COM box should turn blue.  Make sure that you’ve installed Samsung USB drivers before connecting.
  5. For Odin 3.09 hit the AP tab. Select the .tar.md5  file or .tar file, that you downloaded and extracted above.
  6. If you’re using Odin 3.07, you will select “PDA” tab instead of the AP tab, rest of the options remain untouched.
  7. Make sure that the options selected in your Odin are exactly as shown in the pic.Odin-3.09-explained.-2
  8. Hit start and wait till the flashing is complete, as soon as your device restarts, remove it from PC.
  9. Wait for your device to reboot, as soon as it reboots check for Super User app
  10. That’s all!

How To Install CWM PhilZ Touch 6 Recovery on Moto G 2014

0
How To Install CWM PhilZ Touch 6 Recovery on Moto G 2014

Previously we posted the Rooting method and installing TWRP on Moto G 2104, but frankly speaking, not all the users like the TWRP recovery, they feel much better using the CWM recovery, if fact they don’t even try to flash Mods and Custom ROMs while they are using the TWRP recovery, despite that TWRP recovery for a device is always released faster than the CWM recovery, till then the users remains on the TWRP, and once the CWM is out, they switch and they are those who had no other way to root their device except by Flashing the Super SU by recovery. Many recoveries are then developed using TWRP as base, yet not much success is created by it. In my Opinion,as a fan of CWM Recovery, TWRP is more like a recovery for a developer, not for a genuine user.

On the other hand, CWM recovery has another advance version called b, which has most of those features that you are missing in the CWM Recovery. The full touch interface not only gives you more ease but also removes the Strictness of using the buttons for selection, although you can use these buttons too. PhilZ Touch 6 Recovery is now available for Moto G 2014, if you are not a fan on TWRP recovery, then this is the best solution for you too get out of it, nothing except the Custom Recovery in your device will change, from TWRP to PhilZ Touch Recovery.

Screenshot_10

Early Preparations:

This is only for Moto G 2014 (2nd GEN)

This Method is only for the device mentioned above. Make sure that your model number matches the one listed above. To do so, go to Settings > About Device on your device and see your model number. Flashing this ROM on any other device will result in bricking it so make sure that you meet this requirement first of all.

Battery should be charged at least over 60%

Make sure that your battery is charged enough to complete the flashing process. In case your battery is low and your device goes dead during the flashing process, you may end up soft bricking your device as it won’t complete the flashing process.

Unlock the Bootloader

Visit Motorola Website to Unlock the Bootloader of Moto G 2014 as it is one of the main requirement to Install the Custom Recovery and rooting the device.

Configure ADB and Fastboot

Since we are going to use command prompt to flash the recovery, it requires a Working fastboot and adb, Follow the link to Configure Fastboot for your device

Backup everything!

Just to be on the safe side, you may consider backing up each and everything from your Android device. This is highly recommended so that in case anything goes wrong, you still have the access to all of your data and you can restore it immediately. You may backup everything as listed below.

Disclaimer

The methods involved in flashing custom recoveries, roms and rooting your phone are highly custom and may result in bricking your device, and has nothing to do with Google or the device manufacturer that is Google in our case. Also rooting your device will void its warranty and you will be no longer eligible for any kind of free device services by the manufacturers/warranty providers. In case of any mishap we may not be held responsible. Follow these instructions to the letter to avoid any mishap or bricking. Make sure that whatever you do, you are doing it at your own responsibility

Downloads Required:

PhilZ Touch Recovery: Link (titan)

Super SU: Link (If you want to root your device)

How To Install PhilZ Touch Recovery:

  1. Download recovery from above.
  2. Copy the recovery to fastboot folder.
  3. Open Bootloader/Fastboot mode. How? Connect your device with PC and open Command prompt in fastboot folder,How? Hold Shift Key and Right Click anywhere in the Fastboot folder
  4. Now Type: adb reboot bootloader
  5. Once in Bootloader, type in the following command: fastboot flash recovery CWM_Touch_Titan.img Press Enter.
  6. Then type in the following command: fastboot reboot.
  7. After the reboot, take out the battery and wait for at least 10 seconds.
  8. Then re-insert the battery

How To Flash Super SU for Rooting:

  1. Download Super SU from Above link.
  2. Copy it to the root of your sdcard.
  3. Connect your device with PC.
  4. Boot into Recovery, How? Connect your device with PC,Open Command prompt in fastboot folder.
  5. Now Type: adb reboot recovery
  6. Go to Main Menu and Tap Flash Zip.
  7. Locate the Super SU.zip, and Tap on it To install it.
  8. Once the Installation is over, Go Back and Choose Reboot System Now.
  9. Now check Super User app in Drawer or use any root checker app to verify

iPad Air 2 and iPad Pro Real Concepts and Photos [ Till Now ]

0
iPad Air 2 and iPad Pro Real Concepts and Photos [ Till Now ]

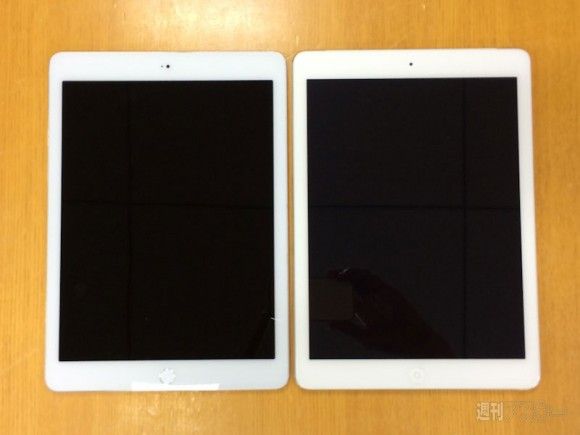
Now the iPhone 6 and iPhone 6 Plus are here with a bigger screen, iOS 8, new design and better camera then other manufacturers. Whats left is iPad and Macbook well no need to wait so long on Oct 16 Apple is planning another event in which they are announcing the new Macbook along with iPad Air 2 or iPad Pro. We have to wait till 16th October to see what we are getting Air 2, Pro or may be both.

Air2-LEAK-01-580-90-1

As we talked about the specs of iPad Air 2, all we know is 0.5mm thinner, 5MP or 8Mp, 720p FaceTime video calls, Apple A8 chip, 2GB of RAM, Storage options are 32GB, 64GB and 128GB no more 16GB this time. I’ve collected the real concepts and photos of iPad Air 2 and iPad Pro.

iPad Air 2 Real Concepts and Photos

iPad Pro Specs:

  • A8X processor
  • 12.9-inch screen
  • hybrid tablet/laptop

iPad Pro Real Concepts and Photos

Image credit: Google Images.

Download Google News & Weather App for iPhone, iPad and iPod Touch Devices

0
Download Google News & Weather App for iPhone, iPad and iPod Touch Devices

Well the Big G know how to get what is the best for the company it doesn’t matter that iOS is a big competitor for Android they are developing Android stock apps for iOS device. First we have seen Gmail, Google Drive, Google Search, Google Maps, Google Voice, and Google Authenticator for iOS and now Google News & Weather App for iPhone, iPad and iPod Touch Devices. Now you can watch weather forecast and the latest news from the best news and weather app.

image-Google-News-and-Weather


Main Features Of Google News & Weather App:

° Coverage from 65,000 publications
° Simple swipe-access to categories such as Top Stories, Technology, Sports & Weather
° Tune your layout with any of 60 country-specific editions and personalized news sections such as ‘Hollywood’, ‘NASA’, ‘Fashion’, or anything else that catches your fancy
° Tap any story for a deep selection of viewpoints, including in-depth articles, Opinion, and local perspectives

Google-News-Weather-on-the-App-Store-on-iTunes

Compatibility: Requires iOS 7.0 or later. Download From Here.

Download Terraria 1.1.5963 APK for Android

0
Download Terraria 1.1.5963 APK for Android

This is the TRIAL version of Terraria for tablet and phone. DIG! FIGHT! EXPLORE! BUILD! The critically-acclaimed, best-selling indie sandbox adventure has finally arrived on Android! In Terraria, every world is unique — from the floating islands in the sky to the deepest level of The Underworld. Adventure to the ends of the earth, and defeat villainous bosses along the way. The world is your canvas. You can download Terraria 1.1.5963 APK for Android from the following links, if you want the complete version you’ve to buy it from Google Play Store.

com.and.games505.Terraria-2

Terraria is an adventure game where you’ll get a chance to explore the whole world from A to Z. You have to face the different kind of enemies who’ll keep coming along with your Journey. In the paid version of Terraria multi player option is added now you and your friends can easily play from their devices and enjoy the funtastic ride of underworld, floating islands and to ends of the earth.

Terraria Features:

Limitations of the Trial version

· Does not save progress
· Limited to the Tutorial World only.

BUY the Full Game Unlock to access:

– NOW WITH MULTIPLAYER! Wi-fi games support up to 4 players! Play Terraria with friends across any other mobile devices! Adventure together or duel each other in player-vs-player combat!

– 200+ CRAFTING RECIPES – weapons, armor, potions, and more!

– 25+ BLOCK TYPES to build anything you can imagine!

– 75+ MONSTERS!

– 5 BOSSES!

– Over a DOZEN environments to explore!

– Dynamic water & lava, day/night cycles!

– 10+ NPCs to meet and recruit to your home!

– Find and summon the Exclusive Android Pet!

– Google Play Game Services leaderboards & achievements!

Whats New:

  • The Oktoberfest festival is here! The merchant has made some of his famous brew and the clothier is selling traditional festival clothes.
  • Minor bug fixes.

com.and.games505.Terraria-0


Download iOS 8.1 Beta 2 ISPW Firmware [ Direct Links ]

0
Download iOS 8.1 Beta 2 ISPW Firmware [ Direct Links ]

Few days back Apple rolled out iOS 8.1 beta 1 a week ago to fix the bugs and now they rolled out iOS 8.1 beta 2 for developers only. You can download iOS 8.1 beta 2 for iPhone, iPad and iPod touch devices. iOS 8.1 beta 2 is rolled out with build number 12B407 and contains few bugs fix and improvements of latest features.

iOS-8.1-Beta-2


You can download iOS 8.1 Beta 2 from the Apple Dev account or if you are running iOS 8.1 beta 1 then you update your device via OTA by going to Settings –> General –> Software Update.

Following are the direct download links of the iOS 8.1 beta 2, kindly download the iPSW firmware according to your device model.

iOS-8.1-Beta-2-download

Direct Download Links:

You need to have a developer ID to download them.

How To Root Galaxy S5 Mini SM-G800H/M/Y

3
How To Root Galaxy S5 Mini SM-G800H/M/Y

Samsung’s Mini series of the Galaxy devices has reached the Galaxy S5 now. Galaxy S5 Mini came out in March, 2015. Although it’s a mini variant, but it’s above mid-range specifications make it stand very well in line with the past flagship of giant smartphone manufacturers. Galaxy S5 Mini flaunts a beautiful 4.5-inch screen with 720 x 1280 pixels resolution with 326 ppi, that’s quite similar to the display of the Galaxy S3. Samsung has powered this device up with Exynos 3 Quad 3470 Quad-Core CPU clocked at 1.4 GHz that is accompanied by Mali-400MP4 CPU. There’s a 1.5 GB RAM and internal storage is 16 GB, that makes it a cool upgrade over the previous Mini Galaxies which only had 8 GB internal storage. Galaxy S5 Mini has a 2100 mAh battery under the hood which is same as that of the Galaxy S3. Out of the box, S5 Mini runs on Android 4.4.2 KitKat having Samsung’s latest TouchWiz UI that it introduced along with the Galaxy S5.

S5 Mini’s development seems to be in run now. If you happen to own this device and you also happen to be an Android power user, the very first step towards unveiling the true potential of your device is to root it. There hasn’t been any method to root this device but recently XDA recognized developer Chainfire brought up his famous CF-Auto-Root for all the variants of the Mini S5. If you’ve been looking for this method, you might have spotted the right place. As you scroll down, you will find a complete guide to root your Galaxy S5 Mini SM-G800H, G800M & G800Y using CF-Auto-Root. For the newbies, we will first go through a brief overview of the root access and know what you can do once you’ve rooted your device.

Samsung Galaxy S5 Mini 019_Dynamic1_white-580-90

What is root access and why you should root your Galaxy S5 Mini?

Rooting your phone gives you complete access over all the data which is apparently locked by the manufacturers. This includes removal of the factory restrictions and making changes to the internal system and the operating system. Gaining the root access gives you the privileges to install various applications to enhance the performance of your device, allows you to remove the built-in applications/programs, helps you to upgrade the battery life of your device & install the apps which require the root access for the proper functionality and modify your device in so many other ways e.g using mods and flashing custom recoveries and custom ROMs. Here’s our collection of 10 Best Root Apps.

Early Preps:

1. This guide is only for Samsung Galaxy S5 Mini SM-G800H, SM-G800M & SM-G800Y

Make sure that your device is exactly as mentioned above. To check out what device you have, go to Settings > More/General > About Device or Settings > About Device and match the model number. Be careful about the device model number, flashing a file on a device not listed here might result in bricking it up.

In case you are looking to root Galaxy S5 Mini SM-G800F, check out this guide.

2. Battery should be charged at least 60%!

Your device’s battery shouldn’t be weak. In case your device goes dead during the flashing process, your device may get soft bricked and you might be in need of flashing stock firmware and that will ultimately result in wiping up your data as well. So, make sure that you charge your device before you start the flashing process.

3. Use the OEM datacable to establish connection!

Always use the original data cable to establish connection between your Android device and your computer / laptop. Using ordinary data cables might interrupt the flashing process, so to avoid any mishap, you need to meet this requirement as well.

4. Backup everything!

Just to be on the safe side, you may consider backing up each and everything from your Android device. This is highly recommended so that in case anything goes wrong, you still have the access to all of your data and you can restore it immediately. You may backup everything as listed below.

5. Turn off Samsung Kies and other softwares while using Odin3!

Make sure that you turn off Samsung Kies while using Odin3 flashtool. Samsung Kies will interrupt Odin3 and will result in causing errors and may not let you flash your desired recovery or root file. Also, make sure that you turn off any antivirus software you’ve installed and also disable firewall to avoid any connection and flashing issues.

6. Disclaimer

The methods involved in flashing custom recoveries, ROMs and rooting your phone are highly custom and may result in bricking your device, and has nothing to do with Google or the device manufacturer that is SAMSUNG in our case. Also rooting your device will void its warranty and you will be no longer eligible for any kind of free device services by the manufacturers/warranty providers. If your device comes with a Knox counter on the bootloader, it will be tripped and you won’t be able to reset it again. In case of any mishap we may not be held responsible. Follow these instructions to the letter to avoid any mishap or bricking. Make sure that whatever you do, you are doing it at your own responsibility.

How To Root Samsung S5 Mini SM-G800H, G800M Or G800Y

Downloads Required:

  1. Download and extract Odin3 v3.09.
  2. Download and Install Samsung USB drivers
  3. Download and extract CF-Auto-Root file for your Variant.

How to root now:

  1. Extract the downloaded CF-Auto-Root  file once only to get the .tar.md5 file.
  2. Open Odin3.exe.
  3. Put your Galaxy S5 Mini in download mode. To do so, turn it off and wait for 10 seconds. Turn it on by pressing and
    holding Volume Down + Home Button + Power Key simultaneously, You should see a warning, press Volume Up to continue. In case this method doesn’t work for you, try one from this guide.
  4. Connect your device to your PC.
  5. As soon as Odin detects your phone, the ID:COM box should turn blue.  Make sure that you’ve installed Samsung USB drivers before connecting.
  6. For Odin 3.09 hit the AP tab. Select the CF-Auto-Root.tar.md5, that you downloaded and extracted above.
  7. If you’re using Odin 3.07, you will select “PDA” tab instead of the AP tab, rest of the options remain untouched.
  8. Make sure that the options selected in your Odin are exactly as shown in the pic.Odin-3.09-explained.-2
  9. Hit start and wait till the rooting process is complete, as soon as your device restarts, remove it from PC.
  10. Find SuperSu in app drawer now.
  11. That’s all with the rooting, let’s verify the root access now.

How To Verify Root Access:

  1. To do so, go to Google Play Store on your Galaxy S5 Mini.
  2. Find “Root Checker” and install it.
  3. Open Root Checker.
  4. Tap “Verify Root”.
  5. It will ask you for SuperSu rights, tap “Grant”.
  6. It should show you Root Access Verified Now!
  7. That’s All!

If you’re stuck with anything regarding this guide, feel free to utilize the comment box below and reach us. We will get back to you immediately. Thank you all.

Credits: Chainfire XDA

How To Root Samsung Galaxy Note 4 SM-N9106W

0
How To Root Samsung Galaxy Note 4 SM-N9106W

Chinese variant of the Galaxy Note 4, SM-N9106W has been rooted successfully by XDA recognized developer Chainfire. Chainfire’s famous CF-Auto-root is up now, that works with Galaxy Note 4 SM-N910C/U and the Chinese variant as well, as mentioned. SM-N910W comes with a Qualcomm Snapdragon 805 Quad Core CPU, the device supports LTE and TD-LTE connectivity. While on the front, a QHD screen with a resolution of 1440 x 2560 pixels having 515 ppi can be found. A 3.7 MP front cam shooter is there and a 16 MP shooter is fixed at the back. Under the hood, a RAM of 3 GB is placed, internal storage is 32 GB and a massive 3220 mAh battery is there. SM-N9106W has a Dual-SIM connectivity. The device runs on Android 4.4.4 KitKat and will most probably be China-specific.

In case you’re going to get your hands on this variant, you would like to unleash the true power of your device. For that, you will have to root it first and then tweak your device as much as you want. If you’ve been looking for the method to root your device and you just got here, you have spotted the right place. As you move forward, you should come across a comprehensive guide that will help you to root your Galaxy Note 4 SM-N9106W using Chainfire’s CF-Auto-Root. Before we begin with the rooting process, it is important to remove any confusions that the newbies may have regarding the root access. In order to do so, we will first go through a brief introduction of the root access and also learn why you should root your Galaxy Note 4 SM-N9106W.

Samsung-Galaxy-Note-4-frost-white-image

What is Root access & why you should root your device

Rooting your phone gives you complete access over all the data which is apparently locked by the manufacturers. This includes removal of the factory restrictions and making changes to the internal system and the operating system. Gaining the root access gives you the privileges to install various applications to enhance the performance of your device, allows you to remove the built-in applications/programs, helps you to upgrade the battery life of your device & install the apps which require the root access for the proper functionality and modify your device in so many other ways e.g using mods and flashing custom recoveries and custom ROMs. Here’s our collection of 10 Best Root Apps.

Early Preps:

1. This guide is only for Samsung Galaxy Note 4 SM-N9106W

Make sure that your device is exactly as mentioned above. To check out what device you have, go to Settings > More/General > About Device or Settings > About Device and match the model number. Be careful about the device model number, flashing a file on a device not listed here might result in bricking it up.

2. Battery should be charged at least 60%!

Your device’s battery shouldn’t be weak. In case your device goes dead during the flashing process, your device may get soft bricked and you might be in need of flashing stock firmware and that will ultimately result in wiping up your data as well. So, make sure that you charge your device before you start the flashing process.

3. Use the OEM datacable to establish connection!

Always use the original data cable to establish connection between your Android device and your computer / laptop. Using ordinary data cables might interrupt the flashing process, so to avoid any mishap, you need to meet this requirement as well.

4. Backup everything!

Just to be on the safe side, you may consider backing up each and everything from your Android device. This is highly recommended so that in case anything goes wrong, you still have the access to all of your data and you can restore it immediately. You may backup everything as listed below.

5. Turn off Samsung Kies and other softwares while using Odin3!

Make sure that you turn off Samsung Kies while using Odin3 flashtool. Samsung Kies will interrupt Odin3 and will result in causing errors and may not let you flash your desired recovery or root file. Also, make sure that you turn off any antivirus software you’ve installed and also disable firewall to avoid any connection and flashing issues.

6. Disclaimer

The methods involved in flashing custom recoveries, roms and rooting your phone are highly custom and may result in bricking your device, and has nothing to do with Google or the device manufacturer that is SAMSUNG in our case. Also rooting your device will void its warranty and you will be no longer eligible for any kind of free device services by the manufacturers/warranty providers. If your device comes with a Knox counter on the bootloader, it will be tripped and you won’t be able to reset it again. In case of any mishap we may not be held responsible. Follow these instructions to the letter to avoid any mishap or bricking. Make sure that whatever you do, you are doing it at your own responsibility.

How To Root Samsung Galaxy Note 4 SM-N9106W

Downloads Required:

  1. Download and extract Odin3 v3.09.
  2. Download and Install Samsung USB drivers
  3. Download and extract CF-Auto-Root file.
    1. CF-Auto-Root-trltechn-trlteduoszn-smn9106w.zip

How to root now:

  1. Extract the downloaded CF-Auto-Root  file once only to get the .tar.md5 file.
  2. Open Odin3.exe.
  3. Put your Galaxy Note 4 SM-N9106W in download mode. To do so, turn it off and wait for 10 seconds. Turn it on by pressing and
    holding Volume Down + Home Button + Power Key simultaneously, You should see a warning, press Volume Up to continue. In case this method doesn’t work for you, try one from this guide.
  4. Connect your device to your PC.
  5. As soon as Odin detects your phone, the ID:COM box should turn blue.  Make sure that you’ve installed Samsung USB drivers before connecting.
  6. For Odin 3.09 hit the AP tab. Select the CF-Auto-Root.tar.md5, that you downloaded and extracted above.
  7. If you’re using Odin 3.07, you will select “PDA” tab instead of the AP tab, rest of the options remain untouched.
  8. Make sure that the options selected in your Odin are exactly as shown in the pic. Odin-3.09-explained.-2
  9. Hit start and wait till the rooting process is complete, as soon as your device restarts, remove it from PC.
  10. Find SuperSu in app drawer now.
  11. That’s all with the rooting, let’s verify the root access now.

How To Verify Root Access:

  1. To do so, go to Google Play Store on your Galaxy Note 4 SM-N9106W
  2. Find “Root Checker” and install it.
  3. Open Root Checker.
  4. Tap “Verify Root”.
  5. It will ask you for SuperSu rights, tap “Grant”.
  6. It should show you Root Access Verified Now!
  7. That’s All!

If you’re stuck with anything regarding this guide, feel free to utilize the comment box below and reach us. We will get back to you immediately. Thank you all.

Credits: Chainfire XDA

How To Restore OnePlus One To Stock/Official Firmware

3
How To Restore OnePlus One To Stock/Official Firmware

OnePlus One is no doubt a Flagship killer device, however, getting it is also a killer thing, to make sure that fewer people get their hands on it, and also OnePlus force people to give out some charity and attend their events for more Publicity, they make sure that the invitation to get the OnePlus One is available only when you attend their event or someone else who has attend the even can get the devices for you, the whole process is not complicated, however, a lengthy one. All the details are available on their official site, do visit, our job here is to make sure that your OnePlus One remains great till end, not how you can purchase it. Since we posted the Rooting method and Custom Recoveries for this device, we can assume that those who got their hands on it, must have rooted it and flashed Custom Recovery on it, now most probably they must have been looking for a way to restore it, as every Android users looks for after making a lot of Customizations.

Most of the time, restoring the devices to Stock is quite time consuming and difficult job, especially if you own a Nexus device or Motorola Device, it is quite hell of a job to Restore them, as you have to Give the commands to do so, however, Samsung and LG are easy they have tools to do so, So is the OnePlus One, all you need is to download and Start the Program, everything will be done without any problem. Without further ado, let’s continue.

awce-800

Early Preparations:

1. This is only for OnePlus Ons!

This custom ROM is only for the device mentioned above. Make sure that your model number matches the one listed above. To do so, go to Settings > About Device on your device and see your model number. Flashing this ROM on any other device will result in bricking it so make sure that you meet this requirement first of all.

2. Battery should be charged at least over 60%

Make sure that your battery is charged enough to complete the flashing process. In case your battery is low and your device goes dead during the flashing process, you may end up soft bricking your device as it won’t complete the flashing process.

3. Backup everything!

Just to be on the safe side, you may consider backing up each and everything from your Android device. This is highly recommended so that in case anything goes wrong, you still have the access to all of your data and you can restore it immediately. You may backup everything as listed below.N

4. Disclaimer

The methods involved in flashing custom recoveries, roms and rooting your phone are highly custom and may result in bricking your device, and has nothing to do with Google or the device manufacturer that is OnePlus in our case. Also rooting your device will void its warranty and you will be no longer eligible for any kind of free device services by the manufacturers/warranty providers. In the case of any mishap we may not be held responsible. Follow these instructions to the letter to avoid any mishap or bricking. Make sure that whatever you do, you are doing it at your own responsibility

Downloads Required:

  • XNPH33R 16GB: Link
  • XNPH33R 64GB: Link
  • Boot Unlocker Script: Link

How To Restore OnePlus One:

  1. flash-all.bat (Windows)
  2. flash-all.sh (Linux)
  • Reboot your device to Fastboot mode and Connect it to PC.
  • Now Double-click the Flash-all file according to the OS or System you have.
  • The process will start and once it is over, your device will reboot.
  • Now everything will be back to stock, even the Bootloader will be Locked.

How To Get Rid of Unauthorized Flash Warning:

  • On the Process of Unlocking the bootloader, you will keep getting a warning about an unauthorized flash.
  • To get rid of this Problem, We need to Restore the Flag Bits as well.
  • First of all, You need to install either CWM or TWRP Recovery (rooting process included)
  • Now Copy the Boot Unlocker.zip to the root of your Sdcard.
  • Boot into recovery and Flash it from there.
  • Reboot the device.
  • Enjoy your Completely stock OnePlus One

How To Root Samsung Galaxy Note 4 SM-N910C

0
How To Root Samsung Galaxy Note 4 SM-N910C

And here we go, Chainfire does it once again first of all. Just yesterday, XDA recognized developer, Chainfire came up with his famous Auto-Root for our beloved Samsung Galaxy Note 4 and becomes the very first person to gain the root access on this mighty device. The Galaxy Note 4 isn’t out in the market yet and the device already has been rooted, that means you can unleash the real power of this device as soon as you get your hands on it.

Before we proceed further, let’s have a recap on the Galaxy Note 4. The Galaxy Note 4 is the fourth iteration of Samsung’s Galaxy Note phablet series. The device came out on 3rd of September, 2014 at the IFA event 2014. On the front, there’s a 5.7-inch QHD display having a resolution of 2560 x 1440 pixels and 515 ppi. Front facing camera shooter is of 3.7 megapixels while a 16 MP shooter is fixed at the back. Galaxy Note 4 is either powered up with Qualcomm’s Snapdragon 805 Quad Core CPU or Samsung’s very own Exynos 5433 CPU, it differs according to the variants reaching different regions. There’s a 3 GB RAM, and the internal storage begins from 32 GB, there’s an external SD card slot as well. Out of the box, Galaxy Note 4 runs on Android 4.4.4 KitKat, having Samsung’s latest touchwiz UI atop. Besides these very nice and hefty hardware and software specifications, Galaxy Note 4 comes with a plethora of sensors that make this device a pure beast.

Well, that was all about the Note 4. Now who wouldn’t like to go across the boundaries on such an awesome device. If you’ve just decided to unleash the power of the Galaxy Note 4, you will have to root it first and as mentioned, the method is already up. In case you’re wondering how you will get across the corner, we will be saving your time from getting wasted and looking around for this. In the succeeding post, we are going to root the Galaxy Note 4 SM-N910C (Exynos/International Variant) using Chainfire’s CF-Autoroot. You only need to follow this guide being careful to avoid any mishaps. Before we begin with the pre-installation instructions, we will go through a brief introduction of root access in order to wipe off any confusions that the newbies may have.Samsung-Galaxy-Note-4

Here’s why you should root your Galaxy Note 4:

Rooting your phone gives you complete access over all the data which is apparently locked by the manufacturers. This includes removal of the factory restrictions and making changes to the internal system and the operating system. Gaining the root access gives you the privileges to install various applications to enhance the performance of your device, allows you to remove the built-in applications/programs, helps you to upgrade the battery life of your device & install the apps which require the root access for the proper functionality and modify your device in so many other ways e.g using mods and flashing custom recoveries and custom ROMs. Here’s our collection of 10 Best Root Apps.

All you need is, you need to follow this guide carefully in order to get it done successfully.

Early Preps:

1. This guide is only for Samsung Galaxy Note 4 SM-N910C

Make sure that your device is exactly as mentioned above. To check out what device you have, go to Settings > More/General > About Device or Settings > About Device and match the model number. Be careful about the device model number, flashing a file on a device not listed here might result in bricking it up.

2. Battery should be charged at least 60%!

Your device’s battery shouldn’t be weak. In case your device goes dead during the flashing process, your device may get soft bricked and you might be in need of flashing stock firmware and that will ultimately result in wiping up your data as well. So, make sure that you charge your device before you start the flashing process.

3. Use the OEM datacable to establish connection!

Always use the original data cable to establish connection between your Android device and your computer / laptop. Using ordinary data cables might interrupt the flashing process, so to avoid any mishap, you need to meet this requirement as well.

4. Backup everything!

Just to be on the safe side, you may consider backing up each and everything from your Android device. This is highly recommended so that in case anything goes wrong, you still have the access to all of your data and you can restore it immediately. You may backup everything as listed below.

Backup SMS Messages
Backup Call Logs
Backup Contacts
Backup Media – Copy your files manually to your PC or Laptop.
Backup EFS

5. Turn off Samsung Kies and other softwares while using Odin3!

Make sure that you turn off Samsung Kies while using Odin3 flashtool. Samsung Kies will interrupt Odin3 and will result in causing errors and may not let you flash your desired recovery or root file. Also, make sure that you turn off any antivirus software you’ve installed and also disable firewall to avoid any connection and flashing issues.

6. Disclaimer

The methods involved in flashing custom recoveries, roms and rooting your phone are highly custom and may result in bricking your device, and has nothing to do with Google or the device manufacturer that is SAMSUNG in our case. Also rooting your device will void its warranty and you will be no longer eligible for any kind of free device services by the manufacturers/warranty providers. If your device comes with a Knox counter on the bootloader, it will be tripped and you won’t be able to reset it again. In case of any mishap we may not be held responsible. Follow these instructions to the letter to avoid any mishap or bricking. Make sure that whatever you do, you are doing it at your own responsibility.

How To Root Samsung Galaxy Note 4 SM-N910C

Downloads Required:

  1. Download and extract Odin3 v3.09.
  2. Download and Install Samsung USB drivers
  3. Download and extract CF-Auto-Root file.
    1. CF-Auto-Root-trelte-treltexx-smn910c.zip

How to root now:

  1. Extract the downloaded CF-Auto-Root  file once only to get the .tar.md5 file.
  2. Open Odin3.exe.
  3. Put your Galaxy Note 4 SM-N910C in download mode. To do so, turn it off and wait for 10 seconds. Turn it on by pressing and holding Volume Down + Home Button + Power Key simultaneously, You should see a warning, press Volume Up to continue. In case this method doesn’t work for you, try one from this guide.
  4. Connect your device to your PC.
  5. As soon as Odin detects your phone, the ID:COM box should turn blue.  Make sure that you’ve installed Samsung USB drivers before connecting.
  6. For Odin 3.09 hit the AP tab. Select the CF-Auto-Root.tar.md5, that you downloaded and extracted above.
  7. If you’re using Odin 3.07, you will select “PDA” tab instead of the AP tab, rest of the options remain untouched.
  8. Make sure that the options selected in your Odin are exactly as shown in the pic.Odin-3.09-explained.-2
  9. Hit start and wait till the rooting process is complete, as soon as your device restarts, remove it from PC.
  10. Find SuperSu in app drawer now.
  11. That’s all with the rooting, let’s verify the root access now.

How To Verify Root Access:

  1. To do so, go to Google Play Store on your Galaxy Note 4 SM-N910C.
  2. Find “Root Checker” and install it.
  3. Open Root Checker.
  4. Tap “Verify Root”.
  5. It will ask you for SuperSu rights, tap “Grant”.
  6. It should show you Root Access Verified Now!
  7. That’s All!

If you’re stuck with anything regarding this guide, feel free to utilize the comment box below and reach us. We will get back to you immediately. Thank you all.

How To Root Samsung Galaxy S5 Mini SM-G800F

0
How To Root Samsung Galaxy S5 Mini SM-G800F

It’s been a few months since the Galaxy S5 Mini came around, but so far, there hasn’t been much development work done on this device anywhere. It was pretty hard to root this device as well as there was no prominent workaround available on that either. Luckily, the root access for the device is available, this has been done by XDA recognized developer Chainfire, who is quite popular for his work on SuperSu and CF-Auto-Root. Galaxy S5 Mini SM-G800F can be easily rooted using Chainfire’s CF-Auto-Root. AS you move forward, you will come across the method to use CF-Auto-Root and gain the root access without any hiccups here and there.

If you’ve got your hands on this nice device, and you are willing to gain the root access in order to make the best use of it, you may follow the proceeding guide. Before we begin with the instructions and rooting procedure, we will first go through a brief introduction of the root access so that the newbies do not get confused with anything.

Samsung_Galaxy_S5_mini_front

Here’s why you should root your Galaxy S5 Mini SM-G800F

Rooting your phone gives you complete access over all the data which is apparently locked by the manufacturers. This includes removal of the factory restrictions and making changes to the internal system and the operating system. Gaining the root access gives you the privileges to install various applications to enhance the performance of your device, allows you to remove the built-in applications/programs, helps you to upgrade the battery life of your device & install the apps which require the root access for the proper functionality and modify your device in so many other ways e.g using mods and flashing custom recoveries and custom ROMs. Here’s our collection of 10 Best Root Apps.

All you need is, you need to follow this guide carefully in order to get it done successfully.

Early Preps:

1. This guide is only for Samsung Galaxy S5 Mini SM-G800F

Make sure that your device is exactly as mentioned above. To check out what device you have, go to Settings > More/General > About Device or Settings > About Device and match the model number. Be careful about the device model number, flashing a file on a device not listed here might result in bricking it up.

2. Battery should be charged at least 60%!

Your device’s battery shouldn’t be weak. In case your device goes dead during the flashing process, your device may get soft bricked and you might be in need of flashing stock firmware and that will ultimately result in wiping up your data as well. So, make sure that you charge your device before you start the flashing process.

3. Use the OEM datacable to establish connection!

Always use the original data cable to establish connection between your Android device and your computer / laptop. Using ordinary data cables might interrupt the flashing process, so to avoid any mishap, you need to meet this requirement as well.

4. Backup everything!

Just to be on the safe side, you may consider backing up each and everything from your Android device. This is highly recommended so that in case anything goes wrong, you still have the access to all of your data and you can restore it immediately. You may backup everything as listed below.

5. Turn off Samsung Kies and other softwares while using Odin3!

Make sure that you turn off Samsung Kies while using Odin3 flashtool. Samsung Kies will interrupt Odin3 and will result in causing errors and may not let you flash your desired recovery or root file. Also, make sure that you turn off any antivirus software you’ve installed and also disable firewall to avoid any connection and flashing issues.

6. Disclaimer

The methods involved in flashing custom recoveries, roms and rooting your phone are highly custom and may result in bricking your device, and has nothing to do with Google or the device manufacturer that is SAMSUNG in our case. Also rooting your device will void its warranty and you will be no longer eligible for any kind of free device services by the manufacturers/warranty providers. In case of any mishap we may not be held responsible. Follow these instructions to the letter to avoid any mishap or bricking. Make sure that whatever you do, you are doing it at your own responsibility.

How To Root Samsung Galaxy S5 Mini SM-G800F

Downloads Required:

How to root now:

  1. Extract the downloaded cf_autoroot.tar.md5.zip file once to get the .tar.md5 file.
  2. Open Odin3.exe.
  3. Put your Galaxy S5 Mini  in download mode. To do so, turn it off and wait for 10 seconds. Turn it on by pressing and holding Volume Down + Home Button + Power Key simultaneously, You should see a warning, press Volume Up to continue. In case this method doesn’t work for you, try one from this guide.
  4. Connect your device to your PC.
  5. As soon as Odin detects your phone, the ID:COM box should turn blue.  Make sure that you’ve installed Samsung USB drivers before connecting.
  6. For Odin 3.09 hit the AP tab. Select the cf_autoroot.tar.md5, that you downloaded and extracted above.
  7. If you’re using Odin 3.07, you will select “PDA” tab instead of the AP tab, rest of the options remain untouched.
  8. Make sure that the options selected in your Odin are exactly as shown in the pic.
  9. Odin 3.09 explained. (2)
  10. Hit start and wait till the rooting process is complete, as soon as your device restarts, remove it from PC.
  11. Find SuperSu in app drawer now.
  12. That’s all with the rooting, now it’s recommended that you install the stock recovery on your device.
  13. To do so, follow the steps from 3 – 9 once again now, but this time you will flash stock recovery.tar.md5 file.
  14. That’s all with the whole process.

How To Verify Root Access:

    1. To do so, go to Google Play Store on your Galaxy S5 Mini.
    2. Find “Root Checker” and install it.
    3. Open Root Checker.
    4. Tap “Verify Root”.
    5. It will ask you for SuperSu rights, tap “Grant”.
    6. It should show you Root Access Verified Now!
    7. That’s All!

You may also want to learn How To Unroot & Restore Stock Firmware On Samsung Galaxy S5 Mini [All Variants].

If you’re stuck with anything regarding this guide, feel free to utilize the comment box below and reach us. We will get back to you immediately. Thank you all.