Home Blog Page 410

How To Install TWRP Recovery On Sprint Galaxy Note 4

0
How To Install TWRP Recovery On Sprint Galaxy Note 4

TWRP is the most active recovery when it comes to arriving on the Android devices, mostly these devices got root after the installation of custom recovery. Although I never liked this recovery, but this recovery brings the great start for any device, if the users is looking for Customization of their device, I would have wait for the CWM Recovery as it is my Favourite one, however, if you want to make some early amendments in your device, this would be the perfect chance for you to get started. There are no Custom ROMs available for this device for now, but that doesn’t mean there won’t be any available for it in near future. Whatever the case be, TWPR recovery is now available for Sprint Galaxy Note 4, Previously it was arrived for T-Mobile Galaxy Note 4, and we are going to show you how to install it.

The Whole Process is simple and only needs few click, as we are going to use Odin in such matter, if you are not familiar with Odin and its working, pay a little close attention towards the tutorial. If you don’t want to use Odin, you can look for an alternate method, which requires commanding and active ADB drivers, Yeah! I know it is difficult, I also use Odin a lot more than ADB Shell. So, Without further ado, Let us begin.

TWRP-Recovery

Early Preparations:

1. This guide is only for Sprint Galaxy Note 4!

Make sure that your device is exactly as mentioned above. To check out what device you have, go to Settings > More/General > About Device or Settings > About Device and match the model number. Be careful about the device model number, flashing a file on a device not listed here might result in bricking it up. In that case, we may not be held responsible.

2. Battery should be charged at least 60%!

Your device’s battery shouldn’t be weak. In case your device goes dead during the flashing process, your device may get soft bricked and you might be in need of flashing stock firmware and that will ultimately result in wiping up your data as well. So, make sure that you charge your device before you start the flashing process.

3. Use the OEM data-cable to establish connection!

Always use the original data cable to establish connection between your Android device and your computer / laptop. Using ordinary data cables might interrupt the flashing process, so to avoid any mishap, you need to meet this requirement as well.

4. Backup everything!

Just to be on the safe side, you may consider backing up each and everything from your Android device. This is highly recommended so that in case anything goes wrong, you still have the access to all of your data and you can restore it immediately. Also, clean install is always recommended, that means you will probably have to wipe your device to install the new firmware. So, you may backup everything as listed below.

5. Discalimer

The methods involved in flashing custom recoveries, roms and rooting your phone are highly custom and may result in bricking your device, and has nothing to do with Google or the device manufacturer that is Samsung in our case. Also rooting your device will void its warranty and you will be no longer eligible for any kind of free device services by the manufacturers/warranty providers. Incase of any mishap we may not be held responsible. Follow these instructions to the letter to avoid any mishap or bricking. Make sure that whatever you do, you are doing it at your own responsibility.

How To Install TWRP Recovery On Sprint Note 4

  1. Download and extract Odin3 v3.09.
  2. Download and Install Samsung USB drivers .
  3. Download and extract TWRP Recovery: Link (scroll to the bottom and choose the Odin method)

Method:

  1. Open Odin3.exe.
  2. Put your Galaxy Note 4 in download mode. To do so, turn it off and wait for 10 seconds. Turn it on by pressing and holding Volume Down + Home Button + Power Key simultaneously, You should see  a warning, press Volume Up to continue. In case this method doesn’t work for you, try one from this guide.
  3. Connect your device to your PC.
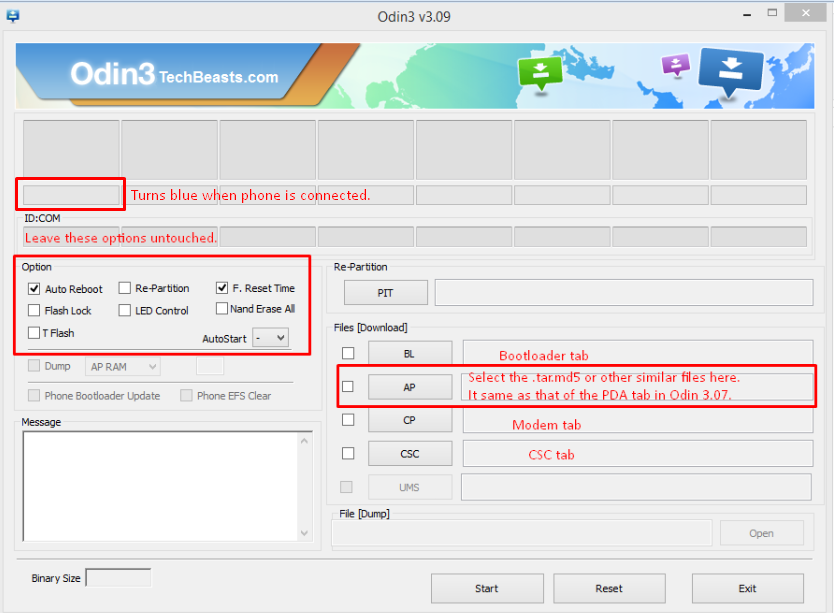
  4. As soon as Odin detects your phone, the ID:COM box should turn blue.  Make sure that you’ve installed Samsung USB drivers before connecting.
  5. For Odin 3.09 hit the AP tab. Select the .tar.md5  file or .tar file, that you downloaded and extracted above.
  6. If you’re using Odin 3.07, you will select “PDA” tab instead of the AP tab, rest of the options remain untouched.
  7. Make sure that the options selected in your Odin are exactly as shown in the pic (Do not Tick the F.reset Option)Odin-3.09-explained.-2
  8. Hit start and wait till the flashing is complete, as soon as your device restarts, remove it from PC.
  9. Wait for your device to reboot.
  10. That’s all!
  11. Now Visit Recovery Mode to Confirm

Record iPad and iPhone Screen Using Your Mac

0
Record iPad and iPhone Screen Using Your Mac

iOS 8 wasn’t the only thing that was released by Apple, that we can say as something new, Apple also released OS X Yosemite, and those who have updated their device to OS X Yosemite are seeing some new features, along with some great performance than before. I tried the beta version of this OS X and man that was the stupid Decision I have ever made, that Lag and slow performance was something that will be there in my mind, if I ever tried to update the Mac to any beta version of OS X. Still the stable version is awesome and filled with some features that are great for people like us and all those who are engaged in solving the common problems of iPhone and iPad, this Screen Recording feature will be very useful in coming times.

Yes! Now you can record your Device screen from your Mac, if your Mac is running OS X Yosemite and your device is on iOS 8 or above. Apple is doing its best to connect Mac with all of its devices, like if you are on same network, you can receive calls on your Mac, send and receive Texts. Quick-Time Player can be used to record screen of your iPhone or iPad, what you need is a Lightning Cable for Connection and other Two Requirements are already mentioned. Without further ado, let us begin.

reflector-intro

How To Record Screen Of Your iDevice:

  1. Get your iDevice.
  2. Connect it to your Mac with the Lightning Cable.
  3. Now Launch Quick-Time Player on your Mac.
  4. Navigate to File > New Screen Recording.
  5. You can ease yourself with Control + Cmd + N.
  6. Now you’ll see a new Window, with a Red Record Button
  7. Click the Drop-Down button next to that.
  8. From the Video Selection, Select your device.
  9. Do the Same with Microphone.
  10. Now if you want to Highlights the Touch you make on your iPhone/iPad, Tick the Show Mouse Clicks
  11. Now once the Settings are configured, Click the Red Record Button to Start the Recording.
  12. To Stop the Recording, just click the Menu Bar or Press  Control + Cmd + N.
  13. Enjoy!

Starbucks v2.7.2 apk Download for Android [ Android 5.0 Supported ]

0
Starbucks v2.7.2 apk Download for Android [ Android 5.0 Supported ]

Everyone loves coffee and the best out their is Starbucks famous for their coffees. Well if you want to get their coffee while working or watching a movies by just one tap, then download Starbucks v2.7.2 apk for your Android. After Google has announced their latest OS Android 5.0 Starbucks app a new interface, digital tipping, and a ton of other smart and helpful features.

Starbucks v2.7.2 apk

Main Features of Starbucks:

– Pay with your phone at company-operated Starbucks stores plus U.S.
Target and Safeway locations.
– Check the balance of your Starbucks Card, reload it, view transaction
history, and transfer balances between cards.
– Add a tip using your phone. Digital tipping on any purchase made
through your app at U.S. company-operated Starbucks stores.
– Track Stars, and redeem your My Starbucks Rewards™.
– Never miss a reward again. See available Earned Rewards, Birthday
Rewards, and Offer coupons on your barcode payment screen.
– Find a store, get directions, look up hours, and review store amenities. We’d love to hear from you.

Starbucks v2.7.2 apk Download for Android:

You can download Starbucks app from Google Play Store or you can download Starbucks v2.7.2 apk directly on your device from here. [ Starbucks v2.7.2 apk ]

How To Install Starbucks v2.7.2 apk on Android:

  1. Copy the downloaded APK file to your phone.
  2. On your Android device, go to settings > security > unknown sources > allow.
  3. Now locate the APK file on your phone and tap it to start installation.
  4. Complete the installation, once done, start the application from the app drawer.
  5. Follow the on-screen instructions.

Increase Volume Of OnePlus One With Volume Boost MOD

0
Increase Volume Of OnePlus One With Volume Boost MOD

One of the most ignored part of Android mobiles is the Sound level and Volume. Users mostly go for a High-end device, just because it has more RAM and high Power CPU, but in the end after praising the device about its Speed and Performance, once they put on the headphones, or missed a call from someone special, then they realize that the Sound and volume of this device is not as good as the one owned by their friends, which as a matter of fact, Cheap and not a high-end device. I have seen many cases, in which a person is sad just because it goes after a high-end device, because of it amazing specs and find that the device does not have such sound boost as it suppose to have.

The same is the case with OnePlus One, the flagship killer device has won thousands of hearts all over the world, because of its awesome and amazing specs with such cheap price. However, the user have complained that they are experiencing some volume issues, that it is not as loud as they want it to be. The XDA community took such things way to seriously, and as always, they too provide the solution and this time,  DARKCHYLDX101, has a MOD that will improve the Sound and Volume of your OnePlus One. There are Two Methods available, one is done through the Recovery and the other one is completely manually.

OnePlus_vm

Recovery Method:

Download the Recovery Volume Boost.zip file: Link

Download Volume Boost for Mhadi ROM: Link

Installation Process:

  • Connect your device with PC.
  • Copy and Paste the Above zip files to the root of your sdcard.
  • Open Recovery mode. How?
  1. Connect your device with PC
  2. Open Command Prompt in Fastboot folder.
  3. Now Type: adb reboot bootloader
  4. Choose Recovery from Bootloader

CWM/PhilZ Touch Recovery Users.

  1. Then Navigate to ‘advance’ and choose ‘Devlik Wipe Cache’, so you won’t get in any bootloop.
  2. Navigate to ‘Install zip from sd card’ another windows will open in front of you.
  3. Select ‘choose zip from sd card’ from the Options.
  4. Select the Volume Boost.zip file and confirm the installation on next screen.
  5. Once the Installation is Over, Select +++++Go Back+++++
  6. Select Reboot Now to Reboot the System.

TWRP Users.

  1. Tap on Wipe Button and Select Cache.
  2. Swipe the Confirmation Slider.
  3. Go back to Main Menu and Tap Install Button.
  4. Locate the VolumeBoost.zipSwipe the Slider To install it.
  5. Once the Installation is Over, you will be promoted to Reboot System Now
  6. Select Reboot Now to Reboot the System.

Root Browser Method:

mema6a2e

  1. Download and Install Root Explorer from Play Store.
  2. Once Installed, Open the app.
  3. Navigate to System/etc/mixer_path.xml
  4. Now You’ll see some modules text, like Speakers, Voice Speakers, Headphones etc.
  5. Now What you need to do is to, check for 88 Value, you’ll find it all over the screen.
  6. Search for Analogue output devices, Search for the word ear, and change the value from 88 to 93.
  7. Save the file and reboot the device for changes to take effect.

Source: XDA

Download Inbox by Gmail 1.0 APK for Android

0
Download Inbox by Gmail 1.0 APK for Android

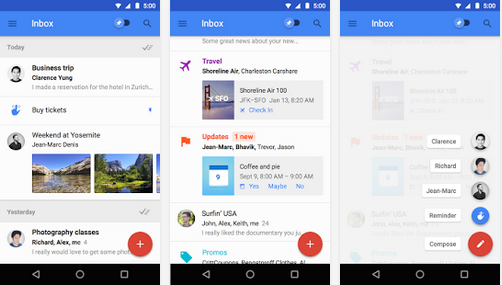
After announcement of Android 5.0 every Google Stock app is getting a make over, but today Google released a new Inbox by Gmail with an awesome interface and all new design.  Inbox team set their main focus on keeps things organized and helps you get back to what matters. This app helps you to create bundles of messages so you can organized them easily and also delete them by single tap. In this post I’ll tell you how to download and install Inbox by Gmail 1.0 APK for Android.

Inbox by Gmail 1.0 APK for Android

Main Features of Inbox by Gamil:

• BUNDLES – Similar messages are bundled together so you can deal with them all at once. And get rid of them with one tap.

• HIGHLIGHTS – Get the most important information without even opening the message. Check-in for flights, see shipping information for purchases, and view photos from friends right up front.

• REMINDERS: More than mail, you can add Reminders so your inbox contains all the things you need to get back to.

• SNOOZE: Snooze emails and Reminders to come back when you are ready to deal with them: next week, when you get home, or whenever you choose.

• SEARCH: Inbox helps you find exactly what you’re looking for— from your upcoming flight to a friend’s address— without having to dig through messages.

• WORKS WITH GMAIL: Inbox is built by the Gmail team, so all your messages from Gmail are here, along with the reliability and spam protection of Gmail. All of your messages are still in Gmail and always will be.

Download Inbox by Gmail 1.0 Android APK:

You can download Inbox by Gmail from Google Play Store or you can download Inbox by Gmail apk directly on your Android device. [ Download ]

How To Install Inbox by Gmail 1.0 Android Apk:

  1. Copy the downloaded APK file to your phone.
  2. On your Android device, go to settings > security > unknown sources > allow.
  3. Now locate the APK file on your phone and tap it to start installation.
  4. Complete the installation, once done, start the application from the app drawer.
  5. Follow the on-screen instructions.

Download the Android 5.0 Lollipop Messenger apk – SMS App

0
Download the Android 5.0 Lollipop Messenger apk – SMS App

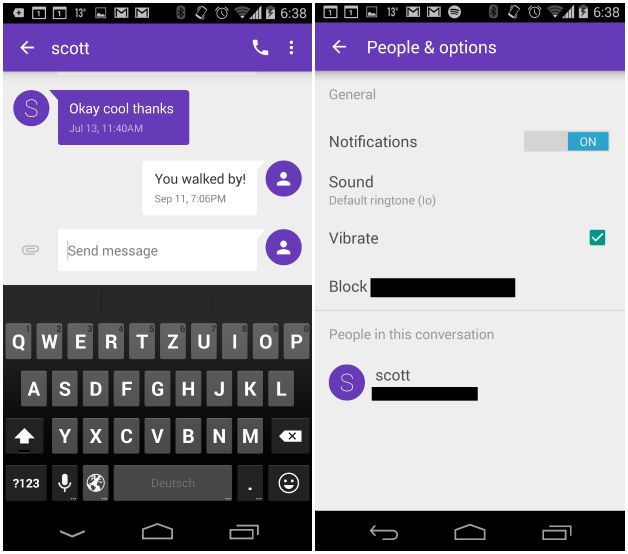
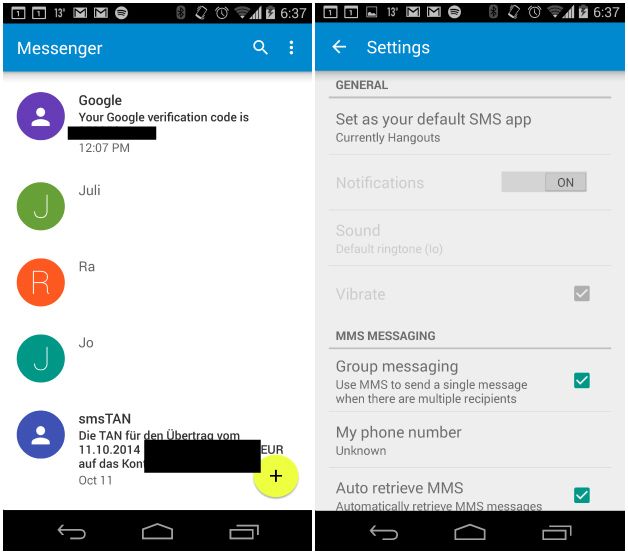
Android 5.0 Lollipop is coming with every thing new design, interface, icons, keyboards and much more. But the one thing i like most is Android 5.0 Lollipop Messenger, a updated version for Google Hangout means you don’t have to use Hangout as default messaging app for Android 5.0 Lollipop. Not every device will get Android 5.0 Lollipop update, but we can still use the main apps on our Android devices. You can download all the Android 5.0 Lollipop apps apk from here.

lollipop-sms-2

Today i got my hands on Android 5.0 Lollipop Messenger so i thought lets share it with you, so you can enjoy the new and updated version of Android 5.0 Lollipop Messenger. In the following guide i’ll explain you how to download and install Android 5.0 Lollipop Messenger apk on your Android devices.

Download the Android 5.0 Lollipop Messenger:

Android 5.0 Lollipop Messenger is designed by Google but its not added on Play Store. Nexus 6 will come with this new Android 5.0 Lollipop  messenger.

Link: Google Messenger APK

messenger-lollipop

How To Install Android 5.0 Lollipop Messenger apk on Android:

  1. Copy the downloaded APK file to your phone.
  2. On your Android device, go to settings > security > unknown sources > allow.
  3. Now locate the APK file on your phone and tap it to start installation.
  4. Complete the installation, once done, start the application from the app drawer.
  5. Follow the on-screen instructions.

How To Install TWRP Recovery On T-Mobile Galaxy Note 4 SM-N910T

0
How To Install TWRP Recovery On T-Mobile Galaxy Note 4 SM-N910T

Generally what comes after the Rooting of an Android device is flashing the TWRP Recovery on the same one. What I have seen most of the times, that TWRP recovery, though not like by most user, comes first for every device, afterwards we get to see the CWM Recovery. Well whatever the case is, TWRP Recovery is here and if you got time and the device which is called a Galaxy Note 4 distributed by T-Mobile, you can flash this Custom Recovery on your device, however, after rooting your device. If you haven’t root your device yet, follow the link to do so. Since the Custom Recovery is here, most probably we are about to see Custom ROMs for this device too, but they are going to take a little more time, till then flash this recovery and wait.

The Whole Process is simple and only needs few click, as we are going to use Odin in such matter, if you are not familiar with Odin and its working, pay a little close attention towards the tutorial. If you don’t want to use Odin, you can look for an alternate method, which requires commanding and active ADB drivers, Yeah! I know it is difficult, I also use Odin a lot more than ADB Shell. So, Without further ado, Let us begin.

TWRP-Recovery

Early Preparations:

1. This guide is only for T-Mobile Galaxy Note 4 SM-N910T!

Make sure that your device is exactly as mentioned above. To check out what device you have, go to Settings > More/General > About Device or Settings > About Device and match the model number. Be careful about the device model number, flashing a file on a device not listed here might result in bricking it up. In that case, we may not be held responsible.

2. Battery should be charged at least 60%!

Your device’s battery shouldn’t be weak. In case your device goes dead during the flashing process, your device may get soft bricked and you might be in need of flashing stock firmware and that will ultimately result in wiping up your data as well. So, make sure that you charge your device before you start the flashing process.

3. Use the OEM data-cable to establish connection!

Always use the original data cable to establish connection between your Android device and your computer / laptop. Using ordinary data cables might interrupt the flashing process, so to avoid any mishap, you need to meet this requirement as well.

4. Backup everything!

Just to be on the safe side, you may consider backing up each and everything from your Android device. This is highly recommended so that in case anything goes wrong, you still have the access to all of your data and you can restore it immediately. Also, clean install is always recommended, that means you will probably have to wipe your device to install the new firmware. So, you may backup everything as listed below.

5. Discalimer

The methods involved in flashing custom recoveries, roms and rooting your phone are highly custom and may result in bricking your device, and has nothing to do with Google or the device manufacturer that is Samsung in our case. Also rooting your device will void its warranty and you will be no longer eligible for any kind of free device services by the manufacturers/warranty providers. Incase of any mishap we may not be held responsible. Follow these instructions to the letter to avoid any mishap or bricking. Make sure that whatever you do, you are doing it at your own responsibility.

How To Install TWRP Recovery On T-Mobile Note 4

  1. Download and extract Odin3 v3.09.
  2. Download and Install Samsung USB drivers .
  3. Download and extract TWRP Recovery: Link (scroll to the bottom and choose the Odin method)

Method:

  1. Open Odin3.exe.
  2. Put your Galaxy Note 4 in download mode. To do so, turn it off and wait for 10 seconds. Turn it on by pressing and holding Volume Down + Home Button + Power Key simultaneously, You should see  a warning, press Volume Up to continue. In case this method doesn’t work for you, try one from this guide.
  3. Connect your device to your PC.
  4. As soon as Odin detects your phone, the ID:COM box should turn blue.  Make sure that you’ve installed Samsung USB drivers before connecting.
  5. For Odin 3.09 hit the AP tab. Select the .tar.md5  file or .tar file, that you downloaded and extracted above.
  6. If you’re using Odin 3.07, you will select “PDA” tab instead of the AP tab, rest of the options remain untouched.
  7. Make sure that the options selected in your Odin are exactly as shown in the pic (Do not Tick the F.reset Option)Odin-3.09-explained.-2
  8. Hit start and wait till the flashing is complete, as soon as your device restarts, remove it from PC.
  9. Wait for your device to reboot.
  10. That’s all!
  11. Now Visit Recovery Mode to Confirm

How To Fix SD Card Write On T-Mobile Galaxy Note 4 After Rooting

0
How To Fix SD Card Write On T-Mobile Galaxy Note 4 After Rooting

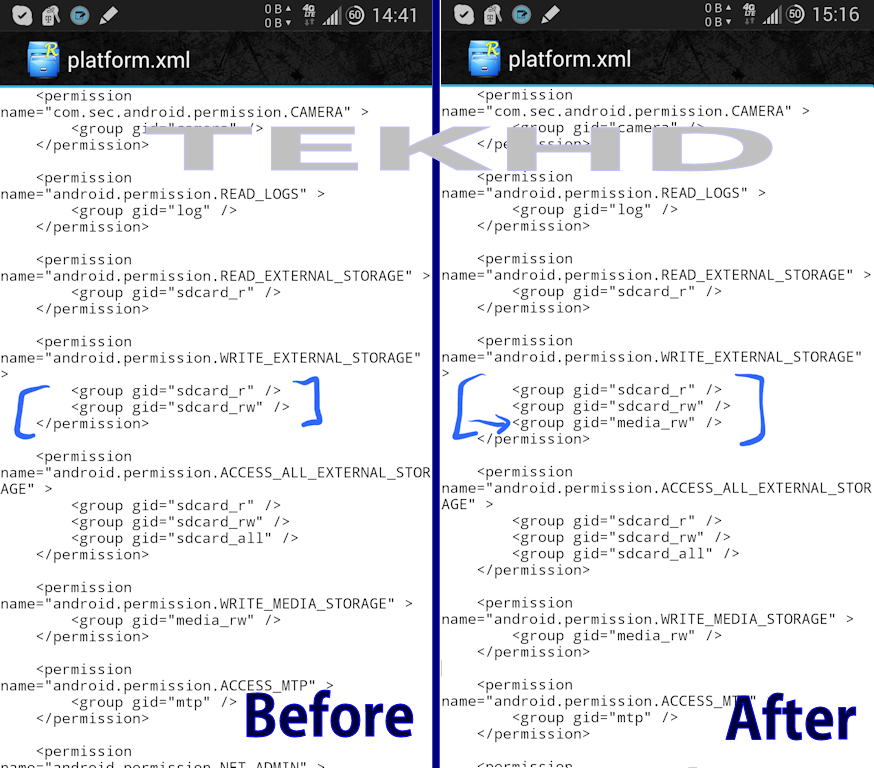
Previously we posted an Article of How To Root T-Mobile Galaxy Note 4, however, everything has a consequence,despite that rooting open a lot of opportunities for you, still there are a lot of dangers in it. In this case of T-Mobile Galaxy Note 4, the person who actually posted the Rooting method of T-Mobile Galaxy Note 4, TEKHD, of XDA developers, also mentioned that after rooting this device, you are sure to encounter this SD Card problem. Now the Problem is something like this, after the successful reboot and rooting your device, when you are going to write anything on your SD Card, by that means, external SD Card, you won’t be able to succeed. However, the good news is that there is a solution, a temporary one though, but it wil work.

sdfix

Developer also mentioned, that they are trying to make a Flashable zip file for this problem as the TWRP recovery for T-Mobile Note 4 is also available, but that solution has to take a while, till then follow the steps below, and solve your problem. Now remember, even if you are having such issues on a non-rooted device, you need to root your device to solve it, because we are going to make some chnages in the Root of your device, which requires a Root Explorer, thus requires a rooted device. Without further ado, let us begin.

How To Fix SD Card Write:

  1. First of all Root your Galaxy Note 4, Follow the link to do so.
  2. Now Download and Install Root Explorer/Root Browser.
  3. Once installed, Open it and Navigate to etc/permissions/platform.xml.
  4. Open it and Add the Line: <group gid=”media_rw” />
  5. Make the Changes Show in Picture Above(Courtsy: TEKHD)
  6. Now Save the File and Reboot the device.
  7. That’s it, though it is a temporary solution, but you need it

How To Root T-Mobile Galaxy Note 4 SM-N910T on Android 4.4.4 1ANIH/1ANJ7 Kit-Kat Official Firmware

1
How To Root T-Mobile Galaxy Note 4 SM-N910T on Android 4.4.4 1ANIH/1ANJ7 Kit-Kat Official Firmware

Galaxy Note 4 is the latest Flagship by Samsung in the world of Android,along with that we have also seen Galaxy Note 4, which is by far one of the most successful Technology I have seen in the Mobile world, I mean that device is perfect for both Left and Right Handed users. However, this article is not for Galaxy Note Edge, but for Galaxy Note 4, which happens to be also released by T-Mobile. Although there are a lot of restrictions applied by such carriers, still if you want to try a flagship device, getting them from carriers is one of the best things. The support provided by carriers is good, on the other side, Custom Support is also there and not like an abandon device but with everything best. However, to get Custom Support, you need to first Root your device, and finally CF-Auto Root is available for T-Mobile Galaxy Note 4.

CF-Auto root and Super Su are both made by the Same developer, Chainfire, the only difference is that, in CF-Auto root you don’t need much work to root your device, where Super Su is somehow completely manual. The Whole Process is simple and only needs few click, as we are going to use Odin in such matter, if you are not familiar with Odin and its working, pay a little close attention towards the tutorial, like you are on a Gun Point.

samsung-galaxy-note-4


Note: External SD Card Problem has been Solved: Link

Early Preparations:

1. This guide is only for T-Mobile Galaxy Note 4 SM-N910T!

Make sure that your device is exactly as mentioned above. To check out what device you have, go to Settings > More/General > About Device or Settings > About Device and match the model number. Be careful about the device model number, flashing a file on a device not listed here might result in bricking it up. In that case, we may not be held responsible.

2. Battery should be charged at least 60%!

Your device’s battery shouldn’t be weak. In case your device goes dead during the flashing process, your device may get soft bricked and you might be in need of flashing stock firmware and that will ultimately result in wiping up your data as well. So, make sure that you charge your device before you start the flashing process.

3. Use the OEM data-cable to establish connection!

Always use the original data cable to establish connection between your Android device and your computer / laptop. Using ordinary data cables might interrupt the flashing process, so to avoid any mishap, you need to meet this requirement as well.

4. Backup everything!

Just to be on the safe side, you may consider backing up each and everything from your Android device. This is highly recommended so that in case anything goes wrong, you still have the access to all of your data and you can restore it immediately. Also, clean install is always recommended, that means you will probably have to wipe your device to install the new firmware. So, you may backup everything as listed below.

5. Discalimer

The methods involved in flashing custom recoveries, roms and rooting your phone are highly custom and may result in bricking your device, and has nothing to do with Google or the device manufacturer that is Samsung in our case. Also rooting your device will void its warranty and you will be no longer eligible for any kind of free device services by the manufacturers/warranty providers. Incase of any mishap we may not be held responsible. Follow these instructions to the letter to avoid any mishap or bricking. Make sure that whatever you do, you are doing it at your own responsibility.

Note : TWRP Recovery is Available For Note 4: Link

How To Root T-Mobile Note 4 With CF-Auto Root

  1. Download and extract Odin3 v3.09.
  2. Download and Install Samsung USB drivers .
  3. Download and extract CF-Auto Root file: SM-N910T

Method:

  1. Open Odin3.exe.
  2. Put your Galaxy Note 4 in download mode. To do so, turn it off and wait for 10 seconds. Turn it on by pressing and holding Volume Down + Home Button + Power Key simultaneously, You should see a warning, press Volume Up to continue. In case this method doesn’t work for you, try one from this guide.
  3. Connect your device to your PC.
  4. As soon as Odin detects your phone, the ID:COM box should turn blue.  Make sure that you’ve installed Samsung USB drivers before connecting.
  5. For Odin 3.09 hit the AP tab. Select the .tar.md5  file or .tar file, that you downloaded and extracted above.
  6. If you’re using Odin 3.07, you will select “PDA” tab instead of the AP tab, rest of the options remain untouched.
  7. Make sure that the options selected in your Odin are exactly as shown in the pic (Do not Tick the F.reset Option)Odin-3.09-explained.-2
  8. Hit start and wait till the flashing is complete, as soon as your device restarts, remove it from PC.
  9. Wait for your device to reboot, as soon as it reboots check for Super User app
  10. That’s all!

How to install Cydia on iOS 8/iOS 8.1 after Pangu Jailbreak [ Guide ]

3
How to install Cydia on iOS 8/iOS 8.1 after Pangu Jailbreak [ Guide ]

As i told you earlier on my post that Saurik is updated Cydia for iOS 8,8.1 to install it manually and i told you that i’ll tell you how to install Cydia on iOS 8 – iOS 8.1 after using Pangu Jailbreak. In the following guide i’ll explain how you can install Cydia manually after using Pangu Jailbreak tool. If you don’t want to install Cydia manually then you have to wait for Pangu8 updated tool.

Cydia-Package

How to install Cydia on iOS 8 – iOS 8.1 after Pangu Jailbreak:

  1. First of all download Cydia deb file from this link.
  2. Then download cydia-lproj file from this link.
  3. Now you’ve to send Cydia file to your device VIA SFTP.
  4. For Mac download Cyberduck and for Windows download and install WinSCP.
  5. Before proceeding to transfer process make sure your Mac/PC are using same WiFi netowrk.
  6. Now open Cyberduck or WinSCP and SSH into your device.
  7. Using the IP address you got from Cyberduck/WinSCP. [ Username ‘ root ‘ Password ‘ alpine ‘ Just copy paste username and password with quotes.
  8. Now copy both the deb files into a location where you can remember.
  9. Press Ctrl + T or ⌘ + T to start an SSH command line session.
  10. Goto the same folder using cd command where you have placed the files.
  11. Run these commands in order:’dpkg -i cydia-lproj_1.1.12_iphoneos-arm.deb’  ‘dpkg -i cydia_1.1.13_iphoneos-arm.deb’ (without quotes).
  12. If you see a error try the process again.
  13. If all the steps are successfully done mean you’ve installed Cydia on your iOS device.

If you face any kind of issue regarding this guide please tell me in comments so i can help you with it.

Credit: iPhoneHacks

Saurik updated Cydia for iOS 8 to be installed manually

0
Saurik updated Cydia for iOS 8 to be installed manually

After unexpectedly Pangu released iOS 8.1 Jailbreak although it doesn’t install Cyida after jailbreaking. But a good thing is that it provide SSH access for developers to update their tweaks and make the compatible with iOS 8.1 – 8. On the other hand Saurik is updating Cydia to make it compatible with iOS 8 and 8.1.

Cydia-Package


Saurik was quoted saying:

I’ve given a new version of Cydia Installer in the form of a standard jailbreak bootstrap for inclusion in a new version of their jailbreak. I’ve also pushed the .deb of the iOS 8 version of Cydia to apt.saurik.com for manual download, but not yet to my repository. A lot of thanks goes out to limneos, who tested the new build for me, as I was at an airport (and now am frantically typing this message while they figure out how to retract the jetbridge from the plane I’m on that is about to take off).

Well now that we can jailbreak our devices running iOS 8 or 8.1, all we have to do is wait for Saurik to release Cydia so that we can install it manually.

Photo Pinner Allows You To Pin Photos On Android Lollipop

Photo Pinner Allows You To Pin Photos On Android Lollipop

With the Arrival of Android Lollipop, many things have changes as well as we are seeing many updates over the Previous version, mostly bringing the Material Design to almost every Google Application at the Current moment, From Google Play Store to G-Mail, all the applications are now updated for the Android Lollipop as well as the Previous versions. Nothing except G-Mail has gotten better, in my Opinion only, I absolutely loved that they added all the Mail support in a single app, means you can now use your Yahoo!, Hotmail or any other Mailing Media within a Single app, and you can easily switch between them with swipes only, Swipe Left, Swipe Right, switch your E-mail and enjoy.

Y7yOLEhl-168x300

Putting that aside, within the Android Lollipop, not the Gapps, there are a lot of improvements and new feature, within the camera and Gallery app, Android 5.0 has introduced another feature, Screen Pinning. Screen Pinning allows you to Pin any screen you want, thus allowing you to save your personal data from anyone looking at your screen. It also supports the Pinch Zoom and Full Screen View. The Application currently works on Android 5.0 and those who have Nexus 4, Nexus 5 or Nexus 7 can install Developer Preview and try this App on their device. Speaking of an app, I forgot to mention, that Quinny899 of XDA Developers has created this app, which is based on the Screen Pinning of Android Lollipop. We are providing you the Apk file, however, it will work on the 3 Mentioned device and you need to Download and Install developer Preview of Android 5.0 on them.

Download and Install Photo Pinner:

    1. Download Photo Pinner
    2. Connect your phone to your laptop or PC now.
    3. Copy the APK file to your phone’s SD card.
    4. Disconnect your phone.
    5. Locate the Photo Pinner file on your phone now and tap to install it.
    6. If prompted to select installer, then select “Package Installer”.
    7. Allow “Unknown Sources” from Settings > Security if prompted.
    8. Proceed with the installation and complete it.
    9. That’s all!

Source: XDA