Home Blog Page 402

Sony Weather app update (2.1.A.0.10) Now You resize widget

0
Sony Weather app update (2.1.A.0.10) Now You resize widget

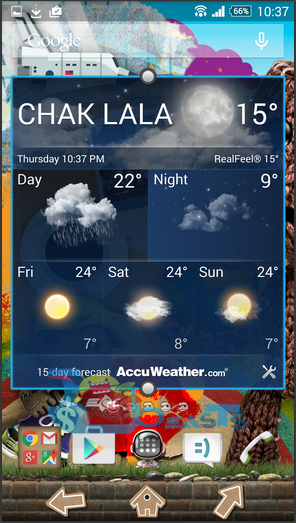
Today Sony updated its weather app allowing you to resize the weather widget. Prior to this update weather widget used fixed size of 1 x 4 spaces. But now you can change the widget size as show in the screenshots. Even now you can fill the complete home screen with weather widget. This new update’s build number is (2.1.A.0.10). Those who didn’t get OTA yet they can download the update Sony Weather app apk from the following link.

Sony Weather widget (2.1.A.0.10)

How To Install Sony Weather App Apk on Android:

  1. Copy the downloaded APK file to your phone.
  2. On your Android device, go to settings > security > unknown sources > allow.
  3. Now locate the APK file on your phone and tap it to start installation.
  4. Complete the installation, once done, start the application from the app drawer.
  5. Follow the on-screen instructions.

New Weather widget Screen Shots:

 Screen Shot 2014-11-27 at 23.01.21 Screen Shot 2014-11-27 at 23.03.17

Root Sprint Galaxy S5 on Android 5.0 Lollipop via CF-AutoRoot

0
Root Sprint Galaxy S5 on Android 5.0 Lollipop via CF-AutoRoot

Let us just assume, (although if I had been in your place my device might have been running Android 5.0 Lollipop already), that you have updated your Sprint Galaxy S5 to Android 5.0 Lollipop leaked firmware. If not then we will provide the Download and installation link below, you don’t have to worry about that. The real thing to worry about is how you can root your device after updating it to Android 5.0 Lollipop? A question that has been asked by a lot of people and this time Chainfire has once again provided his services and mirrored the CF-Auto root for this build too. CF-AutoRoot is one of the best and easiest ways to root your device. It will do the whole process for you and all you have to do is to wait for it to complete the rooting process itself.

Rooting allows you to get full control over your device. Stock apps and mods are good, but installing Custom Mods gives you better support and great battery life. You might want to delete some Stock apps from the device and a non-rooted device can’t do that, but a rooted one has the power to remove stock apps too. Once again, we are going to use Odin to Flash this CF-Auto root file on your device. For those who are not familiar with the CF-Auto root being installed via Odin, just follow the post carefully. Without further ado, let’s begin with How To Root Verizon Galaxy S5 on Android 5.0 Lollipop via CF-Auto Root.

Root Sprint Galaxy S5 on Android 5.0 Lollipop via CF-AutoRoot


Early Preparations:

1. This guide is only for Sprint Galaxy S5 SM-G900P!

Make sure that your device is exactly as mentioned above. To check out what device you have, go to Settings > More/General > About Device or Settings > About Device and match the model number. Be careful about the device model number, flashing a file on a device not listed here might result in bricking it up. In that case, we may not be held responsible.

2. Battery should be charged at least 60%!

Your device’s battery shouldn’t be weak. In case your device goes dead during the flashing process, your device may get soft bricked and you might be in need of flashing stock firmware and that will ultimately result in wiping up your data as well. So, make sure that you charge your device before you start the flashing process.

3. Use the OEM data-cable to establish connection!

Always use the original data cable to establish connection between your Android device and your computer / laptop. Using ordinary data cables might interrupt the flashing process, so to avoid any mishap, you need to meet this requirement as well.

4. Backup everything!

Just to be on the safe side, you may consider backing up each and everything from your Android device. This is highly recommended so that in case anything goes wrong, you still have the access to all of your data and you can restore it immediately. Also, clean install is always recommended, that means you will probably have to wipe your device to install the new firmware. So, you may backup everything as listed below.

5. Turn off Samsung Kies and other softwares while using Odin3!

Make sure that you turn off Samsung Kies while using Odin3 flashtool. Samsung Kies will interrupt Odin3 and will result in causing errors and may not let you flash your desired firmware. Also, make sure that you turn off any antivirus software you’ve installed and also disable firewall to avoid any connection and flashing issues.

6. Update your Device to Android 5.0 Lollipop!

Since this rooting method is only support the Android 5.0 Lollipop LRX21T, there is now way will it work on any other build, so update your device to Android 5.0 Lollipop first, Follow the link to do so : Link

How To Root Sprint Galaxy S5 on Android 5.0 Lollipop!

Downloads Required:

  1. Download and extract Odin3 v3.09.
  2. Download and Install Samsung USB drivers .
  3. Download the CF-Auto Root.zip: Link

Method:

  1. Wipe your device completely in order to attain a neat installation.
  2. Open Odin3.exe.
  3. Put your Galaxy S5 in download mode. To do so, turn it off and wait for 10 seconds. Turn it on by pressing and holding Volume Down + Home Button + Power Key simultaneously, You should see a warning, press Volume Up to continue. In case this method doesn’t work for you, try one from this guide.
  4. Connect your device to your PC.
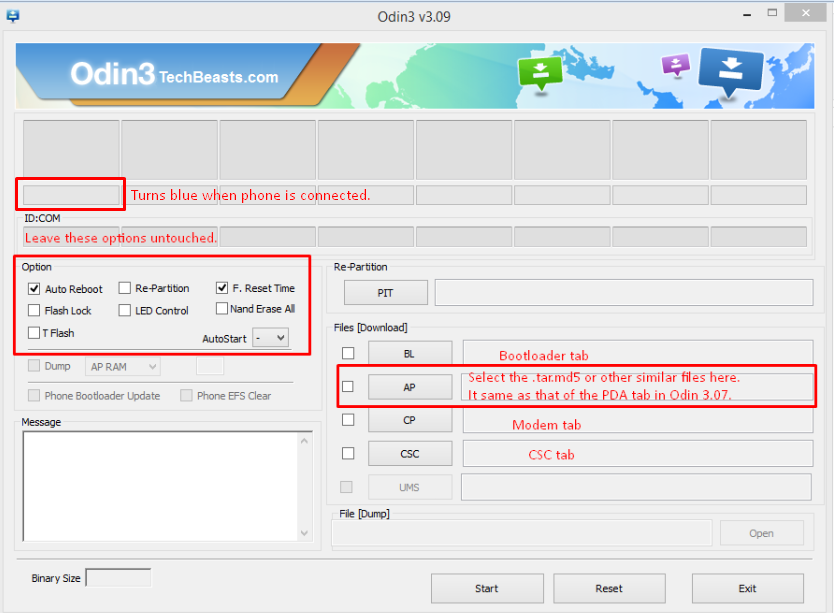
  5. As soon as Odin detects your phone, the ID:COM box should turn blue.  Make sure that you’ve installed Samsung USB drivers before connecting.
  6. For Odin 3.09 hit the AP tab. Select the firmware.tar.md5 or firmware.tar, that you downloaded and extracted above.
  7. If you’re using Odin 3.07, you will select “PDA” tab instead of the AP tab, rest of the options remain untouched.
  8. Make sure that the options selected in your Odin are exactly as shown in the pic.Odin-3.09-explained.-2
  9. Hit start and wait till the CF-AutoRoot  flashing is complete, as soon as your device restarts, remove it from PC.
  10. Wait for your device to reboot, as soon as it reboots check out the root access!
  11. That’s all!

Jigty Jigsaw Puzzles for PC Download ( Windows 8,8.1,7,Xp – Mac )

0
Jigty Jigsaw Puzzles for PC Download ( Windows 8,8.1,7,Xp – Mac )

Jigty Jigsaw Puzzles app is available for PC and you all be wondering how? We can download and install Android games on our PC using a third party emulator. Jigty Jigsaw Puzzles app is basically designed for Android devices and there is no such .EXE or .dmg format of Jigty Jigsaw Puzzles. So in the following guide I’ll explain how to download Jigty Jigsaw Puzzles for PC and learn how to play Jigty Jigsaw Puzzles on Windows 8.1,8,7,Xp – Mac. Before proceeding to the guide let me give you an overview on Jigty Jigsaw Puzzles.

Also See: Candy Crush Soda Saga for PC

Jigty Jigsaw Puzzles for PC Download ( Windows 8,8.1,7,Xp - Mac )

About Jigty Jigsaw Puzzles:

  1. Every piece of the Puzzle has a unique shape.
  2. Simple and easy to use.
  3. Don’t think for one it’s Increasing difficulty: Rotating pieces or solving puzzles from 4 all the way up to 625 (on 10” tablets) pieces!
  4. No need to worry in Jigty Jigsaw Puzzles there is a Kids mode: Guiding lines and ‘magnetic’ piece locking for smaller puzzle
  5. There are Hundreds of images: Grouped in themes or customise by using your own photos
  6. You can Challenge your friends: Time trials and tournament pack puzzles

Also See: Retry for PC Download

Download and Install Jigty Jigsaw Puzzles for PC ( Windows Xp,8,8.1,7 – Mac ):

  1. To download Jigty Jigsaw Puzzles for PC, you will need an Android emulator like Bluestacks. If you do not have it already, you can download it from the website Bluestacks.com.
  2. Open Bluestacks and search for Jigty Jigsaw Puzzles using search tool on the top of the homepage.
  3. Click on install button. The game will automatically download and install.
  4. Once the app has been installed, go to My Apps in Bluestacks homepage.
  5. The icon for the game will appear in My Apps.
  6.  Click on this icon to open Jigty Jigsaw Puzzles.

Now, you can start playing the game any time on your Pc simply by opening it from My Apps. Get mesmerized by the amazing graphics of the game.

Hopefully, you will be able to install the game easily on your PC using this guide. If you still have any issues, please let us know and we will help you solve them. Enjoy !

Word search for PC Download ( Windows 8,8.1,7,Xp – Mac )

0
Word search for PC Download ( Windows 8,8.1,7,Xp – Mac )

There are hundreds of Puzzle game for Android, but there is one which’s really worth playing; Word search. Word search is available for PC, now you all are wondering how? Well thanks to third party emulators we can play Android games and apps on our PC. So in the following guide I’ll explain how to download and install Word search for PC, also help you on how to Play Word search on Windows 8,8.1,7,Xp and Mac. Before proceeding to the guide let me give you an overview on Word search.

Also See: Trivia Crack for PC

Word search for PC Download ( Windows 8,8.1,7,Xp - Mac )

About Word Search:

* First thing i like about Word Search that there are 7 different topics to choose from Animals, Countries of the World, Cities of the World, American presidents,Historical figures and Kids.

* Three levels of difficulties Easy, Medium and Difficult.

* Two different game modes –

  • List of words (words to find the slopes shown)
  • Remaining number of words (the number of words to find earrings shown)

* Word Search comes with 7 different languages.

* All you have to do is find the hidden words to find and are marked with different colors.

Also See: 2048 for PC Windows 8

Download and Install Word search for PC ( Windows Xp,8,8.1,7 – Mac ):

  1. To download Word search for PC, you will need an Android emulator like Bluestacks. If you do not have it already, you can download it from the website Bluestacks.com.
  2. Open Bluestacks and search for Word search using search tool on the top of the homepage.
  3. Click on install button. The game will automatically download and install.
  4. Once the app has been installed, go to My Apps in Bluestacks homepage.
  5. The icon for the game will appear in My Apps.
  6.  Click on this icon to open Word search

Now, you can start playing the game any time on your Pc simply by opening it from My Apps. Get mesmerized by the amazing graphics of the game.

Hopefully, you will be able to install the game easily on your PC using this guide. If you still have any issues, please let us know and we will help you solve them. Enjoy !

Update Galaxy S4 Mini I9190/I9195 To Android 5.0 Lollipop CyanogenMod 12 Custom ROM

0
Update Galaxy S4 Mini I9190/I9195 To Android 5.0 Lollipop CyanogenMod 12 Custom ROM

Samsung’s 2nd Mini Galaxy device, named as Galaxy S4 Mini is currently having a KitKat, the version number is Android 4.4.2. While we are not even sure whether the device will get a little more sweetness by getting a Lollipop update officially, the great developers have once again come up with an unofficial build of CyanogenMod 12, that is based on Android 5.0 Lollipop and this unofficial CM 12 build is found to be working great on the two variants of the Galaxy S4 Mini, the 3G (I9190) and LTE (I9195). Earlier builds of the CyanogenMod 12 for the Samsung devices contained a lot of bugs, in which, the RIL bug was atop, that didn’t let the phone, SMS and other such services work on the device. This bug has been fixed as well, and we are seeing improvement with every new build that’s coming up. For the Galaxy S4 Mini, all the credit goes to the XDA recognized developer F4k, who has worked hard to make it work for this device and allowed the users to calm themselves down til Samsung unveils any plans for the Galaxy S4 Mini’s Lollipop update.

Some folks who are not aware of the Android 5.0 Lollipop update, they may want to know what it’s actually all about. Let’s just have a brief overview of the Android 5.0 Lollipop and learn the purpose we are here for right now. Google recently unveiled the latest and the biggest update in the history of Android, named as Android 5.0 Lollipop. Just as the name suggests, we can see a lot of cool and sweet features in the Lollipop OS, in which the UI changes are the most prominent ones. Google has named the new UI as Material Design, the UI is just flat and smooth. Google has already update most of its applications with the Material Design UI to make them look great on the Android devices. On the core we have battery life enhancements, performance enhancements. Android 5.0 Lollipop also turned out to be the most secured version of Android so far. The changelog list is pretty big, just to know what’s new, you may install it by yourself and go through the actual firmware to learn all about it.

Let’s get back to our topic now. The Galaxy S4 Mini users must be wondering how they can install this Android 5.0 Lollipop based on CyangenMod 12  custom ROM on their device and experience the latest iteration of Android manually. Well, that’s what we are here for. We are about to update the Galaxy S4 Mini 3G (GT- I9190) and LTE(I9195) to Android 5.0 Lollipop using this CyanogenMod 12.0 custom ROM in the succeeding guide. The ROM is still in development stages, bugs are expected and it may not be kept for daily use. You may proceed only if you’ve a very good idea of custom ROMs and you actually know how to deal with them, it is highly recommended not to proceed if you are a newbie. Let’s go through the early preparations now.

20130730T125333

Early Preparations

1. This Guide Is Only For Galaxy S4 Mini I9190 & I9195

This custom ROM is only for the device mentioned above. Make sure that your model number matches the one listed above. To do so, go to Settings > About Device on your device and see your model number. Flashing this ROM on any other device will result in bricking it so make sure that you meet this requirement first of all.

2. Battery should be charged at least over 60%

Make sure that your battery is charged enough to complete the flashing process. In case your battery is low and your device goes dead during the flashing process, you may end up soft bricking your device as it won’t complete the flashing process.

3. Flash a Custom Recovery

A custom recovery is required for flashing this ROM. You may use our guide to from here to install a TWRP custom recovery on your Galaxy S4 Mini I9190 & I9195.

4. Backup everything!

Just to be on the safe side, you may consider backing up each and everything from your Android device. This is highly recommended so that in case anything goes wrong, you still have the access to all of your data and you can restore it immediately. You may backup everything as listed below.

  1. Backup SMS Messages
  2. Backup Call Logs
  3. Backup Contacts
  4. Backup Media – Copy your files manually to your PC or Laptop.
  5. Backup EFS
  6. Titanium Backup – If already rooted, use Titanium Backup to backup all of your apps, system data and other important content.
  7. Backup Nandroid – You can do this using CWM/TWRP recovery.

5. Disclaimer

The methods involved in flashing custom recoveries, ROMs and rooting your phone are highly custom and may result in bricking your device, and has nothing to do with Google or the device manufacturer that is SAMSUNG in our case. Also rooting your device will void its warranty and you will be no longer eligible for any kind of free device services by the manufacturers/warranty providers. In case of any mishap we may not be held responsible. If your device has the Knox counter on the bootloader, it will be tripped and you won’t be able to reset it ever. Follow these instructions to the letter to avoid any mishap or bricking. Make sure that whatever you do, you are doing it at your own responsibility.

Here’s what’s working in this ROM and what’s not

GPS
Wi-Fi
Bluetooth
RIL (Calls, SMS, Mobile Data)
Sensors
Camera
Audio
FM

Issues:

Not known yet..

How To Update Galaxy S4 Mini I9190/I9195 To Android 5.0 Lollipop CyanogenMod 12 Custom ROM

  1. Download CM 12 ROM.zip file for your device carefully
    1. For I9190:  cm-12-20141123-UNOFFICIAL-serrano3gxx.zip
    2. For I9195:  cm-12-20141123-UNOFFICIAL-serranoltexx.zip
  2. Download Google Gapps.zip file.
  3. Connect your phone to your PC now.
  4. Copy both the .zip files to the storage of your phone.
  5. Now disconnect your phone and turn it off complete.
  6. Boot into TWRP/CWM recovery now, in order to do so, turn it on by pressing and holding Volume Up + Home Button + Power Key. You should see the recovery mode in a while.
  7. Now in TWRP/CWM recovery select wipe option and wipe cache, factory data reset, dalvik cache.
  8. After wiping all these three, select “Install” option.
  9. Now select “Install > Choose Zip from SD card / locate the zip file > Select CM-12 ROM.zip  file > Yes”.
  10. This will flash the ROM in your phone.
  11. Once again in recovery select “Install > Choose zip from SD card / locate the file > Gapps.zip file > Yes”.
  12. This will flash Gapps in your phone.
  13. Reboot your device.
  14. You should see the Android 5.0 Lollipop CM 12.0 running on your Galaxy S4 Mini in a while.
  15. That’s all!

Screenshot_21Screenshot_2014-11-19-13-55-36Screenshot_2014-11-19-13-55-14
First boot may take up to 10 minutes, so hold on tighter until your device gets ready. Just in case you don’t find this ROM working so great, you may want to restore your Galaxy S4 Mini to stock condition.

If you’ve any queries or you’re stuck with anything regarding this post, please reach us through the comment box below. We will get back to you immediately. Thank you all.

How to play Super Nintendo games on your iPhone/iPad running iOS 8 device

0
How to play Super Nintendo games on your iPhone/iPad running iOS 8 device

Super Nintendo games are considered to be the best of Gaming industry. We have played many Super Nintendo games in our childhood and still most of us play them. Now a days smartphones have taken over the consoles. There ar thousands of games in App stores, but nothing like Super Nintendo games. I am disappointed in Super Nintendo because they aren’t adding their games in iOS and Android play stores, but no need to worry as emulators are there for us. Today i’ll tell you how to play Super Nintendo games on your iPhone/iPad running iOS 8 device.

play Super Nintendo games on your iPhone:iPad running iOS 8 device

How to play Super Nintendo games on iPhone/iPad running iOS 8:

Step 1: Open iEmulators on your iPhone/iPad browser.

Step 2: Now click on Apps.

Step 3: Tap “SiOS: A SNES emulator.”

Step 4: Now Tap on Install.

Step 5: When a popup appears click on Install.

Step 6: Now go to your iPhone/iPad home screen.

Step 7: You’ll see a error message saying ” Unable to Download App: “SiOS” could not be downloaded at this time.” Tap on Retry.

Step 8: Now when ever this message appears, tap on Retry.

Step 9: Goto Settings > General > Date & Time.

Step 10: Turn off “Set Automatically”.

Step 11: Set your date back at least two months.

Step 12: Now wait for SiOS installation to be completed.

Step 13: After SiOS installation is done, you download your Favourite game ROM form Google.

Step 14: when the ROM is downloaded in Safari.

Step 15: Open SiOS emulator and enjoy the Super Nintendo game.

How to play Super Nintendo games on your iPhone/iPad running iOS 8 device [ Video Tutorial ]

How to Fix passcode Issue with the iOS 8.x jailbreak

0
How to Fix passcode Issue with the iOS 8.x jailbreak

Many iPhone users are reporting that after Jailbreaking iOS 8.x, they are facing passcode and Touch ID issues. Let me tell you what issue people are facing, after installing Cyida on iOS 8.x when users try to establishing a passcode it sends the phone into a bootloop. So I worked on it and finally found a working solution to Fix passcode Issue with the iOS 8.x jailbreak. In the following guide I’ll explain you people how to Fix passcode Issue with the iOS 8.x jailbreak.

iOS-8-Jailbreak-passcode-fix-cydia-substrate-1024x904

You must know that this passcode issue is not because of Pangu, Cydia or Saurik. This Jailbreak is work in progress so there are many bugs to fix. Those who have Jailbroken their devices and facing passcode boot loop issue, they can fix it by using our step by step guide on how to fix passcode Issue with the iOS 8.x jailbreak.

Also See: How to Jailbreak and install Cydia on iOS 8, 8.1 using Pangu8 1.1.0 [iPhone, iPad, iPod Touch]

How to Fix passcode Issue with the iOS 8.x jailbreak:

Step 1: You need to Jailbreak your device running iOS 8.x. [ Jailbreak iOS 8.x ]

Step 2: Do not enabling any passcode or Touch ID on your iPhone.

Step 3: Goto your home screen, tap on Pangu icon.

Step 4: Now install OpenSSH.

Step 5: Download ( Passcode Patch File ).

Step 6: Now connect your device via CyberDuck. [ For windows user try WinSCP ].

Step 7: Open iPhone’s /private/var/root/ directory, now drag and drop Cydia files.

Step 8: Use the following command on Send Command.

dpkg –install cydia-lproj_1.1.12_iphoneos-arm.deb

cydia_1.1.13_iphoneos-arm.deb

Step 9: Reboot your device.

Step 10: Navigate to /usr/libexec/cydia/ and overwrite the move.sh. [ You can find move.sh file from the downloaded zip file ].

Step 11: Reboot your device.

Step 12: Open Cydia and install the updates.

Step 13: Now install Activator.

Step 14: Add a passcode.

Step 15: Now Reboot your device.

How to Fix passcode Issue with the iOS 8.x jailbreak Video Tutorial:

Credit:idownloadblog

How to Enable LED Notifications in Nexus 6

0
How to Enable LED Notifications in Nexus 6

LED notification is used  to notify you when you have received any notification, like messages, missed call, low battery warning or any sort of update. The Notification LED lights are there to inform you all the times, while some devices are shipped without any trace of LED light. One of these devices belongs to both Motorola and Google, Nexus 6 is shipped with a Hidden LED flash-light, not literally, where the Nexus 6 ditched the LED and instead gave the capability to show the notifications on the AMOLED Panel itself. In Past we have seen the same case in Motorola Moto X, but at the XDA portal they were able to find the hidden LED beneath the front speaker and now they have found the LED in Nexus 6 too.

Since the root of Nexus 6 is available, developers are now doing everything to explore the Nexus 6 and because of that, now Nexus 6 users can use the notification LED with the help of an LED light hidden in Front Speaker of Nexus 6. All you need is a rooted Nexus 6 and any Simple app that can control the LED light. Lightflow (Paidapp) was the one used to find this hidden feature, so if you have the money to pay for this app, then do go ahead and try this or if not, the find such app that can be granted root access for LED settings, then and only then you’ll be able to use this feature. Without further ado, let’s continue towards the tutorial of enabling this LED Notification light.

Enable LED Notifications in Nexus 6

Requirements:

  • A Nexus 6.
  • Root Access: Link
  • Lightflow: Link paid | Link Lite

How To Enable LED Notifications in Nexus 6:

  1. Purchase the app or try the Lite version
  2. Open it.
  3. Grant the Root access.
  4. Then go to settings of Lightflow > Notifications settings.
  5. Tap the Mixer option.
  6. Enable it.
  7. Now you’ll see the option to change the colour and Brightness of the LED light
  8. That is it
  9. Now you can use the Notification LED light in Nexus 6

Source: XDA

Install CyanogenMod 12 Android 5.0 Lollipop On Galaxy S5

5
Install CyanogenMod 12 Android 5.0 Lollipop On Galaxy S5

Samsung hasn’t been very good when it comes to Android updates, it rolls out an update when all other manufacturers are already done with updating their flagships to the latest versions of Android. We hope that what we are thinking doesn’t actually turn out to be true this time as well and Samsung shows a little speed by rolling out the Lollipop update for it’s S series flagship device, the Galaxy S5. The device sure is set to receive the update, we’ve already seen previews of Android Lollipop running greatly on the Galaxy S5 by folks over Sammobile, but we are not yet sure about the firmware’s release date, so until then, the Galaxy S5 users will have to hold on a little tighter.

For those who don’t know about Android 5.0 Lollipop, they may want to learn that Android 5.0 Lollipop is the latest version of Android after Android 4.4.4 KitKat. Currently, Google’s very own Nexus devices, and some LG & Motorola devices have received this latest firmware while other manufacturers have queued up their devices in the Lollipop list. Some major changes, specifically in the UI department are prominent. Google has introduced a new UI named as Material Design. A new way for the notifications to appear on lockscreen has been introduced. Some bluetooth updates are there. Battery life has been greatly improved in this latest version of Android and the list goes on.

To treat those Galaxy S5 users, who are eagerly waiting for this update, XDA recognized contributor albinoman887 has compiled up an unofficial build of CyanogenMod 12.0 that is based on Android 5.0 Lollipop. So just in case it’s pretty hard for you to wait, you may give this custom Android 5.0 Lollipop a try and sweeten your Galaxy S5. While this is a very early and unofficial build of CyanogenMod 12, a lot of bugs are expected but the developer has managed to make the very basic features working. The ROM is not intended as a daily-dose, you may flash it only if you’re an Android power user and you can deal with the custom ROMs. Newbies are strongly recommended to stay away.rockford_hotspotflat_1240x700_mainimage

Let’s go through some early preparations and then flash this CyanogenMod 12.0 custom Android 5.0 Lollipop on your LTE Galaxy S5.

Early Preparations

1. This Guide Is Only For Galaxy S5 – All LTE (Qualcomm) Variants.

This custom ROM is only for the device mentioned above. Make sure that your model number matches the one listed above. To do so, go to Settings > About Device on your device and see your model number. Flashing this ROM on any other device will result in bricking it so make sure that you meet this requirement first of all.

2. Battery should be charged at least over 60%

Make sure that your battery is charged enough to complete the flashing process. In case your battery is low and your device goes dead during the flashing process, you may end up soft bricking your device as it won’t complete the flashing process.

3. Flash a Custom Recovery

A custom recovery is required for flashing this ROM. You may use our guide to from here to install a custom recovery on your LTE Galaxy S5.

4. Backup everything!

Just to be on the safe side, you may consider backing up each and everything from your Android device. This is highly recommended so that in case anything goes wrong, you still have the access to all of your data and you can restore it immediately. You may backup everything as listed below.

5. Disclaimer

The methods involved in flashing custom recoveries, ROMs and rooting your phone are highly custom and may result in bricking your device, and has nothing to do with Google or the device manufacturer that is SAMSUNG in our case. Also rooting your device will void its warranty and you will be no longer eligible for any kind of free device services by the manufacturers/warranty providers. In case of any mishap we may not be held responsible. If your device has the Knox counter on the bootloader, it will be tripped and you won’t be able to reset it ever. Follow these instructions to the letter to avoid any mishap or bricking. Make sure that whatever you do, you are doing it at your own responsibility.


Here’s what’s working and what’s not working in this ROM

Service
Text
Data
Call
Audio
WiFi
Google Now
Bluetooth
GPS
MMS
Video playback
Audio playback
Internal/External SDcard mounting
Camera
Video recording
IR Blaster
NFC

Issues:

Touchscreen in some games….
Lots of CM features you expect are missing at this point. All devs are working on adding all your favorite features of CM back in.
64GB SDcards and/or exfat formatted SDcards are not supported yet

How To Install CyanogenMod 12 Android 5.0 Lollipop On Galaxy S5

  1. Download cm-12-20141121-UNOFFICIAL-klte.zip  file.
  2. Download Google Gapps.zip file.
  3. Connect your phone to your PC now.
  4. Copy both the .zip files to the storage of your phone.
  5. Now disconnect your phone and turn it off complete.
  6. Boot into TWRP/CWM recovery now, in order to do so, turn it on by pressing and holding Volume Up + Home Button + Power Key. You should see the recovery mode in a while.
  7. Now in TWRP/CWM recovery select wipe option and wipe cache, factory data reset, dalvik cache.
  8. After wiping all these three, select “Install” option.
  9. Now select “Install > Choose Zip from SD card / locate the zip file > Select cm-12-20141121-UNOFFICIAL-klte.zip file > Yes”.
  10. This will flash the ROM in your phone.
  11. Once again in recovery select “Install > Choose zip from SD card / locate the file > Gapps.zip file > Yes”.
  12. This will flash Gapps in your phone.
  13. Reboot your device.
  14. You should see the Android 5.0 Lollipop CM 12.0 running on your device in a while.
  15. That’s all!

First boot may take up to 10 minutes, so hold on tighter until your device gets ready. Just in case you don’t find this ROM working so great, you may want to restore your Galaxy S5 to stock condition.

If you’ve any queries or you’re stuck with anything regarding this post, please reach us through the comment box below. We will get back to you immediately. Thank you all.

How To Root Samsung Galaxy Note Edge N915F/G/P/S/T

0
How To Root Samsung Galaxy Note Edge N915F/G/P/S/T

One of its very own-kind and the most unique smartphones of the world, the Galaxy Note Edge by Samsung is finally hitting the shelves in different markets all around the world, and a number of lucky users have already got their hands on this latest beast and the sibling of the Galaxy Note 4 by Samsung. On the front, we have a 5.6-inch display that’s curved towards the right side. In the curved section of the screen, we have the  notification panel. The display has 525 ppi and yeah it’s a Quad HD screen with a resolution of 2560 x 1600 pixels. At the back there’s a 16 MP shooter with tons of new features, a 3.7 MP shooter can be found on the front.  Qualcomm Snapdragon 805 SoC clocked at 2.7 GHz accompanied by Adreno 420 GPU is powering up this device, a RAM of 3 GB is there while the internal storage begins at 32 GB. Out of the box, we have this device running on Android 4.4.4 KitKat.

Although the Galaxy Note 4 Edge is a limited edition device, but chances are high that we will be seeing a lot of custom stuff making its way to the development forums and the users will have a lot to play on their devices, and one step to the world of customization has already been taken by famous Elite XDA developer Chainfire, the person behind SuperSu, CF Auto-root and some other such applications.

Chainfire has successfully rooted some variants of the Samsung Galaxy Note Edge, modeled as SM-N915F, N915S, N915G, N915P & N915T. Chainfire has gained the root access using his famous CF Auto-root package, the file is already up and available for the users as well. So, just in case you own Galaxy Note Edge – any of the variants listed above, you can root it right away and start using root applications to unleash the real power of your curved Galaxy Note device. Wondering about the method? Well, there ain’t a need to worry about that as we have it up here in order to save your time. Let’s go through some early preparations and then begin with the method.galaxy-note-edge-large

If you’re wondering why you should root your device, here’s the answer for you

Rooting your phone gives you complete access over all the data which is apparently locked by the manufacturers. This includes removal of the factory restrictions and making changes to the internal system and the operating system. Gaining the root access gives you the privileges to install various applications to enhance the performance of your device, allows you to remove the built-in applications/programs, helps you to upgrade the battery life of your device & install the apps which require the root access for the proper functionality and modify your device in so many other ways e.g using mods and flashing custom recoveries and custom ROMs. Here’s our collection of 10 Best Root Apps.

Early Preps:

1. This guide is only for Samsung Galaxy Note Edge SM-N915F/G/P/S/T

Make sure that your device is exactly as mentioned above. To check out what device you have, go to Settings > More/General > About Device or Settings > About Device and match the model number. Be careful about the device model number, flashing a file on a device not listed here might result in bricking it up.

2. Battery should be charged at least 60%!

Your device’s battery shouldn’t be weak. In case your device goes dead during the flashing process, your device may get soft bricked and you might be in need of flashing stock firmware and that will ultimately result in wiping up your data as well. So, make sure that you charge your device before you start the flashing process.

3. Use the OEM datacable to establish connection!

Always use the original data cable to establish connection between your Android device and your computer / laptop. Using ordinary data cables might interrupt the flashing process, so to avoid any mishap, you need to meet this requirement as well.

4. Backup everything!

Just to be on the safe side, you may consider backing up each and everything from your Android device. This is highly recommended so that in case anything goes wrong, you still have the access to all of your data and you can restore it immediately. You may backup everything as listed below.

5. Turn off Samsung Kies and other softwares while using Odin3!

Make sure that you turn off Samsung Kies while using Odin3 flashtool. Samsung Kies will interrupt Odin3 and will result in causing errors and may not let you flash your desired recovery or root file. Also, make sure that you turn off any antivirus software you’ve installed and also disable firewall to avoid any connection and flashing issues.

6. Disclaimer

The methods involved in flashing custom recoveries, roms and rooting your phone are highly custom and may result in bricking your device, and has nothing to do with Google or the device manufacturer that is SAMSUNG in our case. Also rooting your device will void its warranty and you will be no longer eligible for any kind of free device services by the manufacturers/warranty providers. If your device comes with a Knox counter on the bootloader, it will be tripped and you won’t be able to reset it again. In case of any mishap we may not be held responsible. Follow these instructions to the letter to avoid any mishap or bricking. Make sure that whatever you do, you are doing it at your own responsibility.

Downloads Required:

Download and extract Odin3 v3.09.
Download and Install Samsung USB drivers
Download and extract CF-Auto-Root file.

How To Root Galaxy Note Edge SM-N915S Using CF-Autoroot

  1. Extract the downloaded CF-Auto-Root file once only to get the .tar.md5 file.
  2. Open Odin3.exe.
  3. Put your Galaxy Note Edge in download mode. To do so, turn it off and wait for 10 seconds. Turn it on by pressing and
    holding Volume Down + Home Button + Power Key simultaneously, You should see a warning, press Volume Up to continue. In case this method doesn’t work for you, try one from this guide.
  4. Connect your device to your PC.
  5. As soon as Odin detects your phone, the ID:COM box should turn blue.  Make sure that you’ve installed Samsung USB drivers before connecting.
  6. For Odin 3.09 hit the AP tab. Select the CF-Auto-Root.tar.md5, that you downloaded and extracted above.
  7. If you’re using Odin 3.07, you will select “PDA” tab instead of the AP tab, rest of the options remain untouched.
  8. Make sure that the options selected in your Odin are exactly as shown in the pic. Odin 3.09 explained. (2)
  9. Hit start and wait till the rooting process is complete, as soon as your device restarts, remove it from PC.
  10. Find SuperSu in app drawer now.
  11. That’s all with the rooting, let’s verify the root access now.

How To Verify Root Access:

  1. To do so, go to Google Play Store on your Galaxy Note Edge.
  2. Find “Root Checker” and install it.
  3. Open Root Checker.
  4. Tap “Verify Root”.
  5. It will ask you for SuperSu rights, tap “Grant”.
  6. It should show you Root Access Verified Now!
  7. That’s All!

Screenshot_1

If you’re stuck with anything regarding this guide, feel free to utilize the comment box below and reach us. We will get back to you immediately. Thank you all.

Credits: Chainfire XDA
How To Directly Transfer Any Movie Or Music File To iPhone / iPad Without iTunes and Jailbreak

0
How To Directly Transfer Any Movie Or Music File To iPhone / iPad Without iTunes and Jailbreak

iOS devices have many great features like great battery timing, awesome performance and quality Camera. There is a feature missing in iOS devices, to be able to Directly Transfer Any Movie Or Music File To iPhone / iPad. We have to use iTunes or Jailbreak our device in order to transfer Movie or Music file. Today we’ll tell you how to directly transfer any movie or music file to iPhone/iPad without iTunes and Jailbreak.

how to directly transfer any movie and music file to iPhone:iPad

How To Directly Transfer Any Movie Or Music File To iPhone / iPad Without iTunes and Jailbreak:

To do this, use a third party app named as WALTR. iOS supported file formats are MP3, MP4, AVI, CUE, WMA, M4R, AAC, M4V, M4A, FLAC, ALAC, and MKV. While using WALTR its doesn’t matter which format is it. Let’s start the guide on Transferring Any Movie Or Music File To iPhone / iPad Without iTunes and Jailbreak.

Step 1: Download and Install WALTR.

Step 2: Connect your iPhone or iPad with PC.

Step 3: Close the iTunes.

Step 4: Open WALTR by double clicking on the icon.

Step 5: Now drag the media file and drop it on WALTR main Windows.

Step 6: After dropping the file, WALTR automatically converts the file to the right format.

Step 7: After the conversion is completed the file, WALTR will start the transfer process.

All Done !!!

transfer movie files to iPhone:iPad

If you face any issue regarding this guide please let me know in the comments. Also, we have added a video tutorial on how to Directly Transfer Any Movie Or Music File To iPhone / iPad Without iTunes and Jailbreak.

Unlock, Root & Install Custom Recovery On Nexus 6 With Wug’s Nexus Root Toolkit

0
Unlock, Root & Install Custom Recovery On Nexus 6 With Wug’s Nexus Root Toolkit

XDA recognized developer WugFresh has built a very nice toolkit named after himself, Wug’s Nexus Root Toolkit. The Toolkit exactly does what the name suggests, you can perform almost all the basic operations like unlocking and re-locking bootloader of your Nexus device, rooting-unrooting your Nexus device, flashing custom Kernels, system, userdata files through .img files or simply flash .zip files stored on your phone’s SD card or loading a file through your PC. The tool can also install APK files on your Nexus device, along with that, it can also perform ADB sideload operations, it can push files into your device or pull the files from it, it can take screenshots on the connected device and can even record the screen. You can also restore your device to its stock condition just in a few clicks using the options available in this Toolkit. The tool basically performs a number of ADB & Fastboot commands without letting the users open that command interface and typing each and every single command. The program works very intelligently, it detects your device’s model number, the build number of the running firmware and downloads the required files automatically once you’ve selected an operation.

Wug’s Nexus Root Toolkit is quite helpful, specially when you’re stuck with looking for recovery files, root methods and other stuff here and there and it just wastes a lot of time. With this all-in-one toolkit, you can do all of these tasks in one go. The device supports all the Nexus devices so far, the only device missing its compatibility with Wug’s Nexus Root Toolkit was the Google  Nexus 6, and that wait too is over today. Nexus 6 is still pretty new and not so many users have it, nor the development has kickstarted yet, so having the Nexus 6 Root Toolkit at this time will be easing the unlocking the device’s bootloader methods, rooting processes, flashing custom recoveries, flashing .imgs, flashing .zips and all other such processes. All you need to do is, you need to go ahead and download Wug’s Nexus Root Toolkit with Nexus 6 compatibility, install it on your PC, connect your phone and follow the on-screen instructions to perform your desired operations.1fvKq0b YBMSch4

  1. Download latest version of Nexus Root Toolkit
  2. Install the toolkit on your PC.
  3. Launch the toolkit.
  4. Connect your device.
  5. Follow the on-screen instructions to unlock, root or flash custom recovery.