Home Blog Page 389

How to Easily Create an iCloud Email Alias on iPhone/Mac

0
How to Easily Create an iCloud Email Alias on iPhone/Mac

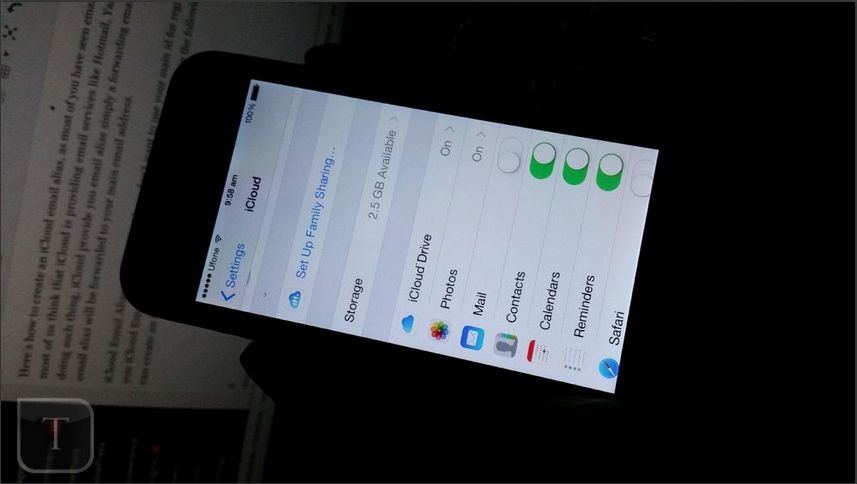
Here’s how to create an iCloud email alias on iPhone/Mac, as most of you have seen email address like [email protected] and people think that iCloud is providing email services like Hotmail, Yahoo and Gmail. Well they are  doing such thing but also iCloud provide you email alias simply a forwarding email address. Anything send to this email alias will be forwarded to your main email address.

iCloud Email Alias come handy, if you don’t want to use your main id for registration on other portals then you can use iCloud Email Alias. It will help your to manage your emails, in the following guide i’ll tell you how you can create an iCloud Email Alias on your iPhone and Mac.

How to Easily Create an iCloud Email Alias on iPhone/Mac

How to Easily Create an iCloud Email on iPhone:

Step#1: Open Settings on your iPhone.

Screen Shot 2015-02-18 at 10.12.30


Step#2: Tap on iCloud.

Screen Shot 2015-02-18 at 10.13.03

Step#3: Tap on Mail to enable it.

Step#4: You’ll see a pop-up at the bottom, Tap on Create.

Screen Shot 2015-02-18 at 10.13.43

Step#5: Now write your desired name to create iCloud email address. Tap Next.

Screen Shot 2015-02-18 at 10.14.40

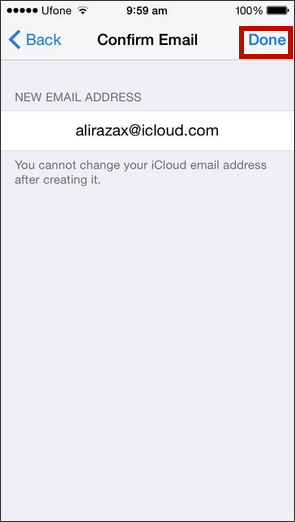
Step#6: Tap on Done to complete the process.

Screen Shot 2015-02-18 at 10.15.17

All Done!!.

How to Easily Create an iCloud Email Alias on Mac:

Step#1: Open icloud.com on your Mac and login with your Apple ID.

Step#2: Now click on Mail icon, to access the emails.

Screen Shot 2015-02-18 at 10.02.45

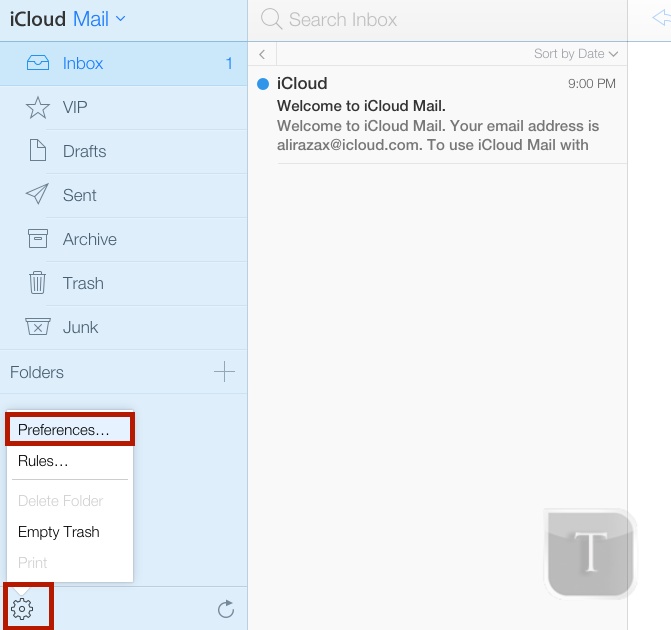
Step#3: Click on action menu icon located on bottom left. Select Preferences.

Screen Shot 2015-02-18 at 10.03.41

Step#4: Click on Account from the tabs, on the left side on your screen you see ” Add Alias ” Click on it.

Screen Shot 2015-02-18 at 10.04.27

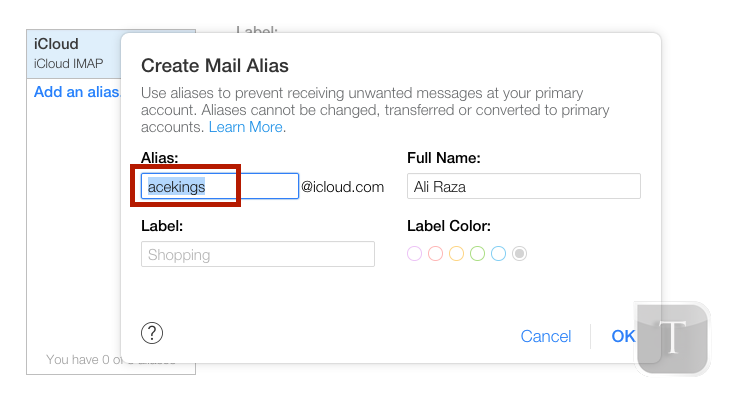
Step#5: Now you can create your Alias, add your desired word or name. Click on Ok.

Screen Shot 2015-02-18 at 10.05.01

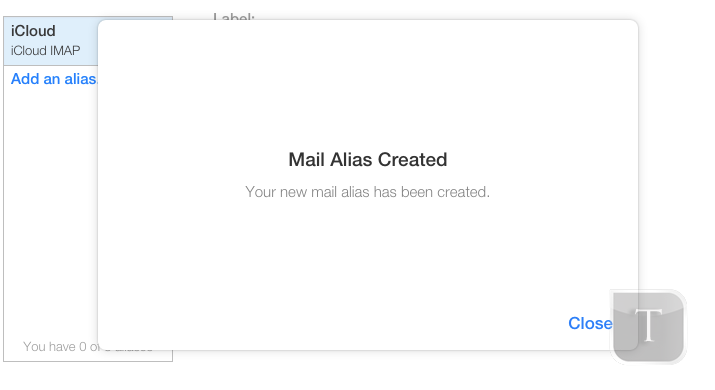
Step#6: You’ll see a message saying Mail Alias Created.

Screen Shot 2015-02-18 at 10.05.25

All Done.

How To Block Unknown Friend Requests in Facebook on iPhone

0
How To Block Unknown Friend Requests in Facebook on iPhone

There is not even a single smartphone user who don’t use the Facebook every day, but as Facebook is way to connect with friends and family, we also get friends request from unknown person that’s very annoying. Today i’ll tell you how to block unknown friend requests in Facebook on iPhone. After you change your privacy setting you won’t be receiving any friend requests in Facebook from strangers.

In the following guide i’ll explain you how you can block unknown friend requests in Facebook by changing the privacy settings in iPhone. It easy and simple all you have to do is follow the steps as mentioned.

 How To Block Unknown Friend Requests in Facebook on iPhone

How To Block Unknown Friend Requests in Facebook on iPhone:

Step#1: Open Facebook App on your iPhone.

How To Block Unknown Friend Requests in Facebook on iPhone


Step#2: Tap on More located at bottom right.

How To Block Unknown Friend Requests in Facebook on iPhone


Step#3: Now Tap on Privacy Shortcuts.

Privacy Shortcuts


Step#4: Tap on Who can contact me?.

Block Friend Request from Strangers in Facebook


Step#5: Now Tap on Who can send me friend requests?

Tap on “Who can send me friend requests?


Step#6: Now to block strangers to send your friends requests, Tap on Friends of Friends

Block Friend Request from Strangers in Facebook


All Done !!!….

Gangstar Vegas for PC Download – ( Windows 8,8.1,7,Xp – Mac )

1
Gangstar Vegas for PC Download – ( Windows 8,8.1,7,Xp – Mac )

Gangstar Vegas for PC is available but not in Pc games format like .exe, Gangstar Vegas is an action based game for smartphones. Now a days there are hundreds of smartphone games which are very addictive and it will be more if we can play these games of PC. Gangstar Vegas is basically designed for Android and iOS, but thanks to third party emulators we can play Android games on PC. In the following guide i’ll tell you how to install Gangstar Vegas on PC using BlueStacks and Andy. Before going any further let me give you an overview on Gangstar Vegas.

About Gangstar Vegas:

1# Gangstar Vegas is mixed martial arts action game.

2# You have to play through 80 MISSIONS filled with action.

3# To win every mission you’ve to build up a gangster squad to take over Vegas.

Gangstar Vegas for PC

How To Download Gangstar Vegas for Pc Using Andy Emulator: 

Step 1: Download the Andy from here.

Step 2: After downloading is complete, install Andy on PC.

Step 3: Andy installation process will take few minutes, When installation is finished launch Andy on you PC.

Step 4: When Andy is open, you’ll see an Android tablet interface head over to Google Play.

Step 5: Open Google Play->Search->Gangstar Vegas – Daybreak->Install.

Step 6: when the installation process is complete, go to the home screen there you’ll see Gangstar Vegas.

Step 7: Double click on Gangstar Vegas icon and start playing the game.

Step 8: Now Gangstar Vegas is successfully installed on your PC, Enjoy the the game.

Download and Install Daytona Rush for PC ( Windows Xp,8,8.1,7,10 – Mac ):

  1. To download Gangstar Vegas for PC, you will need an Android emulator like Bluestacks. If you do not have it already, you can download it from the website Bluestacks.com.
  2. Open Bluestacks and search for Gangstar Vegas using search tool on the top of the homepage.
  3. Click on install button. The game will automatically download and install.
  4. Once the app has been installed, go to My Apps in Bluestacks homepage.
  5. The icon for the game will appear in My Apps.
  6.  Click on this icon to open Gangstar Vegas.

How To Fix “Visual Voicemail Unavailable” Error on the iPhone

0
How To Fix “Visual Voicemail Unavailable” Error on the iPhone

Here’s how to fix visual voicemail unavailable error on the iPhone, most of the time this message appears when ever we are going to check new voicemail on the iPhone. In the following guide i’ll tell how you can fix it with few simple steps. The main reason of this error might be your service issue, network settings and may be because you are not in coverage area.

In the following guide i’ll tell you two methods to fix Visual Voicemail Unavailable on iPhone. All you have to do is follow all the steps carefully.

How To Fix “Visual Voicemail Unavailable” Error on the iPhone

How To Fix “Visual Voicemail Unavailable” Error on the iPhone:

Step#1: Open Settings on your iPhone.

Step#2: Now Toggle on/off Airplane mod, wait for 20 seconds.

Step#3: Restart your iPhone.

Step#4: Check your carrier settings update and make sure they are updated to latest one.

Step#5: Connect your device with PC/Mac, update your device to the latest version of iOS.

Step#6: Setup your voicemail if its not, you can check by dialing your own phone number.

Step#7:  Check your network connection, make sure it working perfect.

Step#8: Goto Settings > General > Reset > Reset Network Settings.

All Done !!!……..

How to Fix an “Unable to Join the Network” Error on iPhone/iPad

0
How to Fix an “Unable to Join the Network” Error on iPhone/iPad

Here’s how to fix unable to join the network error on iPhone/iPad, I find this the most annoying issue in iDevices. This error mostly accoured when you try to connect with a wireless network on your iPhone, iPad and iPod. There is no specific reason why we start seeing “Unable to Join the Network” popup, but we have few solutions that can fix Unable to Join the Network. 

Following is a step by step guide on how to fix unable to join the network error on iPhone/iPad. It happens cause of many reason such as WiFi adopter is not working, Network settings are not updated and a bad software update.

How to Fix an “Unable to Join the Network” Error on iPhone/iPad

How to Fix an “Unable to Join the Network” Error on iPhone/iPad:

Step#1: Open Settings on your iPhone/iPad.

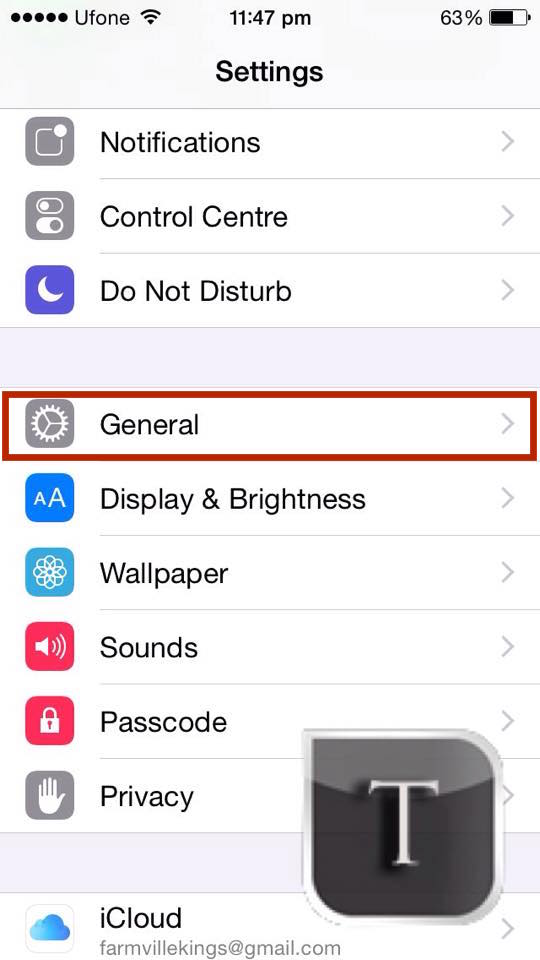
Step#2: Now Tap on General.

how-fix-unable-to-join-network-error-iphone-ipad


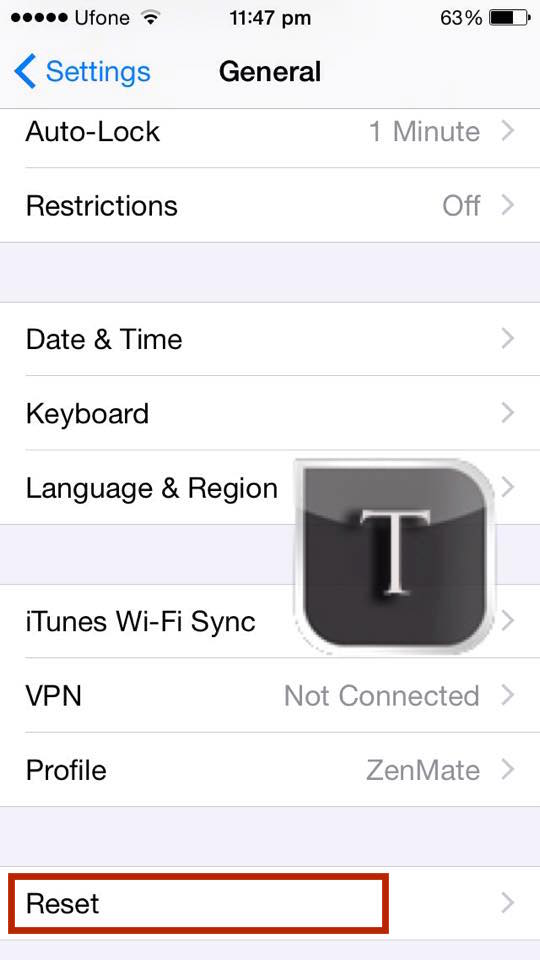
Step#2: Tap on Reset.

how-fix-unable-to-join-network-error-iphone-ipad


Step#4: Tap on Reset Network Settings.

how-fix-unable-to-join-network-error-iphone-ipad


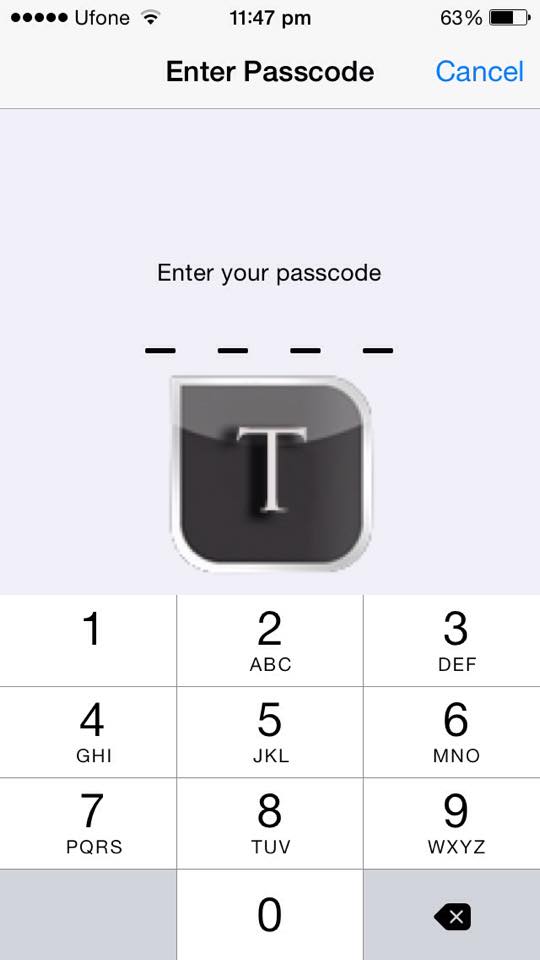
Step#5: Now enter your Passcode, in order to proceed.

how-fix-unable-to-join-network-error-iphone-ipad


Now wait for your device to reboot, you’ll see a processing logon you iPhone screen. After your device is turned on go to Settings->WiFi->Tap on the network to connect. Hopefully you will not see “Unable to Join the Network” popup again.

Daytona Rush for Pc Download – ( Windows 8,8.1,7,Xp/Mac )

0
Daytona Rush for Pc Download – ( Windows 8,8.1,7,Xp/Mac )

Daytona Rush for Pc is available for download, but not in proper PC versions. Daytona Rush is classic racing game for smartphones, if you are a fan of Stock car racing then Daytona Rush is the one for you. Daytona Rush is basically designed Android and iOS , but we can also install Daytona Rush for Pc using emulators like BlueStacks and Andy. Before proceeding any further let me give you an overview on Daytona Rush.

About Daytona Rush:

  • Stunning visuals
  • Advanced physics
  • Pit lane for refuelling
  • Drafting
  • 100+ missions
  • In-game leaderboard
  • Performance tuning
  • Vinyls and colors
  • Achievements

Daytona Rush for Pc Download

How To Download Daytona Rush for Pc Using iPadian Emulator:

  1. To download Daytona Rush for PC, you will need an Android emulator like iPadian. If you do not have it already, you can download it from the website xpadian.com.
  2. Open iPadians and search for Daytona Rush using search tool on the top of the homepage.
  3. Click on install button. The game will automatically download and install.
  4. Once the app has been installed, go to My Apps in iPadian homepage.
  5. The icon for the game will appear in My Apps.
  6.  Click on this icon to open Daytona Rush.

How To Download Daytona Rush for Pc Using Andy Emulator: [ Coming Soon ]

Step 1: Download the Andy from here.

Step 2: After downloading is complete, install Andy on PC.

Step 3: Andy installation process will take few minutes, When installation is finished launch Andy on you PC.

Step 4: When Andy is open, you’ll see an Android tablet interface head over to Google Play.

Step 5: Open Google Play->Search->Daytona Rush – Daybreak->Install.

Step 6: when the installation process is complete, go to the home screen there you’ll see Daytona Rush.

Step 7: Double click on Daytona Rush icon and start playing the game.

Step 8: Now Daytona Rush is successfully installed on your PC, Enjoy the the game.

bluestacks-logo


Download and Install Daytona Rush for PC ( Windows Xp,8,8.1,7,10 – Mac ): [ Coming Soon ]

  1. To download Daytona Rush for PC, you will need an Android emulator like Bluestacks. If you do not have it already, you can download it from the website Bluestacks.com.
  2. Open Bluestacks and search for Daytona Rush using search tool on the top of the homepage.
  3. Click on install button. The game will automatically download and install.
  4. Once the app has been installed, go to My Apps in Bluestacks homepage.
  5. The icon for the game will appear in My Apps.
  6.  Click on this icon to open Daytona Rush.


Install Official Android 5.0 Lollipop On Galaxy S5 G900FD

0
Install Official Android 5.0 Lollipop On Galaxy S5 G900FD

Android 5.0 Lollipop is on the roll for so the mainstream Samsung Galaxy devices at the moment. Samsung has rolled it out for some variants of the Galaxy Note 3, Galaxy Note 4, Galaxy S4 and a number of Galaxy S5 variants have received this update as well. Galaxy S5’s dual SIM family member, SM-G900FD has just started receiving this update now. The update is rolling out to the users in Russia through Samsung kies and OTA updates at the moment. Update carries the Android version Android 5.0 Lollipop.

Apart from being the biggest update in the history of update, this update carries some serious changes. Atop of the list, there’s a completely new TouchWiz UI inspired by Google’s Material Design. It’s a flat UI, that is way smoother and eye-soothing. Battery life of the device has been improved. The new firmware is much more responsive, performance has been enhanced. Notification panel is transparent and new notifications on the lock screen have been introduced. This update will roll out slowly to the users living in other regions, but if you’re an Android power user who is just impatient as much as I am, you may want to go ahead and flash this firmware manually on your device right away.

samsung_galaxy_s5_3__52762.1410933594.1280.1280

It’s pretty easy to install Android 5.0 Lollipop on your Galaxy S5 SM-G900FD using Odin3 right now. We will be doing this in the proceeding guide, you may follow us for a while and get it done successfully. Let’s learn some quick early preparations and then install the firmware.

Firmware details:

  • Device Model: Galaxy S5 G900FD
  • Android Version: Android 5.0 Lollipop
  • Build Number: G900FDXXU1BNL9
  • Build Date: 19.12.2014

Early Preparations

1. This guide is only for Dual SIM Galaxy S5 G900FD

Make sure that your device is exactly as mentioned above. To check out what device you have, go to Settings > More/General > About Device or Settings > About Device and match the model number. Be careful about the device model number, flashing a file on a device not listed here might result in bricking it up. In that case, we may not be held responsible.

2. Battery should be charged at least 60%!

Your device’s battery should not be weak. In case your device goes dead during the flashing process, your device may get soft bricked and you might be in need of flashing stock firmware and that will ultimately result in wiping up your data as well. So, make sure that you charge your device before you start the flashing process.

3. Use the OEM data cable to establish connection!

Always use the original data cable to establish connection between your Android device and your computer / laptop. Using ordinary data cables might interrupt the flashing process, so to avoid any mishap, you need to meet this requirement as well.

4. Backup everything!

Just to be on the safe side, you may consider backing up each and everything from your Android device. This is highly recommended so that in case anything goes wrong, you still have the access to all of your data and you can restore it immediately. Also, clean install is always recommended, that means you will probably have to wipe your device to install the new firmware. So, you may backup everything as listed below.

Backup SMS Messages
Backup Call Logs
Backup Contacts
Backup Media – Copy your files manually to your PC or Laptop.
Backup EFS – If rooted, otherwise skip this step.

5. Install Samsung USB drivers

In order to be able to establish connection between your PC and your Galaxy S4, you need to have the Samsung USB drivers installed on your PC. You can find all Android USB drivers here on our site.

6. Turn off Samsung Kies and other softwares while using Odin3!

Make sure that you turn off Samsung Kies while using Odin3 flashtool. Samsung Kies will interrupt Odin3 and will result in causing errors and may not let you flash your desired firwmrae. Also, make sure that you turn off any antivirus software you’ve installed and also disable firewall to avoid any connection and flashing issues.

Required Downloads & Installations

  1. Download and extract Odin3 v3.10.6.
  2. Download and extract firmware file to get the .tar.md5 file.
    1. SER-G900FDXXU1BNL9-20150102144544.zip

How To Install Official Android 5.0 Lollipop On Galaxy S5 G900FD

  1. Make sure that you read the instructions listed above carefully and you’re all set to go ahead now.
  2. Wipe your device complete in order to attain a neat installation. You may boot into the recovery mode and perform a factory data reset.
  3. Open Odin3.exe.
  4. Put your G900FD in download mode. To do so, turn it off and wait for 10 seconds. Turn it on by pressing and holding Volume Down + Home Button + Power Key simultaneously, You should see a warning, press Volume Up to continue. In case this method doesn’t work for you, try one from this guide.
  5. Connect your device to your PC.
  6. As soon as Odin detects your phone, the ID:COM box should turn blue.  Make sure that you’ve installed Samsung USB drivers before connecting.
  7. For Odin 3.09 or 3.10.6 hit the AP tab. Select the firmware.tar.md5 or firmware.tar, that you downloaded and extracted above.
  8. If you’re using Odin 3.07, you will select “PDA” tab instead of the AP tab, rest of the options remain untouched.
  9. Make sure that the options selected in your Odin are exactly as shown in the pic.Odin 3.10.6 Explained_Techbeasts
  10. Hit start and wait till the firmware  flashing is complete, The flashing process box will turn green upon successful flashing.
  11. Once the flashing process has been completed successfully, disconnect your device and reboot it manually. You can pull out the battery, place it back and turn on.
  12. Once the device boots up, checkout the new firmware now.
  13. Your device will be running on official Android 5.0 Lollipop firmware.
  14. Once updated, do not try to downgrade, or else you will result in messing up EFS partition of your device.
  15. That’s all!

Got any queries? Make sure that you drop em’ in the comment box below. Good Luck!
Install CWM Recovery & Root Xperia Z2 23.0.1.A.0.167 Firmware [D6502,D6503,D6543]

Install CWM Recovery & Root Xperia Z2 23.0.1.A.0.167 Firmware [D6502,D6503,D6543]

Xperia Z2 is Sony’s former flagship device. The device is powered up with Snapdragon 801 Quad Core CPU clocked at 2.3 GHz and it is accompanied by Adreno 330 GPU and a whopping RAM of 3 GB. On the front we can find a full HD 5.2 inch display with a 2.2 shooter at the top and a 20.7 MP shooter is fixed at the back. Xperia Z2 packs up a huge 3200 mAh battery. Out of the box it runs on Android 4.4 KitKat, but Sony has plans to update this device to Android 5.0 Lollipop, that will be happening anytime soon now.

At the time of writing this post, Xperia Z2 is running on Android 4.4.4 KitKat 23.0.1.A.0.167 firmware. Android power users who have already updated their device to this firmware, they must be well aware of the fact that the latest firmware does not allow rooting the device without unlocking the bootloader. Methods to root the device on locked bootloader worked with older firmwares. For quite a while, there was even no method to root the device on this latest firmware. It’s been quite a while now since XDA senior developer Doomlord added support to his all-time famous kernel packing up custom recovery for our beloved Xperia Z2. Recovery is CWM with the version number 6.0.4.7. You will need an unlocked bootloader and load this custom kernel in order to run this custom recovery on your Xperia Z2, after that you will be able to flash SuperSu and gain root access in order to be able to unleash the vast world of tweaks and mods on your Xperia Z2 powered up by the great Android OS. If you’ve just started wondering about the method, you may stop it right away as we are about to install this CWM 6.0.4.7 recovery and root Xperia Z2 D6502, D6503 and D6543. Let’s go through the early preparations now.


6131661

    1. This guide is only for Sony Xperia Z2 running  23.0.1.A.0.167  firmware, the models mentioned above. Do not try this on any other model, please check your device’s mode in Settings > About Device.
    2. You must have installed Android ADB & Fastboot drivers. Follow the quick guide here.
    3. Your device must have an unlocked bootloader. Follow our full guide here in order to unlock.
    4. Please make sure that your phone’s battery is charged at least over 60%. This is highly recommended in order to prevent any power issues during the recovery flashing process.
    5. Backup each and everything on your Android phone as follows:
    6. Backup all your important contacts, find the full guide here.
    7. Backup all your important sms messages, find the full guide here.
    8. Backup all your important call logs, find the full guide here.
    9. Backup all your important media content manually. (Copy to your PC.)
    10. Backup all your apps / data. If you’ve rooted your device, use Titanium Backup to do so. Otherwise skip this step.
    11. Backup your current system using a custom recovery (CWM or TWRP) if you’ve flashed one. This is recommended in case something goes wrong with CWM installation, you can use the custom recovery and return to the old working state of your system.
    12. Enable USB debugging mode on your device.  Get it in Settings > Developer Options > USB Debugging mode.
    13. Use only OEM data cable to establish connection between your PC and Phone.
    14. Alright! Follow this guide to the letter now.
Disclaimer: The methods involved in flashing custom roms and rooting your phone is highly custom and may result in bricking your device, and has nothing to do with Google or the device manufacturer that is SONY in our case. Also rooting your device will void its warranty and you will be no longer eligible for any kind of free device services by the manufacturers/warranty providers. In case of any mishap we may not be held responsible. Follow these instructions to the letter to avoid any mishap or bricking. Make sure that whatever you do, you are doing it at your own responsibility.


How to Install CWM 6.0.4.7 Recovery on Xperia Z2 D6503, D6502, D6543

    1. Download Doomlord’s Z2_DooMLoRD_AdvStkKernel_FW-167-v07.zip
    2. Copy the downloaded Advanced Stock Kernel.zip file to your phone’s SD card.
    3. Extract the downloaded .zip folder on your PC, you will get a Boot.img file.
    4. Place the extracted Boot.img file in the Minimal ADB & Fastboot folder that you created using our ADB & Fastboot Quick Setup Guide.
    5. If you are using Android ADB & Fastboot full package, you can place the downloaded Recovery.img file in the Fastboot folder or in the Platform-tools folder.
    6. Open the folder where you placed the Boot.img  file. E.g Minimal ADB & Fastboot or Fastboot or Platform Tools.
    7. Press and hold the shift key and right click on an empty area within the folder, and click on “Open Command Window Here”.
    8. Turn off your Xperia Z2 completely.
    9. Now press the Volume Up Key and while keeping it pressed plug in the USB cable.
    10. You should see a blue light in the notification light of your phone, that means your device is now connected in Fastboot mode.
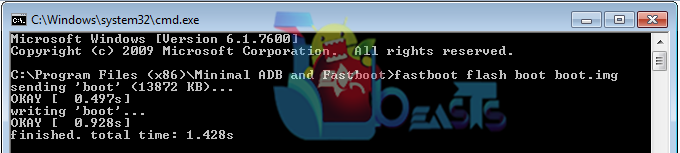
    11. Now type the following command: fastboot flash boot boot.img
    12. Hit Enter and it will quickly flash CWM 6.0.4.7 recovery in your Xperia Z2.
    13. Once recovery is flashed, now issue this command “Fastboot reboot”
    14. Your device will reboot now, as soon as you see the Sony logo,  and the pink LED, press Volume Up key to enter recovery.
    15. Once you’re in recovery, select “Install Zip > Choose Zip from SD Card > Advanced Stock Kernel with CWM.zip > Yes”. [Important]
    16. This will flash the Kernel in your phone now. Once flashed, reboot your device.
    17. Congrats! You should now see the custom recovery.
Screenshot_1
This screenshot is attached only as a reference. The data appearing on your end may be different from the one shown above.


How To Root Your Xperia Z2 On .67 Firmware Now

  1. Download SuperSu.zip file.
  2. Copy the downloaded .zip file to your phone’s SD card.
  3. Now turn off your device and boot into the recovery mode using the method explained above.
  4. Once in recovery, select “install zip > choose zip from SD card > SuperSu.zip > yes”.
  5. Once SuperSu is flashed, reboot your device and find SuperSu in app drawer.
  6. Phewww! You’re rooted now.
  7. Install Root Checker app from Google Play Store to verify root access.

If anything goes wrong, you may immediately create and flash stock FTF on your Xperia Z2 to recovery it.


That’s All with the recovery installation and root process. In case you got any queries or face any difficulties regarding this post, please feel free to stop by the comment box below and let us know. We will get back to you as soon as possible. Thanks all.

Credits: DoomLord – XDA Recognized Developer

How to Recover Deleted Text Messages On iPhone without Backup

1
How to Recover Deleted Text Messages On iPhone without Backup

Here’s how to Recover Deleted Text Messages On iPhone without Backup, yes you can. People who love to text more then calls and they don’t want their messages get deleted, but by any means their text messages are deleted by mistake or any reason. We have a working solution for them, in the following guide we’ll tell you how to Recover Deleted Text Messages On iPhone without Backup.

Now a days people prefer texts over calls, because when we are at office , dinner or party their is not time to make call to talk about stuff.  That’s why we got important information in our text messages so if accidentally they got deleted and we didn’t have any backup, it will be a great loss. So if you are in this kind of situation follow the guide below.

How to Recover Deleted Text Messages On iPhone without BackupHow to Recover Deleted Text Messages On iPhone without Backup:

Step#1: First download PhoneRescue from here. ( Windows/Mac ).

Step#2: Connect your iOS device with PC/Mac.

Step#3: Open PhoneRescue now.

Step#4: Click on Recover from an iOS Device.

How to Recover Deleted Text Messages On iPhone without Backup


Step#5: Click on Normal Mode.

How to Recover Deleted Text Messages On iPhone without BackupStep#6: Now you’ll see all of your apps click on Messages.

How to Recover Deleted Text Messages On iPhone without Backup


Step#7: Now click on Start Scan button and Wait for process to complete.

How to Recover Deleted Text Messages On iPhone without Backup


Step#8: After process is completed, you see you deleted texts message click on the ones you want to recover and click on Recover button.

How to Recover Deleted Text Messages On iPhone without Backup


All Done !!!..


Install Android 5.0.1 Lollipop On Galaxy Note 4 N910K/L [Official Firmware]

0
Install Android 5.0.1 Lollipop On Galaxy Note 4 N910K/L [Official Firmware]

Here’s a comprehensive guide that will help you to update your Galaxy Note 4 SM-N910K or N910L to latest Android 5.0.1 Lollipop official firmware using Odin. This guide is intended for the users who can’t wait for the firmware to hit their region through Samsung Kies or OTA, and they want to install the firmware manually right now. Let’s go through the firmware details and then flash it.N910K N910L Android 5.0.1 Lollipop

Firmware details:

  • Device Model: Galaxy Note 4 N910K & N910L
  • Android Version: Android 5.0.1 Lollipop
  • Build Number: N910KKTU1BOB5 [For N910K] | N910LKLU1BOB4 [For N910L]
  • Build Date: 10/2/2015 [N910K] | 6/2/2015 [N910L]

Early Preparations

1. This guide is only for Galaxy Note 4 SM-N910L or N910K!

Make sure that your device is exactly as mentioned above. To check out what device you have, go to Settings > More/General > About Device or Settings > About Device and match the model number. Be careful about the device model number, flashing a file on a device not listed here might result in bricking it up. In that case, we may not be held responsible.

2. Battery should be charged at least 60%!

Your device’s battery should not be weak. In case your device goes dead during the flashing process, your device may get soft bricked and you might be in need of flashing stock firmware and that will ultimately result in wiping up your data as well. So, make sure that you charge your device before you start the flashing process.

3. Use the OEM data cable to establish connection!

Always use the original data cable to establish connection between your Android device and your computer / laptop. Using ordinary data cables might interrupt the flashing process, so to avoid any mishap, you need to meet this requirement as well.

4. Backup everything!

Just to be on the safe side, you may consider backing up each and everything from your Android device. This is highly recommended so that in case anything goes wrong, you still have the access to all of your data and you can restore it immediately. Also, clean install is always recommended, that means you will probably have to wipe your device to install the new firmware. So, you may backup everything as listed below.

Backup SMS Messages
Backup Call Logs
Backup Contacts
Backup Media – Copy your files manually to your PC or Laptop.
Backup EFS – If rooted, otherwise skip this step.

5. Install Samsung USB drivers

In order to be able to establish connection between your PC and your Galaxy S4, you need to have the Samsung USB drivers installed on your PC. You can find all Android USB drivers here on our site.

6. Turn off Samsung Kies and other softwares while using Odin3!

Make sure that you turn off Samsung Kies while using Odin3 flashtool. Samsung Kies will interrupt Odin3 and will result in causing errors and may not let you flash your desired firwmrae. Also, make sure that you turn off any antivirus software you’ve installed and also disable firewall to avoid any connection and flashing issues.

Required Downloads & Installations

  1. Download and extract Odin3 v3.10.6.
  2. Download and extract firmware file to get the .tar.md5 file.

How To Install Official Android 5.0.1 Lollipop On Galaxy Note 4 N910K/L

  1. Make sure that you read the instructions listed above carefully and you’re all set to go ahead now.
  2. Wipe your device complete in order to attain a neat installation. You may boot into the recovery mode and perform a factory data reset.
  3. Open Odin3.exe.
  4. Put your N910S Note 4 in download mode. To do so, turn it off and wait for 10 seconds. Turn it on by pressing and holding Volume Down + Home Button + Power Key simultaneously, You should see a warning, press Volume Up to continue. In case this method doesn’t work for you, try one from this guide.
  5. Connect your device to your PC.
  6. As soon as Odin detects your phone, the ID:COM box should turn blue.  Make sure that you’ve installed Samsung USB drivers before connecting.
  7. For Odin 3.09 or 3.10.6 hit the AP tab. Select the firmware.tar.md5 or firmware.tar, that you downloaded and extracted above.
  8. If you’re using Odin 3.07, you will select “PDA” tab instead of the AP tab, rest of the options remain untouched.
  9. Make sure that the options selected in your Odin are exactly as shown in the pic.Odin 3.10.6 Explained_Techbeasts
  10. Hit start and wait till the firmware  flashing is complete, The flashing process box will turn green upon successful flashing.
  11. Once the flashing process has been completed successfully, disconnect your device and reboot it manually. You can pull out the battery, place it back and turn on.
  12. Once the device boots up, checkout the new firmware now.
  13. Your device will be running on official Android 5.0.1 Lollipop firmware.
  14. Once updated, do not try to downgrade, or else you will result in messing up EFS partition of your device.
  15. That’s all!

Got any queries? Make sure that you drop em’ in the comment box below. Good Luck!

Update Galaxy Note 4 N910F To Android 5.0.1 Lollipop Official

4
Update Galaxy Note 4 N910F To Android 5.0.1 Lollipop Official

Galaxy Note 4’s snapdragon variant, the N910F has finally started receiving Android 5.0.1 Lollipop update. The device happened to be the third one in the Note 4 family to receive this update. There are some major changes in this update that include a revamped TouchWiz UI meeting up Google’s Material Design. There’s a new look of notifications on the lock screen inspired by Material Design, it looks way awesome now. The notification bar has gone all transparent. Battery life of the device has been greatly enhanced. The new Android version is faster, stable and bug free.

The updated has started rolling out to users in Germany. The build date suggests that this firmware was built on 6th of February, 2015. At the moment, the update is available through Samsung Kies or OTA, but only inside Germany. Users having N910F outside Germany will either have to wait or they will have to flash this firmware manually. If you’re one of the Android geeks who cannot wait for the OTA update to hit their region, you may want to go ahead flashing this firmware using Samsung’s flash tool, the Odin3. You must be wondering about the method to install the firmware, you may stop doing so as you’re going to see a comprehensive guide on how to install this latest and greatest Android version, the Android 5.0.1 Lollipop on your Samsung Galaxy Note 4 N910F. Let’s go through the firmware details first and the begin with the flashing process.

Note 4 Lolllipop

Firmware Details:

  • Model Number: SM-N910F
  • Region: Germany
  • Version: Android 5.0.1 Lollipop
  • Build: N910FXXU1BOB4
  • Build Date: 6/2/2015

Early Preparations

1. This guide is only for Galaxy Note 4 SM-N910F!

Make sure that your device is exactly as mentioned above. To check out what device you have, go to Settings > More/General > About Device or Settings > About Device and match the model number. Be careful about the device model number, flashing a file on a device not listed here might result in bricking it up. In that case, we may not be held responsible.

2. Battery should be charged at least 60%!

Your device’s battery should not be weak. In case your device goes dead during the flashing process, your device may get soft bricked and you might be in need of flashing stock firmware and that will ultimately result in wiping up your data as well. So, make sure that you charge your device before you start the flashing process.

3. Use the OEM data cable to establish connection!

Always use the original data cable to establish connection between your Android device and your computer / laptop. Using ordinary data cables might interrupt the flashing process, so to avoid any mishap, you need to meet this requirement as well.

4. Backup everything!

Just to be on the safe side, you may consider backing up each and everything from your Android device. This is highly recommended so that in case anything goes wrong, you still have the access to all of your data and you can restore it immediately. Also, clean install is always recommended, that means you will probably have to wipe your device to install the new firmware. So, you may backup everything as listed below.

Backup SMS Messages
Backup Call Logs
Backup Contacts
Backup Media – Copy your files manually to your PC or Laptop.
Backup EFS – If rooted, otherwise skip this step.

5. Install Samsung USB drivers

In order to be able to establish connection between your PC and your Galaxy S4, you need to have the Samsung USB drivers installed on your PC. You can find all Android USB drivers here on our site.

6. Turn off Samsung Kies and other softwares while using Odin3!

Make sure that you turn off Samsung Kies while using Odin3 flashtool. Samsung Kies will interrupt Odin3 and will result in causing errors and may not let you flash your desired firwmrae. Also, make sure that you turn off any antivirus software you’ve installed and also disable firewall to avoid any connection and flashing issues.

Required Downloads & Installations

  1. Download and extract Odin3 v3.10.6.
  2. Download and extract firmware file to get the .tar.md5 file.

How To Install Official Android 5.0.1 Lollipop On Galaxy Note 4 SM-N910F

  1. Make sure that you read the instructions listed above carefully and you’re all set to go ahead now.
  2. Wipe your device complete in order to attain a neat installation. You may boot into the recovery mode and perform a factory data reset.
  3. Open Odin3.exe.
  4. Put your N910F Note 4 in download mode. To do so, turn it off and wait for 10 seconds. Turn it on by pressing and holding Volume Down + Home Button + Power Key simultaneously, You should see a warning, press Volume Up to continue. In case this method doesn’t work for you, try one from this guide.
  5. Connect your device to your PC.
  6. As soon as Odin detects your phone, the ID:COM box should turn blue.  Make sure that you’ve installed Samsung USB drivers before connecting.
  7. For Odin 3.09 or 3.10.6 hit the AP tab. Select the firmware.tar.md5 or firmware.tar, that you downloaded and extracted above.
  8. If you’re using Odin 3.07, you will select “PDA” tab instead of the AP tab, rest of the options remain untouched.
  9. Make sure that the options selected in your Odin are exactly as shown in the pic.Odin 3.10.6 Explained_Techbeasts
  10. Hit start and wait till the firmware  flashing is complete, The flashing process box will turn green upon successful flashing.
  11. Once the flashing process has been completed successfully, disconnect your device and reboot it manually. You can pull out the battery, place it back and turn on.
  12. Once the device boots up, checkout the new firmware now.
  13. Your device will be running on official Android 5.0.1 Lollipop firmware.
  14. Once updated, do not try to downgrade, or else you will result in messing up EFS partition of your device.
  15. That’s all!

Got any queries? Make sure that you drop em’ in the comment box below. Good Luck!

Install Official Android 5.0 Lollipop On Galaxy Note 3 N9005

0
Install Official Android 5.0 Lollipop On Galaxy Note 3 N9005

Galaxy Note 3 N9005’s Exynos Sibling, the Note 3 N900 received Android 5.0 update a week ago. For a moment it seemed like, Samsung is preferring updating its very own Exynos powered devices and it’s going to take pretty long for Snapdragon users to get latest Android versions for their devices. But just yesterday, an update based on Android 5.0 Lollipop started rolling out for Galaxy Note 3 N9005. The update gave us a hope that other Snapdragon devices will be receiving the latest update soon now. Changes in this new Android version are prominent enough. We have a completely new look of the TouchWiz UI. Samsung has made it all flat in order to meet Google’s newly introduced Material Design UI. Notifications on the lock screen look quite cool. Notification panel is transparent, battery life of the device is great now, performance enhancements have been made. A lot more is there to check out, you may do so upon flashing this firmware.

Galaxy Note 3′ Android 5.0 Lollipop update is available in a number of regions at the moment. The update carries Android version number 5.0, it’s pretty strange that Samsung is rolling out Android 5.0.1 for Galaxy Note 4, then why are we having Android 5.0 for Galaxy Note 3 N900 and N9005. Users can get this Android version using Samsung Kies or through OTA, but just in case you’re one unlucky user having no traces of this update in their region, you may want to find a way to add some Lollipop sweetness to your device by using an out-of-the-box method. To calm down your impatience, we’ve written down this guide that will explain you to update your Galaxy Note 3 SM-N9005 to Android 5.0 Lollipop using Odin3 right now. Let’s go through the firmware details and then flash the new Android version on your device right away.

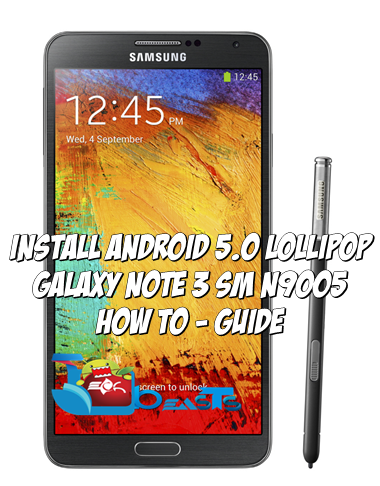
Note 3 Lollipop

Firmware Details:

  • Model Number: SM-N9005 (Galaxy Note 3 LTE)
  • Region: Hungary
  • Version: Android 5.0 Lollipop
  • Build: N9005XXUGBOA5
  • Build Date: Jan 20, 2015.

Early Preparations

1. This guide is only for Galaxy Note 3 SM-N9005

Make sure that your device is exactly as mentioned above. To check out what device you have, go to Settings > More/General > About Device or Settings > About Device and match the model number. Be careful about the device model number, flashing a file on a device not listed here might result in bricking it up. In that case, we may not be held responsible.

2. Battery should be charged at least 60%!

Your device’s battery should not be weak. In case your device goes dead during the flashing process, your device may get soft bricked and you might be in need of flashing stock firmware and that will ultimately result in wiping up your data as well. So, make sure that you charge your device before you start the flashing process.

3. Use the OEM data cable to establish connection!

Always use the original data cable to establish connection between your Android device and your computer / laptop. Using ordinary data cables might interrupt the flashing process, so to avoid any mishap, you need to meet this requirement as well.

4. Backup everything!

Just to be on the safe side, you may consider backing up each and everything from your Android device. This is highly recommended so that in case anything goes wrong, you still have the access to all of your data and you can restore it immediately. Also, clean install is always recommended, that means you will probably have to wipe your device to install the new firmware. So, you may backup everything as listed below.

Backup SMS Messages
Backup Call Logs
Backup Contacts
Backup Media – Copy your files manually to your PC or Laptop.
Backup EFS – If rooted, otherwise skip this step.

5. Install Samsung USB drivers

In order to be able to establish connection between your PC and your Galaxy S4, you need to have the Samsung USB drivers installed on your PC. You can find all Android USB drivers here on our site.

6. Turn off Samsung Kies and other softwares while using Odin3!

Make sure that you turn off Samsung Kies while using Odin3 flashtool. Samsung Kies will interrupt Odin3 and will result in causing errors and may not let you flash your desired firwmrae. Also, make sure that you turn off any antivirus software you’ve installed and also disable firewall to avoid any connection and flashing issues.

Required Downloads & Installations

  1. Download and extract Odin3 v3.10.6.
  2. Download and extract firmware file to get the .tar.md5 file.

How To Install Official Android 5.0 Lollipop On Galaxy Note 3 SM-N9005

  1. Make sure that you read the instructions listed above carefully and you’re all set to go ahead now.
  2. Wipe your device complete in order to attain a neat installation. You may boot into the recovery mode and perform a factory data reset.
  3. Open Odin3.exe.
  4. Put your Note 3 N9005 in download mode. To do so, turn it off and wait for 10 seconds. Turn it on by pressing and holding Volume Down + Home Button + Power Key simultaneously, You should see a warning, press Volume Up to continue. In case this method doesn’t work for you, try one from this guide.
  5. Connect your device to your PC.
  6. As soon as Odin detects your phone, the ID:COM box should turn blue.  Make sure that you’ve installed Samsung USB drivers before connecting.
  7. For Odin 3.09 or 3.10.6 hit the AP tab. Select the firmware.tar.md5 or firmware.tar, that you downloaded and extracted above.
  8. If you’re using Odin 3.07, you will select “PDA” tab instead of the AP tab, rest of the options remain untouched.
  9. Make sure that the options selected in your Odin are exactly as shown in the pic.Odin 3.10.6 Explained_Techbeasts
  10. Hit start and wait till the firmware  flashing is complete, The flashing process box will turn green upon successful flashing.
  11. Once the flashing process has been completed successfully, disconnect your device and reboot it manually. You can pull out the battery, place it back and turn on.\
  12. Once the device boots up, checkout the new firmware now.
  13. Your device will be running on official Android 5.0 Lollipop firmware.
  14. Once updated, do not try to downgrade, or else you will result in messing up EFS partition of your device.
  15. That’s all!

Got any queries? Make sure that you drop em’ in the comment box below. Good Luck!