Home Blog Page 384

How To Install Lollipop Recent Apps Switcher On Android KitKat and Earlier Versions

0
How To Install Lollipop Recent Apps Switcher On Android KitKat and Earlier Versions

The latest and the sweetest version of Android, which is Lollipop, took everyone’s breath away! Google introduced a new system of checking on notifications, an entirely redesigned UI, and a whole new Lockscreen. The most amazing feature that was introduced in teh revamped UI of Lollipop was the recent task-switcher that Google added with its several other awesome features in Android Lollipop. This task switched if officially available to Android users only. Many users are still waiting for Android Lollipop update any many might not even receive it. There is an alternative way to activate Android Lollipop like Task Swtcher on Android smartphones running Android 4.4.4 KitKat or earlier version of Android. Follow this guide to activate Android 5.0 Lollipop Task Switched on smartphones running Android KitKat, or Jelly Bean.

The simplest task to do is to install a clean-looking application directly from the Google Play Store. Although, we found that there are tons of ways that will allow you to have the Lollipop-Like Task switcher on your Non-Lollipop device, but the simplest way is to do is by installing an application from Play Store. The application being discussed here is Fancy Switcher For Android.

Android-Lollipop-Mutliple-Apps-Switching-min

How To Install Lollipop Recent Apps/Task Switcher On Android KitKat and Earlier Versions

Download the application from the link given below. It is the direct link to Play Store therefore you can install the application directly on your smartphone. You can initiate the installation using Play Store on PC or dorectly opening link on phone.

Fancy Switch for Android (Play Link) | Fancy Switcher for Android (Direct Link)

When you first launch the application, you will be guided with tons of amazing and useful information about the application itself. Read each and every bit carefully. We have listed all of them down in the form of an image as well. Click on the image to enlarge it.

Fancy-Switcher-For-Android-Screen-SHot-2

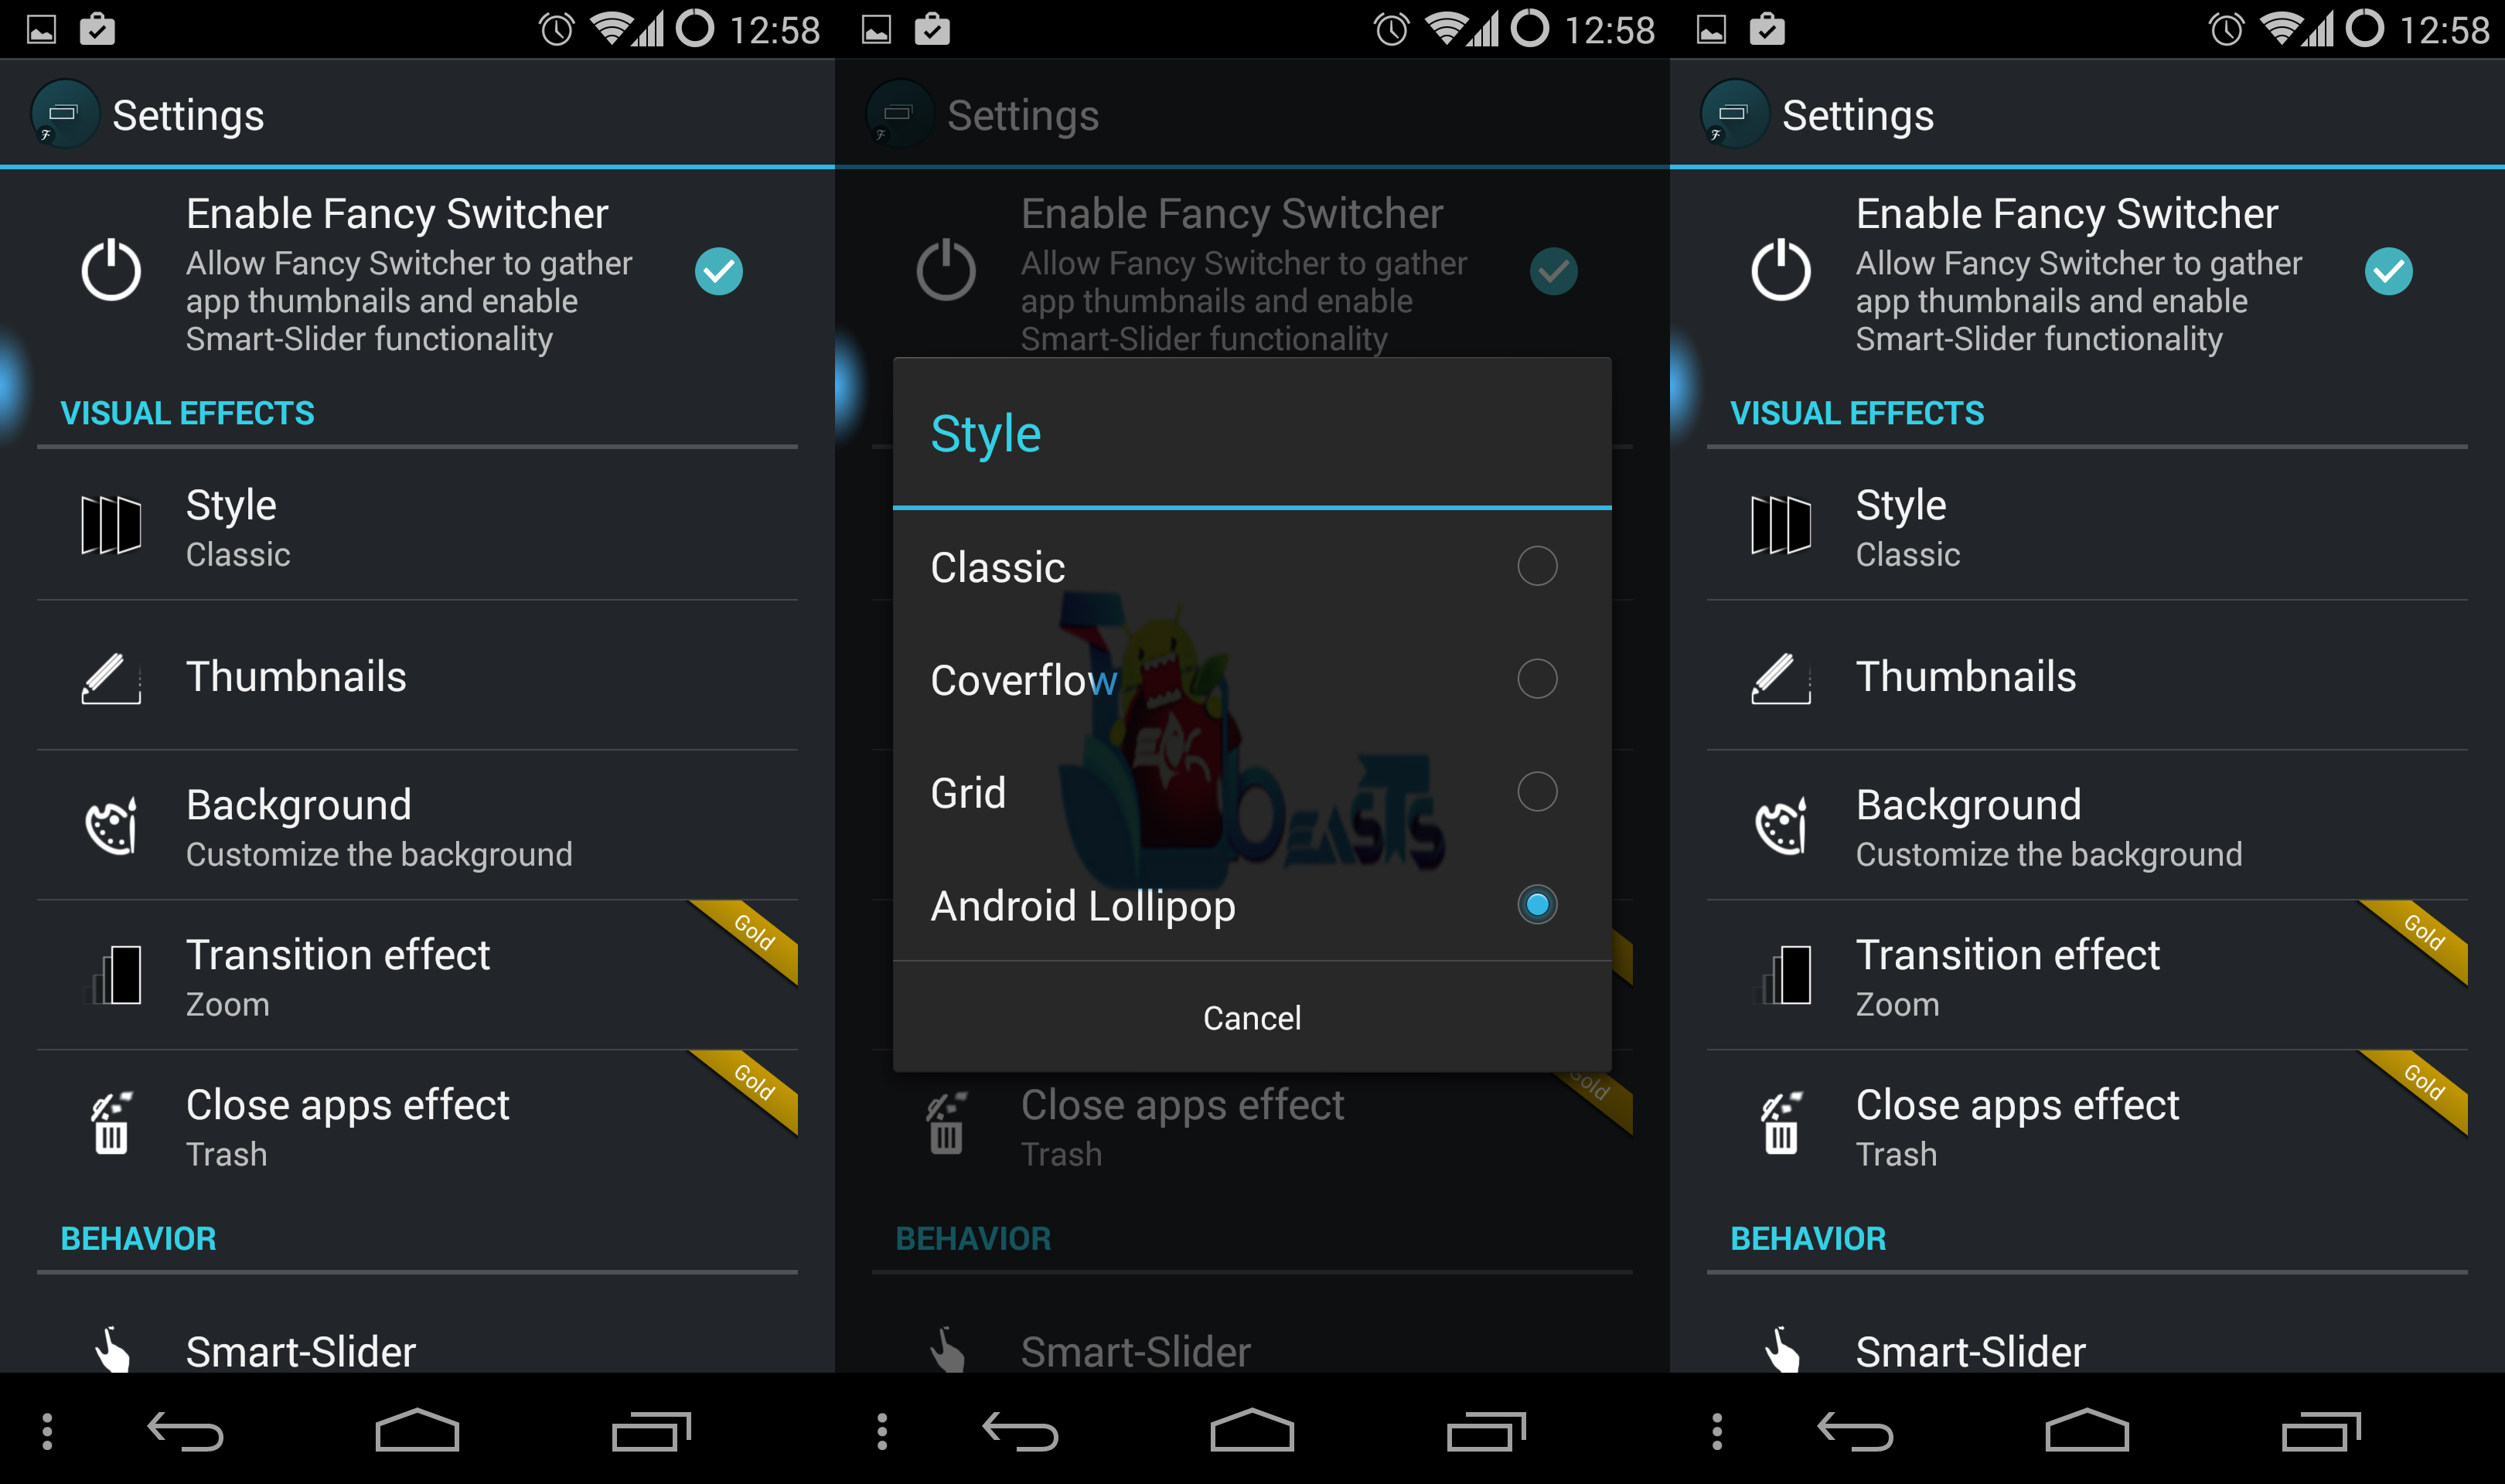
The default recent-apps view of the Fancy Switcher is not what we need. So go ahead and tap on the Fancy Switcher application which is in your app drawer, and tap on the settings icon. Go ahead, and tap on ‘Style‘.  You will find about 4 options to choose from. The last one being the Lollipop Style. Tap on it, and reboot your phone once. Voila! Fancy Switcher For Android doesn’t require root for the recent apps switcher, but you will not be able to access the lollipop-like task switcher directly when you tap your recent app button. This is because you didn’t provide it with root permissions. If you are not a rooted user, then you may find it quite hard to get into the task switcher. All you need to do is swipe down from the notification bar, and tap on the Fancy Switcher Notification.
Fancy-Switcher-For-Android-Screen-SHot-2

But, if you are a rooted user, then deep down into the ‘Advanced Menu’ of the Fancy Switcher application, you can easily and seamlessly switch between apps the Lollipop Style, with just the tap of the recent apps button!

If you have any queries with regard to this guide, then leave us a comment below!

How to Schedule Instagram Posts on iPhone and Android

0
How to Schedule Instagram Posts on iPhone and Android

Instagram is the best photo sharing social media with a lot of options to edit your photos, now days social media is the part of our life. There are many tools that will help you to schedule your posts on Facebook, Google Plus and Twitter, but every time there is one name which is not included in the list of these software Instagram. Today i’ll tell you how to schedule Instagram photos on iPhone and Android.

There is a new app named as TakeOff which will give you option to schedule Instagram post. The main reason Instagram is not included in the list of Buffer and Hootsuite because Instagram don’t give access to third party apps.

Schedule-Instagram-posts-on-iPhone-and_shrink

How to Schedule Instagram Posts on iPhone and Android:

Step#1: First you have to download Takeoff on your iPhone or Android.

Step#2: Now choose a photo or Video and crop it down.

Step#3: Select time on which you want to post it.

Step#4: On the specific time you’ll get a notification that your post is ready to publish.

Step#5: Tap on the notification.

Step#6: You’ll be in Instagram app, add filters, edit the caption, and then share.

Step#7: Now your post will be published on Instagram.

This is how you can schedule Instagram posts on iPhone and Android, i know its not like the other software but its worth giving it a try. If you face any kind of issue regarding this guide do tell me in comments.

Add Custom Codec on MX Player to Support DTS and AC3 Audio

1
Add Custom Codec on MX Player to Support DTS and AC3 Audio

MX Player is one of the best video player for Android devices, but due to some technical restrictions MX player don’t support DTS and AC3 Audio. In this guide i’ll tell you how to add Add Custom Codec on MX Player to Support DTS and AC3 Audio. The main reason of this issue is MX Player is facing licensing issues, that why  DTS & DOLBY audio codec supports are now removed.

In the following guide we have added a step by step method to add Custom Codec on MX Player to Support DTS and AC3 Audio. There is not rooting method involved in this guide nor any tricks.

Add Custom Codec on MX Player to Support DTS and AC3 Audio

How To Add Custom Codec on MX Player to Support DTS and AC3 Audio:

Step#1: First download the download the respective ZIP file.

Step#2: Copy the Zip file into the root folder of your device internal memory.

Step#3: Now open MX player on your device.

Step#4: When you open the player it will automatically detect the Codec.

Step#5: App will ask you for a confirmation if you want to use the codec.

Step#6: Tap on OK to proceed.

Step#7: If MX player doesn’t detect the Codec, you can add it manually.

Step#8: Goto MX player settings.

Step#9: Tap on Decoder.

Step#10: Now scroll down and tap on custom Codec.

Step#11: Select the folder where you placed the Zip file.

Step#12: Tap on OK to confirm.

All Done. ! You have successfully installed Custom Codec on MX Player to Support DTS and AC3 Audio. If you face any issue regarding do tell me in comments.

Hard Reset Your Moto E2 With These Simple Steps

0
Hard Reset Your Moto E2 With These Simple Steps

If you happen to be one of the many novice Android users, and if you just started off with the all new Motorola Moto E (2015), then you might want to take notice of this. Android devices are really very prone to mishaps and bricks. A small mistake in flashing a ZIP file, and you’re device is bricked. There are two types of Bricks – Softbrick and Hardbrick, Softbrick being the lucky of those two. Softbricks can be easily fixed with a Hard Reset. Hard Reset is nothing but a full format of your current device. If you happen to have any problems/bugs with your current Motorola Moto E2, then a simple Hard Reset may fix it. Follow this guide in order to do so.

Pre-Requisites

  • Backup EVERYTHING on your Moto E2. This process will wipe off each and every bit of data store on your device.
  • Your Moto E2 should be running Stock Android, Lollipop.
  • No Custom ROM should be installed.
  • Stock Recovery is a must for best results.
  • Also make sure that the Bootloader of your Moto E2 is locked. This will ensure you’ll still have the warranty if something bad happens in the process!

Once everything is set, proceed in hard resetting your Moto E (2015)

Moto-E2-Hard-Reset

How To Hard Reset Your Moto E (2015)

There are mainly two ways by which you can reset your Moto E2, we are going to go with the safer method, which include you booting into the recovery mode.

  1. Switch off your Moto E2 completely.
  2. Now, boot into the Recovery Mode. First, press and hold simultaneously Power, Volume Down and Volume Up buttons. A boot menu will now be seen. Navigate to ‘Recovery‘ and select it. Now, an Android logo will be shown. All you need to do is press and hold the Volume Up, and Down buttons simultaneously, and tap the Power button once. This will boot you into the Recovery Mode.
  3. Once in recovery mode, navigate using the Volume Up and Down buttons.
  4. Navigate to ‘Factory Reset…’ and select the same.
  5. Wait for a while.
  6. After the process is completed, reboot your Moto E2.
  7. Great work! Your fresh new device will take a little bit of time to boot for the very first time.

If this didn’t work for you, make sure you leave us a comment below!

Fix Unlocked Bootloader Warning On Your Moto E2? Here’s How To Get Rid Of It!

0
Fix Unlocked Bootloader Warning On Your Moto E2? Here’s How To Get Rid Of It!

If you happen to be one of the many novice Android users, and if you just started off with the all new Motorola Moto E (2015), then you might want to take notice of this. To obtain the many features that a rooted Android device holds, you need to unlock its bootloader first. Some manufacturers officially support to the unlocking the bootloader of a specific device, and hence it doesn’t void its warranty. While some strictly hold it against the warranty. If you are a Moto E (2015) user, then cheer up! Motorola now don’t void the warranty if you unlock the bootloader of the device. But, if you happen to be one of the many people who have unlocked the bootloader of their Motorola E (2015), then they might not want the frustrating warning message every time you boot up the device. So in this guide, we are here to present in front of you all, a easy guide which should be followed in order to unlock the bootloader of the Moto E (2015).

Pre-Requisites

  • For this, you need your Moto E2 with its unlocked bootloader.
  • You need a PC with Android-SDK installed upon. You can find it in the downloads section below.
  • You also need the original Motorola Moto E (2015) Boot Logo file. Refer the Downloads section to download it.
  • USB Debugging enabled. In order to do so, head into System, and enable the USB Debugging option.
  • Basic knowledge about extracting and copying files.
  • Make sure that all of your Motorola drivers have been successfully installed on your PC.

Here are all the important downloads you need in order to remove the bootloader unlocked warning!

Downloads

  • Boot Logo File. Download it by clicking here.
  • Android-SDK. Download it by clicking here.
  • Motorola Drivers. Download it by clicking here.

Once you have everything set, you may proceed with removing the unlocked bootloader warning!

Remove-Unlocked-Bootloader-Warning-On-Moto-E2

How To Remove Unlocked Bootloader Warning On Moto E (2015)

  1. Download the Boot Logo File from the downloads section above. Now, extract it anywhere on your PC.
  2. Download the Android-SDK file from above. Extract it to a known location on your PC.
  3. Now, copy the contents of the Boot Logo File to Android/ sdk/ platform-tools. Also, change the name of the boot logo file to boot logo.BIN for convenience.
  4. Now, open up CMD from inside of the Android SDK folder. In order to do so, press Shift, and press Right Mouse button.
  5. Now, connect your Moto E2 to your PC with the bootloader mode on. To get into the fastboot/bootloader mode, simply press and hold the Volume down + Power buttons simultaneously.
  6. Now, type in the following code into the CMD window.
    fastboot flash logo boot logo.bin
  7. Good. Now type in the following command to reboot your Moto E2.
    fastboot reboot

Good job! Now you won’t notice the frustrating warning message anymore on your Moto E2! If you have any queries regarding this guide, then leave us a comment below!

Love The New Galaxy S6 Theme Engine? You Can Now Have It On Your Samsung Galaxy S4, S5 Or Note 4!

10
Love The New Galaxy S6 Theme Engine? You Can Now Have It On Your Samsung Galaxy S4, S5 Or Note 4!

Samsung has recently been killing off the whole market with its latest release of the new Samsung Galaxy S6 and Galaxy S6 Edge. Apart from the breath-taking features that the Samsung Galaxy S6 holds, one major feature that Samsung decided to add was that of the Theme Engine. If you have been using CyanogenMod, or LG’s Optimus UI, then you won’t find anything strange with the whole theme engine concept. With a theme engine, you can change the whole look of your Android device. Your TouchWiz Android device can be turned into a Stock Google-like device with just a few modifications! Samsung’s new idea is going to impress the future Samsung Galaxy S6 Android users. But, if you happen to own another Samsung flagship device, like the Samsung Galaxy Note 4, then you might want the theme engine from the Galaxy S6 right now! And yes, with the vast number of Android development possibilities, porting the Samsung Galaxy S6 theme engine to another TouchWiz device wasn’t a big hassle at all.

Yes, you heard it right. If you happen to own the following TouchWiz devices, then you can have the same exact theme engine that we have seen on the S6. The following devices support this amazing Mod:

  • Samsung Galaxy Note 4
  • Samsung Galaxy S4
  • Samsung Galaxy S5

Thanks to XDA Member Albe95, this is now possible. And this is the reason why we are here this time. In this guide, we will show you all fellow Samsung users, how to enable and use the amazing theme engine from the Samsung Galaxy S6 right now! For this guide, you’re going to need a bunch of pre-requirements! So make sure you follow each and every step really carefully!

Pre-Requisite

  • For this guide, you are going to need one of the above three stated TouchWiz devices, or else this procedure won’t work!
  • You have to be on a rooted Note 4, S4, or S5.
  • Your device should be running Lollipop, Stock Android (TouchWiz)
  • You will also require a root browser, which you will need to dig down deep into the system files! Download it from the Downloads section below!
  • You need the BusyBox Script installed on your device. For that, you’ll first need the BusyBox application itself. You can get hold of that from our Downloads section below too!
  • You will require a UnZipper application, we recommend WinRAR.
  • In your Root Browser Application, set the permissions to  rw-r–r– for each of the copied APK file.

Here is the download section. We have listed below all the important downloads (including Play Store Links). Make sure you have it all downloaded in order to continue with the guide!

Downloads

  • Root Explorer. Download it by clicking Here.
  • BusyBox. Download it by clicking Here.
  • Lollipop_Themes_Enables.ZIP. Download it by clicking Here.

Once you have everything set, go ahead and follow the procedure!

Galaxy-S6-Theme-Engine-Mod

Enable Theme Engine On Your Note 4, S4, and S5

  1. Launch BusyBox, and install the script.
  2. Download the Lollipop_Themes_Enabler.zip file from above, and unzip it anywhere on your device.
  3. Open the Root Browser Application.
  4. Navigate into the folder that you got extracted from the ZIP file earlier. You will find two folders, namely : app and csc.
  5. Now, simply copy the contents of the app folder to System>App on your smartphone. Ensure the set permissions.
  6. Launch the csc folder, and copy the theme_app_list.xml to System>csc.
  7. Tap and Hold the floating_feature.xml which is found in the System>etc directory. Tap on edit.
  8. You will find a bunch of sting codes in this file. Don’t worry. What we need here is the following string code:
    <SEC_FLOATING_FEATURE_COMMON_CONFIG_CHANGEABLE_UI></SEC_FLOATING_FEATURE_COMMON_CONFIG_CHANGEABLE_UI>
  9. Add the following string code in between the code as follows. “theme v2
    <SEC_FLOATING_FEATURE_COMMON_CONFIG_CHANGEABLE_UI>themev2</SEC_FLOATING_FEATURE_COMMON_CONFIG_CHANGEABLE_UI>
  10. Save the file, and close the Root browser.
  11. Now, restart your Galaxy phone.

Great work! Now, to have a look at your brand-new Theme Engine on your Non-Galaxy S6 device, tap and hold anywhere on the home screen, and you’ll find yet another forth option, namely “themes”. Enjoy your brand-new theme engine now! If you had any problems regarding this guide, feel free to leave a comment below!

How To Disable The SU Indicator In The Notification Panel

How To Disable The SU Indicator In The Notification Panel

Annoyed of the tiny little ‘#’ icon sitting in your notification area? Well, that’s because you have the SuperSU application installed on your device. You would think about uninstalling the SuperSU application itself, but hey, it would also un-root your Android device. To disable the SuperSU indicator which always shows up as a ‘#’ in your device’s notification area, you just need to follow this simple guide.

Pre-Requisites

  • A rooted Android device (duh.)
  • Xposed Framework Installed.
  • Disable SU Indicator Module. Download.
  • USB Data Cable. (Not necessary if you’re downloading it directly onto your device)

Instructions

  • Make sure you have the Xposed Framework installed, with proper SuperSU rights granted.
  • Now, go ahead and download the Disable SU Indicator Module. If you have it downloaded on your PC, then simply transfer it anywhere on your device’s storage.
  • Go ahead, and find and locate the .APK file you just downloaded.

Disable-SU-Indicator-Screenshot

  • Install it like any other application. If it doesn’t work, Ensure that you have the ‘Unknown Sources’ check box enabled in Settings>Security. Try installing the application again.
  • Now, you’ll need to launch Xposed Framework on your Android device.
  • Navigate to ‘Modules’ and check the ‘Disable SU Indicator Module’.

Great work! We’ve listed the above process in the form of an image too, so if you have any hassles, just follow the above images too!

Good, now you don’t have the SuperSU ‘#’ Indicator sitting anywhere on your Notification area anymore! If you have any queries regarding this guide, simply leave us a comment below.

Update Sony Xperia Z2 D6503 To Official Android 5.0.2 Lollipop 23.1.A.0.690 Firmware [How To]

3
Update Sony Xperia Z2 D6503 To Official Android 5.0.2 Lollipop 23.1.A.0.690 Firmware [How To]

After Xperia Z3 & Xperia Z3 Compact, Sony has started rolling out the Android 5.0.2 Lollipop update for Xperia Z2 as well. As of now, this update is rolling out for D6503 variant in Baltic and Nordic regions. The update carries some major changes including the UI change atop of the list. New UI is designed according to Google’s Material Design, but as always, Sony has kept the changes very minimal. There are new notifications on the lockscreen, new user and guest modes. Battery life and the over-all performance of the device has been enhanced and improved as well.

Android 5.0.2 Lollipop is reaching out the users through OTA updates or through Sony PC companion. It will take a while for this update to hit different regions all across the world. Users who can’t wait to get their hands on this update as soon as possible, they will have to find some workaround for this. Before you start looking out for that, we’ve already done the job for you. In the on-going post, we are going to flash / install this official Android 5.0.2 Lollipop firmware carrying the build number 23.1.A.0.690 on Sony Xperia Z2 D6503 using the FTF in Sony Flashtool. Let’s go through some early preparations now and then update our beloved Xperia Z2.

Early Preparations:

1. This is only for Sony Xperia Z2

This ROM is only for the device mentioned above. Make sure that your model number matches the one listed above. To do so, go to Settings > About Device on your device and see your model number. Flashing this firmware on any other device will result in bricking it so make sure that you meet this requirement first of all.

2. Battery should be charged at least over 60%.

Make sure that your battery is charged enough to complete the flashing process. In case your battery is low and your device goes dead during the flashing process, you may end up soft bricking your device as it won’t complete the flashing process.

3. Backup everything!

Just to be on the safe side, you may consider backing up each and everything from your Android device. This is highly recommended so that in case anything goes wrong, you still have the access to all of your data and you can restore it immediately. You may backup everything as listed below.

  • Backup SMS Messages
  • Backup Call Logs
  • Backup Contacts
  • Backup Media – Copy your files manually to your PC or Laptop.
  • Titanium Backup – If already rooted, use Titanium Backup to backup all of your apps, system data and other important content. If you haven’t rooted your device previously, skip this step.
  • Backup Nandroid – If CWM  or TWRP installed previously, otherwise skip this step and perform this at the end of flashing.

4. Enable USB Debugging Mode on your device.

Enable USB debugging mode on your device. To do so, tap settings>developer options>USB debugging. If you can’t find developer options in settings, then tap settings > about device and tap “Build Number” for 7 times and you’ll get em’ activated under settings.

5. Install and setup Sony Flashtool.

You must have installed Sony Flashtool. Find the full guide here.

After installing Sony Flashtool, open the Flashtool folder from the drive where you installed it. Now open Flashtool>Drivers>Flashtool-drivers.exe and install the Flashtool, Fastboot & Xperia Z2 drivers from the list. [Important]

6. Use OEM data cable to establish connection.

Make sure that you use the phone’s original data cable to establish connection between your phone and the PC. Using a different data cable might result in interrupting the firmware installation.

xperia-z2-hero-white-1240x840-f32a46b85edbbbbee660994b7e80d2e1

How To Update Sony Xperia Z2 D6503 To Official Android 5.0.2 Lollipop 23.1.A.0.690 Firmware

Before moving forward, please make sure that you’ve read the pre requisites and ensure that you are set to go ahead.

  1. Download the latest firmware Android 5.0.2 Lollipop 23.1.A.0.690 FTF file.
    1. For Xperia Z2 D6503[Generic/Unbranded] Link 1 | Link 2
  2. Copy the file and paste in Flashtool>Firmwares folder.
  3. Open Flashtool.exe now.
  4. Hit the small lightening button on the top left corner and select Flashmode.
  5. Select the FTF firmware file that you placed in the Firmware folder.
  6. From the right side, select what do you want to wipe. Data, cache and apps log, all wipes are recommended, perhaps you may select if you don’t want.
  7. Click on OK, and it will start preparing the firmware for flashing. This may take a little while to load.
  8. As soon as the firmware is loaded, it will prompt you to attach the phone by turning it off and keeping the back key press.
  9. For Xperia Z2 Volume Down key will do the job of back key, just turn off your phone, keep the Volume Down key pressed and plug in the data cable.
  10. As soon as the phone is detected in Flashmode, the firmware will start flashing, Do not leave the Volume Down key until the process is complete.
  11. As soon as you see “Flashing ended or Finished Flashing” leave the Volume Down key, plug the cable out and reboot.
  12. That’s All! Congrats! You’ve installed latest Android 5.0.2 Lollipop on your Xperia Z2. Enjoy

In case you got any queries or face any problems regarding this guide, please feel free to stop by the comment box below and let us know. We will get back to you as soon as possible. Thanks all!

Install Official Android 5.0.1 Lollipop On Galaxy S4 I9505 Black Edition [How To]

0
Install Official Android 5.0.1 Lollipop On Galaxy S4 I9505 Black Edition [How To]

Galaxy S4’s LTE & Black Edition variant was yet to receive the Android 5.0 Lollipop update and just yesterday Samsung surprised the users by rolling out the update. The update carries the version number 5.0.1. There are UI enhancements, Samsung has revamped the TouchWiz UI according to the new Material Design introduced by Google. Applications have been updated to work with this UI properly. New notifications on the lock screen have arrived in this update as well. Core enhancements includes performance and battery life improvement. Android 5.0.1 Lollipop is the biggest update for Samsung’s Galaxy series as it includes the major changes with the TouchWiz UI.

As off now, this update is on a slow roll out to the users in United Kingdom & Baltic and it will take quite a while to hit other regions. If you’re one of the users who can’t wait to get their hands on the most cool Android firmware immediately, you may want to update your device right away using some other method. We’ve already done the job for you and listed a method to help you to get your hands on this latest and greatest version of Android. As you move ahead, you’re going to come across a comprehensive guide that will help you to update your Galaxy S4 I9505 Black Edition to Android 5.0.1 Lollipop using Samsung’s flashtool Odin3.

Firmware details:

  • Device Model: Galaxy S4 I9505 Black Edition
  • Android Version: Android 5.0.1 Lollipop
  • Build Number: I9505XXUHOB7
  • Build Date: 19.12.2014

Early Preparations

1. This guide is only for Galaxy S4 I9505 Black Edition.

Make sure that your device is exactly as mentioned above. To check out what device you have, go to Settings > More/General > About Device or Settings > About Device and match the model number. Be careful about the device model number, flashing a file on a device not listed here might result in bricking it up. In that case, we may not be held responsible.

2. Battery should be charged at least 60%!

Your device’s battery should not be weak. In case your device goes dead during the flashing process, your device may get soft bricked and you might be in need of flashing stock firmware and that will ultimately result in wiping up your data as well. So, make sure that you charge your device before you start the flashing process.

3. Use the OEM data cable to establish connection!

Always use the original data cable to establish connection between your Android device and your computer / laptop. Using ordinary data cables might interrupt the flashing process, so to avoid any mishap, you need to meet this requirement as well.

4. Backup everything!

Just to be on the safe side, you may consider backing up each and everything from your Android device. This is highly recommended so that in case anything goes wrong, you still have the access to all of your data and you can restore it immediately. Also, clean install is always recommended, that means you will probably have to wipe your device to install the new firmware. So, you may backup everything as listed below.

Backup SMS Messages
Backup Call Logs
Backup Contacts
Backup Media – Copy your files manually to your PC or Laptop.
Backup EFS – If rooted, otherwise skip this step.

5. Install Samsung USB drivers

In order to be able to establish connection between your PC and your Galaxy S4, you need to have the Samsung USB drivers installed on your PC. You can find all Android USB drivers here on our site.

6. Turn off Samsung Kies and other softwares while using Odin3!

Make sure that you turn off Samsung Kies while using Odin3 flashtool. Samsung Kies will interrupt Odin3 and will result in causing errors and may not let you flash your desired firwmrae. Also, make sure that you turn off any antivirus software you’ve installed and also disable firewall to avoid any connection and flashing issues.

samsung-galaxy-s4-black-edition

Required Downloads & Installations

  1. Download and extract Odin3 v3.10.6.
  2. Download and extract firmware file to get the .tar.md5 file.

How To Install Official Android 5.0.1 Lollipop On Galaxy S4 I9505 Black Edition

  1. Make sure that you read the instructions listed above carefully and you’re all set to go ahead now.
  2. Wipe your device complete in order to attain a neat installation. You may boot into the recovery mode and perform a factory data reset.
  3. Open Odin3.exe.
  4. Put your G900FD in download mode. To do so, turn it off and wait for 10 seconds. Turn it on by pressing and holding Volume Down + Home Button + Power Key simultaneously, You should see a warning, press Volume Up to continue. In case this method doesn’t work for you, try one from this guide.
  5. Connect your device to your PC.
  6. As soon as Odin detects your phone, the ID:COM box should turn blue.  Make sure that you’ve installed Samsung USB drivers before connecting.
  7. For Odin 3.09 or 3.10.6 hit the AP tab. Select the firmware.tar.md5 or firmware.tar, that you downloaded and extracted above.
  8. If you’re using Odin 3.07, you will select “PDA” tab instead of the AP tab, rest of the options remain untouched.
  9. Make sure that the options selected in your Odin are exactly as shown in the pic.Odin 3.10.6 Explained_Techbeasts
  10. Hit start and wait till the firmware  flashing is complete, The flashing process box will turn green upon successful flashing.
  11. Once the flashing process has been completed successfully, disconnect your device and reboot it manually. You can pull out the battery, place it back and turn on.
  12. Once the device boots up, checkout the new firmware now.
  13. Your device will be running on official Android 5.0.1 Lollipop firmware.
  14. Once updated, do not try to downgrade, or else you will result in messing up EFS partition of your device.
  15. That’s all!

Got any queries? Make sure that you drop em’ in the comment box below. Good Luck!

Install Official Android 5.0.1 Lollipop On Samsung Galaxy S4 LTE I9505 [How To]

0
Install Official Android 5.0.1 Lollipop On Samsung Galaxy S4 LTE I9505 [How To]

Galaxy S4 LTE GT-I9505 has started receiving the long-awaited Android 5.0.1 Lollipop update. It took quite a while for Samsung to roll out the update for the LTE variant of S4, Exynos variant received this update a month ago. The changes in update are as same as that of the other Lollipop updates by Samsung. At the top of the list, there’s new and enhanced TouchWiz UI with a flat, smooth and responsive design. New TouchWiz UI is based on Google’s Material Design UI. New notifications on the lockscreen are introduced, user modes / guest mode have been introduced and battery life along with the performance has been enhanced.

At the present time, this update is rolling out to the users in United Kingdom and will be making its way to other regions in the next few weeks. As this is an OTA update, it will take a little while for sure. Users who can’t wait to get their hands on Android 5.0.1 Lollipop running on their device, they need a different method to update their device. We’ve already worked out on it and written down this guide which will help you to install official Android 5.0.1 Lollipop on your Samsung Galaxy S4 I9505 LTE. Let’s go through some quick early preparations and flash this firmware.

Firmware details:

  • Device Model: Galaxy S4 I9505
  • Android Version: Android 5.0.1 Lollipop
  • Build Number: I9505XXUHOB7
  • Build Date: 20.2.2015

Early Preparations

1. This guide is only for Galaxy S4 I9505 LTE

Make sure that your device is exactly as mentioned above. To check out what device you have, go to Settings > More/General > About Device or Settings > About Device and match the model number. Be careful about the device model number, flashing a file on a device not listed here might result in bricking it up. In that case, we may not be held responsible.

2. Battery should be charged at least 60%!

Your device’s battery should not be weak. In case your device goes dead during the flashing process, your device may get soft bricked and you might be in need of flashing stock firmware and that will ultimately result in wiping up your data as well. So, make sure that you charge your device before you start the flashing process.

3. Use the OEM data cable to establish connection!

Always use the original data cable to establish connection between your Android device and your computer / laptop. Using ordinary data cables might interrupt the flashing process, so to avoid any mishap, you need to meet this requirement as well.

4. Backup everything!

Just to be on the safe side, you may consider backing up each and everything from your Android device. This is highly recommended so that in case anything goes wrong, you still have the access to all of your data and you can restore it immediately. Also, clean install is always recommended, that means you will probably have to wipe your device to install the new firmware. So, you may backup everything as listed below.

Backup SMS Messages
Backup Call Logs
Backup Contacts
Backup Media – Copy your files manually to your PC or Laptop.
Backup EFS – If rooted, otherwise skip this step.

5. Install Samsung USB drivers

In order to be able to establish connection between your PC and your Galaxy S4, you need to have the Samsung USB drivers installed on your PC. You can find all Android USB drivers here on our site.

6. Turn off Samsung Kies and other softwares while using Odin3!

Make sure that you turn off Samsung Kies while using Odin3 flashtool. Samsung Kies will interrupt Odin3 and will result in causing errors and may not let you flash your desired firwmrae. Also, make sure that you turn off any antivirus software you’ve installed and also disable firewall to avoid any connection and flashing issues.

gal_br01

Required Downloads & Installations

  1. Download and extract Odin3 v3.10.6.
  2. Download and extract firmware file to get the .tar.md5 file.

How To Install Official Android 5.0.1 Lollipop On Galaxy S4 I9505 LTE

  1. Make sure that you read the instructions listed above carefully and you’re all set to go ahead now.
  2. Wipe your device complete in order to attain a neat installation. You may boot into the recovery mode and perform a factory data reset.
  3. Open Odin3.exe.
  4. Put your S4 I9505 in download mode. To do so, turn it off and wait for 10 seconds. Turn it on by pressing and holding Volume Down + Home Button + Power Key simultaneously, You should see a warning, press Volume Up to continue. In case this method doesn’t work for you, try one from this guide.
  5. Connect your device to your PC.
  6. As soon as Odin detects your phone, the ID:COM box should turn blue.  Make sure that you’ve installed Samsung USB drivers before connecting.
  7. For Odin 3.09 or 3.10.6 hit the AP tab. Select the firmware.tar.md5 or firmware.tar, that you downloaded and extracted above.
  8. If you’re using Odin 3.07, you will select “PDA” tab instead of the AP tab, rest of the options remain untouched.
  9. Make sure that the options selected in your Odin are exactly as shown in the pic.Odin 3.10.6 Explained_Techbeasts
  10. Hit start and wait till the firmware  flashing is complete, The flashing process box will turn green upon successful flashing.
  11. Once the flashing process has been completed successfully, disconnect your device and reboot it manually. You can pull out the battery, place it back and turn on.
  12. Once the device boots up, checkout the new firmware now.
  13. Your device will be running on official Android 5.0.1 Lollipop firmware.
  14. Once updated, do not try to downgrade, or else you will result in messing up EFS partition of your device.
  15. That’s all!

Got any queries? Make sure that you drop em’ in the comment box below. Good Luck!


Update Sony Xperia Z3 Compact D5803 To Official Android 5.0.2 Lollipop 23.1.A.0.690 Firmware [How To – Guide]

5
Update Sony Xperia Z3 Compact D5803 To Official Android 5.0.2 Lollipop 23.1.A.0.690 Firmware [How To – Guide]

Long wait is over for the Xperia Z series users. Sony has finally started pulling out the Android 5.0.2 update for the Xperia Z family. The update emerged up for the  Xperia Z3 and Xperia Z3 Compact first of all, it’s pretty obvious now that this update will be hitting the entire Xperia Z series in the coming days for sure. Since Android 5.0 is the biggest update in the history of Android, the Android 5.0.2 update for the Xperia Z series also happens to be the biggest and greatest update among all the Sony customised Android OS. Sony has updated the UI according to Google’s all new Material Design, applications have been enhanced to make compatible with this OS. Other changes include new lockscreen notifications, multi user and guest modes. Battery life and performance has been improved.

At the moment, this update is rolling out to Xperia Z3 Compact D5803 users through Sony PC Companion or through OTA. Users who can’t rely on OTA and Sony PC Companion updates, they will have to find aa workaround to load this official Android Lollipop on their Z3 Compact. If you’re one of those who can’t wait for it to arrive automatically, you may find our guide much helpful. We are going to update Sony Xperia Z3 Compact to Android 5.0.2 Lollipop based on build number 23.1.A.0.690 using Sony flashtool. Lets go through some quick early preparations and flash this firmware right away.

Early Preparations:

1. This is only for Sony Xperia Z3 Compact D5803

This ROM is only for the device mentioned above. Make sure that your model number matches the one listed above. To do so, go to Settings > About Device on your device and see your model number. Flashing this firmware on any other device will result in bricking it so make sure that you meet this requirement first of all.

2. Battery should be charged at least over 60%.

Make sure that your battery is charged enough to complete the flashing process. In case your battery is low and your device goes dead during the flashing process, you may end up soft bricking your device as it won’t complete the flashing process.

3. Backup everything!

Just to be on the safe side, you may consider backing up each and everything from your Android device. This is highly recommended so that in case anything goes wrong, you still have the access to all of your data and you can restore it immediately. You may backup everything as listed below.

  • Backup SMS Messages
  • Backup Call Logs
  • Backup Contacts
  • Backup Media – Copy your files manually to your PC or Laptop.
  • Titanium Backup – If already rooted, use Titanium Backup to backup all of your apps, system data and other important content. If you haven’t rooted your device previously, skip this step.
  • Backup Nandroid – If CWM  or TWRP installed previously, otherwise skip this step and perform this at the end of flashing.

4. Enable USB Debugging Mode on your device.

Enable USB debugging mode on your device. To do so, tap settings>developer options>USB debugging. If you can’t find developer options in settings, then tap settings > about device and tap “Build Number” for 7 times and you’ll get em’ activated under settings.

5. Install and setup Sony Flashtool.

You must have installed Sony Flashtool. Find the full guide here.

After installing Sony Flashtool, open the Flashtool folder from the drive where you installed it. Now open Flashtool>Drivers>Flashtool-drivers.exe and install the Flashtool, Fastboot & Xperia Z3 Compact drivers from the list. [Important]

6. Use OEM data cable to establish connection.

Make sure that you use the phone’s original data cable to establish connection between your phone and the PC. Using a different data cable might result in interrupting the firmware installation.

xperia-z3-compact-white-1240x840-f40248bb3132354ba48c58041e244284

How To Update Sony Xperia Z3 Compact D5803 To Official Android 5.0.2 Lollipop 23.1.A.0.690 Firmware

Before moving forward, please make sure that you’ve read the pre requisites and ensure that you are set to go ahead.

  1. Download the latest firmware Android 5.0.2 Lollipop 23.1.A.0.690 FTF file.
    1. For Xperia Z3 Compact D5803[Generic/Unbranded] Link 1 | Link 2
  2. Copy the file and paste in Flashtool>Firmwares folder.
  3. Open Flashtool.exe now.
  4. Hit the small lightening button on the top left corner and select Flashmode.
  5. Select the FTF firmware file that you placed in the Firmware folder.
  6. From the right side, select what do you want to wipe. Data, cache and apps log, all wipes are recommended, perhaps you may select if you don’t want.
  7. Click on OK, and it will start preparing the firmware for flashing. This may take a little while to load.
  8. As soon as the firmware is loaded, it will prompt you to attach the phone by turning it off and keeping the back key press.
  9. For Xperia Z3 Compact, Volume Down key will do the job of back key, just turn off your phone, keep the Volume Down key pressed and plug in the data cable.
  10. As soon as the phone is detected in Flashmode, the firmware will start flashing, Do not leave the Volume Down key until the process is complete.
  11. As soon as you see “Flashing ended or Finished Flashing” leave the Volume Down key, plug the cable out and reboot.
  12. That’s All! Congrats! You’ve installed latest Android 5.0.2 Lollipop on your Xperia Z3 Compact. Enjoy

In case you got any queries or face any problems regarding this guide, please feel free to stop by the comment box below and let us know. We will get back to you as soon as possible. Thanks all!

Update Sony Xperia Z3 D6603 To Official Android 5.0.2 Lollipop 23.1.A.0.690 Firmware [How To – Guide]

11
Update Sony Xperia Z3 D6603 To Official Android 5.0.2 Lollipop 23.1.A.0.690 Firmware [How To – Guide]

Sony started rolling out Android 5.0.2 Lollipop for Xperia Z3 D6603 today. It’s been quite a while since the Sony Xperia Z users have been waiting for the update to to hit their devices and Sony finally took off the barrier of silence by rolling out this update for Z3 first of all. As expected, this update carries some major changes. One of the most prominent and notable change is in the UI department. Sony has revamped its UI in order to comply with Google’s latest Material Design, which offers smooth, enhanced and flat graphics / design. The core is updated to Android 5.0.2 Lollipop, build number is 23.1.A.0.690. Updated features include new notifications on lockscreen, guest mode / multi user modes. Battery life has also received bit of an improvement.

This update is rolling out slowly to the users in different regions at the moment through Sony PC Companion or through OTA. Both these mediums of updates take quite a while, users who can’t wait for the update to hit automatically, would like to find a way to update their phones right away. Sony flashtool can become handy in this case, and just in case you don’t know how to flash a stock FTF to update your device to latest and greatest version of Android, you may find our guide useful. We are set to install official Android 5.0.2 Lollipop firmware based on build number 23.1.A.0.6.90 on our beloved Xperia Z3 D6603 using Sony flashtool. Let’s go through some early preparations and flash this firmware to taste Lollipop right away.

Early Preparations:

1. This is only for Sony Xperia Z3 D6603

This ROM is only for the device mentioned above. Make sure that your model number matches the one listed above. To do so, go to Settings > About Device on your device and see your model number. Flashing this firmware on any other device will result in bricking it so make sure that you meet this requirement first of all.

2. Battery should be charged at least over 60%.

Make sure that your battery is charged enough to complete the flashing process. In case your battery is low and your device goes dead during the flashing process, you may end up soft bricking your device as it won’t complete the flashing process.

3. Backup everything!

Just to be on the safe side, you may consider backing up each and everything from your Android device. This is highly recommended so that in case anything goes wrong, you still have the access to all of your data and you can restore it immediately. You may backup everything as listed below.

4. Enable USB Debugging Mode on your device.

Enable USB debugging mode on your device. To do so, tap settings>developer options>USB debugging. If you can’t find developer options in settings, then tap settings > about device and tap “Build Number” for 7 times and you’ll get em’ activated under settings.

5. Install and setup Sony Flashtool.

You must have installed Sony Flashtool.  Find the full guide here.After installing Sony Flashtool, open the Flashtool folder from the drive where you installed it.Now open Flashtool>Drivers>Flashtool-drivers.exe and install the Flashtool, Fastboot & Xperia Z3 drivers from the list. [Important]

6. Use OEM data cable to establish connection.

Make sure that you use the phone’s original data cable to establish connection between your phone and the PC. Using a different data cable might result in interrupting the firmware installation.

xperia-z3-white-1240x840-430fa6376c394cf59a94a9edca67ed7d


How To Update Sony Xperia Z3 To Official Android 5.0.2 Lollipop 23.1.A.0.690 Firmware

 Before moving forward, please make sure that you’ve read the pre requisites and ensure that you are set to go ahead.

  1. Download the latest firmware Android 5.0.2 Lollipop 23.1.A.0.690 FTF file.
    1. For Xperia Z3 D6603 [Generic/Unbranded] Firmware 1 | Firmware 2 | Firmware 3
  2. Copy the file and paste in Flashtool>Firmwares folder.
  3. Open Flashtool.exe now.
  4. Hit the small lightening button on the top left corner and select Flashmode.
  5. Select the FTF firmware file that you placed in the Firmware folder.
  6. From the right side, select what do you want to wipe. Data, cache and apps log, all wipes are recommended, perhaps you may select if you don’t want.
  7. Click on OK, and it will start preparing the firmware for flashing. This may take a little while to load.
  8. As soon as the firmware is loaded, it will prompt you to attach the phone by turning it off and keeping the back key press.
  9. For Xperia Z3, Volume Down key will do the job of back key, just turn off your phone, keep the Volume Down key pressed and plug in the data cable.
  10. As soon as the phone is detected in Flashmode, the firmware will start flashing, Do not leave the Volume Down key until the process is complete.
  11. As soon as you see “Flashing ended or Finished Flashing” leave the Volume Down key, plug the cable out and reboot.
  12. That’s All! Congrats! You’ve installed latest Android 5.0.2 Lollipop on your Xperia Z3. Enjoy

In case you got any queries or face any problems regarding this guide, please feel free to stop by the comment box below and let us know. We will get back to you as soon as possible. Thanks all!

Next: Root Xperia Z3 D6603, D6653 23.1.A.0.690 5.0.2 Lollipop Firmware Plus TWRP