Home Blog Page 383

Root Samsung Galaxy E7000, E7009, E700F, E700H & E700M [How To]

0
Root Samsung Galaxy E7000, E7009, E700F, E700H & E700M [How To]

Galaxy E7 series is being highly appreciated by the users at the moment. Samsung changed the plastic build and design into something cool with the new Galaxy A & Galaxy E series. These devices sport a  metallic build, a great look and feel. The Galaxy E7 is the elder sibling of the Galaxy E5. It flaunts a beautiful 5.5 inches display accompanied by a 5 MP primary cam. A 13 MP cam can be found at the back. Internal storage is 16 GB, there’s a microSD card slot as well. Samsung used a Quad Core 1.2 GHz CPU accompanied by Adreno 306 GPU to power this device up. Under the hood there’s a RAM of 2 GB, a 2950 mAh battery is fixed inside. Out of the box, the Galaxy E7 can be found running on Android 4.4.4 KitKat.

Android enthusiasts who are going to get their hands on the Galaxy E7 or who have already got it, they may want to unleash the true power of this device. The very first step towards the vast world of customisations on Android OS is to root the device. We’ve already found a working method to root this device and written this post to serve the purpose. Let’s go through some pre-installation instructions and then learn how to root your Galaxy E7 E700, E7009, E700F, E700H & E700M.

16277-c301ecfb_680_400

Early Preps:

1. This guide is only for Samsung Galaxy E7 [Variants listed above]

Make sure that your device is exactly as mentioned above. To check out what device you have, go to Settings > More/General > About Device or Settings > About Device and match the model number. Be careful about the device model number, flashing a file on a device not listed here might result in bricking it up.

2. Battery should be charged at least 60%!

Your device’s battery shouldn’t be weak. In case your device goes dead during the flashing process, your device may get soft bricked and you might be in need of flashing stock firmware and that will ultimately result in wiping up your data as well. So, make sure that you charge your device before you start the flashing process.

3. Use the OEM datacable to establish connection!

Always use the original data cable to establish connection between your Android device and your computer / laptop. Using ordinary data cables might interrupt the flashing process, so to avoid any mishap, you need to meet this requirement as well.

4. Backup everything!

Just to be on the safe side, you may consider backing up each and everything from your Android device. This is highly recommended so that in case anything goes wrong, you still have the access to all of your data and you can restore it immediately. You may backup everything as listed below.

5. Turn off Samsung Kies and other softwares while using Odin3!

Make sure that you turn off Samsung Kies while using Odin3 flashtool. Samsung Kies will interrupt Odin3 and will result in causing errors and may not let you flash your desired recovery or root file. Also, make sure that you turn off any antivirus software you’ve installed and also disable firewall to avoid any connection and flashing issues.

6. Disclaimer

The methods involved in flashing custom recoveries, roms and rooting your phone are highly custom and may result in bricking your device, and has nothing to do with Google or the device manufacturer that is SAMSUNG in our case. Also rooting your device will void its warranty and you will be no longer eligible for any kind of free device services by the manufacturers/warranty providers. If your device comes with a Knox counter on the bootloader, it will be tripped and you won’t be able to reset it again. In case of any mishap we may not be held responsible. Follow these instructions to the letter to avoid any mishap or bricking. Make sure that whatever you do, you are doing it at your own responsibility.

Downloads Required:

Download and extract Odin3 v3.09.
Download and Install Samsung USB drivers
Download and extract CF-Auto-Root file.


How To Root Galaxy E7 Now

  1. Extract the downloaded CF-Auto-Root file once only to get the .tar.md5 file.
  2. Open Odin3.exe.
  3. Put your Galaxy E7 in download mode. To do so, turn it off and wait for 10 seconds. Turn it on by pressing and
    holding Volume Down + Home Button + Power Key simultaneously, You should see a warning, press Volume Up to continue. In case this method doesn’t work for you, try one from this guide.
  4. Connect your device to your PC.
  5. As soon as Odin detects your phone, the ID:COM box should turn blue.  Make sure that you’ve installed Samsung USB drivers before connecting.
  6. For Odin 3.09 hit the AP tab. Select the CF-Auto-Root.tar.md5, that you downloaded and extracted above.
  7. If you’re using Odin 3.07, you will select “PDA” tab instead of the AP tab, rest of the options remain untouched.
  8. Make sure that the options selected in your Odin are exactly as shown in the pic.Odin 3.09 explained. (2)
  9. Hit start and wait till the rooting process is complete, as soon as your device restarts, remove it from PC.
  10. Find SuperSu in app drawer now.
  11. That’s all with the rooting, let’s verify the root access now.

How To Verify Root Access:

  1. To do so, go to Google Play Store on your Galaxy E7.
  2. Find “Root Checker” and install it.
  3. Open Root Checker.
  4. Tap “Verify Root”.
  5. It will ask you for SuperSu rights, tap “Grant”.
  6. It should show you Root Access Verified Now!
  7. That’s All!
Screenshot_1
This picture has been used as a reference here only.


If you’re stuck with anything regarding this guide, feel free to utilize the comment box below and reach us. We will get back to you immediately. Thank you all.

Credits: Chainfire XDA

Root Galaxy E500F, E500H & E500M [How To]

0
Root Galaxy E500F, E500H & E500M [How To]

Samsung brought the users a new design and a new line of smartphones with the Galaxy Alpha. Galaxy Alpha was the very first device to sport a metallic build. After the Galaxy Alpha, Samsung launched Galaxy A series and the Galaxy E series. These mid-ranger devices come in very nice specifications and have successfully attracted a great audience. In the Galaxy E Line-up, there is Galaxy E5 & E7. The Galaxy E5 is further divided in to quite many variants including the LTE & 3G variants. This device has got a 5.0 inches display with 720 x 1280 pixels resolution. 8 MP shooter is fixed at the back, a 5 MP shooter can be found on the front, that may be a great addition for the Selfie freaks. Samsung equipped this device with a Quad Core CPU clocked at 1.2 GHz, 1.5 GB RAM, 16 GB internal storage and a microSD card slot. A battery of 2400 mAh is embedded inside this device. Galaxy E5 is a choice for so many users because of its great look and worthy specifications.

Planning to get a Galaxy E5 unit in your pocket? Once you get it, you may want to go beyond the boundaries and check out what your device has got. There are no limits in Android since its an open source operating system and you can customise your device the way you want. All you need is the root access, that will pave a way for you to unleash the true power of your Samsung Galaxy E5. Rooting has quite many advantages, you can enhance the performance of your device according to your liking. For the users reading this post right now, I assume that you are here to learn how to root your device, so without any further discussions we will head towards the early preparations and then learn how to root your Samsung Galaxy E5 E500F, E500H & E500M. Samsung-Galaxy-E5.2.1

Early Preps:

1. This guide is only for Samsung Galaxy E5 [Variants listed above]

Make sure that your device is exactly as mentioned above. To check out what device you have, go to Settings > More/General > About Device or Settings > About Device and match the model number. Be careful about the device model number, flashing a file on a device not listed here might result in bricking it up.

2. Battery should be charged at least 60%!

Your device’s battery shouldn’t be weak. In case your device goes dead during the flashing process, your device may get soft bricked and you might be in need of flashing stock firmware and that will ultimately result in wiping up your data as well. So, make sure that you charge your device before you start the flashing process.

3. Use the OEM datacable to establish connection!

Always use the original data cable to establish connection between your Android device and your computer / laptop. Using ordinary data cables might interrupt the flashing process, so to avoid any mishap, you need to meet this requirement as well.

4. Backup everything!

Just to be on the safe side, you may consider backing up each and everything from your Android device. This is highly recommended so that in case anything goes wrong, you still have the access to all of your data and you can restore it immediately. You may backup everything as listed below.

5. Turn off Samsung Kies and other softwares while using Odin3!

Make sure that you turn off Samsung Kies while using Odin3 flashtool. Samsung Kies will interrupt Odin3 and will result in causing errors and may not let you flash your desired recovery or root file. Also, make sure that you turn off any antivirus software you’ve installed and also disable firewall to avoid any connection and flashing issues.

6. Disclaimer

The methods involved in flashing custom recoveries, roms and rooting your phone are highly custom and may result in bricking your device, and has nothing to do with Google or the device manufacturer that is SAMSUNG in our case. Also rooting your device will void its warranty and you will be no longer eligible for any kind of free device services by the manufacturers/warranty providers. If your device comes with a Knox counter on the bootloader, it will be tripped and you won’t be able to reset it again. In case of any mishap we may not be held responsible. Follow these instructions to the letter to avoid any mishap or bricking. Make sure that whatever you do, you are doing it at your own responsibility.

Downloads Required:

Download and extract Odin3 v3.09.
Download and Install Samsung USB drivers
Download and extract CF-Auto-Root file.

How To Root Galaxy E5 Now

  1. Extract the downloaded CF-Auto-Root file once only to get the .tar.md5 file.
  2. Open Odin3.exe.
  3. Put your Galaxy E5 in download mode. To do so, turn it off and wait for 10 seconds. Turn it on by pressing and
    holding Volume Down + Home Button + Power Key simultaneously, You should see a warning, press Volume Up to continue. In case this method doesn’t work for you, try one from this guide.
  4. Connect your device to your PC.
  5. As soon as Odin detects your phone, the ID:COM box should turn blue.  Make sure that you’ve installed Samsung USB drivers before connecting.
  6. For Odin 3.09 hit the AP tab. Select the CF-Auto-Root.tar.md5, that you downloaded and extracted above.
  7. If you’re using Odin 3.07, you will select “PDA” tab instead of the AP tab, rest of the options remain untouched.
  8. Make sure that the options selected in your Odin are exactly as shown in the pic.Odin 3.09 explained. (2)
  9. Hit start and wait till the rooting process is complete, as soon as your device restarts, remove it from PC.
  10. Find SuperSu in app drawer now.
  11. That’s all with the rooting, let’s verify the root access now.

How To Verify Root Access:

  1. To do so, go to Google Play Store on your Galaxy E5.
  2. Find “Root Checker” and install it.
  3. Open Root Checker.
  4. Tap “Verify Root”.
  5. It will ask you for SuperSu rights, tap “Grant”.
  6. It should show you Root Access Verified Now!
  7. That’s All!
Screenshot_1
This picture has been used as a reference here only.


If you’re stuck with anything regarding this guide, feel free to utilize the comment box below and reach us. We will get back to you immediately. Thank you all.

Credits: Chainfire XDA

How To Add Close All Button In Recent Apps Menu On Sony Xperia Running Lollipop

0
How To Add Close All Button In Recent Apps Menu On Sony Xperia Running Lollipop

Sony Xperia Z series missed the close all button in the recent apps menu earlier, but the button was there in the new updates. It looks like with the release of Android 5.0.2 Lollipop, Sony has forgot to add the close all button in recent apps menu once again. Users who updated their Xperia Z3, Z3 Compact or Z2 to Android 5.0.2 Lollipop, they couldn’t find the close all button in the recent apps panel. It’s a great hiccup, you can’t just swipe each and every application one by one to close all the applications, a close all button is a must have.

To overcome this little bug, XDA Recognised developer niaboc79 has come up with a little mode that adds a material design close all button to the recent apps panel of your Sony Xperia Z2, Z3 & Z3 Compact. At the time of writing this post, this little mod is available for the aforementioned three devices, but if the firmware misses this feature for rest of the devices, we expect the developer to add support to his mod for other devices as well. Let’s jump up to the method and install it right away.

How To Add Close All Button In Recent Apps Menu On Sony Xperia Running Lollipop

  1. You need to have your device rooted in order to add this button in the recent apps menu.
  2. You need a root explorer in order to access the root directory of your device.
  3. Download the SystemUI_ZX.apk file for according to your device.
  4. Rename the downloaded file to systemUI.apk
  5. Copy the renamed file to your phone.
  6. Now move to /system directory
  7. Set the permissions to r-w-r-r using the permissions option.
  8. Move the file to system/priv-app/systemUI [replace the systemUI if prompted.]
  9. Reboot your device.
  10. Open some applications and minimise.
  11. Open recent apps panel, you should find a close all button in the lower right corner.
  12. That’s all.

recent apps menu

How To Root T-Mobile Galaxy S6 Edge

4
How To Root T-Mobile Galaxy S6 Edge

T-Mobile is currently taking the pre-orders of the Galaxy S6 and the Galaxy S6 Edge. Some lucky folks have managed to get theirs hands on this device as well before it hits the markets all around the world on 10th of April. Galaxy S6 Edge is one of its-own-kind device and its mighty specifications make it worth having. Android power users, who will be switching to the S6 Edge won’t be able to resist themselves from experimenting on this device. Famous XDA recognised developer Chainfire has already paved a way to the world of customisations by adding support for the T-Mobile Galaxy S6 Edge in his famous CF-Autoroot tool. T-Mobile ships the Galaxy S6 & S6 Edge with an unlocked bootloader, so going beyond the boundaries on these devices won’t be a hard job.

You may want to root your T-Mobile S6 Edge as soon as you get your hands on it. To help you do this, we’ve written down this guide. We are going to root our beloved T-Mobile Samsung Galaxy S6 Edge SM-G925T using CF-Autoroot. Let’s go through some early preparations and root your S6 Edge right away.

Samsung-Galaxy-S6_Gold_Platinum-590x1024

Early Preps:

1. This guide is only for T-Mobile Samsung Galaxy S6 Edge SM-G925T

Make sure that your device is exactly as mentioned above. To check out what device you have, go to Settings > More/General > About Device or Settings > About Device and match the model number. Be careful about the device model number, flashing a file on a device not listed here might result in bricking it up.

2. Battery should be charged at least 60%!

Your device’s battery shouldn’t be weak. In case your device goes dead during the flashing process, your device may get soft bricked and you might be in need of flashing stock firmware and that will ultimately result in wiping up your data as well. So, make sure that you charge your device before you start the flashing process.

3. Use the OEM datacable to establish connection!

Always use the original data cable to establish connection between your Android device and your computer / laptop. Using ordinary data cables might interrupt the flashing process, so to avoid any mishap, you need to meet this requirement as well.

4. Backup everything!

Just to be on the safe side, you may consider backing up each and everything from your Android device. This is highly recommended so that in case anything goes wrong, you still have the access to all of your data and you can restore it immediately. You may backup everything as listed below.

5. Turn off Samsung Kies and other softwares while using Odin3!

Make sure that you turn off Samsung Kies while using Odin3 flashtool. Samsung Kies will interrupt Odin3 and will result in causing errors and may not let you flash your desired recovery or root file. Also, make sure that you turn off any antivirus software you’ve installed and also disable firewall to avoid any connection and flashing issues.

6. Disclaimer

The methods involved in flashing custom recoveries, roms and rooting your phone are highly custom and may result in bricking your device, and has nothing to do with Google or the device manufacturer that is SAMSUNG in our case. Also rooting your device will void its warranty and you will be no longer eligible for any kind of free device services by the manufacturers/warranty providers. If your device comes with a Knox counter on the bootloader, it will be tripped and you won’t be able to reset it again. In case of any mishap we may not be held responsible. Follow these instructions to the letter to avoid any mishap or bricking. Make sure that whatever you do, you are doing it at your own responsibility.

Downloads Required:

Download and extract Odin3 v3.09.
Download and Install Samsung USB drivers
Download and extract CF-Auto-Root file.


How To Root Galaxy T-Mobile Galaxy S6 Edge Now

  1. Extract the downloaded CF-Auto-Root file once only to get the .tar.md5 file.
  2. Open Odin3.exe.
  3. Put your Galaxy S6 Edge in download mode. To do so, turn it off and wait for 10 seconds. Turn it on by pressing and
    holding Volume Down + Home Button + Power Key simultaneously, You should see a warning, press Volume Up to continue. In case this method doesn’t work for you, try one from this guide.
  4. Connect your device to your PC.
  5. As soon as Odin detects your phone, the ID:COM box should turn blue.  Make sure that you’ve installed Samsung USB drivers before connecting.
  6. For Odin 3.09 hit the AP tab. Select the CF-Auto-Root.tar.md5, that you downloaded and extracted above.
  7. If you’re using Odin 3.07, you will select “PDA” tab instead of the AP tab, rest of the options remain untouched.
  8. Make sure that the options selected in your Odin are exactly as shown in the pic.Odin 3.09 explained. (2)
  9. Hit start and wait till the rooting process is complete, as soon as your device restarts, remove it from PC.
  10. Find SuperSu in app drawer now.
  11. That’s all with the rooting, let’s verify the root access now.

How To Verify Root Access:

  1. To do so, go to Google Play Store on your Galaxy S6 Edge
  2. Find “Root Checker” and install it.
  3. Open Root Checker.
  4. Tap “Verify Root”.
  5. It will ask you for SuperSu rights, tap “Grant”.
  6. It should show you Root Access Verified Now!
  7. That’s All!
Screenshot_1
This picture has been used as a reference here only.


If you’re stuck with anything regarding this guide, feel free to utilize the comment box below and reach us. We will get back to you immediately. Thank you all.

Credits: Chainfire XDA

Download Stock Wallpapers From HTC One M9

Download Stock Wallpapers From HTC One M9

HTC is done with its flagship device for the year 2015. The One M9 came out almost a month ago in order to face the rivals like Galaxy S6 and the upcoming Xperia Z4, LG G4 and some other devices. Once again, HTC has managed to build one of the most beautiful smartphone of world. The One M9 sports the same premium build and look as the of the HTC M8 and M7. There’s a slight change, the M9 resembles the design of both, the M8 and M7. HTC has used a 5.0 inches full HD screen on this device. There was a 4 MP ultrapixel camera at the back in the previous HTC One device, but this time, HTC fixed that shooter on the front and added a 20.7 MP shooter at the back. M9 is powered up with Qualcomm’s Snapdragon 810 CPU, A RAM of 3 GB is there and internal storage is 32 GB while there’s a microSD card slot available as well. HTC has added the latest version of its UI, the Sense 7 to the One M9 running atop of Android 5.0 Lollipop.

To beautify Sense 7 further, HTC has added some great and cool HD wallpapers. Some of the users would love to grab these wallpapers and set on their devices. If you happen to be one of those, you may be happy to know that in the following post we have collected all the official/stock wallpapers from the HTC One M9. You can simply go ahead and pick up your favorite one, or download all wallpapers from the all-in-one link that attached at the bottom.

These wallpapers have a resolution of 2160 x 1920 pixels.


Download Samsung Galaxy S6 & S6 Edge Stock Wallpapers

Download Samsung Galaxy S6 & S6 Edge Stock Wallpapers

Galaxy S6 & S6 Edge are just a few days away from the users now. Samsung has equipped these devices with a beautiful 5.1 inches QHD display. To enhance the beauty of this display, Samsung has added 12 high definition wallpapers. These wallpapers look pretty great. While some of the users will be getting their hands on these devices straight away, some would love to grab something like, wallpapers, applications or any other feature from these device. If you happen to be one of those users who always like to bring the stuff from other devices to their devices,  you may have spotted the right place for now as we’ve found all the stock wallpapers of homescreen and lockscreen from the Galaxy S6 & S6 Edge and linked right here. Just go through the post and grab your favorite wallpaper, or simply download all from the all-in-one link at the bottom.

For those who don’t know about the Galaxy S6 & Galaxy S6 Edge, Samsung released these devices at MWC, 2015 as the 6th iteration in the Galaxy S series. Both these devices sport same specifications but a slightly different design. We have a 5.1 inch QHD display on the front having a 5 MP shooter fixed at the top. A 16 MP camera is fixed at the back. Samsung used its own Exynos 7420 CPU to power this device up. Internal storage begins from 32 GB, and a RAM of 3 GB is fixed inside. Both these devices have a 2550 mAh battery.

These wallpapers have a resolution of 2240 x 2240 pixels.

How To Unroot Galaxy S6 Edge

0
How To Unroot Galaxy S6 Edge

Galaxy S6 Edge is all set to land the markets in next few days. A method to root the T-Mobile variant of the Galaxy S6 Edge is already available, and there soon will be methods to root all other variants of this device. The developer community is also looking forward to get their hands on this new beast and come up with the best tweaks, mods and custom ROMs. If you happen to be an Android power user and you’re keeping your eyes on the custom stuff for the Galaxy S6 Edge, chances are you will keep rooting & unrooting your device.

While you’re reading this post, I assume that you have already rooted your device and you’re here to learn how to unroot it now in order to gain the factory state of your device back. Without jumping on to any further discussion, we will begin with the unrooting process. You can wipe root access from your Galaxy S6 Edge by flashing a stock firmware on it, so, in the following guide we will go through a method to install stock firmware to unroot the Galaxy S6 Edge.

Early Preparations

1. This guide is only for Samsung Galaxy S6 Edge (All Variants)

Make sure that your device is exactly as mentioned above. To check out what device you have, go to Settings > More/General > About Device or Settings > About Device and match the model number. Be careful about the device model number, flashing a file on a device not listed here might result in bricking it up. In that case, we may not be held responsible.

2. Battery should be charged at least 60%!

Your device’s battery should not be weak. In case your device goes dead during the flashing process, your device may get soft bricked and you might be in need of flashing stock firmware and that will ultimately result in wiping up your data as well. So, make sure that you charge your device before you start the flashing process.

3. Use the OEM data cable to establish connection!

Always use the original data cable to establish connection between your Android device and your computer / laptop. Using ordinary data cables might interrupt the flashing process, so to avoid any mishap, you need to meet this requirement as well.

4. Backup everything!

Just to be on the safe side, you may consider backing up each and everything from your Android device. This is highly recommended so that in case anything goes wrong, you still have the access to all of your data and you can restore it immediately. Also, clean install is always recommended, that means you will probably have to wipe your device to install the new firmware. So, you may backup everything as listed below.

Backup SMS Messages
Backup Call Logs
Backup Contacts
Backup Media – Copy your files manually to your PC or Laptop.
Backup EFS – If rooted, otherwise skip this step.

5. Install Samsung USB drivers

In order to be able to establish connection between your PC and your Galaxy S4, you need to have the Samsung USB drivers installed on your PC. You can find all Android USB drivers here on our site.

6. Turn off Samsung Kies and other softwares while using Odin3!

Make sure that you turn off Samsung Kies while using Odin3 flashtool. Samsung Kies will interrupt Odin3 and will result in causing errors and may not let you flash your desired firwmrae. Also, make sure that you turn off any antivirus software you’ve installed and also disable firewall to avoid any connection and flashing issues.

Required Downloads & Installations

  1. Download and extract Odin3 v3.10.6.
  2. Download and extract firmware file (carefully for your variant) to get the .tar.md5 file.

Galaxy S6 Edge

How To Unroot & Restore Samsung Galaxy S6 Edge

  1. Make sure that you read the instructions listed above carefully and you’re all set to go ahead now.
  2. Wipe your device complete in order to attain a neat installation. You may boot into the recovery mode and perform a factory data reset.
  3. Open Odin3.exe.
  4. Put your Galaxy S6 Edge in download mode. To do so, turn it off and wait for 10 seconds. Turn it on by pressing and holding Volume Down + Home Button + Power Key simultaneously, You should see a warning, press Volume Up to continue. In case this method doesn’t work for you, try one from this guide.
  5. Connect your device to your PC.
  6. As soon as Odin detects your phone, the ID:COM box should turn blue.  Make sure that you’ve installed Samsung USB drivers before connecting.
  7. For Odin 3.09 or 3.10.6 hit the AP tab. Select the firmware.tar.md5 or firmware.tar, that you downloaded and extracted above.
  8. If you’re using Odin 3.07, you will select “PDA” tab instead of the AP tab, rest of the options remain untouched.
  9. Make sure that the options selected in your Odin are exactly as shown in the pic.Odin 3.10.6 Explained_Techbeasts
  10. Hit start and wait till the firmware  flashing is complete, The flashing process box will turn green upon successful flashing.
  11. Once the flashing process has been completed successfully, disconnect your device and reboot it manually. You can pull out the battery, place it back and turn on.
  12. Once the device boots up, checkout the new firmware now.
  13. Your device will be running on official Android Lollipop firmware.
  14. Your device is no longer rooted, its back in its stock state.
  15. Once updated to stock, do not try to downgrade, or else you will result in messing up EFS partition of your device.
  16. That’s all!

Got any queries? Make sure that you drop em’ in the comment box below. Good Luck!

How To Install Stock Firmware On Samsung Galaxy S6 Edge

9
How To Install Stock Firmware On Samsung Galaxy S6 Edge

Samsung took the smartphone world by a storm after launching the Galaxy S6 & the Galaxy S6 Edge. Samsung’s experiment with the Galaxy Note Edge went pretty much successful and the results urged Samsung to bring up something much more cool and better, that came out in the form of the Galaxy S6 Edge. The metallic build with two sided bent display makes the Galaxy S6 Edge much beautiful. On the front we have a 5.1 inch QHD screen with a 5MP shooter fixed at the top. A 16 MP shooter is fixed at the back for secondary photography. Galaxy S6 Edge is equipped with Exynos 7420 CPU, a 3 GB RAM, 2550 mAh battery, 32 GB internal storage and runs on Android 5.0 Lollipop out of the box. You must be wondering about these mighty specifications in such a beautiful gadget. If you’re planning to get it as soon as it hits the markets, there are probably chances that you won’t be able to keep yourself within the limitations set by Samsung, and you sure would love to explore the vast world of Android by unleashing the real power of your S6 Edge.

To get the best out of your device, you’re going to tweak it, and when you are going to tweak it, you’re going to soft-brick it and you are going to need a fresh installation of stock firmware on your device. Or if your device’s software is slowing down with time, you may wish to install a fresh firmware. The purpose of our on-going guide is to help you to install a fresh & pure stock firmware and restore your device to its original (factory) state. Before you proceed, you need to keep this in mind that, if you have rooted your device or modified it and you have already voided the knox counter, installing a stock firmware won’t reset the counter, however, it will reset your device to stock state. Let’s go through some early preparations and then learn to install stock firmware on your Galaxy S6 Edge (all variants).

Early Preparations

1. This guide is only for Samsung Galaxy S6 Edge (All Variants)

Make sure that your device is exactly as mentioned above. To check out what device you have, go to Settings > More/General > About Device or Settings > About Device and match the model number. Be careful about the device model number, flashing a file on a device not listed here might result in bricking it up. In that case, we may not be held responsible.

2. Battery should be charged at least 60%!

Your device’s battery should not be weak. In case your device goes dead during the flashing process, your device may get soft bricked and you might be in need of flashing stock firmware and that will ultimately result in wiping up your data as well. So, make sure that you charge your device before you start the flashing process.

3. Use the OEM data cable to establish connection!

Always use the original data cable to establish connection between your Android device and your computer / laptop. Using ordinary data cables might interrupt the flashing process, so to avoid any mishap, you need to meet this requirement as well.

4. Backup everything!

Just to be on the safe side, you may consider backing up each and everything from your Android device. This is highly recommended so that in case anything goes wrong, you still have the access to all of your data and you can restore it immediately. Also, clean install is always recommended, that means you will probably have to wipe your device to install the new firmware. So, you may backup everything as listed below.

Backup SMS Messages
Backup Call Logs
Backup Contacts
Backup Media – Copy your files manually to your PC or Laptop.
Backup EFS – If rooted, otherwise skip this step.

5. Install Samsung USB drivers

In order to be able to establish connection between your PC and your Galaxy S6 Edge, you need to have the Samsung USB drivers installed on your PC. You can find all Android USB drivers here on our site.

6. Turn off Samsung Kies and other softwares while using Odin3!

Make sure that you turn off Samsung Kies while using Odin3 flashtool. Samsung Kies will interrupt Odin3 and will result in causing errors and may not let you flash your desired firwmrae. Also, make sure that you turn off any antivirus software you’ve installed and also disable firewall to avoid any connection and flashing issues.

Required Downloads & Installations

  1. Download and extract Odin3 v3.10.6.
  2. Download and extract firmware file (carefully for your variant) to get the .tar.md5 file.

Galaxy S6 Edge

How To Install Stock Firmware & Restore Samsung Galaxy S6

  1. Make sure that you read the instructions listed above carefully and you’re all set to go ahead now.
  2. Wipe your device complete in order to attain a neat installation. You may boot into the recovery mode and perform a factory data reset.
  3. Open Odin3.exe.
  4. Put your Galaxy S6 Edge in download mode. To do so, turn it off and wait for 10 seconds. Turn it on by pressing and holding Volume Down + Home Button + Power Key simultaneously, You should see a warning, press Volume Up to continue. In case this method doesn’t work for you, try one from this guide.
  5. Connect your device to your PC.
  6. As soon as Odin detects your phone, the ID:COM box should turn blue.  Make sure that you’ve installed Samsung USB drivers before connecting.
  7. For Odin 3.09 or 3.10.6 hit the AP tab. Select the firmware.tar.md5 or firmware.tar, that you downloaded and extracted above.
  8. If you’re using Odin 3.07, you will select “PDA” tab instead of the AP tab, rest of the options remain untouched.
  9. Make sure that the options selected in your Odin are exactly as shown in the pic.Odin 3.10.6 Explained_Techbeasts
  10. Hit start and wait till the firmware  flashing is complete, The flashing process box will turn green upon successful flashing.
  11. Once the flashing process has been completed successfully, disconnect your device and reboot it manually.
  12. Once the device boots up, checkout the new firmware now.
  13. Your device will be running on official Android firmware.
  14. Once updated to stock, do not try to downgrade, or else you will result in messing up EFS partition of your device.
  15. That’s all!

Got any queries? Make sure that you drop em’ in the comment box below. Good Luck!

How To Unroot Samsung Galaxy S6

0
How To Unroot Samsung Galaxy S6

Galaxy S6 is on the roll now. Its mighty specifications, cool design, a solid build and mesmerising features make it worth having. If you are planning to get your hands on this device, I’m pretty sure that you won’t be able to resist yourself from going out of the boundaries and checkout what your device has got or what’s its potential. To pave a way for doing all this and to allow Android power users to unleash the real power of their new Samsung  S6, Chainfire, the famous XDA Elite Recognised Developer who is behind CF-Autoroot, SuperSU has already added support to his Autoroot script for the Galaxy S6. At the moment, CF-Autoroot supports 3 different variants, but it will be making its way to all the variants pretty soon. It’s pretty hard for some Android Enthusiasts to stay on the stock state of their device and they keep experimenting, and rooting the device is an essential part of performing experiments on your device.

If you’ve already got your device rooted or you are planning to root it after you get it, you may want to unroot it at a later stage. Unrooting your device is pretty easy, you can simply do so by flashing a stock firmware on your device. Loading a stock firmware will wipe the root access and bring back your device to the complete factory state, but it won’t reset the binary counter and knox counter of your Galaxy S6, that you’ve probably tripped while rooting your device in the very first place. While you’re going to unroot your device, do not expect your device to gain its warranty back, as this guide’s purpose is to bring your device back to the original stock state only. Let’s go through some early preparations and then unroot your Galaxy S6 [all variants].


Early Preparations

1. This guide is only for Samsung Galaxy S6 (All Variants)

Make sure that your device is exactly as mentioned above. To check out what device you have, go to Settings > More/General > About Device or Settings > About Device and match the model number. Be careful about the device model number, flashing a file on a device not listed here might result in bricking it up. In that case, we may not be held responsible.

2. Battery should be charged at least 60%!

Your device’s battery should not be weak. In case your device goes dead during the flashing process, your device may get soft bricked and you might be in need of flashing stock firmware and that will ultimately result in wiping up your data as well. So, make sure that you charge your device before you start the flashing process.

3. Use the OEM data cable to establish connection!

Always use the original data cable to establish connection between your Android device and your computer / laptop. Using ordinary data cables might interrupt the flashing process, so to avoid any mishap, you need to meet this requirement as well.

4. Backup everything!

Just to be on the safe side, you may consider backing up each and everything from your Android device. This is highly recommended so that in case anything goes wrong, you still have the access to all of your data and you can restore it immediately. Also, clean install is always recommended, that means you will probably have to wipe your device to install the new firmware. So, you may backup everything as listed below.

Backup SMS Messages
Backup Call Logs
Backup Contacts
Backup Media – Copy your files manually to your PC or Laptop.
Backup EFS – If rooted, otherwise skip this step.

5. Install Samsung USB drivers

In order to be able to establish connection between your PC and your Galaxy S4, you need to have the Samsung USB drivers installed on your PC. You can find all Android USB drivers here on our site.

6. Turn off Samsung Kies and other softwares while using Odin3!

Make sure that you turn off Samsung Kies while using Odin3 flashtool. Samsung Kies will interrupt Odin3 and will result in causing errors and may not let you flash your desired firwmrae. Also, make sure that you turn off any antivirus software you’ve installed and also disable firewall to avoid any connection and flashing issues.
Galaxy S6

Required Downloads & Installations

  1. Download and extract Odin3 v3.10.6.
  2. Download and extract firmware file (carefully for your variant) to get the .tar.md5 file.

How To Unroot & Restore Samsung Galaxy S6

  1. Make sure that you read the instructions listed above carefully and you’re all set to go ahead now.
  2. Wipe your device complete in order to attain a neat installation. You may boot into the recovery mode and perform a factory data reset.
  3. Open Odin3.exe.
  4. Put your Galaxy S6 in download mode. To do so, turn it off and wait for 10 seconds. Turn it on by pressing and holding Volume Down + Home Button + Power Key simultaneously, You should see a warning, press Volume Up to continue. In case this method doesn’t work for you, try one from this guide.
  5. Connect your device to your PC.
  6. As soon as Odin detects your phone, the ID:COM box should turn blue.  Make sure that you’ve installed Samsung USB drivers before connecting.
  7. For Odin 3.09 or 3.10.6 hit the AP tab. Select the firmware.tar.md5 or firmware.tar, that you downloaded and extracted above.
  8. If you’re using Odin 3.07, you will select “PDA” tab instead of the AP tab, rest of the options remain untouched.
  9. Make sure that the options selected in your Odin are exactly as shown in the pic.Odin 3.10.6 Explained_Techbeasts
  10. Hit start and wait till the firmware  flashing is complete, The flashing process box will turn green upon successful flashing.
  11. Once the flashing process has been completed successfully, disconnect your device and reboot it manually. You can pull out the battery, place it back and turn on.
  12. Once the device boots up, checkout the new firmware now.
  13. Your device will be running on official Android Lollipop firmware. The root access is wiped now.
  14. Once updated to stock, do not try to downgrade, or else you will result in messing up EFS partition of your device.
  15. That’s all!

Got any queries? Make sure that you drop em’ in the comment box below. Good Luck!

How To Install Stock Firmware On Samsung Galaxy S6

0
How To Install Stock Firmware On Samsung Galaxy S6

Samsung Galaxy S6 is set to hit markets all around the world in a few days. As soon as the device comes out, the developers will be getting their hands on and all of a sudden there will be quite a lot to play with this new Samsung beast. If you happen to be an Android power user, chances are, you are going to tweak your device in order get the maximum out of it and there are obvious chances that you will end up soft-bricking your device or messing up the software of your device in particular ways. This can happen if you flash an invalid file on your device or any of your experiment fails. In this case, to recover your device, you are going to need a fresh installation of stock firmware on your device. Or you may only want to have a fresh installation of stock firmware on your device from scratch. To over come this need of users, we have written down this comprehensive guide that will help you to install stock Android firmware on all the variants of your Samsung Galaxy S6.

Before head towards our guide, let’s have a recap on the Galaxy S6. It happens to be the 6th iteration in the Galaxy series. It came out of the curtains on March 1, 2015. Samsung gave the Galaxy S series a whole new look. Its metallic unibody design makes it one of its-own-kind device. We have a 5.1 inch QHD display on the front. A 5 MP shooter is fixed atop of this screen, a 16 MP enhanced shooter is fixed at the back accompanied by a heart rate monitor and flash light. Samsung has used its very own Exynos 7420 Chipset to power up this device. A RAM of 3 GB is fixed inside while under the hood we have a 2550 mAh battery. Out of the box, it can be found running on Android 5.0 Lollipop.

Let’s head towards the guide and learn to flash stock firmware on your Galaxy S6.

Note: At the time of writing this post, official firmwares are not available, but we expect them to come out in a week or less. However, the method to flash stock firmware and all the links will remain same.

Early Preparations

1. This guide is only for Samsung Galaxy S6 (All Variants)

Make sure that your device is exactly as mentioned above. To check out what device you have, go to Settings > More/General > About Device or Settings > About Device and match the model number. Be careful about the device model number, flashing a file on a device not listed here might result in bricking it up. In that case, we may not be held responsible.

2. Battery should be charged at least 60%!

Your device’s battery should not be weak. In case your device goes dead during the flashing process, your device may get soft bricked and you might be in need of flashing stock firmware and that will ultimately result in wiping up your data as well. So, make sure that you charge your device before you start the flashing process.

3. Use the OEM data cable to establish connection!

Always use the original data cable to establish connection between your Android device and your computer / laptop. Using ordinary data cables might interrupt the flashing process, so to avoid any mishap, you need to meet this requirement as well.

4. Backup everything!

Just to be on the safe side, you may consider backing up each and everything from your Android device. This is highly recommended so that in case anything goes wrong, you still have the access to all of your data and you can restore it immediately. Also, clean install is always recommended, that means you will probably have to wipe your device to install the new firmware. So, you may backup everything as listed below.

Backup SMS Messages
Backup Call Logs
Backup Contacts
Backup Media – Copy your files manually to your PC or Laptop.
Backup EFS – If rooted, otherwise skip this step.

5. Install Samsung USB drivers

In order to be able to establish connection between your PC and your Galaxy S4, you need to have the Samsung USB drivers installed on your PC. You can find all Android USB drivers here on our site.

6. Turn off Samsung Kies and other softwares while using Odin3!

Make sure that you turn off Samsung Kies while using Odin3 flashtool. Samsung Kies will interrupt Odin3 and will result in causing errors and may not let you flash your desired firwmrae. Also, make sure that you turn off any antivirus software you’ve installed and also disable firewall to avoid any connection and flashing issues.

Galaxy S6

Required Downloads & Installations

  1. Download and extract Odin3 v3.10.6.
  2. Download and extract firmware file (carefully for your variant) to get the .tar.md5 file.

How To Install Stock Firmware & Restore Samsung Galaxy S6

  1. Make sure that you read the instructions listed above carefully and you’re all set to go ahead now.
  2. Wipe your device complete in order to attain a neat installation. You may boot into the recovery mode and perform a factory data reset.
  3. Open Odin3.exe.
  4. Put your Galaxy S6 in download mode. To do so, turn it off and wait for 10 seconds. Turn it on by pressing and holding Volume Down + Home Button + Power Key simultaneously, You should see a warning, press Volume Up to continue. In case this method doesn’t work for you, try one from this guide.
  5. Connect your device to your PC.
  6. As soon as Odin detects your phone, the ID:COM box should turn blue.  Make sure that you’ve installed Samsung USB drivers before connecting.
  7. For Odin 3.09 or 3.10.6 hit the AP tab. Select the firmware.tar.md5 or firmware.tar, that you downloaded and extracted above.
  8. If you’re using Odin 3.07, you will select “PDA” tab instead of the AP tab, rest of the options remain untouched.
  9. Make sure that the options selected in your Odin are exactly as shown in the pic.Odin 3.10.6 Explained_Techbeasts
  10. Hit start and wait till the firmware  flashing is complete, The flashing process box will turn green upon successful flashing.
  11. Once the flashing process has been completed successfully, disconnect your device and reboot it manually. You can pull out the battery, place it back and turn on.
  12. Once the device boots up, checkout the new firmware now.
  13. Your device will be running on official Android Lollipop firmware.
  14. Once updated to stock, do not try to downgrade, or else you will result in messing up EFS partition of your device.
  15. That’s all!

Got any queries? Make sure that you drop em’ in the comment box below. Good Luck!

Automatically Download Subs in VLC and Resume Play from Last Position

0
Automatically Download Subs in VLC and Resume Play from Last Position

VLC is no doubt the best and most accomplished video player of all times, since it supports all types of video formats, one doesn’t have to worry about downloading codecs again and again and the best part is that it is completely free and open source. As usual, the first job of any developer is to make sure that the app is as simple as possible for all the users to use, but also he has to make sure that it is more than enough for a tech sevy too and that is the case with VLC, in first look everything looks so simple, but when it comes to support and under the hood changes, it is one of the best thing available.

However, there are a little things you need to do manually, in past there were some extension, namely one VLSub, that allows users to download the Movie subs without doing much effort, now that same thing has been ported in VLC as default, while on the other hand, Resuming playback was also done by installing some extensions, now everything has been ported in VLC as default and all you need is to enable it, thinking how to do it, well I haven’t write the whole story just to waste your time, without further ado, let us continue.

Automatically Download Subs in VLC and Resume Play from Last Position

How to Download Subtitles in VLC:

  • Open VLC.
  • Click “View” in the option above.

Screenshot_2

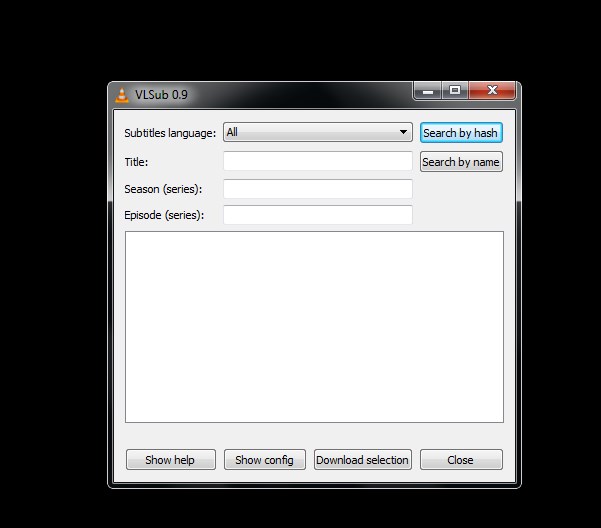
  • Click the VLsub 0.9.10.
  • You’ll see a pop-up.

Screenshot_8

  • Type the Name in Search bar, or while playing any video, use “Search by Hash”
  • Once the Search is over, Download the Subs from the options available.
  • Enjoy!

How to Resume Play-back in VLC:

  • This resuming option was once done by extensions.
  • Now with the release of VLC 2.2.0, it has been added in it by default.
  • Now if you play the movie you have been watching before, you’ll see a small option on top to let you resume.

resumeplaybackvlc220-100570406-large

  • Now all you need is to click the Continue and the movie will start playing from the previous line.
  • Enjoy!

Downgrade to Kit-Kat from Lollipop on Samsung Devices

0
Downgrade to Kit-Kat from Lollipop on Samsung Devices

We all love yo update our devices to the latest versions available or till date, sometimes we are so impatient to update our device that we don’t bother looking at the down side and after updating, the thing after regret the is search for a way to downgrade it back to the previous version. Samsung released the Lollipop update quite a time ago and it was great, both in term of speed and performance, although in terms of Battery timing, there was some problems there. Most of the users, include my Brother, even though using the Galaxy Note 4, complained that he battery timing is not as good as it as before, even I felt it a little using the Lollipop ROM on Nexus 4, on Mahdi Kit-Kat ROM the batter was awesome, however, in this Euphoria ROM it is not that good.

Now those who updated their device to Lollipop while owning a Samsung device are now looking for a way to downgrade the device to Kit-Kat, for the least, cause Jelly Bean is not available, unless you have downloaded it a long time ago, along with a way to flash that particular firmware on their device, cause in most cases you heard that the device might go brick if you downgrade it from Lollipop to Kit-Kat, however, that is all Bongus! and I can assure you that unless you are super unlucky, nothing wrong will happened to your device. Here is how you can downgrade your Galaxy Device back to Kit-Kat, without further ado, let us continue.

Downgrade to Kit-Kat from Lollipop on Samsung Devices


Early Preparations:

How to Downgrade Galaxy device:

  1. Make sure that you read the instructions listed above carefully and you’re all set to go ahead now.
  2. Wipe your device complete in order to attain a neat installation. You may boot into the recovery mode and perform a factory data reset.
  3. Open Odin3.exe.
  4. Put your Device in download mode. To do so, turn it off and wait for 10 seconds. Turn it on by pressing and holding Volume Down + Home Button + Power Key simultaneously, You should see a warning, press Volume Up to continue. In case this method doesn’t work for you, try one from this guide.
  5. Connect your device to your PC.
  6. As soon as Odin detects your phone, the ID:COM box should turn blue.  Make sure that you’ve installed Samsung USB drivers before connecting.
  7. For Odin 3.09 or 3.10.6 hit the AP tab. Select the firmware.tar.md5 or firmware.tar, that you downloaded and extracted above.
  8. If you’re using Odin 3.07, you will select “PDA” tab instead of the AP tab, rest of the options remain untouched.
  9. Make sure that the options selected in your Odin are exactly as shown in the pic.Odin 3.10.6 Explained_Techbeasts
  10. Hit start and wait till the firmware  flashing is complete, The flashing process box will turn green upon successful flashing.
  11. Once the flashing process has been completed successfully, disconnect your device and reboot it manually. You can pull out the battery, place it back and turn on.
  12. Once the device boots up, checkout the new firmware now.
  13. Your device will be running on any version before the Lollipop, most probably Android 4.4.4 Kit-Kat..
  14. That’s all!