Home Blog Page 375

Root Galaxy S6 Edge Without Tripping Knox

0
Root Galaxy S6 Edge Without Tripping Knox

Samsung Galaxy S6 Edge is the most beautiful Galaxy device yet. Samsung managed to win the hearts of its users once again after disappointing them for a very long time. Galaxy S6 Edge has a premium build, a beautiful design. The dual edge display makes it look stunning. Samsung loaded the device with top-notch specifications of today. We have a 5.1 inch QHD screen with a 5 MP shooter set atop. At the back we have a 16 MP shooter accompanied by a heart rate monitor & LED flash. Under the hood Samsung has used its Exynos 7420 to power this device up. A 3 GB RAM is plugged inside and a battery of 2600 mAh is there. Out of the box, S6 Edge can be found running on Android 5.0.2 Lollipop.

Like the previous flagship Galaxy devices, Galaxy S6 Edge has a Knox counter on its bootloader as well. So, if you are an Android freak who cannot live with the factory restrictions, you will have to keep in mind that going out of the way and trying to flash anything custom will simply trip the Knox counter and it will result in voiding the warrant your device. This Knox counter has been holding a number of Android enthusiasts back from making the best out of their device. Methods to root the devices without tripping the Knox counter have been coming up for past Galaxy flagships, but it always took a very long time and the methods came up for specific variants running specific firmwares. This doesn’t seem to be the case with the Galaxy S6 and S6 Edge, and the device owners are pretty lucky.Samsung-Galaxy-S6-edge-official-images

Root access for the Galaxy S6 and S6 Edge without tripping the Knox counter and without voiding the warranty has been achieved. This work has been done by XDA senior member idler1984 who made the PingPong Root Tool. This tool uses an exploit to root almost all variants of Galaxy S6 Edge running various firmwares. All it takes is just one tap and few on-screen instructions that you need to follow. The tool came up for Galaxy S6 a few days back, and just today it made its way to the Galaxy S6 Edge as well.

If you have been waiting for a safe and secure root  method to come up, you may have your chance now. If you’re looking for the appropriate method, we would like to save some time of yours. In the following guide we are going to root Galaxy S6 Edge without tripping Knox counter.

Here is a list of supported variants with supported firmware version.

  • Samsung Galaxy S6 Edge G9250 – Chinese
  • Samsung Galaxy S6 Edge G925V – Verizon
  • Samsung Galaxy S6 Edge G925F – Global
  • Samsung Galaxy S6 Edge G925P – Sprint
  • Samsung Galaxy S6 Edge G925T – T-Mobile
  • Samsung Galaxy S6 Edge G925A – At&t
  • Samsung Galaxy S6 Edge G925I – India, Latam, Singapore
  • Samsung Galaxy S6 Edge G925S – Korea
  • Samsung Galaxy S6 Edge G925L – Korea
  • Samsung Galaxy S6 Edge G925R4 – US Cellular

Samsung Galaxy S6 Edge with following ROM versions:
G9250ZCU1AODC
G925VVRU1AOC3
G925FXXU1AOD9
G925PVPU1AOCF
G925FXXU1AOCV
G925AUCU1AOCE
G925TUVU1AOCG
G925W8VLU1AOCG
G925IDVU1AOD1
G925SKSU1AOD5
***new*** Use Download Data!
G925FXXU1AOD4
G925R4TYU1AOD3
G925FXXU1AODG
G925FXXU1AOCZ
G925IDVU1AOD3
G925LKLU1AOD8
G925SKSU1AOD8
G925FXXU1AOE3

How To Root Galaxy S6 Edge Without Tripping Knox

  1. Download pingpongroot_beta5.1.apk
  2. Copy the downloaded APK file to your phone.
  3. Now go to settings > system > security > all unknown sources.
  4. Open file manager and locate the downloaded APK file.
  5. Tap the APK file and follow on-screen instructions to complete installation.
  6. Once done, open the installed PingPong ROOT application from the app drawer.
  7. PingPong Root will now automatically install Super SU.
  8. Once SuperSU is installed, in order to activate it tap “Open”.
  9. SuperSu will display an error message and exit back to PingPong Root. This is normaly, so no need to worry about anything.
  10. Click “Download Data” button to update your device before you click get root. Make sure that you’re connected to internet while you update.
  11. Once you are in PingPong ROOT , tap the “Get Root” button now and see the magic!
  12. Reboot your device once done.
  13. You may uninstall PingPong application after rooting your device successfully.
  14. That’s it. Pretty easy, isn’t it?
  15. Also install BusyBox from Play Store.
  16. Verify root access using Root Checker.
  17. That’s all. You’re now set to unleash the open source nature of Android.

11198415_10205921985661421_1780252442_n

That’s all.

FAQ

What is Knox Counter?

Knox Counter is Samsung’s security service implemented in Samsung Galaxy devices. Knox components activated within the device do not let the root applications to work properly, while the Knox counter implemented on the bootloader of Samsung Galaxy device records the number of custom installations. Default value for Knox counter is 0, after voiding it becomes 0x1. Flashing any custom recovery or CF-Autoroot through Odin trips the Knox counter and users are not eligible for claiming the warranty of their device anymore. Samsung introduced Knox counter with the Galaxy Note 3. Thefeature made its way to other devices with software updates later on.

What is Root Access?

Rooting your phone gives you complete access over all the data which is apparently locked by the manufacturers or carriers. This includes removal of the factory restrictions and making changes to the internal system and the operating system. Gaining the root access gives you the privileges to install various applications to enhance the performance of your device, allows you to remove the built-in applications/programs, helps you to upgrade the battery life of your device & install the apps which require the root access for the proper functionality and modify your device in so many other ways e.g using mods and custom roms.

Don’t forget to checkout the top ten root applications!

Root At&t Galaxy S6 Edge G925A Without Tripping Knox

Root At&t Galaxy S6 Edge G925A Without Tripping Knox

At&t Galaxy S6 Edge users have been waiting for the root access to come their way since the device started hitting their pockets. The good news has just come today. XDA senior member idler1984, who rooted a number of Galaxy S6 variants 3 days back has now successfully achieved root access on our beloved At&t Galaxy S6 Edge as well. The cake on cream is, idler1984’s PINGPONG Root Tool doesn’t trip the Knox counter and thus keeps the warranty of the device safe and secure. The tool doesn’t hurt the bootloader of the device in anyway.  This is a great development as the carriers like At&t and Verizon make it too tough for developers to gain root access on their devices.Samsung-Galaxy-S6-edge-official-images

Now that the root access is available, you’re all good to explore the open-nature Android OS running on your device in the best possible ways. The root application will let you root the device in just one tap. In case you’re still wondering how you will be able to do this, the following guide is going to help you. We will root At&t Galaxy S6 Edge G925A without tripping the Knox counter. Let’s go ahead and get it done now.

Some Important Instructions

  • This tool will work for At&t Galaxy S6 Edge G925A running the firmware build UCU1AOCE. Trying it on any other firmware may result in bricking your device.
  • This tool is safe and secure. Using it to root your device will not harm it in any way, neither will it void the warranty of your device.

How To Root At&t Galaxy S6 Edge G925A Without Tripping Knox Using PingPong

  1. Download pingpongroot_beta5.1.apk
  2. Copy the downloaded APK file to your phone.
  3. Now go to settings > system > security > all unknown sources.
  4. Open file manager and locate the downloaded APK file.
  5. Tap the APK file and follow on-screen instructions to complete installation.
  6. Once done, open the installed PINGPONG ROOT application from the app drawer.
  7. PINGPONG Root will now automatically install SuperSU.
  8. Once SuperSU is installed, in order to activate it tap “Open”.
  9. SuperSu will display an error message and exit back to PINGPONG Root. This is normaly, so no need to worry about anything.
  10. Once you are in PINGPONG ROOT , tap the “Get Root” button now and see the magic!
  11. Reboot your device once done.
  12. You may uninstall PINGPONG application after rooting your device successfully.
  13. That’s it. Pretty easy, isn’t it?
  14. Also install BusyBox from Play Store.
  15. Verify root access using Root Checker.
  16. That’s all. You’re now set to unleash the open source nature of Android.

11198415_10205921985661421_1780252442_n

That’s all.


FAQ

What is Knox Counter?

Knox Counter is Samsung’s security service implemented in Samsung Galaxy devices. Knox components activated within the device do not let the root applications to work properly, while the Knox counter implemented on the bootloader of Samsung Galaxy device records the number of custom installations. Default value for Knox counter is 0, after voiding it becomes 0x1. Flashing any custom recovery or CF-Autoroot through Odin trips the Knox counter and users are not eligible for claiming the warranty of their device anymore. Samsung introduced Knox counter with the Galaxy Note 3. Thefeature made its way to other devices with software updates later on.

What is Root Access?

Rooting your phone gives you complete access over all the data which is apparently locked by the manufacturers or carriers. This includes removal of the factory restrictions and making changes to the internal system and the operating system. Gaining the root access gives you the privileges to install various applications to enhance the performance of your device, allows you to remove the built-in applications/programs, helps you to upgrade the battery life of your device & install the apps which require the root access for the proper functionality and modify your device in so many other ways e.g using mods and custom roms.

Don’t forget to checkout the top ten root applications!
Root At&t Galaxy S6 G920A Without Tripping Knox

Root At&t Galaxy S6 G920A Without Tripping Knox

At&t’s bootloader restrictions give developers a tough time every time when a new Samsung flagship device is released under At&t’s umbrella. It took a very long time for developers to achieve root access on the Galaxy S5, Android power users had to hold themselves back from testing out the potential of their device. People who have got At&t’s Galaxy S6, they seem very lucky in this regard. At&t’s Galaxy S6 G920A has been rooted successfully without tripping the Knox counter and without voiding the warrant of the device. This great work has been done by XDA senior member idler1984, who brought up his PINGPONG Root Tool that roots almost all variants of the Galaxy S6 & S6 Edge.Samsung-Galaxy-S6-edge-official-images

At&t Galaxy S6 users, who have been eagerly waiting for this milestone to be achieved, they can now root their device in just one tap and checkout the potential of their mighty Galaxy S6. Once you’ve rooted your device, you can make performance enhancements according to your liking. If you’re wondering how you can do this, you may scroll a little bit down and find out the method to root your At&t Galaxy S6 G920A without hurting the Knox counter and keeping the warranty safe and sound.

Some Important Instructions

  • This tool will work for At&t Galaxy S6 G920A running the firmware build UCU1AOCE. Trying it on any other firmware may result in bricking your device.
  • This tool is safe and secure. Using it to root your device will not harm it in any way, neither will it void the warranty of your device.

How To Root At&t Galaxy S6 G920A Without Tripping Knox Using PingPong

  1. Download pingpongroot_beta5.1.apk
  2. Copy the downloaded APK file to your phone.
  3. Now go to settings > system > security > all unknown sources.
  4. Open file manager and locate the downloaded APK file.
  5. Tap the APK file and follow on-screen instructions to complete installation.
  6. Once done, open the installed PINGPONG ROOT application from the app drawer.
  7. PINGPONG Root will now automatically install Super SU.
  8. Once SuperSU is installed, in order to activate it tap “Open”.
  9. SuperSu will display an error message and exit back to PINGPONG Root. This is normaly, so no need to worry about anything.
  10. Once you are in PINGPONG ROOT , tap the “Get Root” button now and see the magic!
  11. Reboot your device once done.
  12. You may uninstall PINGPONG application after rooting your device successfully.
  13. That’s it. Pretty easy, isn’t it?
  14. Also install BusyBox from Play Store.
  15. Verify root access using Root Checker.
  16. That’s all. You’re now set to unleash the open source nature of Android.

11198415_10205921985661421_1780252442_n

That’s all.

FAQ

What is Knox Counter?

Knox Counter is Samsung’s security service implemented in Samsung Galaxy devices. Knox components activated within the device do not let the root applications to work properly, while the Knox counter implemented on the bootloader of Samsung Galaxy device records the number of custom installations. Default value for Knox counter is 0, after voiding it becomes 0x1. Flashing any custom recovery or CF-Autoroot through Odin trips the Knox counter and users are not eligible for claiming the warranty of their device anymore. Samsung introduced Knox counter with the Galaxy Note 3. Thefeature made its way to other devices with software updates later on.

What is Root Access?

Rooting your phone gives you complete access over all the data which is apparently locked by the manufacturers or carriers. This includes removal of the factory restrictions and making changes to the internal system and the operating system. Gaining the root access gives you the privileges to install various applications to enhance the performance of your device, allows you to remove the built-in applications/programs, helps you to upgrade the battery life of your device & install the apps which require the root access for the proper functionality and modify your device in so many other ways e.g using mods and custom roms.

Don’t forget to checkout the top ten root applications!
Root Verizon Galaxy S6 Edge G925V Without Tripping Knox

0
Root Verizon Galaxy S6 Edge G925V Without Tripping Knox

Good news for Verizon Galaxy S6 Edge owners! You can now root your device without the fear of loosing warranty of your device and also without causing any damage to the Knox counter.

Few days back, XDA senior member idler1984 came up with his little tool named as PingPong Root Tool. The tool rooted a variety of Galaxy S6 variants without tripping Knox counter. The tool was expected for Galaxy S6 Edge and also for the variants that it missed initially. Missing variants included At&t & Verizon. Both these carriers lock the bootloaders of their devices and it becomes pretty tough for developers to achieve root access on any device from these two carriers specifically. With PingPong Root Tool, the problem seems to be resolved. PingPong Root Tool now supports Galaxy S6 Edge. The tool also supports Galaxy S6 & S6 Edge for Verizon & At&t. This is a great news for Android power users who have got these variants and have been anxiously waiting for root access to get the best out of their devices.Samsung-Galaxy-S6-edge-official-images

PingPong Root Tool roots the Verizon Galaxy S6 Edge G925V running Android 5.0.2 Lollipop VRU1AOC3 firmware without tripping Knox and without voiding the warranty of the device. Once you’ve rooted the device, you can use root specific applications to customize your device at your best. You can also load custom recoveries on your device using applications like FlashFire, Flashify etc. You can unleash the power of your Verizon Galaxy S6 Edge in just one tap. Wondering how? Well, that’s what we are going to do in the following guide. We will root the Verizon Galaxy S6 Edge G925V using PingPong Root Tool keeping the Knox counter safe and sound.

Some Important Instructions

  • This tool will work for Verizon Galaxy S6 Edge G925V running the firmware build VRU1AOC3. Trying it on any other firmware may result in bricking your device.
  • This tool is safe and secure. Using it to root your device will not harm it in any way, neither will it void the warranty of your device.

How To Root Verizon Galaxy S6 Edge G925V Without Tripping Knox Using PingPong

  1. Download pingpongroot_beta5.1.apk
  2. Copy the downloaded APK file to your phone.
  3. Now go to settings > system > security > all unknown sources.
  4. Open file manager and locate the downloaded APK file.
  5. Tap the APK file and follow on-screen instructions to complete installation.
  6. Once done, open the installed PINGPONG ROOT application from the app drawer.
  7. PINGPONG Root will now automatically install Super SU.
  8. Once SuperSU is installed, in order to activate it tap “Open”.
  9. SuperSu will display an error message and exit back to PINGPONG Root. This is normaly, so no need to worry about anything.
  10. Once you are in PINGPONG ROOT , tap the “Get Root” button now and see the magic!
  11. Reboot your device once done.
  12. You may uninstall PINGPONG application after rooting your device successfully.
  13. That’s it. Pretty easy, isn’t it?
  14. Also install BusyBox from Play Store.
  15. Verify root access using Root Checker.
  16. That’s all. You’re now set to unleash the open source nature of Android.

11198415_10205921985661421_1780252442_n

That’s all.

Root Verizon Galaxy S6 G920V Without Tripping Knox

0
Root Verizon Galaxy S6 G920V Without Tripping Knox

Great news for Verizon Galaxy S6 owners. The milestone for rooting Verizon Galaxy S6 G920V without tripping Knox counter has been achieved by XDA senior member idler1984. A few days back idler1984 came up with his little application named as PingPong Root Tool that rooted a long list of Galaxy S6 variants. As it was expected, developer successfully managed to root the carrier branded phones, specially Verizon and At&t Galaxy S6 without voiding the warranty. It took a very long time for developers to achieve root on At&t & Verizon Galaxy S5, while the development for Galaxy S6 happened way faster.

G920V Verizon Galaxy S6 owners who have been anxiously waiting for the root method to come up, they may go ahead now. Using PingPong Root Tool, you can root your device in just one tap and you are all set to unleash the vast world of Open-Nature Android platform. Let’s go ahead and learn how you can root your Verizon Galaxy S6 G920V without tripping the Knox counter and also without voiding its warranty.Samsung-Galaxy-S6-Official-1-1280x2200 (1)

Some Important Instructions

  • This tool will work for Verizon Galaxy S6 G920V running the firmware build VRU1AOC3. Trying it on any other firmware may result in bricking your device.
  • This tool is safe and secure. Using it to root your device will not harm it in any way, neither will it void the warranty of your device.

How To Root Verizon Galaxy S6 G920V Without Tripping Knox Using PingPong

  1. Download pingpongroot_beta5.1.apk
  2. Copy the downloaded APK file to your phone.
  3. Now go to settings > system > security > all unknown sources.
  4. Open file manager and locate the downloaded APK file.
  5. Tap the APK file and follow on-screen instructions to complete installation.
  6. Once done, open the installed PINGPONG ROOT application from the app drawer.
  7. PINGPONG Root will now automatically install Super SU.
  8. Once SuperSU is installed, in order to activate it tap “Open”.
  9. SuperSu will display an error message and exit back to PINGPONG Root. This is normaly, so no need to worry about anything.
  10. Once you are in PINGPONG ROOT , tap the “Get Root” button now and see the magic!
  11. Reboot your device once done.
  12. You may uninstall PINGPONG application after rooting your device successfully.
  13. That’s it. Pretty easy, isn’t it?
  14. Also install BusyBox from Play Store.
  15. Verify root access using Root Checker.
  16. That’s all. You’re now set to unleash the open source nature of Android.

11198415_10205921985661421_1780252442_n

That’s all.

How to Reboot Galaxy S6 & S6 Edge In Recovery, Download Mode

0
How to Reboot Galaxy S6 & S6 Edge In Recovery, Download Mode

Samsung’s Galaxy S6 and S6 Edge are undoubtedly the most brilliant Galaxies yet. Both of the devices sport some top-notch specifications packed inside a premium metal build. Samsung has learnt well from the past and the improvements can be seen clearly in the form of Galaxy S6 and S6 Edge. Both these devices have a 5.1-inch Quad HD screen on the front having a 5 MP shooter fixed atop. At the back a 16 MP shooter can be found accompanied by a Flash LED and a Heart Rate monitor. Inside the device Samsung used its own Exynos 7420 64 bit Chipset, A 3 GB RAM and under the hood a 2550/2600 mAh battery can be found. Samsung has worked a lot on the devices’ build and look. Galaxy S6 Edge has become a choice for millions of users and eventually won Samsung all the lost respect back. S6 Edge’s dual edge display makes it stunning.

Now that Samsung has done this job in a great way, Samsung has made some compromises as well. The biggest compromise is the installation of an in-built battery. Users can no longer plug the battery out and switch of their device instantly or restart it if the device has hung. The devices uses the same old methods to boot into recovery and download modes, but restarting the device from recovery and download mode may become a real hiccup.

When you have booted your device into recovery mode or download mode, keeping the power key for a very long time won’t reboot it. The device doesn’t have a removable battery, so removing the battery option doesn’t exist here. How to restart the device then? Well, that’s what we are going to have a look at. In the following guide we will learn how to boot Galaxy S6 and Galaxy S6 Edge into recovery and download modes. We will also learn how to reboot device when you’re stuck in these modes.

How To Boot Into Recovery Mode On Galaxy S6 & S6 Edge

  1. Turn off your device by long pressing the power key.
  2. Now turn it on by pressing and holding Volume Up + Home + Power Key.
  3. Leave the keys as soon as your device boots up.
  4. You should see the recovery mode now.
  5.  Use volume up and down keys to navigate through recovery and power key to make selections.
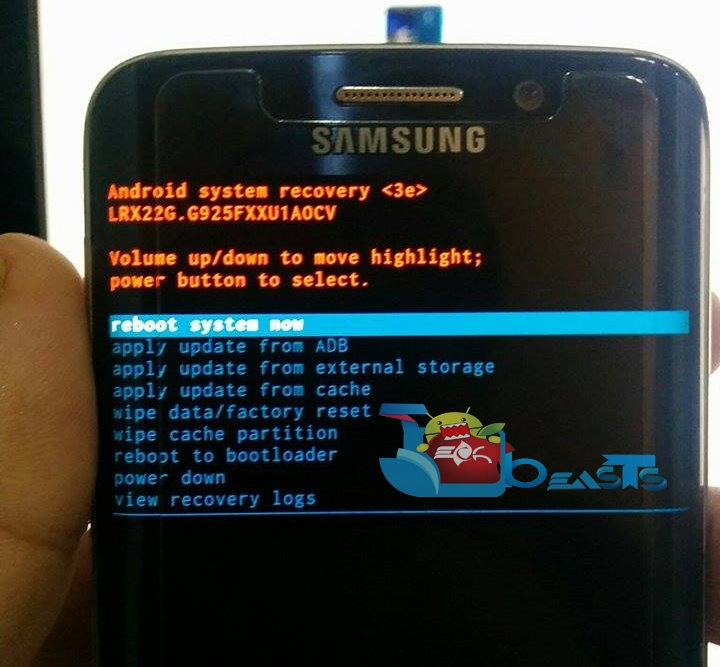
  6. That’s all.  Samsung-Galaxy-S6-edge-Recovery11210253_10205932410602038_1658359170_n

How to Boot Into Download Mode On Galaxy S6 & S6 Edge

  1. Turn off your device by long pressing the power key.
  2. Now turn it on by pressing and holding Volume Down + Power + Home Key.
  3. Once your device boots up leave the keys.
  4. Now press the Volume Up key to continue.
  5. You’re in download mode now and all set to flash your desired files.Samsung-Galaxy-S6-edge-downloadScreenshot_2-horz

How To Reboot Galaxy S6 & Galaxy S6 Edge From Recovery / Download Mode

There’s an option to reboot the device in recovery mode, but this can become a hiccup when you’re in the download mode. Rebooting the device is a bit trick.

  • While you’re stuck in download or recovery mode and you want to reboot your device you need press and hold Volume Up + Volume Down + Power Key and wait for a few seconds to reboot your device.

Samsung-Galaxy-S6-edge-reboot

That’s all!

Install Android Lollipop On Verizon Galaxy S5 G900V, Root & Enable Native Tethering

Install Android Lollipop On Verizon Galaxy S5 G900V, Root & Enable Native Tethering

Samsung is rolling out the biggest update of Android, the Android 5.0 Lollipop to its mainstream devices slowly. Android 5.0 Lollipop update hit the Galaxy S5 in the Galaxy lineup first of all. The update carried some major changes including the new UI. Samsung revamped TouchWiz according to Google’s new Material Design. New features like notifications on the lock screen, multi-user and guest modes made their way to the device. A number of other improvements are there that the users may come across upon getting this update.14

Android 5.0 Lollipop sure is the cool-most Android update yet and many users would love to get it right away, but it takes a lot of time for manufacturers to compile up new software, and then it takes long enough for carriers to roll out the update for their variants. Samsung rolled out the update for S5 months ago, and it took a while for Verizon to cook the all new Android Lollipop for its Galaxy S5 G900V. Its been a month since the update is out for the Verizon users now, but many of the users may have not updated their device yet due to certain reasons. If you haven’t received this update, or you haven’t updated the device just because of the fear of loosing root, you may have the solution right now.

We are going to flash the official update OTA file to update the Verizon Galaxy S5 G900V to stock Android 5.0 Lollipop. If you’re an Android enthusiast who would love to unleash the real power of Android Lollipop, you may use the second method that will help you to flash pre-rooted Android 5.0 Lollipop on your G900V. This guide will also help you to enable Native (WiFi) Tethering/Hotspot on your Verizon Galaxy S5 G900V running Android 5.0 Lollipop. 

Let’s begin with the method now.

Early Preparations:

  1. This guide is intended for Verizon Galaxy S5 G900V owners only.
  2. Your device’s battery should be charged at least over 50% to avoid power issues during the flashing process.
  3. Make sure that you’ve already backed all of your important contacts, call logs, sms messages. Also backup your important media content.
  4. Do not forget to backup EFS of your Verizon Galaxy S5. We also recommend backing up Nandroid if you’ve flashed a custom  recovery on your device.
  5. Non of these methods will void the warranty of your phone or trip the Knox counter. Follow the instructions carefully, and make sure that you do everything on your own responsibility. In case a mishap occurs, we or the device manufacturers may not be held responsible.

Install Android 5.0 Lollipop Stock On Your Verizon Galaxy S5 G900V [Stock – No Root]

For using this method, your device must be running pure stock Android 5.0 Lollipop firmware with the build number VRU1BOA8. This guide will only help you to flash the latest available Android 5.0 update with the build number VRU1BOC4 on your Verizon Galaxy S5 G900V. The second method will help you to update your device to Android 5.0 Lollipop from any lower version of Android.

  1. Download OA8-OC4_update.zip.
  2. Rename the downloaded file and update.zip and copy it to your phone’s external SD card.
  3. Now boot your phone into stock recovery. To do so turn off your device completely. Now turn it on by pressing and holding Volume Up + Home + Power Key. Leave the keys as your phone turns on.
  4. Now using the Volume Up & Down keys select the options “apply update from external storage > select the update.zip file > select yes” and wait for the file to be flashed now.
  5. Once done, your device should be running on pure stock Android 5.0 Lollipop OC4 firmware.

How To Install Android 5.0 Lollipop On Verizon Galaxy S5 G900V Keeping Root

This method will help you to install pre-rooted Android 5.0 Lollipop OC6 update on your Verizon Galaxy S5. You can update your device from whatever firmware you are running previously, but you need to have your device rooted prior to flash this firmware. This method will not trip your knox counter and your warranty won’t be void.

  • If your device is currently running Android 4.4.2 KitKat, you can root it using TowelRoot.
  • If your device is currently running Android 5.0 Lollipop OC4 firmware, you need to flash a different firmware and root it. After that you can update it using the method listed below.
  • You need to flash this G900VVRU1ANCG_Full_Odin.rar firmware using this guide.
  • Once you’ve installed the firmware linked above, you can root your device using TowelRoot.


  1. Instal FlashFire app, you must follow these steps to install FlashFire.
    • Join Android-FlashFire community on Google+.
    • Now open FlashFire Google Play Store link and hit “Become a beta tester”.
    • It will take you to the installation page now, you can install it easily.
    • You may install it using the FlashFire APK if you’re having difficulties with the procedure explained above.
  2. Now download the firmware file G900V_OC4_Stock_Rooted_ROM.zip.
  3. Copy the downloaded .zip file to your phone’s SD card now.
  4. Now open the FlashFire App that you just installed on your device.
  5. Tap “Agree” to terms and conditions and allow the application for root privileges.
  6. Tap the “+” button twice in the lower right corner of FlashFire in order to bring up the actions menu.
  7. Now tap “Flash OTA or Zip” and select the G900V_OC4_Stock_Rooted_ROM.zip file. FlashFire will now scan the file.
  8. In the next screen, leave the Auto-mount option un-checked and press the tick mark on the top-right corner.
  9. In the main settings, uncheck all options under “EverRoot” and use Default Reboot settings.
  10.  Do not touch anything else, follow these instructions to the letter.
  11. Once you’re done with all this, you’re good to go now. Tap the “lightening” button on the lower-left corner now.
  12. That’s all. Sit back and wait for the application to do the job. It will take around 10-15 minutes for your device to reboot and it will be running on rooted Android 5.0 Lollipop.

How To Enable WiFi Tethering On Your Verizon Galaxy S5 G900V Running Lollipop

  1. Download G900V_OC4_TetherAddOn.zip and copy it to your phone’s SD card.
  2. Open FlashFire and Tap the “+” button on the lower right corner.
  3. Select the “Flash OTA or Zip” option and select the TetherAddOn.zip file. FlashFire will scan the file.
  4. Do not touch any other options in FlashFire and tap the lightening button now.
  5. Wait for a while till FlashFire flashes the file and reboots your device.
  6. You can now enable WiFi hotspot on your Verizon Galaxy S5. That’s all.

That’s all with this guide. If you face any kind of issues following any of the methods listed above, make sure that you reach us out through the comment box below. We will try our best to help you out. Thank you.

Credits: Rooted Firmware: muniz_ri | Stock firmware: ChadH42

Install TWRP & Root T-Mobile Galaxy S6 Edge G925T

Install TWRP & Root T-Mobile Galaxy S6 Edge G925T

With the Galaxy S6 Edge, Samsung managed to pull the curtains off from the most beautiful Galaxy yet. Galaxy S6 Edge’s dual edge display packed up inside a metal build makes it extremely beautiful and gives it a great premium feel. Galaxy S6 Edge occupies some mighty specifications which include a 5.1-inch QHD display with a 5 MP camera on the front. A 16 MP shooter is fixed at the back. Samsung has used its very own Exynos 7420 Octa-Core CPU to power this device up. A RAM of 3 GB is fixed inside. Samsung has made the best use of the Edges on this device. It can be used for notifications or news feeds. 

Galaxy S6 Edge is now available through all the carriers as well. T-Mobile’s Galaxy S6 Edge carries the model number G925T. Users who have got or who are ready to get their T-Mobile Galaxy S6 Edge, they may not be able to stick with all-things-stock on their device and they may want to push some custom stuff into their device. Luckily, T-Mobile doesn’t put any restrictions on the bootloader. Galaxy S6 Edge from T-Mobile has an unlocked bootloader, you can load a custom recovery easily into the device but only if you have one. TWRP recovery came up pretty early for all variants of the Galaxy S6, which also worked for some variants of the Galaxy S6 Edge. But the TWRP recovery which worked for T-Mobile S6 didn’t work for T-Mobile S6 Edge. XDA developer recognized developer bigbiff seems to have this issue resolved and with a few compromises brought up the TWRP recovery for T-Mobile Galaxy S6.T Mobile S6 Edge TWRP

The recovery will allow users to perform all basic functions including flashing zip files, creating and restoring Nandroid backup etc. The only bug at the moment is in the Reboot button, it will reboot you into the recovery regardless of the option which you tap. But it doesn’t seem a great deal here as you can always use power key to reboot your device. Another issue that was faced by some users was the deep sleep issue. Using a custom recovery didn’t let the device go into deep sleep mode and users had to revert back to stock recovery. this issue also seems to be resolved by means of a kernel issue brought up by XDA senior member  eousphoros. So, you’re all good to load a custom recovery on your T-Mobile Galaxy S6 Edge and tweak it to get the maximum out of it.

In the on-going guide we will flash the TWRP 2.8.6.0 recovery on our beloved T-Mobile Galaxy S6 Edge G925T. We will also root the device after flashing the recovery. Let’s go through some quick early preparations and get it done.

Early preparations & instructions

  1. After following this guide, you will be done with
    1. TWRP Recovery and root Galaxy S6 Edge G925T [T-Mobile]
  2. Do not try this guide on any other device. Check your device’s model number under settings > general / more > about device. Trying this method on any other device will result in bricking it.
  3. Make sure that your phone’s battery is charged at least over 50%. This is recommended in order to avoid power issues during the installation process.
  4. Enable USB debugging mode on your device. To do so, you need to enable developer options first. Go to settings > system > about device > tap build number for 7 times. You will have developer options enabled under settings > system > developer options. Open developer options now and enable USB debugging mode.
  5. Use original data cable to establish connection between your PC and your phone.
  6. While using Odin3, disable Samsung Kies, Windows Firewall or any Anti-Virus if you’ve enabled.
  7. To be on the safe side, backup your contacts, call logs, text messages and copy the important media content to your PC.
  8. Download the files properly for your device and follow the instructions to the letter to avoid mishap.

Disclaimer: The methods involved in flashing custom recoveries, roms and rooting your phone are highly custom and may result in bricking your device, and has nothing to do with Google or the device manufacturer that is SAMSUNG in our case. Also rooting your device will void its warranty and you will be no longer eligible for any kind of free device services by the manufacturers/warranty providers. In case of any mishap we may not be held responsible. Follow these instructions to the letter to avoid any mishap or bricking. Make sure that whatever you do, you are doing it at your risk.


Required Downloads & Installations

How To Install TWRP Recovery On Your T-Mobile Galaxy S6 Edge G925T & Root It

  1. Copy SuperSu.zip file to your phone’s internal or external storage.
  2. Open Odin3 V3.10.6.exe that you extracted on your PC.
  3. Put your phone in download mode now. To do so, turn it off completely. Now turn it on by pressing and holding Volume Down + Home + Power Key. Once your phone boots up, press the Volume Up key to continue.
  4. Connect your phone to your PC now. The ID:COM box in the top-left corner of Odin3 should  turn blue. This indicates that your phone is connected properly.
  5. Now click the “AP” tab in Odin and select the twrp-2.8.6.0-zeroltetmo.img.tar file. It will take a second or two for Odin3 to load this file.
  6. If the Auto-reboot option is unticked, tick it. Leave all other options in Odin3 as they are.Odin 3.10.6 Explained_Techbeasts
  7. Now you’re all set to flash the recovery. Just click the start button in Odin3 and sit back.
  8. Once the process box above ID:COM box shows green light and flashing process is finished, disconnect your device. Let it reboot
  9. Now turn off your device properly as we are going to boot into recovery mode.
  10. Now turn it on by pressing and holding Volume Up + Home + Power Key. This will boot your device in recovery mode. It should be TWRP recovery that you just installed.
  11. Now in TWRP recovery, select Install > locate the SuperSu.zip file and flash it.
  12. Once flashed, reboot your device.
  13. Checkout the SuperSu in application drawer. Also install BusyBox from Play Store.
  14. Verify root access using Root Checker.
  15. That’s all. You’re now set to unleash the open source nature of Android.

Deep Sleep Mode Issue Solution

Users facing deep sleep mode issue can simply resolve it using the following instructions.

  1. Download newbootv3.img file.
  2. Copy the downloaded file to your phone’s sd card.
  3. Flash the newbootv3.img file using Flashify.

Just in case you’re facing any difficulties following this procedure or you’re stuck with something, feel free to reach me out in the comment box below. Thank you.

Credits: bigbiff |  eousphoros

Samsung Galaxy Note 2 Android Lollipop Update Confrmed

0
Samsung Galaxy Note 2 Android Lollipop Update Confrmed

Its been quite a while since the Android 5.0 Lollipop is rolling out for Samsung’s past flagship devices. Samsung has update the Galaxy S4, Galaxy S5, Galaxy Note 3, Galaxy Note 4 and even the Galaxy A3 A300F to Android 5.0 Lollipop, but one of the best phablets which brought Samsung a lot of respect is yet to see the update. We are talking about the Galaxy Note 2. Some time ago, Samsung Poland gave the users hints that the Galaxy Note 2 will get the Android 5.0 Lollipop, but later on Samsung Arabia told some users in response to their queries that the Galaxy Note 2 will not get Android 5.0 Lollipop update due to stability issues. This caused a lot of confusion and it was pretty much hard to know whether the Galaxy Note 2 will get the sweetness of Lollipop or not.

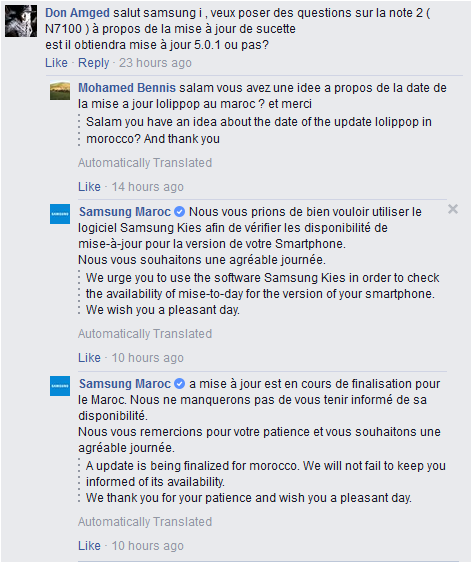
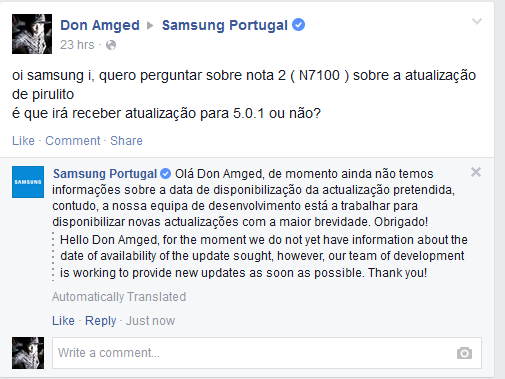
Now the update has been confirmed in three different regions through Samsung’s region specific pages. This comes from the official fan pages of Samsung Denmark, Samsung Morocco and Samsung Portugal. According to Samsung Morocco, Samsung Galaxy Note 2’s Android Lollipop update is being finalized, Samsung Portugal says that the date is not known yet while Samsung Denmark says that the Galaxy Note 2 will get Android 5.0.1 Lollipop update. Although this doesn’t give us an idea and estimated time for the update to arrive, but it does show that Samsung’s developers are working hard enough to bring this update to our beloved Galaxy Note 2.

Samsung-Galaxy-Note-2-Android-5.0-Lollipop-Update-Denmark Samsung-Galaxy-Note-2-Android-5.0-Lollipop-Update-Morocco Samsung-Galaxy-Note-2-Android-5.0-Lollipop-Update-Portugal

Via: Sammobile

Install TWRP & Root Sprint Galaxy S6 Edge G925P

Install TWRP & Root Sprint Galaxy S6 Edge G925P

Galaxy S6 Edge for Sprint is making its way to the users now. Like T-Mobile, Sprint also pushes an unlocked bootloader in its exclusive devices and users do not have to go through any restrictions to make tweaks to their devices. Custom ROMs, MODs and tweaks will be making their way to the Galaxy S6 Edge for Sprint pretty soon, but to load anything custom on your device you will need a custom recovery. Out of the two famous recoveries (CWM & TWRP), TWRP is already available for almost all variants of the Galaxy S6, the recovery didn’t come to the Edge variant of the device particularly. Since the Galaxy S6 and Galaxy S6 Edge use same hardware & software architecture, the recovery for Galaxy S6 also worked for some variants of the Galaxy S6 Edge, but the recovery for Sprint Galaxy S6 did not work on Sprint Galaxy S6 Edge. Recently XDA senior member Soooperstar brought up the modified version of Chinese TWRP recovery, that was reported to be working on Sprint S6 Edge by a number of users. The recovery initially had the Chinese language, but an English version of the recovery is already up and available.

If you’re looking for a custom recovery for your S6 Edge, you may have spotted the right place already. Without any further discussion we will proceed to the recovery installation guide and root for the Sprint Galaxy S6 Edge now.Sprints-Samsung-Galaxy-S6-and-S6-edge-start-shipping-on-April-6

Early preparations & instructions

  1. After following this guide, you will be done with
    1. TWRP Recovery and root Galaxy S6 Edge G925P [Sprint]
  2. Do not try this guide on any other device. Check your device’s model number under settings > general / more > about device. Trying this method on any other device will result in bricking it.
  3. Make sure that your phone’s battery is charged at least over 50%. This is recommended in order to avoid power issues during the installation process.
  4. Enable USB debugging mode on your device. To do so, you need to enable developer options first. Go to settings > system > about device > tap build number for 7 times. You will have developer options enabled under settings > system > developer options. Open developer options now and enable USB debugging mode.
  5. Use original data cable to establish connection between your PC and your phone.
  6. While using Odin3, disable Samsung Kies, Windows Firewall or any Anti-Virus if you’ve enabled.
  7. To be on the safe side, backup your contacts, call logs, text messages and copy the important media content to your PC.
  8. Download the files properly for your device and follow the instructions to the letter to avoid mishap.

Disclaimer: The methods involved in flashing custom recoveries, roms and rooting your phone are highly custom and may result in bricking your device, and has nothing to do with Google or the device manufacturer that is SAMSUNG in our case. Also rooting your device will void its warranty and you will be no longer eligible for any kind of free device services by the manufacturers/warranty providers. In case of any mishap we may not be held responsible. Follow these instructions to the letter to avoid any mishap or bricking. Make sure that whatever you do, you are doing it at your risk.


Required Downloads & Installations


How To Install TWRP Recovery On Your Sprint Galaxy S6 Edge G925P & Root It

  1. Copy SuperSu.zip file to your phone’s internal or external storage.
  2. Open Odin3 V3.10.6.exe that you extracted on your PC.
  3. Put your phone in download mode now. To do so, turn it off completely. Now turn it on by pressing and holding Volume Down + Home + Power Key. Once your phone boots up, press the Volume Up key to continue.
  4. Connect your phone to your PC now. The ID:COM box in the top-left corner of Odin3 should  turn blue. This indicates that your phone is connected properly.
  5. Now click the “AP” tab in Odin and select the TWRP-2.8.6.0-zerolte_ZiDroid.com.tar.md5r file. It will take a second or two for Odin3 to load this file.
  6. If the Auto-reboot option is ticked, untick it. Leave all other options in Odin3 as they are.Odin 3.10.6 Explained_Techbeasts
  7. Now you’re all set to flash the recovery. Just click the start button in Odin3 and sit back.
  8. Once the process box above ID:COM box shows green light and flashing process is finished, disconnect your device.
  9. Keep the power key+volume up + volume down pressed for a while and turn it off.
  10. Now turn it on by pressing and holding Volume Up + Home + Power Key. This will boot your device in recovery mode. It should be TWRP recovery that you just installed.
  11. Now in TWRP recovery, select Install > locate the SuperSu.zip file and flash it.
  12. Once flashed, reboot your device.
  13. Checkout the SuperSu in application drawer. Also install BusyBox from Play Store.
  14. Verify root access using Root Checker.
  15. That’s all. You’re now set to unleash the open source nature of Android.

Just in case you’re facing any difficulties following this procedure or you’re stuck with something, feel free to reach me out in the comment box below. Thank you.

Credits: Zi.Droid

Root Sprint Galaxy S6 G920P Without Tripping Knox

Root Sprint Galaxy S6 G920P Without Tripping Knox

Samsung introduced the Knox feature in the Galaxy devices with the Galaxy Note 3. The feature became a hurdle for flawless development and users greatly disliked the implementation of Knox counter on the bootloader of devices and also presence of Knox components inside the software. The Knox counter implemented on the bootloader records the number of custom installations on the device and if tripped from 0 to 0x1, it results in tripping the warranty of your device. This hiccup has been holding a number of users back from tweaking their device and getting the maximum out of it. Right now, many Sprint Galaxy S6 users might be sticking to the stock state of their device because of this Knox counter. Although the device can be easily rooted using CF-Autoroot, but it trips the Knox counter and not all the users like to void the warranty of their newly owned device in the very early stages. Samsung-Galaxy-S6-Official-1-1280x2200

If you’re one of those users who haven’t rooted their device yet, it may be the right time for you now. Just yesterday, a method to root the Sprint Galaxy S6 came up that does not  trip the Knox counter of the device and the warranty stays safe. XDA member idler1984 has built a small application named as PINGPONG Root Tool which can root your Sprint Galaxy S6 in just one tap. The application install KingUser and you can load all of your favorite root required applications later on. If you’ve started wondering how you will be able to use the application, you may read the following post as we are about to learn to root the Sprint Galaxy S6 SM-G920P without tripping Knox counter with this PINGPONG root tool.

  • This tool will work for Sprint Galaxy S6 running the firmware build G920PVPU1AOCF. Trying it on any other firmware may result in bricking your device.
  • This tool is safe and secure. Using it to root your device will not harm it in any way, neither will it void the warranty of your device.

How To Root Sprint Galaxy S6 Without Tripping Knox With PINGPONG

  1. Download pingpongroot_beta5.1.apk
  2. Copy the downloaded APK file to your phone.
  3. Now go to settings > system > security > all unknown sources.
  4. Open file manager and locate the downloaded APK file.
  5. Tap the APK file and follow on-screen instructions to complete the installation.
  6. Once done, open the installed PINGPONG ROOT application from the app drawer.
  7. PINGPONG Root will now automatically install Super SU.
  8. Once SuperSU is installed, in order to activate it tap “Open”.
  9. SuperSu will display an error message and exit back to PINGPONG Root. This is normaly, so no need to worry about anything.
  10. Once you are in PINGPONG ROOT , tap the “Get Root” button now and see the magic!
  11. Reboot your device once done.
  12. You may uninstall PINGPONG application after rooting your device successfully.
  13. That’s it. Pretty easy, isn’t it?
  14. Also install BusyBox from Play Store.
  15. Verify root access using Root Checker.
  16. That’s all. You’re now set to unleash the open source nature of Android.

11198415_10205921985661421_1780252442_n

That’s all.

Root T-Mobile Galaxy S6 Without Tripping Knox

0
Root T-Mobile Galaxy S6 Without Tripping Knox

T-Mobile users seem pretty lucky this time. The all new Samsung Galaxy S6 under the umbrella of T-Mobile can now be rooted without tripping the Knox counter. The development happened just yesterday by the XDA member idler1984. The tool is named as PINGPONG, which is a simple Android application. You can install it on your device and have it rooted in one simple tap. If you happen to be a T-Mobile S6 user and the fear of loosing warranty of your device after tripping the Knox counter is holding you back from unleashing the real power of your S6, then now is the time for you to get the best out of your device.Samsung-Galaxy-S6-Official-1-1280x2200

Let’s go through the method and gain the root access on our beloved T-Mobile Galaxy S6 G920T without tripping Knox counter using the PINGPONG root tool.

  • This tool will work for T-Mobile Galaxy S6 running the firmware build  G920TUVU1AOCG. Trying it on any other firmware may result in bricking your device.
  • This tool is safe and secure. Using it to root your device will not harm it in any way, neither will it void the warranty of your device.

How To Root T-Mobile Galaxy S6 Without Tripping Knox With PINGPONG

  1. Download pingpongroot_beta5.1.apk
  2. Copy the downloaded APK file to your phone.
  3. Now go to settings > system > security > all unknown sources.
  4. Open file manager and locate the downloaded APK file.
  5. Tap the APK file and follow on-screen instructions to complete installation.
  6. Once done, open the installed PINGPONG ROOT application from the app drawer.
  7. PINGPONG Root will now automatically install Super SU.
  8. Once SuperSU is installed, in order to activate it tap “Open”.
  9. SuperSu will display an error message and exit back to PINGPONG Root. This is normaly, so no need to worry about anything.
  10. Once you are in PINGPONG ROOT , tap the “Get Root” button now and see the magic!
  11. Reboot your device once done.
  12. You may uninstall PINGPONG application after rooting your device successfully.
  13. That’s it. Pretty easy, isn’t it?
  14. Also install BusyBox from Play Store.
  15. Verify root access using Root Checker.
  16. That’s all. You’re now set to unleash the open source nature of Android.

11198415_10205921985661421_1780252442_n

That’s all.