Home Blog Page 376

Root Samsung Galaxy S6 Without Tripping Knox With PINGPONG

0
Root Samsung Galaxy S6 Without Tripping Knox With PINGPONG

You read it right. Great news just came up for the Galaxy S6 users, and especially those who haven’t rooted their device yet because of the fear of tripping Knox counter and voiding the warranty. Galaxy S6 owners have turned out to be way luck as compared to the previous flagship Samsung Galaxy owners who didn’t see much of greater development in the very early stages. Just today, XDA member idler1984 came up with this great work packed up inside the tool named as PINGPONG Root Tool. The root tool allows users to root a number of variants of the Galaxy S6 on some specific firmwares. The tool is just one tap application which will root your device right away without getting you involved in any kind of complications. With the release of this tool, we expect that there will be much greater developments looking forward the luck Galaxy S6 owners. According to the developer, the tool might be available for Samsung Galaxy S6 Edge, HTC M9 and LG G Flex 2 soon, but right now its party time for the Galaxy S6 owners.

For those who don’t know about the Knox Counter, let’s have a brief overview of this little restriction put by Samsung. Knox Counter is Samsung’s security service implemented in Samsung Galaxy devices. Knox components activated within the device do not let the root applications to work properly, while the Knox counter implemented on the bootloader of Samsung Galaxy device records the number of custom installations. The default value for Knox counter is 0, after voiding it becomes 0x1. Flashing any custom recovery or CF-Autoroot through Odin trips the Knox counter and users are not eligible for claiming the warranty of their device anymore. Samsung introduced Knox counter with the Galaxy Note 3. The feature made its way to other devices with software updates later on. PINGPONG tool doesn’t require any Odin flashing. The tool roots the device in a single tap after being installed in the device so it will not trip Knox counter of the Galaxy S6’s supported variants.S6 PINGPONG

Let’s learn how you can root your Galaxy S6 using this PINGPONG Root Tool now.

Here’s a list of supported variants with supported ROM. Do not try this tool on any other firmware or a model number that is not listed here.

Samsung Galaxy S6 with following ROM versions:

Chinese Variant G9200 – G9200ZCU1AOD5
Chinese Variant G9200 – G9200ZHU1AOD3
Chinese Variant G9200 –  G9200ZHU1AOD9
US Cellular G920R4 – G920R4TYU1AOD3
Indian, Singapore, Latam Variant G920I – G920IDVU1AOD1
Global G920F – G920FXXU1AOCV
Sprint G920P – G920PVPU1AOCF
T-Mobile G920T – G920TUVU1AOCG
Global G920F – G920FXXU1AOBN
Global G920F –  G920FXXU1AODG
Chinese G9209 – G9209KEU1AOCI
Chinese G9209 – G9209KEU1AODA
Chinese G9208 – G9208ZMU1AOD5
Chinese G9208 – G9208ZMU1AOCI

Device List – Updated!

G9200ZCU1AOD5
G9200ZHU1AOD3
G9200ZHU1AOD9
G920R4TYU1AOD3
G920IDVU1AOD1
G920FXXU1AOCV
G920PVPU1AOCF
G920TUVU1AOCG
G920VVRU1AOC3
G920FXXU1AOBN
G920FXXU1AODG
G9209KEU1AOCI
G9209KEU1AODA
G9208ZMU1AOD5
G9208ZMU1AOCI
G920FXXU1AOD9
G920AUCU1AOCE
G920FXXU1AODE
G9200ZCU1AOD9
G920W8VLU1AOCG
G920FXXU1AOD4
G920R4TYU1AOCB
***new*** Use Download Data!
G920FXXU1AOCY
G920IDVU1AOC4
G920FXXU1AODI
G9209KEU1AOD5
G920IDVU1AOBQ

How To Root Galaxy S6 Without Tripping Knox With PINGPONG

  1. Download pingpongroot_beta5.1.apk
  2. Copy the downloaded APK file to your phone.
  3. Now go to settings > system > security > all unknown sources.
  4. Open the ile manager and locate the downloaded APK file.
  5. Tap the APK file and follow on-screen instructions to complete the installation.
  6. Once done, open the installed PINGPONG ROOT application from the app drawer.
  7. PINGPONG Root will now automatically install Super SU.
  8. Once SuperSU is installed, in order to activate it tap “Open”.
  9. SuperSu will display an error message and exit back to PINGPONG Root. This is normaly, so no need to worry about anything.
  10. Once you are in PINGPONG ROOT , tap the “Get Root” button now and see the magic!
  11. Reboot your device once done.
  12. You may uninstall PINGPONG application after rooting your device successfully.
  13. That’s it. Pretty easy, isn’t it?
  14. Also ,install BusyBox from Play Store.
  15. Verify root access using Root Checker.
  16. That’s all. You’re now set to unleash the open source nature of Android.

11198415_10205921985661421_1780252442_n

That’s all.

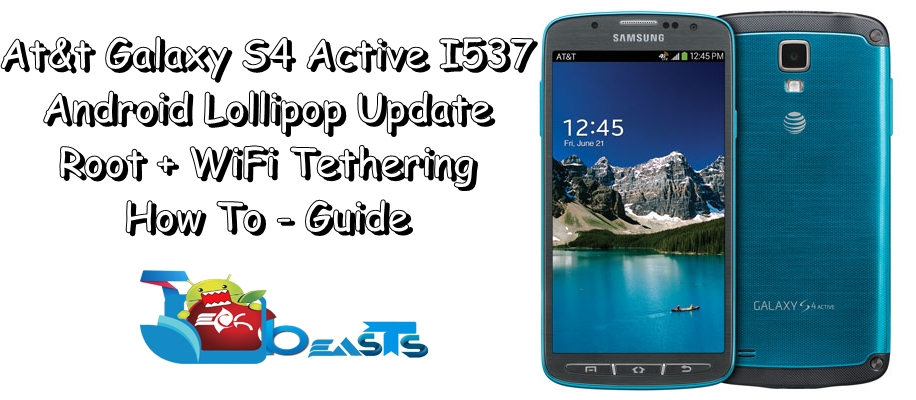
Install Android Lollipop On At&t Galaxy S4 Active I537, Root & Enable WiFi Tethering

Install Android Lollipop On At&t Galaxy S4 Active I537, Root & Enable WiFi Tethering

With the Galaxy S4 Active, Samsung started its new line of Active series and introduced a new trend. The Galaxy S4 Active carries some specifications from the original Galaxy but is waterproof and dust resistant. The device comes under the umbrella of At&t in the United States with the model number SGH-I537 . Good new for the At&t Galaxy S4 Active owners is, At&t has started updating this device to the long awaited Android 5.0.1 Lollipop. The update is available through OTA, but if you haven’t got it yet or you are a power user with a rooted device, you may have not updated your device yet and some of you may want to update the device manually. You may also want to root your device right away. In the on-going guide we have brought you the detailed method to update your At&t Galaxy S4 Active SGH I537 to Android 5.0.1 Lollipop I537UCUCOC6 firmware and root it.

The following guide will take you through two different methods. You can install stock Android 5.0.1 Lollipop on your S4 Active without root, and you can also install rooted Android 5.0.1 Lollipop on your Galaxy S4 Active. You will be able to enable WiFi tethering as well on your device running this latest Android 5.0.1 Lollipop. This is completely up to you. Let’s go through the method to install pure stock Lollipop firmware first.att-samsung-s4-active-network-unlock-code

Early Preparations:

  1. This guide is intended for At&t Galaxy S4 Active SGH-I537 owners only.
  2. Your device’s battery should be charged at least over 50% to avoid power issues during the flashing process.
  3. Make sure that you’ve already backed all of your important contacts, call logs, sms messages. Also backup your important media content.
  4. Do not forget to backup EFS of your Galaxy S4 Active. We also recommend backing up Nandroid if you’ve flashed a custom  recovery on your device.
  5. Non of these methods will void the warranty of your phone or trip the Knox counter. Follow the instructions carefully, and make sure that you do everything on your own responsibility. In case a mishap occurs, we or the device manufacturers may not be held responsible.

Install Android 5.0.1 Lollipop Stock On Your Galaxy S4 Active I537 [Stock – No Root]

The method to update your device to pure stock Android 5.0.1 Lollipop is pretty easy if you meet the requirements, but if you do not, it may get a little longer. In order to install this stock firmware on your device, you must be running stock Android 4.4.2 KitKat based on (NH3) build. You cannot apply this update if your device is running a newer firmware then the NH3 firmware. If your device is running on an older build number, you can easily update it to NH3 firmware. The method to update to NH3 is also listed below.

  • If your device is already running the NH3 firmware, you may skip the first 5  steps.
  • To update to NH3 firmware, we will first flash NE3 firmware on the device and then we will apply NH3 OTA update through stock recovery.
  1. Download SGH-I537UCUCNE3_v4.4.2_ATT_ALL.zip
  2. Flash the NE3 firmware on your At&t Galaxy S4 Active using this guide.
  3. Now download NE3toNH3.zip & unzip it. Find the 2400258.cfg file and rename it to update.zip.
  4. Now copy the update.zip file to your phone’s external SD card.
  5. Now boot your phone into stock recovery. To do so turn off your device completely. Now turn it on by pressing and holding Volume Up + Home + Power Key. Leave the keys as your phone turns on.
  6. Now using the Volume Up & Down keys select the options “apply update from external storage > select the update.zip file > select yes” and wait for the file to be flashed now.
  7. Once done, download this NH3toLollipop.zip and unzip it. You will find the 2400258.cfg file here as well, rename it to update.zip and copy it to your phone’s external SD card. Make sure that you have already flashed the NH3 update.zip file prior to flashing this file.
  8. Now once again boot your device into recovery mode and using the method in step 6, flash this update.zip file as well.
  9. Once done, your device should be running on pure stock Android 5.0.1 Lollipop OC6 firmware.

How To Install Android 5.0.1 Lollipop On Your At&t S4 Active Keeping Root

This method will help you to update your At&t S4 Active to Android 5.0.1 Lollipop pre-rooted firmware. This method will not void the Knox counter and warranty of your phone. You need to have your device rooted prior to use this method. You do need to be on a specific firmware to apply this update, you can use this method on whatever firmware you are running currently on your device.

Root your At&t Galaxy S4 Active using Towelroot – [The method linked here is for Galaxy S5, but the same method will work for your At&t S4 Active].

  1. InstallFlashFire app, you must follow these steps to install FlashFire.
    • Join Android-FlashFire community on Google+.
    • Now open FlashFire Google Play Store link and hit “Become a beta tester”.
    • It will take you to the installation page now, you can install it easily.
    • You may install it using the FlashFire APK if you’re having difficulties with the procedure explained above.
  2. Now download the firmware file I537_OC6_Stock_Rooted_ROM.zip.
  3. Copy the downloaded .zip file to your phone’s SD card now.
  4. Now open the FlashFire App that you just installed on your device.
  5. Tap “Agree” to terms and conditions and allow the application for root privileges.
  6. Tap the “+” button twice in the lower right corner of FlashFire in order to bring up the actions menu.
  7. Now tap “Flash OTA or Zip” and select the  I537_OC6_Stock_Rooted_ROM.zip file. FlashFire will now scan the file.
  8. In the next screen, leave the Auto-mount option un-checked and press the tick mark on the top-right corner.
  9. Do not touch anything else, follow these instructions to the letter.
  10. Once you’re done with all this, you’re good to go now. Tap the “lightening” button on the lower-left corner now.
  11. That’s all. Sit back and wait for the application to do the job. It will take around 10-15 minutes for your device to reboot and it will be running on rooted Android 5.0 Lollipop.

How To Enable WiFi Tethering On Your At&t Galaxy S4 I537 Running Lollipop

  1. Download I537_OC6_TetherAddOn.zip and copy it to your phone’s SD card.
  2. Open FlashFire and Tap the “+” button on the lower right corner.
  3. Select the “Flash OTA or Zip” option and select the TetherAddOn.zip file. FlashFire will scan the file.
  4. Do not touch any other options in FlashFire and tap the lightening button now.
  5. Wait for a while till FlashFire flashes the file and reboots your device.
  6. You can now enable WiFi hotspot on your At&t Galaxy S4 Active. That’s all.

That’s all with this guide. If you face any kind of issues following any of the methods listed above, make sure that you reach us out through the comment box below. We will try our best to help you out. Thank you.

Credits: Rooted Firmware: muniz_ri | Stock firmware:  Devo7v

Install TWRP Recovery & Root Galaxy S6 Edge G925F, G925I

Install TWRP Recovery & Root Galaxy S6 Edge G925F, G925I

Galaxy S6 Edge is Samsung’s best and the most beautiful Android device to the date. It has caught attention from users all across the world and grabbed space in all of the pockets. The two-edge display makes this device looks magnificent and the metal build adds to its charm. S6 Edge’s mighty specifications are good enough to experiment and get the most out of the all-new Android Lollipop running on it. Before you unleash the power of your device, you will need to gain root access and for flashing custom ROMs, recoveries and MODs you will need a custom recovery installed on your device. Luckily, the latest version of TWRP recovery has already landed in for the Galaxy S6 Edge G925F and D925I and it is pretty easy to gain root access on the device now. Wondering about the method? The following guide is going to help you.

Install TWRP Recovery & Root Galaxy S6 Edge G925F, G925I

Let’s go through some early preparations and then flash TWRP recovery on your Galaxy S6 Edge G925F & G925I. Also, we will root the device.

Early preparations & instructions

  1. After following this guide, you will be done with
    1. TWRP Recovery and root Galaxy S6 Edge G925F [Global]
    2. TWRP Recovery and root Galaxy S6 Edge G925I
  2. Do not try this guide on any other device. Check your device’s model number under settings > general / more > about the device. Trying this method on any other device will result in bricking it.
  3. Make sure that your phone’s battery is charged at least over 50%. This is recommended in order to avoid power issues during the installation process.
  4. Enable USB debugging mode on your device. To do so, you need to enable developer options first. Go to settings > system > about device > tap build number for 7 times. You will have developer options enabled under settings > system > developer options. Open developer options now and enable USB debugging mode.
  5. Use original data cable to establish a connection between your PC and your phone.
  6. While using Odin3, disable Samsung Kies, Windows Firewall or any Anti-Virus if you’ve enabled.
  7. To be on the safe side, backup your contacts, call logs, text messages and copy the important media content to your PC.
  8. Download the files properly for your device and follow the instructions to the letter to avoid a mishap.

Disclaimer: The methods involved in flashing custom recoveries, roms and rooting your phone are highly custom and may result in bricking your device, and has nothing to do with Google or the device manufacturer that is SAMSUNG in our case. Also rooting your device will void its warranty and you will be no longer eligible for any kind of free device services by the manufacturers/warranty providers. In case of any mishap we may not be held responsible. Follow these instructions to the letter to avoid any mishap or bricking. Make sure that whatever you do, you are doing it at your risk.

Update: Latest TWRP 3.2.3.0 Added as of October 2018.

Required Downloads & Installations

Samsung-Galaxy-S6-edgeHow To Install TWRP Recovery On Your Galaxy S6 Edge G925F, G925I & Root It

  1. Copy SuperSu.zip file to your phone’s internal or external storage.
  2. Open Odin3 V3.10.6.exe that you extracted on your PC.
  3. Put your phone in download mode now. To do so, turn it off completely. Now turn it on by pressing and holding Volume Down + Home + Power Key. Once your phone boots up, press the Volume Up key to continue.
  4. Connect your phone to your PC now. The ID:COM box in the top-left corner of Odin3 should turn blue. This indicates that your phone is connected properly.
  5. Now click the “AP” tab in Odin and select the twrp-2.8.6.0-zeroflte.img.tar file. It will take a second or two for Odin3 to load this file.
  6. If the Auto-reboot option is ticked, untick it. Leave all other options in Odin3 as they are.Odin 3.10.6 Explained_Techbeasts
  7. At this point, you’re all set to flash the recovery. Just click the start button in Odin3 and sit back.
  8. Once the process box above ID:COM box shows a green light and flashing process is finished, disconnect your device.
  9. Keep the power key pressed for a while and turn it off.
  10. Now turn it on by pressing and holding Volume Up + Home + Power Key. This will boot your device in recovery mode. It should be a TWRP recovery that you just installed.
  11. Now in TWRP recovery, select Install > locate the SuperSu.zip file and flash it.
  12. Once flashed, reboot your device.
  13. Check out the SuperSu in the application drawer. Also, install BusyBox from Play Store.
  14. Verify root access using Root Checker.
  15. That’s al. You’re now set to unleash the open source nature of Android.

Just in case you’re facing any difficulties following this procedure or you’re stuck with something, feel free to reach me out in the comment box below. Thank you.

Install Android 5.0.1 Lollipop On Canadian Galaxy S4 I337M & Root It

Install Android 5.0.1 Lollipop On Canadian Galaxy S4 I337M & Root It

The Galaxy S4 is one of the most lucky devices as it happens to pretty old but being updated to Android 5.0.1 Lollipop. Galaxy S4 debuted with Android Jelly Bean originally. It looks like Samsung wants to be very fair with the Galaxy S4 owners and doesn’t want to put them in any disappointment. As promised, Samsung started rolling out the Lollipop update start with the Exynos variant of the device. The update has hit a number of variants of the Galaxy S4 already and now is the time for the Canadian variant. This variant carries the model number SGH-I337M. The new firmware brings tons of goodies to the device. The most prominent change is in the UI department. As expected, Samsung has revamped the whole UI according to Google’s Material Design. Notification cards have been implemented on the lock-screen. Performance and battery life have been enhanced to a very good level.

The latest update is being rolled out to users over-the-air or through Samsung KIES, but if you are not seeing any traces of this update anytime soon at your end, you may want to update your device using some alternative method. The good new is, we have the alternative method here for you. In the following guide we will install the latest available Android 5.0.1 Lollipop on our beloved Canadian Galaxy S4 SGH-I337M. This guide will help you to update all Canadian variants of the Galaxy S4 i.e. Bell, Roger, Telus, Fido, Virgin, Sasktel & Koodo mobile Galaxy S4. After you have successfully updated your device to this latest firmware, some of you may want to root the device. We have also added the method to root the device running this latest Android 5.0.1 Lollipop. Let’s go through the guide and update & then root it.dvd-galaxy-s4

Early Preparations & Precautions

  • This guide is only for the Galaxy S4 I337M, the variants listed below. Do not try this on any other device. Make sure that you check your device’s model number in settings > system > about device.
    • Fido Mobile Galaxy S4 SGH-I337M
    • Telus Galaxy S4 SGH-I337M
    • Bell Galaxy S4 SGH-I337M
    • Rogers Galaxy S4 SGH-I337M
    • Virgin Mobile Galaxy S4 SGH-I337M
    • Sasktel Galaxy S4 SGH-I337M
    • Koodo Mobile Galaxy S4 SGH-I337M
  • Make sure that your batter has 50% of its battery. This is recommended in order to avoid any power issues during the installation process.
  • Enable USB debugging on your device. To do so, you need to enable developer options first by going to settings > system > about device > tap build number for 7 times. Once you’ve the developer options enabled under settings > system > developer options > enable USB debugging.
  • Backup all of your important stuff. This includes contacts, call logs, text messages and your important media content. This is important since you need to wipe your phone to achieve a neat and clean installation.
  • Make sure that you’ve backed up your EFS partition [Strongly recommended].
  • If your device has a custom recovery installed previously, you may create a Nandroid backup. Otherwise, skip this step.
  • Factory reset your phone by booting into recovery mode. To do so, turn off your phone completely. Now turn it on by pressing and holding Volume Up + Home + Power Key. Once you’re in recovery mode, wipe factory data.
  • While using Odin3, turn off Samsung Kies if you’ve installed it. Also turn off your Firewall or any Antivirus software if enabled.
  • Use original data cable to establish connection between your device and your PC.
  • This is official firmware and it won’t void the warranty of your phone. It will not cause any damage to your phone either.
  • Follow these instructions to the letter to make it happen successfully.

Required Downloads

  1. Download & Install Samsung USB drivers. MAC users do not need to install drivers or Samsung Kies.
  2. Download & extract Odin3 v3.10.6. MAC users may use JOdin.
  3. Download & extract firmware for your device.

How To Update Galaxy S4 SGH-I337M To Android 5.0.1 Lollipop Official Firmware

  1. Make sure that you’ve carefully prepared according to the instructions listed above. Also make sure that you’ve made the necessary downloads and installs as explained.
  2. Open Odin3 V3.10.6.exe on your PC. MAC users will use JOdin.
  3. Connect your phone to your PC or MAC in download mode now. To do so, turn off your phone completely first. Now turn it on by pressing and holding Volume Down + Home + Power Key. Once your phone turns on and shows you warning, press Volume Up to continue. You are in download mode now. Plug in the data-cable now. As soon as Odin3 detects your phone, the ID:COM bar in the top-right corner should turn blue or yellow depending upon your version of Odin.
  4. Load the downloaded and extracted firmware file, which should be in .tar format. To do so, click the “AP” tab and locate the extracted .tar firmware file. If you’re using an older version of Odin, you will use “PDA” tab to load the firmware file. Once you’ve selected the file, it will take a while for Odin to load it. Wait patiently at this point.
  5. If the Auto-reboot option is un-ticked, tick  it. Leave all other options as it is. The picture below can explain you further.Odin 3.10.6 Explained_Techbeasts
  6. Once you’re done with it according to the steps explained above, you’re set to flash the firmware now. Simply click the “Start” button now.
  7. This will start flashing the firmware on your device. It will take a few minutes for Odin to complete installation. Once the installation is finished, Odin will show “Finished” status in the installation box, the ID:COM bar will turn green now. Your device will reboot automatically if you ticked the Auto-reboot option before the installation. Disconnect your device now.
  8. If your device doesn’t reboot automatically, you may reboot it manually now. To do so, disconnect it from your PC and keep the power key pressed for a while and your device will turn off. Now turn it on by pressing power key only.
  9. For the first boot it may take up to 10 minutes, so hold on tighter. Once your device boots up, set it up and enjoy the all new Android 5.0.1 Lollipop on it. That’s all 🙂

Here’s How To Root Your Canadian Galaxy S4 Running Lollipop

Disclaimer: The methods involved in flashing custom recoveries, roms and rooting your phone are highly custom and may result in bricking your device, and has nothing to do with Google or the device manufacturer that is SAMSUNG in our case. Also rooting your device will void its warranty and you will be no longer eligible for any kind of free device services by the manufacturers/warranty providers. In case of any mishap we may not be held responsible. Follow these instructions to the letter to avoid any mishap or bricking. Make sure that whatever you do, you are doing it at your own responsibility.


Download & extract CF-Auto-Root-jfltecan-jfltevl-sghi337m.zip [extract the file once only.]

  1. Put your phone in download mode. To do so, turn it off completely. Now turn it on by pressing and holding Volume Down +Home + Power Key. Once it boots up and shows warning, press Volume Up to continue.
  2. Now open Odin3 v3.10.6.exe file on your PC.
  3. Click on “AP” tab in Odin and select the CF-Autoroot.tar file that you got after extracting the file above.
  4. Let Odin load the file and connect your phone to your PC in the meanwhile.
  5. If Aut0-reboot option is unticked in your Odin, tick it. Leave all other options untouched.Odin 3.10.6 Explained_Techbeasts
  6. As soon as Odin has detected your phone in download mode, the “ID:COM” box on the top-right corner will turn blue.
  7. Now click on the Start button. Odin will start flashing the Auto-Root file.
  8. As soon as the flashing ends, your phone will reboot.
  9. Once it has booted up, check out the SuperSu application in the app drawer. If it asks you to update SU binary, update it.
  10.  Also install BusyBox from Play Store.
  11. Verify root access using Root Checker.
  12. That’s all. You’re now set to unleash the open source nature of Android.

If you’re stuck with anything or facing any issues, make sure that you reach us out through the comment box below. We’d love to help you out. Thank you 🙂

Install CWM/TWRP & Root Xperia Z2 D6503/D6502 23.1.A.1.28 Firmware

Install CWM/TWRP & Root Xperia Z2 D6503/D6502 23.1.A.1.28 Firmware

Xperia Z2 is now being updated t0 the latest Android 5.0.2 Lollipop update. The new build number is 23.1.A.1.28. If you have updated your device and you happen to be an Android power user, you must be missing the root access on your device. Updating to the latest firmware wipes off the root access. If you’re eager to root your device once again now, you may calm down as you have already spotted the right place. We are going to root and install CWM + TWRP recovery our beloved Xperia Z2 D6503 & D6502 on Android 5.0.2 Lollipop 23.1.A.1.28 firmware keeping the bootloader locked/unlocked. The method is a little bit longer, all you need to do is, you need to follow the guide being very careful and it will go successful.

1. This is only for Sony Xperia Z2 D6503, D6502

This rooting method is only for the device mentioned above. Make sure that your model number matches the one listed above. To do so, go to Settings > About Device on your device and see your model number. Flashing this firmware on any other device will result in bricking it so make sure that you meet this requirement first of all.

2. Battery should be charged at least over 60%.

Make sure that your battery is charged enough to complete the flashing process. In case your battery is low and your device goes dead during the flashing process, you may end up soft bricking your device as it won’t complete the flashing process.

3. Backup everything!

Just to be on the safe side, you may consider backing up each and everything from your Android device. This is highly recommended so that in case anything goes wrong, you still have the access to all of your data and you can restore it immediately. You may backup everything as listed below.

4. Enable USB Debugging Mode on your device.

Enable USB debugging mode on your device. To do so, tap settings>developer options>USB debugging. If you can’t find developer options in settings, then tap settings > about device and tap “Build Number” for 7 times and you’ll get em’ activated under settings.

5. Install and setup Sony Flashtool.

You must have installed Sony Flashtool. Find the full guide here.

After installing Sony Flashtool, open the Flashtool folder from the drive where you installed it. Now open Flashtool>Drivers>Flashtool-drivers.exe and install the Flashtool, Fastboot & Xperia Z2 drivers from the list. If you do not find the Flashtool drivers in Flashmode, skip this step and install Sony PC Companion instead, for drivers support. [Important]

6. Use OEM data cable to establish connection.

Make sure that you use the phone’s original data cable to establish connection between your phone and the PC. Using a different data cable might result in interrupting the firmware installation.

7. Unlock Bootloader (Optional)

Use the following guide to unlock the bootloader of your Xperia device before proceeding.

Disclaimer: The methods involved in flashing custom recoveries, roms and rooting your phone are highly custom and may result in bricking your device, and has nothing to do with Google or the device manufacturer that is SONY in our case. Also rooting your device will void its warranty and you will be no longer eligible for any kind of free device services by the manufacturers/warranty providers. In case of any mishap we may not be held responsible. Follow these instructions to the letter to avoid any mishap or bricking. Make sure that whatever you do, you are doing it at your own responsibility.

Steps For Rooting Xperia Z2 D6503, D6502 23.1.A.1.28 Firmware

1. Downgrade to .167 Firmware and Root It

  1. If you have already updated your smartphone to Android 5.0.2 Lollipop, then you have to downgrade your device to KitKat OS and Root it.
  2. Use this guide to Install .167 firmware.
  3. Root using this guide.
  4. Now Install XZ Dual Recovery.
  5. Now phone is rooted, USB Debugging must be enabled.
  6. Download latest installer for Xperia Z2 from here. (Z2-lockeddualrecovery2.8.10-RELEASE.installer.zip)
  7. Connect phone to PC using OEM date cable and run install.bat.
  8. It will install the custom recovery.
  9. Now work here is done. Lets move on to next step.

2. Make A Pre-Rooted Flashable Firmware For .28 FTF

  1. Download PRF Creator and install on your system.
  2. Download SuperSU zip and place anywhere on PC.
  3. Download .28 FTF and place it anywhere on PC. [For D6502 | For D6503]
  4. Download Z2-lockeddualrecovery2.8.10-RELEASE.flashable.zip
  5. Now run PRFC and add all three required files in it.
  6. Then click on Create.
  7. Once the Flashable ROM is created, it will show the successful message.
  8. Do not touch any other option while creating the pre-rooted firmware.
  9. Now copy the pre-rooted firmware to the phone’s internal storage.
  10. Our work in this step is now done. Move on to next step.

3. Root and Install Recovery on Z2 D6503/D6502 5.0.2 Lollipop Firmware

  1. Custom recovery was installed in the first step.
  2. The pre-rooted firmware was created and copied to phone in next step.
  3. Now you have to turn off phone.
  4. Turn it on again and press volume up or down repeatedly to enter custom recovery.
  5. Click on install and locate the folder where you placed the flashable zip earlier.
  6. Tap on it and install it.
  7. Now reboot the phone.
  8. If phone is still connected to PC via USB cable, disconnect it.
  9. Now go back to the .28 ftf you downloaded in second step and copy it to /flashtool/fimrwares
  10. Open flashtool and click on lightning icon in the top left.
  11. Click on it and click on flashmode.
  12. Select the .28 firmware.
  13. In the right bar, in the exclude options, exclude System only while flashing. Leave every other options as it is.
  14. While flashtool prepares the software for flashing, turn off your phone.
  15. Keep the volume down button pressed and connect it to PC via USB cable.
  16. The button must be pressed during it.
  17. The phone will enter flashmode.
  18. Flashtool will automatically detect it and start flashing.
  19. After flashing phone will reboot and you will be done 🙂
  20. That’s all 🙂 Enjoy
  21. Now your phone has a dual custom recovery, root access and of course latest Android 5.0.2 Lollipop Firmware.

Got any questions? Ask me in the comments below

Install CWM/TWRP & Root Xperia Z3 Compact D5803/D5833 23.1.A.1.28 Firmware

Install CWM/TWRP & Root Xperia Z3 Compact D5803/D5833 23.1.A.1.28 Firmware

Xperia Z3 Compact is now being updated t0 the latest Android 5.0.2 Lollipop update. The new build number is 23.1.A.1.28. If you have updated your device and you happen to be an Android power user, you must be missing the root access on your device. Updating to the latest firmware wipes off the root access. If you’re eager to root your device once again now, you may calm down as you have already spotted the right place. We are going to root and install CWM + TWRP recovery our beloved Xperia Z3 Compact D5803 & D5833 on Android 5.0.2 Lollipop 23.1.A.1.28 firmware keeping the bootloader locked/unlocked. The method is a little bit longer, all you need to do is, you need to follow the guide being very careful and it will go successful.

1. This is only for Sony Xperia Z3 Compact D5803, D5833

This rooting method is only for the device mentioned above. Make sure that your model number matches the one listed above. To do so, go to Settings > About Device on your device and see your model number. Flashing this firmware on any other device will result in bricking it so make sure that you meet this requirement first of all.

2. Battery should be charged at least over 60%.

Make sure that your battery is charged enough to complete the flashing process. In case your battery is low and your device goes dead during the flashing process, you may end up soft bricking your device as it won’t complete the flashing process.

3. Backup everything!

Just to be on the safe side, you may consider backing up each and everything from your Android device. This is highly recommended so that in case anything goes wrong, you still have the access to all of your data and you can restore it immediately. You may backup everything as listed below.

4. Enable USB Debugging Mode on your device.

Enable USB debugging mode on your device. To do so, tap settings>developer options>USB debugging. If you can’t find developer options in settings, then tap settings > about device and tap “Build Number” for 7 times and you’ll get em’ activated under settings.

5. Install and setup Sony Flashtool.

You must have installed Sony Flashtool. Find the full guide here.

After installing Sony Flashtool, open the Flashtool folder from the drive where you installed it. Now open Flashtool>Drivers>Flashtool-drivers.exe and install the Flashtool, Fastboot & Xperia Z3 Compact drivers from the list. If you do not find the Flashtool drivers in Flashmode, skip this step and install Sony PC Companion instead, for drivers support. [Important]

6. Use OEM data cable to establish connection.

Make sure that you use the phone’s original data cable to establish connection between your phone and the PC. Using a different data cable might result in interrupting the firmware installation.

7. Unlock Bootloader

Use the following guide to unlock the bootloader of your Xperia device before proceeding.


Disclaimer: The methods involved in flashing custom recoveries, roms and rooting your phone are highly custom and may result in bricking your device, and has nothing to do with Google or the device manufacturer that is SONY in our case. Also rooting your device will void its warranty and you will be no longer eligible for any kind of free device services by the manufacturers/warranty providers. In case of any mishap we may not be held responsible. Follow these instructions to the letter to avoid any mishap or bricking. Make sure that whatever you do, you are doing it at your own responsibility.

Steps For Rooting Xperia Z3 Compact D5803, D5833 23.1.A.1.28 Firmware

1. Downgrade to .77/.93 Firmware and Root It

  1. If you have already updated your smartphone to Android 5.0.2 Lollipop, then you have to downgrade your device to KitKat OS and Root it.
  2. Use this Flashtool Guide to Install 23.0.A.2.93 firmware.
  3. Root using this guide.
  4. Now Install XZ Dual Recovery.
  5. Now phone is rooted, USB Debugging must be enabled.
  6. Download latest installer for Xperia Z3 Compact from here. (Z3-lockeddualrecovery2.8.10-RELEASE.installer.zip)
  7. Connect phone to PC using OEM date cable and run install.bat.
  8. It will install the custom recovery.
  9. Now work here is done. Lets move on to next step.

2. Make A Pre-Rooted Flashable Firmware For .726 FTF

  1. Download PRF Creator and install on your system.
  2. Download SuperSU zip and place anywhere on PC.
  3. Download .28 FTF and place it anywhere on PC.
  4. Download Z3-lockeddualrecovery2.8.10-RELEASE.flashable.zip
  5. Now run PRFC and add all three required files in it.
  6. Then click on Create.
  7. Once the Flashable ROM is created, it will show the successful message.
  8. Do not touch any other option while creating the pre-rooted firmware.
  9. Now copy the pre-rooted firmware to the phone’s internal storage.
  10. Our work in this step is now done. Move on to next step.

Note: If you do not want to create your own pre-rooted firmware and skip all these steps then you can download the pre-rooted flashable zip from the link given below.

3. Root and Install Recovery on Z3 Compact D5803/D5833 .28 5.0.2 Lollipop Firmware

  1. Custom recovery was installed in the first step.
  2. The pre-rooted firmware was created and copied to phone in next step.
  3. Now you have to turn off phone.
  4. Turn it on again and press volume up or down repeatedly to enter custom recovery.
  5. Click on install and locate the folder where you placed the flashable zip earlier.
  6. Tap on it and install it.
  7. Now reboot the phone.
  8. If phone is still connected to PC via USB cable, disconnect it.
  9. Now go back to the . 28 ftf you downloaded in second step and copy it to /flashtool/fimrwares
  10. Open flashtool and click on lightning icon in the top left.
  11. Click on it and click on flashmode.
  12. Select the .28 firmware.
  13. In the right bar, in the exclude options, exclude System only. It means that tick System only there. Leave every other options as it is.
  14. While flashtool prepares the software for flashing, turn off your phone.
  15. Keep the volume down button pressed and connect it to PC via USB cable.
  16. The button must be pressed during it.
  17. The phone will enter flashmode.
  18. Flashtool will automatically detect it and start flashing.
  19. After flashing phone will reboot and you will be done 🙂
  20. That’s all 🙂 Enjoy
  21. Now your phone has a dual custom recovery, root access and of course latest Android 5.0.2 Lollipop Firmware.

Got any questions? Ask me in the comments below

Install CWM/TWRP & Root Xperia Z3 On Android Lollipop 23.1.A.1.28 Firmware

Install CWM/TWRP & Root Xperia Z3 On Android Lollipop 23.1.A.1.28 Firmware

Xperia Z3 is now being updated t0 the latest Android 5.0.2 Lollipop update. The new build number is 23.1.A.1.28. If you have updated your device and you happen to be an Android power user, you must be missing the root access on your device. Updating to the latest firmware wipes off the root access. If you’re eager to root your device once again now, you may calm down as you have already spotted the right place. We are going to root and install CWM + TWRP recovery on our beloved Xperia Z3 D6603, D6653 & D6643 on Android 5.0.2 Lollipop 23.1.A.1.28 firmware keeping the bootloader locked/unlocked. The method is a little bit longer, all you need to do is, you need to follow the guide being very careful and it will go successful.

1. This is only for Sony Xperia Z3 D6603, D6653, D6643

This rooting method is only for the device mentioned above. Make sure that your model number matches the one listed above. To do so, go to Settings > About Device on your device and see your model number. Flashing this firmware on any other device will result in bricking it so make sure that you meet this requirement first of all.

2. Battery should be charged at least over 60%.

Make sure that your battery is charged enough to complete the flashing process. In case your battery is low and your device goes dead during the flashing process, you may end up soft bricking your device as it won’t complete the flashing process.

3. Backup everything!

Just to be on the safe side, you may consider backing up each and everything from your Android device. This is highly recommended so that in case anything goes wrong, you still have the access to all of your data and you can restore it immediately. You may backup everything as listed below.

4. Enable USB Debugging Mode on your device.

Enable USB debugging mode on your device. To do so, tap settings>developer options>USB debugging. If you can’t find developer options in settings, then tap settings > about device and tap “Build Number” for 7 times and you’ll get em’ activated under settings.

5. Install and setup Sony Flashtool.

You must have installed Sony Flashtool. Find the full guide here.

After installing Sony Flashtool, open the Flashtool folder from the drive where you installed it. Now open Flashtool>Drivers>Flashtool-drivers.exe and install the Flashtool, Fastboot & Xperia Z3 drivers from the list. If you do not find the Flashtool drivers in Flashmode, skip this step and install Sony PC Companion instead, for drivers support. [Important]

6. Use OEM data cable to establish connection.

Make sure that you use the phone’s original data cable to establish connection between your phone and the PC. Using a different data cable might result in interrupting the firmware installation.

7. Unlock Bootloader [Optional]

Use the following guide to unlock the bootloader of your Xperia device before proceeding.


Disclaimer: The methods involved in flashing custom recoveries, roms and rooting your phone are highly custom and may result in bricking your device, and has nothing to do with Google or the device manufacturer that is SONY in our case. Also rooting your device will void its warranty and you will be no longer eligible for any kind of free device services by the manufacturers/warranty providers. In case of any mishap we may not be held responsible. Follow these instructions to the letter to avoid any mishap or bricking. Make sure that whatever you do, you are doing it at your own responsibility.

Steps For Rooting Xperia Z3 23.1.A.1.28 Firmware

1. Downgrade to 23.0.A.2.93 Firmware and Root It

  1. If you have already updated your smartphone to Android 5.0.2 Lollipop, then you have to downgrade your device to KitKat OS and Root it.
  2. Root using this guide.
  3. Now Install XZ Dual Recovery.
  4. Now phone is rooted, USB Debugging must be enabled.
  5. Download latest installer for Xperia Z3 from here. (Z3-lockeddualrecovery2.8.xx-RELEASE.installer.zip)
  6. Connect phone to PC using OEM date cable and run install.bat.
  7. It will install the custom recovery.
  8. Now work here is done. Lets move on to next step.

2. Make A Pre-Rooted Flashable Firmware For .28 FTF

  1. Download PRF Creator and install on your system.
  2. Download SuperSU zip and place anywhere on PC.
  3. Download .28 FTF and place it anywhere on PC.
  4. Download Z3-lockeddualrecovery2.8.xx-RELEASE.flashable.zip
  5. Now run PRFC and add all three required files in it.
  6. Then click on Create.
  7. Once the Flashable ROM is created, it will show the successful message.
  8. Do not touch any other option while creating the pre-rooted firmware.
  9. Now copy the pre-rooted firmware to the phone’s internal storage.
  10. Our work in this step is now done. Move on to next step.

Note: If you do not want  to create a pre-rooted flashable zip yourself, then you can download flashable zip for your phone from one of the downlod links given below.

3. Root and Install Recovery on Z3 D6603, D6653, D6643 5.0.2 Lollipop Firmware

  1. Custom recovery was installed in the first step.
  2. The pre-rooted firmware was created and copied to phone in next step.
  3. Now you have to turn off phone.
  4. Turn it on again and press volume up or down repeatedly to enter custom recovery.
  5. Click on install and locate the folder where you placed the flashable zip earlier.
  6. Tap on it and install it.
  7. Now reboot the phone.
  8. If phone is still connected to PC via USB cable, disconnect it.
  9. Now go back to the .28 ftf you downloaded in second step and copy it to /flashtool/fimrwares
  10. Open flashtool and click on lightning icon in the top left.
  11. Click on it and click on flashmode.
  12. Select the .28 firmware.
  13. In the right bar, in the exclude options, exclude System only while flashing. Leave every other options as it is.
  14. While flashtool prepares the software for flashing, turn off your phone.
  15. Keep the volume down button pressed and connect it to PC via USB cable.
  16. The button must be pressed during it.
  17. The phone will enter flashmode.
  18. Flashtool will automatically detect it and start flashing.
  19. After flashing phone will reboot and you will be done 🙂
  20. That’s all 🙂 Enjoy
  21. Now your phone has a dual custom recovery, root access and of course latest Android 5.0.2 Lollipop Firmware.

Got any questions? Ask me in the comments below

Update Xperia Z2 D6502 To Official Android Lollipop 23.1.A.1.28 Firmware

0
Update Xperia Z2 D6502 To Official Android Lollipop 23.1.A.1.28 Firmware

Xperia Z2’s D6502 is now being updated to the latest Android 5.0.2 Lollipop firmware carrying the build number 23.1.A.1.28. The update brings some improvements and missing features back. Close All button is back in the recent apps menu. Some performance and stability enhancements have been made. The update is already on the roll to different regions at the moment, but if you haven’t already got it, you may want to flash it manually. In the following guide we will install this latest Android 5.0.2 Lollipop with the build number 23.1.A.1.28 on our beloved Sony Xperia Z2 D6502 using Sony Flashtool.

Update Changelog:

– Ensured the lock screen / notification bar doesn’t indicate “no service” when the device has coverage

– Added a Sony feature; bringing back the “close-all-button” in the activity menu, so you can easily close all apps at once

– Unblocked devices with server policies (such as Exchange Active Sync for e-mail), to enable the new Lollipop lock-screen notifications

– Ensured the LED light is lit across all sound modes – and no longer offset by “silent”

– Made the necessary fixes to enable the easy movement of content from internal memory to external microSD card (something we saw affecting a few devices)

– Improved messaging functionality in Ultra stamina mode – some conversations could not be opened before in Ultra stamina mode

Early Preparations:

1. This is only for Sony Xperia Z2 D6502

This ROM is only for the device mentioned above. Make sure that your model number matches the one listed above. To do so, go to Settings > About Device on your device and see your model number. Flashing this firmware on any other device will result in bricking it so make sure that you meet this requirement first of all.

2. Battery should be charged at least over 60%.

Make sure that your battery is charged enough to complete the flashing process. In case your battery is low and your device goes dead during the flashing process, you may end up soft bricking your device as it won’t complete the flashing process.

3. Backup everything!

Just to be on the safe side, you may consider backing up each and everything from your Android device. This is highly recommended so that in case anything goes wrong, you still have the access to all of your data and you can restore it immediately. You may backup everything as listed below.

  • Backup SMS Messages
  • Backup Call Logs
  • Backup Contacts
  • Backup Media – Copy your files manually to your PC or Laptop.
  • Titanium Backup – If already rooted, use Titanium Backup to backup all of your apps, system data and other important content. If you haven’t rooted your device previously, skip this step.
  • Backup Nandroid – If CWM  or TWRP installed previously, otherwise skip this step and perform this at the end of flashing.

4. Enable USB Debugging Mode on your device.

Enable USB debugging mode on your device. To do so, tap settings>developer options>USB debugging. If you can’t find developer options in settings, then tap settings > about device and tap “Build Number” for 7 times and you’ll get em’ activated under settings.

5. Install and setup Sony Flashtool.

You must have installed Sony Flashtool. Find the full guide here.

After installing Sony Flashtool, open the Flashtool folder from the drive where you installed it. Now open Flashtool>Drivers>Flashtool-drivers.exe and install the Flashtool, Fastboot & Xperia Z2 drivers from the list. [Important]

6. Use OEM data cable to establish connection.

Make sure that you use the phone’s original data cable to establish connection between your phone and the PC. Using a different data cable might result in interrupting the firmware installation.

Screenshot_1
How To Update Sony Xperia Z2 D6502 To Official Android 5.0.2 14.5.A.0.242 Lollipop FirmwareXperia Z2

Before moving forward, please make sure that you’ve read the pre requisites and ensure that you are set to go ahead.

  1. Download the latest firmware Android 5.0.2 Lollipop 23.1.A.1.28 FTF file.
    1. For Xperia Z2 D6502 [Generic/Unbranded. Link 1  |Create your own FTF using this guide.
  2. Copy the file and paste in Flashtool>Firmwares folder.
  3. Open Flashtool.exe now.
  4. Hit the small lightening button on the top left corner and select Flashmode.
  5. Select the FTF firmware file that you placed in the Firmware folder.
  6. From the right side, select what do you want to wipe. Data, cache and apps log, all wipes are recommended, perhaps you may select if you don’t want.
  7. Click on OK, and it will start preparing the firmware for flashing. This may take a little while to load.
  8. As soon as the firmware is loaded, it will prompt you to attach the phone by turning it off and keeping the back key press.
  9. For Xperia Z2 Volume Down key will do the job of back key, just turn off your phone, keep the Volume Down key pressed and plug in the data cable.
  10. As soon as the phone is detected in Flashmode, the firmware will start flashing, Do not leave the Volume Down key until the process is complete.
  11. As soon as you see “Flashing ended or Finished Flashing” leave the Volume Down key, plug the cable out and reboot.
  12. That’s All! Congrats! You’ve installed latest Android 5.0.2 Lollipop on your Xperia Z2 D6502. Enjoy

In case you got any queries or face any problems regarding this guide, please feel free to stop by the comment box below and let us know. We will get back to you as soon as possible. Thanks all!

Update Xperia Z3 Compact D5803/D5833 To Official Android Lollipop 23.1.A.1.28 Firmware

2
Update Xperia Z3 Compact D5803/D5833 To Official Android Lollipop 23.1.A.1.28 Firmware

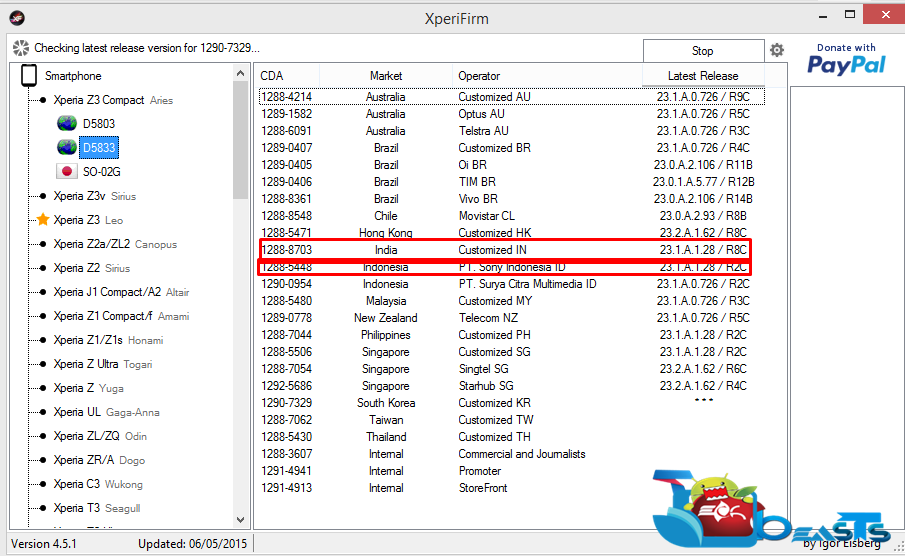
Xperia Z3 Compact is one of the lucky devices to receive Android 5.0.2 Lollipop very early in the Xperia Z family. Sony is making a number of improvements to make sure that Xperia Z3 Compact owners stay at ease. A number of Lollipop builds has already rolled out, but Sony missed one of the very important features, the Close All button in the recent apps menu. In the latest update, which just started rolling out today, Sony has added the Close All button back in the recent apps menu. Users can now close all applications at once rather then swiping off all applications one by one. The new update also includes some improvements for the on-screen notifications, messaging functionality while stamina mode is on and some other minor improvements are there. The new update is rolling out for different regions and is also downloadable through XperiFirm. It carries the build number 23.1.A.1.28, while the base is still Android 5.0.2 Lollipop.

If you haven’t already received this update, some of you may want to get it immediately but you will need a manual method. If you want to update, we have the method explained here for you. In the proceeding tutorial we are going to install Android 5.0.2 Lollipop 23.1.A.1.28 FTF on our beloved Xperia Z3 Compact D5803 & D5833 using Sony Flashtool.  We will go through some early preparations and then flash the firmware. 

Update Changelog:

– Ensured the lock screen / notification bar doesn’t indicate “no service” when the device has coverage

– Added a Sony feature; bringing back the “close-all-button” in the activity menu, so you can easily close all apps at once

– Unblocked devices with server policies (such as Exchange Active Sync for e-mail), to enable the new Lollipop lock-screen notifications

– Ensured the LED light is lit across all sound modes – and no longer offset by “silent”

– Made the necessary fixes to enable the easy movement of content from internal memory to external microSD card (something we saw affecting a few devices)

– Improved messaging functionality in Ultra stamina mode – some conversations could not be opened before in Ultra stamina mode

Early Preparations:

1. This is only for Sony Xperia Z3 Compact D5803 & D5833

This ROM is only for the device mentioned above. Make sure that your model number matches the one listed above. To do so, go to Settings > About Device on your device and see your model number. Flashing this firmware on any other device will result in bricking it so make sure that you meet this requirement first of all.

2. Battery should be charged at least over 60%.

Make sure that your battery is charged enough to complete the flashing process. In case your battery is low and your device goes dead during the flashing process, you may end up soft bricking your device as it won’t complete the flashing process.

3. Backup everything!

Just to be on the safe side, you may consider backing up each and everything from your Android device. This is highly recommended so that in case anything goes wrong, you still have the access to all of your data and you can restore it immediately. You may backup everything as listed below.

  • Backup SMS Messages
  • Backup Call Logs
  • Backup Contacts
  • Backup Media – Copy your files manually to your PC or Laptop.
  • Titanium Backup – If already rooted, use Titanium Backup to backup all of your apps, system data and other important content. If you haven’t rooted your device previously, skip this step.
  • Backup Nandroid – If CWM  or TWRP installed previously, otherwise skip this step and perform this at the end of flashing.

4. Enable USB Debugging Mode on your device.

Enable USB debugging mode on your device. To do so, tap settings>developer options>USB debugging. If you can’t find developer options in settings, then tap settings > about device and tap “Build Number” for 7 times and you’ll get em’ activated under settings.

5. Install and setup Sony Flashtool.

You must have installed Sony Flashtool. Find the full guide here.

After installing Sony Flashtool, open the Flashtool folder from the drive where you installed it. Now open Flashtool>Drivers>Flashtool-drivers.exe and install the Flashtool, Fastboot & Xperia Z3 Compact drivers from the list. [Important]

6. Use OEM data cable to establish connection.

Make sure that you use the phone’s original data cable to establish connection between your phone and the PC. Using a different data cable might result in interrupting the firmware installation.

Screenshot_2
How To Update Sony Xperia Z3 Compact D5803 & D5833 To Official Android 5.0.2 14.5.A.0.242 Lollipop  FirmwareXperia Z3 Compact

Before moving forward, please make sure that you’ve read the pre requisites and ensure that you are set to go ahead.

  1. Download the latest firmware Android 5.0.2 Lollipop 23.1.A.1.28 FTF file.
    1. For Xperia Z3 Compact D5803 [Generic/Unbranded. Link 1 | Create your own FTF using this guide.
    2. For Xperia Z3 Compact D5833 [Generic/Unbranded] Link 1  | You can also create your own FTF using this guide.
  2. Copy the file and paste in Flashtool>Firmwares folder.
  3. Open Flashtool.exe now.
  4. Hit the small lightening button on the top left corner and select Flashmode.
  5. Select the FTF firmware file that you placed in the Firmware folder.
  6. From the right side, select what do you want to wipe. Data, cache and apps log, all wipes are recommended, perhaps you may select if you don’t want.
  7. Click on OK, and it will start preparing the firmware for flashing. This may take a little while to load.
  8. As soon as the firmware is loaded, it will prompt you to attach the phone by turning it off and keeping the back key press.
  9. For Xperia Z3 Compact Volume Down key will do the job of back key, just turn off your phone, keep the Volume Down key pressed and plug in the data cable.
  10. As soon as the phone is detected in Flashmode, the firmware will start flashing, Do not leave the Volume Down key until the process is complete.
  11. As soon as you see “Flashing ended or Finished Flashing” leave the Volume Down key, plug the cable out and reboot.
  12. That’s All! Congrats! You’ve installed latest Android 5.0.2 Lollipop on your Xperia Z3 Compact Enjoy

In case you got any queries or face any problems regarding this guide, please feel free to stop by the comment box below and let us know. We will get back to you as soon as possible. Thanks all!

Update Xperia Z3 To Official Android Lollipop 23.1.A.1.28 Firmware

0
Update Xperia Z3 To Official Android Lollipop 23.1.A.1.28 Firmware

Sony took a very long time to roll out Android 5.0.2 Lollipop for the Xperia Z family, but now that it has, improvements are coming every second day. Sony has rolled out a newer update with a number of prominent improvements. The new update, which carries the build number 23.1.A.1.28 includes the missing “Close All” button in the recent apps menu. The update also insures the proper working of messaging in stamina mode. Notifications will no longer show no service on the lock screen if there’s weak connectivity. Sony has fixed all the known bugs in this most recent update. All non-branded variants of the Xperia Z3 have started receiving this update in different regions. If you haven’t received the .28 firmware update yet, you may want to get it immediately. The only way to get it right now is to flash it via Sony Flashtool. Wondering how? Well, that is what we are here for.

In the succeeding guide we are going to flash/install the latest Android 5.0.2 Lollipop firmware with the build number 23.1.A.1.28 on our beloved Sony Xperia Z3 D6603, D6653 & D6643. Let’s go through some quick preparations and flash the firmware to get the missing features back.

Update Changelog:

– Ensured the lock screen / notification bar doesn’t indicate “no service” when the device has coverage

– Added a Sony feature; bringing back the “close-all-button” in the activity menu, so you can easily close all apps at once

– Unblocked devices with server policies (such as Exchange Active Sync for e-mail), to enable the new Lollipop lock-screen notifications

– Ensured the LED light is lit across all sound modes – and no longer offset by “silent”

– Made the necessary fixes to enable the easy movement of content from internal memory to external microSD card (something we saw affecting a few devices)

– Improved messaging functionality in Ultra stamina mode – some conversations could not be opened before in Ultra stamina mode

Early Preparations:

1. This is only for Sony Xperia Z3 D6603, D6653 & D6643.

This ROM is only for the device mentioned above. Make sure that your model number matches the one listed above. To do so, go to Settings > About Device on your device and see your model number. Flashing this firmware on any other device will result in bricking it so make sure that you meet this requirement first of all.

2. Battery should be charged at least over 60%.

Make sure that your battery is charged enough to complete the flashing process. In case your battery is low and your device goes dead during the flashing process, you may end up soft bricking your device as it won’t complete the flashing process.

3. Backup everything!

Just to be on the safe side, you may consider backing up each and everything from your Android device. This is highly recommended so that in case anything goes wrong, you still have the access to all of your data and you can restore it immediately. You may backup everything as listed below.

  • Backup SMS Messages
  • Backup Call Logs
  • Backup Contacts
  • Backup Media – Copy your files manually to your PC or Laptop.
  • Titanium Backup – If already rooted, use Titanium Backup to backup all of your apps, system data and other important content. If you haven’t rooted your device previously, skip this step.
  • Backup Nandroid – If CWM  or TWRP installed previously, otherwise skip this step and perform this at the end of flashing.

4. Enable USB Debugging Mode on your device.

Enable USB debugging mode on your device. To do so, tap settings>developer options>USB debugging. If you can’t find developer options in settings, then tap settings > about device and tap “Build Number” for 7 times and you’ll get em’ activated under settings.

5. Install and setup Sony Flashtool.

You must have installed Sony Flashtool. Find the full guide here.

After installing Sony Flashtool, open the Flashtool folder from the drive where you installed it. Now open Flashtool>Drivers>Flashtool-drivers.exe and install the Flashtool, Fastboot & Xperia Z3 drivers from the list. [Important]

6. Use OEM data cable to establish connection.

Make sure that you use the phone’s original data cable to establish connection between your phone and the PC. Using a different data cable might result in interrupting the firmware installation.

Screenshot_7


How To Update Sony Xperia Z3 D6603, D6653 & D6643 To Official Android 5.0.2 23.1.A.1.28 Lollipop  FirmwareXperia Z3

Before moving forward, please make sure that you’ve read the pre requisites and ensure that you are set to go ahead.

  1. Download the latest firmware Android 5.0.2 Lollipop 23.1.A.1.28 FTF file.
    1. For Xperia Z3 D6603 [Generic/Unbranded. Create your own FTF using this guide.
    2. For Xperia Z3 D6653 [Generic/Unbranded] Create your own FTF using this guide.
    3. For Xperia Z3 D6643 [Generic/Unbranded] Create your own FTF using this guide.
  2. Copy the file and paste in Flashtool>Firmwares folder.
  3. Open Flashtool.exe now.
  4. Hit the small lightening button on the top left corner and select Flashmode.
  5. Select the FTF firmware file that you placed in the Firmware folder.
  6. From the right side, select what do you want to wipe. Data, cache and apps log, all wipes are recommended, perhaps you may select if you don’t want.
  7. Click on OK, and it will start preparing the firmware for flashing. This may take a little while to load.
  8. As soon as the firmware is loaded, it will prompt you to attach the phone by turning it off and keeping the back key press.
  9. For Xperia Z3 Volume Down key will do the job of back key, just turn off your phone, keep the Volume Down key pressed and plug in the data cable.
  10. As soon as the phone is detected in Flashmode, the firmware will start flashing, release the volume down key now and wait.
  11. As soon as you see “Flashing ended or Finished Flashing” leave the Volume Down key, plug the cable out and reboot.
  12. That’s All! Congrats! You’ve installed latest Android 5.0.2 Lollipop on your Xperia Z3. Enjoy

In case you got any queries or face any problems regarding this guide, please feel free to stop by the comment box below and let us know. We will get back to you as soon as possible. Thanks all!

How to Install ADB & Fastboot drivers on Windows 8/8.1 with USB 3.0

10
How to Install ADB & Fastboot drivers on Windows 8/8.1 with USB 3.0

Installing ADB and Fastboot drivers on a Windows 8 or 8.1 PC with USB 3.0 is a real hiccup. If you own a Windows 8/8.1 laptop with USB 3.0 ports and you also happen to be Android enthusiasts, you must have come across the ADB and Fastboot drivers issue. Simply installing the drivers and connecting the device to your PC won’t allow you to detect your phone and perform any operations. It’s been pretty long since this issue is there and there hasn’t been any fix to this in the recent while. Many people have come across this issue of connection failure between their Android device and their computer running Windows 8/8.1 with USB 3.0 ports. The issue either doesn’t detect the device or gets stuck on “waiting for device”. You must be wondering what causes this issue to occur and how you can resolve it. The good news is, we have the answer and the solution as well today.

Basically, the combination of Windows 8 / 8.1 and USB 3.0 is the culprit. In the latest machines, Microsoft has installed its very own USB drivers, which do not allow you to connect your device in ADB or Fastboot mode and it keeps showing the exclamation mark in device manager.  This issue can be resolved within a few minutes by replacing Microsoft’s USB drivers with Intel’s USB drivers. This great work has been done by Ekko, and the guide came up from plugable as well. If you’re wondering how you can replace the drivers and get ADB & Fastboot drivers working on your Windows 8 or 8.1 PC, then the following guide is going to help you to get beyond.

How To Replace Microsoft USB 3.0 Drivers With Intel’s USB 3.0 Drivers

First of all you need to look for Intel(R) USB 3.0 eXtensible Host Controller in Device Manager > Universal Serial Bus Controllers. If the aforementioned driver exists, you may proceed otherwise you may not follow this guide.

  1. Now download Intel(R)_USB_3.0_eXtensible_Host_Controller_Driver rev. 1.0.6.245
  2. If you are using Windows 8.1 with Haswell processor, download this drivers Intel(R)_USB_3.0_eXtensible_Host_Controller_Driver_3.0.5.69.zip
  3. Now download the following edited files:
  4. Unzip the downloaded Intel USB 3.0 drivers on your desktop.
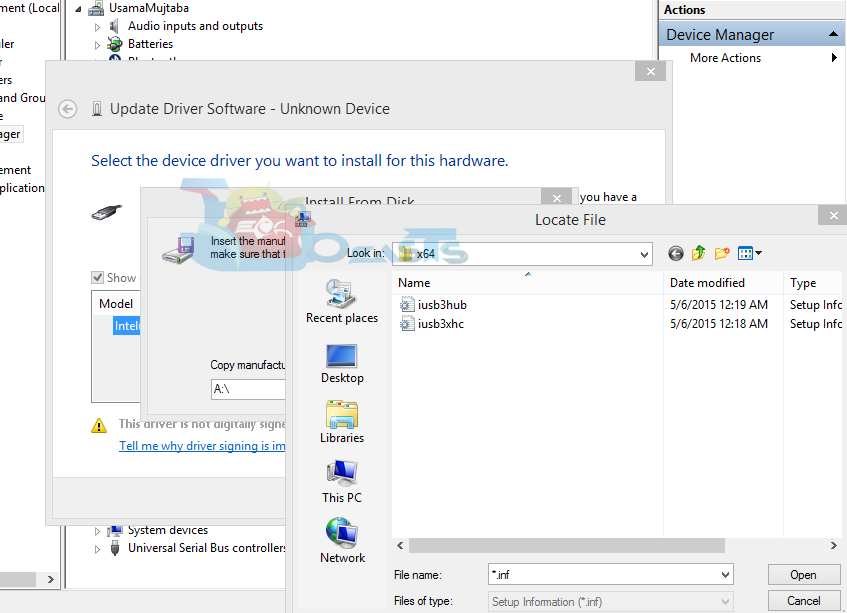
  5. Now open the unzipped folder and then open Drivers > Win7 > x64 and copy both files i.e. iusb3hub.inf and iusb3xhc.inf here. If the window prompts up asking for replace, replace the existing files with these new files.
  6. Now press Windows + R key and paste the follow command “shutdown.exe /r /o /f /t 00” and hit enter. This will reboot your computer.Screenshot_1
  7. Once you are in setup/recovery mode on your computer, click Troubleshoot > Advanced Options > Startup Settings > Restart.
  8. Once your computer restarts, press F7 key to disable driver signature verification. Your computer will reboot once again now.
  9. Once your computer has booted up, open device manager >  Intel(R) USB 3.0 eXtensible Host Controller – 0100 Microsoft, verify that the driver provide is Microsoft.
  10. Now click on update driver within the same menu, and click on Browse my computer for driver software > let me pick from a list of device drivers from my computer > Have disk > select the iusb3xhc.inf file and click ok.Screenshot_3
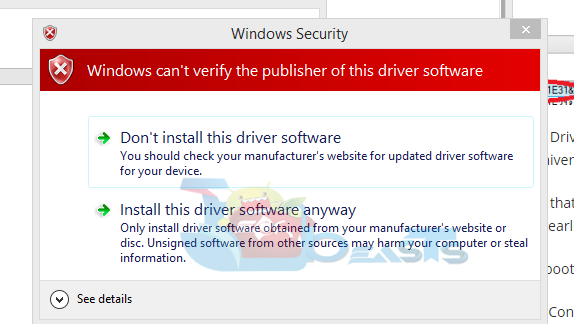
  11. A window will prompt up warning you about disabled driver signature verification. Confirm the installation and allow your computer to install the driver.Screenshot_4
  12. Now once again press Windows button + R and paste following command “shutdown.exe /r /o /f /t 00” and hit enter. This will reboot your computer now again. Follw the instructions in step 5 to boot up your computer having the driver signature verification disabled.
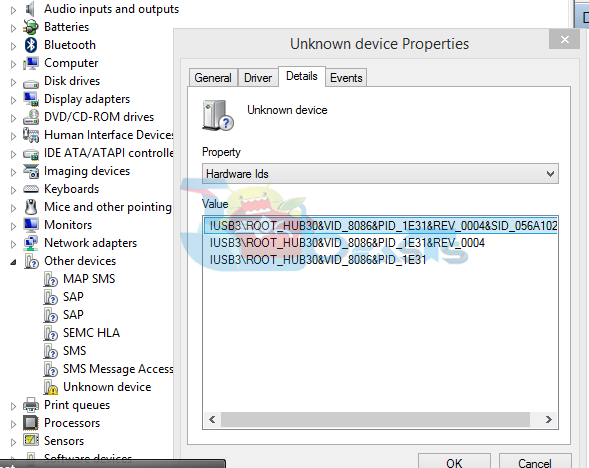
  13. Once your computer has booted up, open device manager > look for an unknown device > right click > driver details > select Hardware Ids and make sure that you find the code ” VID_8086″ in hardware Ids. Screenshot_2
  14. After matching the hardware ID, click on update driver > Browse my computer for driver software > let me pick from a list of device drivers from my computer > Have disk > select the iusb3hub.inffile and click ok.
  15. Now reboot your computer once again.
  16. Once your computer boots up, open device manager > Universal Serial Bus controllers and find  Intel(R) USB 3.0 eXtensible Host Controller and the Intel(R) USB 3.0 Root Hub to verify your successful installation of Intel drivers over the Microsoft drivers.
  17. That’s all.

Now that you have replaced your Microsoft USB drivers with Intel’s USB drivers, you are all set to plug-in your Android device into the USB 3.0 port of your PC running Windows 8 or 8.1. You will need to install ADB & Fastboot drivers before connect your device. You can follow the drivers using the following guide.

  1. If you don’t want full Android SDK tools, you can install Minimal Android ADB & Fastboot tools. It will also save your time.
  2. If you want complete Android ADB & Fastboot drivers on your Windows PC, you may follow our full guide to install ADB & Fastboot drivers.
  3. MAC users can follow this guide to install ADB & Fastboot drivers.

Credits: Plugable & Ekko

Most Popular HD Wallpapers for Desktop – Free Download

0
Most Popular HD Wallpapers for Desktop – Free Download

Here’ you go download the most popular HD wallpapers for desktop, PC and Mac. There are million’s of HD Wallpapers are available on the web, but it takes a lot of time to choose the best HD wallpapers, but now you don’t have to search for hours because i bring you the most popular HD wallpapers for free. These wallpapers are the best you can get and this time its not only my choice, these wallpapers are chosen by all of you. Enjoy the free and most popular HD Wallpapers for free.

popular-hd-wallpapers


You can see my Wallpaper collection by going into Techbeasts wallpapers gallery. Please share these free HD Wallpapers with your friends.