Home Blog Page 335

Hexlock Enables Full Control On Your Privacy And Secures Your Apps

0
Hexlock Enables Full Control On Your Privacy And Secures Your Apps

With cyber crime now official, it is hard to argue that your device might be in danger. Many think that getting hold of one’s data is rather impossible, but there are numerous times one feels violated when a person starts scrolling through the gallery photos. Yes, this is a common frustrating problem in the realm of modern technology. It is reasonably important to keep your bits of data secured and protected. While you could just put up a pattern on your device and call it a day, there are many ways by which even a novice can by-pass it. Today, we introduce you all to a great application for Android – Hexlock. Following is our say on how the application feels, functions, and why it is the best.

Hexlock – Our Finest Review

I’ve been using Hexlock for over a year now, and there is no better way to compile a review one year later. We will be taking about the way you interact with the application, and its main functions. We will also be highlighting the key aspects as to why you would want to use Hexlock in the first place. Let’s start without any further ado.

The Looks

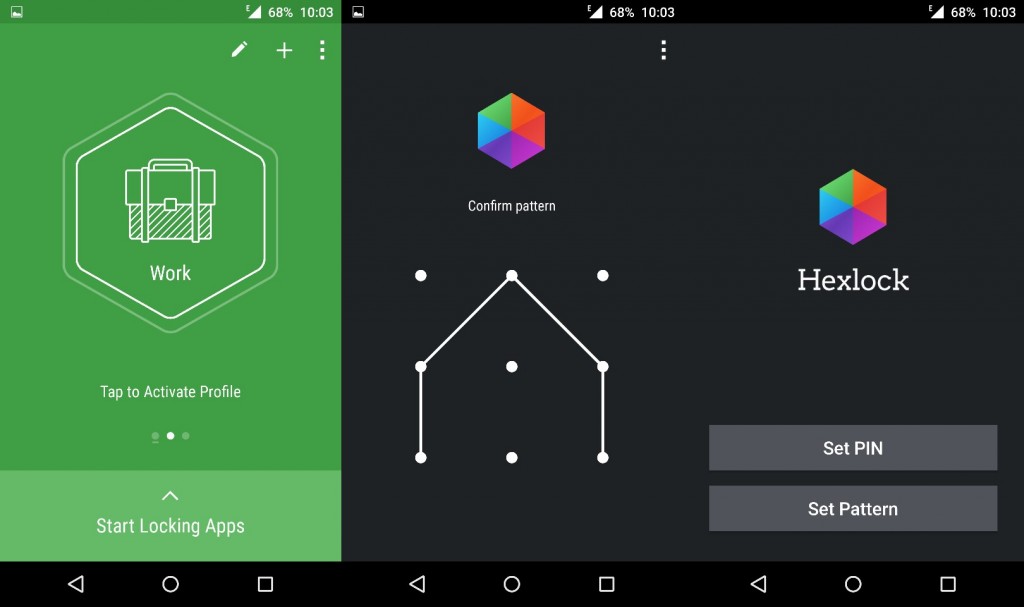
While Hexlock doesn’t follow the trend of Google’s Material Design, it can be said that it still is unique in its own way. The developer has impressed thousands of people with its intuitive selection of colors for the application. Hexlock is bound by a responsive layout, and it has been loaded with highly polished buttons and logos, more on that later. While there isn’t much to talk about looks in an application that outperforms our functioning test, we therefore conclude that the design Hexlock adopted is still intuitive and engaging, with bright and vibrant colors for each set of profiles.
Hexlock-1-1024x607

The Functioning

Now here’s where we talk a lot about the way Hexlock has improvised our Android lives. Coming to functionality, Hexlock is a basic application which lets you simply lock individual applications as and when you like, with a unique pattern code set by you. Once you’ve locked a specific set of applications, you’ll be required to enter the pattern every time you launch a locked application. Pretty witty, right?

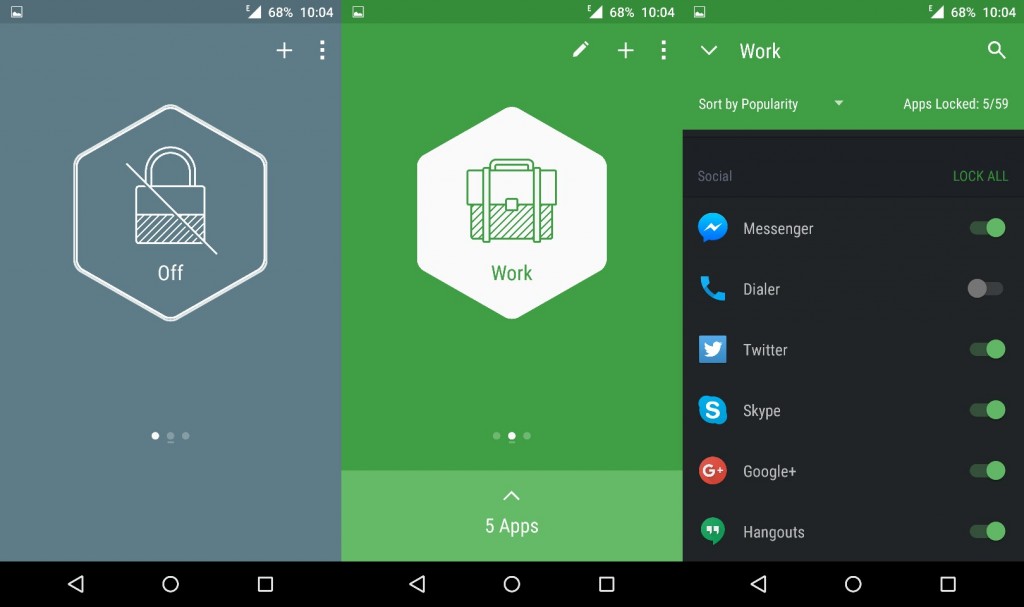
But wait, hold your horses before you say anything against it! Hexlock isn’t only ‘another’ locking application on the Google Play Store. What sets it apart from the crowd, is the feature which allows it to create different profiles and lock a specific set of applications with a single tap. Consider the following example where you’re at work, and you don’t want your spying colleagues to peek into your boss’s conversation on WhatsApp or Slack. In such a case, you can choose to lock vulnerable applications at specific times. Okay, now you’re heading home, and you don’t want your kids to mess up with the important files, so you just select another profile, and lock applications that aren’t child safe!
Hexlock-2-1024x607

With such power in your hands, Hexlock brings about a barrier between your creepy cousins and your device’s applications. Personally, I’ve found the profile feature to be really convenient, as all it needs is a one-time setup, and you’re good to go.

Key Aspects

Phew, with the ordeal experience (not really) of the geeky stuff now over, we’ve compiled some of the best features and reasons as to why we’ve voted Hexlock as the best app locker application for Android.

  • Parental Control : There’s no need for you to worry about your kids deleting important conversations and photos from your device’s gallery. Just setup the ‘Child’ mode, and lock all applications except for games which your young one loves to play. This ensures no loss of important data, and no prank calls to relatives.
  • Shared Devices : With Hexlock, you can seamlessly manage your profiles on different devices at the same time.
  • Privacy : You can use Hexlock to lock down applications which are data-filled, such as Facebook, and WhatsApp. This will ensure no leak or loss of your data.
  • Strong Management : Unlike other app lockers, you can’t uninstall this one easily. To do so, you need to enter the pattern/pin.
  • Self-Activate : Hexlock has a smart and intuitive feature which lets you change profiles or activate them when you automatically change networks.

Hexlock-3-1024x607

Verdict

At the end of the day, Hexlock keeps your Android powered smartphone safe from the wrong hands. You now no longer need to worry about people accessing specific applications. In my time of usage, I found Hexlock to be really reliable, and the developer is fast at pushing updates to the Play Store to minimize bugs and errors. For now, you should right away go ahead and install Hexlock on your Android device.

Download Hexlock – The Smart App Locker

Access Networks Like Never Before Using RocketVPN

0
Access Networks Like Never Before Using RocketVPN

Isn’t it quite annoying that some websites are available to only selected geographical locations? Have you ever wondered why you can’t access a specific video or a specific website on the Internet? This is all due to restrictions in geographical servers. For example, Zedge, the most popular space for obtaining free goodies for your devices, is not accessible to many countries. In order to break these restrictions put up for several reasons, you’d need to literally travel to another country, and access it from over there. But with the present technology in mind, it would be pretty dumb to do that. This is where VPN servers come in. VPN stands for a Virtual Private Network, and does absolutely that.

A VPN allows you to surf through the geographical restricted websites/videos or almost everything by creating a virtual or fake network for you. While you needn’t get all those technical terms, you’d love if your Android device could now get applications which aren’t available in your region, right? Well, amongst all of the VPN Severs, it is hard to decide which is the safest and the most reliable. Worry not, for we’ve got an app review of the best VPN server application for Android – RocketVPN.Rocket-VPN-SC_1-576x1024

RocketVPN – App Review

With RocketVPN installed on your Android device, you can keep your content to yourself while surfing anonymously around the web! RocketVPN sees to it that nothing ever catches hold of your real geographical location, and puts a barrier across you and the information-hungry websites. In my time of usage, I personally used RocketVPN to unlock geographical inaccessible websites (Zedge was my go-to), and also download some applications which aren’t available in my country. Rocket-VPN-SC_2-576x1024

At the end of the day, RocketVPN avoids your from being monitored by third parties for the utmost in speed, security and privacy. Not only that, but RocketVPN also allows you to have 500 MB of free data every 30 days for you to easily and safely surf throughout the web. We have enumerated the reasons as to why you’d be using RocketVPN as follows:

  • RocketVPN allows you Access to content not available in your country (for example, Youtube videos or applications).
  • RocketVPN helps you keep your data encrypted, increase your security and privacy with a single tap.
  • Rocket VPN doesn’t share your connection with other users as other VPN applications do.

Verdict

I’ve been astonished with my time of testing this application. Hats off to that amazing developer behind this application. I highly recommend you follow the link provided below and install this application on your Android device right away.

Download RocketVPN For Android

Install Android 6.0.1 Marshmallow on Galaxy Mega 5.8 I9152 via CyanogenMod 13

24
Install Android 6.0.1 Marshmallow on Galaxy Mega 5.8 I9152 via CyanogenMod 13

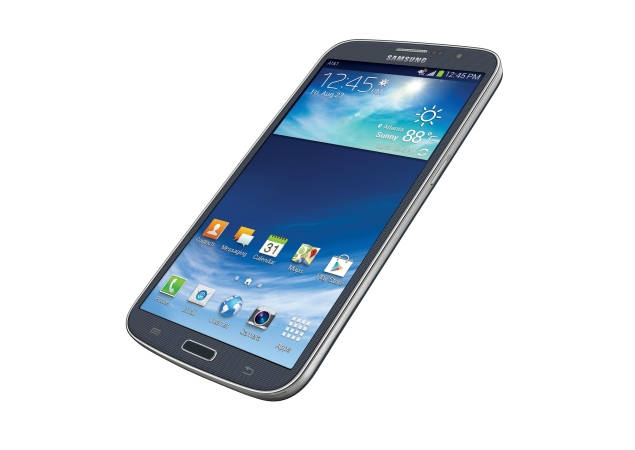
Here’s a step-by-step guide that will help you install Android 6.0.1 Marshmallow on your Samsung Galaxy Mega 5.8 I9152 via CyanogenMod 13 custom ROM. Prior to the installation process, we’ll have a look on the importance of custom ROMs and Galaxy Mega’s 5.8’s software life.530201313624PM_635_Samsung_galaxy_mega_5

Custom ROMs have always proved to be a blessing for the Android smartphones that have been forgotten by the manufacturers in the software aspects. The reason for manufacturers to stop the software updates is the limitation of hardware. Old hardware is not capable enough to run the latest softwares all the time. Thus, to keep the device’s software intact, device manufacturers keep it to a certain version of OS and then discontinue its software support. One such unlucky device is Samsung’s Galaxy Mega I9152, It couldn’t see any further version of Android after Android 4.2.2 Jelly Bean. Galaxy Mega enjoyed the latest versions of Android by means of custom ROMs, so that’s how this device comes under the umbrella of blessings we just talked about a minute ago.

Galaxy Mega’s dual SIM variant I9152’s official software support was limited to Android 4.2.2 Jelly Bean as well. We’ve posted the guides to update your Galaxy Mega I9152 to Android KitKat and Android Lollipop earlier, now that the Android 6.0.1 Marshmallow in the form of CyanogenMod 13 is also out, so we are going to help you update to this latest and greatest version of custom Android OS now. Time for us to take you through the early preparations and then begin flashing the Android 6.0.1 Marshmallow with CyanogenMod 13 on Samsung Galaxy Mega I9152.

Note: This ROM is in early development stages and isn’t meant to be kept for every day use. You may install this ROM at your own risk. Proceed only if you know how to handle a mishap if it occurs after flashing this ROM. It is expected to carry a handful of bugs as long as the builds do not enter stable stage. It’s only good to give you a look and feel of Android 6.0.1 Marshmallow. As the new builds come up, we will update this post. Newbies have to be more careful and follow this guide to the letter.

Precautions

  1. This ROM is intended for Galaxy Mega 5.8 I9152 . Do not try flashing this ROM on any other device otherwise you will result in bricking it. Check your device’s model number under settings > about device.
  2. Charge your phone up to 50% to avoid any power issues during the flashing process.
  3. Flash a custom recovery on your Galaxy Mega 5.8 I9152 .
  4. Backup everything including your important contacts, call logs and text messages.
  5. Don’t forget to create a Nandroid backup. This is highly recommended so that you can revert back to your previous system in case of a mishap.
  6. Backup EFS partition to avoid EFS corruption later on.
  7. Follow the instructions to the letter.

DISCLAIMER: FLASHING CUSTOM ROMS VOIDS THE WARRANTY OF A DEVICE AND ITS NOT RECOMMENDED OFFICIALLY. WHILE YOU’RE GOING TO DO THIS, MAKE SURE THAT YOU’RE DOING THIS AT YOUR OWN RISK. IN CASE OF A MISHAP TECHBEASTS, SAMSUNG OR THE DEVICE MANUFACTURERS MAY NOT BE HELD RESPONSIBLE.

Install Android 6.0.1 Marshmallow on Galaxy Mega 5.8 I9152 via CyanogenMod 13

  1. Download TWRP Recovery with SELinux support for your Galaxy Mega 5.8.
  2. Download latest CyanogenMod 13.zip file according to your device
    1. CyanogenMod 13 Android 6.0.1.zip file
  3. Download Gapps.zip [arm, 6.0.zip] file for Android 6.0.1 Marshmallow.
  4. Connect your phone to your PC now.
  5. Copy all .zip files to the storage of your phone.
  6. Now disconnect your phone and turn it off complete.
  7. Boot into TWRP recovery now, in order to do so, turn it on by pressing and holding Volume Up + Home Button + Power Key. You should see the recovery mode in a while.
  8. Now in TWRP  recovery, wipe cache, factory data reset and advanced options > dalvik cache.
  9. After wiping all these three, select “Install” option.
  10. Now select “Install Zip >  Select twrp_v2.8.7.0…….zip file > Yes”.
  11. This will flash the SELinux supported TWRP on your Galaxy Mega 5.8 now. Now go back to main menu in TWRP Recovery and tap “Reboot > Recovery”. This will reboot into newly flashed TWRP on your Galaxy Mega 5.8 I9152 now.
  12. Now in the new recovery select “Install Zip >  Select cm-13.0…….zip file > Yes”.
  13. This will flash the ROM in your phone, once done get back to the main menu in recovery.
  14. Now once again select “Install > Select Gapps.zip file > Yes”
  15. This will flash the Gapps in your phone.
  16. Reboot your device.
  17. You should see the Android 6.0.1 Marshmallow CyanogenMod 13.0 running on your device in a while.
  18. That’s all!

In order to enable root access on this ROM, go to settings > about device > tap the build number for 7 times. This will enable developer options on in settings. Now open developer options and enable root.

First boot may take up to 10 minutes, you may not worry if it’s taking that much long. In case it’s taking too long, you may boot into TWRP recovery and wipe cache and dalvik cache and reboot your device as it may fix the issue. In case your device is having issues, you may return to your old system using the Nandroid backup or follow our guide here to install stock firmware.

Got any queries? Reach us out through the comment box below.

Install Android 6.0.1 Marshmallow on Galaxy Mega 6.3 I9200/I9205 via CyanogenMod 13

5
Install Android 6.0.1 Marshmallow on Galaxy Mega 6.3 I9200/I9205 via CyanogenMod 13

You can easily install Android 6.0.1 Marshmallow via CyanogenMod 13 custom ROM on your Galaxy Mega 6.3 I9200 and I9205 using the steps given here. Before heading towards the steps, let’s have a flashback at the Galaxy Mega 6.3.samsung-galaxy-mega-63-635

Galaxy Mega’s elder variant, the Mega 6.3 runs on Android 4.2.2 Jelly Bean. Like its younger brother, the Galaxy Mega 5.8, Galaxy Mega 6.3 didn’t happen to be too much unlucky in the software aspects. It did get software updates till Android 4.4.2 KitKat and that’s where Samsung officially ended its software support. Galaxy Mega 6.3 powers itself with a Qualcomm Snapdragon 400 CPU, which is a Dual-core 1.7 GHz Krait 300. The phone is equipped with a 1.5 GB RAM and 8 GB / 16 GB internal storage options are there. Galaxy Mega 6.8 was one of the greatest devices at the time of its release, but technology doesn’t remain the same everyday. In fact, it changes every single minute. Android has taken the world by storm over the past few years. A lot has changed and a lot has been invented while the Galaxy Mega 6.8 was getting older. Unfortunately, because of the hardware restrictions the Galaxy Mega 6.8 owners cannot enjoy the new stuff that Android OS has brought up. We do not mean that it’s impossible, it still is possible, but it’s only possible by means of some nice custom ROM.

Galaxy Mega 6.3 enjoyed Android 4.4.4 KitKat and Android 5.1.1 Lollipop by means of various custom ROMs. Now is the time to install Android 6.0.1 Marshmallow using the best available custom ROM on our beloved device. The famous and widely used CyanogenMod 13 custom ROM has already made its way for the Galaxy Mega 6.3 I9200 and I9205. The post from here onwards will help you to flash this latest Android 6.0.1 Marshmallow via CyanogenMod 13 on your Samsung Galaxy Mega 6.3 I9200 and I9205. Read the early preps and then get this done.

Note: This ROM is in early development stages and isn’t meant to be kept for every day use. You may install this ROM at your own risk. Proceed only if you know how to handle a mishap if it occurs after flashing this ROM. It is expected to carry a handful of bugs as long as the builds do not enter stable stage. It’s only good to give you a look and feel of Android 6.0.1 Marshmallow. As the new builds come up, we will update this post. Newbies have to be more careful and follow this guide to the letter.

Precautions

  1. This ROM is intended for Galaxy Mega 6.3 I9200 and I9205 . Do not try flashing this ROM on any other device otherwise you will result in bricking it. Check your device’s model number under settings > about device.
  2. Charge your phone up to 50% to avoid any power issues during the flashing process.
  3. Flash a custom recovery on your Galaxy Mega 6.3 I9200 and I9205 .
  4. Backup everything including your important contacts, call logs and text messages.
  5. Don’t forget to create a Nandroid backup. This is highly recommended so that you can revert back to your previous system in case of a mishap.
  6. Backup EFS partition to avoid EFS corruption later on.
  7. Follow the instructions to the letter.

DISCLAIMER: FLASHING CUSTOM ROMS VOIDS THE WARRANTY OF A DEVICE AND ITS NOT RECOMMENDED OFFICIALLY. WHILE YOU’RE GOING TO DO THIS, MAKE SURE THAT YOU’RE DOING THIS AT YOUR OWN RISK. IN CASE OF A MISHAP TECHBEASTS, SAMSUNG OR THE DEVICE MANUFACTURERS MAY NOT BE HELD RESPONSIBLE.

Install Android 6.0.1 Marshmallow on Galaxy Mega 6.3 I9200/I9205 via CyanogenMod 13

  1. Download latest CyanogenMod 13.zip file according to your device
    1. CyanogenMod 13 Android 6.0.1.zip file
  2. Download Gapps.zip [arm, 6.0.zip] file for Android 6.0.1 Marshmallow.
  3. Connect your phone to your PC now.
  4. Copy all .zip files to the storage of your phone.
  5. Now disconnect your phone and turn it off complete.
  6. Boot into TWRP recovery now, in order to do so, turn it on by pressing and holding Volume Up + Home Button + Power Key. You should see the recovery mode in a while.
  7. Now in TWRP  recovery, wipe cache, factory data reset and advanced options > dalvik cache.
  8. After wiping all these three, select “Install” option.
  9. Now select “Install Zip >  Select cm-13.0…….zip file > Yes”.
  10. This will flash the ROM in your phone, once done get back to the main menu in recovery.
  11. Now once again select “Install > Select Gapps.zip file > Yes”
  12. This will flash the Gapps in your phone.
  13. Reboot your device.
  14. You should see the Android 6.0.1 Marshmallow CyanogenMod 13.0 running on your device in a while.
  15. That’s all!

In order to enable root access on this ROM, go to settings > about device > tap the build number for 7 times. This will enable developer options on in settings. Now open developer options and enable root.

First boot may take up to 10 minutes, you may not worry if it’s taking that much long. In case it’s taking too long, you may boot into TWRP recovery and wipe cache and dalvik cache and reboot your device as it may fix the issue. In case your device is having issues, you may return to your old system using the Nandroid backup or follow our guide here to install stock firmware.

Got any queries? Reach us out through the comment box below.

How to Install User Apps as System Apps in Android

1
How to Install User Apps as System Apps in Android

Android Settings

Installing apps on Android device is as simple as searching the Play Store and hitting Install button. You can also sideload the APKs on your Android device by enabling Apps from Unknown Sources in the Settings menu. These apps will be installed as User apps on the device and you can uninstall them anytime you want. However, you may have noticed that the apps that came preloaded with the device can’t be removed. These are the system apps and can’t be removed unless you root your device. Similarly, you can’t install an app as system app unless you have Super SU permissions on your device.

Sometimes, you might want to make some user apps as System apps so that they won’t be killed by the system. If you’re willing to shell out some money to buy premium apps like Titanium Backup, this job is as simple as a button click. However, there are other methods to install user apps as system apps without paying any money. Today, we will show you how to install user apps as System apps manually without paying money for apps like Titanium backup. So, without any further ado, let’s see how it’s done.

Prerequisites

  • A rooted Android device. If you haven’t rooted your Android device yet, you can check our rooting guides.
  • Backup all important data on your device so that you can restore it if anything goes wrong.
  • Make sure that you have at least 70% charge before proceeding with the procedure.

How to Install User Apps as System Apps in Android

Installing a System App with ES File Explorer

Download the ES File Explorer app from the Google Play Store and install it on your Android device. Now, follow the below procedure carefully to convert user apps to system apps on Android manually.

  1. Open the ES File Explorer app and click on the hamburger icon (horizontal three lines) at the top left corner.
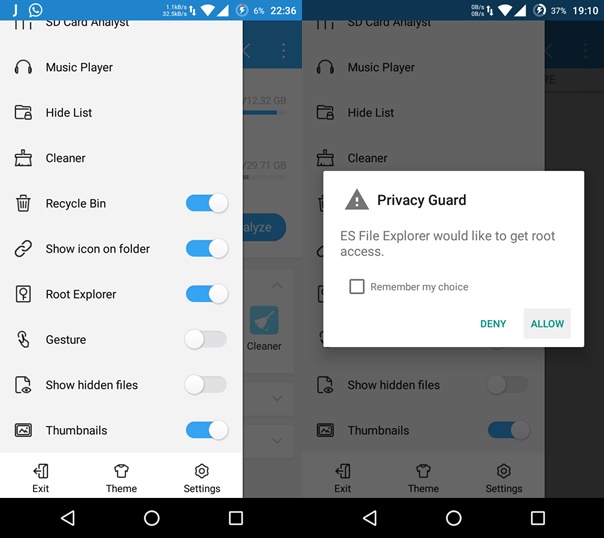
  2. At the bottom of the menu, you’ll the option to enable the Root Explorer, just toggle to option to enable root explorer. Grant Super SU permissions if prompted.
    es-file-exp-enable-root
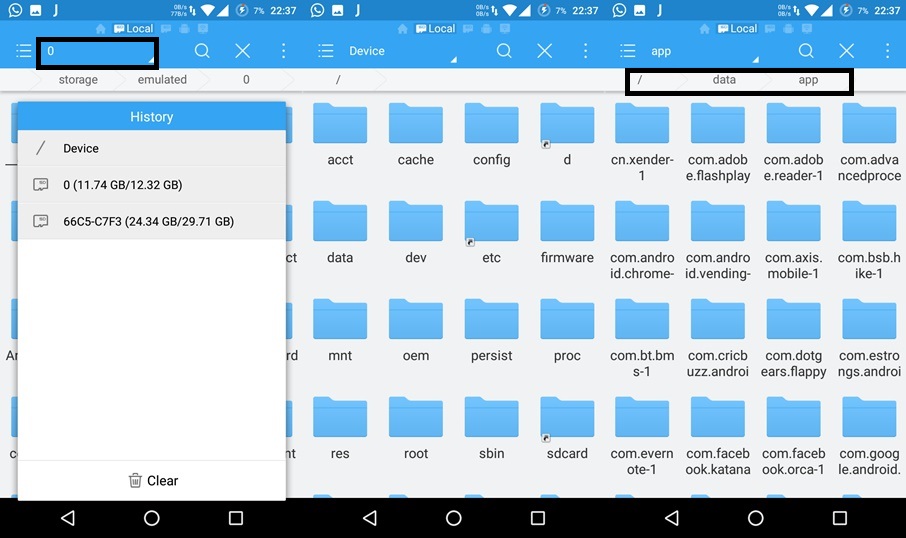
  3. Now click on the Path drop-down menu and select Device. 
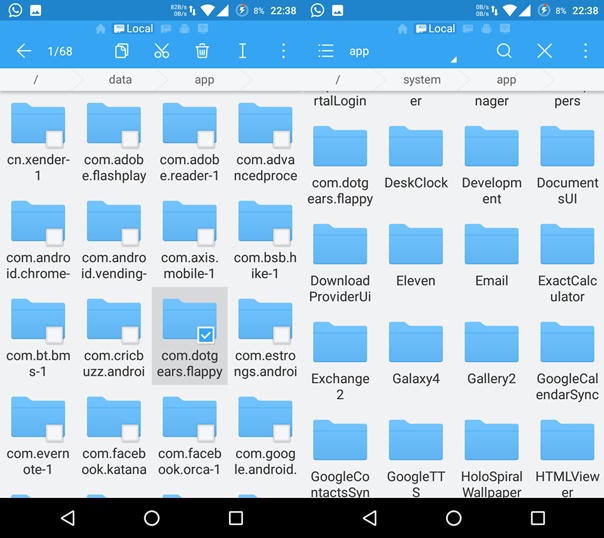
  4. Go back to the app’s main screen and tap on “/” to go to “Device”. Now, navigate to /data/app folder.
    navigate-to-data-app
  5. In this folder, you’ll see all the user apps that are installed on your Android device. Each app is contained in a folder along with all the essential library files.
  6. Select the app you want to make as System app and then click on Cut (don’t copy) option.
  7. Navigate to /system/app location and paste the app folder here. This is where all the system apps are located. If the app asks for root permissions, grant it.
    copy-to-sys-app
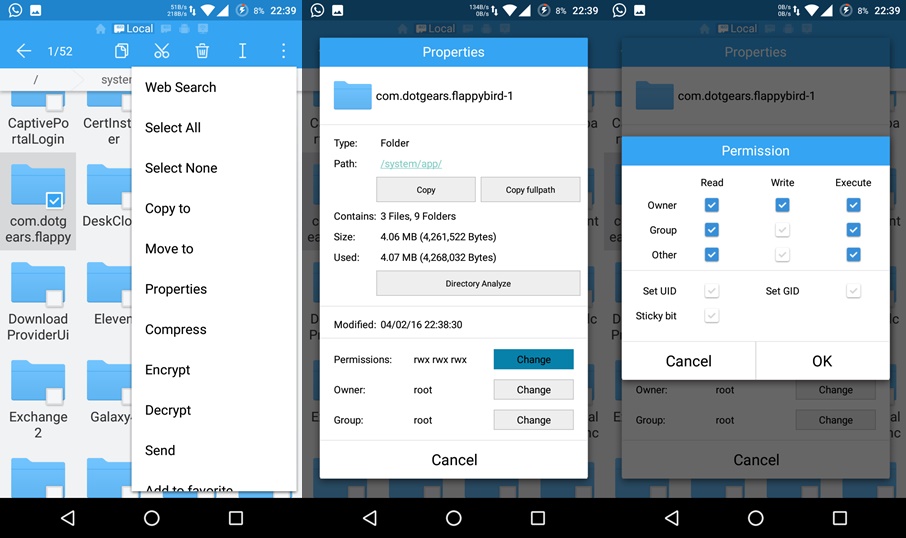
  8. Now, you have to change the permissions of both the folder and APK that you have pasted in the /system/app folder.
  9. Long press on the folder you’ve moved to /system/app and choose Menu » Properties » Permissions » Change and set them as shown below (rwx-rx-rx).
    app-folder-perm
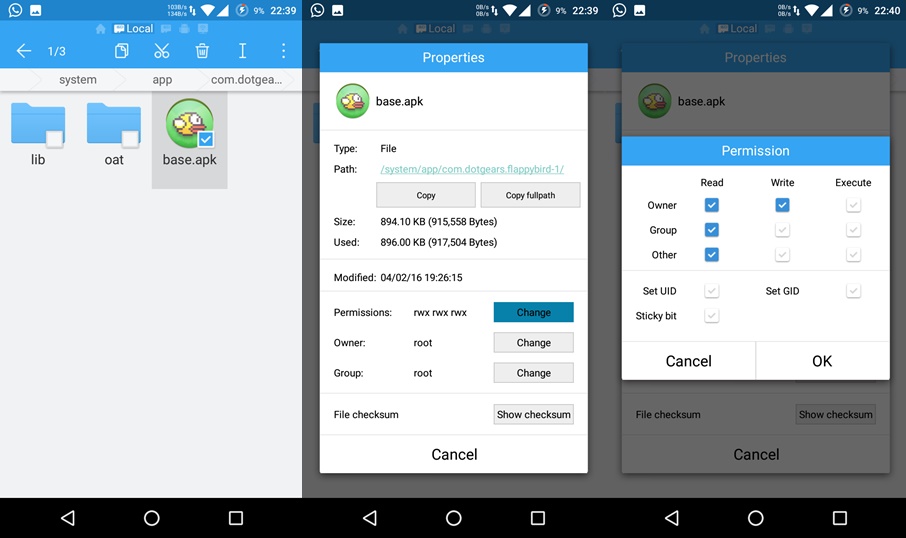
  10. Similarly, click on the APK in the folder and set the permissions as below (rw-r-r).
    app-perm
  11. Finally, reboot the device for the changes to take effect.

That’s it. You can use this tutorial for changing any user app to system app.

How To Launch Remix OS for PC (Windows 32-bit/64-bit)

0
How To Launch Remix OS for PC (Windows 32-bit/64-bit)

Remix OS is the custom version of Android that runs on a PC and allows you to run all of your favourite Android games and applications on a bigger screen. Remix OS  from Jide is built on Android-x86 Project. Remix OS redefines PC mobility. You can pack it inside a USB stick and take it anywhere with you and launch it on the go. There are different methods to run Remix OS, you can pick up the one that suites you the best. Remix OS is based on Android 5.1.1 Lollipop. It’s actually an engineered version of Android Lollipop that is optimised and customised to run on a PC. The OS provides a beautiful UI and a smooth computing experience. Remix OS is available for both Windows and Mac OS X.Remix OS for PC

Remix OS has changed the way we used to use Android on our desktop PC. Remix OS took over traditional Android emulators within a month. The early builds of Remix OS had some annoying bugs, but with the new updates Jide seems to be fixing it. Remix OS was available for 64-bit PCs only, but due to a very high demand of 32-bit version, Jide came up with a 32-bit Remix OS for PC a couple of days back. You can now enjoy Remix OS for PC on both, the 32-bit and 64-bit OS powering up your desktop PC or laptop.

The succeeding guide will take you through a comprehensive guide to install Remix OS on a USB stick and then launch Remix OS for PC on a Windows OS (32-bit/64-bit). Let’s go through early preparations in order to get this done now.

How To Launch Remix OS for PC (Windows 32-bit/64-bit)

Required Hardware & Software

  1. A USB 3.0 with minimum of 8GB storage and FAT32 formatted.
  2. A Windows PC running Windows 7,8,8.1,10 desktop / Laptop – 32-bit/64-bit.
  3. Download and extract Remix OS 2.0 Legacy Package file: Windows 64-bit | Windows 32 – bit.
  4. Enable legacy boot mode from the BIOS of your Windows PC.

Create a Remix OS 2.0 bootable USB disk and launch it

  1. Open the extracted Remix OS 2.0 folder, you will find an ISO file inside this folder alongside a Remix USB Tool.
  2. Connect your USB 3.0 flash drive to your PC / Laptop now. Format it using FAT32 system as stated above in the requirements.
  3. Now launch the Remix USB Tool.
  4. Select the Remix OS 2.0.iso file in the USB Tool and create a Remix OS 2.0 bootable disk now.
  5. Now leave your USB drive connected to your computer.
  6. Restart your PC.
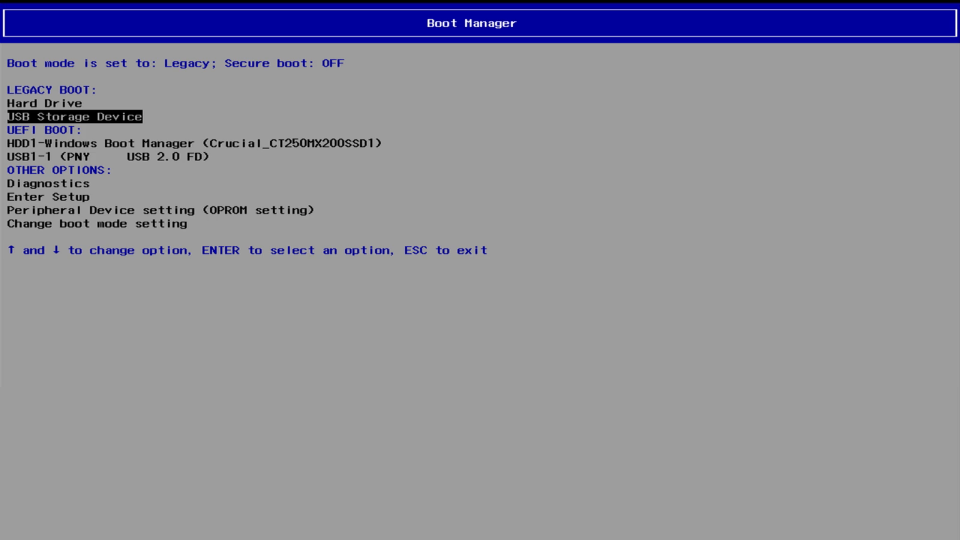
  7. As soon as your PC boots up, you’ve to enter boot menu. To do so, press F12 Key. This key maybe different for your PC, you can look over search engines to find out what Key for your computer will take you to the boot menu. For most of the PCs it’s F12 Key.
  8. Now that you’re in the Boot Menu, select “USB Storage Device” in the Legacy Boot.vlcsnap-2015-02-26-02h53m10s76
  9. Now Remix OS will boot up and ask you whether you want to run it as Guest Mode or in Resident Mode. Select Resident Mode since you will want to save all your data and information in Remix OS. Guest mode will save nothing at all.
  10. Remix OS 2.0 will begin to configure and show you the logs on screen. It can take up to 10 minutes for Remix OS 2.0 to completely boot up.batch_12644779_10207707387215344_5956372426651091735_n
  11. As Remix OS 2.0 boots up, select your desired language. After selecting the language, accept the license agreement and then connect to your internet connection.batch_12512620_10207707388495376_4384354272862343509_n
  12. Your Remix OS 2.0 will be all set and you can begin to use it now. That’s all. Best of luck.
  13. In order to boot into Remix OS 2.0 every time, you’ve to connect the USB 3.0 flash drive and follow the same steps (Step 5 – 9).

In case your Remix OS 2.0 doesn’t have Google Play Store and Google Play Services, then follow this guide to install both these on it.

Mac OS X users can follow this guide to install Remix OS 2.0. on their Macbook Air, Macbook Pro and iMac.

Got any problems with the Remix OS 2.0 installation? No worries, reach us out through the comment box below.


Fix Unfortunately Android Keyboard Has Stopped

0
Fix Unfortunately Android Keyboard Has Stopped

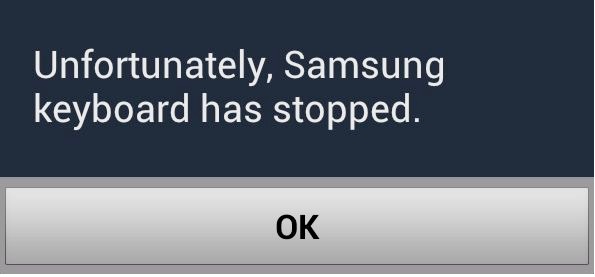
Here are the instuctions on how to fix unfortunately Android keyboard Has stopped error on Android devices, this is most common error every Android user has faced. I never found out the cause of this type of issues but I did find a solution for these bugs. We have a working solution for those are facing unfortunately Android keyboard Has stopped error. Before going any further let me tell you once you started facing this error message there is no way you can use your keyboard, so in order to fix unfortunately Android keyboard has stopped follow all the steps carefully.

How-To-Fix-Unfortunately-Android-Keyboard-Has-Stopped

Also SeeHow To Fix “Unfortunately messaging has stopped” Error

Read MoreHow To Fix Unfortunately WhatsApp Has Stopped on Android

How To Fix “Unfortunately Android Keyboard has stopped” Error

Before going any further you must see our ultimate guide on how to Fix ‘Unfortunately app has stopped’ errors.

Step#1: Open Settings on your Android device.
Step#2: Now tap on More tab.

Step#3: Tap on Application Manager form the list.

Step#4: Now select All Application by swipe to left.

Step#5: There you’ll see all your installed apps, Tap on Android Keyboard.

Step#6: Now all you have to do tap on Clear Cache and Clear data.

Step#7: Now goto home screen and restart your device.

All Done ….

If still you are facing this error try one the following apps:

  • Flesky Keyboard
  • Swift Keyboard
  • Google Keyboard

Fix Unfortunately App Has Stopped [ Video Tutorial ]

Download Latest SN Write Tool [ Flash IMEI Easily ]

0
Download Latest SN Write Tool [ Flash IMEI Easily ]

Once there was a time when mobile phone are used to calls and messaging, as the time passed people start inventing more and more advanced products mobile phones changed into smartphones. Now we can do anything on our smartphones, we can send emails, take snaps, chat free with friends and family, share our experience through social media, run our business setups and much more. As technology is moving on to next step every day, developers are also working hard to keep up with it, today I have a perfect tool for all those who love to do new, experiment on the smartphones. Those who are using Android devices they are well-know of IMEI issues, well today I’ve a tool who can fix IMEI issue and also you can even flash new IMEI on your device. To do so you need to download SN Write Tool, but before going any further let me tell you main features of SN Write Tool.

Also See: Download Latest Odin [Odin3 v3.10.7]

SN-write-tool

Features of SN Write Smart Tool:

  • IMEI flashing: The new and best feature of latest SN Write Tool is that now you can flash multiple IMEI of the smartphones, but keep in mind that it only support Mediatek devices.
  • Multiple Writing Options: SN Write tool also supports Barcode, BT Address, Mac Copy, Wi-Fi address and many more that can be changed by SN Write Smart Tool.
  • Lock IMEI: By using the latest SN Write Smart Tool, you can lock IMEI of your Mediatek device.
  • Target Support: It supports Dual SP Modem, Tablet, Feature phones and Rndis Dongle.

Download SN Write Smart Tool (All Versions ):

Download:  SN Write Tool v2.1504.00 

How to root BlueStacks 2 app player

0
How to root BlueStacks 2 app player

The succeeding guide demonstrates how you can easily root your BlueStacks 2 app player using Kingroot application. After rooting BlueStacks 2, we will also show how you can replace Kingroot (KingUser) by SuperSu. Before rooting BlueStacks 2 app player, we will learn a little bit about this new emulator.bluestacks-2

BlueStacks 2 is the successor of the most famous Android emulator BlueStacks. BlueStacks 2 follows a new design line. It comes with a whole new UI with tons of new features. As it brings a new UI, the very first notable thing you will find in this app player is the new toolbar on the left side which allows you to do everything on the go.

You do not have to go to the settings of the emulator to copy files between Windows and BlueStacks anymore. It also allows you to install APK files simply by clicking on the APK button located in the middle of the toolbar. The toolbar in BlueStacks 2 also contains some handy features like rotate the screen, shake the screen, take a screenshot, location etc. It brings a multi-window feature.

That means now you can run multiple applications at a same time in BlueStacks 2. The applications appear in the form of tabs. You can quickly switch between applications / games simply by clicking on the tab of that particular game / app. Your whole Android core lies within the Android tab in BlueStacks 2.

So that was all about the BlueStacks 2. Let’s get back to the idea of rooting this emulator. A rooted version of BlueStacks was available, which made it pretty easy for users to access their desired root-specific applications on their Windows PC. But a pre-rooted version of BlueStacks 2 wasn’t available. Luckily, the famous root application KingRoot, which is the rooting power behind millions of Android device is found to be working pretty fine with BlueStacks 2. So, users who’ve been willing to break the boundaries on BlueStacks 2 are all set to go ahead now. Let’s have a look on how to do this.

How to root BlueStacks 2 app player

Screenshot_3

  1. Download and install BlueStacks 2 app player on your Windows PC.
  2. Download KingRoot APK file and copy it to your desktop.
  3. Now double click the KingRoot APK file in order to install it via BlueStacks 2. Alternatively you can click on the APK button inside BlueStacks 2 and select the KingRoot APK from your desktop.
  4. Once the Kingroot application has been installed, open BlueStacks 2.
  5. Click on the Android tab in BlueStacks 2. Go to “all apps” or simply search for Kingroot using the search button.
  6. Open Kingroot in BlueStacks 2 now and click on the Android logo appearing in the center.
  7. This will look for an exploit and root your BlueStacks 2 immediately.
  8. Once done, close your BlueStacks 2 and open it again.
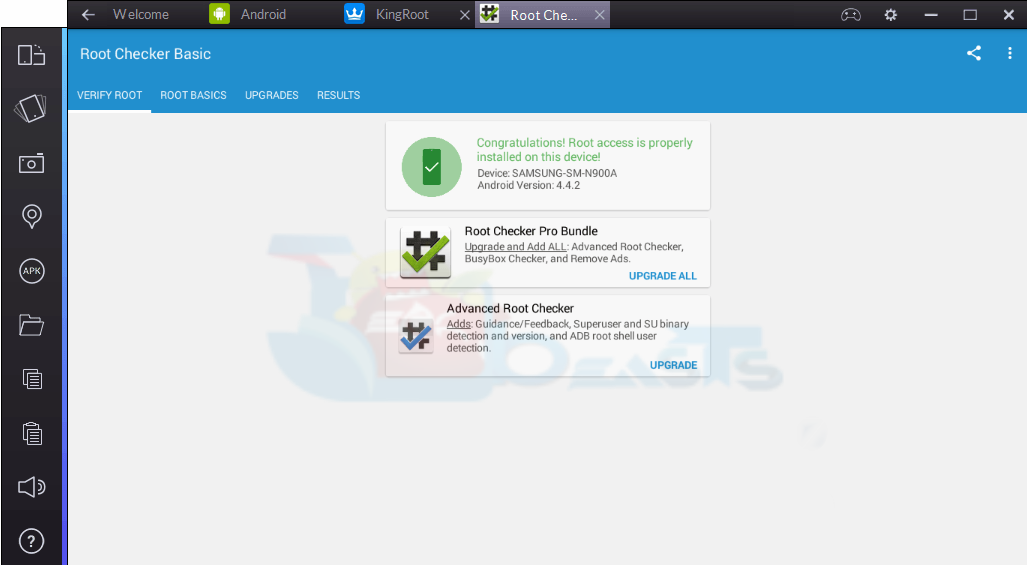
  9. Congratulations. You’re rooted now. Verify root access using Root Checker application now.

How to replace Kingroot (KingUser) by SuperSu

SuperSu is the choice for most of the Android user and its pretty easy to use as well. You may consider replacing Kingroot application by SuperSu now. Here’s a method on how to do so.

  1. Download Super Sume APK file and copy it to your desktop.
  2. Use the instruction explained in step 3 above to install Super Sume.
  3. Now open Super Sume using step 5 from the method explained above.
  4. Tap the button appearing in Super Sume. If it asks to tap the button again, then tap it.
  5. Super Sume will now uninstall Kingroot and install SuperSu.
  6. You will be notified by Super Sume once its done.
  7. That’s all! Enjoy!

How to install Dolby Atmos on Android Jelly Bean, Kitkat, Lollipop & Marshmallow

1
How to install Dolby Atmos on Android Jelly Bean, Kitkat, Lollipop & Marshmallow

Here’s a comprehensive guide on how to install Dolby Atmos sound effect on your Android smartphone running Android 4.3 Jelly Bean, Android KitKat, Android Lollipop and Android Marshmallow. Before proceeding with the installation process, let’s learn a little bit about the Dolby Atmos and the sound MOD we are going to flash.20150304180525_DolbyAtmosLenovoMWC2015Web

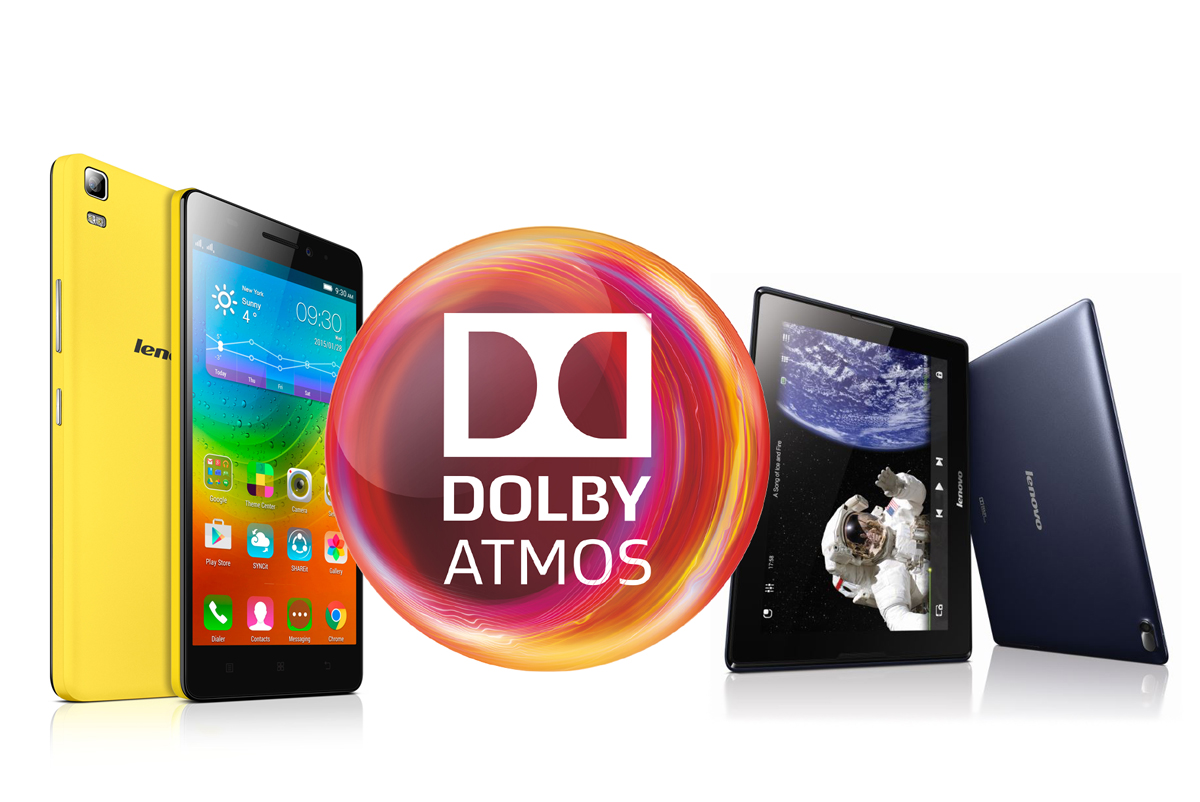
Dolby Atmos takes you beyond traditional surround sound. You must have experienced quit many surround effects on your Android smartphones, but you may have not come across any prominent difference between them. Dolby Atmos was first introduced in 2012. It became a part of movies first of all, but later on Dolby Atmos made its way to the Android smartphones as a sound effect. Dolby Atmos became a part of Lenovo A7000 and Amazon Fire HDX. Although it works because of a hardware encoder with certified Dolby Atmos content, but that wasn’t enough to restrict this sound effect in a certain number of devices.

It’s pretty easy to get your hands on an Android smartphone or tablet with Atmos hardware renderer inside, but there are many users looking for a way to get this sound effect on their existing Android devices. Since we live in an open-source Android world, where anything is possible, the Dolby Atmos sound effect has already been ported from a Lenovo ROM to all other Android smartphones running Android Jelly Bean, KitKat, Lollipop and Marshmallow. You can easily install this sound effect on any of your Android smartphone running the aforementioned versions of Android. All you need to install this sound effect is a custom recovery and root access. The following guide will take you through the step-by-step procedure now.

Disclaimer: Flashing MODs, custom recoveries and rooting the device is not recommended by the device manufacturers. These are entirely custom processes and undergo high risk. In case of a mishap Techbeasts, the device manufacturers or the MOD developers may not be held responsible. Make sure that you’re doing everything at your own risk.

How to install Dolby Atmos on Android Jelly Bean, Kitkat, Lollipop & Marshmallow


Screenshot_2015-05-15-19-21-55-side

  1. Make sure that your device is running Android 4.3 Jelly Bean, Android 4.4 – 4.4.2 or 4.4.4 KitKat, Android 5.0.2, 5.1.1 Lollipop or Android 6.0, 6.0.1 Marshmallow. This MOD will not work with any other version of Android.
  2. Install a custom recovery on your Android smartphone. You may find a custom recovery in our custom recoveries section.
  3. Root your Android smartphone. Find a guide in our site’s root section.
  4. Now download the following .zip files.
    1. dap_r6.5.zip
    2. dap_r6.5.1-uninstall.zip
    3. deep_buffer-remover.zip
  5. Copy all the downloaded.zip files to your phone’s internal or external SD card.
  6. Now boot into TWRP or CWM recovery on your phone.
  7. Select “Install > chose zip from SD card / locate the .zip file [dap_r6.5.zip] > select the .zip file > flash it / yes “.
  8. Once done, wipe the cache and dalvik cache of your device from the custom recovery.
  9. Reboot your device.
  10. That’s all.
  11. Now open the app drawer on your phone and open Dolby Atmos.
  12. You will have the control panel of this application with equaliser and all the options.
  13. Select your desired sound effects, configure according to your liking.
  14. Experience the sound now. For enhanced experience, use some nice headphones.

Just in case you want to uninstall the Dolby Atmos sound effect or your phone faces some issue, you can immediately uninstall it by flashing the dap_r6.5.1_uninstall.zip file and deep_buffer_remover.zip file. Use the instructions in step 6 to uninstall it.

That’s all. Let us know how did this go for you.


How to get Chat Heads on WhatsApp

0
How to get Chat Heads on WhatsApp

Ever wanted to get Facebook Messenger-like chat heads on WhatsApp? Well, if you’ve been wanting to do so, now you can. It’s pretty easy to enable Chat Heads on WhatsApp. This is possible through a third-party application that intelligently pops-up a chat head of any message that hits your WhatsApp. This actually works pretty well. After giving this a try for a day, we are here with a method on how to get / enable Chat Heads on WhatsApp using Dashdow application.

What are Chat Heads?

Chat Heads were introduced on Facebook Messenger back in 2013. Chat Heads brought a new way of quickly interacting with the messages, reading them and replying them on the go. Whenever someone texts you on a the Messenger, the Chat Head pops up and upon taping the Chat Head, it opens the conversation in a kind of a pop-up window. There ain’t a doubt that Chat Heads are a convenient way to reply your buddies even when you’re doing something else on your Android smartphone, you do not have to open the whole messenger to reply, but you can reply simply through the Chat Head pop-up.

Chat Heads for WhatsApp

Using Dashdow application, you can grab this feature on WhatsApp. Dash Dow leaves a Chat Head on your screen whenever a text hits your WhatsApp. Upon tapping the Chat Head, it shows you the message and upon tapping the message, it takes you to that conversation in WhatsApp Messenger. Dashdow doesn’t open WhatsApp in a pop-up window, but we still consider it a great effort keeping in view the conveniency it provides by showing a single or multiple messages inside the Chat Head dancing on your screen. It doesn’t show multiple chat bubbles like the messenger application, but it shows all the messages under one head instead. Let’s have a look on how to enable this application in order to get our task done here.

How to get Chat Heads on WhatsApp

dashdow

  1. Make sure that you’ve installed WhatsApp messenger on your Android smartphone.
  2. Download and install Dashdow on your Android phone. The application works with Android 4.0 and higher.
  3. Give notification access to Dashdow as it prompts you to allow access.
  4. Now let someone text you and the Chat Head or message ball will appear on the screen.
  5. Tap the Chat Head to read the message and tap the message to open it in WhatsApp.
  6. Drag the Chat Head to the trash box located in the center of the screen to remove it.
  7. That’s all.
  8. Just in case you do not want to use Dashdow to get Chat Heads on WhatsApp, you can simply uninstall this application.