Home Blog Page 320

Delete the Useless Photos in your WhatsApp Automatically [ Tip ]

Delete the Useless Photos in your WhatsApp Automatically [ Tip ]

WhatsApp is the one app that eat up the most space on your smartphone, as we share and receive hundreds of photos on WhatsApp daily. As WhatsApp auto download the Photo and video sent by anyone so if you like it or not its stored in your phone memory. In this post, I’ll tell you how to delete the Useless Photos in your WhatsApp Automatically.

[note]

Check out the Cool WhatsApp Group names that your can use: 100+ Cool Whatsapp Group Names for Family, Cousins, Friends [ 2016 ]

[/note]

whatsapp-photo-delete

Delete the Useless Photos in your WhatsApp Automatically [ Tip ]:

  • First, Open Google Play Store on your Android device.
  • Now download and install ” Magic Cleaner for WhatsApp“.
  • Once the app is installed, Open it from home screen on app drawer.
  • You’ll see three notes with information.
  • Go to the third one and click on Show me the magic.
  • First, this App will analyse your photos.
  • Then it will show you how much space is taken by junk images including screenshots, memes, video screen grabs, cartoons and other pictures.
  • Once the app is done analyzing it will delete all the Junk from WhatsApp folder.

This app is created by http://siftr.co/ and they have used the same technology as Google’s image recognition API. They have created their own image recognition API which analyse the image content nature, whether its Junk or Not.

How to Set Bing Images as your Desktop Wallpaper

How to Set Bing Images as your Desktop Wallpaper

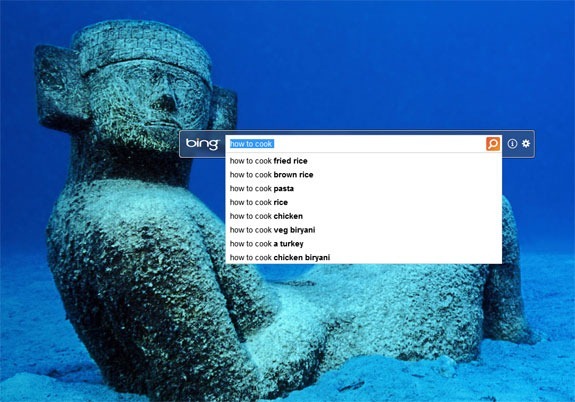
In the following post, I’ll tell you how you can set Bing images as your Desktop Wallpaper. Whenever you open Bing you see a different Wallpapers in the background, I like the Wallpapers set by Bing developers. Let’s start the method to set Bing images as Desktop Wallpapers.

bing-images-desktop-wallpaper

How to Set Bing Images as your Desktop Wallpaper:

Step1: First you have download Bing Desktop App.

Step2: Now install the App on your Windows PC or Laptop.

Step3: Once the installation is done, double click on the App to launch it.

Step4: Now when you launch the app you’ll see a pop with following options.

bing-images-desktop-wallpaper

  • Make the Bing HomePage image your desktop background.
  • Set homepage to MSN.
  • Set Bing as my default search provider.

Step5: Choose the first option and if you like to set Bing as your default search engine instead of Google you can check other options as well.

How to Save your Gmail Data to Google Drive Automatically

How to Save your Gmail Data to Google Drive Automatically

In the following post, I’ll tell you how to save your Gmail messages, files, media, documents and everything to Google drive automatically or you can use the popular term Send Gmail to Google drive.

gmail-to-google-drive

image credit : labnol.org

How to Save your Gmail Data to Google Drive Automatically:

Now before moving on, let tell you few things about the add-on we’ll be using. Download Save email is available on Chrome store, all you have to do is download the add-on and set it up. This add-on helps you convert chat messages in PDF file and save it to Google drive. Whenever you are running out of space in Gmail you can use this add-on to move the large attachments to Google drive. Now let’s start the method on Send Gmail to Google drive.

Step1: Download the add-on and install it on your Chrome browser.

Step2: Goto your Google drive and create a folder specifically for this purpose.

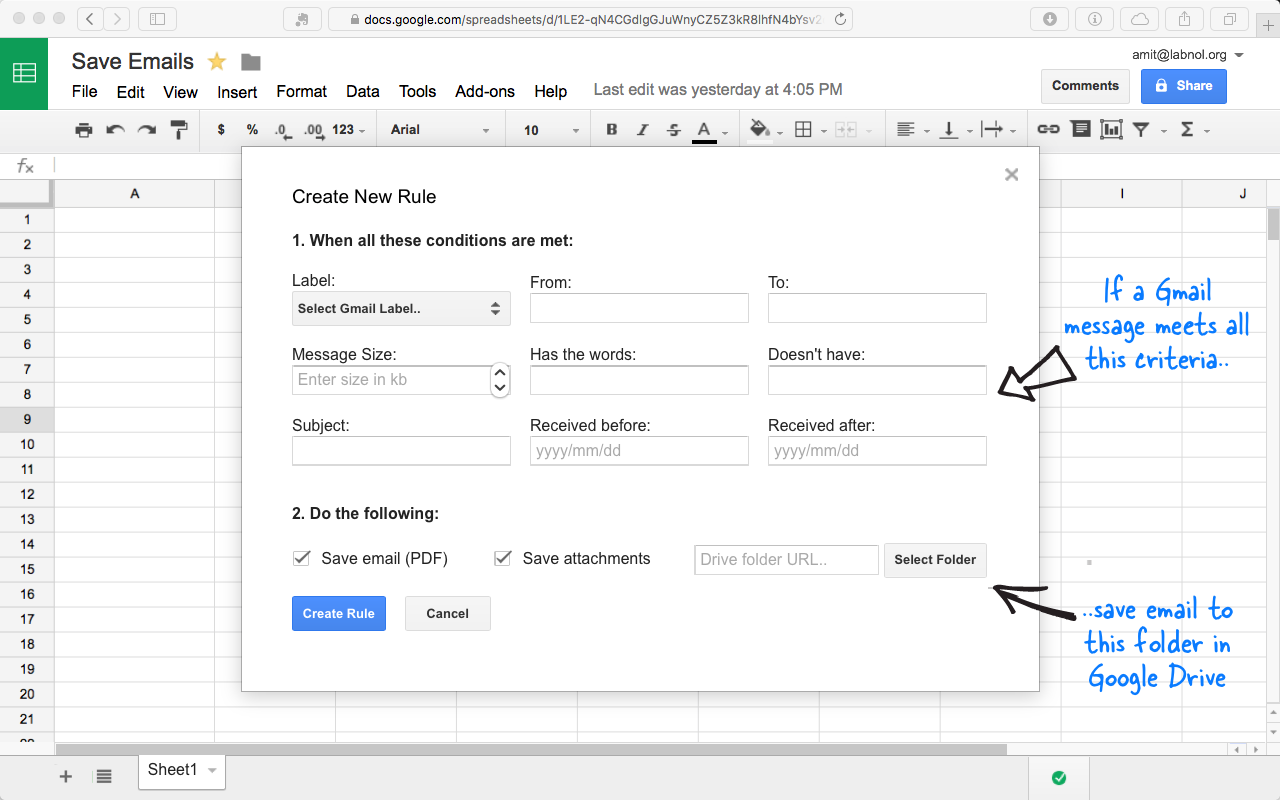
Step3: Now Goto Google docs and click on Add-ons->Save Emails and Attachments->Create New Rule.

Step4: A new page will open in which you have to select the label from Gmail, this process is same as filters in our Gmail account. Click on the label option and drop down menu will appear now choose the label you want to save.

send-gmail-to-google-drive

Step5: Once you have selected the label from the list, leave all the fields empty and click on the select folder button and choose the folder you have created in 2nd step.

Step6: Now once you have selected the folder you’ll see create rule button at the end of the page. Click on Create Rule and as the process completes you’ll see a notification saying a new rule is created.

Now if you want to save emails from a specific sender, all you have to is go back to Google Docs and click on Add-ons->Save Emails and Attachments->Create New Rule. This you have to add few things in given fields, for e.g. I want to save emails from a site as I have their monthly subscription so every month I get receipt email from them to pay the monthly fee. I’ll add that site in from field and Receipt in Subject, now I have to select a folder and click on create a rule.

Save Gmails Emails to Google Drive Video Tutorial

The Best Twitter Search Tricks You Can Find [ Tip ]

0
The Best Twitter Search Tricks You Can Find [ Tip ]

When it comes to best source social media Twitter is on the top and there is no doubt about it. There are hundreds of other social media but no one can replace Twitter, In this post I’ve something really interesting for all Twitter users. The Best Twitter Search Tricks You Can Find, you can use these simple quires to find the exact result.

twitter-search-tricks

[note]Check out how you view Twitter Full Website on iOS and Android devices.

[/note]

The Best Twitter Search Tricks List:

  • from:BarackObama

If you want to find particular tweets from a user.

  • to:BarackObama -filter:links

Now if you want to find tweets from a user containing links.

  • elections list:TIME/time-staff

This query will help you find  tweets from a user who is in particular Twitter list

  • youtube.com min_faves:100

This will help you find Youtube videos which are favorited by at least 100 users.

  • earthquake min_retweets:10

This will help you find tweets which are retweeted at least 10 times.

  • iPhone near:NY within:10mi

If you want to find tweets from users who are nearby.

#foodrecipe lang:en
This will help you find specific language tweets.
  • iPhone Reviews since:2016-04-01 until:2016-04-09

IF you find tweets sent in a particular time frame.

  • YouTube good OR amazing OR awesome filter:links

IF you want to find awesome and amazing Youtube videos on twitter.

  • #Emmys filter:images

This will give you images containing specific Hashtag.

  • Barack Obama filter:news

This will help you find tweets that mention a keyword and links to news websites.

from:john to:peter -RT
Tweets from user @John that @mention user @Peter but exclude Retweets
  • family games filter:safe

This will help you find filter tweets containing adult content.

  • tornado filter:media

If you want to see tornado tweets which contains images or videos.

music concert filter:native_video
Show tweets that contain native video

Reverse Image Search on your Mobile Phone [ How To ]

Reverse Image Search on your Mobile Phone [ How To ]

Reverse Image Search gives your option to discover related images from around the web. All you have to do is upload a photograph from your computer to Google images and it will give you similar images on other websites. Reverse Image Search can be very handy in many manners, In this post I will tell you how to do Reverse Image Search on your Mobile Phone.

reverse-image-search-google

Image Source:

How To Reverse Image Search on your Mobile Phone:

  • Now before going any further let me tell you that, this post is only for mobile devices.
  • First, Open browser on your mobile.
  • Type this URL (  ctrlq.org/google/images ) and tap on enter.
  • Now once the page loads up, click on “Select Image” and choose an image from the photo gallery.
  • Once your image is uploaded,  click “Search” and it will upload your photo to Google Images.
  • All Done.

Method#2:

  • Open Google Chrome on your mobile.
  • Tap on Settings and select ” Request Desktop Site “.
  • Now Open images.google.com in chrome.
  • Here you’ll see a camera icon on top right corner.
  • Tap on it to upload your photograph.
  • All Done.

Download WhatsApp Desktop App for Windows and Mac

0
Download WhatsApp Desktop App for Windows and Mac

WhatsApp finally has its own desktop application for Windows PCs and Mac OS X powered devices. WhatsApp’s desktop application looks like to be a great move by WhatsApp since a number of users were looking for a way to use their favourite social chat application on their desktop PCs and Laptops. A number of workarounds has helped users to access WhatsApp on their computers. This included the use of emulators like BlueStacks, Andy, Remix OS and many others. But this didn’t turn out be smooth enough. Users now finally have an official WhatsApp Desktop App to fulfil their chat desire straight from their computers.

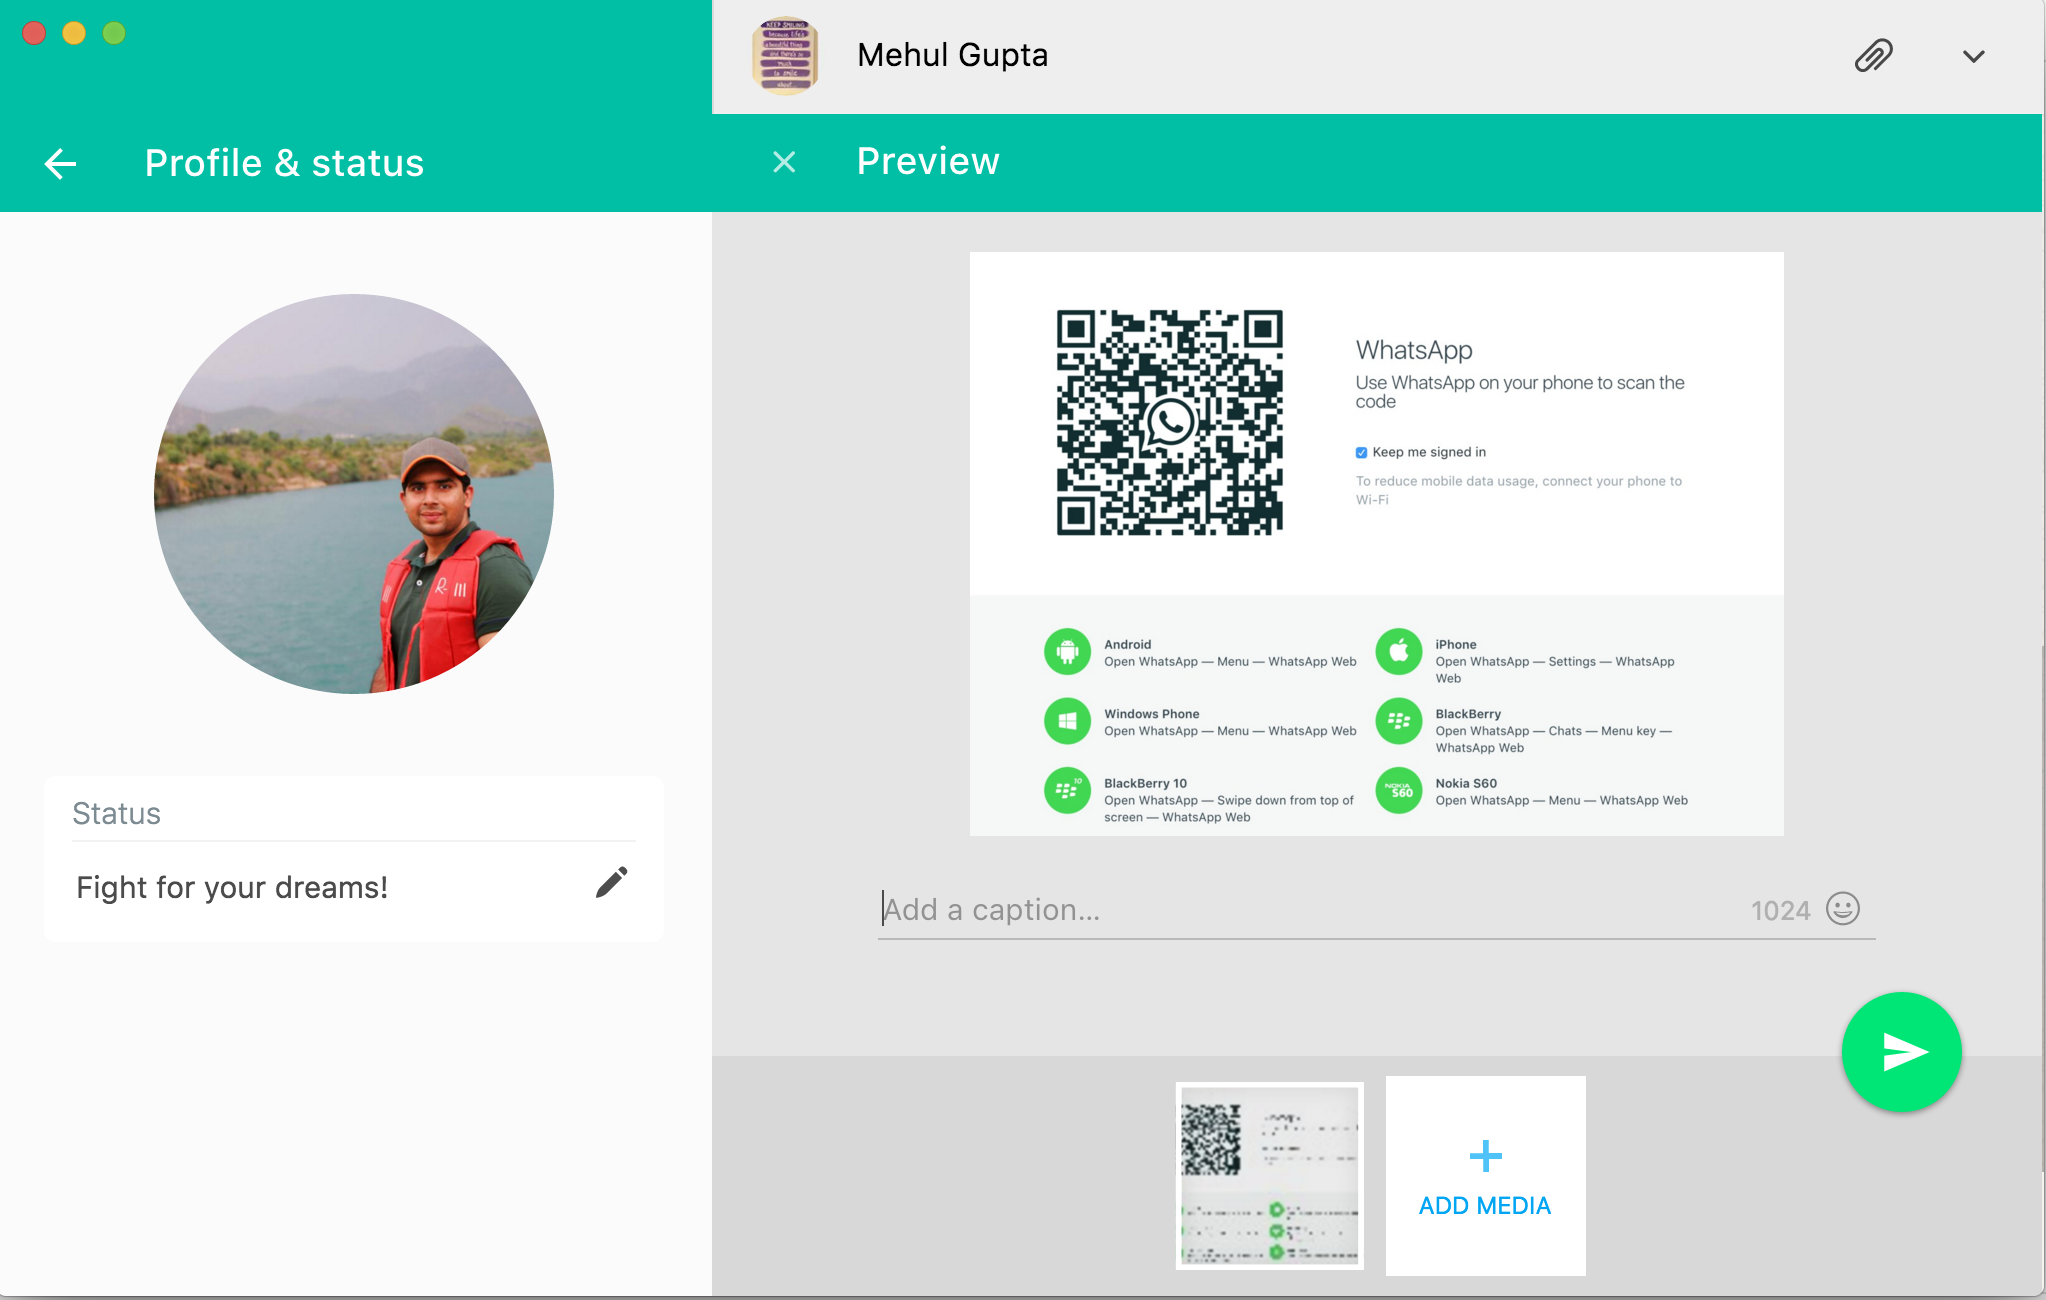
WhatsApp’s desktop application is as same as that of the WhatsApp web. The only difference is, you don’t have to open a dedicated web page for it. You can just install the application on your computer and it will stick around. You need to have WhatsApp messenger installed on your phone in order to sync it with your WhatsApp desktop app. WhatsApp desktop app equips only basic WhatsApp features. It doesn’t allow you to existing media files in your conversations neither it allows making calls. The procedure to use it is also as same as that of the WhatsApp Web. You’ve to scan a QR code by going into the menus by tapping that 3 dotted line on the top right corner of your WhatsApp messenger for phone.

WhatsApp desktop app is compatible with Windows 8+ and Mac OS 10.9+. The desktop app also brings you all your favourite emojis, it also pushes notifications and allows you to use keyboard shortcuts as well. Last but not the least, WhatsApp desktop application is pretty smooth, and runs on a computer without any hiccups here and there. The desktop application is worth replacing WhatsApp installed in Android emulators on your computers.WhatsApp Desktop App

We’ve got our hands on the installation files of WhatsApp desktop application and have linked here. If you’re looking for the best possible way to use WhatsApp for PC then all you need to do is to go ahead, download WhatsApp desktop application and then install it using the installation instructions below.

Download WhatsApp Desktop App for Windows and Mac

  1. Download WhatsApp Desktop App: Windows | Mac OS X
  2. Extract the downloaded zip file using a software like 7zip or Winzip.
  3. You will get the WhatsApp executable file.
  4. Launch the file and get into WhatsApp now.
  5. Scan the QR code shown on the front using your phone. You can do this by tapping the options button on your WhatsApp messenger installed in your phone. Now tap WhatsApp Web and then scan this QR code.
  6. It will sync WhatsApp desktop app and you will be able to access all your chats right away.
  7. That’s all.

How To Fix OK Google is not working

How To Fix OK Google is not working

If your are facing issue with Google Now, I have found a perfect solution for that. I`ve seen many users reporting that when ever they say Ok Google there is no response from Google Now. In the end they have to open the app in order to use Google Now. In the following method I’ll tell you how to fix Ok Google is not working.

OK Google is not working

How To Fix OK Google is not working:

  • Watch your language:

First thing you must do is check Google Now lunguage settings, head over to Go to Voice > Search Language Settings > Offline Speech Recognition >English (US) > Update Available.

  • Check the microphone:

Well this may be the reason which is causing Ok Google Command not work properly. When ever you say OK Google to activate Google Now it uses your microphone to get the command. The best solution is that you should goto service center and get your devcice checked by officials.

  • Disable S Voice:

i have no such idea why S Voice is not compatible with Google Now, I have seen many users saying that after disabling the S voice, Google Now is working perfectly now.

  • Soft Reset:

Reseting your device is oldest trick in books and it works most of the time. So its worth trying, Long press the power button to turn off your device and remove your battery, wait for few seconds. Now put your battery back and turn on your device. Hope so this will work.

  • Reset Ok Google Settings:

This might help, goto Google Settings App->Search & Now option>Voice>OK Google detection>Retrain Voice Model>”OK Google” three times.

How To Fix “google maps not working” Issue [ Tutorial ]

How To Fix “google maps not working” Issue [ Tutorial ]

If you are having problems with Google maps, following is a perfect solution if Google maps are not working, google maps not working in chrome or google maps not loading. Let’s Fix all these issues.

google maps not working

How to fix the ‘Google Maps not loading’ issue?:

Now before starting the tutorial, if you are having this issue on Android then solutions will be different and if you are facing this issue on your PC then solutions will be different. Good thing is that we had both. Let’s start with PC.

Troubleshooting the “Google Map not working” issue in various browsers:

google-chrome-maps-not-working

  • First Open Google Chrome.
  • Now click on the menu button.
  • Select Settings from the list.
  • Now scroll down and select ‘Show Advanced Settings’.
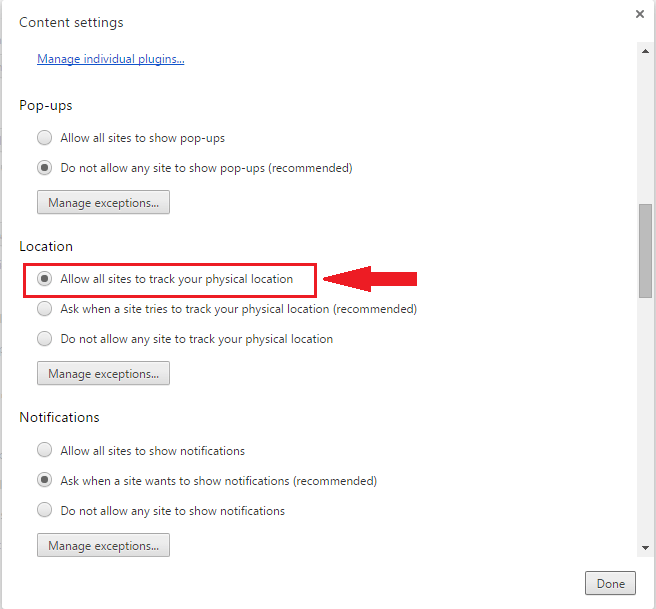
  • Select ‘Content Settings’ under Privacy.
  • In content settings-> location->Allow all sites to track your physical location.
  • Click “Done”.

In Mozilla Firefox browser:

  • Open Firefox on your Pc and open maps.google.com.
  • In URL bar, you’ll see Green lock, Click on it.
  • A new window will open, Select ‘Permissions’ tab.
  • Under ‘Access you Location’ select ‘Allow’.

In Safari browser:

  • Open Safari browser and from the file menu Click on Preferences.
  • Privacy-> ‘Prompt for every website for one time’.
  • Now go to your country version in Google Maps, Click on ‘GPS-like’ icon.
  • When you see a pop select ” Remember my decision and don’t ask again”.
  • Now all you have to do is Click on allow.

In Internet Explorer:

  • Launch Internet Explorer.
  • Open Settings->Internet options.
  • Click on ‘Security’ tab > Trusted Sites > Sites.
  • Now type the version of Google Maps you use, Add the version number now.
  • Uncheck the box ‘Require server verification for all sites in this zone’.
  • Now all you have to do is Click on OK.

Fix “Google Maps not working” issue on Android phones?

Step#1: Open Settings on your Android device.

Step#2: Now tap on More tab.

Step#3: Tap on Application Manager from the list.

Step#4: Now select All Application by Swipe to left.

Step#5: There you’ll see all your installed apps, Tap on Google Maps.

Step#6: Now all you have to do tap on Clear Cache and Clear data.

Step#7: Now goto home screen and restart your device.

All Done.

Best 5 iOS emulator for windows | Emulators for iOS

2
Best 5 iOS emulator for windows | Emulators for iOS

There are millions of iOS apps that even non iPhone users learn to use. Good news is that it is now possible to use iOS apps by anyone. Here are the best iOS emulators for Windows. These iOS emulators for Windows can help run your favorite iOS apps on Windows computers or laptops. This is made possible because the emulator makes your computer behave like a ‘guest’ to run any iPhone or iPad app.

Although there are various emulators and simulators available online, however, it is not necessary that each one of them is reliable and worthy. I have short listed the best iOS emulators for Windows. These are very easy to install, simple to use and require basic systems rather than high tech systems.

So let’s move on and see the Best iOS Emulators for Windows.

[note]Here are the Top 6 Best Bluestacks Alternatives for PC[/note]

ios-emulator-for-windows

iPadian

The first on the list is the best iOS emulator for windows. It is flawless in its work and is capable of running any iOS app or game on your PC.  iPadian is most recommended by the experts and the biggest plus of using this emulator is that it supports Apple’s latest OS update, iOS 9. It is easy and simple to install on the Windows computers and laptops. Here is how.

First of all, Download iPadian simulator .exe file on your computer.  Once it has been downloaded, install the file and run the iPadian Simulator on your PC. That’s all. Now, you can search any iOS app or game and click on the install button to install the app on your PC.

ios-simulator

MobiOne Studio:

MobiOne Studio is simple to install on the Windows PCs. This is basically useful to build cross platform app for iOS as well as Android devices. It can do the following tasks;

  • Produce Status Notifications on Desktop
  • Share App and App links through email
  • Configure Apps to run on iPhone or iPad
  • View Status of your App through AppCentre Progress
  • Automatically download App installation file on PC
[note]Learn how to Install GBA4iOS on iOS 9.2.1 without Jailbreak.[/note]

iPhone Simulator:

Another way to access and run iOS apps and games on your Windows computer or laptop is through this iOS emulator. What is best about iPhone Simulator is that it can be used to test drive the apps so if you are deciding to purchase an iOS app or game, it is better scan it for any major issues. It has a user friendly interface, runs most of iOS apps excluding some by default and is free to use. iPhone Simulator makes your device look like clone of iPhone with amazing graphics and interface.

iPad Simulator:

Next, we have iPad Simulator among the best iOS emulators for Windows. iPad Simulator is installed as an extension of Google Chrome. Similar to iPhone Simualtor, this one helps you get iPad interface on your computer or laptop. You can also use iMessage to communicate with your friends who use iPad. While using iMessage, you will also get notifications and alerts of incoming messages on the Chrome extension. Other features that you can use through iPad Simualtor are;

  • Use Siri
  • Cloud Access
  • Easily connect with the Web services
  • Multi-tasking
  • Easily locate apps using the search tool
  • HD animated background and screensaver

Smartface:

Lastly, you can get Smartface which is an iPhone emulator that not only helps run iOS apps and games on Windows PC but also helps in testing iOS apps. It provides debugging options so you can scan and debug the iOS apps easily.
These were the Best iOS Emulators and Simualtors for Windows that can help you run iOS apps on your computers or laptops. All versions of iOS, iPhone and iPad, including iOS 4, iOS 5, iOS 6, iOS 7, iOS 8, iOS 9, iPhone 4, iPhone 4S, iPhone 5, iPhone 5C, iPhone 6, iPhone 6 Plus, iPad 3, iPad 4, iPad Mini and iPad Air are supported by the emulators along with all versions of Windows Vista and later. These emulators are free to use and run smoothly on PCs.

Uncharted Fortune Hunter for PC – Windows and Mac

0
Uncharted Fortune Hunter for PC – Windows and Mac

Uncharted Fortune Hunter brings your favourite gaming character Nathan Drake inside your Android and iOS devices now. The game just made its way to the Google Play Store and Apple’s App Store a day ago. Uncharted Fortune Hunter is much different from its play station counterpart. As the name suggests, you’ve to hunt fortune in this game. It turns out to be a puzzle game with over 200 exciting levels. You’ve to draw your way towards the fortune. Approach the fortune from the right direction. Reaching out the treasure from a wrong direction will kill Nathan Drake and also result in failing your level. Uncharted Fortune Hunter is a free to play game. Although the game is pretty easy to get on an Android or iOS smartphone, but many of the users will want to get it on their PCs as well. For those users, we have this guide here.Fortune Hunter

You can easily install and play Uncharted Fortune Hunter for PC on your Windows XP/7/8/8.1 Desktop PC/Laptop and also Mac OS X powered Macbook / iMac. You will need an emulator like BlueStacks, Andy OS or Remix OS to play Uncharted Fortune Hunter for PC. The instructions are listed below. Go ahead and start playing Uncharted Fortune Hunter for PC now.

Download and install Uncharted Fortune Hunter for PC (Windows and Mac)

  1. Download Uncharted Fortune Hunter APK
  2. Download and install Bluestacks: Bluestacks Offline Installer | Rooted Bluestacks | Bluestacks App Player | Rooted BlueStacks 2
  3. Once you’ve installed Bluestacks, double click the downloaded Uncharted Fortune Hunter APK.
  4. The APK will be installed using Bluestacks, once installed open Bluestacks and locate the recently installed Uncharted Fortune Hunter.
  5. Click the Uncharted Fortune Hunter icon to open it, follow the on-screen instructions to play it.

You can also use Andy OS or Remix OS to install Uncharted Fortune Hunter, here’s the tutorial:  How To Run Android Apps On Mac OS X With Andy | How to launch Remix OS for PC and install Apps for PC via Remix OS.

The Andy OS and Remix OS tutorial explains how to play a game on your Mac OS X, but the same guide will also work for a Windows PC.

That’s all. In case you’re stuck with anything, reach us out through the comment box below.

10 best google gravity tricks which will amaze you

1
10 best google gravity tricks which will amaze you

Here are 10 Best Google Gravity Tricks Which Will Amaze You. If you are tired of using your same old Google search engine everyday, you can now add some twist to it and have a different experience.

google gravity

Google Gravity was introduced by Google in 2009. It is a java based search engine trick that makes using Google even more fun in extra ordinary ways. The trick basically maneuvers with the contents of the search engine to make them look interesting with a bit of crazy element.

10 Best Google Gravity Tricks Worth Trying:

Google Zero gravity:

google gravity

Google Zero Gravity is basically what makes all the web pages and its content turn upside down or if you ask more clearly, it shows in reverse order. This not only includes text, but also applies to the images, search text as well as search result order.

Try Here.

Google Gravity Underwater:
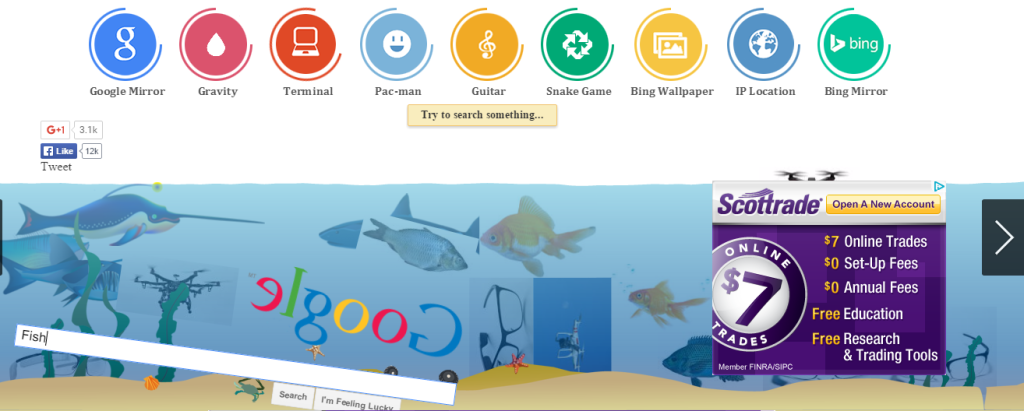
google gravity

The next amazing trick that you should try is the Underwater trick. And you can guess from the name, the web pages will have an underwater effect where you will be able to see all the contents on the webpage floating alongwith the water species.

Try Here:

Google Gravity Guitar:

google gravity

This trick is for all the guitarists or guitar fans who want to see a guitar on the homepage of the search engine. Google Gravity Guitar displays a guitar alongwith some popular tunes and notes that you can follow. It will also show the search results in reverse order.

Try Here:

Google Gravity Sphere:

google gravity

Want to see the contents of the webpage moving in a circular motion? Well, Google Sphere will do the trick for you and as you hiver the mouse over the web page, you will be able to see the contents circle around the mouse. However, it can be a little tricky to click on the link.

Try Here:

Google Space:
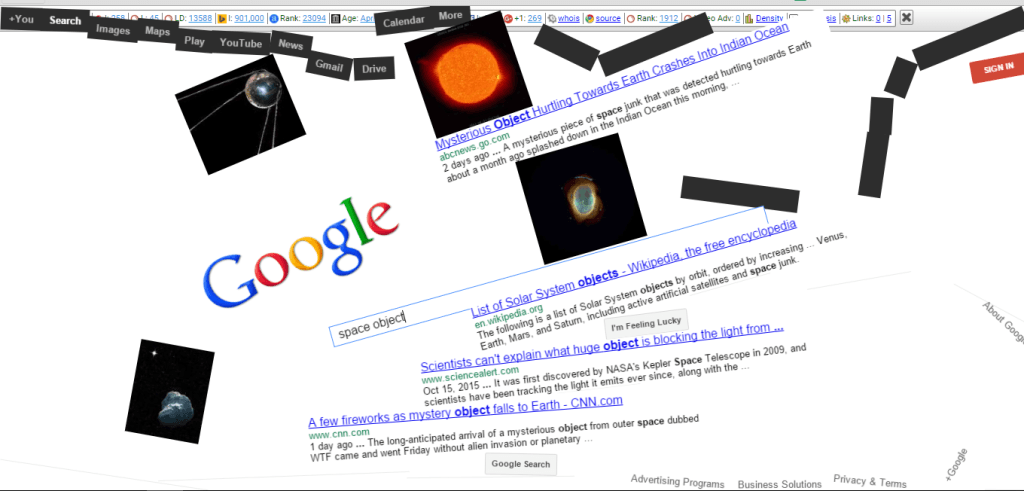
google gravity

Google Space is much similar to Google Gravity in which the webpage content shows like it is in outer space, floating as if its under zero influence of gravity.

Try Here:

Google Barrel Roll:

google gravity

‘Do a barrel roll’ is another interesting Google Gravity Trick and unlike other trick mentioned above, this one is just spontaneous. If you type ‘do a barrel roll’ in Google search bar, your webpage will make a speedy 360 degree spin which is really cool.

Try Here:

Google Tilt:

google gravity

This one will actually slightly tilt the webpage and all of its content. Like Barrel Roll, to apply Google Tilt, all you have to do is write ‘Tilt’ in the Google search bar.

Google Gravity Zerg Rush:
google gravity

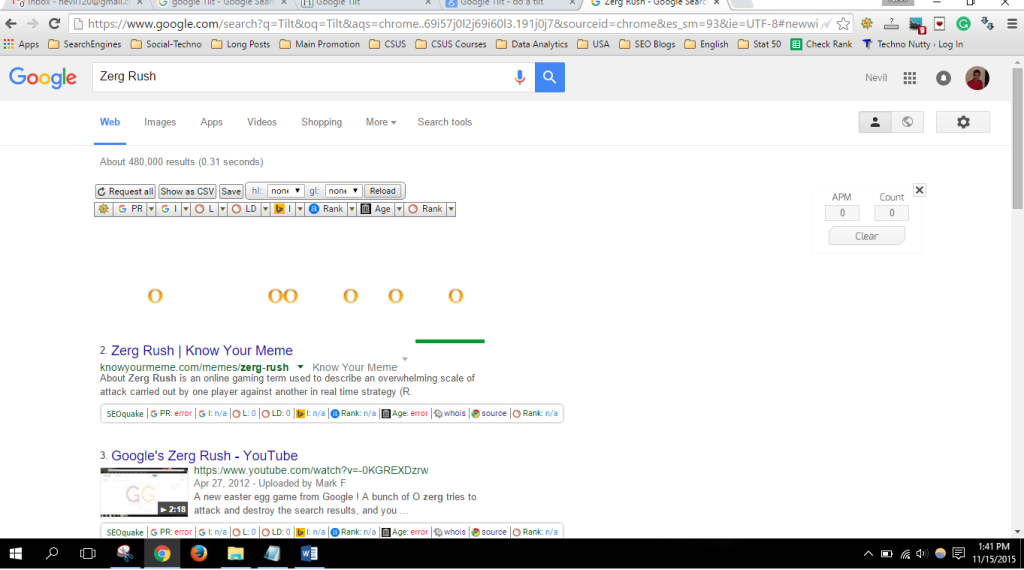
This trick is derived from the popular video game Zerg Rush and what it does to the webpage is amazing. As you type Zerg Rush in the Google Search bar,  zero digits will start falling on the screen. As they fall on the search results, they results will start to disappear one by one.

Google Flat Fall:
google gravity

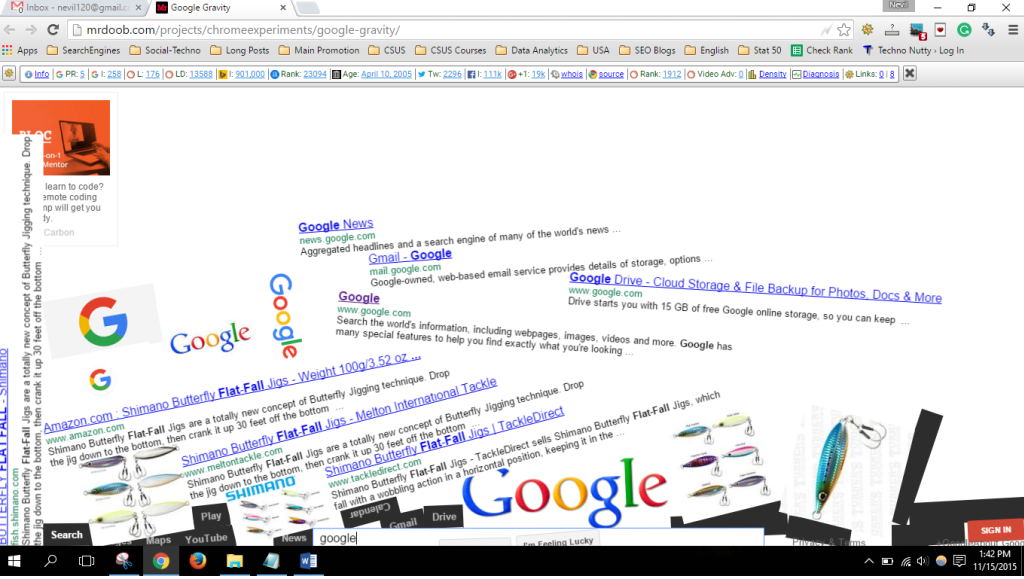
Flat Fall makes the webpage contents; images and everything else fall down on the screen with a little bounce.

Try Here:

Google Gravity Mirror:

google gravity

The Mirror is very interesting. Through Google Gravity Mirror, you can actually apply mirror effect to the webpage where all the contents will appear inverted or in reverse.

These were the 10 Best Google Gravity Tricks that everyone should try atleast once. These tricks are quite distinctive and perfect if anyone needs to play a prank or have some fun rather than to keep using the same old search engine.