Galaxy Tab 4 10.1 is a pretty old device by Samsung. Galaxy Tab 4 runs on Android 5.0.2 Lollipop. Samsung doesn’t have any plans in pipeline to update this device to a further version of Android. If you are willing to play with the Galaxy Tab 4, it may be the time for you to pull it out if you have one. You can install a handful of custom MODs, pick up a working custom ROM or pick up any tweak to add some new features to your pretty old device. Galaxy Tab 4 10.1’s CyanogenMod 14 custom ROM is already out, you can also give a try to Xposed framework to unleash the real power of your device.
The question comes up when you think how are you going to do all the aforementioned things? Well, that is what custom recoveries and root access are meant to be for. You can flash a custom recovery like TWRP or CWM and then you are all set to flash any files of your liking on the device. The good thing for now is, TWRP recovery is available for our beloved Galaxy Tab 4. The available TWRP recovery will work with your Galaxy Tab 4 SM-T530, SM-T531, SM-T533, SM-T535 and the US Cellular Galaxy Tab 4 as well. In a while, a guide coming your way will educate you on how to install TWRP recovery and Root Galaxy Tab 4 10.1. Let’s go through the precautions and then flash the recovery in order to kickstart tweaking the Tab 4.
Preparations
- This guide is only for Galaxy Tab 4 10.1 SM-T530/T531/T533/T535. Do not try this on any other device.
- Charge your device up to 50%.
- Use original data cable to establish connection between your PC and your phone.
- Backup your important data as a safety measure. Use the backup guides linked below.
-
- Backup SMS Messages
- Backup Call Logs
- Backup Contacts
- Backup Media – Copy your files manually to your PC or Laptop.
- Follow this guide to the letter to avoid any mishap.
DISCLAIMER: FLASHING CUSTOM RECOVERY AND ROOTING THE DEVICE VOID ITS WARRANTY. IN CASE OF A MISHAP, TECHBEASTS OR SAMSUNG MAY NOT BE HELD RESPONSIBLE. MAKE SURE THAT YOU’RE DOING EVERYTHING AT YOUR OWN RISK AND WITH YOUR FULL UNDERSTANDING.
Required Downloads:
- Download and install Samsung USB drivers.
- Download and extract Odin 3.10.6.
- Download TWRP Recovery file: twrp-3.0.1-0_matisse_20160402-2032.tar
- Download SuperSU.zip file and copy it to your Tab’s internal storage.
How to install TWRP recovery and Root Galaxy Tab 4 10.1
- Open Odin3 V3.10.6.exe that you extracted on your PC.
- Enable OEM Unlock on your Tab 4 10.1. To do so on your phone, go to settings > about device > tap the build number for 7 times to enable developer options. Get back to the settings and open developer options. Under developer options turn on “OEM unlock.“
- Put your Tab 4 10.1 in download mode now. To do so, turn it off completely. Now turn it on by pressing and holding Volume Down + Home + Power Key. Once your phone boots up, press the Volume Up key to continue.
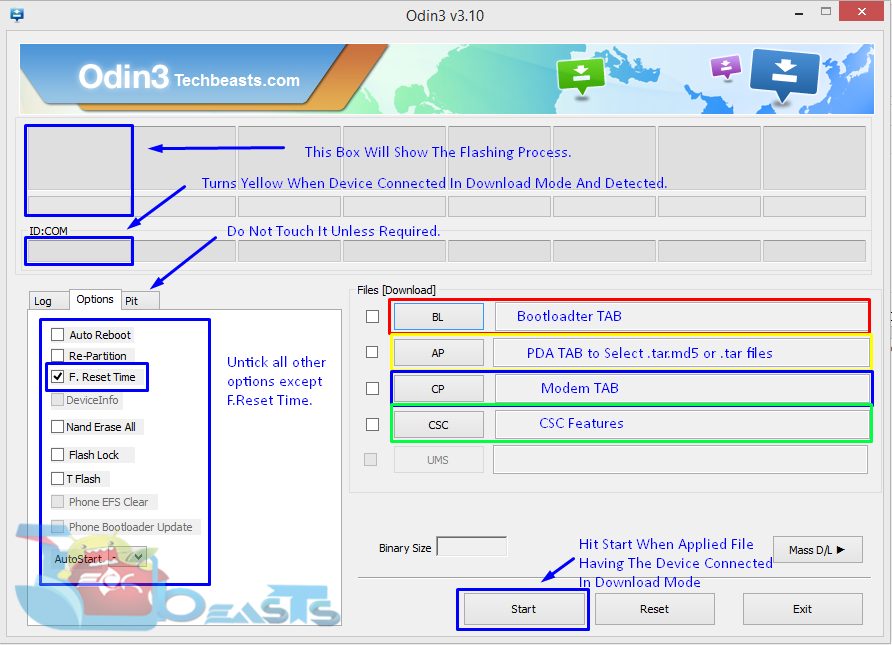
- Connect your phone to your PC now. The ID:COM box in the top-left corner of Odin3 should turn blue. This indicates that your phone is connected properly.
- Now click the “AP” tab in Odin and select the TWRP recovery.tar file that you downloaded. It will take a second or two for Odin3 to load this file.
- Make sure that your Odin3 looks like this. The only option ticked should be F. Reset Time.
- Now you’re all set to flash the recovery. Just click the start button in Odin3 and sit back.
- Once the process box above ID:COM box shows green light and flashing process is finished, disconnect your device.
- Without rebooting the device, we have to boot into TWRP recovery now. To do this, press and hold Volume Down + Home + Power key on your device, as soon as the screen goes black, immediately switch the key from Volume Down to Volume Up while having the Power + Home Key pressed. This will take you to the TWRP recovery.
- In TWRP Recovery, Swipe to allow modifications and then tap “Install > Locate the SuperSU.zip file > Select this file > Swipe to confirm flash > flash it”.
- Once SuperSU.zip file flashing ends, reboot your device into system.
- As it boots up, checkout the SuperSu in application drawer. Also install BusyBox from Play Store.
- Verify root access using Root Checker.
- That’s all. You’re now set to unleash the open source nature of Android.
Don’t forget to backup Nandroid now. And also learn How to install Android 7.0 Nougat CyanogenMod 14 on your Galaxy Tab 4 10.1.
Stuck with anything? Reach us out through the comment box below!


My Tab 4 does not have a OEM Unlock option under developer options
@disqus_P5dRGrV0zO:disqus if it doesn’t have this option, then you don’t need to do anything.
Thank you
is it ok to download Odin3 v3.12 ?