Rooting is, now a days, a primary need of any of the Android user, no matter which device they own, if they want to have a complete control over it and also wants to use the device to its full extent, then they must root their device and also make sure to install the Custom Recovery, if you want to use any sort of custom Stuff on your device like Mods, Tweaks. Even installing the Custom ROMs requires both of these things and in most of the cases, it becomes a little tricky to root your device let alone the installation of Custom Recovery, however, in case of Samsung devices, thanks to Odin, it becomes quite easy to root your device and install recovery files on it,
CF-Auto-Root is by far the easiest way to install the Root binaries on your device, even better than all the one-click tools. One click root tools are good but is most of the cases they left user device Bricked, however, in Odin case, even if you get the fail message, all you need is to try the process again and you are good to go. CF-Auto root not only roots your device but also install the Superuser Apk, so you won’t have to separately install the Super SU on your device. In this article, we will show you How to Root your device with CF-Auto root and Install Recovery Files on your Samsung Device, without further ado, let us continue.
Disclaimer:
The methods involved in flashing custom recoveries, roms and rooting your phone are highly custom and may result in bricking your device, and has nothing to do with Google or the device manufacturer that is Samsung in our case. Also rooting your device will void its warranty and you will be no longer eligible for any kind of free device services by the manufacturers/warranty providers. In case of any mishap we may not be held responsible. Follow these instructions to the letter to avoid any mishap or bricking. Make sure that whatever you do, you are doing it at your own responsibility
Contents
Early Preparations:
- This is only for Samsung Galaxy Devices!
- Don’t use Odin for any other OEM except Samsung
- Battery should be charged at least over 60%
- Backup EFS
- Also, Backup SMS Messages
- Make sure you Backup Call Logs
- Backup Contacts
- Backup Media – Copy your files manually to your PC or Laptop.
Downloads Required:
- Download and extract Odin3 v3.09.
- Download and Install Samsung USB drivers .
- Download CF-Auto root Package: Link
- Download Recovery Image for your device: Link
How to Root or Install Recovery Your Device:
- CF-Auto Root comes in .zip format, just extract it and save the XXXXX.tar.md5 file anywhere you can remember.
- The Recovery File must be a .img file.
- Download and Extract the Odin file too.
- Open Odin3.exe.
- Put your Galaxy Device in download mode. To do so, turn it off and wait for 10 seconds. Turn it on by pressing and holding Volume Down + Home Button + Power Key simultaneously, You should see a warning, press Volume Up to continue. In case this method doesn’t work for you, try one from this guide.
- Connect your device to your PC.
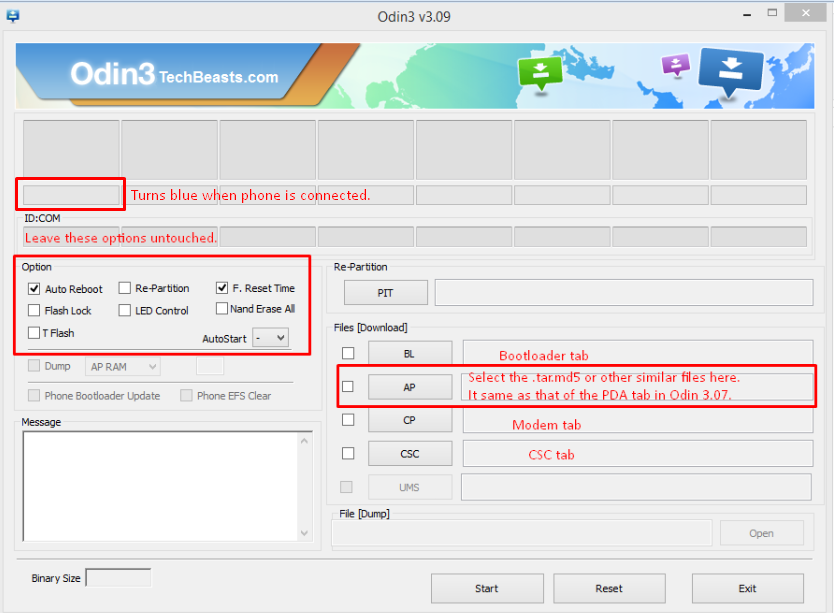
- As soon as Odin detects your phone, the ID:COM box should turn blue. Make sure that you’ve installed Samsung USB drivers before connecting.
- For Odin 3.09 hit the AP tab. Select the firmware.tar.md5 or firmware.tar, that you downloaded and extracted above.
- If you’re using Odin 3.07, you will select “PDA” tab instead of the AP tab, rest of the options remain untouched.
- Make sure that the options selected in your Odin are exactly as shown in the pic.
- Hit start and wait till the firmware flashing is complete, as soon as your device restarts, remove it from PC.
- Wait for your device to reboot, as soon as it reboots check out the new firmware!
- That’s all!


