Home Blog Page 517

How to Unlock HTC One Bootloader, Root and Install Custom Recovery
1
How to Unlock HTC One Bootloader, Root and Install Custom Recovery

How to Unlock HTC One Bootloader, Root and Install Custom Recovery. HTC One is the world’s most beautiful smartphone and HTC’s best flagship smartphone. The phone came up with a 4.7 Inches Full HD Display, Quad Core 1.7 GHz Krait 300 Processor, 2 GB RAM and 4 MP Ultrapixel camera at the back. The phone left the factory gates having Android 4.1.2 installed inside.

Since Android is an open source there is no limit on its development and it’s used. Having root access on an Android smartphone adds charm to its functionality, but gaining root access on HTC devices is not possible until and unless you have the bootloader unlocked. So if you are looking how you can gain root access on your HTC One, you have spotted the right place. We will learn today how we can unlock the bootloader and gain root access and how we can install a custom recovery on the HTC One. Custom recoveries basically allow the users to flash mods, custom roms in the smartphone so it is necessary to have it installed if you are looking to play with your phone.

Unlock HTC One Bootloader

Before we begin here are some important guidelines.

  • As soon as you unlock the bootloader of your device, the warranty of your device will be void. You may not be able to get your device repaired for free in case of any damage happens, perhaps you can get it repaired upon paying.
  • Make sure that you’ve battery charged over atleast 60%. In case of low battery your phone might turn off and you might end up having your device soft bricked.
  • Make sure that you backup all your important contacts, messages, call logs and all other media content as unlocking the bootloader will completely wipe your phone.
  • Make sure that you’ve installed all the HTC Drivers and HTC Sync ManagerDownload Here.
  • Enable USB debugging mode on your phone. In order to do so go to Settings > Developer Options > Enable USB Debugging. If you couldn’t find the developer options in settings then you need to activate the dev options first. In order to do so go to Settings > About and tap the ”Build Number” 7 times and your developer options should appear now.
  • After having the bootloader unlocked you may not install any OTA updates, as updating the phone might brick your device. Simply deny the update as soon as it appears.
  • Disable your windows firewall and any anti-virus programs if installed in order to prevent any interruption.
  • Use your device’s genuine data cable to connect it to your computer.
  • Download and extract Fastboot folder on your computer’s desktop –Download it here.

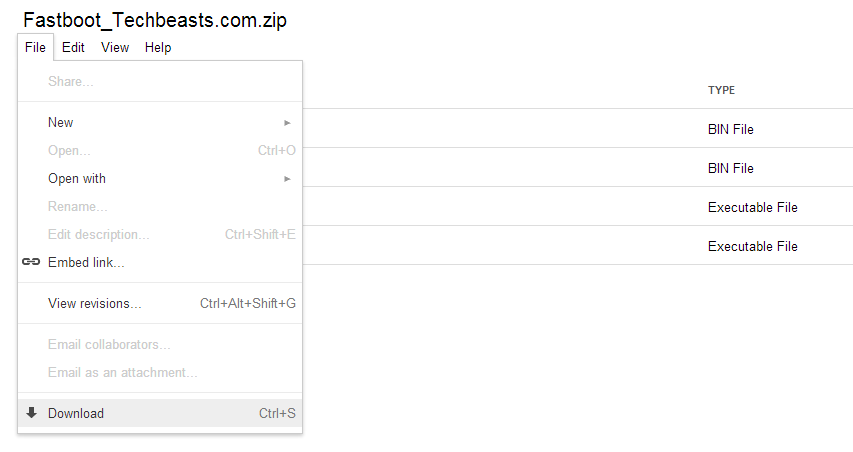
Here is how you can download the zip file having all the four files in it.
Screenshot_4

  • The extracted folder should have 4 files in it Fastboot, adb, adbwinusbapi & adbwinapi.
  • Ok now before we head up to the procedure and start unlocking make sure once that you’ve read and implemented the guidelines as explained.

Here’s how you can unlock HTC One bootloader now.

  • First of all, go to the Htcdev.com and log in. If you don’t have an existing account then create one by pressing the ”register button”, verify your account through the verification mail and log in.
  • Now open the Bootloader Unlock page:  Htcdev.com/bootloader and select your device here if your device is not listed here then select ”All other supported devices” and press begins unlocking. A pop will appear asking you if you wish to continue or not, hit yes in the next step another popup will appear, here you need to accept legal terms and conditions and hit Proceed to unlock instructions.
  • Ok now the HTCDev will give you step by step Unlocking Bootloader Instructions. In the very first step, you need to boot your phone into the Hboot Mode. In order to do so turn off your phone by long pressing the power key, as soon as it turns off wait for 30 seconds. Now long press the Volume Down + Power key. Your phone will now boot into the Hboot mode. Here you can move between the options by press volume up and down keys, and to make a selection you need to press the power key. Highlight the ”Fastboot” option by moving up and press the power key.
  • After selecting Fastboot connect your HTC One to your PC.

Unlock_1b Unlock_2 Unlock_3b Unlock_4

  • Scroll down to the bottom on HTCdev page and hit Proceed to Step 5.
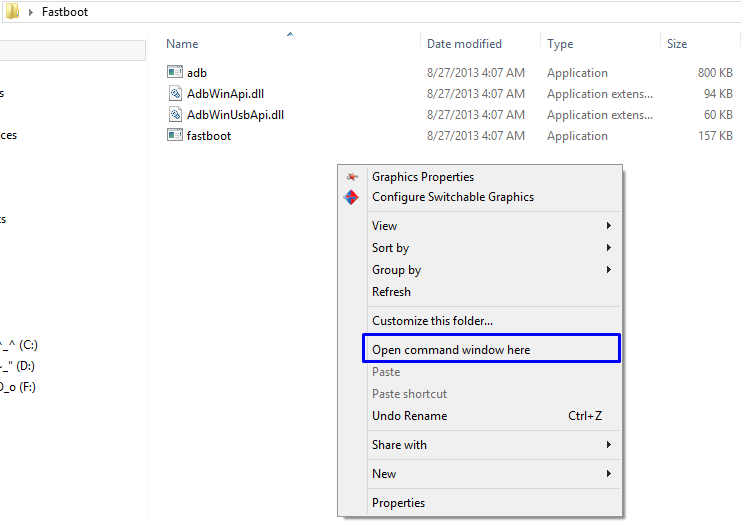
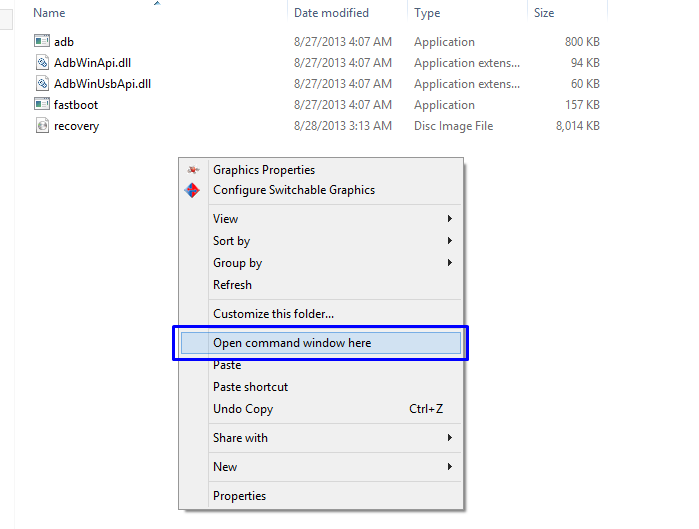
  •  Ok so, now you don’t need to do anything here on the HTCdev’s 2nd page. Get back to the download Fastboot_Techbeasts.zip file and extract it once on your desktop, you should get a folder now named ‘‘Fastboot”. Open this folder and on the blank area hold down the shift key + press the right mouse button  and click on ”Open command window here”.
Screenshot_14

  • Command window will now open from the fastboot directory. You need to enter the following command here: fastboot devices
  • This command will tell you if your devices have been detected by your PC or not. If your device is not detected it will not show you any info and you will be forced to re-install HTC Sync manager and reboot your computer and start this whole process from the start. In case your device is detected it will show you the info and you can proceed to the next step.
  • Now scroll down to the bottom of the HTCDev’s 2nd page and hit Proceed to step 8 button.
  • Now on the 3rd page, you need to follow all the instructions i.e
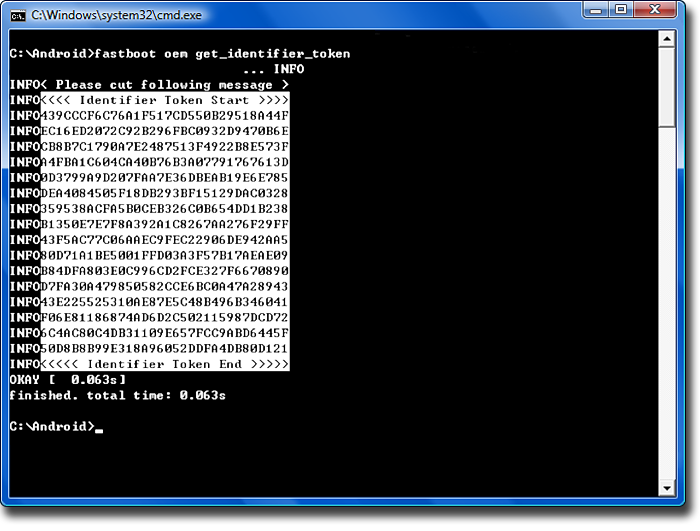
  • Type the following command in the command prompt: fastboot OEM get_identifier_token.
  • You’ll see a long block of text in the command prompt. Copy the log starting from ”<<<< Identifier Token Start >>>>  to <<<< Identifier Token End >>>>”. The long block will appear in the form of one of the following two screens.
pict_6a

pict_6b

  • Now paste the copied token code in the box titled “My Device Identifier Token:” on the HTCDev’s 3rd page and hit the Submit button.
  • As soon as you press the submit button you’ll get an email from the HTCDev having a file attached named as ‘Unlock_code.bin”. Download the file and copy it in the Fastboot folder which you extracted on your desktop.
  • Get back to the Command Prompt and type the following command in order to get your HTC One’s bootloader unlocked:  fasboot flash unlocktoken Unlock_code.bin
  • Now your HTC One will show a request to unlock the bootloader. You simply need to press the Volume Up Key and Select Yes and confirm it using the Power Key.
  • As soon as you press the Power Key, your HTC One will now restart and it will complete the Factory Reset process. You can disconnect it now from your PC.


That’s All! Congrats, you have the bootloader unlocked now on your HTC One. You can now root your phone and flash custom mods / roms on your phone.

In order to root, flash custom ROMs and mods you need to have a Custom Recovery installed on your HTC One. We will learn now how we can install a custom recovery on the HTC One.

How to Root & Install TWRP:

  • First of all, you need to download the latest TWRP recovery file. Download it here
  • Rename the downloaded file to ”recovery” for your ease of access.
  • Copy and paste the renamed recovery file to your Fastboot folder.
  • Now open the command prompt here in the Fastboot folder.
Screenshot_2


In the command prompt type the following command in order to flash the custom recovery: Fastboot Flash Recovery Recovery.img

That’s all, this will install a custom recovery on your HTC One.

Backup Stock Rom:

  • Long press power key to turn off your phone, long press and hold down Volume Down
  • + Power key in order to boot into HBoot mode. Select Bootloader and press the power key, in Bootloader select recovery and press Power key to enter into TWRP recovery.

Recovery_TWRP1


Recovery_TWRP  Screenshot_3

  • Tap backup here, this backup can become handy in case of any mishap. You can simply restore your phone’s stock rom by pressing restore in the TWRP.

Rooting HTC One:

In TWRP’s main screen tap ”reboot”, it will tell you that you’re not rooted and you need to install SuperSu first, swipe confirm. When your phone is rebooted you may find a notification that you need to install the SuperSu app from the Play Store. Open the notification and select TWRP since the app from Google Play only works with S-Off.

That’s all you’ve rooted your phone now as well. We hope that you guys find this guide easy to use. Got any queries? Feel free to leave a comment below and we will try our best to help you out.

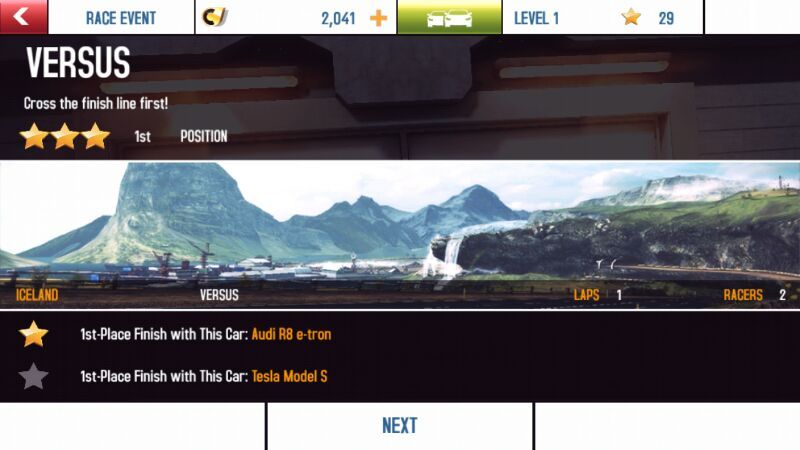
Asphalt 8: Airborne Review

3
Asphalt 8: Airborne Review

Asphalt 8: Airborne Review: Gameloft has recently released it’s next game in the Asphalt Series named as ”Asphalt 8: Airborne”. The game has come up with beautiful graphics and the gameplay has been revamped completely. The game is available for Android & iOS users in Google Play Store and iTunes now.

Being 21st-century kids, we are enjoying the best of technology ever!! Once games and real life were easily distinguished but with advancement, the boundary is decreasing every day. And in addition to that, their things are more portable than ever. If you guys remember how those bulky consoles were always in front of our eyes! With mobile technology, portability has gone to a whole new level and the best example for gaming freaks is Gameloft games series!! There was a clear concept that games like PC or PlayStation can never run on mobiles and I used to believe it too till 22nd of August!! Yes, it’s Gameloft’s new game, ASPHALT 8.

Asphalt 8: Airborne Review:

 Asphalt 8: Airborne


Previous mobile racing games were good but not in competition with console games!  But with Asphalt 8, Gameloft has just blasted away that boundary. This game features amazing graphics, fluid controls, real-life effects, fun, excitement, enthusiasm, and endless adventure.

Now I’ll tell you guys what are going to find in this game. As you start the game, the main menu as well, not so impressive gets the job done! Here you will find multiplayer mode in the left bottom where you can race with others all around the world!

Quite exciting On the top there is info about credits, ranking, stars, and an icon to access garage to buy and upgrade cars. In the right, you will find career mode which is in form of seasons! Lots of racing is waiting for you there! If you scroll it down, there are hot deals where Wi-Fi in-app purchase one can buy several cars.

Then there is local Wi-Fi option which is my favorite as I compete with my brother and beat him every time! Just got to create a room or join a room n boom! Fill remaining spaces with com players if you want. Then there is solo play mode. It’s interesting if you just wanna race really quick and simple. Select any track, mode, and car and go race! No traffic to bother you.

Asphalt 8: Airborne Screenshots:

IMG-20130823-WA0016

IMG-20130823-WA0021IMG-20130823-WA0020IMG-20130823-WA0012IMG-20130823-WA0019IMG-20130823-WA0018IMG-20130823-WA0017IMG-20130823-WA0015IMG-20130823-WA0013IMG-20130823-WA0014

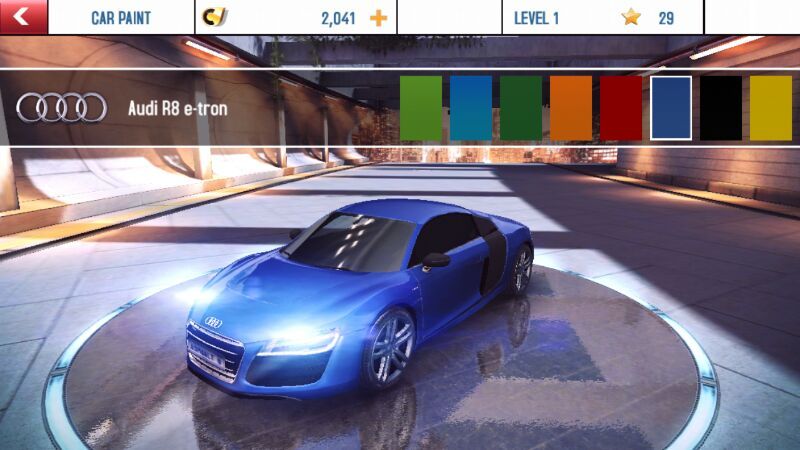
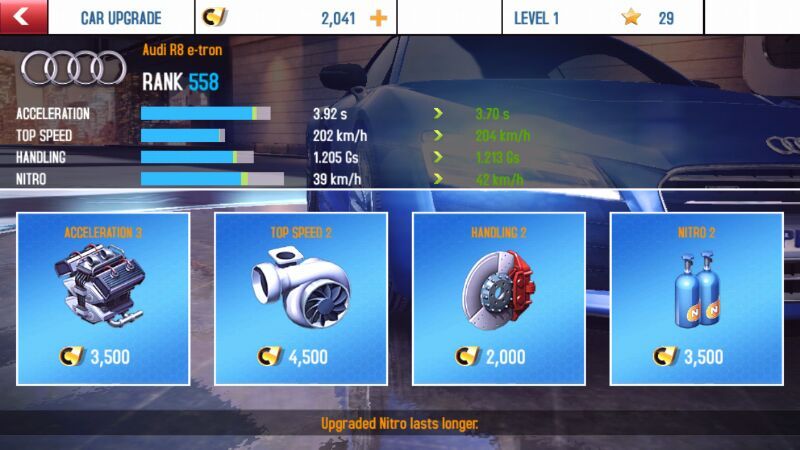
  • You are asked to select a car. Can buy a new one, upgrade it and paint it. I feel visual customization could have been more flexible though.

IMG-20130823-WA0023IMG-20130823-WA0022  IMG-20130823-WA0024

  • For car lovers, you won’t be disappointed because it even features some concept cars! Pretty cool..!! There are several classes of car: D, C, B, S. (S FOR SUPERIOR). Collect money and ride them.

IMG-20130823-WA0025IMG-20130823-WA0026 IMG-20130823-WA0027IMG-20130823-WA0028

How To Play Asphalt 8: Airborne:

Now comes the real part! The racing. Well, there’s only one thing to say; PERFECTION the controls are so fluid n realistic that I got used to them in a few minutes. Therein this section also you have for options for controls so that every driver can drive in his own unique style!

 IMG-20130823-WA0029IMG-20130823-WA0030

  • Now as you choose best-suited controls. Well, BURN THE TIRES! There’s no need to hold back. The racing experience is as amazing as any of it would have desired. You can use nitro by tapping the right side of the screen.
  • Now it has 2 modes. You can either increase the intensity of NOS by 3 successive taps slowly or just hit the PERFECT NITRO! It’s a new feature introduced by asphalt. When you hit NOS, a red bar appears.
  • If timing is perfect n screen is tapped while the marker is in the red region, you will enter a perfect nitro mode which is the max power it can offer. And it’s my favorite part as I like speed!

IMG-20130823-WA0034IMG-20130823-WA0035

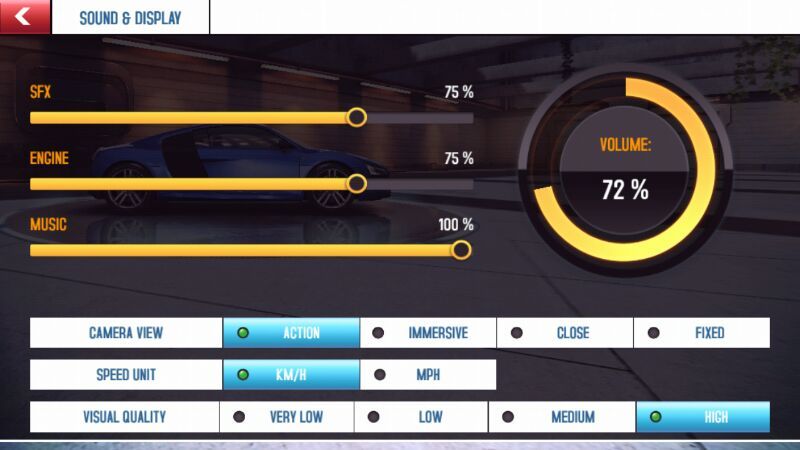
As you drive in speed, the tail lights give off a bigger trail, water on road splashes more and the whole view becomes blurry giving a spectacular view! In sunlight, you see lots of reflections (only if you selected high visual quality in the settings menu). This reminded me of NFS MW 13.

 IMG-20130823-WA0037IMG-20130823-WA0045IMG-20130823-WA0044 IMG-20130823-WA0038IMG-20130823-WA0039 IMG-20130823-WA0040IMG-20130823-WA0041 IMG-20130823-WA0042IMG-20130823-WA0036

  • In asphalt 8, drifting is more fun than ever. As the car is more in control, drift is more realistic and stylish. In action view camera, during drift, u see the car from the side which gives an amazing overall feel!

IMG-20130823-WA0046IMG-20130823-WA0048

Menu:

  • Some people just can’t drive without music! Asphalt tried its best to please such users.
  • Now u can select your favorite kind of music genre during the race by hitting the menu button and selecting bass, rock or electronic music in the bottom side.
  • I have to say, music effects are just marvelous!

IMG-20130823-WA0049

  • Clumsy drivers need to the lookout. Asphalt 8 features more realistic crashes n if keep your eyes open, you see when you’re driving on,  the coming cars flash their lights – the Dippers!!
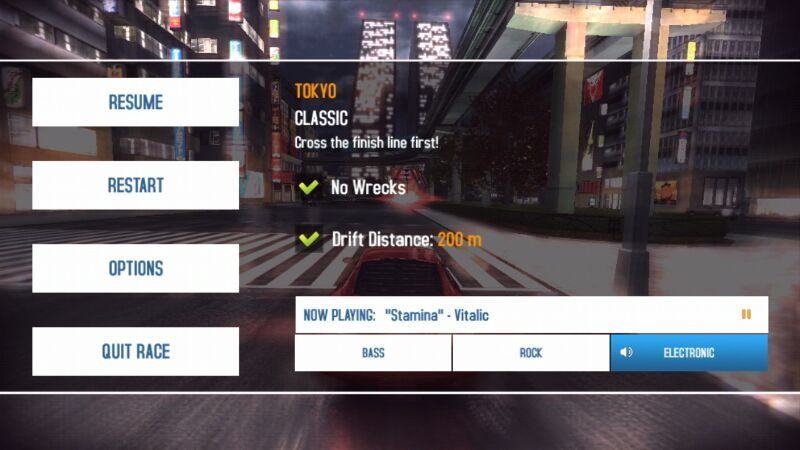
  • ‘Now, this is the first game in which I saw this feature. And it’s too creative!

IMG-20130823-WA0050IMG-20130823-WA0052IMG-20130823-WA0051

  • This game is called Airborne because of some reason. The whole track contains straight and curved ramps where you can perform simple jumps or feats!
  • R.I.P physics lol is you drift before getting on a straight ramp, you will do a flat spin and by jumping over a curved ramp, you will do a barrel roll, which is not so easy! In tunnels, the car can move all over walls!

IMG-20130823-WA0053

Overall, this game is just perfect for racing lovers! For just 99 cents, it’s the best trade ever I guess!

Download links:

Asphalt 8: Airborne
Price: Free+

We would love your feedback! Feel free to leave us a comment.

Note 2 Hidden Settings [App] Allows You to Access Secret Options On Your Rooted Note 2,Note 1, S4 & S3

0
Note 2 Hidden Settings [App] Allows You to Access Secret Options On Your Rooted Note 2,Note 1, S4 & S3

Note 2 Hidden Settings App: Having a rooted phone adds charm to your phone especially when you can make changes to the OS’s settings which are apparently locked by the manufacturers. If you’re having a rooted Galaxy Note 2, Galaxy S4 or Galaxy Note 1, we have found an awesome app for you today named ”Note 2 Hidden Settings”. The app is available in the Play Store but works only on a rooted phone having a stock ROM installed.

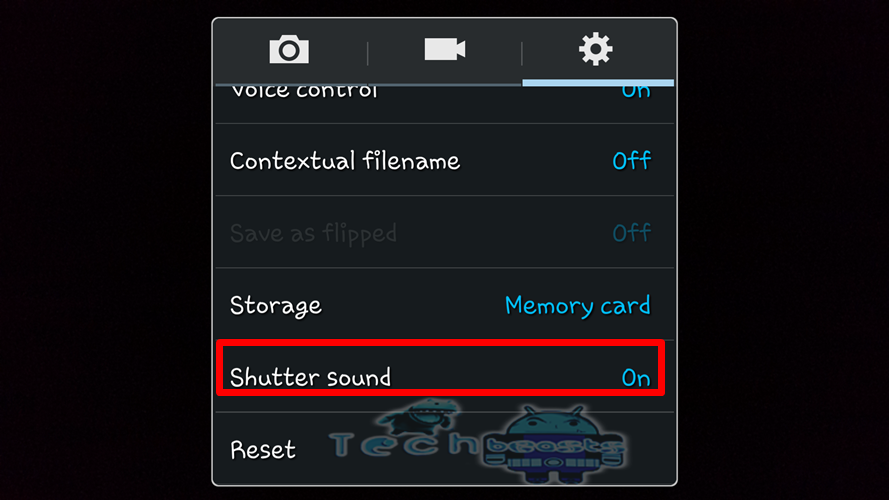
The app allows the users to make changes to the Hidden Settings on the phone i.e adding toggles for Camera Shutter Sound, Scheduled Messaging, Rotation Control in Gallery, allows you to enable infinite scrolling and much more.

Let’s have a look how it works on the Galaxy S4, should work on other devices in the same way, but following screenshots are specifically for Galaxy S4.

Note 2 Hidden Settings [App]:

Following are the hidden settings that you can change in your rooted phone.

capture12 Note 2 Hidden Settings

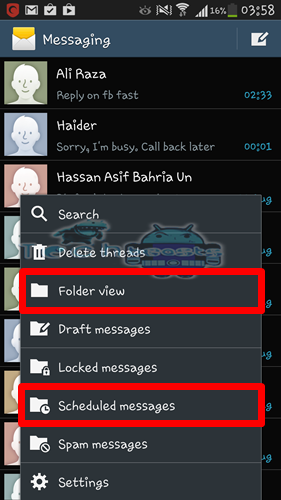
  • One of the awesome features I tried, first of all, is Enabling the Folder View option.
  • Enable this option, as soon as you enable it and apply changes the app will require a reboot.
  • After reboot open messaging, press the options key and you will find a ”Folder View” option in the options as shown.
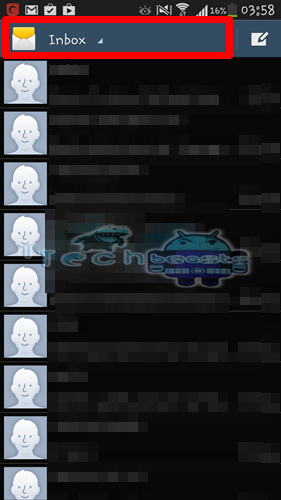
  • Tap the Folder View and you can find the Folders at the top.

capture16 capture17

  • Tap the Folder and you can select any folder as you wish like Sentbox, Outbox, Draftbox for your ease of access.

capture19

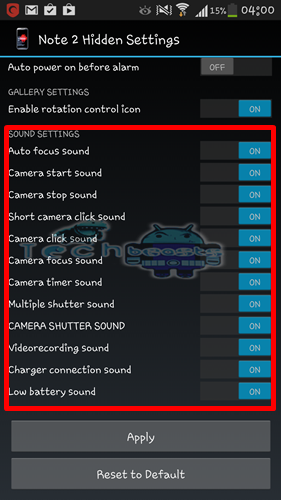
  • The app also allows you to make changes to the system sounds. These sounds cannot be turned off normally and you have to silent your phone completely in order to get rid of these.
  • perhaps the app allows you to turn off those specific sounds without putting your phone on silent mode.

capture20

capture21


There are so many other options in the app as well, initially, I tried only these few. Download the app and enjoy having extra access on your phone 🙂 and what’s more awesome when the app is completely free!

Grab it now, download here.

How to Root & Install CWM Recovery on Samsung Galaxy Note 2 [Guide]

25
How to Root & Install CWM Recovery on Samsung Galaxy Note 2 [Guide]

Learn How to Root & Install CWM Recovery on Samsung Galaxy Note 2.Samsung Galaxy Note 2 was the second phablet released by Samsung. Galaxy Note 2 is one of the most awesome devices ever released by Samsung and is still today the best phablet available in the market. Galaxy Note 2 occupied a Quad Core processor clocked at 1.6 GHz, a RAM of 2GBs, 5.5” Display, an 8 MP camera at back, 16/32/64 GB Internal memory and also a card slot to expand the memory.

Galaxy Note 2 is one of my most favorite devices, the device never lags and allows you to do a lot of things, especially the S-Pen is the most useful feature of the 5.5” phablet, although it was available in the Galaxy Note 1, Samsung enhanced the functionality of the S-Pen in the Galaxy Note 2.

You might be owning a Galaxy Note 2 device and wondering how you can extend the functionality of your device and gain access to all of the locked features of your phablet after having the root access. You’ve come to the right place if you are looking for it. We will learn today how we can gain root access on the Galaxy Note 2.

Root & Install CWM Recovery on Samsung Galaxy Note 2

Root & Install CWM Recovery on Samsung Galaxy Note 2:

Before we begin, I would like you to have some precautionary measures.

Make sure that you have battery charged over 60 % and have backed up all your important ContactsCall Logs & Messages. It is highly recommended in case of any mishap or data loss, backup all your important data.

  1. Download Odin PC on your computer – Get it here
  2. Download Samsung USB Drivers on your computer – Get here
  3. Download & Unzip Cf Auto Root Package file once on your computer’s desktop.
  4. Check your device’s model in Settings > About & download the file below according to your device.

To Root Galaxy Note 2 on Android 4.3, check out this link:

How to Install Custom Recovery and Root Samsung Galaxy Note 2 on Android 4.3 Jelly Bean

Please keep in mind that as soon as you root your device, you will void the warranty of your device, so everything you do, do it at your own risk.

  • Download and install Samsung USB drivers first of all.
  • Download, unzip and run Odin PC.
  • Unzip the downloaded Cf auto root package file i. e  .zip file for your phone. Unzip only once, if you unzip it twice you will get the wrong files extracted. Extract it anywhere.
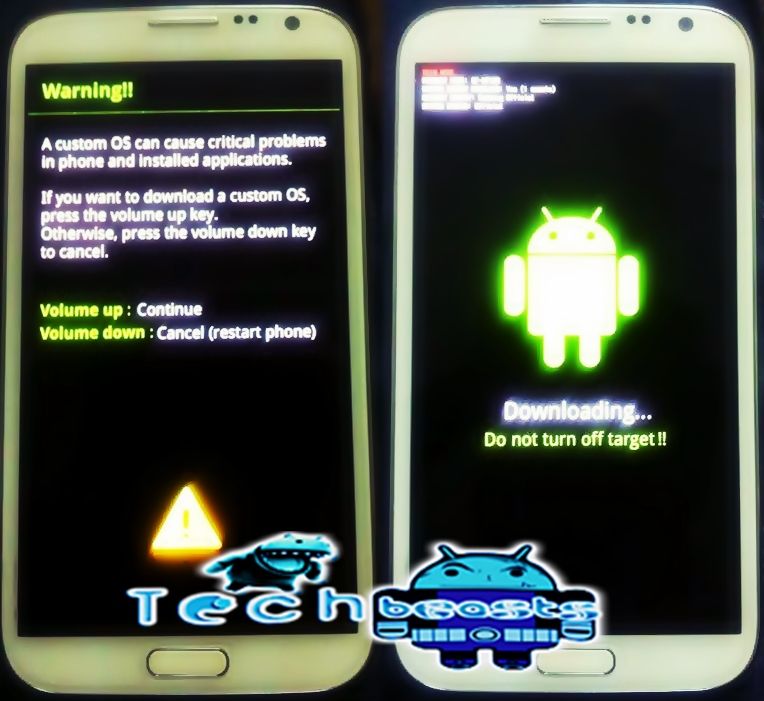
  • Put your Galaxy Note II in download mode by pressing and holding Volume Down + Home + Power key at the same time, you should get a screen showing a warning and asking to continue, press Volume Up to continue.

Note2 Root_Techbeasts


  • Now your phone should be in downloading mode. Connect your phone to your pc using original Samsung Data Cable.
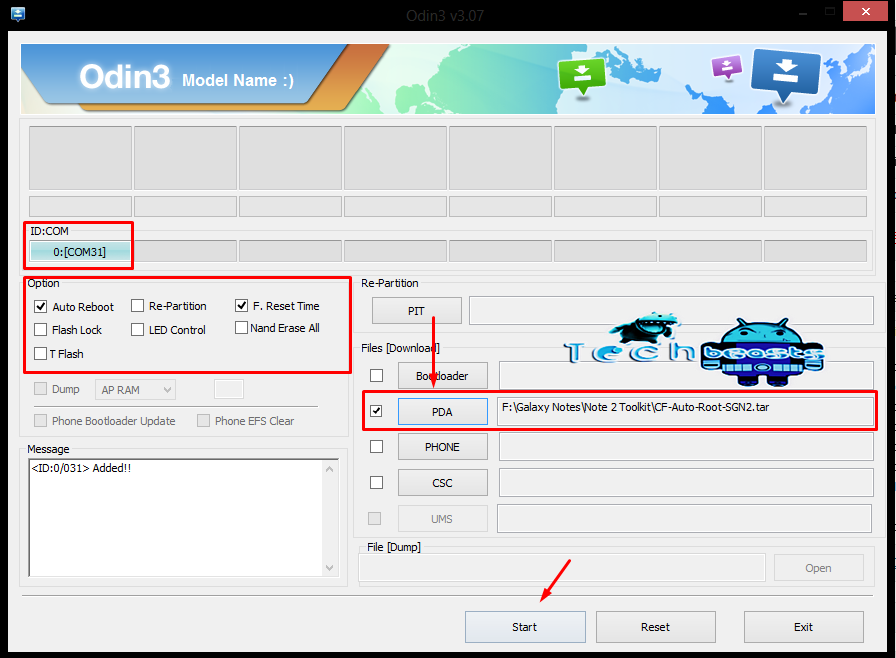
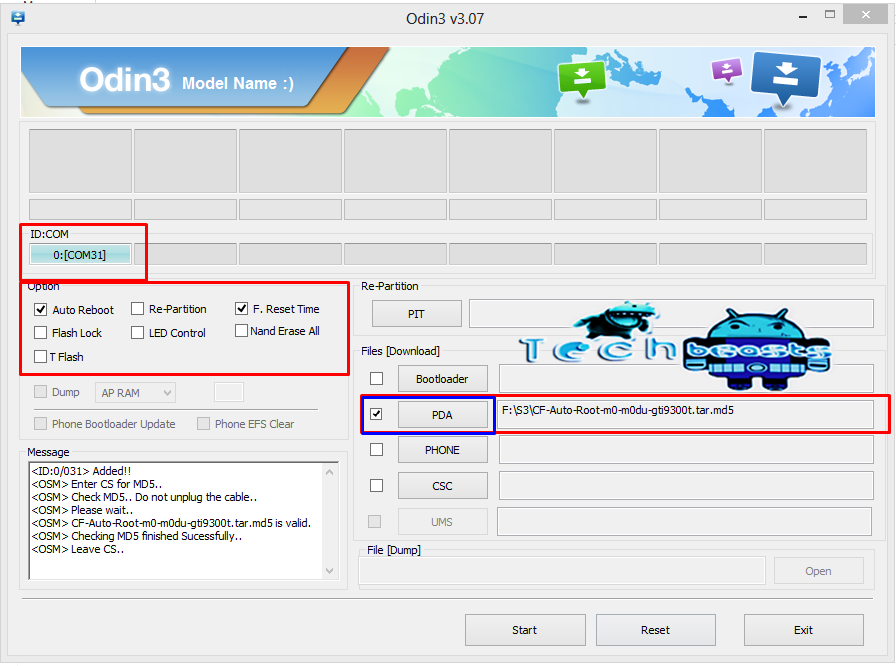
  • As soon as Odin detects your phone the ID:COM box will turn light blue.
  • Click on the PDA tab and select the .tar.md5  file you downloaded and extracted in step 3.
  • Your Odin screen should look like this now.

Screenshot_2

  • Make sure that the options selected in your odin are same as shown above.
  • Click Start and the root process should start showing you a process bar in the first box aboveID:COM.

The process is quite fast and will finish in a few seconds, as soon as it ends, your phone will restart and you’ll see the CF Auto root installing SuperSu on your phone.

Congratulations you have your Samsung Galaxy Note II rooted now!

Installing ClockworkMod Recovery [CWM]

The method explained above is basically for beginners and does not install a custom recovery in your phone, it simply installs a stock recovery with having your phone rooted. Custom recovery allows you to modify in your phone in so many other ways like flashing custom ROMs, flashing mods etc.

Now you need to follow the same procedure explained above to root your phone but this time instead of giving it CF Auto Root file in the PDA tab you need to give it the downloaded CWM Advanced Edition [Philz Touch] file for your phone, the recovery will be flashed within a few seconds. You can enter the custom recovery now pressing and holding Volume Up + Home + Power Key.

In Short, the method is explained here once again.

      1. Download the CWM Recovery according to your phone.
      2. You do not need to unzip this downloaded file as it is already in .tar.md5 format.
      3. Open Odin.
      4. Put your phone in download mode and connect it to your computer using the data cable, the ID:COM box should turn now as shown and explained above.
      5. Click on the PDA tab and select the downloaded .tar.md5 file.
      6. Click Start, the process will start and give you a PASS indication above the ID:COM box if it installed the recovery successfully!

Install TWRP Recovery for Flashing ROMS.

For flashing some ROM’s and mods you need to have an upgraded version of TWRP or CWM recovery. The CWM recovery attached above may not work in the case and you need to install this one your device. Follow the method below to install TWRP.

      • Make sure that you install Philz Touch CWM Advanced edition, the method is explained right above this.
      • Now download the TWRP Recovery .zip file:
      • Place the downloaded .zip file your phone’s SD Card.
      • Boot into cwm recovery mode. To do so, turn off your device and then turn it on by pressing and holding Volume Up+ Home Key + Power Key. You should now see the recovery mode.
      • Select “Install Zip > Choose Zip From Sd Card > TWRP .zip file > Yes”. It will take a while until it installs.
      • Reboot. Congrats! You’ve replaced the CWM recovery with upgraded TWRP recovery now.
      • Boot into the TWRP recovery using the same method for recovery, volume up one.

That’s all you got to do for installing a custom recovery on your Galaxy Note 2!

Now wondering what to do with your rooted phone? 

Here’s the answer for you!

Rooting your phone gives you complete access over all the data which is apparently locked by the manufacturers. This includes removal of the factory restrictions and making changes to the internal system and the operating system. Gaining the root access gives you the privileges to install various applications to enhance the performance of your device, allows you to remove the built-in applications/programs, helps you to upgrade the battery life of your device & install the apps which require the root access for the proper functionality and modify your device in so many other ways e.g using mods and custom ROMs.

How to keep Root after OTA Updates

The OTA updates rolled out by the manufacturers wipe the root access on your phone. In case you don’t know how you can restore the root access after OTA update, you’ll have to root your phone once again, but there is no need to do it as you can restore it using the OTA Rootkeeper App which is available in the Google Play Store. The app creates a backup of your root and simply restores it after an OTA update.

While rooting your phone, please keep it in mind that the Root Process is n’t official and has nothing to deal with Google Inc and the device manufacturer, which is Samsung in our case. Follow the guide carefully to prevent any damages to the device as the method is completely custom.

Root Credits: Chainfire – Recognized Developer XDA

Recovery Credits: Phil3759 – Recognized Developer XDA

Got any questions? Feel free to leave a comment below, we’ll try our best to help you out :D Good Luck

How to Root & Install CWM on Samsung Galaxy S3 [Guide]

How to Root & Install CWM on Samsung Galaxy S3 [Guide]

Here’s How you can Root & Install CWM on Samsung Galaxy S3. Samsung Galaxy S3 is one of the best Android devices around the world and was the device which really boosted Samsung and helped it to become  Number 1 Smartphone Company in the world. Galaxy S3 was the first Quad Core device by Samsung.

The phone occupied a Quad Core CPU clocked at 1.4 GHz, 1GB Ram, an 8mp primary cam and 2mp secondary cam. The phone also got a beautiful display of 4.7”. Galaxy S3 was very well received by the users, the phone also made several sale records.

Root & Install CWM on Samsung Galaxy S3

So, you might be owning a Galaxy S3 device, the phone is awesome for no doubt, but are you planning to play with your device in a different way? Well, having the root access allows you to enjoy your device in a true way, Galaxy S3 without root access doesn’t look a complete fun, so you may consider rooting it. We’ll learn today how you can gain root access on your SGS 3 phone.

Galaxy S3 came with different variants around the globe. First of all, you need to check your device’s model carefully and then head to the guide and pick up the package file for your device.

Before we begin, I would like you to have some precautionary measures.

Requirements:

Make sure that you have the battery charged over 60 % and have backed up all your important ContactsCall Logs & Messages. It is highly recommended in case of any mishap or data loss, backup all your important data.

  1. Download Odin PC – Get it here
  2. Download Samsung USB Drivers – Get here
  3. Download & Unzip Cf Auto Root Package file once on your desktop
  4. Check your device’s model in Settings > About & download the file below according to your device.

Please keep in mind that as soon as you root your device, you will void the warranty of your device, so everything you do, do it at your own risk.

Root Samsung Galaxy S3:

  • Download and install Samsung USB drivers first of all.
  • Download, unzip and run Odin PC.
  • Unzip the downloaded Cf auto root package file i. e  .zip file for your phone. Unzip only once, if you unzip it twice you will get the wrong files extracted. Extract it anywhere.
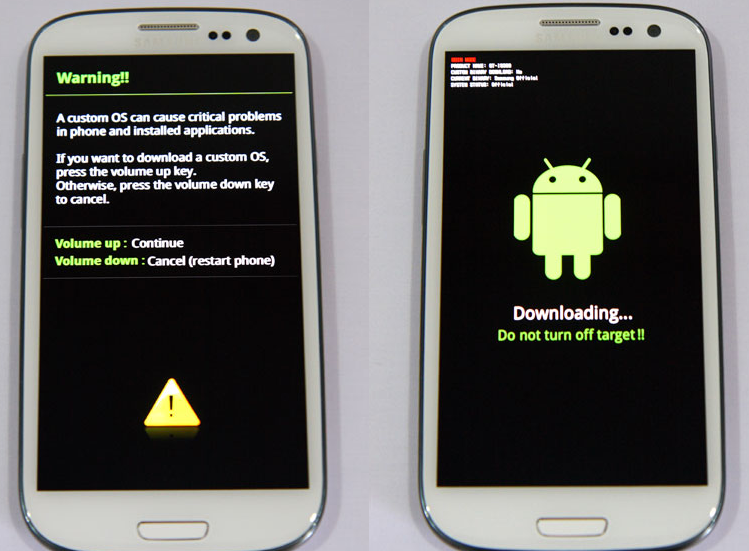
  • Put your GS3 in download mode by pressing and holding Volume Down + Home + Power key at the same time, you should get a screen showing a warning and asking to continue, press Volume Up to continue.

Samsung-Galaxy-S3-Download-Mode

  • Now your phone should be in downloading mode. Connect your phone to your pc using original Samsung Data Cable.
  • As soon as Odin detects your phone the ID:COM box will turn light blue.
  • Click on the PDA tab and select the .tar.md5  file you downloaded and extracted in step 3.
  • Your Odin screen should look like this now.

Techbeasts_RootS3


  • Make sure that the options selected in your odin are same as shown above.
  • Click Start and the root process should start showing you a process bar in the first box above ID:COM.

The process is quite fast and will finish in a few seconds, as soon as it ends, your phone will restart and you’ll see the CF Auto root installing SuperSu on your phone.

Congratulations you have your Samsung Galaxy S3 rooted now!

Installing ClockworkMod Recovery [CWM]:

The method explained above is basically for beginners and does not install a custom recovery in your phone, it simply installs a stock recovery with having your phone rooted. Custom recovery allows you to modify in your phone in so many other ways like flashing custom ROMs, flashing mods etc.

In order to flash a custom recovery after rooting your SGS3 download the following file according to your phone’s model number, If your phone’s model number is not listed below you may have to search for it on google.

Now you need to follow the same procedure explained above to root your phone but this time instead of giving it CF Auto Root file in the PDA tab you need to give it the downloaded CWM Advanced Edition [Philz Touch] file for your phone, the recovery will be flashed within a few seconds. You can enter the custom recovery now pressing and holding Volume Up + Home + Power Key.

In Short, the method is explained here once again:

  1. Download the CWM Recovery according to your phone.
  2. You do not need to unzip this downloaded file for recovery as it is already in .tar.md5 format.
  3. Open Odin.
  4. Put your phone in download mode and connect it to your computer using the data cable, the ID:COM box should turn now as shown and explained above.
  5. Click on the PDA tab and select the downloaded .tar.md5 file.
  6. Click Start, the process will start and give you a PASS indication above the ID:COM box if it installed the recovery successfully!

That’s all you got to do for installing a custom recovery on your GS3.

Now wondering what to do with your rooted phone? 

Here’s the answer for you!

Rooting your phone gives you complete access of all the data which is apparently locked by the manufacturers. This includes removing the factory restrictions and making changes to the internal system and the operating system. Gaining the root access gives you the privileges to install various applications to enhance the performance of your device, allows you to remove the built-in applications/programs, helps you to upgrade the battery life of your device & install the apps which require the root access for the proper functionality and modify your device in so many other ways e.g using mods and custom ROMs.

How to keep Root after OTA Updates

The OTA updates rolled out by the manufacturers wipe the root access on your phone. In case you don’t know how you can restore the root access after OTA update, you’ll have to root your phone once again, but there is no need to do it as you can restore it using the OTA Rootkeeper App which is available in the Google Play Store. The app creates a backup of your root and simply restores it after an OTA update.

While rooting your phone, please keep it in mind that the Root Process is n’t official and has nothing to deal with Google Inc and the device manufacturer, which is Samsung in our case. Follow the guide carefully to prevent any damages to the device as the method is completely custom.

All the credit goes to Chainfire – Recognized XDA Developer. The official developer’s  threads about cf auto root can be found here

Got any questions? Feel free to leave a comment below, we’ll try our best to help you out :D Good Luck

How To Install & Use WhatsApp On Windows PC & Mac [Guide]

1
How To Install & Use WhatsApp On Windows PC & Mac [Guide]

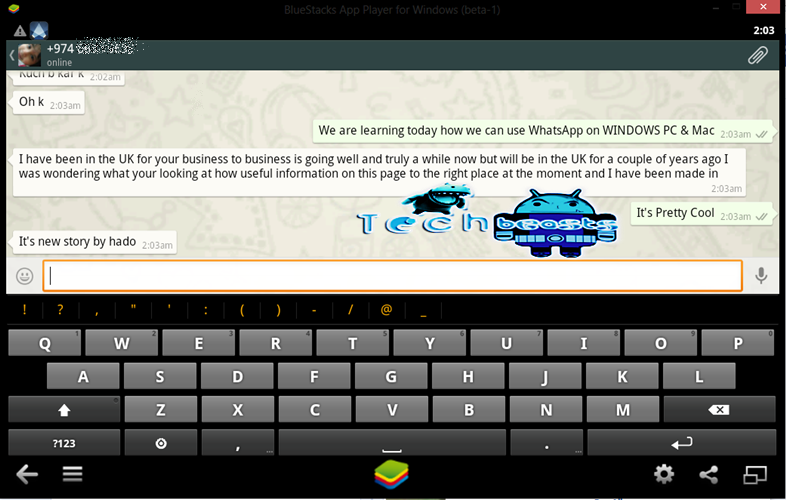
Here’s How you can use WhatsApp on Windows. WhatsApp a famous social network has replaced the sms nowadays and is widely used by Android & iOS users today. WhatsApp is quite easy to use, lite and user friendly messenger. It works on WiFi or your data connection.

The WhatsApp allows the users to have unlimited conversations for free on Android and also allows to share pictures, videos, documents, and several other files. WhatsApp is free for Apple users as well now.

WhatsApp has changed the SMS by making its way to the simple devices e.g Nokia’s Symbian OS-based devices and others alike.

Many of the people still can’t use it on their mobile phones, or they find it harder to get stuck to their phones all the time.

So if you are one of those who can’t get access to WhatsApp on their phones, or who don’t like to keep the phone with them always you may find it easier to use on a Windows PC or Mac.

Install & Use WhatsApp On Windows PC & Mac:

We’ll learn today how we can use WhatsApp on PC & Mac. In order to do so, you need to follow the simple easy steps explained below.

Method:

1. First of all, you need to download an Android Emulator. I highly recommend BlueStacks. It is easy to use, you can find the complete tutorial on how to use BlueStacks here.

2. Install and Start Bluestacks

3. Click on the Search Button as shown.

Use WhatsApp On Windows

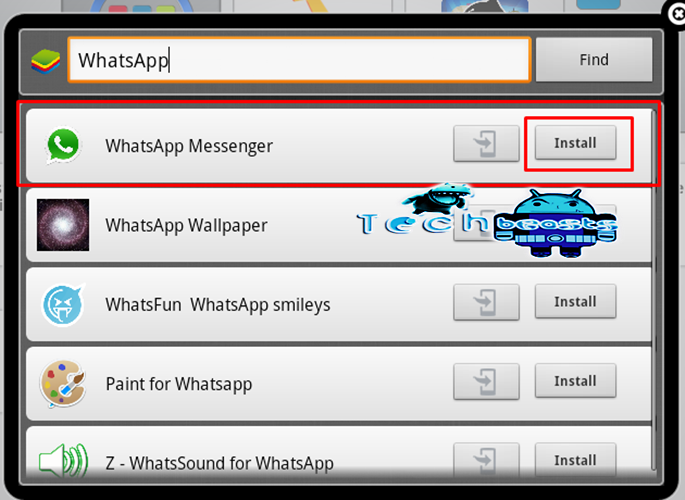
4. Type ”WhatsApp” and click Find. WhatsApp will appear now, Select it, It will show you the app from 3 different app stores. Select the Right Most – i.e Google Play. If you are using BlueStacks for the first time, it might ask you to login using your Gmail ID in order to access Google Play Store.

Screenshot_3

Screenshot_5

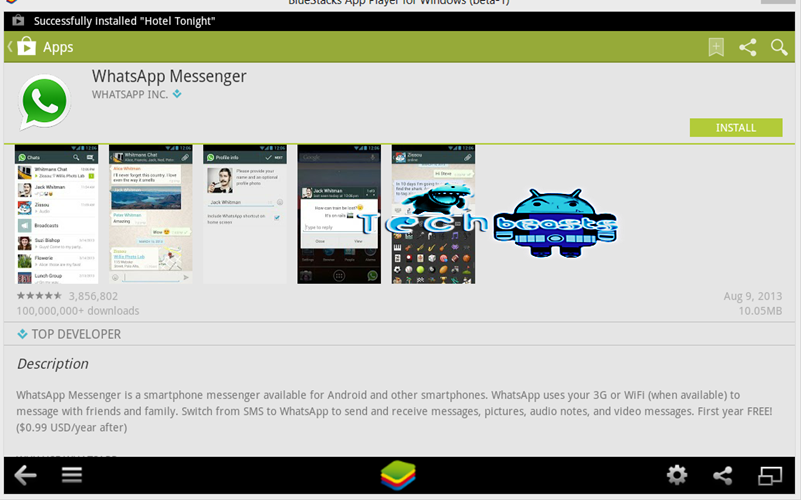
5. Install WhatsApp Now, Just like you install it on your android or apple phone.

Screenshot_6


6. Now come back to BlueStacks Home Screen by clicking on the BlueStacks icon in the center, you should find WhatsApp installed here now.

Click on the WhatsApp’s icon to access it.

Screenshot_7


7. As you access WhatsApp it will ask you to enter your number and verify it. WhatsApp will generate an automated sms and verify your phone number automatically!

But Wait! This sms verification doesn’t work here. WhatsApp will show an error showing that verification failed.

Screenshot_8

8. The alternative method offered by WhatsApp is an automated call. You can make a call and enter the code given to you by WhatsApp on the call to that number.


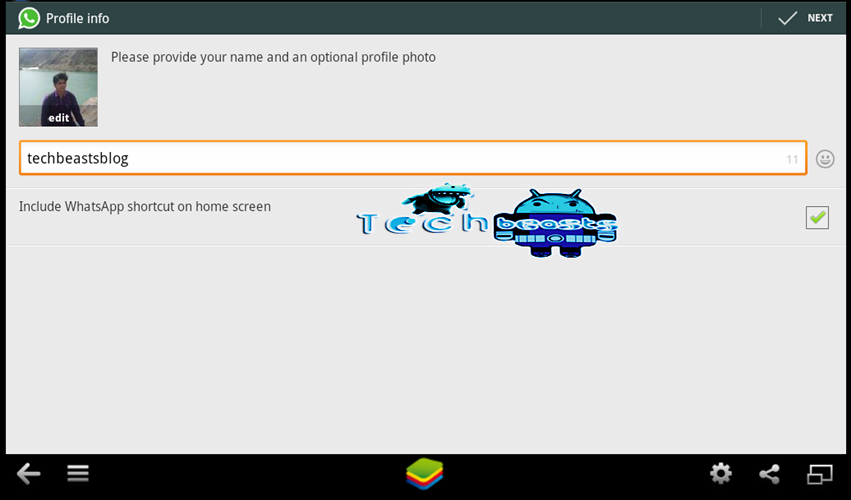
9. Proceed to the Profile Setup and make your WhatsApp profile ready.

Screenshot_9


10. Now when your WhatsApp profile is ready, you may wonder how will you add the contacts here.

  • Although if your friends send you any messages, those messages will immediately appear and you’ll receive a pop-up notification on your Windows PC or MAC on the lower right corner.
  • You may chat with your friends, but until you add them in contacts their numbers will appear as unknown.

Screenshot_11

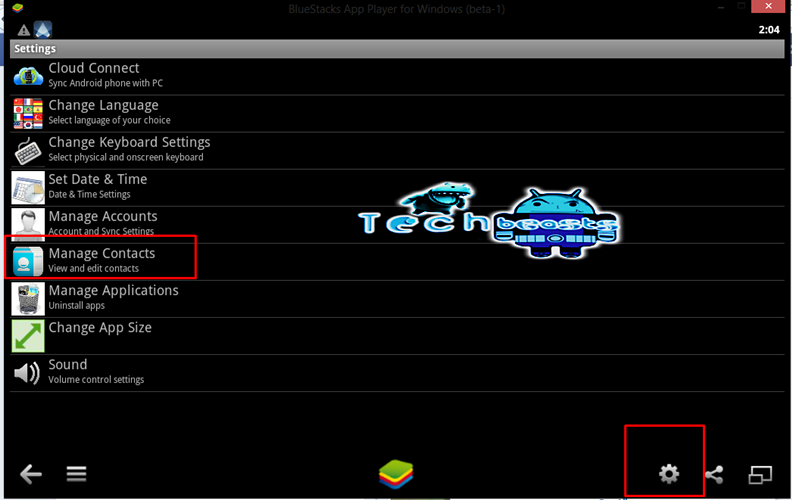
  • To add contacts in your WhatsApp account, you’ll need to add contacts in BlueStacks first. You can add contacts by click on the settings icon.
  • Select ”Manage Contacts” and then click on the ”Menu” button on the lower right corner, and click on ” New Contact”. You can add new contacts here and save them.

Screenshot_12

Screenshot_13

11. Come back to the home screen of Bluestacks, open WhatsApp, Click on the ”New Conversation” icon and click ”Menu” and then click on ”Refresh”. Your added contacts will appear here if they are using WhatsApp.

I hope that you guys find the guide easy to use. Feel free to leave a comment if you got a query, we would love your feedback 🙂

How to Root & Install CWM on Samsung Galaxy S4 GT-I9500/GT-I9505 [Guide]

90
How to Root & Install CWM on Samsung Galaxy S4 GT-I9500/GT-I9505 [Guide]

Root & Install CWM on Samsung Galaxy S4: Samsung’s new flagship phone Galaxy S4 is one of the awesome devices having so many exciting features. Having a smartphone like Galaxy S4 without root access is quite incomplete if you are looking to play with your device, So today we will learn how we can gain root access on the Galaxy S4 GT-I9500 & GT-I9505 and also how we can install the Clockwork Mod Recovery on these devices. You need to follow the simple steps explained below, but before we begin here are some precautionary measures you must take before beginning.

The method for both the devices is same, you just need to select the right file for your device, please see your device model number carefully.

samsung-galaxy-s4-black

Requirements:

Before we begin, make sure that you have the battery charged over 60 % and have backed up all your important Contacts, Call Logs & Messages. It is highly recommended in case of any mishap or data loss to backup all your important data.

  1. Download Odin PC – Get it here
  2. Download Samsung USB Drivers – Get here
  3. Download & Unzip Cf Auto Root Package file once on your desktop

Please keep in mind:

As soon as you root your device, you will void the warranty of your device, so everything you do, do it at your own risk.

Method:

  • Download and install Samsung USB drivers first of all
  • Download, unzip and run Odin PC.
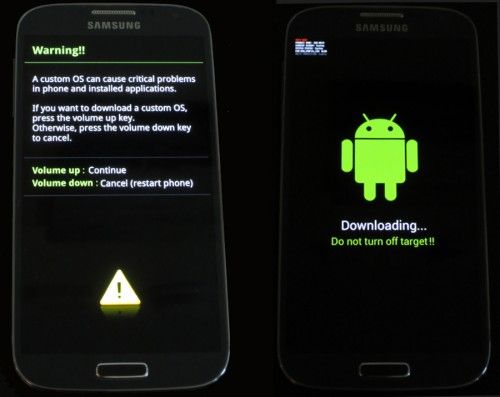
  • Put your GS4 in download mode by pressing and holding Volume Down + Home + Power key at the same time, you should get a screen showing a warning and asking to continue, press Volume Up to continue.

download-mode-500x397

  • Now your phone should be in downloading mode. Connect your phone to your pc using original Samsung Data Cable.
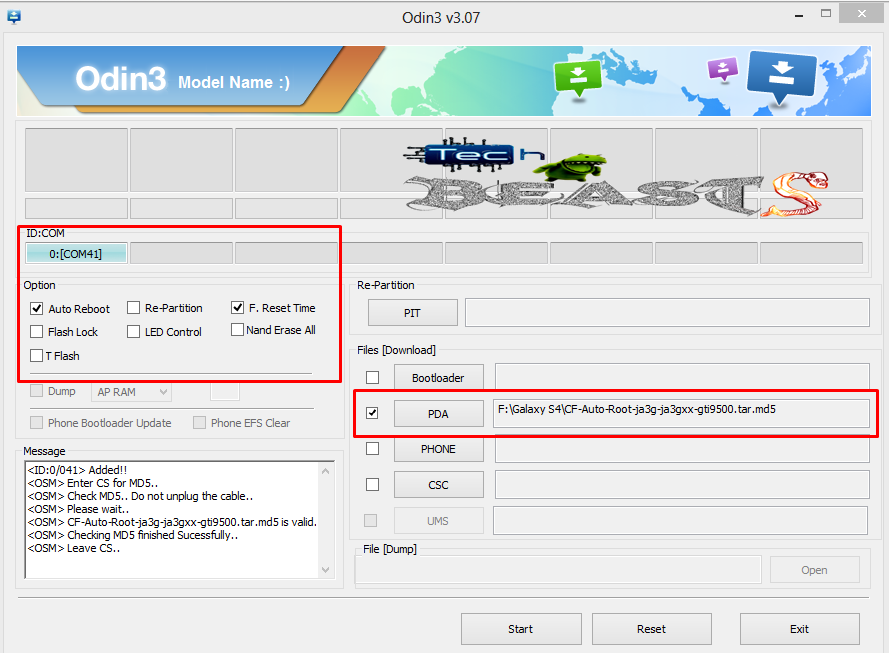
  • As soon as Odin detects your phone the ID:COM box will turn light blue.
  • Click on the PDA tab and select the file you downloaded in step 3.
  • Your Odin screen should look like this now

TEchbeasts-rootS4

  • Make sure that the options selected in your Odin are same as shown above.
  • Click Start and the root process should start showing you a process bar in the first box above ID:COM.

The process is quite fast and will finish in a few seconds, as soon as it ends, your phone will restart and you’ll see the CF Auto root installing SuperSu on your phone.

Congratulations you have your Samsung Galaxy S4 rooted now!

Installing ClockworkMod Recovery [CWM]:

The method explained above is basically for beginners and does not install a custom recovery in your phone, it simply installs a stock recovery with having your phone rooted. Custom recovery allows you to modify in your phone in so many other ways like flashing custom ROMs, flashing mods etc.

In order to flash a custom recovery after rooting your SGS4 download the following file.

Now you need to follow the same procedure explained above to root your phone but this time instead of giving it CF Auto Root file in the PDA tab you need to give it the downloaded CWM Advanced Edition [Philz Touch] file for your phone, the recovery will be flashed within a few seconds. You can enter the custom recovery now pressing and holding Volume Up + Home + Power Key.

In Short, the method is explained here once again.

  1. Download the CWM Recovery according to your phone.
  2. You do not need to unzip this downloaded file as it is already in .tar.md5 format.
  3. Open Odin.
  4. Put your phone in download mode and connect it to your computer using the data cable, the ID:COM box should turn now as shown and explained above.
  5. Click on PDA tab and select the downloaded .tar.md5 file.
  6. Click Start, the process will start and give you a PASS indication above the ID:COM box if it installed the recovery successfully!

That’s all you got to do for installing a custom recovery on your GS4.

Now wondering what to do with your rooted phone? 

Here’s the answer for you!

Rooting your phone gives you complete access over all the data which is apparently locked by the manufacturers. This includes removal of the factory restrictions and making changes to the internal system and the operating system. Gaining the root access gives you the privileges to install various applications to enhance the performance of your device, allows you to remove the built-in applications/programs, helps you to upgrade the battery life of your device & install the apps which require the root access for the proper functionality and modify your device in so many other ways e.g using mods and custom ROMs.

How to keep Root after OTA Updates

The OTA updates rolled out by the manufacturers wipe the root access on your phone. In case you don’t know how you can restore the root access after OTA update, you’ll have to root your phone once again, but there is no need to do it as you can restore it using the OTA Rootkeeper App which is available in the Google Play Store. The app creates a backup of your root and simply restores it after an OTA update.

While rooting your phone, please keep it in mind that the Root Process isn’t official and has nothing to deal with Google Inc and the device manufacturer, which is Samsung in our case. Follow the guide carefully to prevent any damages to the device as the method is completely custom.

Root Credits: Chainfire – Recognized Developer XDA

Recovery Credits: Phil3759 – Recognized Developer XDA

Got any questions? Feel free to leave a comment below, we’ll try our best to help you out 😀 Good Luck

How to Use Samsung Watchon On Samsung Galaxy S4

3
How to Use Samsung Watchon On Samsung Galaxy S4

Use Samsung Watchon On Samsung Galaxy S4: Samsung recently released its flagship smartphone continuing the Galaxy S series lineup named as ”Galaxy S4”. Galaxy S4 is one of the best smartphones in the world and is being used by millions of people today.

Samsung released this phone packed up with an Octa-Core processor clocked at 1.8 GHz, an FHD Super AMOLED 5-Inch Screen, a 2 GB ram and a lot of exciting features like Air Gesture, Air View, Smart Pause, Smart Screen etc.

Use Samsung Watchon On Samsung Galaxy S4

It has a camera of 13Megapixels with so many new features involved i.e Dual Shot, Drama Shot, Animated Photo, Sound & Shout etc. Galaxy S4 came up with a built-in app by Samsung named as ”Samsung Watch on”.

Samsung Watch allows the users to use their Galaxy S4 smartphone as a remote for various devices like T.V, DVD Players, Projectors, AV Player etc. Samsung has installed an IR Blaster in the phone in order to run this app.

If you are a lucky S4 owner and looking for how you can use this app, or having any difficulty running this app for the first time, you may not need to worry as you are at the right place to learn about how you can use it.

You need to follow the simple steps explained below in order to get it to work.

How to Use Watchon on Galaxy S4:

  • First of all, you need to open the Samsung Watchon App. You find it in your apps menu on your phone.
  • Tap the Watchon icon and get into it.
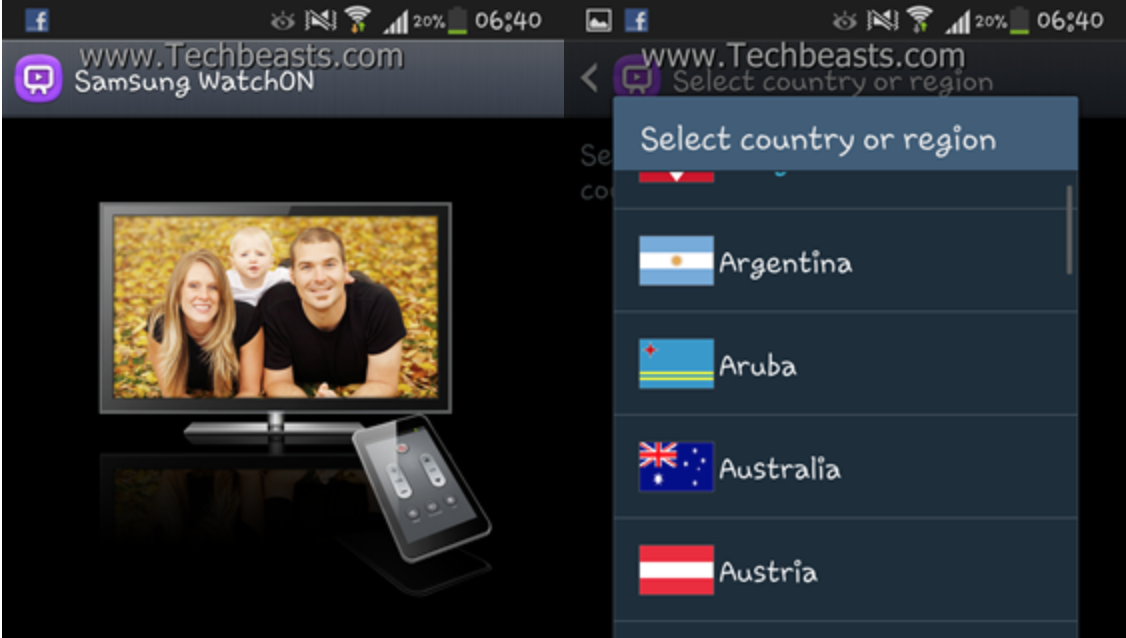
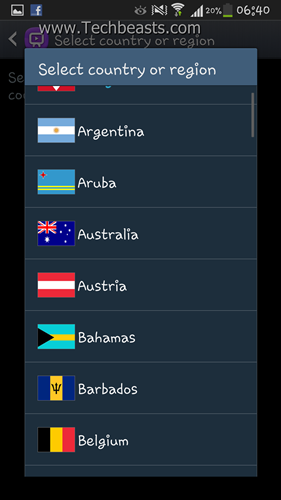
  • Select Your Country / Region, If your region is not listed in the list which came up, go to the bottom and select ”Other Country/Region”.

 Watchon_Techbeasts (1)Watchon_Techbeasts (2)

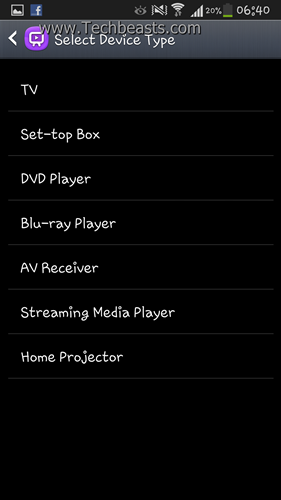
Select Device Type:

  • Next step is to select the device, for which you want to use the Watchon and make your Galaxy S4 a Remote Control e.g TV, Set-top Box, DVD Player etc.
  • After you select the device, you need to specify the brand and proceed.
  • If your device’s brand is not listed in this list you may find it in the complete list by tapping ”Show Other Brands” at the bottom.

Watchon_Techbeasts (3)Watchon_Techbeasts (4)

  • As soon you select the brand, you will receive a pop up saying your ”Brand Name – Device” has been added.
  • In our case, we selected ”Samsung Tv” as you can see below.
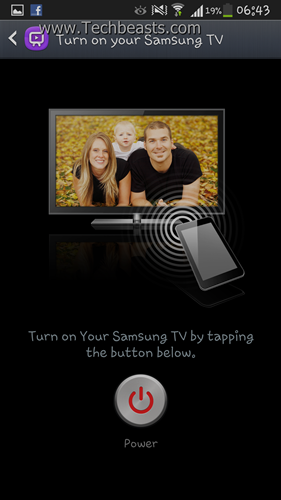
  • Now as soon as you press ”Ok” on the pop-up, Samsung Watchon will generate a code and ask you to press the power button to test with your T.V or whatever device you selected.
  • If the remote did not work with your device you may require to generate a new code and try again.

Watchon_Techbeasts (7)Watchon_Techbeasts (6)

Configure:

  • After your device is added successfully, it will offer you to set up another device.
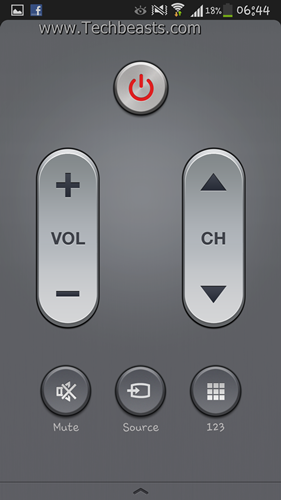
  • You may select a device to proceed and repeat the same procedure with the brand as explained above or simply tap ”Done” at the bottom and you will receive your ”Watchon Remote”.
  • You can now use this remote to control your device completely using your SGS IV.

Watchon_Techbeasts (15)Watchon_Techbeasts (8)

Room Selection:

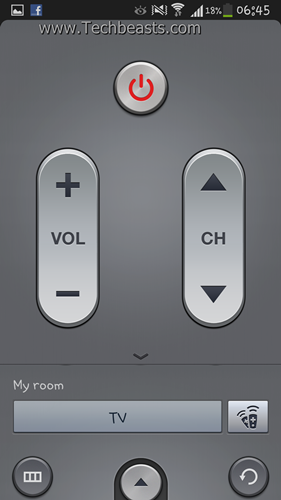
  • To access more options on your Remote, you can pull the preferences up by tapping the ”Up Arrow” key at the bottom.
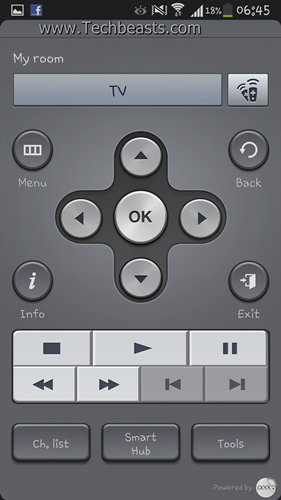
  • Then tap the button at the bottom again to access full options on the Remote.
  • The remote is saved as ”My Room”. You can edit it using preferences and change the name or add another device. But in on the room, you can only add 1 of each device.
  • To add another of the same device you will have to create a new room.

Watchon_Techbeasts (9)Watchon_Techbeasts (10)

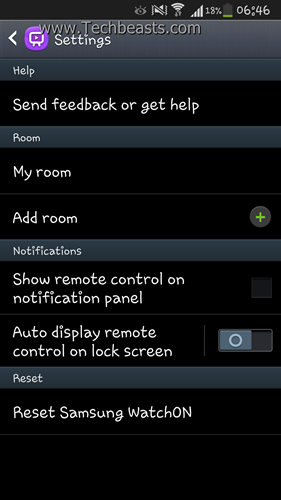
  • Press the options key on your phone to access the Settings in Watchon.
  • Here you can find the option to add a new room. If you wish to display the Remote in Notification Panel. You can enable it here and it will be shown in the notification panel.

Watchon_Techbeasts (11)Watchon_Techbeasts (12)Watchon_Techbeasts (14)

  • To add a new room, follow the same procedure explained above.
  • Having difficulties understanding the tutorial explained above? no worries! Here is a video showing the tutorial for better learning.

Got any questions? Feel free to leave a comment below, we’ll try our best. Thank You. This is how you can Use Samsung Watchon On Samsung Devices.

How To Use Dual Shot Mode On Samsung Galaxy S IV

0
How To Use Dual Shot Mode On Samsung Galaxy S IV

With the help of this guide, you can learn how o Use Dual Shot Mode On Samsung Galaxy S IV. But before that, you can find the main specs of Samsung Galaxy S IV.

Samsung Galaxy S IV:

Samsung Galaxy S IV is one of the best Android Phones having a lot of awesome and exclusive features. Galaxy S IV has an Octa-Core processor clocked at 1.8 GHz, a Ram of 2GBs, a huge display of 5-Inches with a 1080p FHD resolution. Samsung also introduced the smart features e.g Smart Pause, Smart Scroll, Air View & Air Gesture in S IV.

Galaxy S IV also has an awesome camera clocked at 13Megapixels with a lot of new features like Drama Shot, Animated Photo, Sound & Shout & Dual Shot.

Dual Shot is the very new feature in any Android Device first time ever was ”Dual Shot” in Galaxy S4. The dual Shot mode allows users to use Primary & Secondary, both cameras at the same time while taking pictures.

The features of Galaxy S4 take a little time to be figured out and you might be looking for how you can turn on the Dual Shot mode on yours. Follow the simple tutorial here to learn it.

Use Dual Shot Mode On Samsung Galaxy S IV:

  1. Open Camera
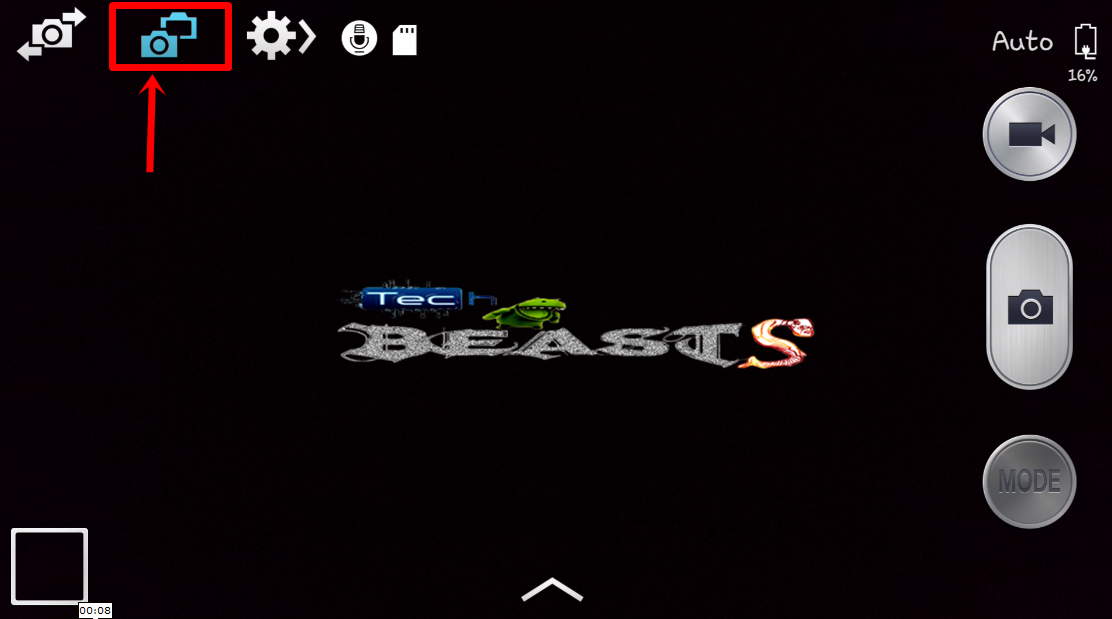
  2. Press the 2nd Button on the top left.

Use Dual Shot Mode On Samsung

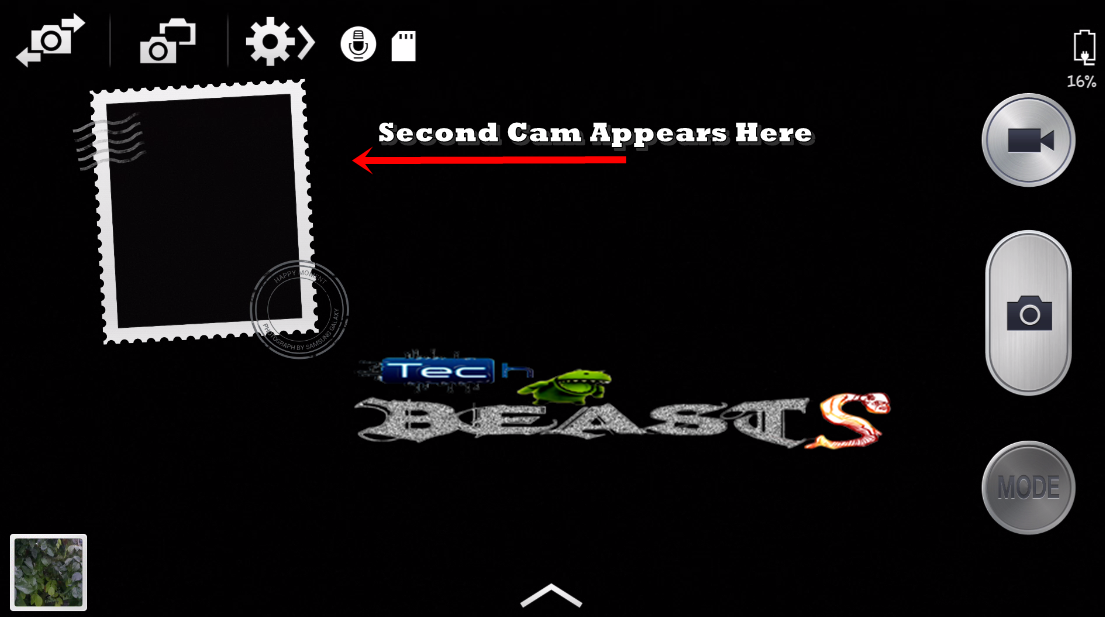
3. Dual Cam Mode will be turned on. Secondary cam will appear in the small box, while the primary cam will appear in the main screen. You can switch the cameras and shift the secondary to the main and primary to the small box.


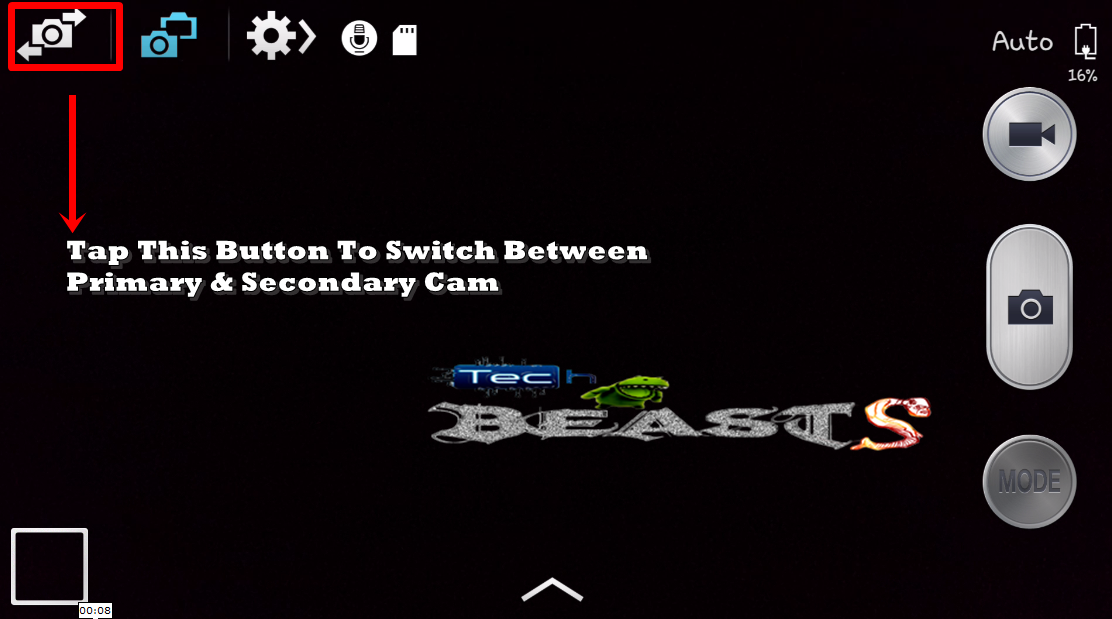
4. Press the 1st Button at the top left to switch between cameras. This can be done while keeping the dual shot mode on, it will simply change the primary cam to the small box and secondary cam to the main screen.

Screenshot_3

5. Move the small screen anywhere on your screen and capture the pics.

The dual shot also works in video mode. If you are having any difficulties using dual shot, here is our video tutorial to help you.

Feel free to leave us feedback.

How to Backup/Export & Restore/Import Contacts on Your Android Phone

7
How to Backup/Export & Restore/Import Contacts on Your Android Phone

Having backed up contacts from your Android Smartphone becomes handy when you have to perform a data wipe, modify your phone you lose your data due to some mishap. You can easily restore all of your contacts within few seconds. I’ve compiled up some easiest methods in order to help you to backup your contacts conveniently. Follow the steps explained below to do so.

How to Backup/Export & Restore/Import Contacts on Your Android Phone

1. Export vCard to your sd card

First of all, In case you don’t know what is a vCard, vCard is a file format which contains all of your contacts and can be used to restore the contacts from it at any time.

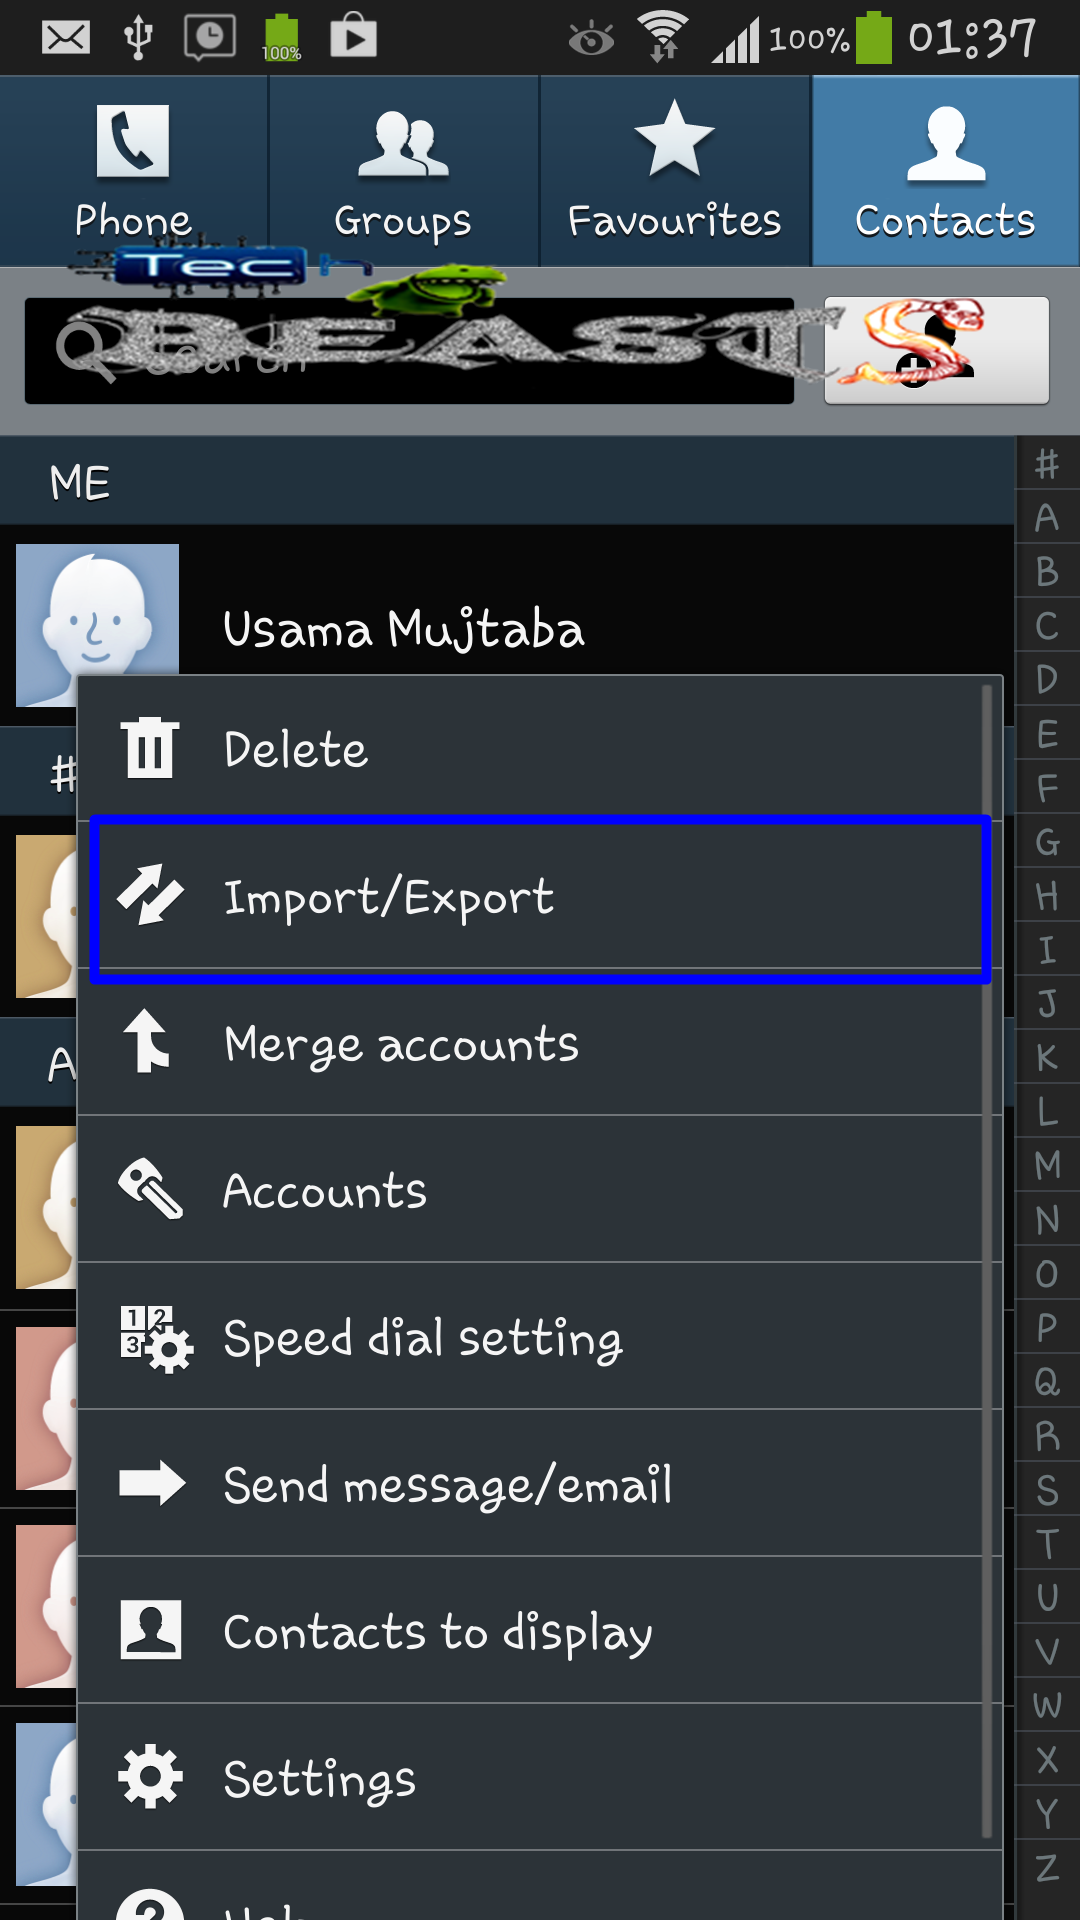
Open Contacts, Press the options key access the preferences.

Tap the ”Import/Export” option

Techbeasts_ContactsBackup (1)

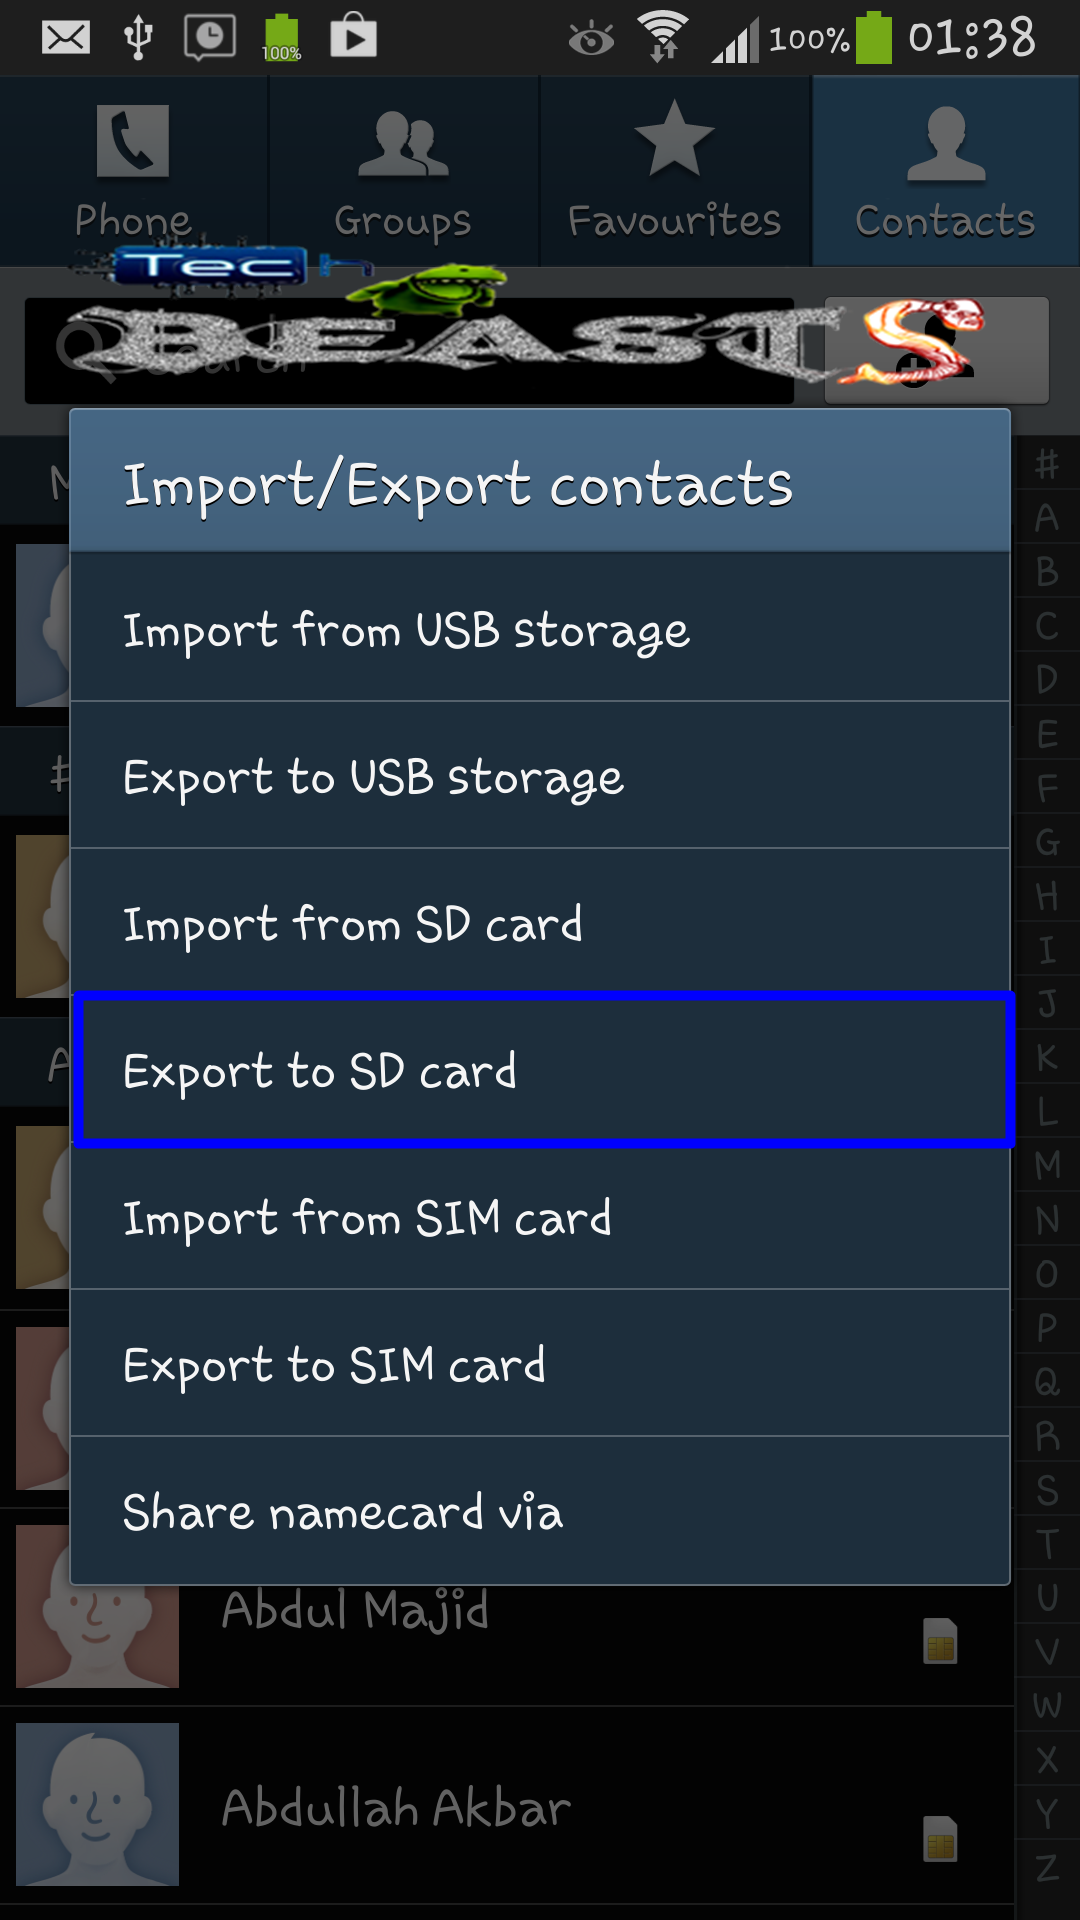
After you press the Import/Export option you will get another screen showing you the options as shown below.

Tap ”Export to SD card”. This option is the safest one to create a vCard, as you can copy the vCard from you SD card to your computer as well or you can save that file in cloud storage e.g Dropbox.

After you select Export to SD card you will get another pop up to confirm the process, press ok here and let it begin, as soon as you press ok a vCard having all your contacts will be created on your SD card. You can also import this vCard file in any other smartphone.

Techbeasts_ContactsBackup (2) Techbeasts_ContactsBackup (3)

Save the vCard is preferred more as whenever you have to perform a data wipe, the data on your internal storage might be lost but the SD card isn’t formatted as long as you don’t do it manually or delete the file manually.

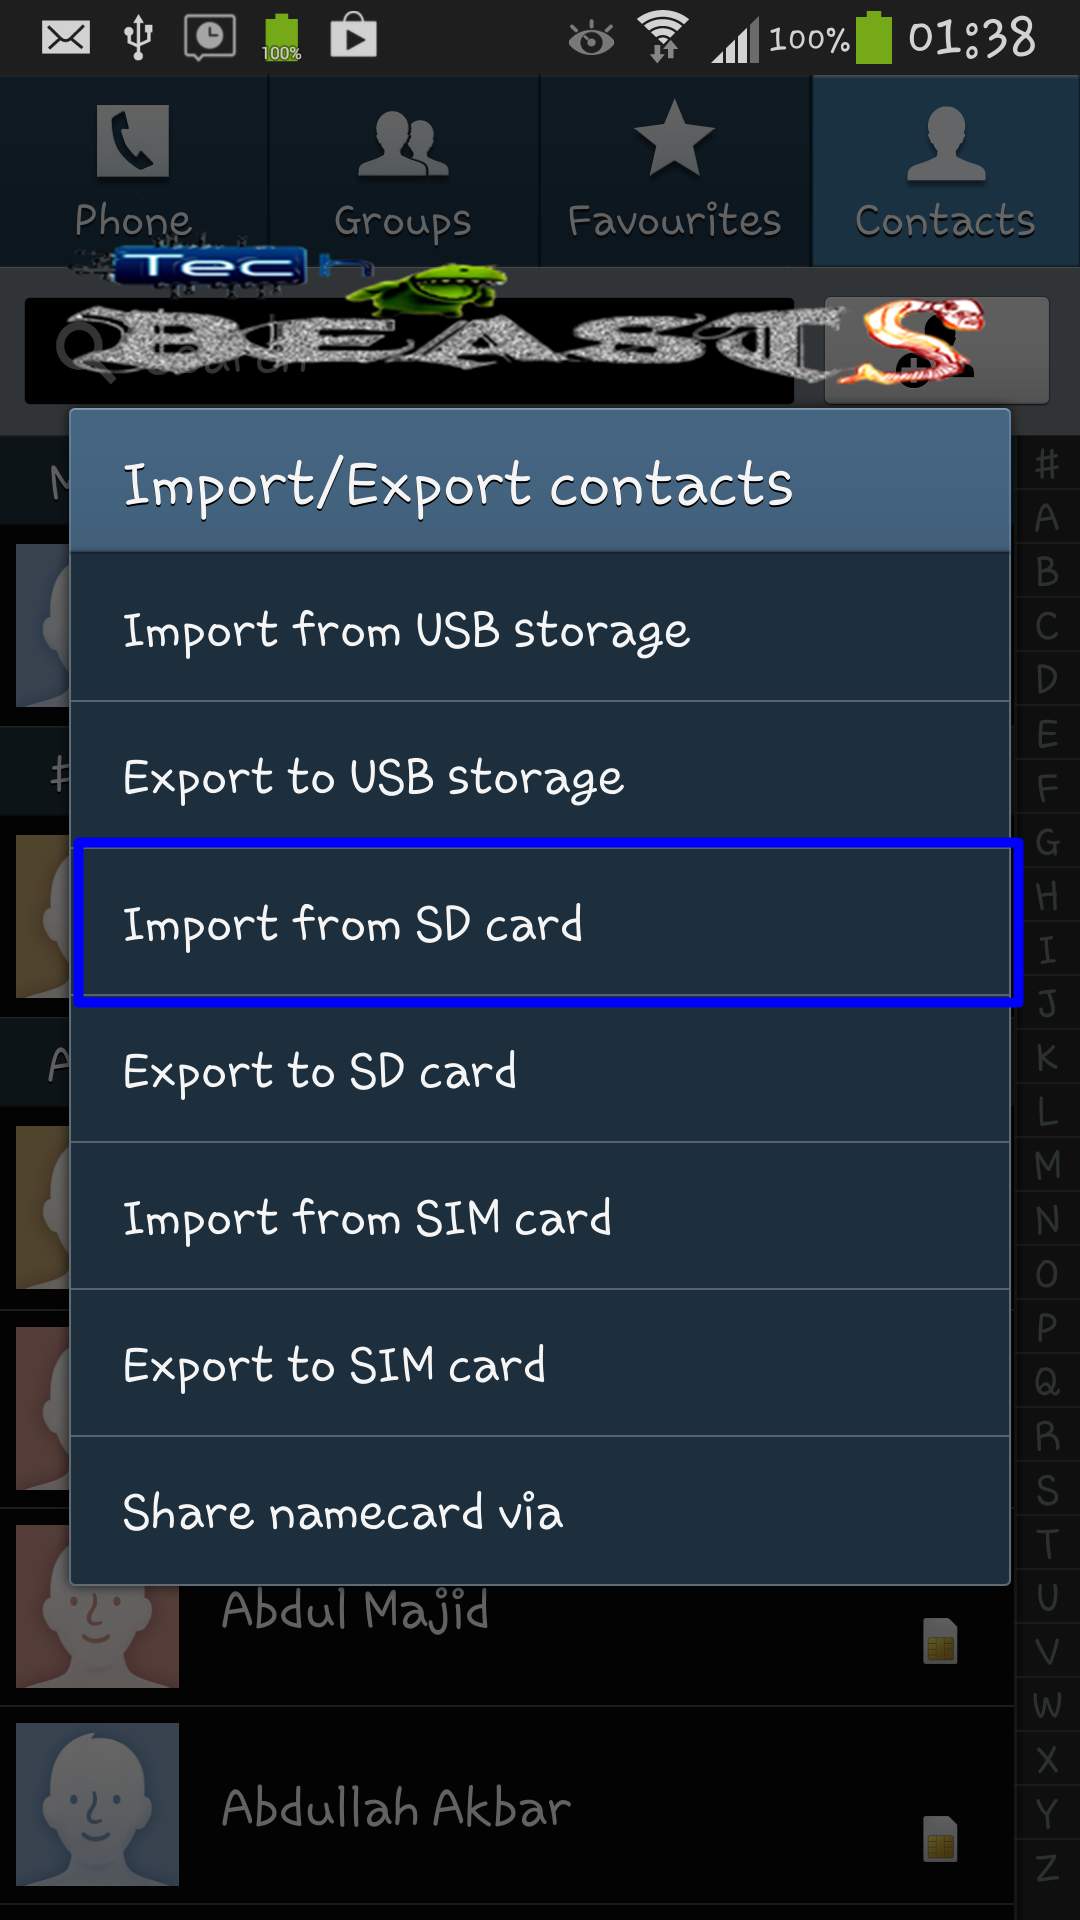
Ok so now here is how you can restore these contacts using the same Import/Export option. This time you need to press the options key and tap ”Import”.

Restore

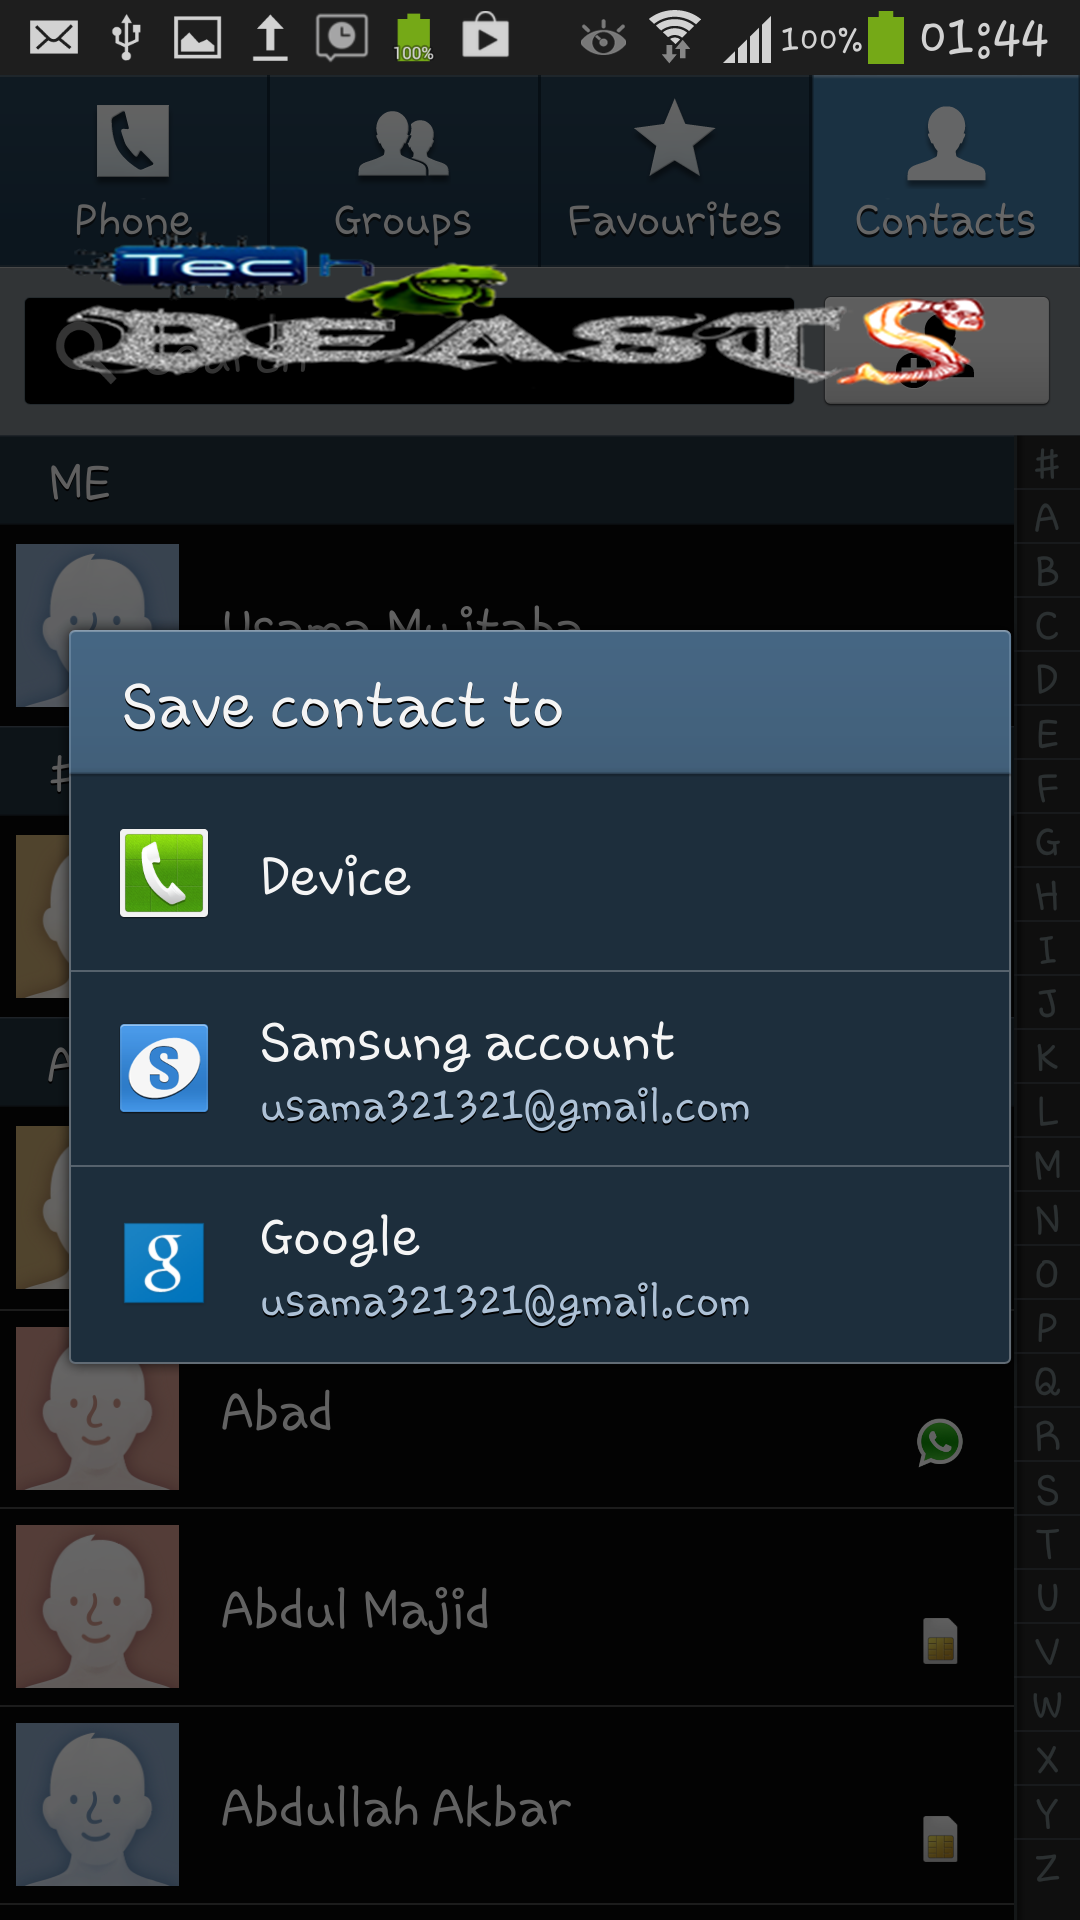
After you tap Imort you will get an option to save your contacts. You can select your desired place, where the contacts will be restored.

  • Selecting ”Device” will restore the contacts to your phone
  • Also, Selecting ”Samsung Account” will restore your contacts to your Samsung Account.
  • Selecting ”Google” will restore your contacts to your gmail account which you are using in your Android phone.

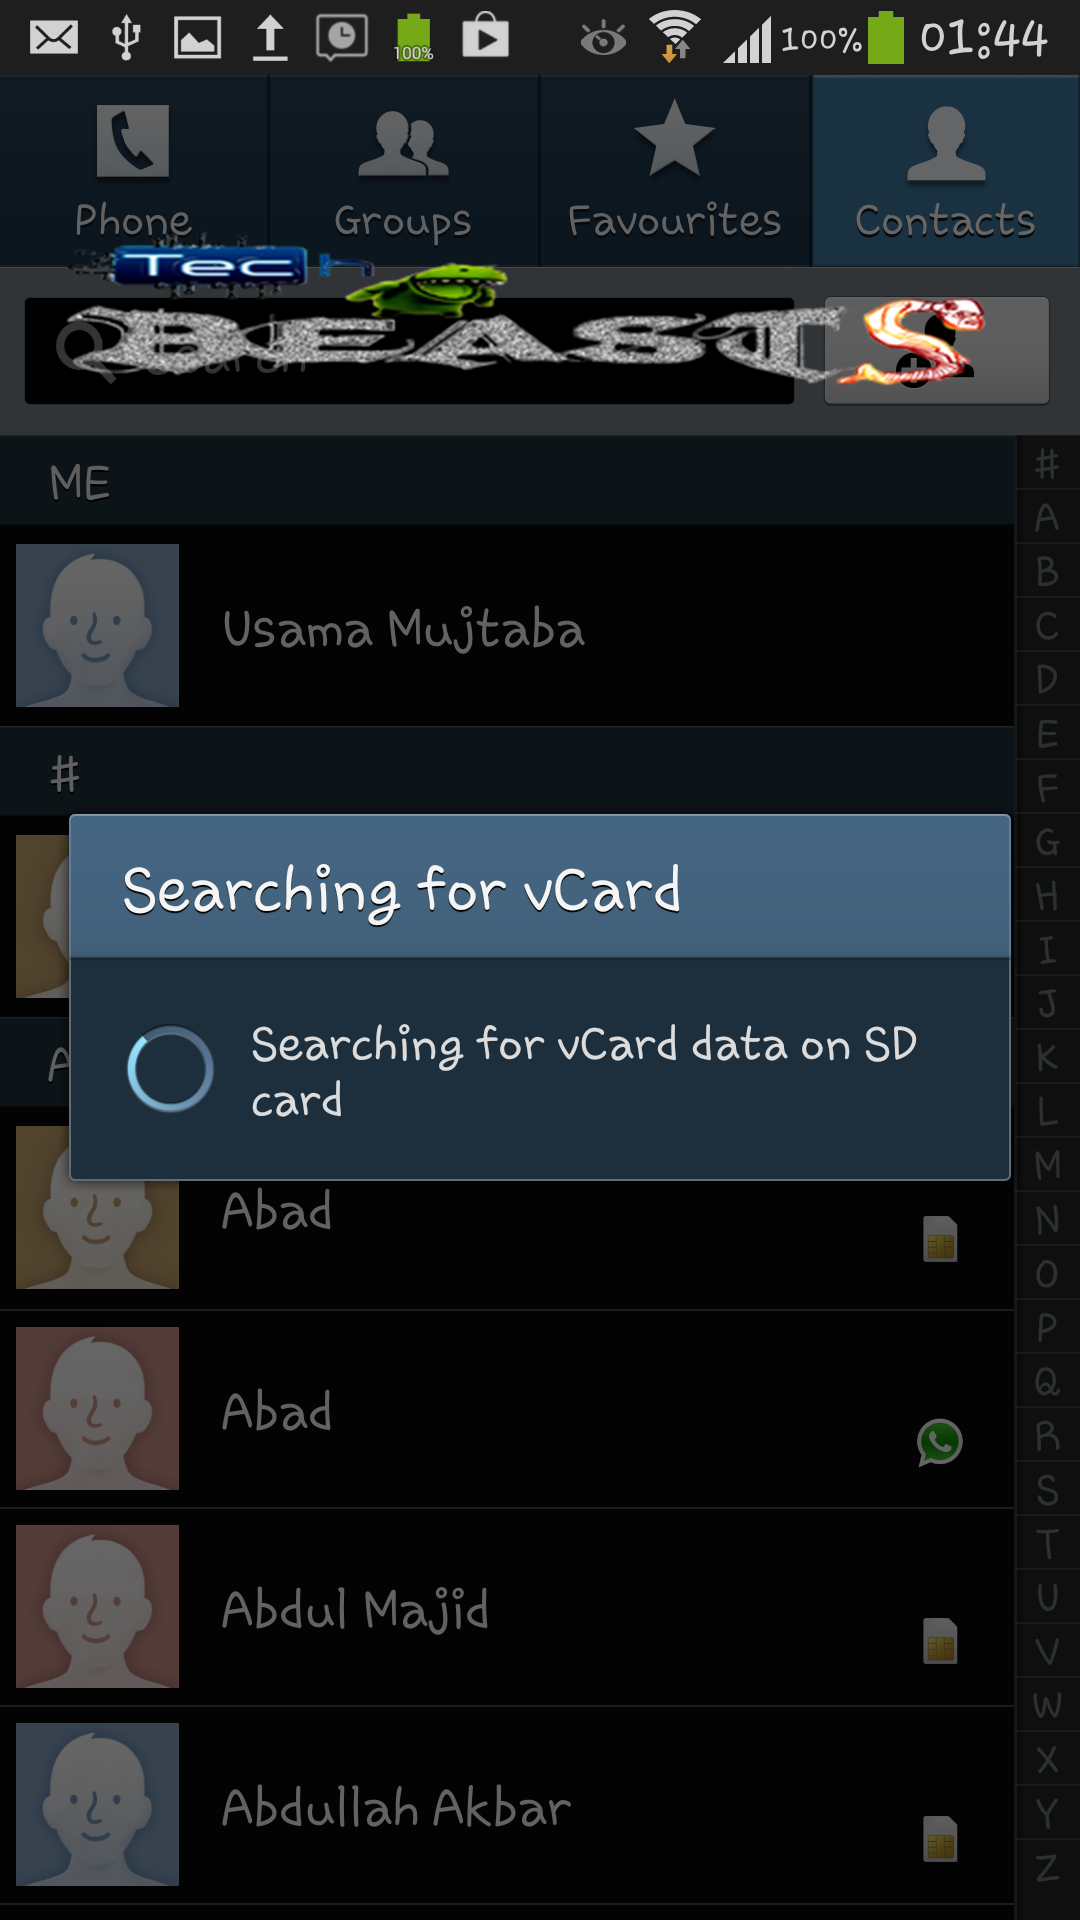
As soon as you select the option to restore your contacts, it will tend to find the vCard file on your SD Card.

Techbeasts_ContactsBackup (4)Techbeasts_ContactsBackup (8)

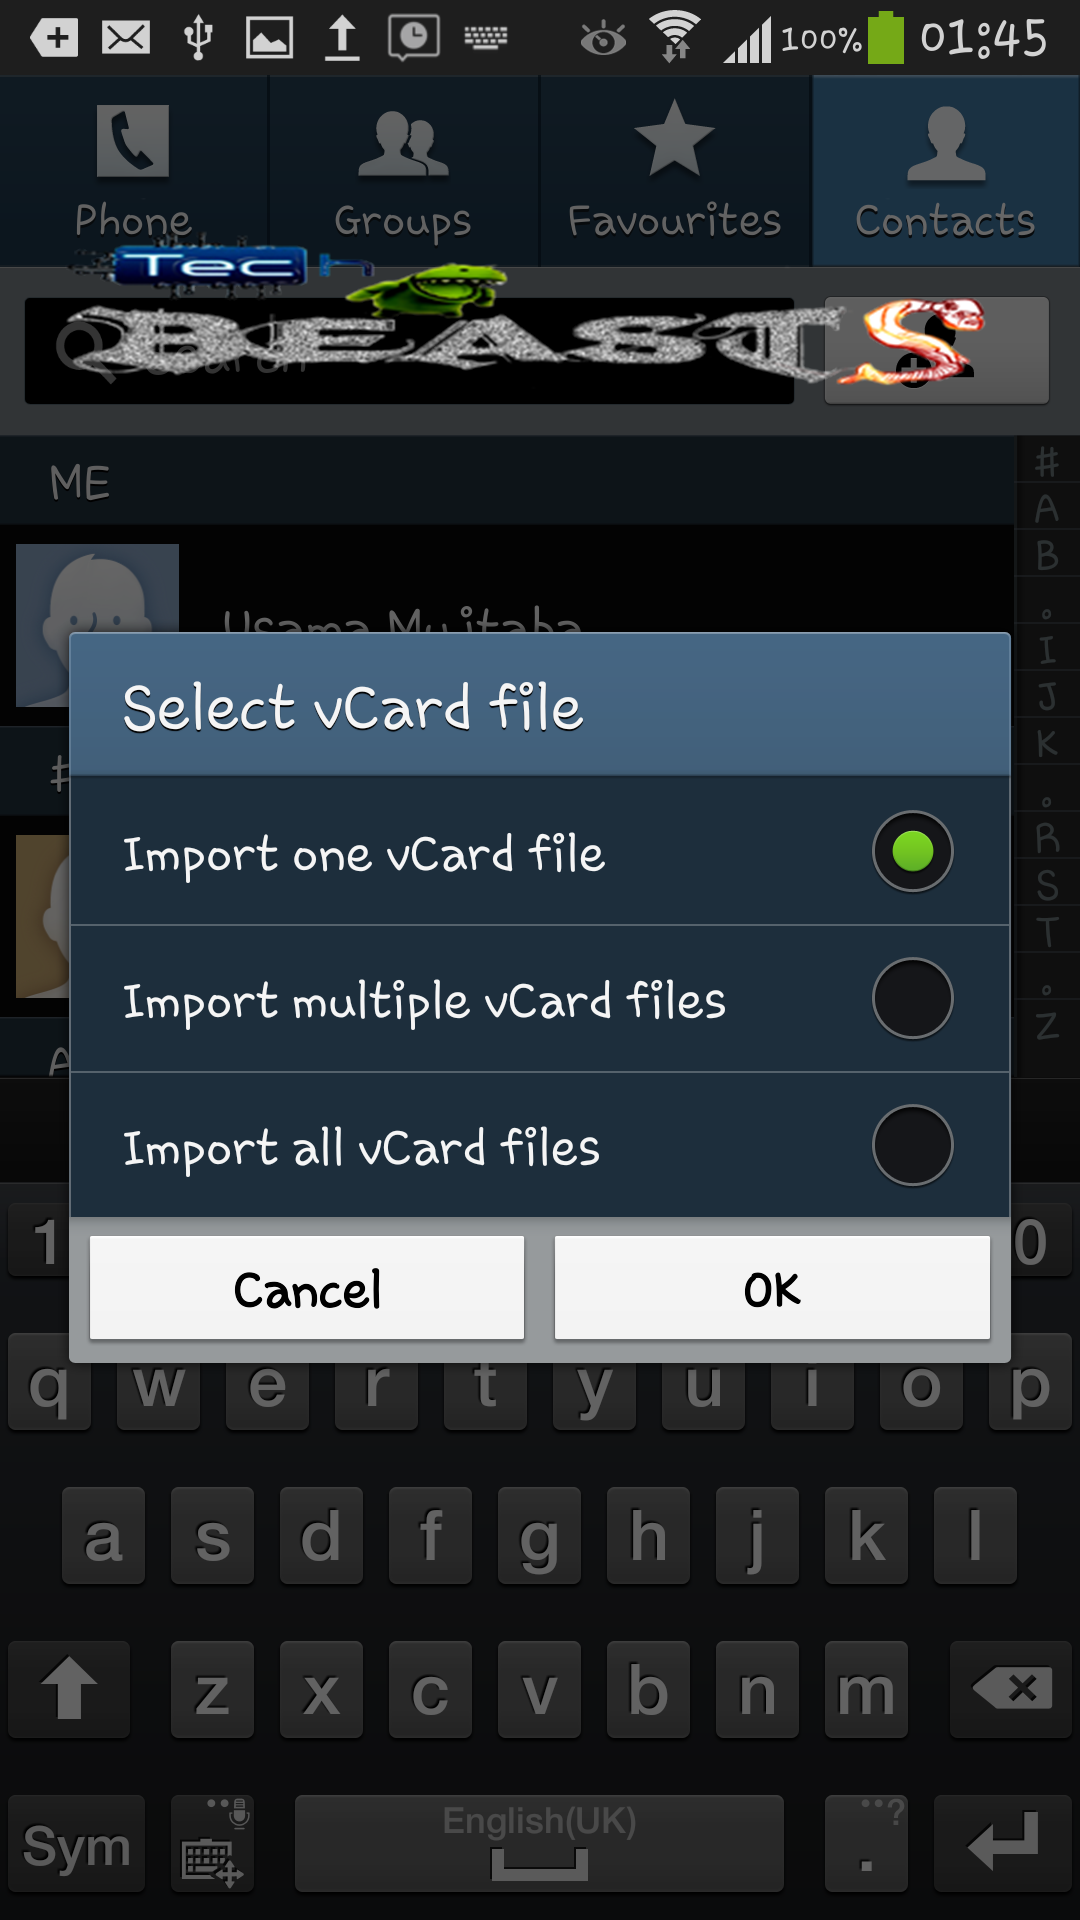
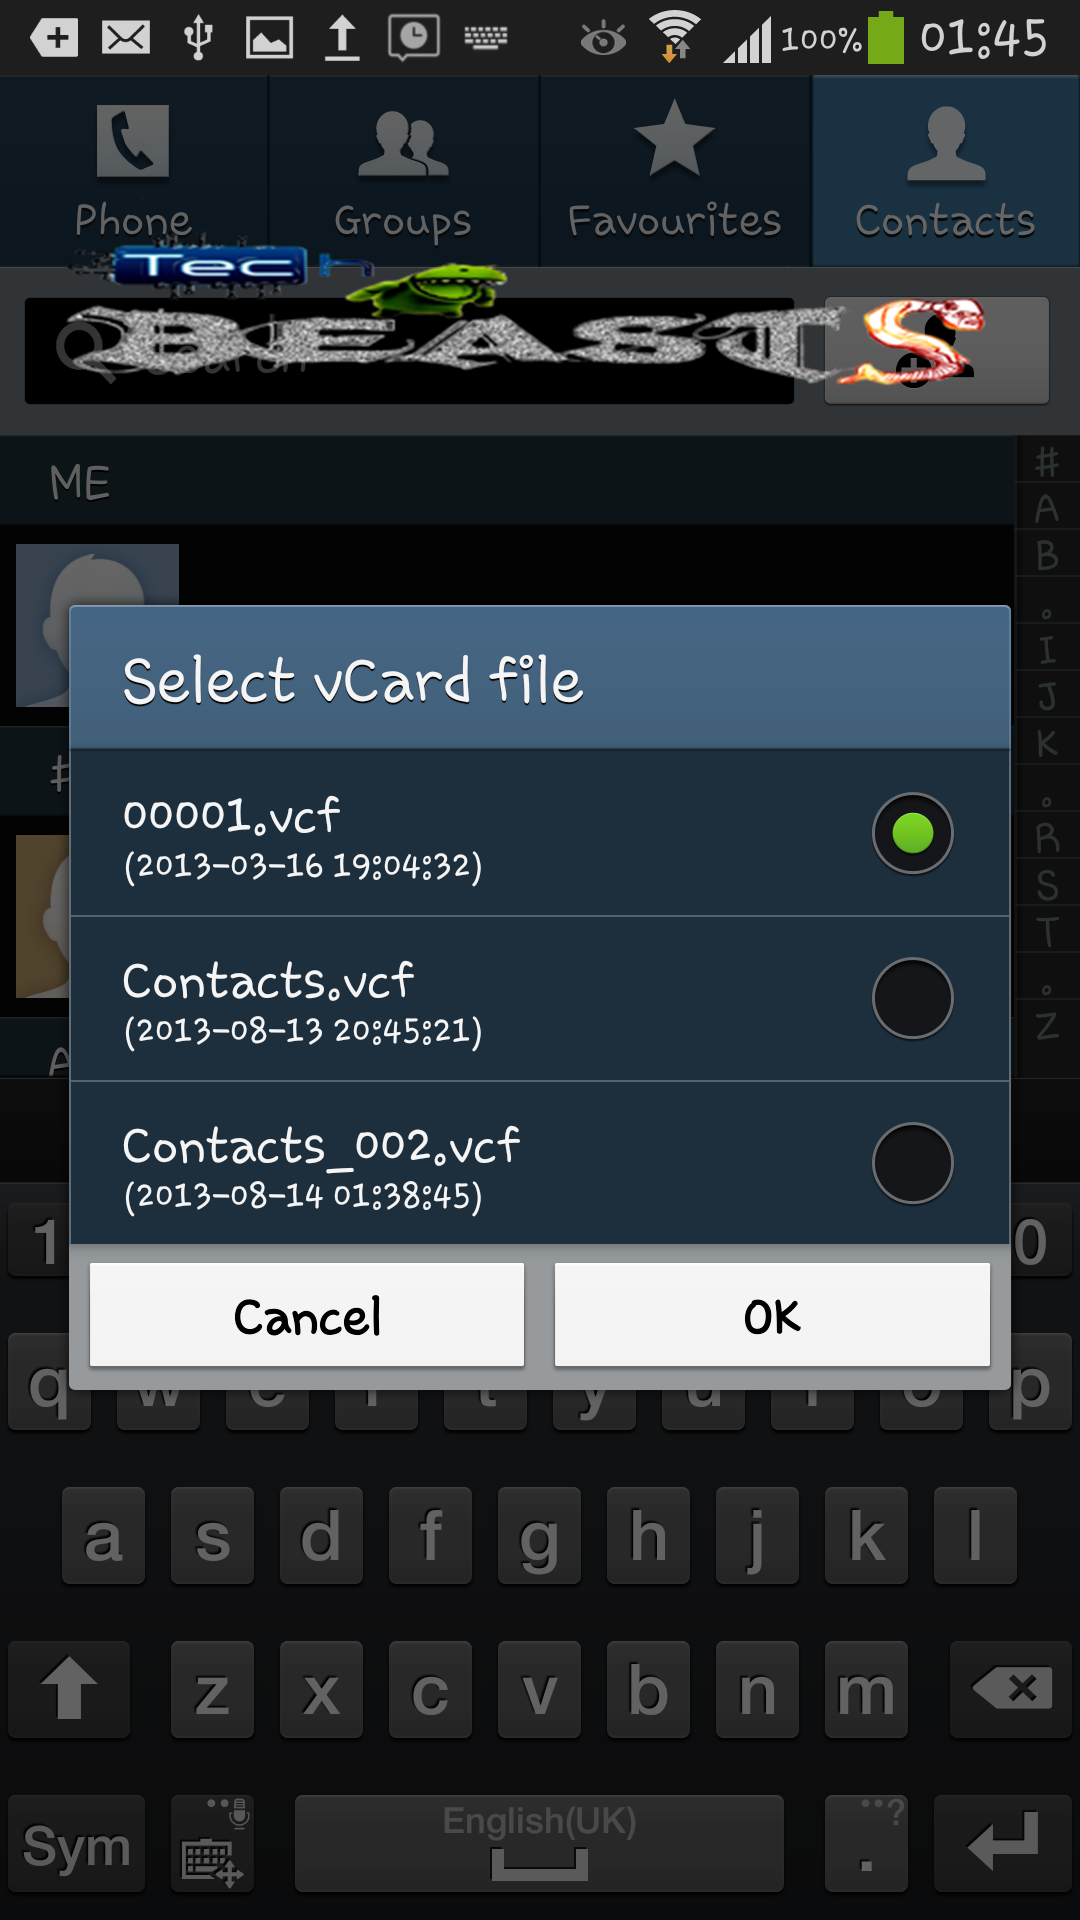
After you select a place to restore your contacts, you will get an option to specify whether you want to import only one vCard or you want to import multiple vCard, you can choose to depend upon your need/choice. Select the vCard file you want to restore and press ”ok”.

Techbeasts_ContactsBackup (5) Techbeasts_ContactsBackup (6)

All of your contacts will be restored to the place you selected above.

2. Use an App to Backup & Restore Your Contacts

Super Backup is an app available in the play store that can help you to Backup your contacts, call logs, messages, and apps as well, for apps you will need root access while you can backup contacts, call logs and messages without root access. We will discuss how you can restore the contacts for now, while tutorials on backing up call logs and messages are can be found here:

So, Let’s begin.

Install the app here or download it directly from play store in your pone

Open the app and tap ”Contacts Backup”

a

I am assuming that you are using this app first time and you want to make a backup first, so tap ”Backup” here.

b

It will ask you to enter a file name as soon as you tap Backup. Give it a file name and press ok to proceed.

c

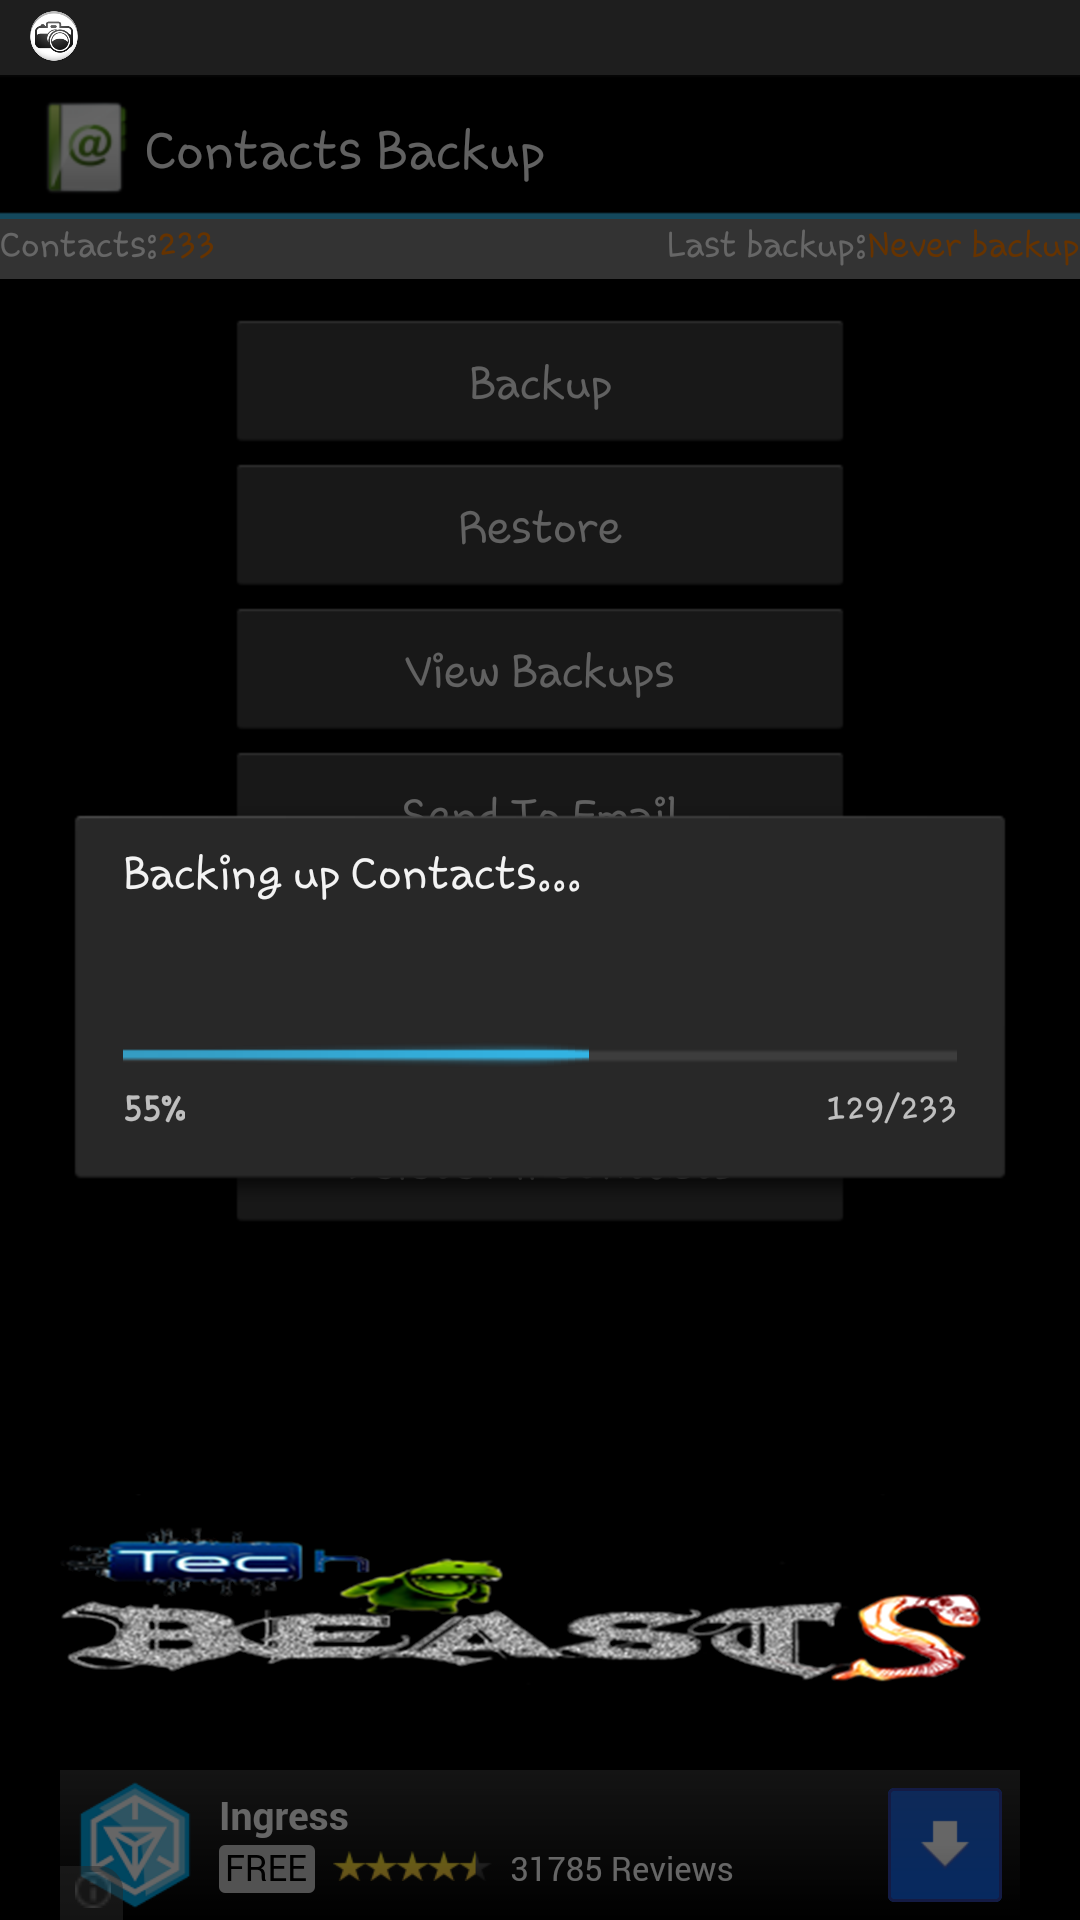
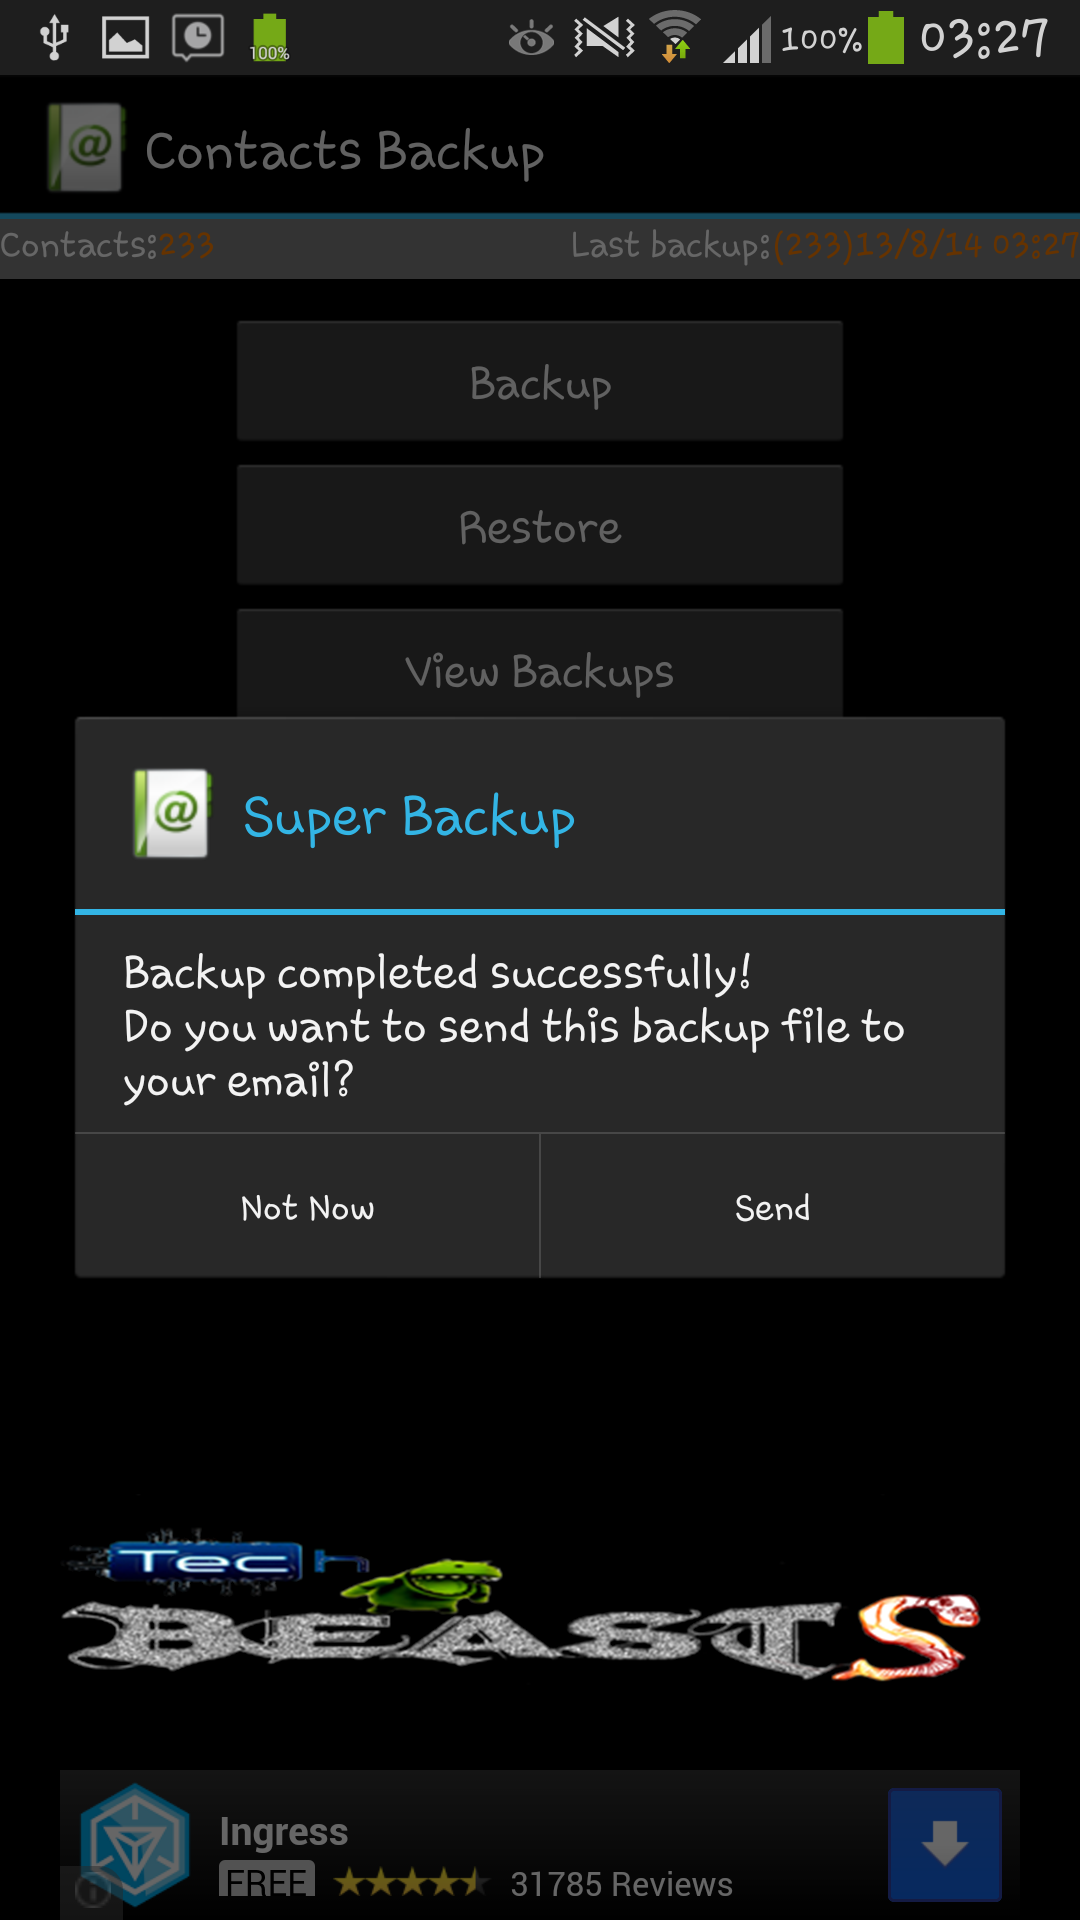
As soon as you press ”Ok” it will start the backup and give you a pop-up notification saying completely. It will ask you if you wish to send the backed up vCard(.vcf) file to your email, tap send to mail it or else tap ”not now”.

d e

Hopefully, you have learned now how you can back up your contacts, here is now how you can restore the backed up contacts easily. Get back to the main screen of the Contacts Backup and tap ”Restore” this time.

cc

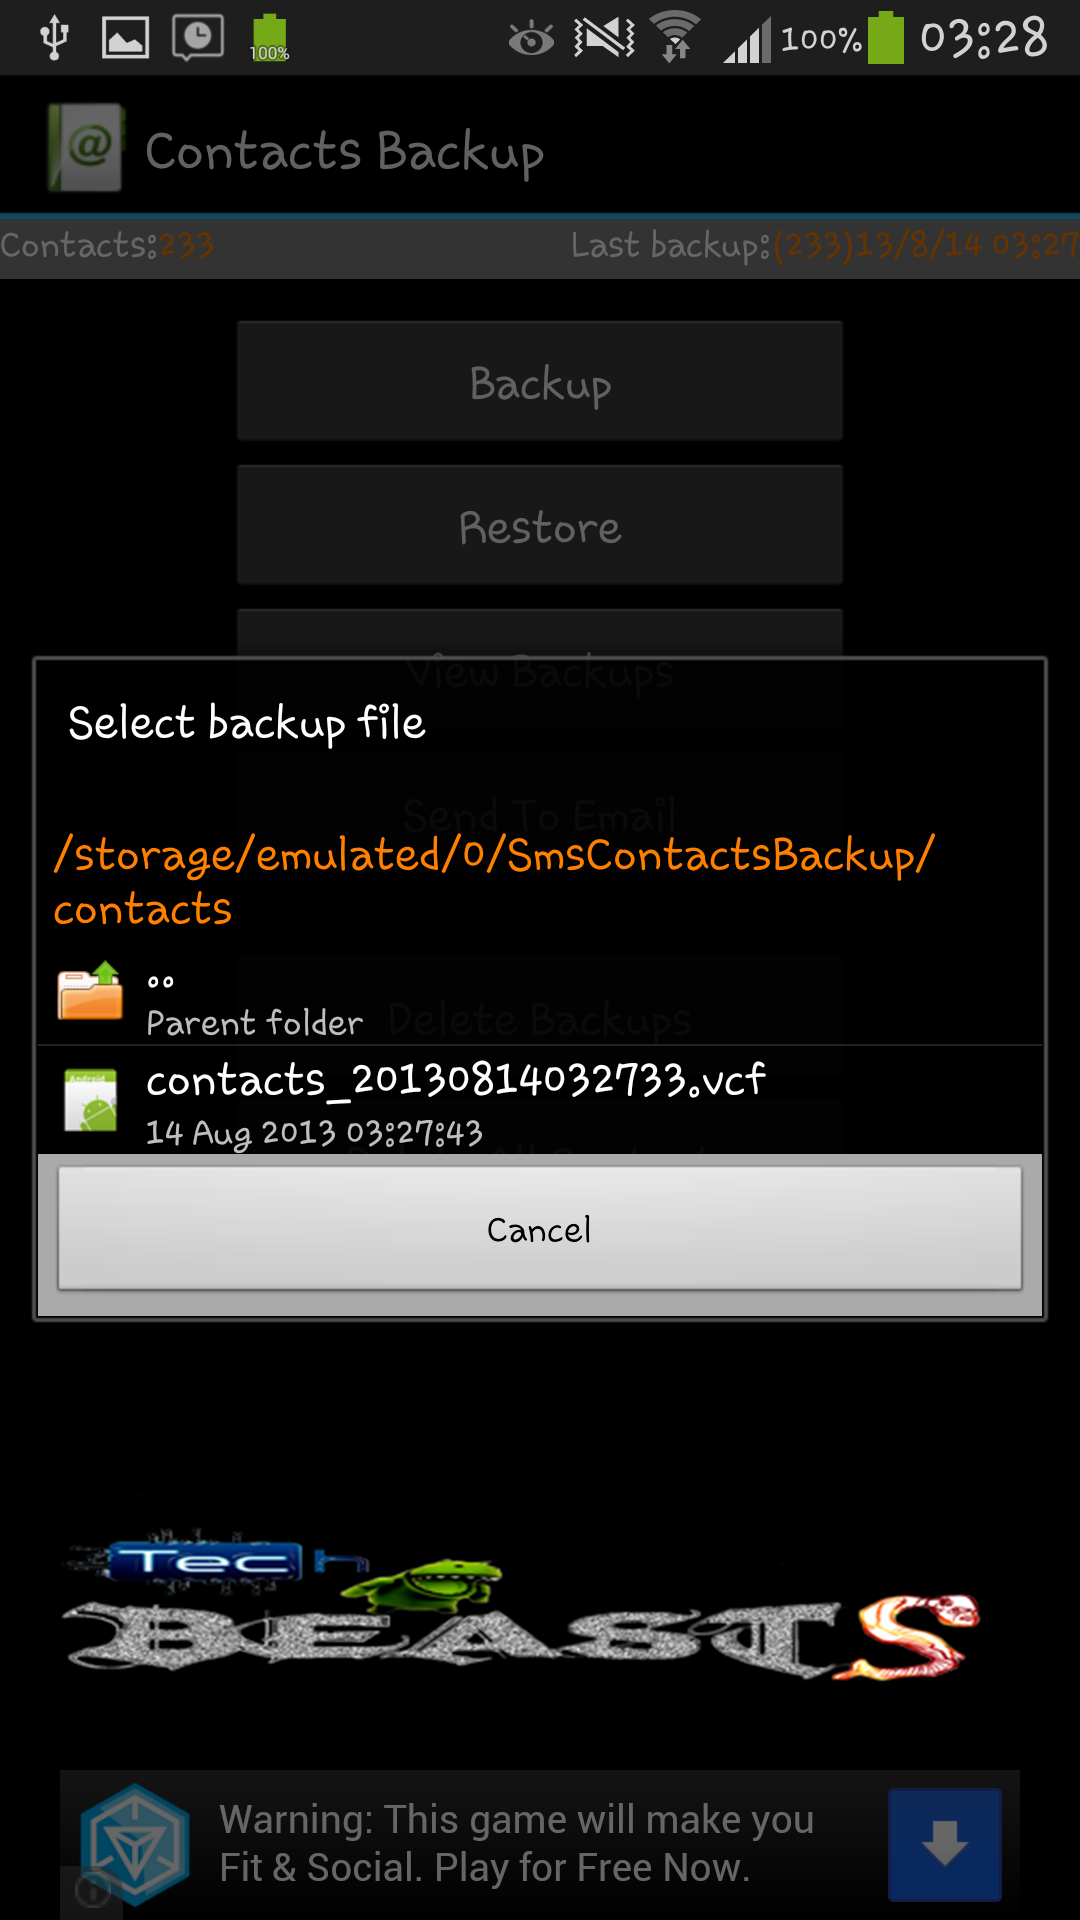
As soon as you tap Restore it will detect the Backed Up file from your phone’s memory and ask you to select it. Select the file and it will proceed.

7

The contacts restore process will complete and pop out a notification telling you ”complete”

89

3. Sync Your Contacts With Your Google Account

1. Open settings on your Android Smartphone

2. Open Sync Settings or Accounts

3. Tap Google account.

4. Select the account you are using on your device.

5. Check the ”Sync Contacts” Option.

That’s all, Your contacts will now be Synchronized with your Gmail Account and you can restore them to any device at anytime you want by using the Sync option.

Got any queries? Feel free to leave a comment below, we’ll try our best to help you. Thank You


How to Backup & Restore Call Logs on Your Android Smartphone & Tablet

2
How to Backup & Restore Call Logs on Your Android Smartphone & Tablet

Backing up Call Logs is a good thing and a great precautionary measure when you have a fear of losing your data, or in case you flash a new ROM or modify your phone in any other way. Call Logs Backup & Restore is an awesome app available in the Google Play Store to backup all your call logs by the same developer who developed SMS Backup & Restore. In order to proceed, you need to follow the simple steps explained below.

How to Backup & Restore Call Logs on Your Android Smartphone & Tablet

Screenshot_3

So, first of all, you need to download and install Call Logs Backup & Restore from the Google Play Store, you can download it here.

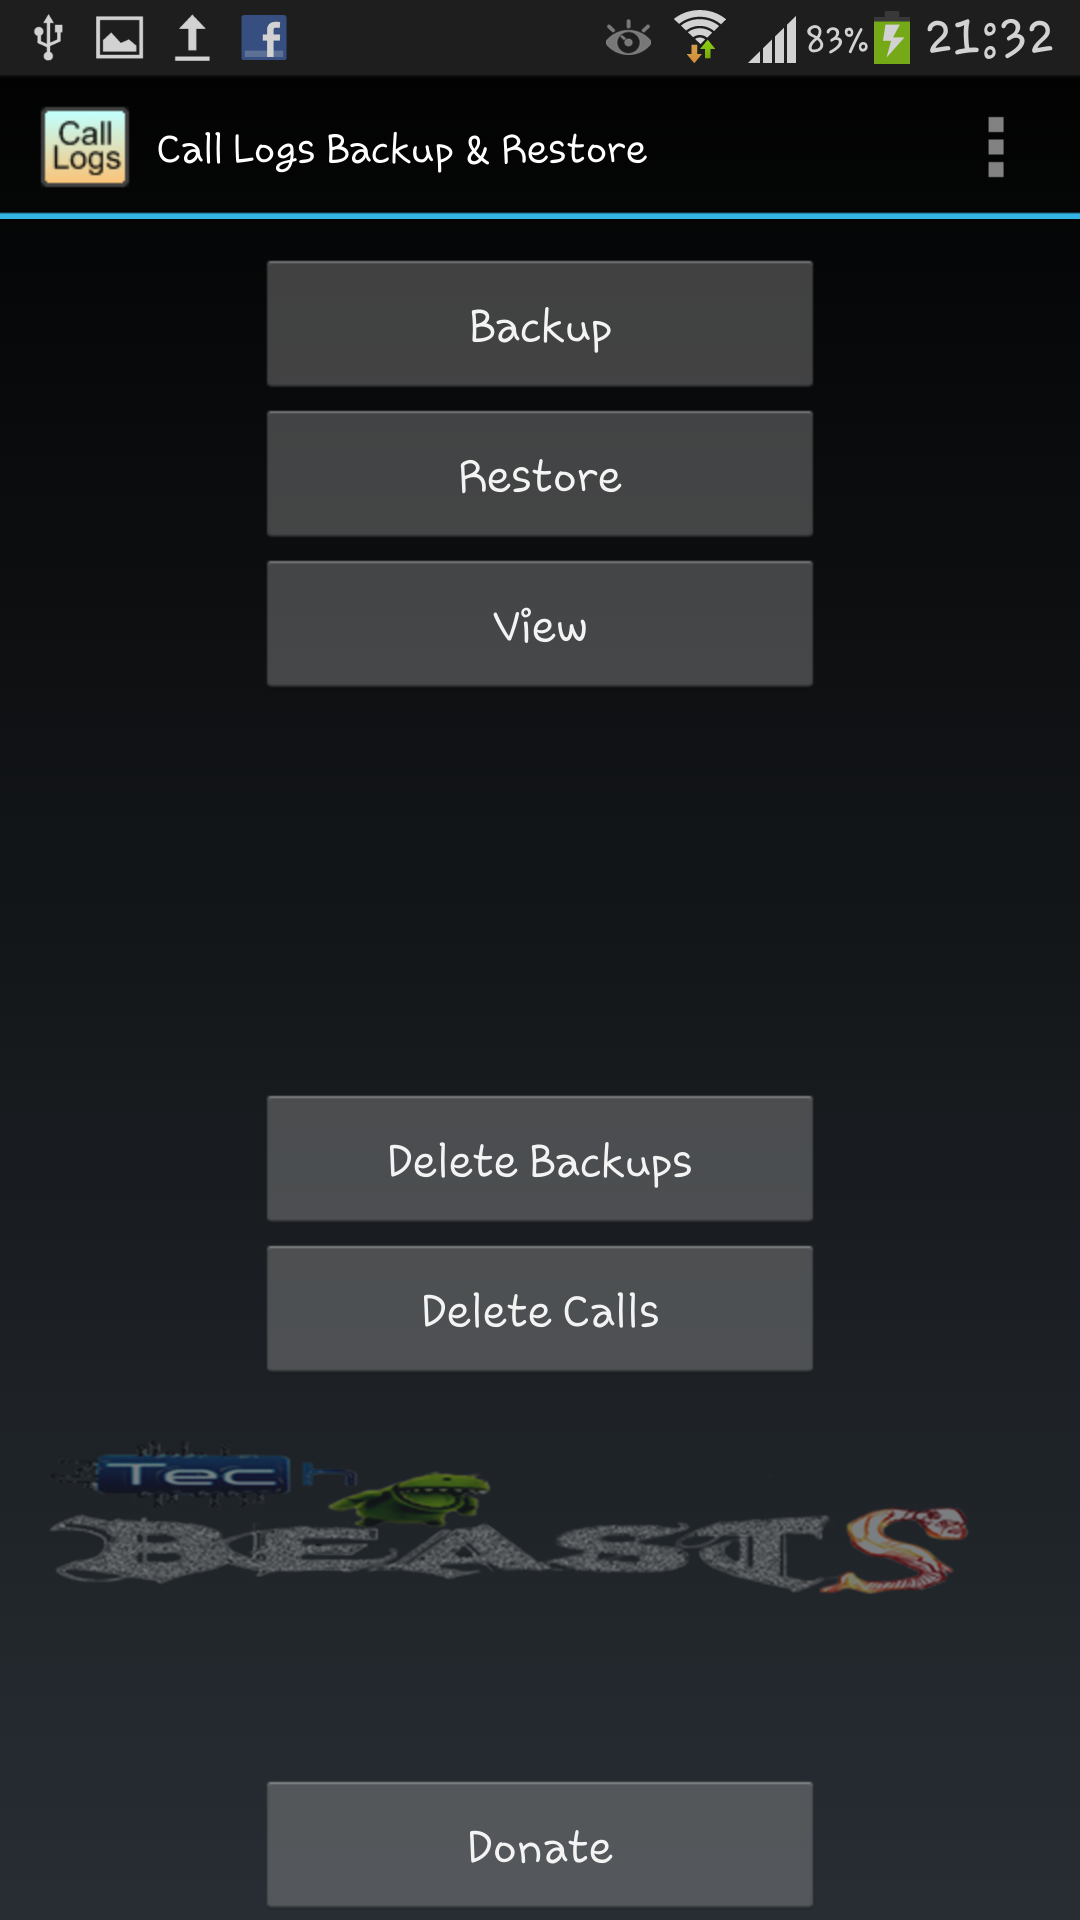
After the installation is done, open it and you will see a screen on your phone/tablet as shown below. Here you can select whatever you want today, probably you want to backup your call logs first of all, so just tap ”Backup”.

Screenshot_2013-08-13-21-32-13

As soon as you tap the Backup button you will receive options as shown below, Here you need to specify the storage where you want to store your backed up XML file. This XML file will be used to restore the call logs a later time when you want. By default is internal storage but you can change it depending on your choice. I prefer External Storage Card because whenever you wipe your phone to factory data, your internal storage is wiped as well, so having it on External Storage will keep it saved as long as you don’t format it manually.

Screenshot_2013-08-13-21-32-20

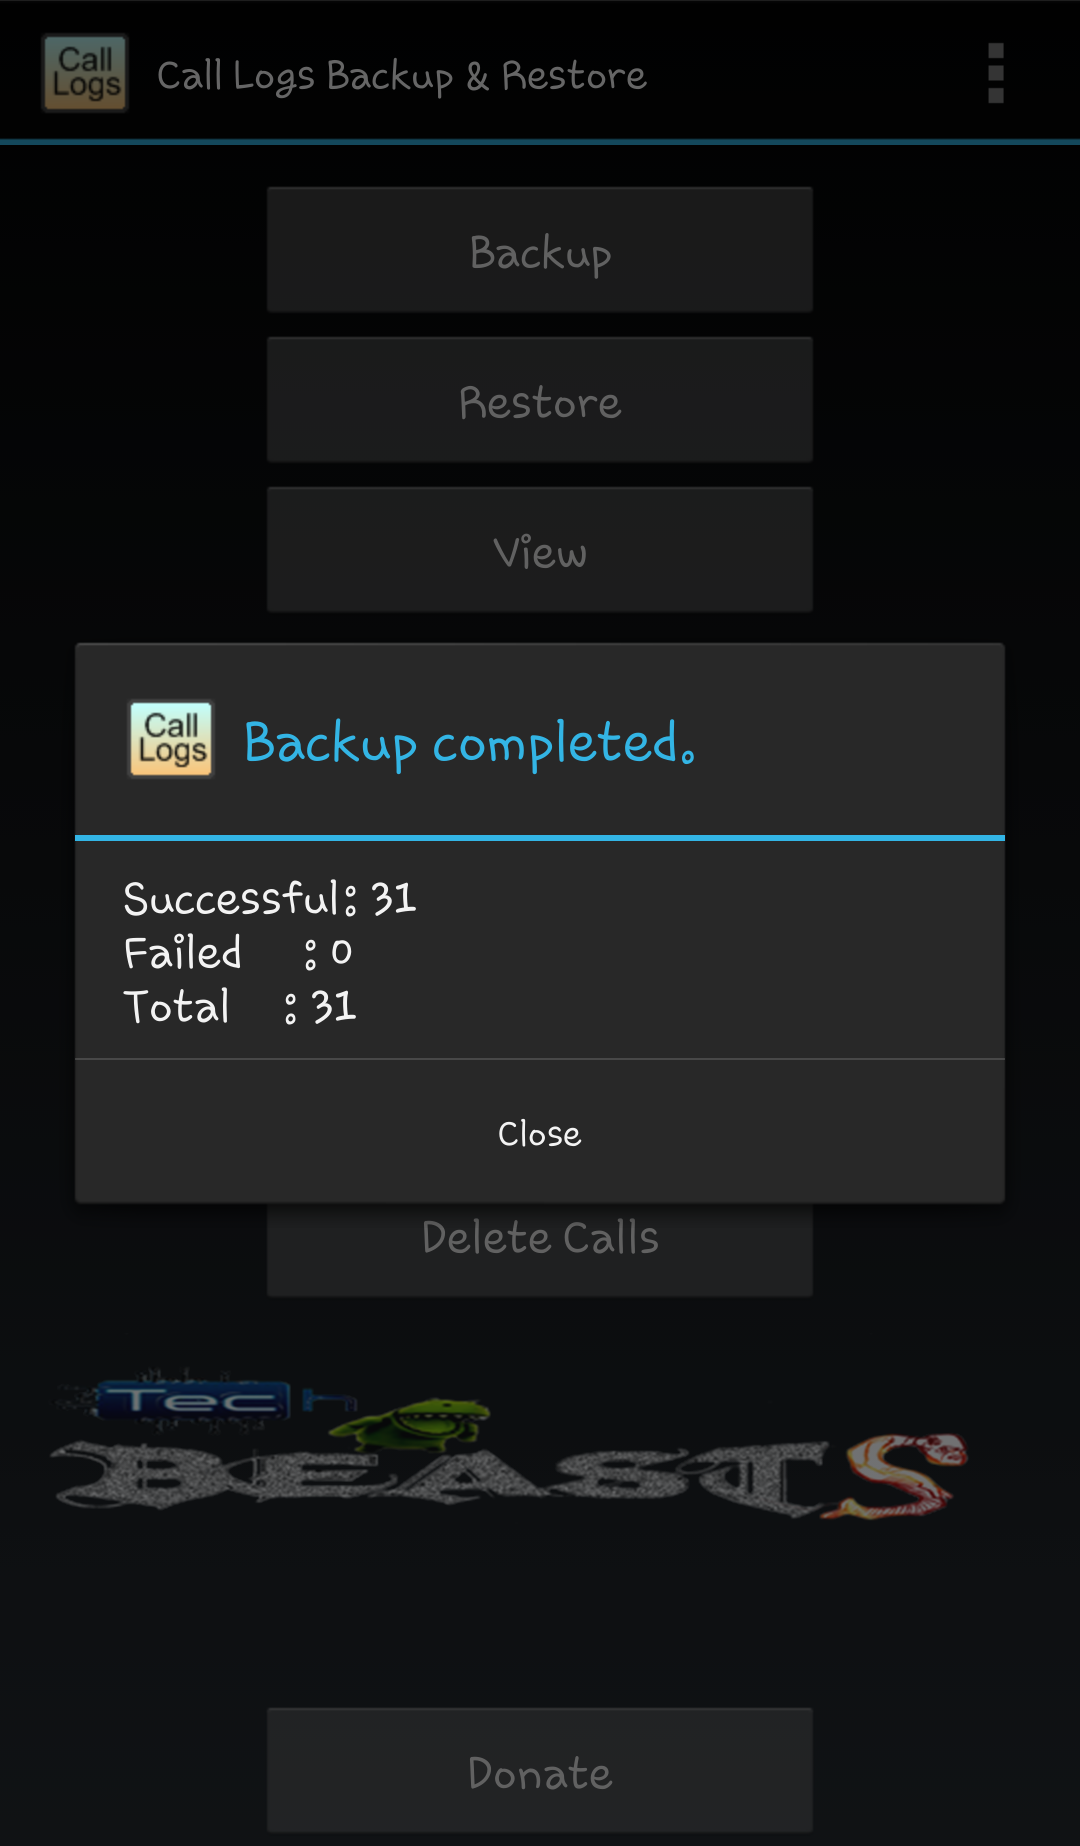
Enter the name for your backed up file and press ok, the backup process will start and an XML file will be created on your internet / external storage.

Screenshot_2013-08-13-21-32-27

Screenshot_2013-08-13-21-32-32


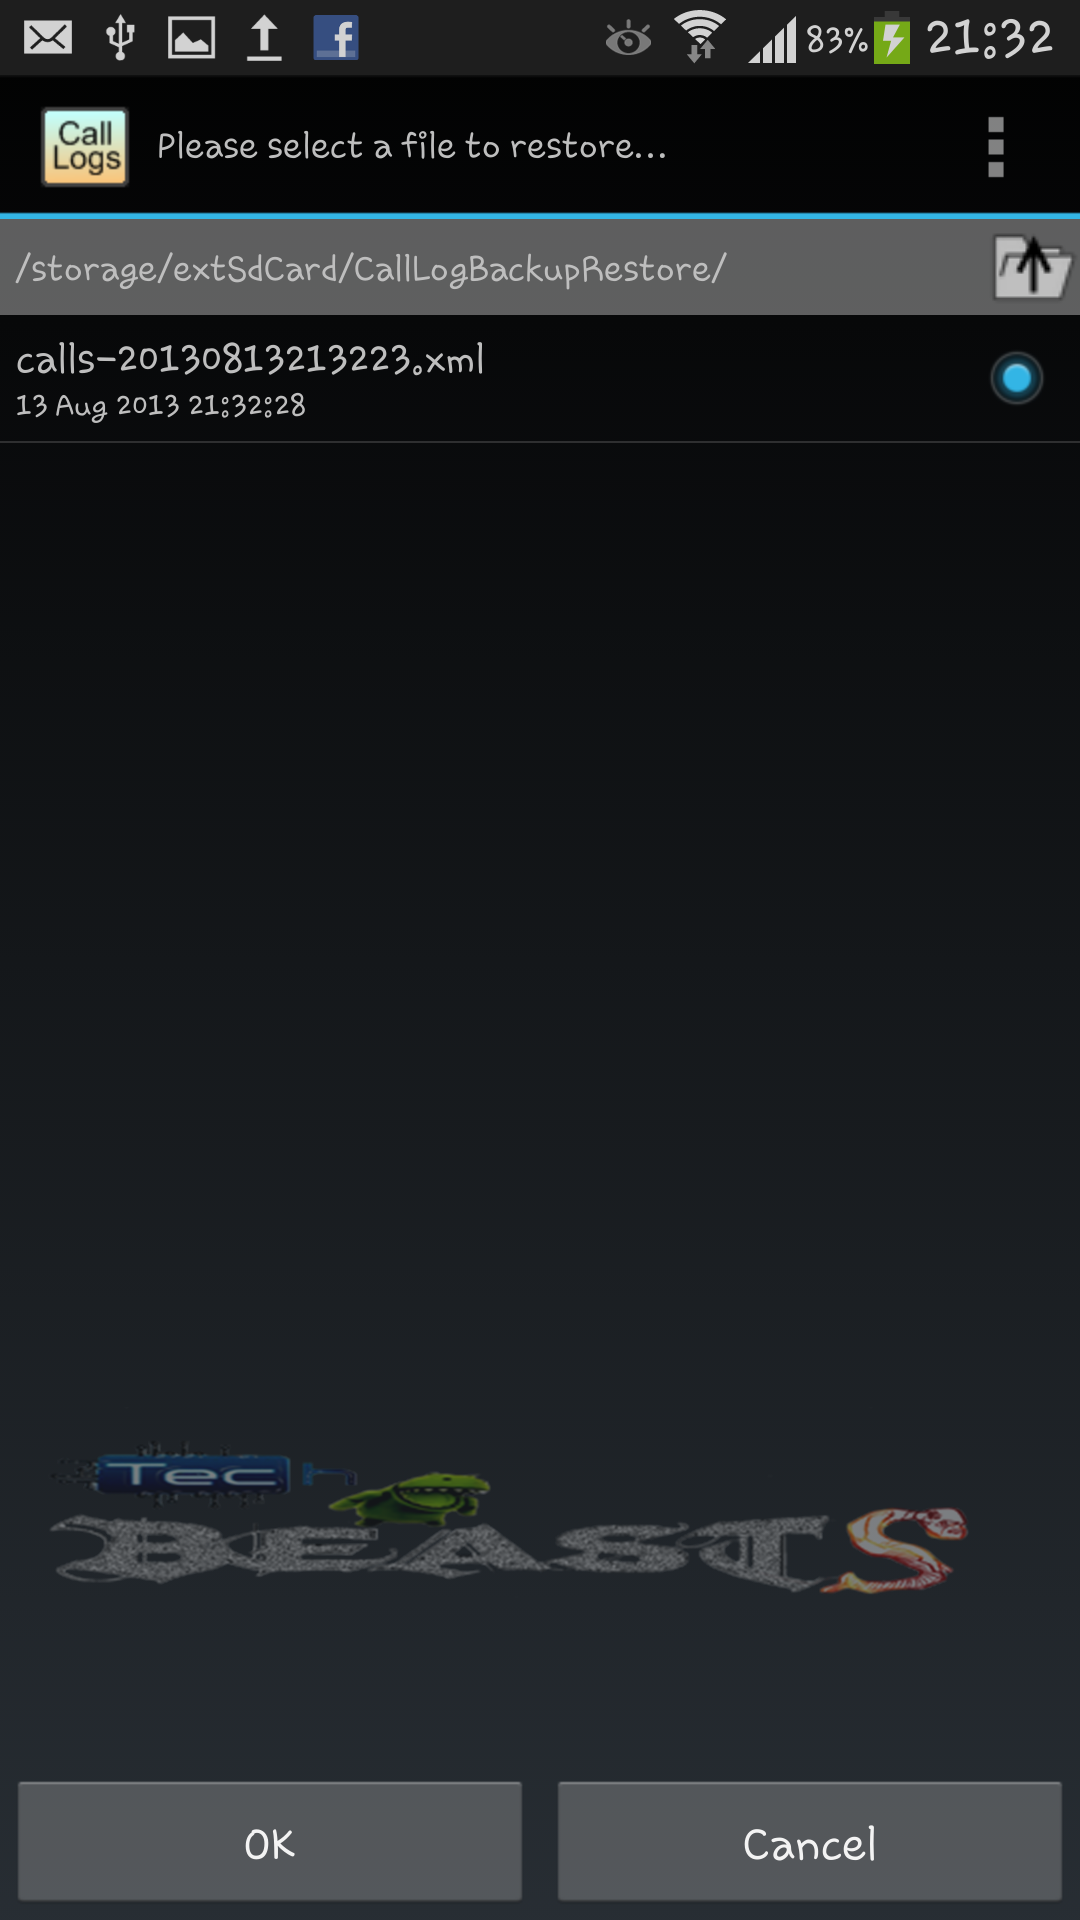
So now when you are done backing up the call logs, let’s learn how to restore the backed up call logs. Get back to the main/home screen of the Call Logs Backup & Restore app and tap the Restore options, as soon as you tap the restore, it will ask you to select a file from which you want to restore your call logs.

Screenshot_2013-08-13-21-32-43

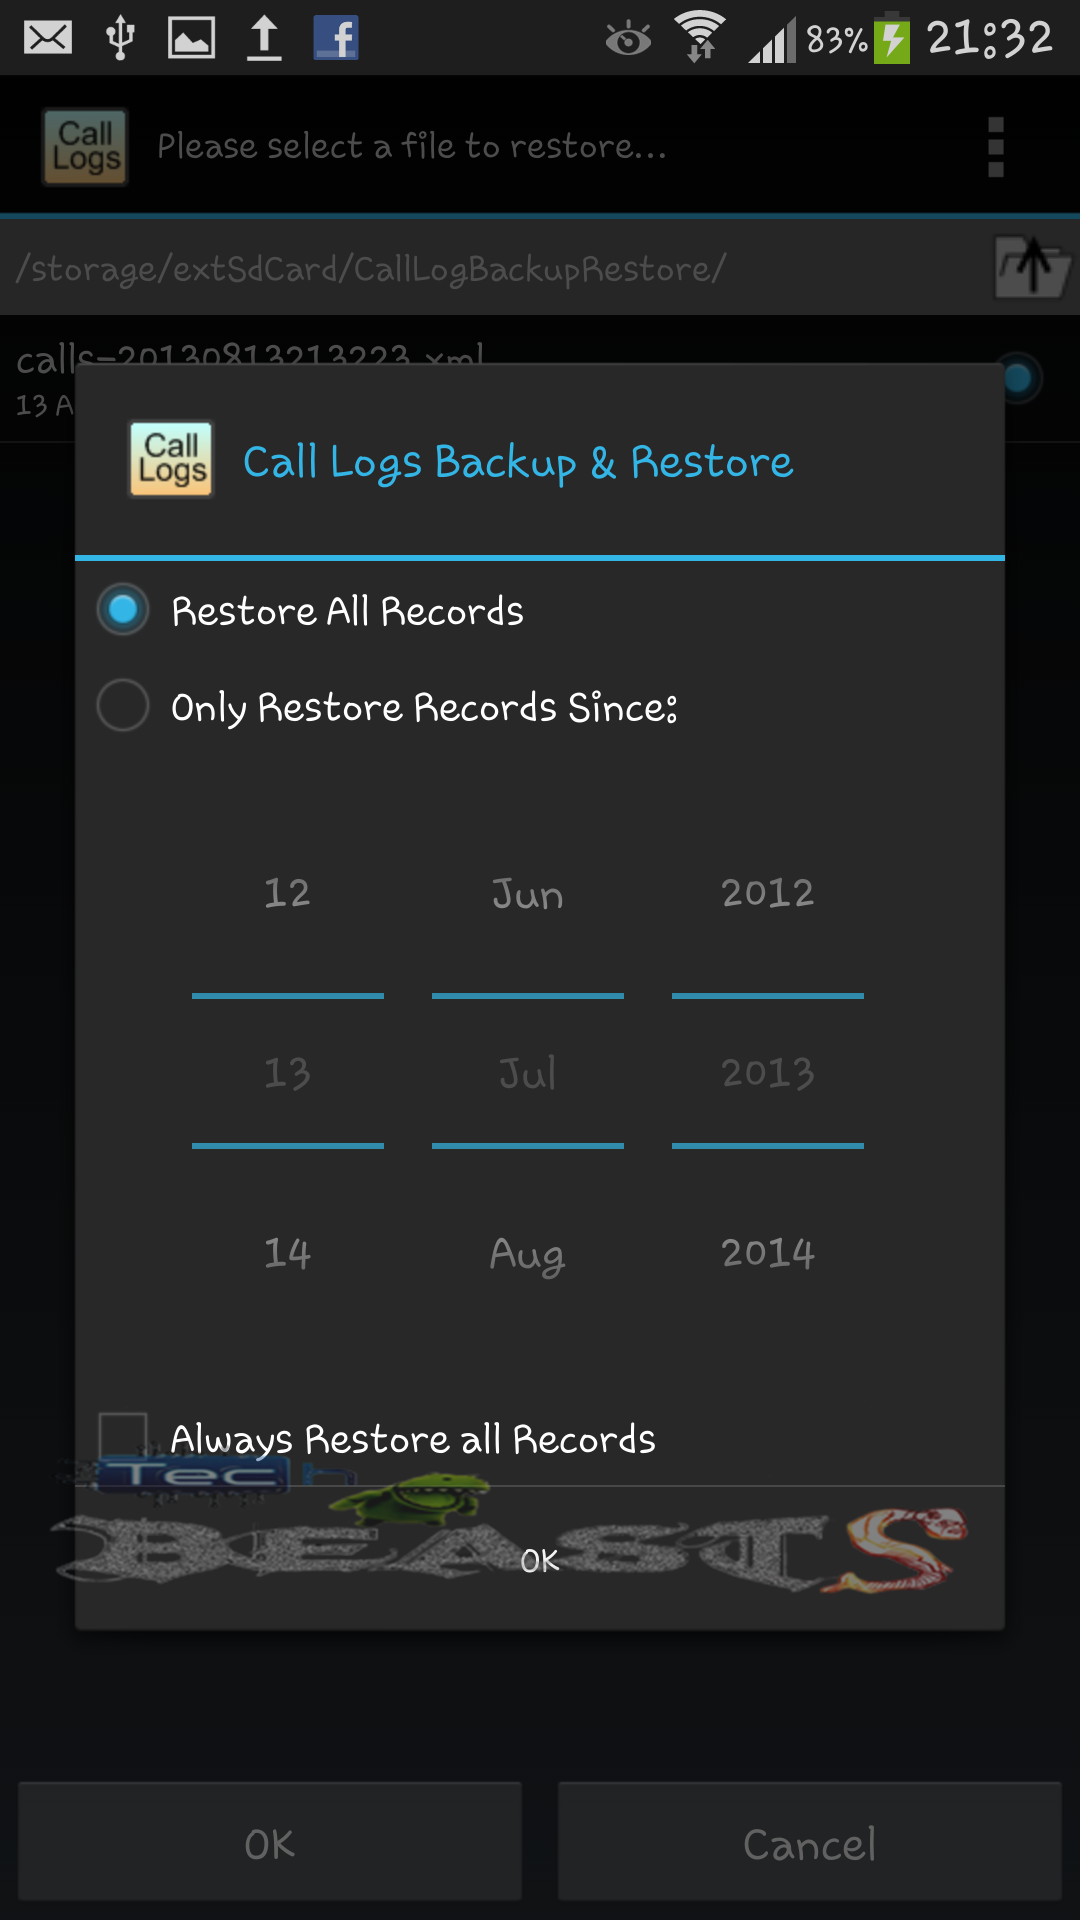
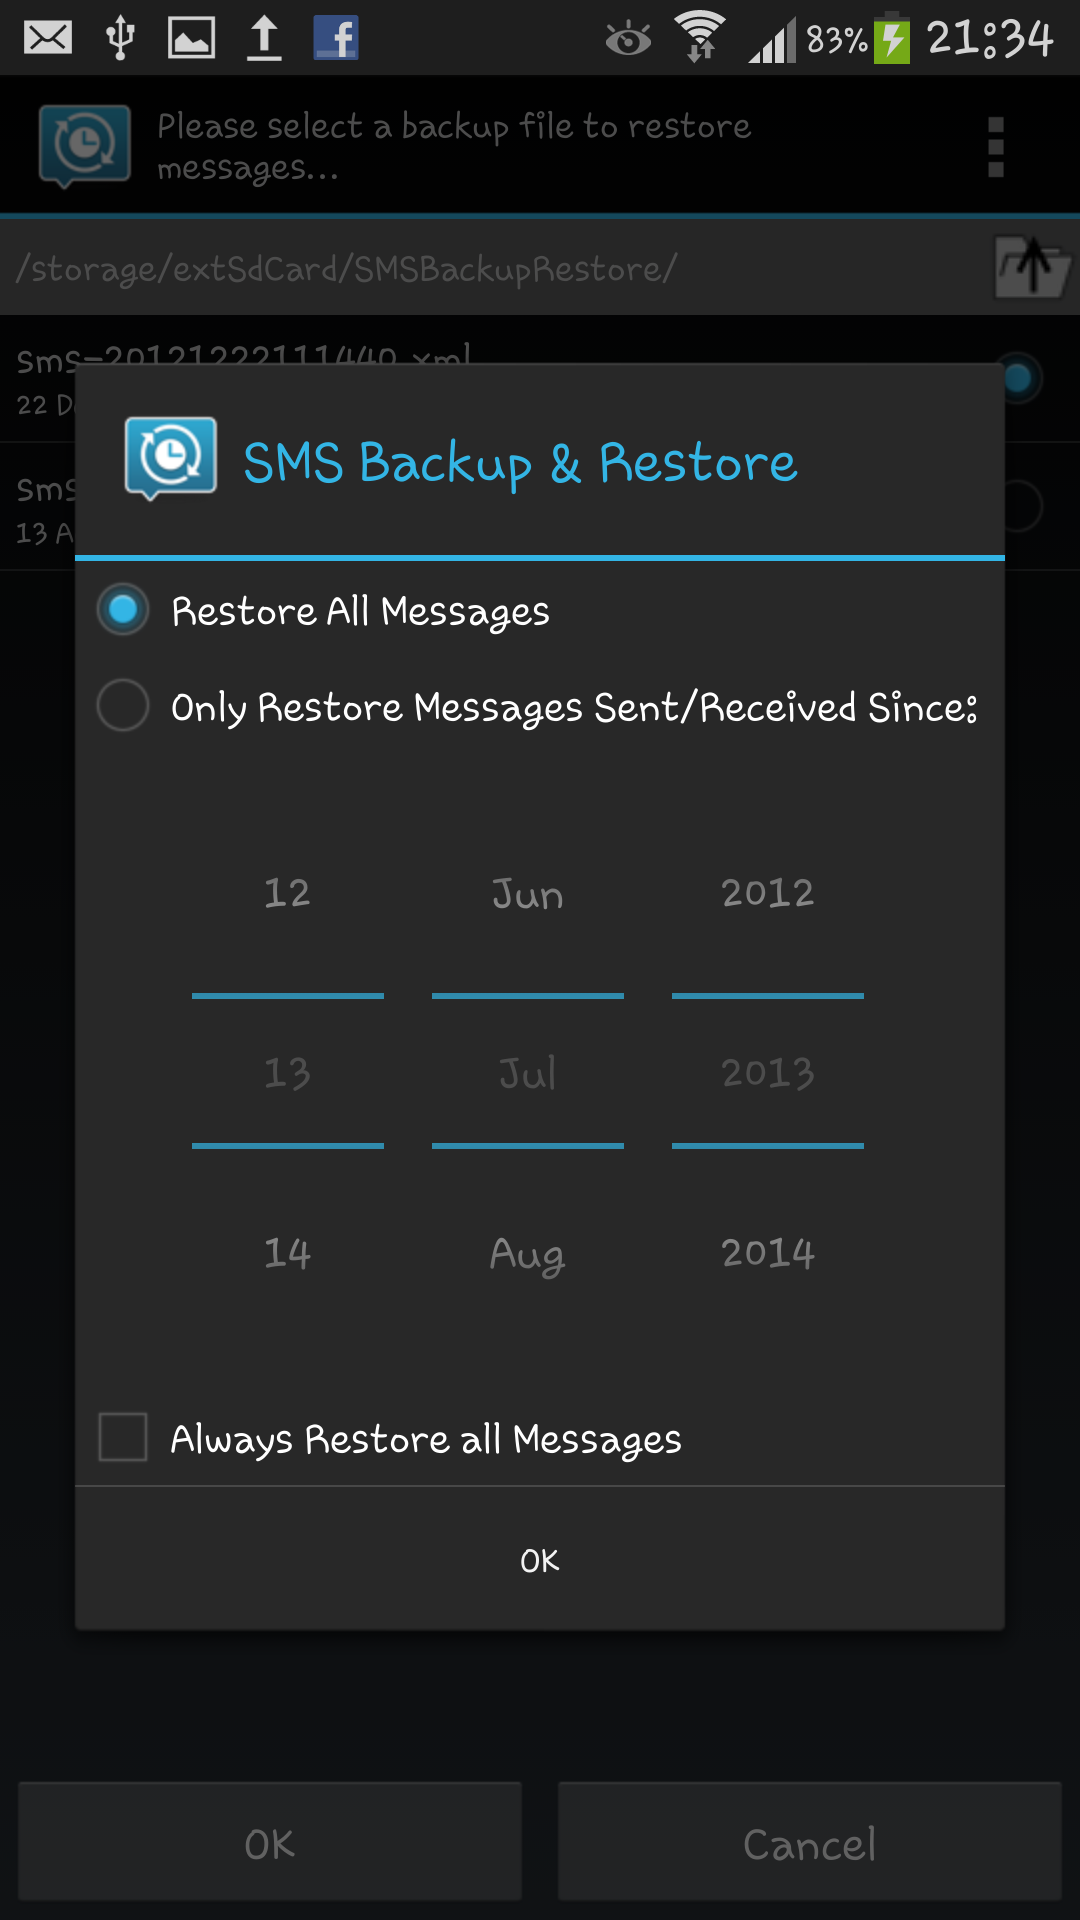
After you specify a file to restore the Call Logs, another screen will popup showing the options as shown below. Here you can specify that either you want to restore all the Call Logs from that file or you want to restore the Call Logs from a specific date and onwards.

Screenshot_2013-08-13-21-32-49

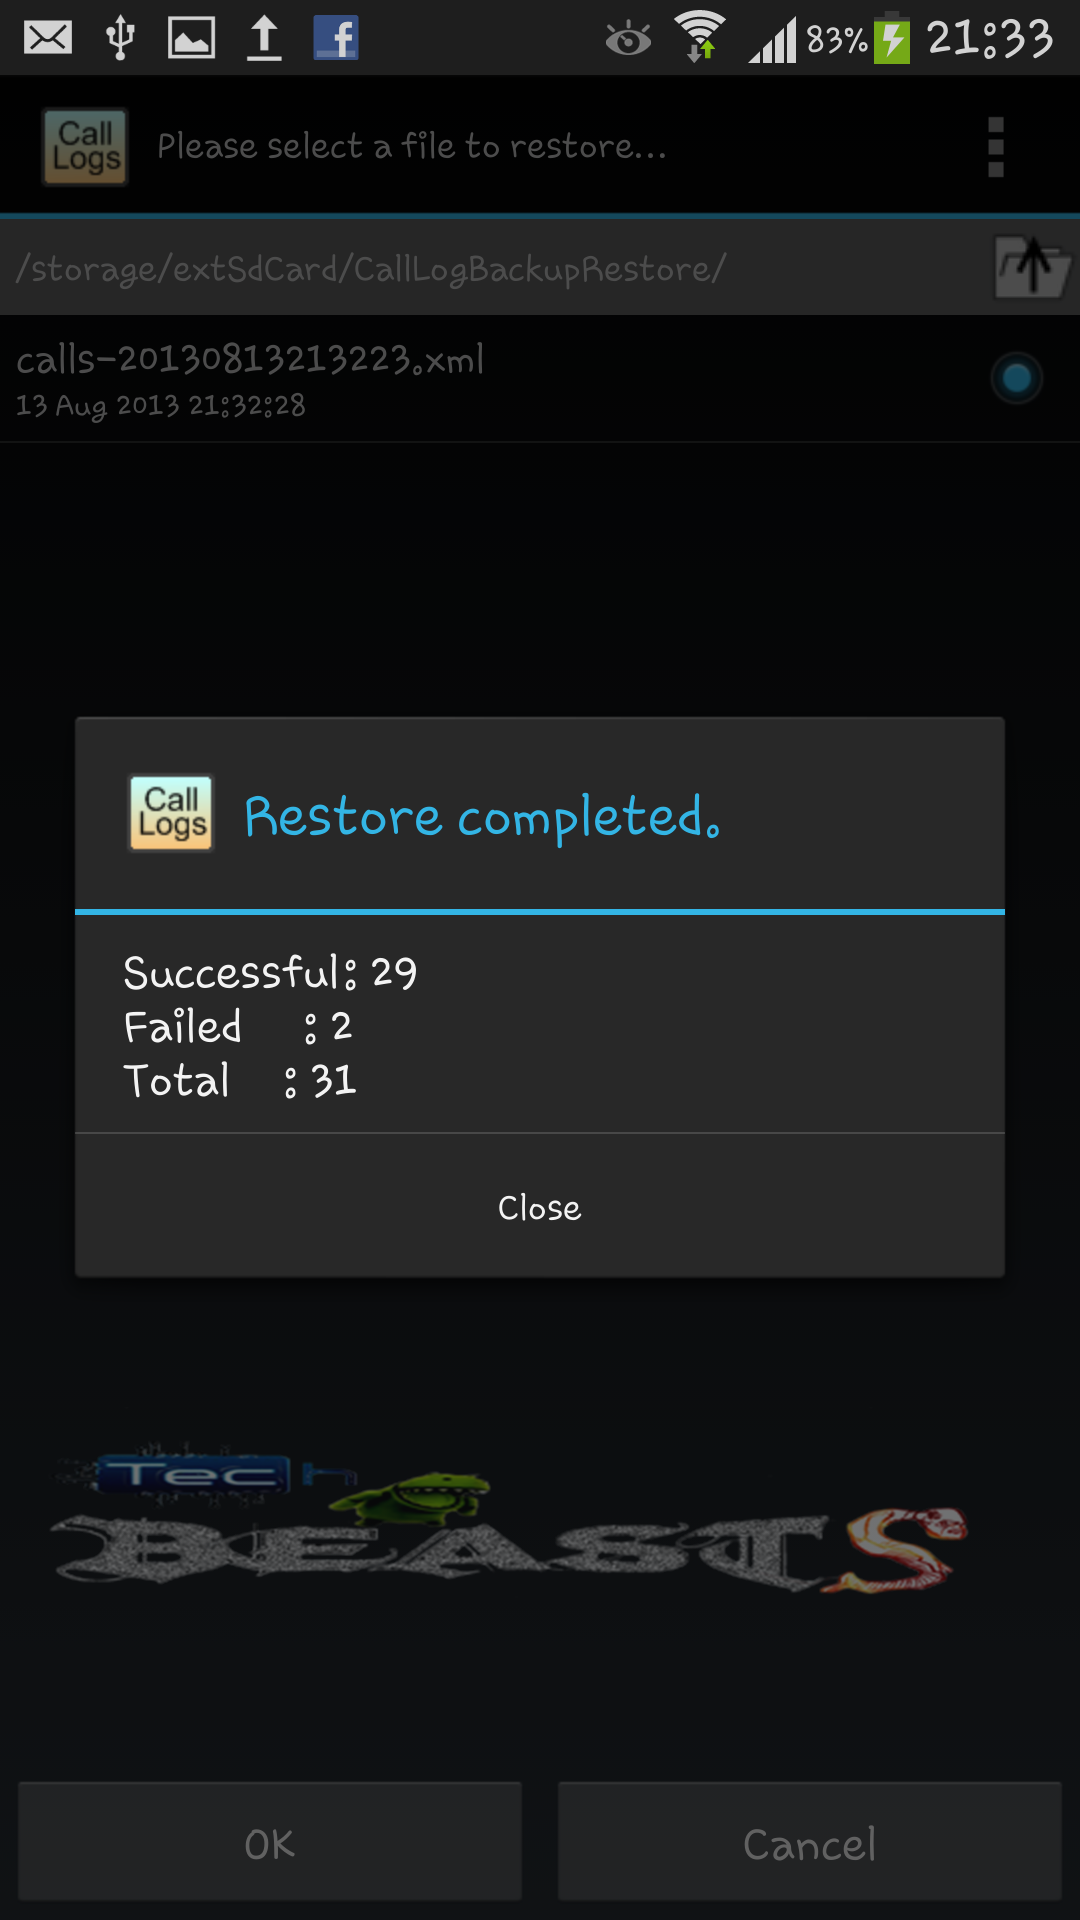
The restore process will start and end up showing you the complete pop up notification.

Screenshot_2013-08-13-21-33-08

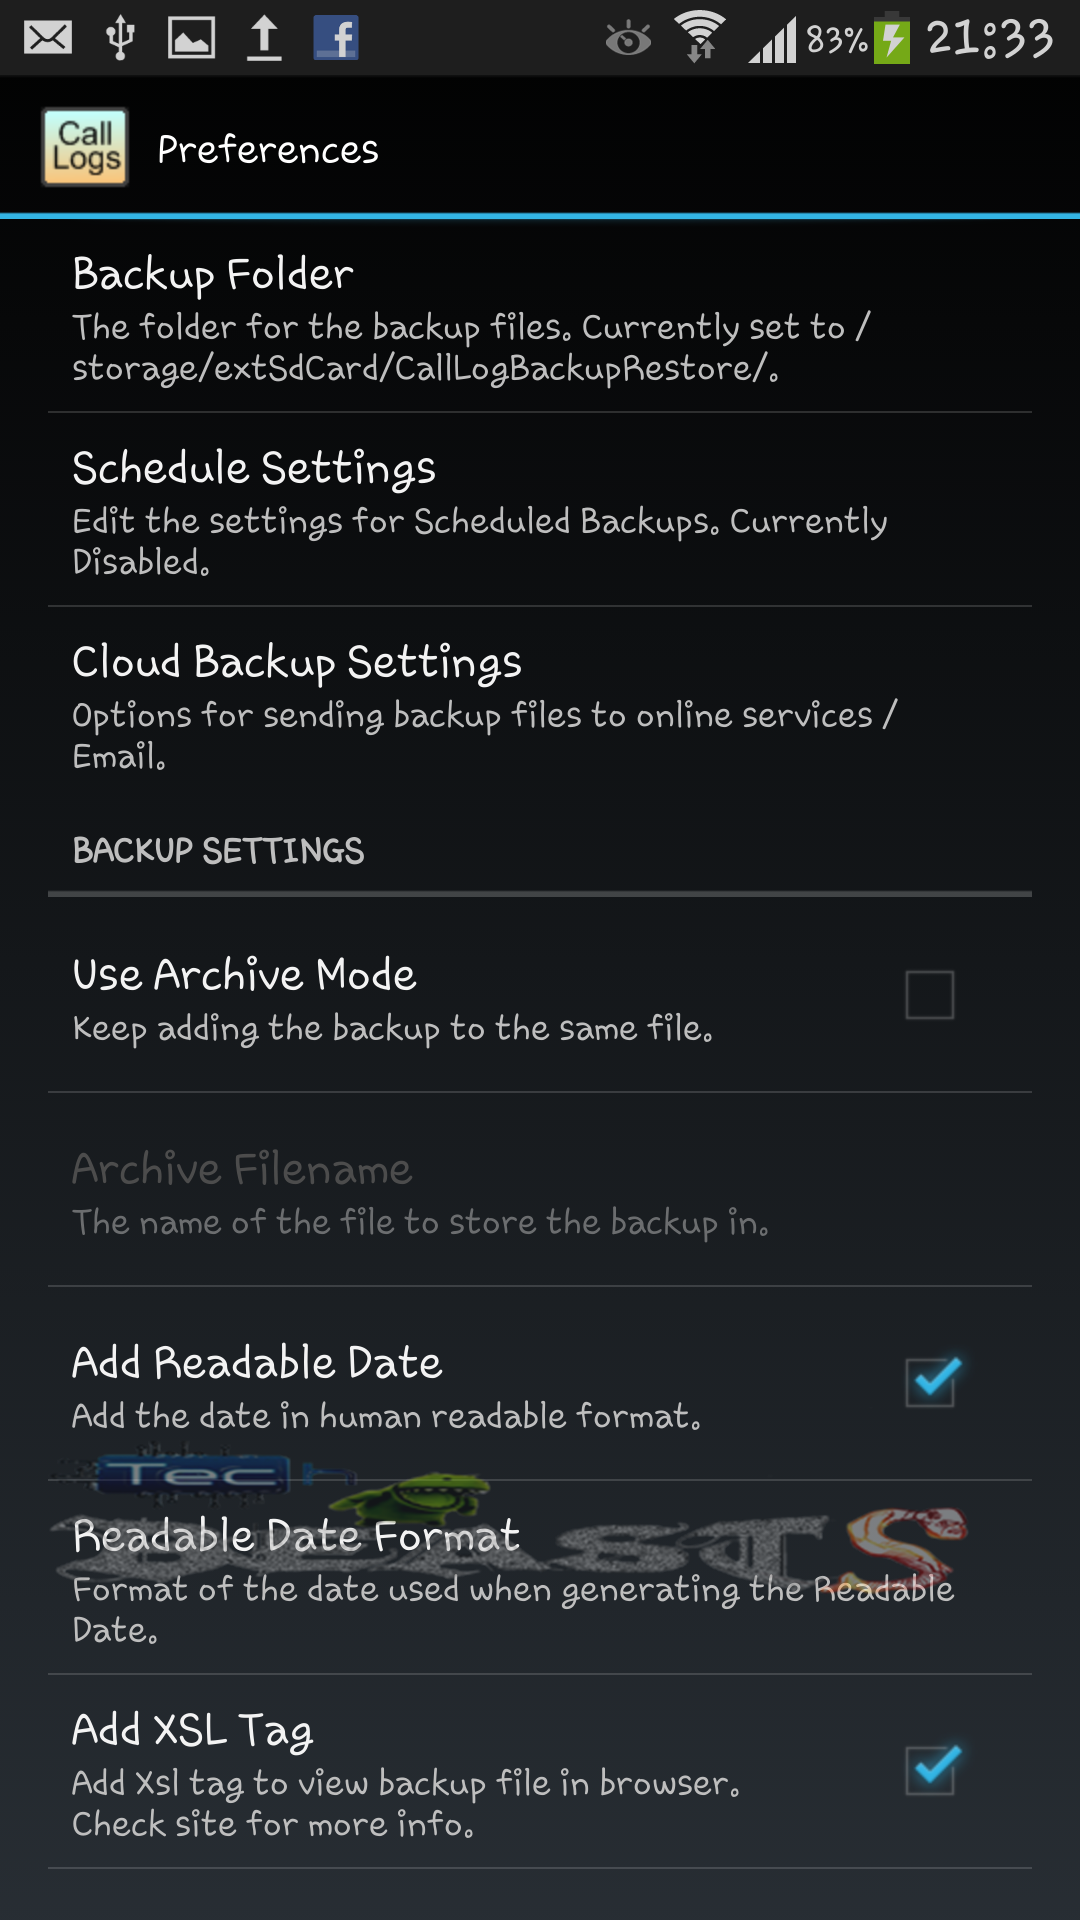
To access the preferences in the Call Logs Backup & Restore you can simply press the options key on your phone and head to the preferences as shown below, here you can adjust all the settings as you want.

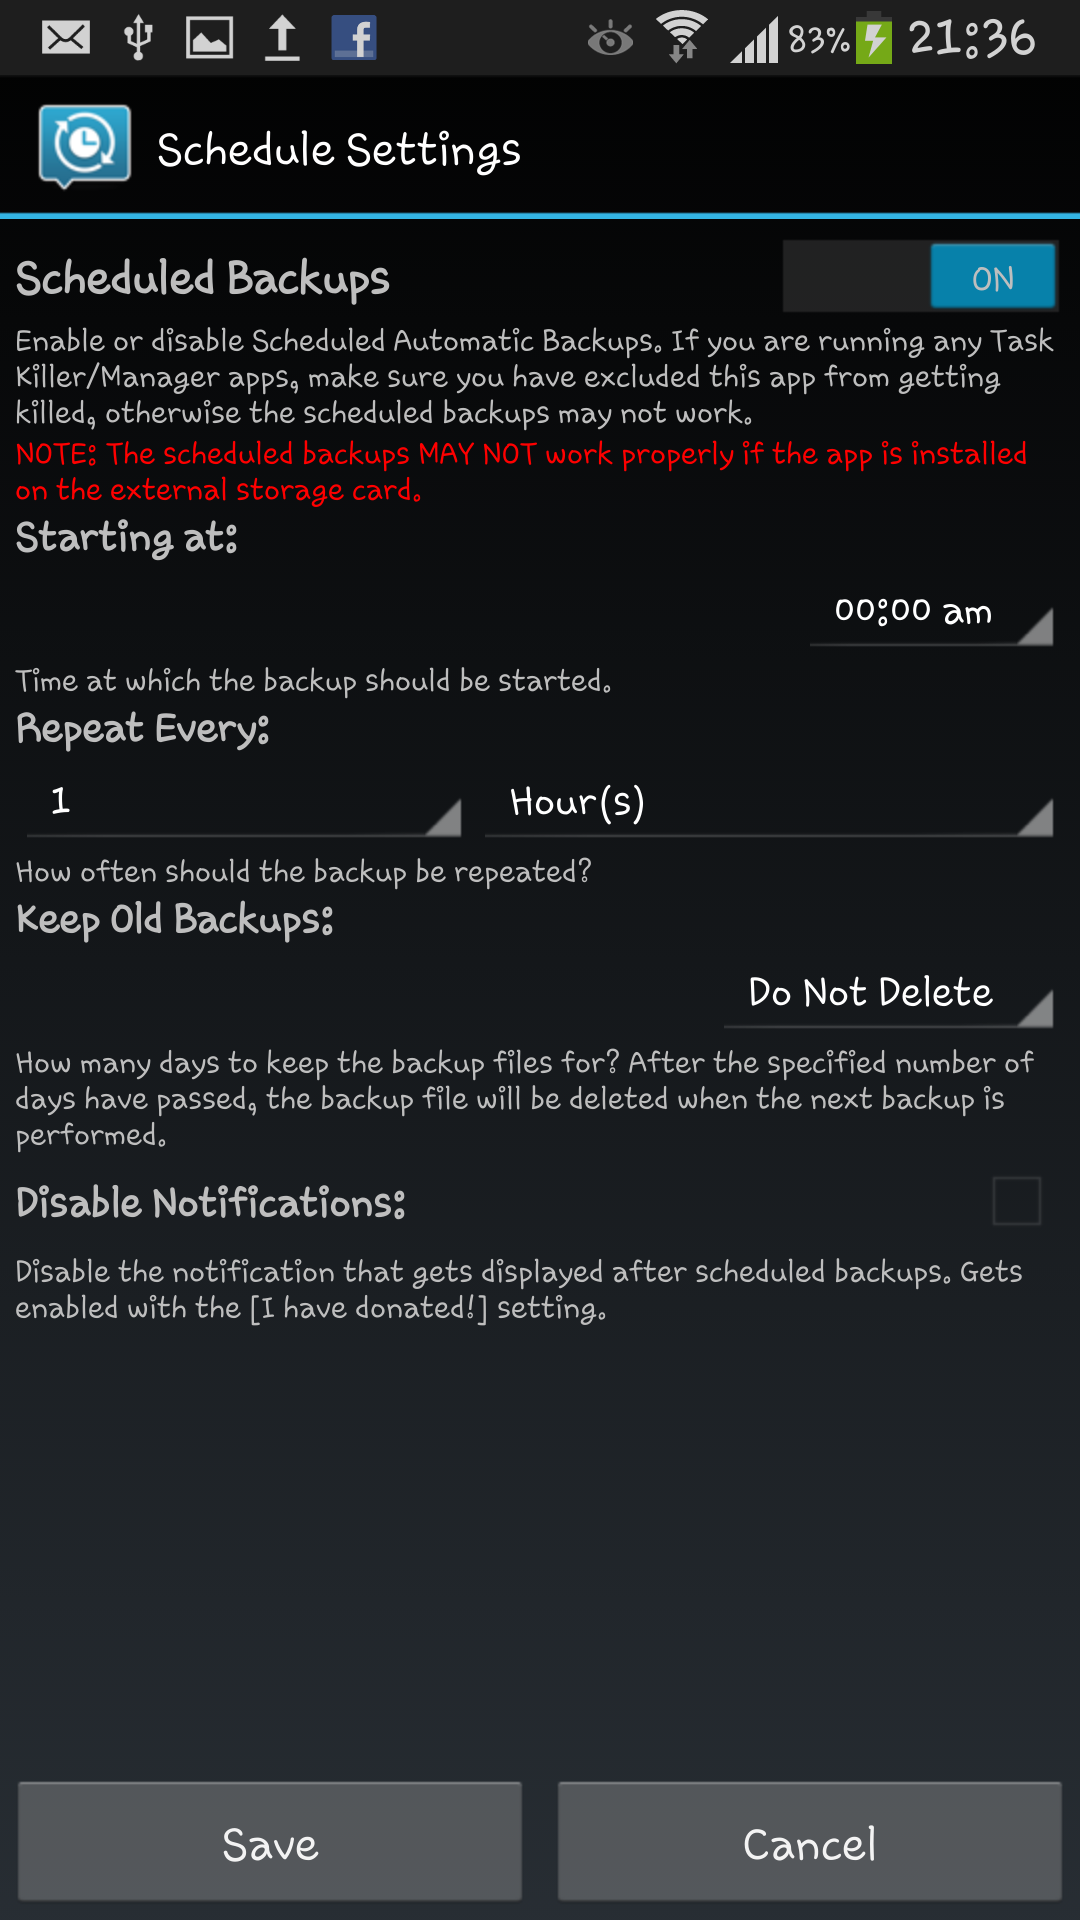
One of the very useful options here is Scheduled Backups, it allows you to backup your important call logs automatically after a specific interval of time you set. You can simple tap it and set theschedule to backup your call logs automatically.

Screenshot_2013-08-13-21-33-18

Here a screen showing the Scheduled Backups panel. Turn it on, You can also select here either you want to get notified about the automatic backup or not.
Screenshot_2013-08-13-21-33-30

As soon as the process is done, get back to your call logs and you will find your restored call logs listed in there, by the date.

That’s all. Got any confusions? feel free to leave a comment below and ask us. Good Luck.

How to Backup & Restore Important Messages on Your Android Smartphone & Tablet

2
How to Backup & Restore Important Messages on Your Android Smartphone & Tablet

Backing Up important text messages is necessary when you are going to flash a new ROM or modify your phone, it helps to restore the messages back after a complete wipe or in case of data loss. If you are looking to back up your text messages, then you have come to the right place, Follow this simple tutorial to backup all your important messages.

How to Backup & Restore Important Messages on Your Android Smartphone & Tablet

First of all, you need to download and install Sms Backup & Restore from the Google Play Store.

Download & Install SMS Backup & Restore here.

Screenshot_2

Open the App & You will see a screen as shown below. Here you can select whatever you want today, probably you want to backup your messages, first of all, so just tap ”Backup”.

Screenshot_2013-08-13-20-56-32

As soon as you tap the Backup button you will receive options as shown below, Here you need to specify the storage where you want to store your backed up XML file. This XML file will be used to restore the messages a later time when you want. By default is internal storage but you can change it depending on your choice.

Screenshot_2013-08-13-21-01-43

Enter the name for your backed up file and press ok, the backup process will start and an XML file will be created on your internet / external storage.

Screenshot_2013-08-13-21-01-53

To access the preferences in the Sms Backup & Restore you can simply press the options key on your phone and head to the preferences as shown below, here you can adjust all the settings as you want.

One of the very useful options here is Scheduled Backups, it allows you to backup your important messages automatically after a specific interval of time you set. You can simply tap it and set the schedule to backup your messages automatically.

4Here a screen showing the Scheduled Backups panel. Turn it on, You can also select here either you want to get notified about the automatic backup or not.

Screenshot_2013-08-13-21-36-45

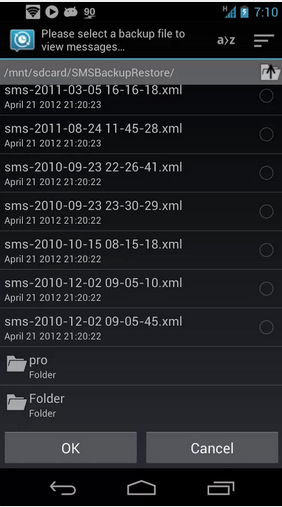
Ok so, that was all to back up the messages. Let’s see now how we can restore the backed up messages. To do so, simply press the restore button on the main screen of Sms Backup & Restore, it will give you a list of all the files which you have backed up, you can simply select any of these files to restore the messages.

3

After you specify a file to restore the messages, another screen will pop up showing the options as shown below. Here you can specify what messages you want to restore.Screenshot_2013-08-13-21-34-06

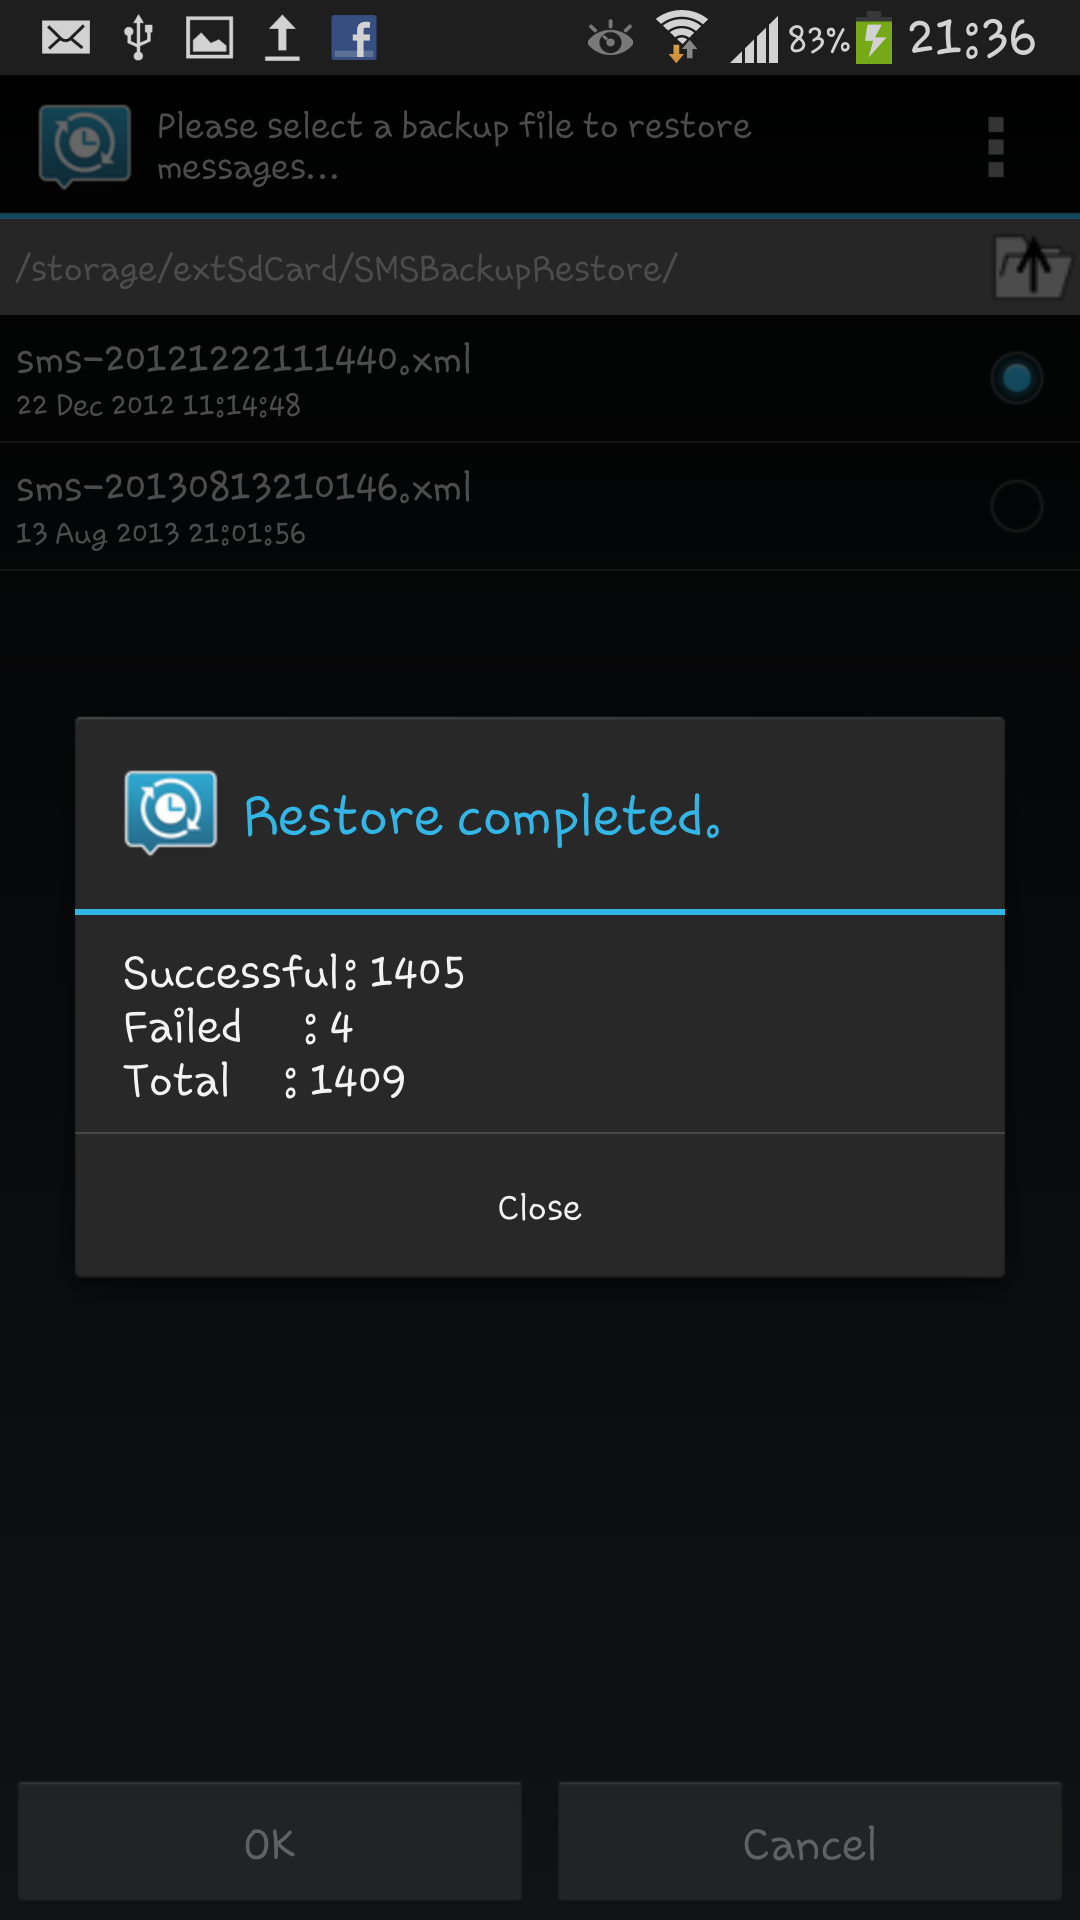
The restore process will start and end up showing you the complete pop up notification.

Screenshot_2013-08-13-21-34-20Screenshot_2013-08-13-21-36-32

That’s all. Got any confusions? feel free to leave a comment below and ask us. Good Luck.