Home Blog Page 512

How to Unroot Samsung Galaxy S4 [All Versions]

How to Unroot Samsung Galaxy S4 [All Versions]

Have you rooted your Samsung Galaxy S4 and modified it? or installed a custom rom? and now looking for a way to get rid of the root access and get back to the Factory state / stock firmware? Well, sometimes the root access becomes a pain in vein, specially when you have flashed mods or custom roms along with the root access and you want to get rid of it as soon as you can. Following the need, We will be having a look on how we can unroot the Samung Galaxy S4 and get back to the factory state. You just need to follow the steps explained below to the letter.

samsung-galaxy-s-4

To unroot your Samsung Galaxy S4, you need to flash a stock firmware / rom on your phone, this will unroot and remove all the junk from your phone as you will remove the factory data after completing the flashing process. So before we begin, you need to backup all the important data placed on your phone’s internal storage, contactscall logs and messages. Also make sure that you have battery charged over at least 60%.

  • Check your device’s model in Settings > General > About Device > Model.
  • Download the latest stock firmware for your Galaxy S4 from HERE.
  • Make sure that you download the firmware for your device, according the model number properly.
  • Unzip the downloaded file, it should be an MD5 file the format should be .tar.md5.
  • Open Odin.
  • Put your device in download mode. In order to do so press and hold Volume Down + Home Button + Power Key simultaneously until you see the warning to continue. Press Volume Up to continue.
  • download-mode-500x397
  • Connect your phone to your PC.
  • As soon as Odin detects your phone, the ID:COM box on the top Right corner should turn blue or yellow depending upon your Odin version.
  • Select the PDA tab and give it the extracted / unzipped file, that is in .tar.md5 format. Make sure that only Aut0 Reboot and F. Reset Time are selected in Odin and all others are unchecked.
  • odin_explained
  • Hit start. It will take a few minutes while the process gets completed.
  • As soon as your device restarts, disconnect it from the PC, turn it off by pulling out the battery and wait for 30 seconds. Turn it on by pressing and holding Volume Up + Home Button + Power Key, it should boot into the recovery mode now.
  • Wipe / Reset Factory Data and Cache in recovery and restart.
  • Phewwww! That’s all. You’ve successfully unrooted your Samsung Galaxy S4 and its in the factory state now.

Please keep in mind that flashing a stock firmware following the above method will not get your device’s warranty back as it does not erase the binary counter. It is possible to gain the warranty back on Galaxy S4 GT-I9505 using Tirangle Away app, but the app doesn’t work on other variants due to the restrictions by Samsung. The method explained above is basically for unrooting your phone and getting it back to the factory state (as it comes out of the box).

We hope that the above method helped you. In case you face any problems, feel free to write us. We will try our best to help you out. Thank You!

How to Install Stock Firmware on Samsung Android Smartphones

53
How to Install Stock Firmware on Samsung Android Smartphones

Installing / Flashing a stock firmware on Samsung Smartphones powered with Android becomes necessary sometimes, in case of soft brick or if your phone is strucked in the bootloop. One of the advantages of installing a Stock Firmware is that, it clears all the junk from your phone, wipes the root access if you’ve rooted itin simple words, it unroots your phone. The other big advantage of installing a stock firmware manually is, sometimes the OTA updates take a long time to get rolled out in the specific regions while the firmware files are available over the web, and if you have some know-how about the flashing it manually, you may not need to wait for the OTA updates and flash a firmware in 3-4 minutes using Odin through your PC.

We’ll be having a look on the method to Install  a Stock Firmware on your Android powered Samsung Device. Follow the steps explained below to the letter to avoid any mishap and get the stock firmware installed on your device successfully.

Backup all your data placed on your phone’s internal storage, contacts, call logs and messages. This is necessary as wiping the factory data after flashing a stock firmware is a good choice in order to make it new and remove all the junk.

  • First of all you need to download the Stock Firmware file for your Android Smartphone.
  • Check your device’s model number, to do so head to Settings > About Phone > Model
  • Open THIS PAGE and download the latest stock firmware for your device. See the stock rom for your region, if your region is not listed then download any. Region doesn’t really matter, just go with the latest firmware.
  • Extract the downloaded zip file on your desktop, it should be in .tar.md5* format. If you get the other files like PIT, CSC and Phone you may use them otherwise you just need to put the MD5 file which has the firmware in the PDA tab in Odin.
      • PDA – is the file that contains the firmware for your device.
      • Phone – refers to the baseband or the modem of the phone
      • PIT – refers to the re-partitioning of your device. The file is not used in most cases, it is only required when you have messed up your phone in a serious way.
      • CSC – refers to the settings provided by the carrier or the custom apps.
  • Open Odin.
  • Put your device in download mode. In order to do so press and hold Volume Down + Home Button + Power Key simultaneously until you see the warning to continue. Press Volume Up to continue.
  • download-mode-500x397
  • In case your device doesn’t go into the download mode using this method, search for the method for your device on Google.
  • Connect your phone to your PC using the original data cable. As soon as your phone is detected by Odin, the ID:COM box on the top left corner should turn blue or yellow depending upon your Odin version.
  • Hit the PDA tab in odin, and select the extracted file that is in [MD5.tar.md5 format.
  •  Most probably you have the .tar.md5 only for the PDA tab so make sure that only Auto Reboot and F. Reset Time are selected in Odin, In case you got the other files like CSC and Phone, put them in their respective tabs.In case you’ve got the PIT file you need to select the re-partition tab as well (remember PIT is only needed in some special cases, ignore this file for normal upgrading / flashing of the stock firmware).
  • odin_explained
  • Hit start – It should take a few seconds while the firmware flashing gets completed.
  • As soon as it gets finished, your device will restart. As soon as it restarts, get  it into the recovery mode by pressing and holding Volume Up + Home Button + Power Key simultaneously. You should get the recovery mode now. Reset Factory Data and Cache here – Restart your phone.
  • That’s all! You’ve successfully installed stock / factory firmware on your device and have it in the factory state now. Your device is just like a new device out of the box now.

That’s All! In case you face any problems, feel free to leave us a comment below. We will try our best to help you out. Thank You!

 

Download And Install Temple Run 2 On PC.

0
Download And Install Temple Run 2 On PC.

Save your self from the Horrible, scary monster of Temple, as you have stolen th Idol, and now he is after you to get it back. Run,  run and keep running as long as you can, because in this game running is the only thing that matters along with what you collect on the run. There will be Coins, Jewels, Magnets and much more. You can upgrade the powers and unlock much more characters as you go on.

temple_run2

In this article, we will tell you how to install Temple Run 2 On PC, running either OS X or Windows. Swipe to turn, jump and slide to avoid obstacles, collect coins and buy power ups, unlock new characters, and see how far you can run!

Downloads Required:

Screenshot_12


Download temple run 2 On Mac:

Method One:

  • Download an Apk file from here. Link

Method Two:

  • Download from BlueStacks itself.

Install temple run 2 On Mac:

Method One:

  • Navigate to the folder where you have downloaded the Apk file.
  • Double click on it to install in automatically on bluestacks.

Method Two:

  • Open Bluestacks.
  • Click on search bar.
  • Search for Temple Run 2.
  • Choose your favourite Store.
  • Once the store is open, click on Install.
  • Wait for the installation to over, then click on the app icon to start the app.


Download And Install Subway Surfers On Mac.

1
Download And Install Subway Surfers On Mac.

Now the ultimate endless running game is available to be played on Mac. Subway Surfers, has become the favourite running game, and frequent updates has increased its demand more than ever. Gameplay is simple, Run, dodge, collect coins and bonuses and above all save yourself from the Inspector. Every update does not only change the outfit of your player but also the Inspector and his dog. The best part about this game is now, you can even download and install the Modded Apk file in BlueStacks.

subway-surfers-Logo


Downloads Required:

Screenshot_12

Download Subway Surfers On Mac.

Method One:

  • Download the Apk file of Subway Surfers. Link
  • Download Modded Apk of Subway Surfers. Link

Method Two:

  • Download from BlueStacks itself.

Install Subway Surfers On Mac.

Method One:

  • Navigate to the folder where you have downloaded the Apk file.
  • Double click on it to install in automatically on bluestacks.

Method Two:

  • Open Bluestacks.
  • Click on search bar.
  • Search for Subway Surfers.
  • Choose your favourite Store.
  • Once the store is open, click on Install.
  • Wait for the installation to over, then click on the app icon to start the app.


Download And Install Talking Tom On Mac.

0
Download And Install Talking Tom On Mac.

One of the best app to amuse kids and make them busy is the Talking Tom. Tom is your virtual pet, that will repeat everything you say in a funny voice, you can pet him, grab his tail, poke him and watch his reactions. You can even record your videos and save them in your library, share them with friends on Facebook, Twitter and Google +.

How To Play With Talking Tom:

  • Talk to Tom and he will repeat everything you say with a funny voice.
  •  Pet him to make him purr.
  • Poke his head, belly or feet.
  •  Grab his tail.
  •  Pour a glass of milk for him.
  •  Make Tom scratch the screen.
  •  Make Tom play the cymbals, fart, throw a cake at the screen or try to eat Larry.
  • Record and share videos on YouTube, Facebook or send them by email or MMS.

tom_bg_8bit

Well for all the Talking Tom Lover, we got a good news for them ,they can play the same game on Mac too.

Downloads Required:

Screenshot_12

Download Talking Tom On Mac:

Method One:

  • Download an Apk file from here. Link

Method Two:

  • Download from BlueStacks itself.

Install Talking Tom On Mac:

Method One:

  • Navigate to the folder where you have downloaded the Apk file.
  • Double click on it to install in automatically on bluestacks.

Method Two:

  • Open Bluestacks.
  • Click on search bar.
  • Search for Talking Tom.
  • Choose your favourite Store.
  • Once the store is open, click on Install.
  • Wait for the installation to over, then click on the app icon to start the app.

Download And Install Shazam For PC.

1
Download And Install Shazam For PC.

Shazam is an app that helps you in finding the name of any song you hear or hearing. It’s just like the Sound Hound app of Android. While I was searching this app on Play Store, I found a lot of positive reviews of this app, Users upvoted this app as one of the best among its class. You can use this app to find any song you listen, and today we will share the way you can install in on PC.Remember once again, you will need an active internet connection for this app, not like all the time, but most of the time.

Shazam


How To use Shazam:

  • Play any song.
  • Open Shazam, Click on Listen, when done press stop.
  • If you have an active internet connection then Shazam will tell you the name of that song.

Download Bluestacks:

Link

Screenshot_12

Download Shazam for PC.

Method One:

  • Download Shazam.apk file, if you don’t want to try the Play store. Link

Method Two:

  • If you don’t prefer the .apk files, then you should try the Play Store within the Bluestacks.

Install Shazam On PC.

Method One:

If you  have downloaded the Apk file Then:

  • Open the folder where you have downloaded the apk file.
  • Double click on the Apk file to start the installation on Bluestacks.
  • Wait for the installation to finish, and then double-click the app icon to start using it.

Method Two:

If you haven’t downloaded the Apk file, Then:

  • Open Bluestacks.
  • Click on Search bar and Search for Shazam.
  • Choose your Favourite Store.
  • Once the Store is open, Click Install.
  • First it will download and then the installation process will start.
  • Once the installation is finished, click the app icon to start the app.

Use Instagram on Mac.

3
Use Instagram on Mac.

Installing Android apps on Windows is now a simple job, since Bluestacks is there for your help. But the real game starts when it all comes to Mac OS X. Bluestacks can also be installed on Mac using the same way. Today, On Mac, we will tell you how to install Instagram using Bluestacks. Instagram is an online photo sharing app and social networking service that allows users to take a photo or video, apply digital effects on them then upload and share with their friends on Instagram. Users can also upload 15-seconds videos on Instagram.

instagramimage11


With Instagram you can apply a lot of different filters on your photo and videos and share with your family and friends. Share your photos with your friends in a single stream line, follow your friends with just a single click. In this article, we will show you how to Download and Install Instagram on Mac.

Downloads Required:

Screenshot_12

How To Download and Install Instagram on Mac.

  • Download and Install Bluestacks on your Mac.
  • Once the installation is done, open Bluestacks.
  • In the Search bar, Search for Instagram.
  • Choose your source, I prefer Play Store.
  • Once in Play Store, click on Install.
  • Wait for it to download and install.
  • Once the installation process is done, you will find the Instagram icon on the HomeScreen.
  • Click on the icon to start the app, the rest of the process is same as in any iOS or Android device, so you won’t have any problem dealing with it.

How to delete Instant Upload Photos Folder from your Android Smartphone

0
How to delete Instant Upload Photos Folder from your Android Smartphone

Goolgle+ app has an auto backup feature that backs up all of your pictures once you set it up on your Android Smartphone. It uploads those photos to your Google+ profile and creates an Instant Uploads folder in your Smartphone’s Gallery. Now that folder becomes so much annoying when you can’t delete it, or when you can’t get rid of those photos. If you are tired of finding the method, then don’t worry as the solution is cooked below for you guys, just follow the instructions and that’s all.

Here’s How to Get Rid of the Instant Upload Photos:

    • First of all you need to delete the auto backup photos from your Google + profile.
    • Open your Google + profile on your PC and click photos on the left side.

Screenshot_1

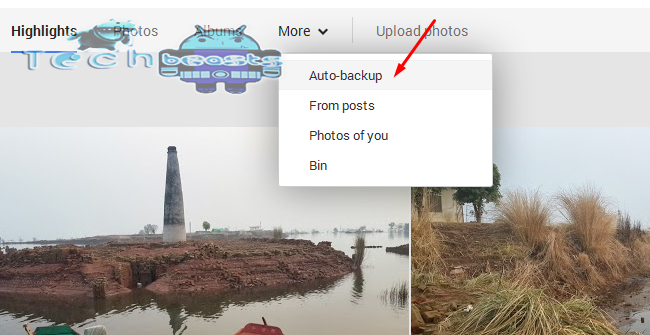
    • Click on the More option in the center and then click on the Auto Backup photos

Screenshot_2

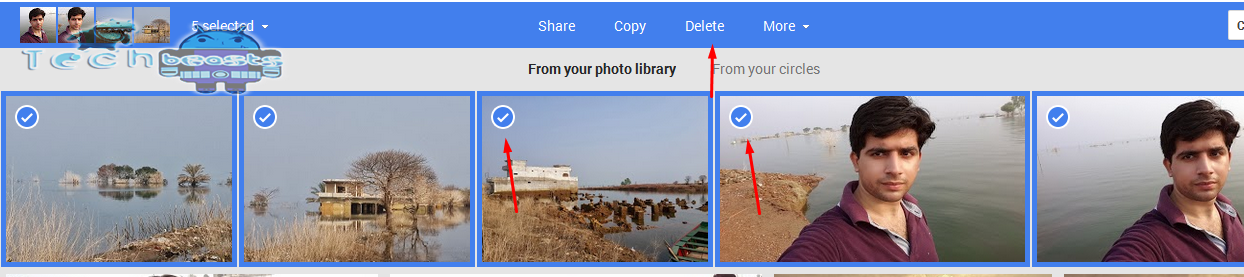
    • Select the photos you want to delete and hit the delete button right above at photos.

Screenshot_3

    • Now, open settings on your Android Smartphone
    • In settings tap Application Settings or Application Manager
    • Find Gallery in all apps, tap it.
    • Clear Data in Gallery.
    • Open Gallery and the Instant Upload photos album should have gone now.

Screenshot_2013-10-11-04-02-53Screenshot_2013-10-11-04-03-26Screenshot_2013-10-11-04-04-01

  • If you wish to get rid of the Auto Backup feature then open the Google + app on your Android phone
  • Tap settings > auto backup and turn it off.

That’s all – We hope that you guys resolved the issue using this tutorial, We would love to see your feedback. In case you got any queries, feel free to leave us a comment.

How to Root Sony Xperia Z1 [Guide]

21
How to Root Sony Xperia Z1 [Guide]

Sony recently pulled the curtains off from its latest flagship device, the Xperia Z1 at a press event holded on 4th of September, 2013. The device, similar to its predecessor is water proof and similar in shape, having the upgraded specs. Let’s have a recap in case you forgot, it sports a 5-inch FHD Triluminos display, has a 2 GB RAM under the hood, while a qualcomm snapdragon 800 processor is there to power it up clocked at 2.2 GHz. The internal memory is 16 GB while there is an Sdcard slot as well which supports the memory cards of upto 64 GB. One of the major updates and as stated by Sony as well, this device has the best camera i.e 20.3 MP that is packed up with a lot of new features, you can find here.  Out of the box, Xperia Z1 runs on Android Jelly Bean 4.2.2.

xperia-Z1-hero-black-1240x840-3c449514e1daf8b0652a5dc235530ebc

Ok that’s all with the specs and features. Let’s get back to the topic. Sony Xperia Z1, no doubt, is an awesome device but only when you have root access as you can enjoy installing various apps, modding your phone, flashing custom roms and playing with the clock speed of your device’s processor and many more things. Following the need we will be having a look on how we can gain root access on the Sony Xperia Z1.

Before we begin, Make sure that you have backed up all the contacts, call logs, messages and other important data. This is a precaution to prevent any mishap at a later time, so do take it serious. Also make sure that you have the battery charged over atleast 60%.

At the moment there are two tools available, capable of gaining the root access on Sony Xperia Z1VRoot & 360 Root Tool.

How to Root Xperia Z1 using VRoot Tool:

The tool is in chinese but you do not need to worry about it, just follow the steps explained with screenshots below and root your phone.

  • Install VRoot on your windows PC – Download it here.
  • Enable USB debugging mode on your phone. Settings > Developer Options > USB debugging  and check it.
  • Connect your phone to your PC.
  • Open VRoot tool and hit the green button on the bottom right.

Xperia Z1 root

  • Wait while it completes the first step, then hit the green button again when it appears in the 2nd stage. That’s probably the finish button!

Xperia Z1 root2

  • Congrats! You’ve rooted your phone now.

How to Root Xperia Z1 using 360:

    • Download the 360 Root Tool – Get it Here
    • Open it, it will give you a prompt to close the conflicting programs before continuing adb.exe. Close the programs if any.
    • Enable USB debugging mode on your phone. Settings > Developer Options > USB debugging  and check it.
    •  Connect your phone to your PC.
    • Open the 360 Root Tool again.
    • Click on the root button on the bottom right corner.
  • 360
  • Root process will start and take a few minutes to complete. As soon as it gets completed you will get a finish window.
  • 360_1
  • Congrats! You’ve successfully rooted your Xperia Z1.

That’s all! We hope that you found this easy. We would love your feedback, also if you face any difficulty, feel free to write us. 🙂

Create a Shortcut of a Website Using Chrome Beta on Adnroid.

0
Create a Shortcut of a Website Using Chrome Beta on Adnroid.

Last Week Google Released Beta version of Chrome for Android, just casual bug fixes in this version along with some new issues were introduces to the users. But there is one thing that truly is great in Chrome beta, is the option of adding any website to the Home screen to used as a shortcut, well not only website you can also add a web app, if you want, to your device home screen.

Screenshot_2013-10-09-22-47-02

Adding a shortcut in Android is not a big task, but before you can only add bookmarks to the Home screen, now Chrome Beta allows you to add any Site to the home screen to use as a shortcut, but the process is a bit different and way too easy for anyone, with just 2-3 taps you can add any site as a shortcut to your home screen.

Take techbeasts as an example, visit this site on Chrome beta, then tap the menu button, in the list you will see ‘Add to Home screen’ button. Then you will be promoted to select a name for it, then tap save. An icon will be then placed on your Homescreen, not every icon will be proper in Android to use as a shortcut, like Facebook will use it’s default icon not the Facebook icon.

Screenshot_2013-10-09-22-46-44


Now when you launch the shortcut from Home screen, it will not take you to the address bar like it happened before, but it will take you to the part where you saved it. If you are not the one who usually take interest in Beta released but want to wait for the stable one, then i should suggest you to wait for the final release.

Root & Install CWM on Samsung Galaxy Note 3 [Easy Method for All Versions]

Root & Install CWM on Samsung Galaxy Note 3 [Easy Method for All Versions]

Samsung’s 3rd generation phablet – the Galaxy Note 3 has hit the shelves now and is getting popular every day. Galaxy Note 3 offers you a wide list of features, to recap – the Galaxy Note 3 sports a 5.7-inch FHD Super AMOLED display with 386 ppi and 1920 x 1080 pixels. You can choose either an Octa-Core processor clocked at 1.9 GHz[SM-N900] or a Qualcomm Snapdragon 800 Quad Core processor clocked at 2.3 GHz [SM-N9005]. The RAM is ranged at 3GB while it has a 3200 mAh large battery under the hood. The back camera is of 13 MP and the front one is ranged at 2.1 MP.

Ok So, that’s all with the specs, Let’s have a look at the features now. The Galaxy Note 3’s S Pen has been improved, has got a new feature named as Air Command that offers you the features like Pen Window, S Finder, Action Memo etc. There is Samsung Knox to give you a new user profile and a lot more.

Getting back to the topic, Galaxy Note 3 seems to be incomplete without having root access. By gaining the root access you can explore the locked features of the phone, play with the internal system, and make changes beyond the boundaries like changing the clock speed of the processor, improving battery life by installing root apps etc. The ClockworkMod recovery, on the other hand, helps you to flash custom ROMs / mods through the phone using .zip files.

Following the need, we are going to have a look at the easiest method to root galaxy note 3 so far. Although we made a guide on Galaxy Note 3 first of all over the web, here we will be having the easiest method to help you out.

***Rooting Samsung Galaxy Note 3 will permanently void it’s warranty, it is not possible yet to restore the warranty by using any method/app because of Samsung’s new security system ”Samsung Knox”. Make sure that you do it at your own risk.***

While rooting your phone, please keep it in mind that the Root Process is n’t official and has nothing to deal with Google Inc and the device manufacturer, which is Samsung in our case. Follow the guide carefully to prevent any damages to the device as the method is completely custom.

Root & Install CWM on Samsung Galaxy Note 3

Make sure that you have the battery charged over 60 % and have backed up all your important ContactsCall Logs & Messages. It is highly recommended in case of any mishap or data loss to backup all your important data.

  1. Download Odin PC and install it. – Get it Here
  2. Download and install Samsung USB Drivers – Get Here

Root Samsung Galaxy Note 3:

Download the CF-AutoRoot Package file for your phone below.

Select your model carefully, find it in Settings > General > About Device > Model Number

Here’s now how you will root your Galaxy Note 3:

  1. Extract the downloaded CF-Auto-Root zip file once.
  2. Open Odin.
  3. Put your phone in download mode. In order to do so turn it off by pressing power key for a few seconds or by pulling out the battery, wait for 30 seconds. Turn it on by pressing and holding Volume Down + Home Button + Power Key, as soon as it shows you the warning press Volume Up to continue. You are in the download mode now.
  4. Open Odin, you installed in step 1 above.
  5. Connect your Galaxy Note 3 to your PC using the original data cable. The ID:COM box should now turn blue, and Odin shows ”Added” in the log box below.
  6. Hit the PDA tab and select the extracted CF-Auto-Root file, it should be a .tar file.
  7. Make sure that the options selected in your Odin screen are exactly as shown below.
  8. Alright! hit start and let the process begin, as soon as your device restarts, you can check the root access by finding the SuperSu app in the app drawer or by installing the Root Checker app from the Play Store.

Ok now when you have rooted your phone, you may want to install cwm recovery as well. As mentioned above cwm recovery allows you to flash .zip files in order to modify your phone or install custom ROMs. It also becomes handy to take backup of your ROM and do so many other similar tasks.

Download the recovery file for your model. 

Here’s how you can install the CWM recovery on your Galaxy Note 3:

  1. Put your phone in download mode. In order to do so turn it off by pressing power key for a few seconds or by pulling out the battery, wait for 30 seconds. Turn it on by pressing and holding Volume Down + Home Button + Power Key, as soon as it shows you the warning press Volume Up to continue. You are in the download mode now.
  2. Open Odin, you installed in step 1 above.
  3. Connect your Galaxy Note 3 to your PC using the original data cable. The ID:COM box should now turn blue, and Odin shows ”Added” in the log box below.
  4. Hit the PDA tab and select the downloaded CWM Recovery file, it should be a .tar file.
  5. Make sure that the options selected in your Odin are exactly as shown below.
  6. Alright! hit start and let the process begin, as soon as your device restarts, you can check the recovery by booting into it. In order to do so, turn off your device and then turn it on by pressing and holding Volume Up + Home Button + Power Key simultaneously, your phone should now boot into the ClockworkMod recovery.

That’s All! In case you face any issues, or need any assistance feel free to leave us a comment, we will try our best to sort it out. Thank You All!

How To Delete and/or Forward Messages In iOS 7.

0
How To Delete and/or Forward Messages In iOS 7.

One of the most common question asked after the release of iOS 7 was, How To Delete and Forward multiple messages? Well the way is quite the same but turns are bit steep. The method in iOS 7 is a bit different from previous iOS versions, but still it is easy. When is a conversation in Message app, you want to delete a message or want to forward a message, you simply press and hold the bubble until a pop-up says ‘Copy’ and ‘More’.

Delete_Forward_Messages_iOS_7_More_270x473

Tapping on ‘More’ will give you the option of forward or delete the message, using the buttons located at the bottom of Screen. You can delete or forward multiple messages using the bubbles located on left side of screen. But Keep in mind that while forwarding multiple messages from multiple parties involved in conversations, iOS 7 won’t differentiate them. They will be sent as one bulk of text, without any sense as to who said what.