Home Blog Page 490

Update Xperia Z Ultra C6802/C6883 Official 14.2.A.0.290 Android 4.3 Jelly Bean Firmware

4
Update Xperia Z Ultra C6802/C6883 Official 14.2.A.0.290  Android 4.3 Jelly Bean Firmware

Sony’s 6.4″ device came up in competition to the rival phablets in May, 2013. The device sported a beautiful and huge Full HD display with 344 ppi and a size of 6.4 inches as mentioned. Under the hood, Sony plugged in a Qualcomm Snapdragon 800 Quad Core CPU clocked at 2.2 GHz with a RAM of 2 GBs and Adreno 330 GPU. Battery ranged at 3050 mAh and the back of the phone sports an 8 MP camera while 2 MP camera sensor is fixed on front.

Xperia Z Ultra ran on Android 4.2.2 Jelly Bean initially, With the new Xperia Lineup Sony has become pretty fair with updating it’s devices to the latest and greatest version of Android and following it’s new trends Sony updated a number of Xperia devices to Android 4.3  Jelly Bean recently and Xperia Z Ultra is one of those lucky devices. Android 4.3 is rolling out through OTA updates and through Sony PC companion, obviously these updates always roll out slowly and hit different regions of world with time. So, in case you’re one of Xperia Z Ultra owners and haven’t received Android 4.3 update yet, this guide may be helpful for you.Xperia_Z_Ultra_black_Flat

We’ll be having a look on a method to update Xperia Z Ultra C6802/C6833 to latest Android 4.3 Jelly Bean 14.2.A.0.290 Firmware using Sony Flashtool. Follow these instructions to the letter in order to get it completed successfully.

Here are some necessary pre-requisites and pre-cautions that you must keep in mind before heading towards the firmware flash guide.

      1. This guide is only for Sony Xperia Z Ultra C6802 and C6833. Please check your device model first in Settings > About Device > Model.
      2. You must have installed Sony Flashtool – Get the full guide here. Also Install drivers using Flashtool > Drivers > Flashtool-drivers > Flashtool, Xperia Z Ultra, Fastboot, select all these and install.
      3. Your phone’s battery must be charged at least over 60%. This is highly recommended in order to prevent any power issues during the process.
      4. Make sure that you backup your media content,contactscall logs and text messages.  This is important and recommended so that in case you decide to wipe your phone during the flashing process, you can get all of your data back using the backup.
      5. Enable USB debugging mode on your device. To do so, tap settings>developer options>USB debugging. If you can’t find developer options in settings, then tap settings > about device and tap “Build Number” for 7 times and you’ll get em’ activated under settings.
      6. To flash this firmware, you do not need to root your device, you do not need to unlock the bootloader. All you need is, your device must be the one mentioned and must be running on Android 4.2.2 Jelly Bean.
      7. Download the firmware file properly.
      8. Use the OEM data cable to connect your phone to your PC. Using any other data cable might cause connection problems.
      9. You need enough confidence to perform this custom method.
      10. Alright! Follow this guide to the letter in order to prevent any mishap.

Let’s move forward to the 2nd page for ROM flashing guide.

Pages: Page 1 > Page 2

Dragon Slayer for PC – Windows XP/7/8/8.1 & MAC

0
Dragon Slayer for PC – Windows XP/7/8/8.1 & MAC

Dragon Slayer is an arcade and action game by the well known Glu studios. You’re on a hunt to bring down the might dragons and clean out the areas to save it. The game consists of a number of levels, players are provided various power ups depending on the way they play and kill the dragons. Magical equipment are used to challenge the dragons and these can be upgraded using a suitable amount of  money/coins. The game sports stunning graphics, game play is addictive and much fun.

Once having a look and knowing about this game, it will be definitely hard to stop yourself from play it. In case you can’t install it on your Android smartphone or you just don’t have an Android smartphone, you may not need to worry and remain hungry to hunt the dragons as in the following post we will install this game on your Windows PC or Apple MAC. Just follow the guidelines to the letter. Screenshot_1

Let’s have a look at game’s description first:

Description

The Dragon Slayers are hunting once again and you have answered the call. Dragon Slayer is a visually spectacular, magic-based combat game that is brought to you by the studio that brought you Blood & Glory and Blood & Glory: Legend.BATTLE MOUNTAINOUS DRAGONS
Challenge massive dragons, wyverns, and reptiles as you traverse the map of the fantasy realm.

UNLEASH POWERFUL MAGIC
Cast deadly spells and avoid the flaming breath, bite, tail-whip and talons of the Dragon Bosses.

UPGRADE MAGICAL EQUIPMENT
Equip magical gauntlets, cloak armor and pets to slay more dragons.

STUNNING AAA GRAPHICS
Cutting-edge graphics optimized for the latest devices

MOTION COMIC STORY
Journey through the Realm on the hunt to vanquish menacing Dragons.

Dragon Slayer is free to play, but you can choose to pay real money for some extra items.

How to Install and Play Dragon Slayer on Windows PC or MAC:

      1. You need an Android emulator to run this game on your Windows PC or MAC. We recommend using Bluestacks. Use our guide to install it on your PC.
      2. After downloading and installing Bluestacks, download Dragon Slayer APK from here.
      3. Open the downloaded APK file now, and let Bluestacks install it.
      4. Open BlueStacks now > All Apps > Dragon Slayer
      5. The game will begin downloading 414 MB data files, keep patience while it downloads.
      6. As soon as the download is finished, thee will start now, follow the on screen instructions.
      7. Follow the on screen “Key Combination” instructions in order to fight with the dragons.
      8. Enjoy endless hunting and  fun.Dragon Slayer for PCDragon Slayer for PC 2

That’s all. Check out more Apps for PC in our Android Apps for PC Garage.

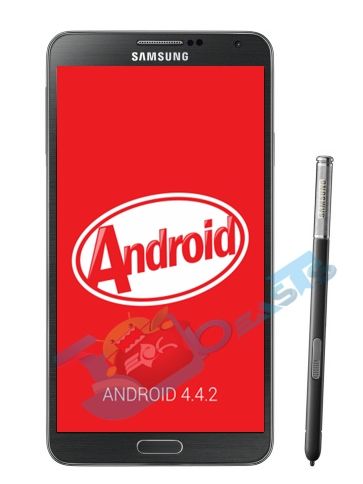
Root XXUENA6 Android 4.4.2 KitKat on Galaxy Note 3 SM-N9005

0
Root XXUENA6 Android 4.4.2 KitKat on Galaxy Note 3 SM-N9005

Samsung surprised all of its’ users recently by suddenly rolling out Android 4.4.2 update for it’s latest flagship phablet Galaxy Note 3’s LTE variant. We posted a full guide to install the latest firmware on the device earlier,  and found it necessary to post a root method for the latest firmware as well, So, here it is.

Many of you may not be familiar with rooting, so to make it clear before you head towards the rooting guide, here’s a little intro the root access and also a custom recovery if you flash it as well.Samsung-Galaxy-Note-3-front-back.jpg-640x488

Rooting your phone gives you complete access over all the data which is apparently locked by the manufacturers. This includes removal of the factory restrictions and making changes to the internal system and the operating system. Gaining the root access gives you the privileges to install various applications to enhance the performance of your device, allows you to remove the built-in applications/programs, helps you to upgrade the battery life of your device & install the apps which require the root access for the proper functionality and modify your device in so many other ways e.g using mods and custom roms. By installing custom recovery, you can flash custom roms in the phone easily. Custom recovery also let’s you backup your current rom and restore it in case of any mishap. There is a laundry list of things you can do after having your device rooted and installed the custom recovery, now once you’re rooted and haveinstalled custom recovery, go ahead and enjoy it on your phone. Here’s our collection of 10 Best Root Apps.

Here are some instructions that you must follow in order to gain root access on your Galaxy Note 3 SM-N9005:

      1. This guide is only for Galaxy Note 3 LTE SM-N9005. Do not try this on any other device, please check your device’s model number in Settings > General > About Device.
      2. Your phone’s battery must be charged at least over 60%. This is highly recommended in order to prevent any power issues during the flashing process.
      3. ake sure that you backup your important media content, Contacts, Call Logs & Messages. This is highly recommended just in case something goes wrong and you need to reset your phone.
      4. Use only OEM data cable to establish connection between your phone and PC. Turn off your Anti Virus and Firewall to prevent any connection issues. Also enable USB debugging mode on your phone if you face connection issues.
      5. Your device must be running Android 4.4.2 KitKat XXUENA6 firmware.
      6. Alright! Go ahead and flash the files, follow this guide to the letter.

Disclaimer: The methods involved in flashing custom roms and rooting your phone is highly custom and may result in bricking your device, and has nothing to do with Google or the device manufacturer that is SAMSUNG in our case. Also rooting your device will void its warranty and you will be no longer eligible for any kind of free device services by the manufacturers/warranty providers. In case of any mishap we may not be held responsible. Follow these instructions to the letter to avoid any mishap or bricking. Make sure that whatever you do, you are doing it at your own responsibility.

Make sure that you read all the instructions above carefully and let’s move forward to the rooting guide.

Root Galaxy Note 3 Running Android 4.4.2 KitKat XXUENA6 Firmware: Method 1:

Files you need to download: 

  1. Download and extract Odin PC – Get it here
  2. Download and Samsung USB Drivers – Get here
  3. Download & Unzip Cf Auto Root Package file once on your desktop

How to Root now:

    • Put your GN3 SM-N9005  in download mode by pressing and holding Volume Down + Home + Power key at the same time, you should get a screen showing a warning and asking to continue, press Volume Up to continue.
    • Now your phone should be in downloading mode. Connect your phone to your PC.
    • As soon as Odin detects your phone the ID:COM box will turn light blue.
    • Click on the PDA tab and select the CF-autoroot file that you extracted above.
    • Your Odin screen should look like exactly as shown below.
  • odin_explained
    • Click Start and the root process should start showing you a process bar in the first box above ID:COM.
    • The process is quite fast and will finish in a few seconds, as soon as it ends, your phone will restart and you’ll see the CF Auto root installing SuperSu on your phone.
    • Congratulations you have your Samsung Galaxy Note 3 SM-N9005 rooted now!


In case this method didn’t work for you, head towards the method 2 on the 2nd page.

Pages: Page 1 > Page 2

Install Official XXUENA6 Android 4.4.2 KitKat Firmware on Galaxy Note 3 SM-N9005

2
Install Official XXUENA6 Android 4.4.2 KitKat Firmware on Galaxy Note 3 SM-N9005

Samsung was expect to roll out Android 4.4.2 KitKat for the Galaxy Note 3 and Galaxy S4 in the start of 2014 somewhere around January. A chain of test firmwares has started leaking out and it was just yesterday that a leak test firmware Android 4.4.2 KitKat based on the build number XXUENA6 surfaced over the web, and surprisingly Samsung made it official today. The LTE variant of the Galaxy Note 3 – SM N9005 is receiving the KitKat update through Samsung Kies and Over-the-Air as well in Poland.

As usual, the update is on a slow roll out and may take a long time to reach your region. Some of you may want to update your device to the latest and greatest version of Android and taste the new white icons atop the display and check out the new performance and stability enhancements. To overcome your appetite, we’ve explained the method below in detail for updating Galaxy Note 3 SM-N9005 to Android 4.4.2 KitKat.Samsung-Galaxy-Note-3-front-back.jpg-640x488

Before we head towards the installation guide, here are some pre-requisites and pre-cautions that you must follow.

  1. This firmware is only for Galaxy Note 3 SM-N9005. Do not try this on any other device, check your device’s model in Settings > General > About Device.
  2. Your device’s battery should be charged at least over 60%. This is highly recommended in order to prevent any power issues during the flashing process.
  3. Make sure that you backup your important media content, ContactsCall Logs & Messages. This is highly recommended just in case something goes wrong and you need to reset your phone.
  4. Use only OEM data cable to establish connection between your phone and PC. Turn off your Anti Virus and Firewall to prevent any connection issues. Also enable USB debugging mode on your phone if you face connection issues.
  5. If you already have rooted your device, use Titanium Backup to back up all your important apps + system data. Also if you are using a custom recovery, it is recommended that you backup your current system using that first. [Just for the sake of safety.]
  6. Using TWRP Recovery, please make an EFS backup before you flash this ROM.
  7. For the best performance results, it is always recommend to wipe cache and factory data before installing official firmware. This is not necessary but may be one in order to make the phone work at its best.
  8. Alright! Go ahead and flash the firmware, follow this guide to the letter.

Make sure that you read everything explained above carefully. Also, make sure that you’re doing it at your own risk, in case of any mishap we may not be held responsible.

Alright, let’s move forward to the 2nd page for flashing this ROM:

Pages: Page 1 > Page 2

Root Xperia ZR C5503/C5502 Running Android 4.3 Jelly Bean 10.4.B.0.569 Firmware

47
Root Xperia ZR C5503/C5502 Running Android 4.3 Jelly Bean 10.4.B.0.569 Firmware

Recently we posted the guides to update Xperia ZR C5503 and C5502 to Android 4.3 Jelly Bean. You may have updated your phone to the latest version of Android available for your device and may be looking out for a way to root your phone now. In case you’ve ended up finding no method to root your phone, you may stop worrying as we’ve found a method and explained right here for you.

In case you don’t know what is rooting and why should you root your Android smartphone, let’s have a look on a little intro to the Root and Custom recovery as well and then move forward to the root method for Sony Xperia ZR C5503 and C5502.Xperia ZR Android 4.3 Root

Rooting your phone gives you complete access over all the data which is apparently locked by the manufacturers. This includes removal of the factory restrictions and making changes to the internal system and the operating system. Gaining the root access gives you the privileges to install various applications to enhance the performance of your device, allows you to remove the built-in applications/programs, helps you to upgrade the battery life of your device & install the apps which require the root access for the proper functionality and modify your device in so many other ways e.g using mods and custom roms. By installing custom recovery, you can flash custom roms in the phone easily. Custom recovery also let’s you backup your current rom and restore it in case of any mishap. There is a laundry list of things you can do after having your device rooted and installed the custom recovery, now once you’re rooted and have installed custom recovery, go ahead and enjoy it on your phone. Here’s our collection of 10 Best Root Apps.

 Let’s move forward to the root method. Here are some important pre-cautions and pre-requisites that you may keep in mind before you use this method.

  1. This method is for Sony Xperia Z C5503 / C5502. Do not try this on any device, please check your device first in Settings > About device.
  2. You must have unlocked your device’s bootloaderFollow the full guide here.
  3. You must have installed Android ADB & Fastboot drivers. Follow the quick guide here.
  4. Use only on OEM data cable to establish connection between your PC and Phone.
  5. Make sure that you back up all your important media content, contacts, call logs and important text messages. This is highly recommended so that in case something goes wrong, you still have your data saved.
  6. Make sure that your battery is at least charged over 60%. This is highly recommended in order to prevent any power issues during the process.
  7. Your device must be running on latest Android 4.3 Jelly Bean 10.4.B.0.569 firmware. Check your firmware in Settings > About device.
  8. Enable USB debugging mode on your phone. Find it in Settings > Developer options > USB debugging mode. IF you can’t see it in settings, then you will have to enable it first. To do so, open settings and tap build number for 7 times.
  9. Alright! Follow this guide to the letter now.

Disclaimer: The methods involved in flashing custom roms and rooting your phone is highly custom and may result in bricking your device, and has nothing to do with Google or the device manufacturer that is SONY in our case. Also rooting your device will void its warranty and you will be no longer eligible for any kind of free device services by the manufacturers/warranty providers. In case of any mishap we may not be held responsible. Follow these instructions to the letter to avoid any mishap or bricking. Make sure that whatever you do, you are doing it at your own responsibility.

Make sure that you read all the instructions carefully and let’s move forward to the 2nd page for Rooting guide.

Pages: Page 1 > Page 2

Update Xperia ZR C5502 to Android 4.3 Jelly Bean 10.4.B.0.569 Official Firmware

3
Update Xperia ZR C5502 to Android 4.3 Jelly Bean 10.4.B.0.569 Official Firmware

Recently Sony made a bold move and updated a few of it’s devices to Android 4.3 Jelly Bean altogether. The Xperia Z family has a planned update to Android 4.4 KitKat and to add some excitement to the wait Sony rolled out Jelly Bean’s last update and paved a way for KitKat updates. Xperia ZR, Z’s brother initially ran on Android 4.1 and received Android 4.1.2 and 4.2.2 updates later on. 4.3 update has just started rolling out and is currently hitting different regions on a slow mode.

Just in case you’re an Xperia ZR owner and an Android enthusiast and can’t wait to get your hands on the latest Android 4.3 Jelly Bean running on your device, you’re on the right place at the moment as we’ve the method to overcome your appetite. In the following post we will update Xperia ZR C5503 to Android 4.3 10.4.B.0.569 Official firmware, before you head towards this method please make sure that you’ve checked OTA updates and you’re not already running this firmware on your device. At first, it is preferred to perform an OTA update check as it will save some time as well, otherwise let’s move forward to this guide.Xperia ZR C5502

Here are some necessary pre-requisites and pre-cautions that you must keep in mind before heading towards the firmare flash guide.

      1. This guide is only for Sony Xperia ZR C5502, even though this firmware works fine on C5503, perhaps it would not be wiser to flash it on C5503 to prevent any mishap. Please check your device model first in Settings > About Device > Model.
      2. You must have installed Sony Flashtool – Get the full guide here. Also Install drivers using Flashtool > Drivers > Flashtool-drivers > Flashtool, Xperia ZR, Fastboot, select all these and install.
      3. Your phone’s battery must be charged at least over 60%. This is highly recommended in order to prevent any power issues during the process.
      4. Make sure that you backup your media content,contactscall logs and text messages.  This is important and recommended so that in case you decide to wipe your phone during the flashing process, you can get all of your data back using the backup.
      5. Enable USB debugging mode on your device. To do so, tap settings>developer options>USB debugging. If you can’t find developer options in settings, then tap settings > about device and tap “Build Number” for 7 times and you’ll get em’ activated under settings.
      6. To flash this firmware, you do not need to root your device, you do not need to unlock the bootloader. All you need is, your device must be the one mentioned and must be running on Android 4.2.2 Jelly Bean or Android 4.1.2 Jelly Bean.
      7. Download the firmware file properly.
      8. Use the OEM data cable to connect your phone to your PC. Using any other data cable might cause connection problems.
      9. You need enough confidence to perform this custom method.
      10. Alright! Follow this guide to the letter in order to prevent any mishap.

Let’s move forward to the 2nd page for ROM flashing guide.

Pages: Page 1 > Page 2

Update Xperia ZR C5503 to Android 4.3 Jelly Bean 10.4.B.0.569 Official Firmware

1
Update Xperia ZR C5503 to Android 4.3 Jelly Bean 10.4.B.0.569 Official Firmware

One of Xperia Z’s siblings is Xperia ZR, pretty much similar to Xperia Z. ZR sports a 4.55 inches screen with 323 ppi and 720 x 1280 pixels  resolution. Under the hood it has got a Qualcomm Snapdragon  Quad-core 1.5 GHz Krait CPU, a RAM of 2 GBs and a battery of 2300 mAh. Internal memory is 8 GB and a microSD card slot is also there to expand it. At the back a camera sensor of 13.1 MPs is fixed while a VGA camera is set on the front.

Xperia ZR ran on Android 4.1 initially, the device received Android 4.1.2 and 4.2.2 updates having the planned upgrades to Android 4.4 KitKat. Sony has been impressive with the Android updates to its devices and keeping its promise rolled out much awaited Android 4.3 Jelly Bean update for it’s Xperia Z line up including Xperia Z, Z1, ZR, ZL, Z Ultra. The OTA update has reached different regions, however these updates may get slower hitting the regions and may increase the appetite of Android Enthusiasts owning a Sony Xperia ZR. In the following post we’re going to install Android 4.3 Jelly Bean 10.4.B.0.569 firmware on Sony Xperia ZR C5503. So just in case you were after this update, you’re on the right place at the moment. Just go through this detailed guide.Xperia-ZR-Hero

Before we head towards the Stock Android 4.3 Jelly Bean installation, here are some pre-requisites and pre-cautions that you need to keep in mind.

      1. This guide is only for Sony Xperia ZR C5503, even though this firmware works fine on C5502, perhaps it would not be wiser to flash it on C5502 to prevent any mishap. Please check your device model first in Settings > About Device > Model.
      2. You must have installed Sony Flashtool – Get the full guide here. Also Install drivers using Flashtool > Drivers > Flashtool-drivers > Flashtool, Xperia ZR, Fastboot, select all these and install.
      3. Your phone’s battery must be charged at least over 60%. This is highly recommended in order to prevent any power issues during the process.
      4. Make sure that you backup your media content,contacts, call logs and text messages.  This is important and recommended so that in case you decide to wipe your phone during the flashing process, you can get all of your data back using the backup.
      5. Enable USB debugging mode on your device. To do so, tap settings>developer options>USB debugging. If you can’t find developer options in settings, then tap settings > about device and tap “Build Number” for 7 times and you’ll get em’ activated under settings.
      6. To flash this firmware, you do not need to root your device, you do not need to unlock the bootloader. All you need is, your device must be the one mentioned and must be running on Android 4.2.2 Jelly Bean or Android 4.1.2 Jelly Bean.
      7. Download the firmware file properly.
      8. Use the OEM data cable to connect your phone to your PC. Using any other data cable might cause connection problems.
      9. You need enough confidence to perform this custom method.
      10. Alright! Follow this guide to the letter in order to prevent any mishap.

Let’s move forward to the 2nd page for ROM flashing guide.

Pages: Page 1 > Page 2

Watch Styler APK: Change the Face of your Galaxy Gear

0
Watch Styler APK: Change the Face of your Galaxy Gear

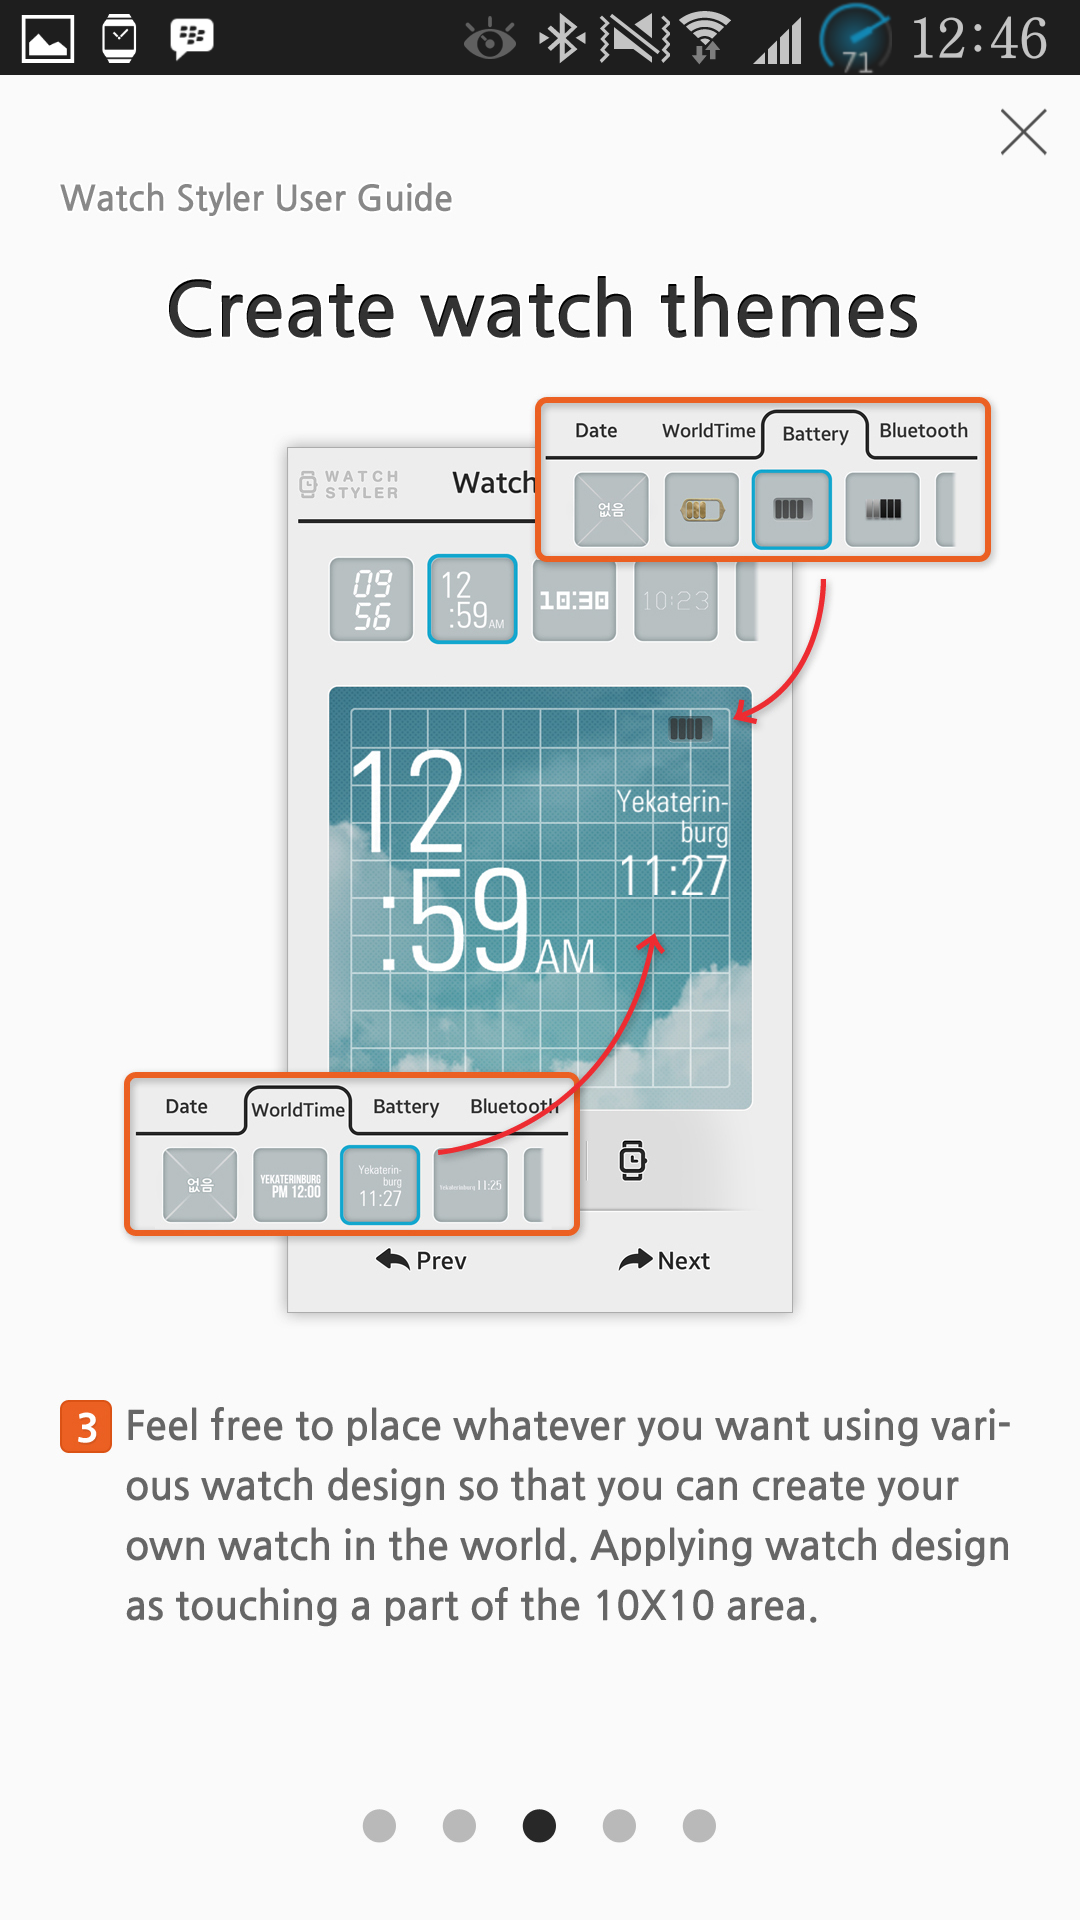
Watch Styler is an amazing app available in the Samsung App Store that helps you to change the Face of your Samsung Galaxy Gear. By default, Samsung Galaxy Gear comes with a few clocks that you can select from Gear Manager. You may not find a way to change your Gears Wallpaper/Face apparently but you should not worry anymore as Watch Styler is already there.

Yesterday I came across this app and enjoyed making different screens for my Galaxy Gear and found it really awesome, the app let’s you create custom faces using your own images, lets you place the timer, date, battery and bluetooth icons at a random place on the screen. By default it packs up a few backgrounds that you may use to create faces for your Gear, but as said you can also use custom images from your phone’s gallery. Moreover you can also change the color scheme / effects of the screen.

In the following post we are going to have a look on how to install and use this app. Bare with us for a while, let’s go through the tutorial:

    • Download and Install Watch Styler on your phone [Galaxy Note 3, Note 2, S4 or S3]. Get the APK file here.
    • Open the app from the App Drawer.
    • Tap the “+” button on screen.
    • Using the first option select background for your Gear’s screen. You can select from the backgrounds loaded by the app, or you can select a custom background from your phone’s gallery.
    • Option 2 will let you add effects to the background photo that you just selected.
    • In the 3rd option you can select the icons/widgets that you want to put on your Gear’s screen. These icons can be placed anywhere on the screen.
    • After you’re done creating a custom face, save it.
    • Open Gear Manager now and tap “Clocks”.
    • Under Clocks tap “Watch Styler”
    • In Watch Styler select the face that you just created a while ago.
    • Your Gear’s screen will be changed now.
    • Phewww! That’s all. Now have fun creating different faces.
    • Screenshot_2014-01-11-12-46-05 Screenshot_2014-01-11-12-46-09 Screenshot_2014-01-11-12-46-16 Screenshot_2014-01-11-12-46-22 Screenshot_2014-01-11-12-46-29Screenshot_2014-01-11-12-34-43Screenshot_2014-01-11-12-35-11 Screenshot_2014-01-11-12-35-29  Screenshot_2014-01-11-12-36-29 Screenshot_2014-01-11-12-37-07Screenshot_2014-01-11-12-38-56 Screenshot_2014-01-11-12-38-09    Screenshot_2014-01-11-12-39-26 Screenshot_2014-01-11-12-39-32 Screenshot_2014-01-11-12-36-25Screenshot_2014-01-11-12-39-50 Screenshot_2014-01-11-12-39-57 Screenshot_2014-01-11-12-40-08

Checkout our Galaxy Gear to find Galaxy Gear’s Custom ROM, Root & Custom Recovery Methods.

That’s All. We hope that you find this tutorial helpful. In case you got any queries or face any difficulties regarding this post, please feel free to stop by the comment box below and drop us your message. We will get back to you as soon as possible.

How to Use Titanium Backup [Guide]

5
How to Use Titanium Backup [Guide]

Android is all about development being an open source operating system. There is a number of tweaks, mods and custom roms that you may install and enhance your Android smartphone and in some cases you have to go through data wipes / factory resets, this may just cause inconvenience installing apps / getting back your wiped data. This is alright if becomes a hitch actually, but unfortunately installing all the apps once again takes a long time, you also loose your app’s data.What we have for you here today will let you backup your system apps, user apps, apps data easily, and will simply let you restore in a few minutes whenever you want.

If you’ve guessed it, we’re talking about Titanium Backup. As the name suggests, it’s a backup app that helps you to backup and restore each and everything on your Android smartphone. You can also set schedules on your phone so that you don’t need to backup your data manually. Also, scheduling helps you to backup updated applications with their data. This app basically creates a folder on your phone’s internal storage and backups up the data in the form of .zip files. You can also change the backup folder location if you’ve an external SD card inserted in your phone, there’s a hefty list of actions you can perform using this amazing app.  A freeware of Titanium Backup is available in the Google Play Store, you can also purchase Titanium Backup Key in order to unlock all of it’s features.  Freeware will perform the basic functions only and obviously there is a hefty list of features that the pro version of Titanium Backup sports.Titanium

We have been posting custom ROMs since a long time now and you may have read about backing up all your important data, many of you might be wondering how to use this app so today in the following post we are going to have a look on how to use Titanium Backup. Before you head towards the guide, do keep in mind that this app requires a rooted Android phone. Let’s have a look on the description by the developer:

Titanium Backup is the most powerful backup tool on Android, and then some.

You can backup, restore, freeze (with Pro) your apps + data + Market links. This includes all protected apps & system apps, plus external data on your SD card. You can do 0-click batch & scheduled backups. Backups will operate without closing any apps (with Pro). You can move any app (or app data) to/from the SD card. You can browse any app’s data and even query the Market to see detailed information about the app.

Let’s move forward to the Titanium Backup guide.

How to Use Titanium Backup:

What this App can backup:

  • User Apps.
  • User Apps with data.
  • System Apps.
  • System Apps with data
  • All user apps + system apps + data.
  • Titanium cannot backup the obb files of your games. In order to save your obb files, you may copy the obb folder manually to your computer.
    1. Your device must be rooted in order to install and run this application.
    2. Download and Install Titanium Backup on your phone: Google Play Link
    3. After installing Titanium Backup, open it from the app drawer.
    4. In the main menu you will find Over View, Backup/Restore and Schedules.
    5. Overview shows you all the preferences/stats/status of your phone.
    6. Titanium_Techbeasts (2)
    7. Tap Backup/Restore Option, it will show you a list of all installed / system apps. Tapping any application will show you all the available actions you can perform e.g Run app, Wipe Data, Backup, Restore, Freeze, Uninstall, Delete.
    8. Titanium_Techbeasts (1)Titanium_Techbeasts (3)
    9. Tapping Schedules will show you the scheduling panel. You can set the schedule when you want Titanium to automatically backup your data.
    10. Titanium_Techbeasts (12)Titanium_Techbeasts (11)Titanium_Techbeasts (9)Titanium_Techbeasts (10)
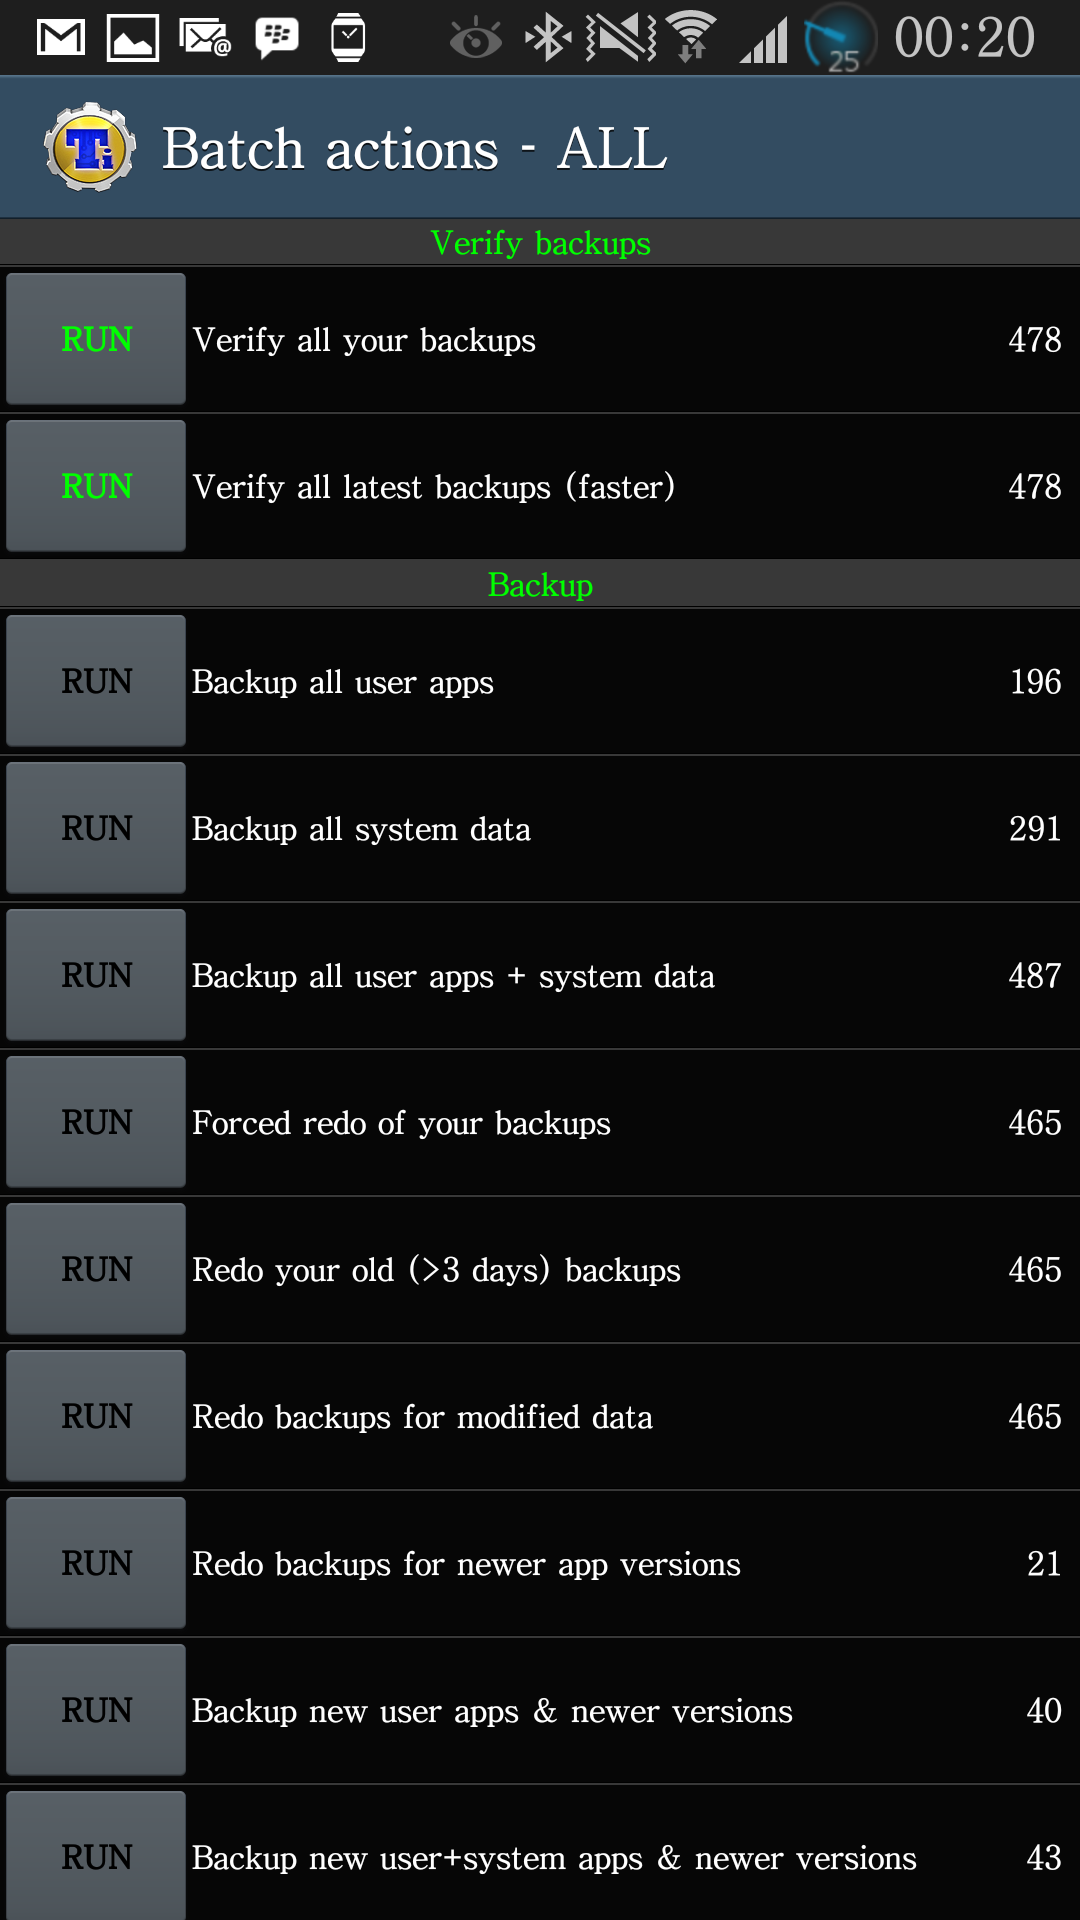
    11. Tap the small tick mark on the top right corner inside Titanium Backup, it will take you the “Batch Actions”. You can find and perform the following actions here.
    12. All the actions are explained below, in case you only want to Backup / Restore your user apps + system apps, skip all others and have a look at Backup / Restore options below.
    13. Titanium_Techbeasts (8) Titanium_Techbeasts (7) Titanium_Techbeasts (6)

Note: I’m using Titanium Backup Pro on my phone and all the options explained below are courtesy of Titanium Backup Pro. You may not find all these in case you’re using Titanium Backup freeware. Freeware comes with limited options, it will surely let you use Backup/Restore options at the least.

Verify Backups

      • Let’s you verify whether you’ve backed up all your data properly or not. This takes a few seconds to run. Tapping the Run button may perform this.

Backup

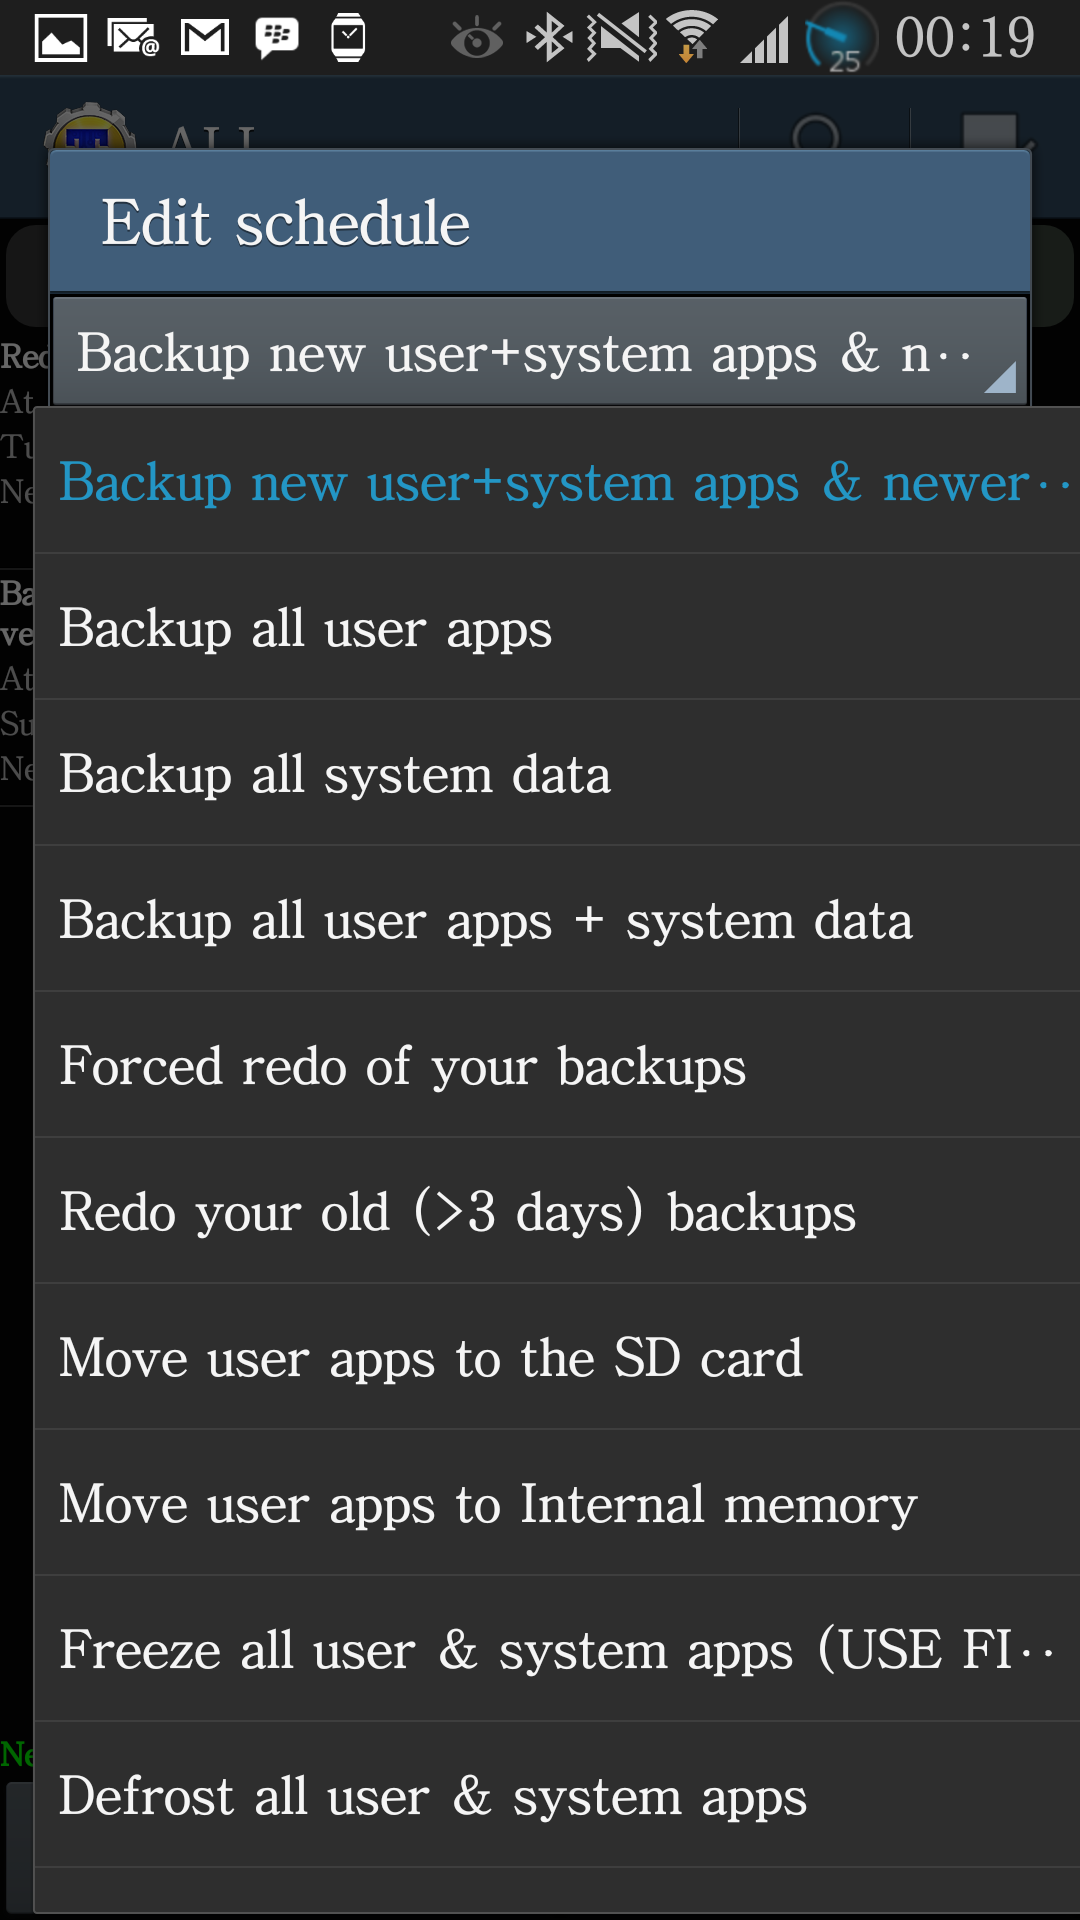
      • Backup all user apps: Backup all user installed apps. e.g Apps installed from the play store.
      • Backup all system data: Backup all system apps e.g Apps installed in the OS by default. This also includes your system settings.
      • Backup all user apps + system data: Backup user installed apps and system data altogether.
      • Backup new uer apps: Let’s you backup if any app has been updated.
      • Backup new user + system apps  & newer versions.

Tapping the RUN button will take you to the list of apps installed on your phone. You can select / unselect the apps you want to backup.


Restore

      • Similar to backup. You can restore user apps, user apps with data, system apps, system apps with data or user apps with data + system data.

Tapping the RUN button will take you to the list of apps installed on your phone. You can select / unselect the apps you want to restore.

Move/Integrate:

      • Let’s you integrate updates of system apps into your phone’s current OS / ROM

Freeze/Defrost:

      • Freeze option helps you to freeze any apps that’s eating a lot of memory or causing any problem on your phone. This option is quiet handy specially when you want to enhance the performance of your phone and reduce the load. You can select the apps to be frozen from the list under this option.

Android Market :

      • You can detach user and system apps from the Google Play store using this option.

Manipulate Data:

Another handy feature that let’s you:

      • Clear cache for user & system apps.
      • Wipe date for user & system apps.
      • Remove orphan data.
      • Conver DBs to Rollbac Journal mode.
      • Convert DBs to WAL mode.


Recovery Mode:

    • Using this option you can create an update.zip file, that can be flashed using a custom recovery. This option is quiet helpful and may take a few more minutes.

Un-install:

    • Uninstall backed up user apps.
    • Uninstall non backed up user apps.
    • Uninstall all user apps.
    • Uninstall all user apps & system data.


Delete Backups:

      • Trim backups.
      • Delete backups for uninstalled apps.
      • Delete all backups.

Titanium Backup Settings:

Titanium_Techbeasts (5)Titanium_Techbeasts (4)

  • General:
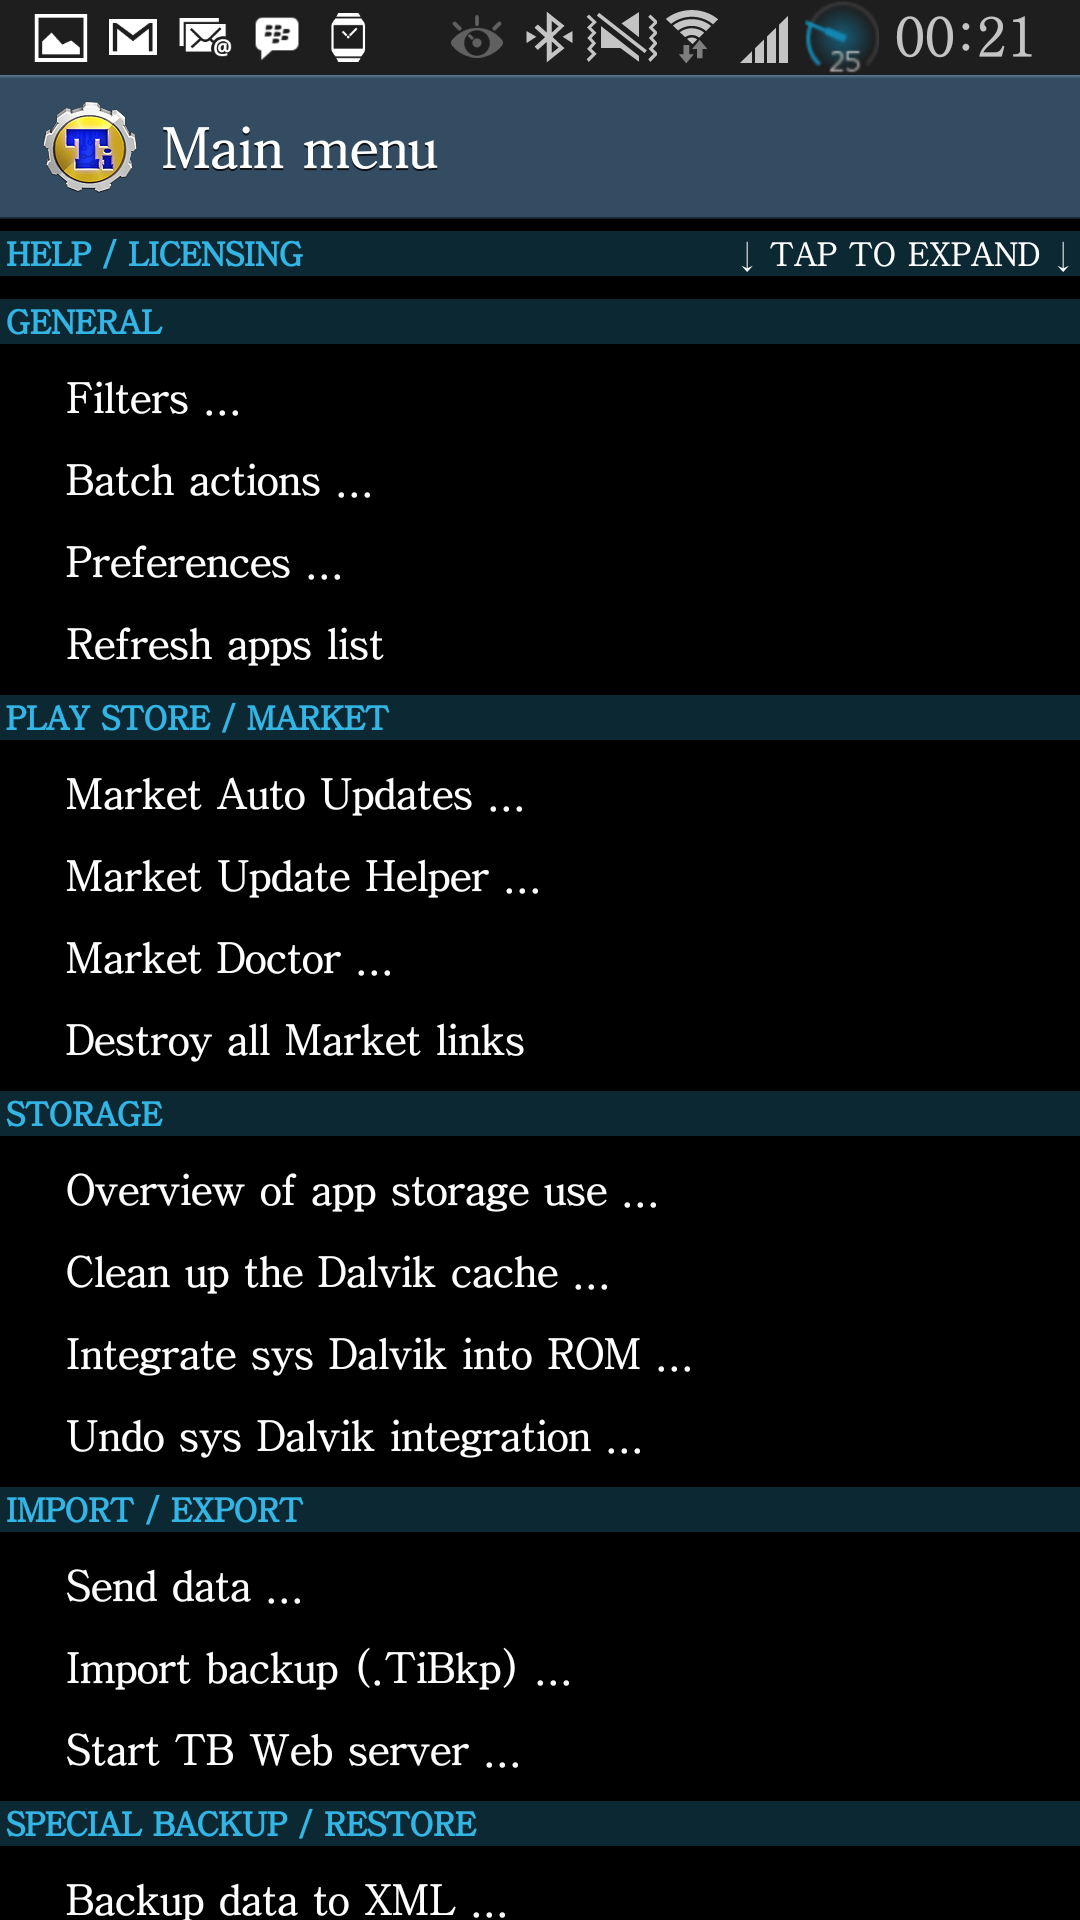
    • Filters: You can filter between what apps you want to display in Titanium Backup options.
    • Batch Actions: All explained above.
    • Preferences: Enable cloud services, enable backup encryption, backup settings (backup folder location, external data etc.).
    • Play Store: Automatic Updates, Update Helper, Market Links Manager.
    • Storage: Clean Dalvik Cache, Overview of app storage use, Integrate and undo system dalvik integration.
    • Import / Export: Send data, Import backup, Start Titanium Backup Web Server.
    • Special Backup / Restore: Backup / Restore data to and from XML. Extract from Nandroid Backup, Extract from ADB Backup.
    • Your Device: Reboot the device, Manager Android ID.
    • Special Features: Create update.zip file, Reload application.
  • Once backed up, Titanium will create a folder named “Titanium Backup” on the location you selected in preferences. You can copy this folder to your computer. Every time you flash a custom ROM and wipe your phone’s data, you restore each and everything in just one click using Titanium backup. All you need is root access and install the app from play store.
  • Once installed, run Titanium Backup and in preferences tap Backup Folder Location. Search your device and it will automatically detect the backup folder whether you placed it on internal or external storage in order to restore your apps.

That’s All. In case you got any queries or face any difficulties regarding this guide, feel free to stop by the comment box below and drop us your message. We will surely get back to you as soon as possible. Thanks All.

Root AT&T Galaxy Note 2 SGH-I317 On UCUBMK6 Android 4.3 Jelly Bean(Guide).

Root AT&T Galaxy Note 2 SGH-I317 On UCUBMK6 Android 4.3 Jelly Bean(Guide).

The Roll-out of Android 4.3 Jelly Bean for Samsung Devices is bouncing in different regions and different devices, devices like Galaxy Note 2 and Galaxy S3 are on the top of list. These two devices have received most of the Updates, in terms of Android 4.3 Jelly Bean. Usually, Devices marked with Variants, gets the update months after the international update, but it seems like US variants are moving pretty fast in this case. The AT&T Galaxy Note 2 is blessed with Android 4.3 Jelly Bean with Build Number UCUBMK6 . Beside bringing Smoothness and improved performance, like any-other Official firmware, it also removes the root access and you have to root it again.

ATT-Gnote-2-Root

Rooting allows you to get full control over your device, Stock apps and mods are good, but installing Custom Mods gives you better support and great battery life, you might need to delete some Stock apps from the device, a non-rooted device can’t do that, but a rooted one has the power to remove stock apps too. If you are familiar with Odin and it’s working, then this tutorial might not be difficult for you. Otherwise read the whole tutorial first before trying it on your device. In this Article, we will show you How To Root AT&T Galaxy Note 2 On UCUBMK6 Android 4.3 Jelly Bean.But before we begin, Make sure that:

  1. That you have a Well Charged Battery.
  2. Back-Up all your important ContactsCall Logs & Messages.It is highly recommended in case of any mishap or data loss to back up all your important data.
  3. Back-Up your Mobiles EFS DataHow To Restore and Back-Up EFS Data On Samsung Galaxy Devices.

Disclaimer: 

The methods involved in flashing custom roms and rooting your phone is highly custom and may result in bricking your device,and has nothing to do with Google or the device manufacturers which is Samsung in our case. In case of any mishap we may not be held responsible. Follow these instructions to the letter to avoid any mishap or bricking. Make sure that whatever you do, you are doing it at your own responsibility.

Important things:.

  • Enable USB debugging mode.
  • Make sure that battery level is at 85% or more.
  • This Tutorial is Only For AT&T Galaxy Note 2 SGH-I317.
  • Your Device must be running UCUBMK6 Android 4.3 Jelly Bean.

All done and good, let’s head towards the Next page to See, How you can Root AT&T Galaxy Note 2 SGH-I317 On UCUBMK6 Android 4.3 Jelly Bean.

Pages: Page 1 > Page 2

How To Root Samsung Galaxy Note 2 N7105 On XXUEMK9 Android 4.3 Jelly Bean Official Firmware.

How To Root Samsung Galaxy Note 2 N7105 On XXUEMK9 Android 4.3 Jelly Bean Official Firmware.

Before Doing anything else, Go to the Following Link to Install XXUEMK9 Android 4.3 Jelly Bean Official Firmware On Your Galaxy Note 2 N7105.

Update Samsung Galaxy Note 2 N7105 To XXUEMK9 Android 4.3 Jelly Bean Official Firmware.

Now that you have updated your Galaxy Note 2 N7105, it is time to Root it. It is obvious that flashing an Official Firmware erase the root access and the only way to regain it by rooting it again.Rooting allows you to get full control over your device, Stock apps and mods are good, but installing Custom Mods gives you better support and great battery life, you might need to delete some Stock apps from the device, a non-rooted device can’t do that, but a rooted one has the power to remove stock apps too.

Samsung-Galaxy-Note-II

If you are familiar with Odin and it’s working, then this tutorial might not be difficult for you. Otherwise read the whole tutorial first before trying it on your device. In this Article, we will show you How To Root Samsung Galaxy Note 2 N7105 On XXUEMK9 Android 4.3 Jelly Bean Official Firmware.But before we begin, Make sure that:

  1. That you have a Well Charged Battery.
  2. Back-Up all your important ContactsCall Logs & Messages.It is highly recommended in case of any mishap or data loss to back up all your important data.
  3. Back-Up your Mobiles EFS DataHow To Restore and Back-Up EFS Data On Samsung Galaxy Devices.

Disclaimer: 

The methods involved in flashing custom roms and rooting your phone is highly custom and may result in bricking your device,and has nothing to do with Google or the device manufacturers which is Samsung in our case. In case of any mishap we may not be held responsible. Follow these instructions to the letter to avoid any mishap or bricking. Make sure that whatever you do, you are doing it at your own responsibility.

Important things:.

  • Enable USB debugging mode.
  • Make sure that battery level is at 85% or more.
  • This Tutorial is Only For Samsung Galaxy Note 2 N7105.
  • Your Device must be running XXUEMK9 Android 4.3 Jelly Bean

All done and good, let’s head towards the Next page to See, How you can Root Samsung Galaxy Note 2 N7105 On XXUEMK9 Android 4.3 Jelly Bean Official Firmware.

Pages: Page 1 > Page 2

Download BBM apk for Android 1.0.3.87

0
Download BBM apk for Android 1.0.3.87

BBM( Black Berry Messenger ) the main reason Black Berry got so famous the unique thing in every Black Berry device was BBM, its the main reason this company is consider the best for business communication. But month back they made a good step by adding BBM as Android App in Google Play Store. And it got awesome response right now BBM app is downloaded 10,000,000 – 50,000,000 times. So this is why we are adding the latest BBM apk for Android 1.0.3.87 so that everybody using Android device easily download and use BBM.

BBM-Android-320x300

Description:
The OFFICIAL version of BBM™ from BlackBerry is now here for Android. Get the free BBM app for the best way to stay connected with friends and family. Download it now.Chat with friends on Android, BlackBerry and iPhone:
• BBM is always on and always connected – no app to open
• Know when messages have been delivered (D’s) and read (R’s)
• Share photos, files, documents, voice notes and more
• See when contacts are responding to your message
• Emoticons for every mood and emotion let you express yourselfBBM lets you protect your privacy. You control it:
• You chose how to share your information – BBM uses PINs instead of phone numbers or email addresses so that it’s more private, and you always control who can contact you
• You chose your contacts – 2-way opt-in means you have control over who is able to message youChat and Share with many at once:
• Groups – BBM groups help you share pictures, lists, and appointments with group members. You can even be in a group with people who aren’t part of your own BBM contact list.
• Multi-person chats – Invite multiple contacts to have a chat together.
• Broadcast messages – Send a message to multiple BBM contacts at one time.Create your own BBM profile:
• Post a profile picture using images, pictures or even animated pictures (GIFs).
• Update your status to let people know what you’re up to or how you feel
  1. Download BBM apk for Android 1.0.3.87

How to Install BBM apk For Android 1.0.3.87:

bbm-apk-emoticons-view-168x300

All you have to do is follow the simple steps and you will easily install BBM apk on your Android device. Lets start the process now.

Step 1: Download BBM apk for Android 1.0.3.87

Step 2: If you download it on your device the you can find this files in “Download” or it would be easy to find and use if you download it on your computer.

Also See: WeChat for pc

Step 3: Connect your device with pc and copy the apk file in your SD Card anywhere.

Step 4: Install Astro File Manager that would help you to install such files.

Step 5: Now you have to change some settings-> More -> Security-> Unknown Sources = allow.

Step 6: Now goto apk file where you placed it tap on it and select “App Manager”.

Step 7: Now follow the instruction on screen and in fews seconds it done.!