Home Blog Page 488

Retrica for PC – Download Here

0
Retrica for PC – Download Here

Retrica for PC is now available for download. Retrica offers numerous professionally designed filters, many more than any other camera apps. You can apply the filters even before you take a photo, or after, as you like.Take photo collages with Retrica, WITH filters applied! You can set the time interval to take consecutive photos, to fool around with your friends too. Awesome photos! Retrica comes with chic and deep filters that just turn your photos to pop! Your night out in the city, the great view from your trip and amazing meal you had will become more memorable with Retrica’s EIGHTY classy filters! Retrica comes with many trendy logos you can choose from too. Today i will tell you how you can Download Retrica for PC.

retrica for pc


Retrica For PC Features:

● 80 real-time vintage filters (of which 25 are provided upon Pro Upgrade)

● Additional features
– Vignette
– Out-of-focus Blur
– Self-Timer
– Various layout Photo Booth (22 collages)
– Border selectable
– Prepare for Instagram

● Retrica Logo Watermark
– 14 awesome Retrica Logos (You can also turn the logo watermark off in settings.)

● Import photos from Saved Album
– You can now import photos from your Saved Album and apply Retrica filters on them to turn those photos to pop! You can also apply vignette or blur effects on them too (in-App purchase only feature.)

How To Install Retrica for PC:

Step1: Download and Install Blue Stacks on pc.

Step2: After the installation is completed the go to search and write Retrica.

Step3: Now click on install and it will take few minutes to get install.

Install CWM Recovery on Samsung Galaxy Tab 3 8.0

0
Install CWM Recovery on Samsung Galaxy Tab 3 8.0

Samsung’s 3rd generation tab series comes in 3 different sizes: small, medium and large, as Galaxy Tab 3 7.0, 8.0 and 10.1. All these tabs are further modeled under different variants having different radio frequencies e.g 2G, 3G and 4G. Earlier, we posted methods to install custom recovery and root Galaxy Tab 3 7.0, but found it necessary to post the methods to install custom recovery on the other versions of Galaxy Tab 3 as well now. In the following post we are going to install CWM(ClockworkMod) recovery on Galaxy Tab 3 8.0 SM-T310, SM-T311 and SM-T315. So in case you any of these devices and you’re looking for a custom recovery, you’re on the right spot. Move a little ahead with us and get it installed on your device.

As these methods are not so much common, some of you might be the first timers and may not be familiar with what is a custom recovery and why should you install it on your device. So, just to make the things a bit more clear, we will first go through a quick intro to the custom recovery that is CWM in our case. Galaxy Tab 3 8.0

A custom recovery allows you to install custom roms, mods etc. Along with these, you can make a Nandroid backup, this helps you a lot as you can move back to the previous working state of your phone at any time you want if you have backed up your current system. In some cases, to root the phone you need to flash SuperSu.zip file in the custom recovery, having installed the recovery may help you while in some cases to install the recovery easily, you need to have the phone rooted. You can also wipe cache and dalvik cache of your phone using a custom recovery.

Here are some pre-requisites and some pre-cautions that you must follow before you head towards the installation guide:

      1. This guide is only for Galaxy Tab 3 8.0 SM-T310, SM-T311 and SM-T315. Do not try this on any other device, please check your device’s model number in Settings > General > About Device.
      2. Your phone’s battery must be charged at least over 60%. This is highly recommended in order to prevent any power issues during the flashing process.
      3. Make sure that you backup your important media content, ContactsCall Logs & Messages. This is highly recommended just in case something goes wrong and you need to reset your phone.
      4. Use only on OEM data cable to connect your Galaxy Tab to your PC.
      5. Turn off your Anti-virus, Firewall and other security programs to avoid connection interruption.
      6. Use a stable connection/device. Your laptop must have enough battery charged to perform this method, in case you’re using a desktop PC make sure that you’re not on a risk of power loss during the flashing process.
      7. Follow this guide carefully. Do not go ahead if you don’t know what you’re going to do.

Disclaimer: The methods involved in flashing custom roms or recoveries and rooting your phone is highly custom and may result in bricking your device, and has nothing to do with Google or the device manufacturer that is SAMSUNG in our case. Also rooting your device will void its warranty and you will be no longer eligible for any kind of free device services by the manufacturers/warranty providers. In case of any mishap we may not be held responsible. Follow these instructions to the letter to avoid any mishap or bricking. Make sure that whatever you do, you are doing it at your own responsibility.

Files you need to download / install:

  1. Download and extract Odin PC – Get it here
  2. Download and Install Samsung USB Drivers – Get here
  3. Download the Philz touch Advanced CWM for your device:

How to Install Philz Advanced Touch CWM on Samsung Galaxy Tab 3 8.0:

      1. Download the file for your variant carefully.
      2. Open Odin3.exe.
      3. Put your phone in download mode, to do so, turn it off completely. Now turn it on by pressing and holding Volume Down + Home Button + Power Key, you should see a warning now, press Volume Up to continue.
      4. In case the download mode method doesn’t work for your device, try one of the methods from this guide.
      5. Connect your phone to your PC.
      6. The ID:COM box in Odin should turn blue now, that means your phone is connected properly in download mode.
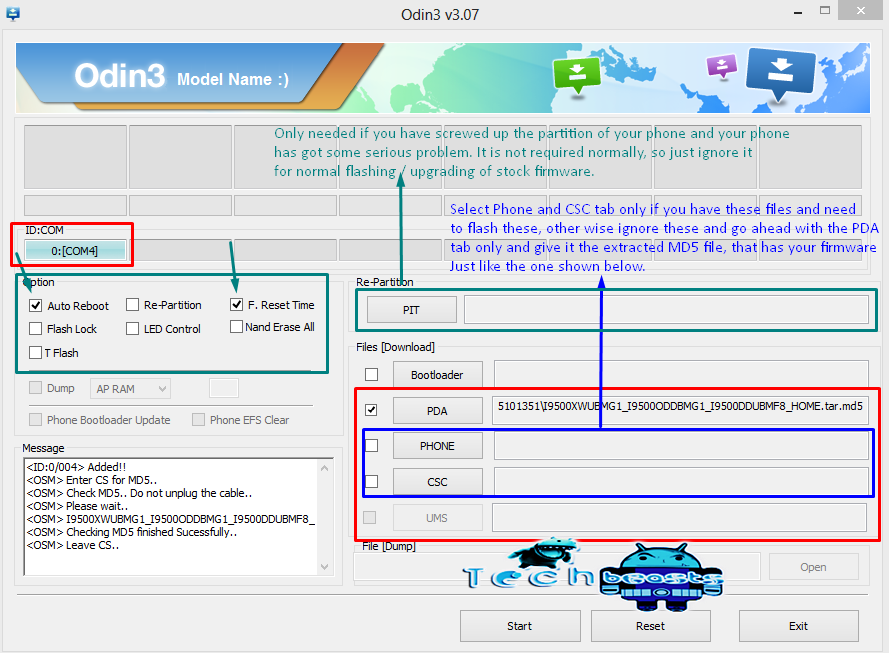
      7. Click the PDA tab in Odin and select the downloaded Recovery.tar.zip file and let it load. Your Odin should look exactly as shown below, make sure that no extra options are selected.
      8. odin_explained
      9. Hit start now and sit back, it will take a few seconds to flash the recovery and your device will reboot.
      10. Press and hold Volume Up + Home Button + Power Key to access the CWM Recovery  that you just installed.
      11. You can backup your current ROM and do a lot of other things using the options in CWM Recovery.
      12. That’s All.

That’s All! We hope that you found this guide of much help. In case you got any queries or face any difficulties regarding this guide, don’t hesitate to stop by the comment box below and leave us your message. We will try our best to help you out. Thanks All.

Credits: Phil3759

How to Root Samsung Galaxy Tab 3 7.0 SM-T210/T210R

55
How to Root Samsung Galaxy Tab 3 7.0 SM-T210/T210R

Samsung brought up it’s 3rd generation Galaxy Tab in May, 2013. The device sported a 7.0 inches display, under the hood a 1.2 GHz dual core processor is set alongside a RAM of 1 GBs. At the back it sports a 3.15 MP camera and a 1.3 MP on the front as well while a massive 4000 mAh battery is placed under the hood. Galaxy Tab 3 comes modeled under different variants having WiFi, 3G and 4G capabilities. Earlier we posted a tutorial for installing a custom recovery on the SM T210 and T210R variants (both are WiFi) of the device, but missed the method to root these devices, so in the following post we will be going through a method to root em’.

Some of you might be new to rooting and installing a custom recovery, so to make the things more clear, we will be having a look on a small intro to root and custom recovery and also the reason to get both the things on your device.GALAXY TAB 3 7.0 GOLD BROWN

Rooting your phone gives you complete access over all the data which is apparently locked by the manufacturers. This includes removal of the factory restrictions and making changes to the internal system and the operating system. Gaining the root access gives you the privileges to install various applications to enhance the performance of your device, allows you to remove the built-in applications/programs, helps you to upgrade the battery life of your device & install the apps which require the root access for the proper functionality and modify your device in so many other ways e.g using mods and custom roms. By installing custom recovery, you can flash custom roms in the phone easily. Custom recovery also let’s you backup your current rom and restore it in case of any mishap. There is a laundry list of things you can do after having your device rooted and installed the custom recovery, now once you’re rooted and have installed custom recovery, go ahead and enjoy it on your phone. Here’s our collection of 10 Best Root Apps.

Here are some instructions that you must follow in order to gain root access on your Galaxy Note Tab 3 7.0 SM-T210 or T210R

      1. This guide is only for Galaxy Tab 3 7.0 SM-T210/SM-T210R. Do not try this on any other device, please check your device’s model number in Settings > General > About Device.
      2. Your phone’s battery must be charged at least over 60%. This is highly recommended in order to prevent any power issues during the flashing process.
      3. ake sure that you backup your important media content, ContactsCall Logs & Messages. This is highly recommended just in case something goes wrong and you need to reset your phone.
      4. Alright! Go ahead and flash the custom firmware, follow this guide to the letter.

Disclaimer: The methods involved in flashing custom roms and rooting your phone is highly custom and may result in bricking your device, and has nothing to do with Google or the device manufacturer that is SAMSUNG in our case. Also rooting your device will void its warranty and you will be no longer eligible for any kind of free device services by the manufacturers/warranty providers. In case of any mishap we may not be held responsible. Follow these instructions to the letter to avoid any mishap or bricking. Make sure that whatever you do, you are doing it at your own responsibility.

How to Root Galaxy Tab 3 7.0:

      1. Your device must have a CWM Recovery or TWRP Recovery installed. Follow our full guide here to install it on your device.
      2. Download Android-armeabi.universial-root.zip file and place on the SD card of your Galaxy Tab.
      3. Boot into CWM Recovery  or TWRP Recovery now. To do so, turn off your device completely. Now turn it while pressing and holding Volume Up + Home Button + Power Key. In case this method doesn’t work for your device, try one of the methods explained in this guide.
      4. In CWM select “Install Zip>Chooe Zip from SD Card > Android-armeabi-universal-root.zip > Yes”.
      5. Wait for the flashing to complete.
      6. Reboot your Galaxy Tab.
      7. Find SuperSu in App Drawer.
      8. Phewwwww! You’re rooted now.

That’s All! We hope that you found this guide of much help. In case you got any queries or face any difficulties regarding this guide, don’t hesitate to stop by the comment box below and leave us your message. We will try our best to help you out. Thanks All.

Credits: gr8nole

Install CWM/TWRP Recovery on Samsung Galaxy Tab 3 7.0 SM-T210/210R

39
Install CWM/TWRP Recovery on Samsung Galaxy Tab 3 7.0 SM-T210/210R

We will be installing CWM Recovery v 6.0.4.9 or TWRP Recovery 2.8 on the Samsung Galaxy Tab 3 7.0 inches SM – T210 and SM – T210R also known as Samsung Galaxy Tab P3210 in the following post today. So, if you’re a Galaxy Tab 3 owner and you were looking for a custom recovery compatible with your device, you’re on the right location at the moment. Move a little forward with us and get it installed on your device.

Before we being install this recovery on Galaxy Tab 3, some of you may not be familiar with what is a custom recovery, that is CWM and TWRP in our case as some of you might be the first timer. So, to make it clear we will be first having a small overview of a custom recovery.

A custom recovery allows you to install custom roms, mods etc. Along with these, you can make a Nandroid backup, this helps you a lot as you can move back to the previous working state of your phone at any time you want if you have backed up your current system. In some cases, to root the phone you need to flash SuperSu.zip file in the custom recovery, having installed the recovery may help you while in some cases to install the recovery easily, you need to have the phone rooted. You can also wipe cache and dalvik cache of your phone using a custom recovery.

Here are some pre-requisites and some pre-cautions that you must follow before you head towards the installation guide:

      1. This guide is only for Galaxy Tab 3 7.0 SM-T210/210R. Do not try this on any other device, please check your device’s model number in Settings > General > About Device.
      2. Your phone’s battery must be charged at least over 60%. This is highly recommended in order to prevent any power issues during the flashing process.
      3. Make sure that you backup your important media content, Contacts, Call Logs & Messages. This is highly recommended just in case something goes wrong and you need to reset your phone.
      4. Use only on OEM data cable to connect your Galaxy Tab to your PC.
      5. Turn off your Anti-virus, Firewall and other security programs to avoid connection interruption.
      6. Use a stable connection/device. Your laptop must have enough battery charged to perform this method, in case you’re using a desktop PC make sure that you’re not on a risk of power loss during the flashing process.
      7. Follow this guide carefully. Do not go ahead if you don’t know what you’re going to do.

Disclaimer: The methods involved in flashing custom roms and rooting your phone is highly custom and may result in bricking your device, and has nothing to do with Google or the device manufacturer that is SAMSUNG in our case. Also rooting your device will void its warranty and you will be no longer eligible for any kind of free device services by the manufacturers/warranty providers. In case of any mishap we may not be held responsible. Follow these instructions to the letter to avoid any mishap or bricking. Make sure that whatever you do, you are doing it at your own responsibility.

Files you need to download / install:

  1. Download and extract Odin PC – Get it here
  2. Download and Install Samsung USB Drivers – Get here
  3. Download the CWM 6 or TWRP 2.8 Recovery for your device:

How to Install CWM 6 or TWRP 2.8 on Samsung Galaxy Tab:

      1. Download the file for your variant carefully.
      2. Open Odin3.exe.
      3. Put your phone in download mode, to do so, turn it off completely. Now turn it on by pressing and holding Volume Down + Home Button + Power Key, you should see a warning now, press Volume Up to continue.
      4. In case the download mode method doesn’t work for your device, try one of the methods from this guide.
      5. Connect your phone to your PC.
      6. The ID:COM box in Odin should turn blue now, that means your phone is connected properly in download mode.
      7. Click the PDA tab in Odin and select the downloaded Recovery.tar.zip file and let it load. Untick all options in Odin, just let the F.Reset Time be ticked. [Untick Auto-Reboot]
      8. Hit start now and sit back, it will take a few seconds to flash the recovery.
      9. Once the recovery flashing is finished and your device is still in download mode, unplug the cable and turn it off manually by keeping the power key pressed for a while.
      10. Now turn your device on by pressing and holding Volume Up + Home Button + Power Key to access the CWM Recovery or TWRP Recovery that you just installed.
      11. You can backup your current ROM and do a lot of other things using the options in CWM Recovery or TWRP Recovery.
      12. That’s All.

You may want to root your device now, have a look on:

That’s All! We hope that you found this guide of much help. In case you got any queries or face any difficulties regarding this guide, don’t hesitate to stop by the comment box below and leave us your message. We will try our best to help you out. Thanks All.

Credits: gr8nole

Chrome Browser v32.0.1700.99 Apk – Download Here.

0
Chrome Browser v32.0.1700.99 Apk – Download Here.

Chrome Browser from Google is the best browser for PC and there is no doubt about it. Google released the same browser for Android too and every update has resolved different issues in it and brought amazing performance along with better support. Browse even faster than any usual browser of Android. Sync your Computer Chrome Browser Experience by Signing in and enjoy it anywhere on the Go. Chrome Browser has received the update yesterday, and now you can add Page Shortcuts to your Home-Screen easily from the Menu. You can reduce Data Usage by going to Chrome’s Settings > Bandwidth Management > Reduce Data Usage. Search Faster using the updated New Tab Page and more security and Stability. You can download and install the Updated Chrome Browser Apk at the end of the Post.

Google_Chrome

But before we go any further, let’s look at the features of Chrome Browser:

  •  Search and navigate fast, directly from the same box. Choose from results that appear as you type.
  •  Browse faster with accelerated page loading, scrolling and zooming.
  • Simple, intuitive experience
  •  Open and quickly switch between an unlimited number of browser tabs. On your phone, flip through tabs the way you would fan a deck of cards. On your tablet, swipe from edge to edge to switch tabs.
  • Sign in to the Chrome web browser to sync your open tabs, bookmarks, and omnibox data from your computer to your phone or tablet. Pick up right where you left off.
  • Send pages from Chrome on your computer to Chrome on your phone or tablet with one click and read them on the go, even when you’re offline.
  • Browse privately in Incognito mode

All Read and Ready, let’s go to the next page and Download and Install Chrome Browser Apk.

Pages: Page 1 | Page 2

How to Deknox Samsung Galaxy S3, S4, Note 2 & Note 3

72
How to Deknox Samsung Galaxy S3, S4, Note 2 & Note 3

Samsung’s new security solution Samsung Knox is an awesome thing only if seen from the point of view of it’s convenience but a real pain in vein if seen from a point of view of freedom. Samsung implemented Knox in Android 4.3 Jelly Bean and first time sent it along with the Galaxy Note 3, and later on the devices that received Android 4.3 Jelly Bean update, those devices faced the Knox security solution as well.

Basically Samsung Knox allows the users to create a new profile within the phone, just like we create different users on Windows. This profile is highly secure and private, and can be accessed by applying the password that you set. Knox has a separate store as well that allows the users to install Knox compatible apps. Moreover, Knox keeps a check on the phone and makes the security of the device as strict as possible. This results in blocking root apps and other unverified apps. Samsung has implemented Knox warranty void on the bootloaders of the devices that got Android 4.3 Jelly Bean update.

Deknox Samsung

Earlier, it was possible for the developers to find a way to reset the warranty of the phone and erase the binary count from the bootloader, this allowed  the people to unleash the true power of their Galaxy devices and mod em’ to the maximum possible extent as they were always able to gain the warranty back after voiding it by pushing in custom roms or simply by rooting the device. As Samsung Knox made it’s way, it closed all the doors for the developers and then the users as well. Once void and tripped Knox counter it can never be reset and will result in voiding the warranty of your device.

Not only that, there is another big issue. Knox does not let root apps to breathe in your device and keeps on giving errors like force close or app not verified etc. What’s sure is there is no solution to Knox warranty void that appears on the device’s bootloader, but there is a solution for Knox’s root apps permissions. So if you are looking to root your device, you will also have to freeze / disable Samsung Knox apps in order to get the root apps working, otherwise simply rooting will be useless.  So in the following post we are going to have a look on a method that will help you to disable and freeze all Samsung Knox apps and components and make your phone’s life easy with having the root access. Thanks to our friend Dr Ketan for making this great tool and providing us a way to get rid of Samsung Knox.
Samsung-knox-logo

How to disable Samsung Knox:

You’ll need a TWRP or CWM Recovery installed on your device as this process involves running a tool from recovery. So in order to install a TWRP recovery, follow our guides:

Once installed TWRP Proceed here:

  • Now download Dr Ketan’s Multitool Mod v6 and copy it to the internal or external storage of your device.
  • Now boot into TWRP Recovery. To do so, turn off your device completely first. Now turn it on by pressing and holding Volume Up + Home Button + Power Key. You should see the TWRP interface now.
  • Tap Install > Select the Dr Ketan Multitool v6.zip file from the place where you placed it > Swipe to confirm flash.
  • Multi Tool will start now.
  • Hit the Next button at the bottom > Agree with the terms of use > Press Next 4 times> Proceed with MultiTool.
  • Now MultiTool will start showing you the things it can do for you.
    • In Root > Select Do Not Change > Next.
    • Here’s the thing we want actually. You’re in Deknox now.
    • In Deknox press > Deknox Device > Next.
          • Recovery > Do Not Change > Next.
          • Backup Utility > Skip Backup Utility >  Next.
          • Restore Utility > Skip Restore Utility > Next.
          • Odex Remover > Skip > Next.
          • Bloatware Remove > Skip > Next.
          • CSC Features > Skip > Next.
          • Build Prop Features > Skip > Next.
          • LockScreen > Do Not Change > Next.
          • System Push > Do Not Change > Next.
          • GPS Fix > Do Not Change Next.
      • Read to Install / Flash > Run Now.
      • Multitool Mod will run and Deknox your device in a few seconds > Reboot your device > Finish!

Phewwww! That’s All! Knox apps have vanished from your device, you can root your device and enjoy knox free phone with freedom.

In case you got any queries or you face any difficulties regarding this post, feel free to stop by the comment box below and leave us your message. We will get back to you as soon as possible. Thanks All!

Root Verizon Droid Razr M, Razr HD and Max HD On Android 4.1.2 Jelly Bean.

0
Root Verizon Droid Razr M, Razr HD and Max HD On Android 4.1.2 Jelly Bean.

It has been a long time since, Motorola has released the Long-Awaited Android 4.1.2 Jelly Bean for the range of Smartphone including Verizon Droid Razr M, Razr HD and Max HD. The Update brings know changes to the device and left you with a non-rooted device. If you have been spending time with a Rooted phone there is no way you can live without one. Sometimes, developers released the Rooting methods soon after the Update arrives, but sometimes it take a lot more time than usual. In case of Motorola, the rooting methods are already pretty rare to find. However, the scene has been changed for Verizon Droid Razr M, Razr HD and Max HD.

verizon-droid-razr-m-550

If you own on of the following devices and received the latest OTA update, you can root your device using k1mu’s Saferoot tool.

  • Verizon Droid RAZR M XT907 [Firmware version: 98.18.94 or 98.30.1]
  • Verizon Droid RAZR HD XT926 [Firmware version: 9.30.1]
  • Verizon Droid RAZR MAXX HD XT926M  [Firmware version: 9.18.94]

In this Article, we will show you How To Root Verizon Droid Razr M, Razr HD and Max HD On Android 4.1.2 Jelly Bean.But before we begin, Make sure that:

  1. Back-Up all your important ContactsCall Logs & Messages.It is highly recommended in case of any mishap or data loss to back up all your important data.
  2. Check your device model, Go To Setting > About and Make sure that it is Droid RAZR M/ RAZR HD/ RAZR MAXX HD.

Disclaimer: 

The methods involved in flashing custom roms and rooting your phone is highly custom and may result in bricking your device,and has nothing to do with Google or the device manufacturers which is Motorola in our case. In case of any mishap we may not be held responsible. Follow these instructions to the letter to avoid any mishap or bricking. Make sure that whatever you do, you are doing it at your own responsibility.

Warning:

Rooting an Android device Voids Manufacturers Warranty, the Saferoot tool method for Droid Razr M, Razr HD and Max HD is tested and Found Working. If you don’t follow the Procedure as we instructed, You only are responsible for your device. We won’t be liable if any damage occurs to your device and/or its components.

All read and ready to Root your Verizon Droid Razr M, Razr HD and Max HD.

Pages: Page 1 | Page 2

Swipe Lock Screen Launcher, Quickly Access Recent Apps.

0
Swipe Lock Screen Launcher, Quickly Access Recent Apps.

Fast access to one’s favorite apps is a must thing in modern Operating Systems, whether they are embedded or not. Modern man has become busy and demanding more luxury, thus making us Lazy but giving us things easy and quick. Though one cannot access all things around him easy and fast, but at least we fulfill that wish through our Mobile Phones. Using lots of apps is a good things as you get to know about apps as well as you can pass your time better. But it is not possible to try all the apps to pick one, instead you have to choose one that is best for you.

Screenshot_2014-01-17-21-12-04


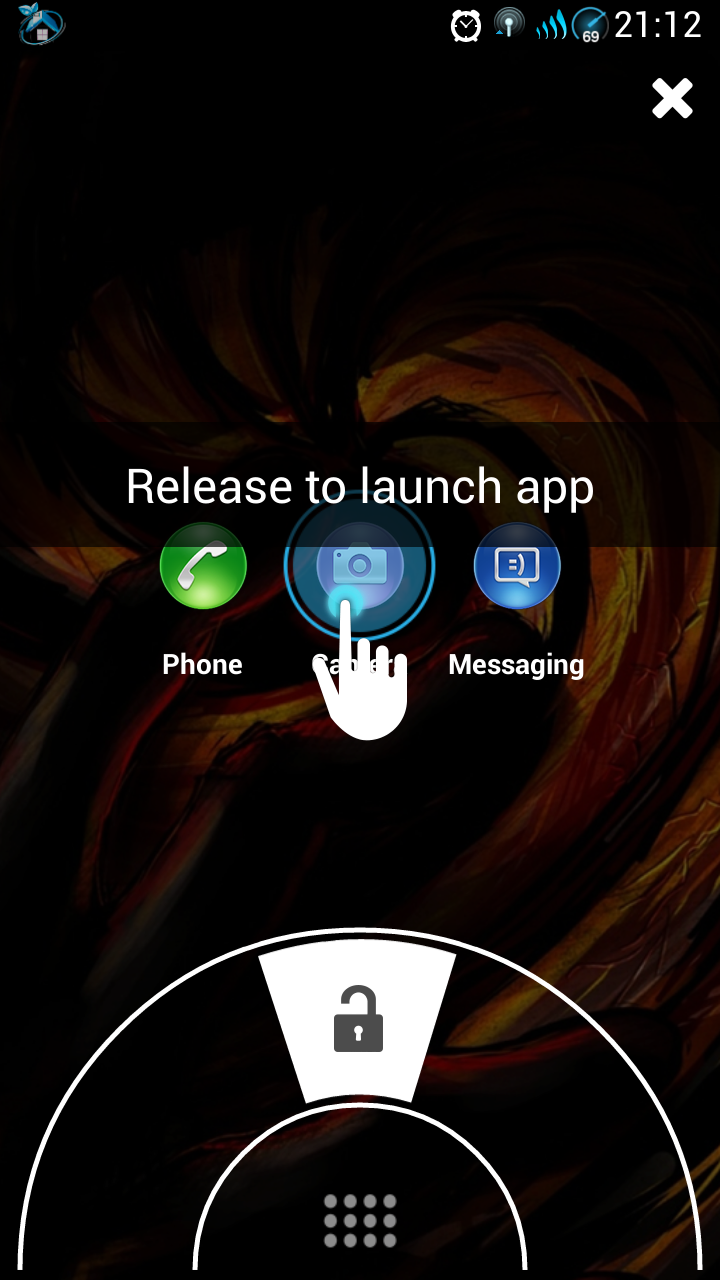
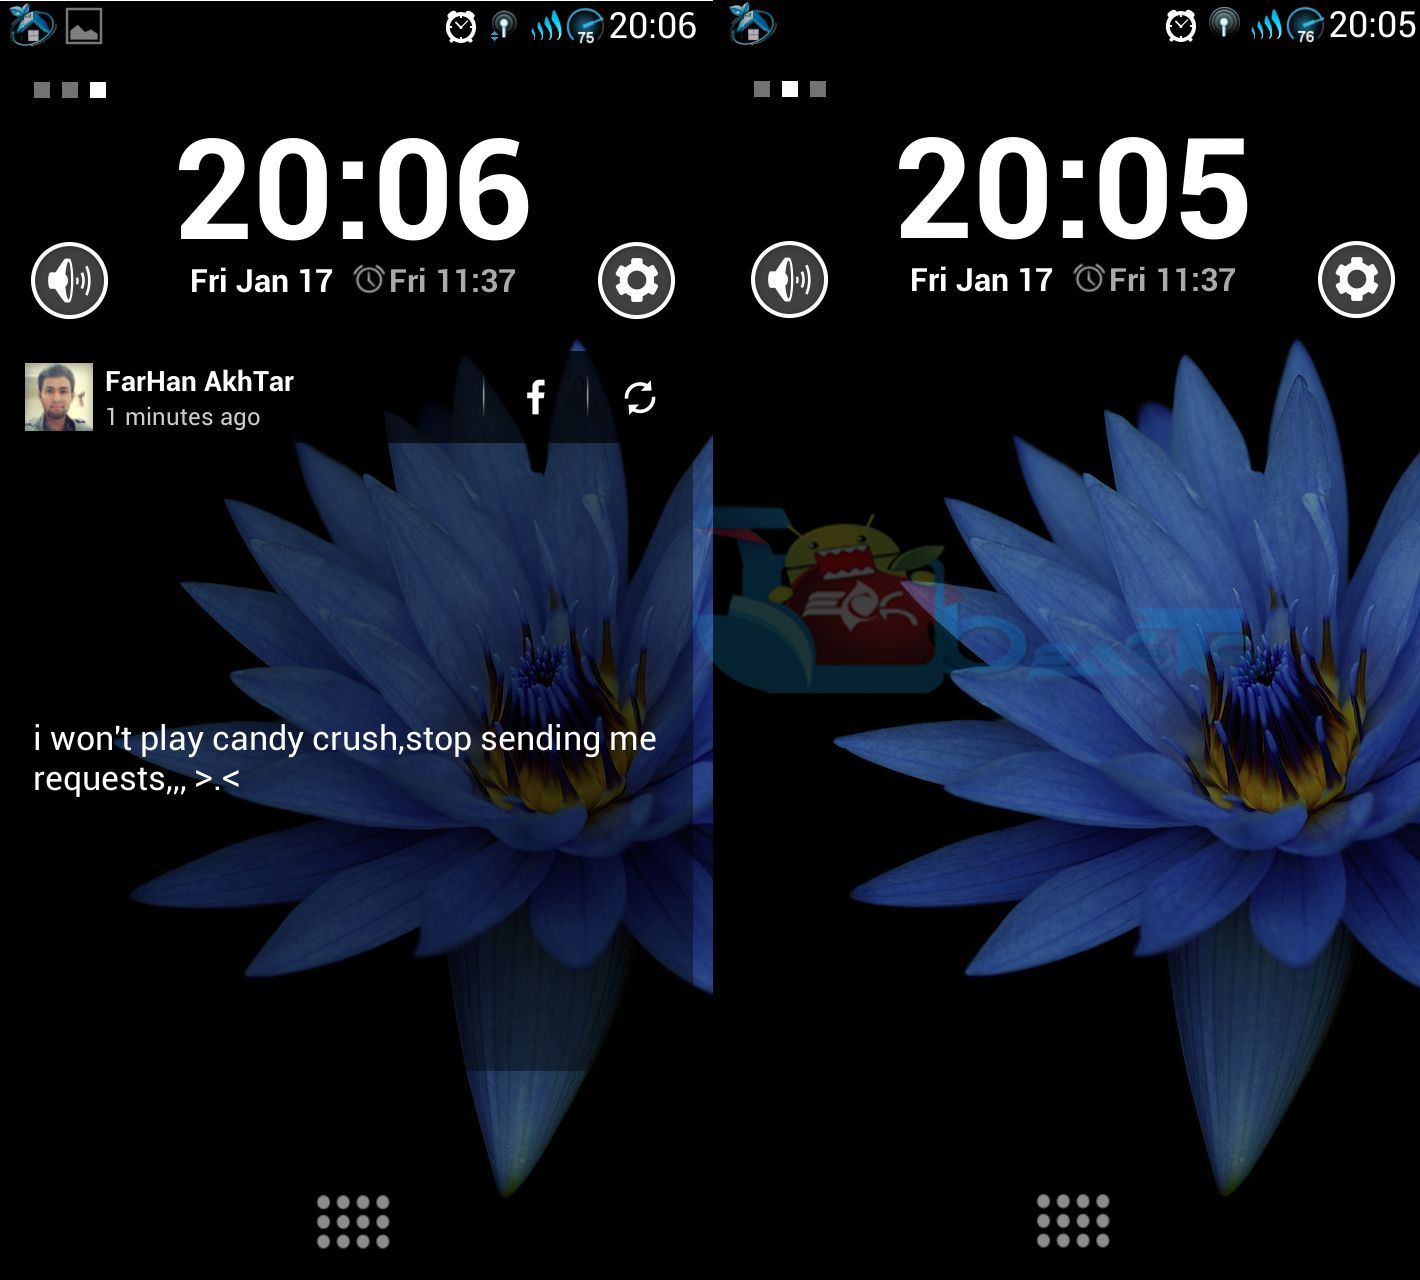
Mobile Lock Screen is the most viewed screen in whole day, most people only want to see time as they unveil the lock-screen, while others want to see some notification as they view the lock-screen. If you have a Multi-Functional lock-screen, your mobile experience will become more rich that usual. Still haven’t find such application, well you will get it today. Swipe Lock Screen Launcher, let’s you switch between applications from the Lock-Screen, thus bringing multi-tasking to another level. Untitled 3 The app has been categorize in four parts, When you swipe your finger from the Center Trigger to the lock icon, you will be promoted to choose between 4 recent apps. If you swipe from right to left, you will see a screen asking you to add Facebook here. While from Left to Right, you can add a widget here. Pressing the Center Trigger will let you choose between Five options. Messages, Calls, Search, Camera and Lock. Whatever you choose, there will be a pop-up first asking you to select from 4 previous activities. But you can still ignore them and go ahead. Untitled 2 In the Settings, you will have usual things, like Wallpaper Change, Widget adding option, Enable Lock Screen, Vibration Feedback etc. Swipe Lock Screen Launcher might not offer all the things that you need, but still it offers much, upcoming updates might make it even better. It is super fast and with different choices to choose from. It is the best Lock-Screen available yet. Screenshot_2014-01-17-20-04-51

Download Swipe Lock Screen Launcher

What is Android CPU Underclocking/Overclocking and How to Attain it

0
What is Android CPU Underclocking/Overclocking and How to Attain it

Android is all about development and that’s the only reason a big number of users and developers turning towards Android every day. The open source advantages of Android allow the developers to tweak the Android-powered devices to the maximum possible extent that changes the whole map of an Android device.

One of the biggest developments and biggest tweaks is Underclocking and Overclocking the CPU of an Android device that developers have gained with the help of different applications/mods. You may have heard of these terms but not much familiar with both these, we talk about these sometimes when we have a concern with the battery of our Android device and reducing the use of CPU.

Android CPU Underclocking/Overclocking

So, to make it more clear to you, I’ll be explaining these terms and also how to underclock and overclock your Android device in the following post.

Understanding Clockspeed / ClockingAndroid-CPU-UnderClock-OverClock

All the Android devices are powered by a CPU, these CPUs are provided by various companies like Qualcomm, Samsung’s Exynos, Nvidia’s Tegra etc. You must have seen the devices having a specific amount of GHz’s or MHz’s. These GHz’s / MHz’s are the clock speed of your device’s CPU. It also depends on how many cores your devices has, whether it’s a single core, dual core, quad core or octa core device.

Understanding Underclocking

To understand CPU Underclocking, let’s say a device comes with a processor having 800 MHz processing speed and you want to underclock it, you will reduce its speed to 600 MHz or 500 MHz. That probably gives you an idea about underclocking, basically, it refers to slowing down or restricting the speed of your device’s CPU to a lower number.

Underclocking is greatly effective as the battery life of your Android device is directly linked with the user of your device’s CPU, so in case you are not an Android freak and you don’t disturb your device much with gaming and other such processes, you can underclock your Android device to improve its battery life.

Advantages of Underclocking

Underclocking can greatly affect your device’s battery life. As mentioned, underclocking is only helpful if you’re not a game freak and don’t use your device that much. In that scenario, you should probably underclock your device and restrict its CPU to a suitable low speed.

Disadvantages of Underclocking

Underclocking your device to the minimum lowest speed can result in sending the device to sleep mode. In that case, you’ll have to pull the battery and put it back and then turn it on. So always restrict it to a suitable speed.

Is Underclocking Safe?

Yes, it is safe. But still, we highly recommend you to underclock your Android device at your own risk.

Understanding Overclocking

The name is self-explanatory. In Underclocking we basically restrict the speed of CPU but Overclocking is completely opposite to Underclocking. We can enhance the clock speed of some Android devices from the stock clock speed. For example, a device has 800 MHz clock speed then CPU Overclocking will be to increase this speed from 800 MHz to 1 GHz. It is also known as increasing the frequency of your device’s CPU.

Advantages of Overclocking

As the purpose of a CPU is to perform tasks on your Android device, higher is the CPU, faster it will perform the tasks and less will be the chances of lag. Overclocking is mostly useful on old devices having less CPU clock speed. If you wish to play 3D/HD games or you want to run the games/apps lag free you may Overclock your device’s CPU and it will work like a new device with higher clock speed.

Disadvantages of Overclocking

Overclocking your Android device will directly affect the battery life and will result in battery drainage. More burden you put on your CPU more battery it will consume. This can be tested only upon Overclocking an Android device that how much its battery it eats, in case your device is not able to hand Overclocking it is recommended to plug in a wall charger when you open an app that wakes up the CPU.

Is Overclocking Safe

Well, it’s safe. Unlike the CPU’s of computers, Android devices have safer  CPUs. The maximum danger it will cause the device is, it will result in rebooting it not in resulting in a hard brick or something like that. The maximum possible speed that you can gain on your Android device’s CPU will be mentioned in the app/mod that you use to Overclock it. Also, Overclocking doesn’t mean that your device will always use the Overclocked CPU. Overclocked speed will be only used when you run any app/game that requires it.

Android GPU Underclocking

GPU is responsible for displaying each and everything on your Android device. All the graphics/effects are drawn by the GPU of your Android device. Underclocking the GPU can be greatly effective as well as lowering down and restricting its frequency will lessen the use of your device’s Battery and give you more Battery backup.

How to Underclock / Overclock CPU on Android

Requirements
    • Your device must be rooted and running a supported kernel that allows underclocking and overclocking. Check out our Root Section to root your device.
    • Your device must have a kernel that supports CPU Underclocking / Overclocking. A little search may help you in this case.
    • Backup each and everything before you proceed. So that just in case something goes wrong, you can still have all of your important data.

Warning: The process involved in Underclocking or Overclocking your device’s CPU or GPU are always custom and the cellphone manufacturers or Google is not responsible for these processes. Make sure that what you’re doing, you consider yourself responsible for that and you’re doing it at your own risk. In case of any mishap / damage we may not be held responsible. It is highly recommended not to proceed if you don’t have any idea about such custom process.

How to do it:

      • Download and Install Trickster Mod from Google Play.
      • Open the App and grant SuperSu permissions.
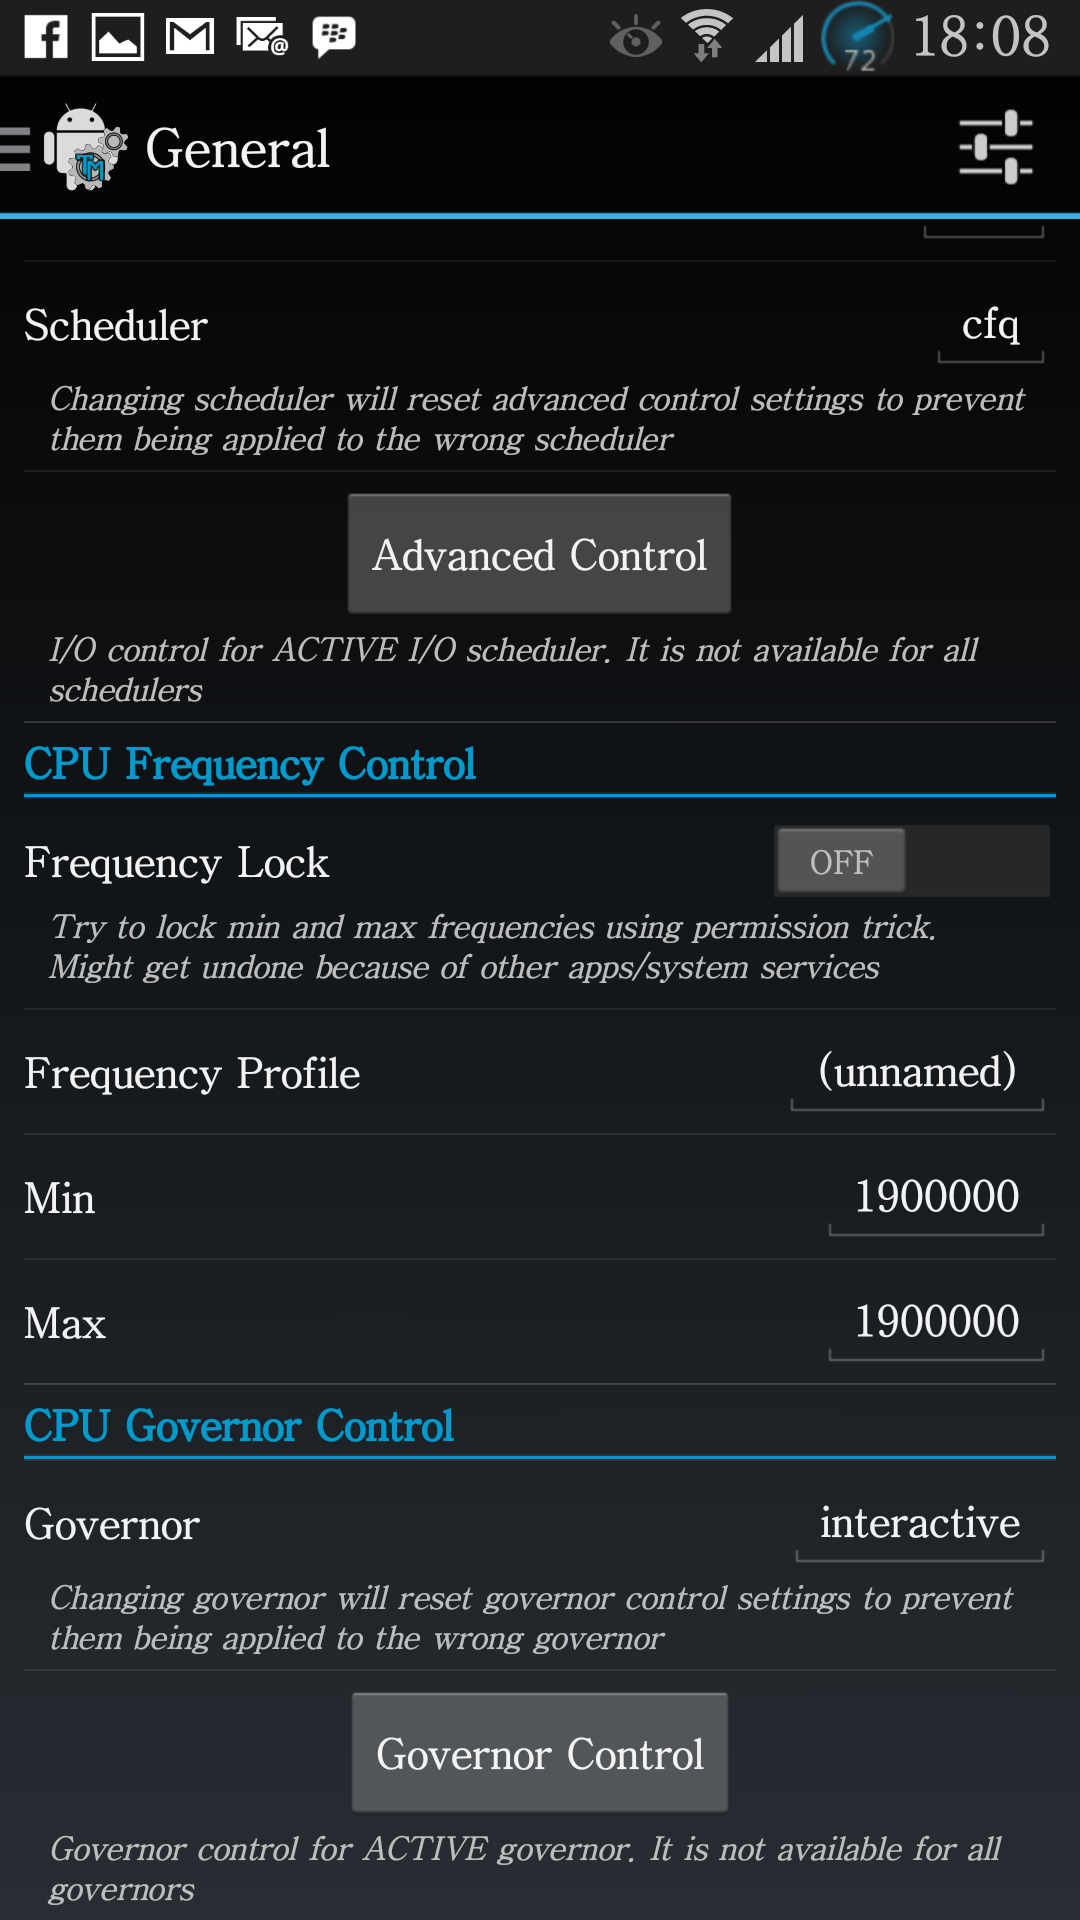
      • Tap info > General.
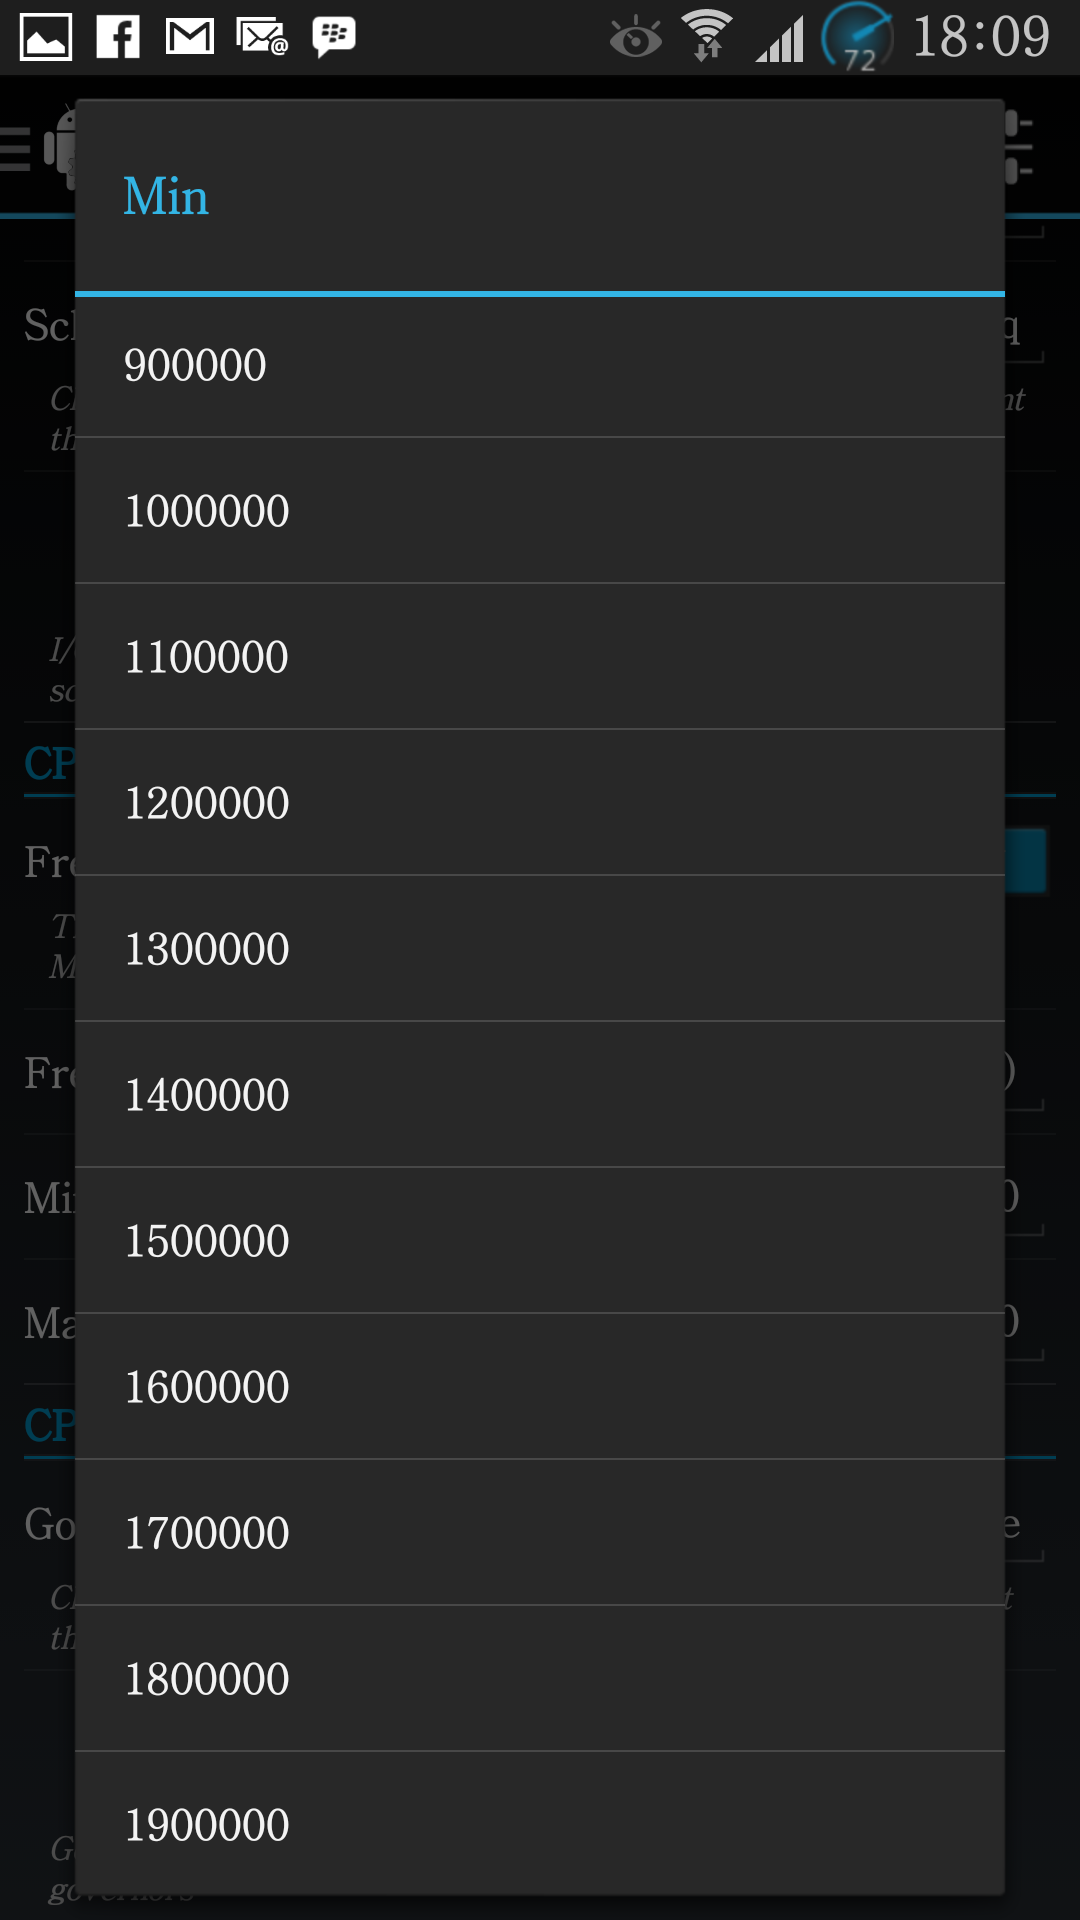
      • Now under CPU Frequency Control > Enter the Minimum clock speed you want to use.
      • Similarly, enter the Maximum clock speed you want your device to use.
      • Tap Gover on the bottom and select on-demand.
      • Save settings!
      • CPU Over-Under Clock_Techbeasts (1)CPU Over-Under Clock_Techbeasts (2) CPU Over-Under Clock_Techbeasts (3)CPU Over-Under Clock_Techbeasts (4)

Similarly, you can overclock your device by setting these speeds to a higher number available in the list.

To unlock more features and enhance your device more, you’ll have to purchase Trickster Mod’s donate key, or purchase Set CPU from the Play Store.

Also check out:


Root Samsung Galaxy Note 10.1 2014 Wi-FiP600 With CF-Auto Root[Guide]

0
Root Samsung Galaxy Note 10.1 2014 Wi-FiP600 With CF-Auto Root[Guide]

This time it’s Galaxy Note 10.1 2014 Wi-Fi P600 turn to be rooted with CF-Auto root Tool. There is no need to introduce CF-Auto Root Tool and its working. We will directly take you to the Tutorial of rooting Galaxy Note 10.1 WI-FI using CF-Auto Root after a good time break. In the break you will learn the Requirements to root your device and other Important things. Meanwhile, learn what are the benefits of Rooting.Rooting allows you to get full control over your device, Stock apps and mods are good, but installing Custom Mods gives you better support and great battery life, you might need to delete some Stock apps from the device, a non-rooted device can’t do that, but a rooted one has the power to remove stock apps too.

Screenshot_6

If you are familiar with Odin and it’s working, then this tutorial might not be difficult for you. Otherwise read the whole tutorial first before trying it on your device. In this Article, we will show you How To Root Samsung Galaxy Note 10.1 2014 3G P601.But before we begin, Make sure that:

  1. That you have a Well Charged Battery, 60%-80% is better.
  2. Back-Up all your important ContactsCall Logs & Messages.It is highly recommended in case of any mishap or data loss to back up all your important data.
  3. Back-Up your Mobiles EFS DataHow To Restore and Back-Up EFS Data On Samsung Galaxy Devices.
  4. Check your device model, Go To Setting > About and Make sure that it is SM-P600.
  5. Do-not try it on SM-P601 or SM-P605.

Disclaimer: 

The methods involved in flashing custom roms and rooting your phone is highly custom and may result in bricking your device,and has nothing to do with Google or the device manufacturers which is Samsung in our case. In case of any mishap we may not be held responsible. Follow these instructions to the letter to avoid any mishap or bricking. Make sure that whatever you do, you are doing it at your own responsibility.

Warning:

Rooting an Android device Voids Manufacturers Warranty, the CF-Auto Root method for Galaxy Note 10.1 is tested and Found Working. If you don’t follow the Procedure as we instructed, You only are responsible for your device. We won’t be liable if any damage occurs to your device and/or its components.

All done and good, let’s head towards the Next page to See, How you can Root Samsung Galaxy Note 10.1 2014 WiFi P600.

Pages: Page 1 | Page 2

How to Save Battery Life on Android

0
How to Save Battery Life on Android

The fastest growing operating system Android comes with a lot of features that you can enjoy. As off now, there is a huge number of devices running on Android. Almost all the smartphone manufacturers are turning towards Android one by one and almost everyone owns a device running on Android today whether it’s Android Cupcake or on Android KitKat.

You may wonder sometimes about your Android device’s battery discharging and sometimes it may disappoint a lot of users. The process running on Android surely eat a lot of battery and it becomes a hitch sometimes. However, you can still enhance the battery life and performance of your Android device but making some changes here and there. While you are unable to do so, we’ve compiled up a number of solutions that will take you to a better battery life of your Android device. Keep patience for a while and move forward with us in this comprehensive guide.Android-Battery

Saving the Battery Life of your Android Smartphone / Tablet / Note:

First of all you need to check in Settings > Battery about what’s eating the battery at most. You’ll probably find “Screen” at top, so we’ll begin optimizing the Display settings for your Android device.

Display:

Brightness:

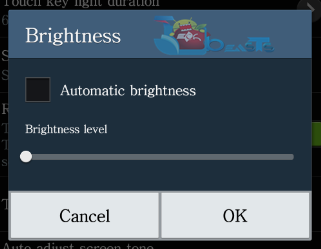
Always use as low brightness as you can. This is highly recommended as high brightness produces more light out of your phone’s screen and stresses the battery and results in battery drain.        Screen

Solution:  To adjust the brightness on your phone, follow these steps:

    • Tap Settings.
    • In Settings tap Display.
    • In Display tab Brightness.
    • Now in Brightness > Untick -Automatic Brightness / Auto Adjust and set the lowest brightness. Auto Brightness
Screen Time-out:

Always use minimum screen time-out. Sometimes when you’re done using your Android device, the screen remains on for a duration of 30 seconds or more. You can set this time-out to the minimum available time and unstress your device’s battery.

Solution:  To adjust the Screen Time-Out goto Settings > Display > Screen Time-out > Set it to to the lowest available option.Screen Timeout

Auto-rotate Screen:

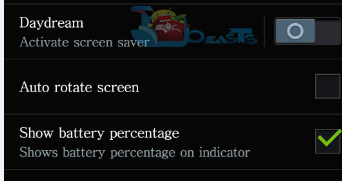
Auto-rotate uses the G-Sensor of your Android device to determine in what direction you’re holding your Android smartphone and helps you to view your screen in that direction. Use of G-Sensor is also linked with the battery life of your device, so always turn off Aut-rotate screen and turn it only when you need it.

Solution: To turn off Auto Rotate goto Settings > Display > Untick Auto Rotate.Auto Rotate
Wallpaper:Wallpaper

Always use a static wallpaper. That means you got to avoid Live wallpapers on your Android smartphone. Live wallpapers include screen animations, graphics are high. These animations and graphics probably use CPU and GPU of your device as well and the processing results in more battery usage.

Solution:  To set a static wallpaper, goto Setting > Display > Wallpaper > Pick a Static wallpaper and ignore Live wallpapers.Wallpaper2

Framework Animations: 

Disabling Framework Animations is another way to increase the battery life and also improve the speed of your Android device. These animations work when you open an app, switch between apps or you go back to the home page or press the home key to come back to your device’s home. These animations definitely eat battery while processing.

Solution:  To turn off these animations goto Settings > Developer Options > Scroll down to Drawing Section and turn off following three:

      • Window Animation Scale
      • Transition Animation Scale
      • Animator Duration Scale

Set all these three to “Animation Off”.

In case your device is running on Android 4.2.2 and you can’t find Developer Options in Settings then goto Settings > About Device > Tap build number for 7 times and you will get Developer Options activated in Settings. You can proceed once activated.Animations

Widgets:

Try to ignore the use of Widgets on your phone’s screen. Widgets keep updating em’ regularly, whether you’re using a Weather update widget, or a Social Feeds widget or any other. These widgets can use the CPU at any time and start a process on your phone that directly affects the battery life of your device.

Use light themes on LCD displays:

Always use light/brighter themes on the devices having LCD displays. This is effective when you want to keep your phone’s brightness as low as possible and you still want to keep everything visible, a brighter theme maybe a lot helpful while keeping the device’s brightness at the lowest level.


Use Dark Themes / Graphics / Effects on AMOLED & Super AMOLED Screens:

Using lighter themes on AMOLED and Super AMOLED screens consumes more power and results in more battery usage. Using dark themes / dark graphics on AMOLED or Super AMOLED powered devices will effect the battery. Basically using dark themes on these screens uses less pixels and doesn’t put much burden on the system, so keeping everything as dark as possible will be a life savior for your phone’s battery.


Optimizing the System:

Turn of Auto – Sync:

Auto-Sync consumes your smartphone’s battery to the worst extent. Basically this feature keeps on checking all your synced accounts with your cloud storage or with your gmail / email and other such services and displays / updates the missing data. Disabling Auto-Sync may save your battery a life.

Solution:  To disable Auto-Sync goto Settings > Accounts > Google > Untick All ticked Sync options.

Similarly unsync the options for other accounts that are not in use.Auto Sync

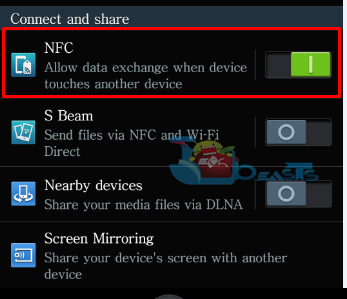
Turn of NFC & Bluetooth:

Keeping NFC and Bluetooth and other such wireless connectivity options is a lot helpful as well. NFC uses your phone’s screen and results in consuming the battery, similarly Bluetooth stresses the system as well and eats a lot of battery.

Solution:  Goto Settings > Connect & Share or Connectivity > Disable Bluetooth & NFC.

It is always wiser to enable these options only for a while when you actually need em’.NFC
Turn of Mobile Data:

Believe me or not, Mobile Data eats more battery then the WiFi. You may use Mobile data only when it’s needed otherwise it will definitely result in battery drain.

Solution:  To disable Mobile Data, goto Settings > Network Connections > Mobile Networks > Disable Mobile Data.Mobile Data

Use Airplane Mode When Possible:

Always turn on Airplane mode when it’s possible and when you don’t need your Network. Enabling Airplane mode stop the Modem / Radio of the phone from working and gives rest to your smartphone and results in more battery life.

Solution: To turn on Airplane Mode goto Settings > Airplane Mode > Check it.AirPlane

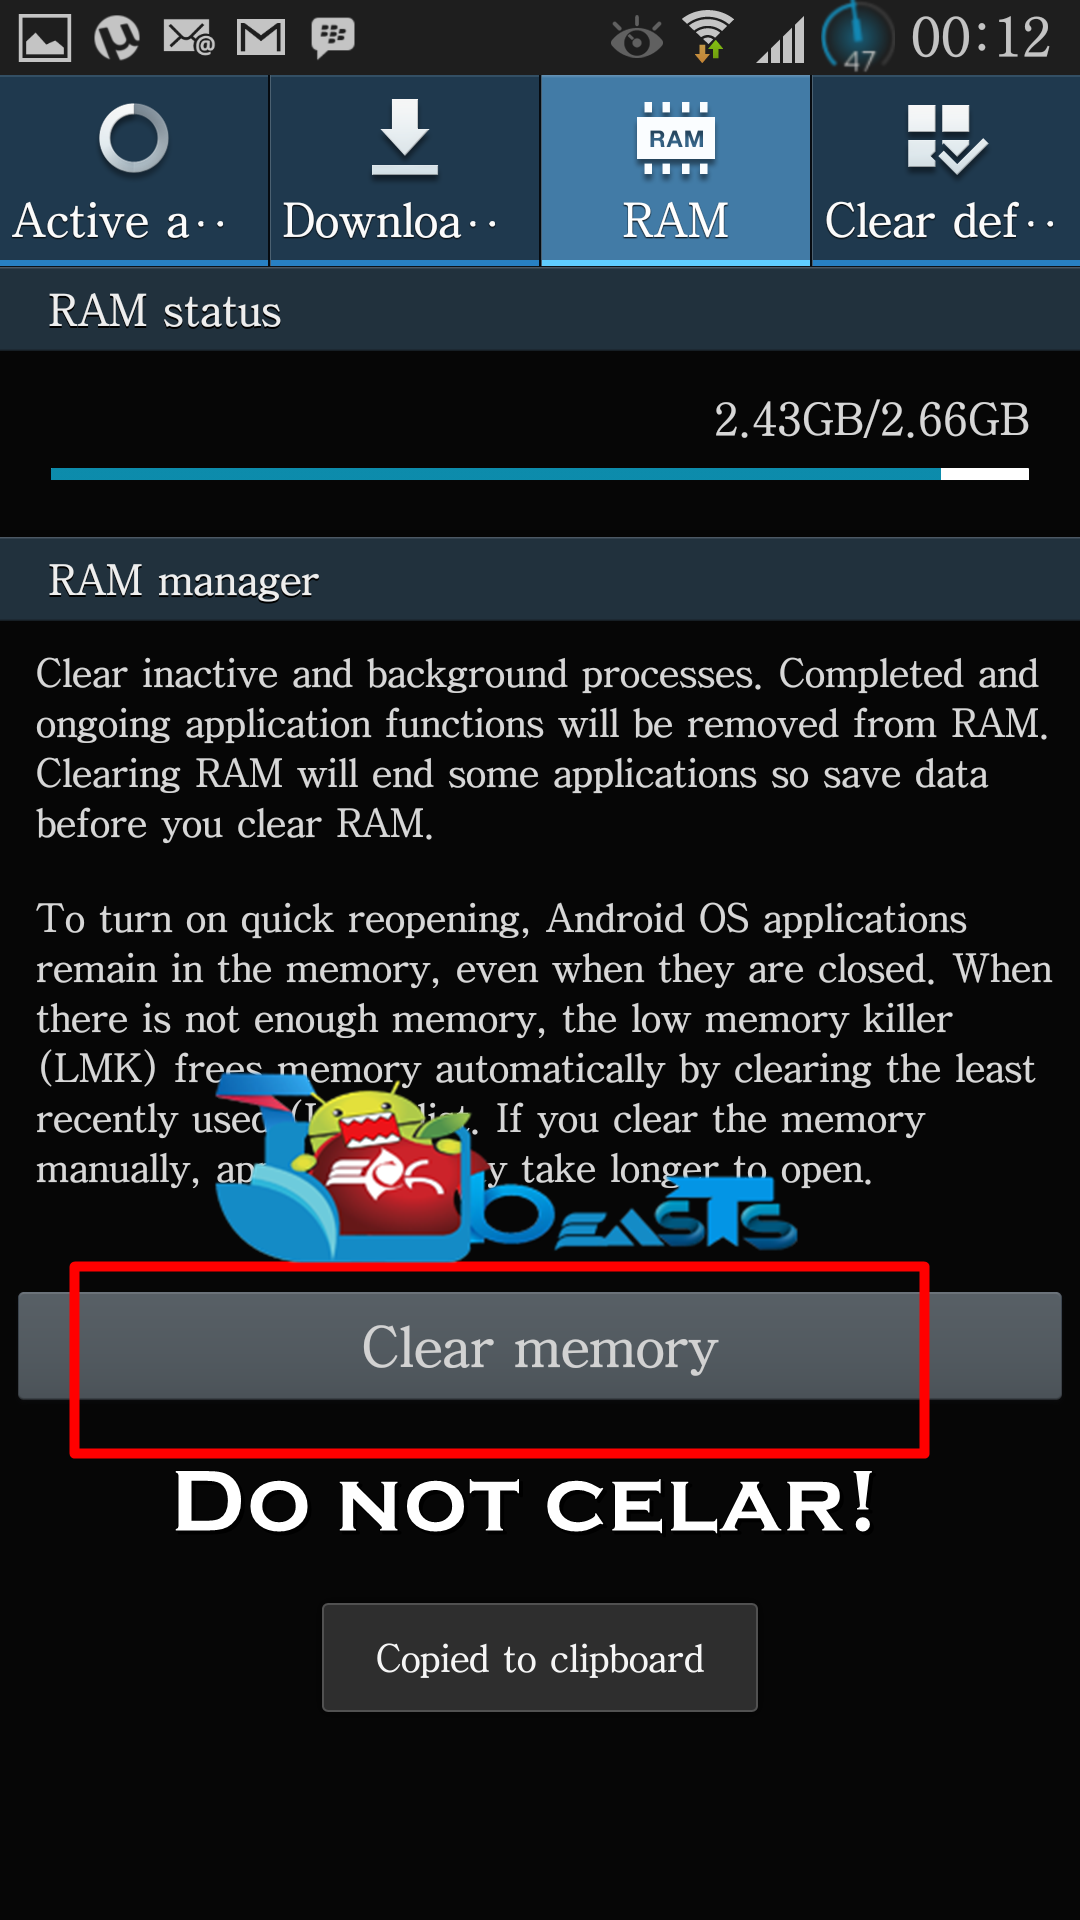
Stop Clearing Your Device’s RAM:

Sounds weird, but that’s right. Most of the Android smartphones do not know about this fact and they keep on opening the task manager on their Android device and clear it’s RAM again and again. This is basically known among the users as clearing the device’s RAM always wipes the applications running at background and leaves a positive effect on the device’s battery, while this assumption is totally wrong.

RAM (1) RAM (2)

Android device’s RAM uses the same amount of battery whether it’s full or empty, so clearing it again and again won’t help your device’s batter at all. Basically what happens is, when you close an application or clear your device’s RAM and open that application again, the app opens up from scratches, starts it’s necessary process and uses the CPU. Use of CPU = Use of Battery, so if you leave it opened and use Home Button to turn back to your phone’s home screen or come out of that application, then accessing it from recent applications will be surely helpful as it won’t load from scratch and won’t start all process once again.

Charge Your Device’s Properly:

Charge your Android device properly and carefully always. Do not wait for the battery to drain to 0%. Always plug the charger in as soon as your device falls to 50%. This will help the battery life cycles, and help the battery to remain efficient.

Always Use Correct Charger:

Always use the correct charger to charge your Android device. Do not use a charger with invalid voltages, or invalid power to charge your device. You may use a slow charger for this purpose when you’ve time, specially when you’re sleeping. Using a slow charger keeps the battery calm. While use of fast charger is only efficient when you’re in a hurry.

It is always preferred to use the Stock Charger of your Android device.

Use ART in Android 4.4:

ART stands for Android Runtime that is replacement for Dalvik Runtime in Android 4.4 KitKat. Quite similar to Dalvik, it basically helps the phone to handle apps.

Use of ART pre-compiles the apps, so that whenever you open an app you don’t disturb the CPU of your phone that much.  As mentioned, less use of CPU always results in less use of Battery.

Solution: To use ART goto Settings > Developer Options > Select Runtime > Use ART > Reboot.

Rooted Users:

If you’ve rooted your Android smartphone, the root access may be of a lot worth when it comes to saving the battery life of your device. You can undervolt and underclock your device’s CPU and make it use as less battery as possible. Following links may help you:

Also checkout:

Thanks to XDA Recognized Contributor Riro Zizo for his great work.

That’s All! We hope that you found this guide helpful. In case you got any queries or confused about something, feel free to stop by the comment box below and drop us your query. We will try our best to help you out. Thanks All.

Root Samsung Galaxy Note 10.1 2014 3G P601 With CF-Auto Root[Guide].

0
Root Samsung Galaxy Note 10.1 2014 3G P601 With CF-Auto Root[Guide].

Here is another CF-Auto Root tool tutorial, In our Previous Post we discussed why CF-Auto Root is better than any other Rooting. So, we are not going to discuss it again, let’s get straight to the point. CF-Auto Root Tool for Samsung Galaxy Note 10.1 2014 3G P601 is available, thanks to Chainfire, we will show you how to use this tool to root your device. Follow the rest of the post and find out how. Rooting allows you to get full control over your device, Stock apps and mods are good, but installing Custom Mods gives you better support and great battery life, you might need to delete some Stock apps from the device, a non-rooted device can’t do that, but a rooted one has the power to remove stock apps too.

Screenshot_3

If you are familiar with Odin and it’s working, then this tutorial might not be difficult for you. Otherwise read the whole tutorial first before trying it on your device. In this Article, we will show you How To Root Samsung Galaxy Note 10.1 2014 3G P601.But before we begin, Make sure that:

  1. That you have a Well Charged Battery, 60%-80% is better.
  2. Back-Up all your important ContactsCall Logs & Messages.It is highly recommended in case of any mishap or data loss to back up all your important data.
  3. Back-Up your Mobiles EFS DataHow To Restore and Back-Up EFS Data On Samsung Galaxy Devices.
  4. Check your device model, Go To Setting > About and Make sure that it is SM-P601.
  5. Do-not try it on SM-P600 or SM-P605.

Disclaimer: 

The methods involved in flashing custom roms and rooting your phone is highly custom and may result in bricking your device,and has nothing to do with Google or the device manufacturers which is Samsung in our case. In case of any mishap we may not be held responsible. Follow these instructions to the letter to avoid any mishap or bricking. Make sure that whatever you do, you are doing it at your own responsibility.

Warning:

Rooting an Android device Voids Manufacturers Warranty, the CF-Auto Root method for Galaxy Note 10.1 is tested and Found Working. If you don’t follow the Procedure as we instructed, You only are responsible for your device. We won’t be liable if any damage occurs to your device and/or its components.

All done and good, let’s head towards the Next page to See, How you can Root Samsung Galaxy Note 10.1 2014 3G P601.

Pages: Page 1 | Page 2