Home Blog Page 467

Install Android 4.4.2 on Samsung Galaxy S3 I9300 With Fusion Boeffla KitKat ROM Custom ROM

Install Android 4.4.2 on Samsung Galaxy S3 I9300 With Fusion Boeffla KitKat ROM Custom ROM

Galaxy S3’s current Android version is Android 4.3 Jelly Bean. There has been a number of rumors suggesting about Galaxy S3’s Android 4.4.2 KitKat in the first quarter of 2014, but the first quarter has almost passed away so there are not chances of any update anytime soon, also there hasn’t been any official word by Samsung about the Galaxy S3’s any further Android updates. The only way to taste KitKat on your Galaxy S3 for now is to use some nice and stable custom ROM and taste it unofficially.

To do the job, one of the popular and nice custom ROMs available around is Fusion Boeffla KitKat. Developed by XDA senior member Dragon7780, Fusion Boeffla KitKat is based on CyanogenMod, the ROM packs up some features from AOKP, SlimROM, Paranoid Android, Chameleon OS and other similar popular custom ROMs. The current version 4.4.2_2.0.6 that is Fusion Boeffla KitKat representing unofficial Android 4.4.2 KitKat for the Galaxy S3. There is a hefty list of features and mods included in this ROM, so to make it easier to understand we’ll be going through each and everything thoroughly and in steps. Let’s start by over-viewing Fusion Boeffla KitKat’s features/mods.

galaxy_w_29

Fusion Boeffla KitKat ROM

    • Recents Rambar
    • Navigationbar by slimroms
    • AppSidebar (Chaos)
    • Networks Traffic meter (Chaos)
    • TRDS 3.0 (Awesome Thanks SLIM)
    • AOKP Weather
    • MediaScanner behavior on boot
    • Show CPU Info
    • Show Clear all button + location
    • Low battery warning
    • Less frequent notification sounds
    • Screen on notification
    • Lockscreen by slimroms
    • Power Menu by slimroms
    • Keyboard: Auto keyboard rotation
    • Customizable PowerWidget (Thnx to DerTeufel)
    • CRT Animations
    • AOKP Custom system animations
    • Listview animations
    • Keyboard animations
    • Scroll animations
    • Smooth Progressbar animations
    • HALO
    • Gesture anywhere (Chaos)
    • Identicons (Chaos)
    • Wakelock Blocker
    • Suspend actions
    • Build.prop modder
    • Init.d configurator
    • Double tab to sleep gesture on statusbar
    • Gesture Lockscreen (Chaos)
    • Flip animation on clicking a qs tile
    • Keyboard: Volume key cursor control
    • QuietHours AutoSMS && Bypass Alarm
    • Notification drawer shorcuts
    • Notification drawer and qs background transparency
    • Advanced display
    • Contextual notification panel header (Omni)
    • Center clock and more (Slim)
    • Screen-On notification light
    • Keyboard: Option to disable fullscreen keyboard
    • Statusbar brightness slider
    • Option to disable qs by removing all tiles
    • Option to choose custom lockscreen handle
    • Quiet Hours Ringer
    • SlimPIE
    • Double tap to sleep features
    • Active display (Chaos)
    • Lockscreen notifications & more

Pre-Installation Instructions:

      1. This ROM is only for Samsung Galaxy S3 GT-I9300. Do not try this on any other device, please check your device’s model in Settings > About Device > Model.
      2. Your device must have a custom recovery installed, in case you’re missing it you may Follow our full guide here to install TWRP.
      3. Your device’s battery should be charged at least over 60%. This is highly recommended in order to prevent any power issues during the flashing process.
      4. Make sure that you backup your important media content, ContactsCall Logs & Messages. This is highly recommended just in case something goes wrong and you need to reset your phone.
      5. If you already have rooted your device, use Titanium Backup to back up all your important apps + system data. Also if you are using a custom recovery, it is recommended that you backup your current system using that first. [Just for the sake of safety]. Here’s our full Nandroid Backup guide.
      6. You will have to go through Data Wipes during installation of this ROM, so make sure that you have backed up all the mentioned data.
      7. Make an EFS backup of your phone before you flash this ROM.
      8. You need enough confidence to flash this ROM.
      9. Alright! Go ahead and flash the custom firmware, follow this guide to the letter.

Disclaimer: The methods involved in flashing custom roms and rooting your phone are highly custom and may result in bricking your device, and has nothing to do with Google or the device manufacturer that is SAMSUNG in our case. Also rooting your device will void its warranty and you will be no longer eligible for any kind of free device services by the manufacturers/warranty providers. In case of any mishap we may not be held responsible. Follow these instructions to the letter to avoid any mishap or bricking. Make sure that whatever you do, you are doing it at your own responsibility.

How to Install Fusion Boeffla KitKat Custom ROM on Galaxy S3 GT-I9300:

      1. Download Fusion Boeffla  Android 4.4.2 KitKat ROM .zip file.
      2. Download Google Gapps for Android 4.4.2 KitKat .zip file.
      3. Connect your phone to your PC now.
      4. Copy both the .zip files to the storage of your phone.
      5. Now disconnect your phone and turn it off complete.
      6. Boot into TWRP recovery now, in order to do so, turn it on by pressing and holding Volume Up + Home Button + Power Key. You should see the recovery mode in a while.
      7. Now in TWRP recovery select wipe option and  wipe cache, factory data reset, dalvik cache.
      8. After wiping all these three, select “Install” option.
      9. Now select “Install > Choose Zip from SD card / locate the zip file > Select Fusion Boeffla KitKat.zip file > Yes”.
      10. This will flash the ROM in your phone.
      11. Once again in TWRP select “Install > Choose zip from SD card / locate the file > Gapps.zip file > Yes”.
      12. This will flash Gapps in your phone.
      13. Reboot your device.
      14. You should see the Fusion Boeffla KitKat ROM running on your device in a while.
      15. That’s all!

First boot may take up to 10 minutes, you may not worry if it’s taking that much long. In case it’s taking too long, you may boot into CWM  or TWRP recovery and wipe cache and dalvik cache and reboot your device as it may fix the issue. In case your device is having issues, you may return to your old system using the Nandroid backup or follow our guide here to install stock firmware.

In case you got any issues or you face any difficulties regarding this post, please feel free to stop by the comment box below and let us know. We will get back to you as soon as possible. Thank you all.

How To Root Samsung Galaxy Core I8260 and I8262

How To Root Samsung Galaxy Core I8260 and I8262

Looking for a way to get your Galaxy Core rooted? Well, it’s quite easy. In the following post we are going to gain root access on Samsung Galaxy Core I8260 and I8262 (Dual SIM). If you’ve been wondering here and there for the method, you just need to stop and follow the comprehensive and step-by-step method below.

Galaxy Core Root

Before we begin with the root process, I’m assuming that some of you might be the first timers and are not familiar with rooting an Android device and have no idea at all about why they should root their device. To leave no confusions, we will first have a look on a brief introduction of root access and then proceed with pre-installation instructions.

Rooting your phone gives you complete access over all the data which is apparently locked by the manufacturers. This includes removal of the factory restrictions and making changes to the internal system and the operating system. Gaining the root access gives you the privileges to install various applications to enhance the performance of your device, allows you to remove the built-in applications/programs, helps you to upgrade the battery life of your device & install the apps which require the root access for the proper functionality and modify your device in so many other ways e.g using mods and custom roms. By installing custom recovery, you can flash custom roms in the phone easily. Custom recovery also let’s you backup your current rom and restore it in case of any mishap. There is a laundry list of things you can do after having your device rooted and installed the custom recovery, now once you’re rooted and have installed custom recovery, go ahead and enjoy it on your phone. Here’s our collection of 10 Best Root Apps.

Pre-Installation Instructions:

  1. This guide is only for Samsung Galaxy Core GT-I8260 and I8262. Before installing this, make sure that your device is listed below. Check your device’s model number in Settings > More > About Device.
  2. Download the file carefully for your device.
  3. Make sure that your device’s battery is charged over at least 60%. Highly recommended in order to prevent any mishap during the recovery installation process.
  4. Make sure that you backup your important media content, Contacts, Call Logs Messages. This is highly recommended just in case something goes wrong and you need to reset your phone.
  5. Use only OEM data cable to establish connection between your phone and PC.
  6. Turn off your Anti Virus and Firewall to prevent any connection issues. Also enable USB debugging mode on your phone if you face connection issues.
Disclaimer: The methods involved in flashing custom roms and rooting your phone are highly custom and may result in bricking your device, and has nothing to do with Google or the device manufacturer that is SAMSUNG in our case. Also rooting your device will void its warranty and you will be no longer eligible for any kind of free device services by the manufacturers/warranty providers. In case of any mishap we may not be held responsible. Follow these instructions to the letter to avoid any mishap or bricking. Make sure that whatever you do, you are doing it at your own responsibility.

How to Root Galaxy Core I8260 & I8262:

      1. You need CWM recovery. Install it from here.
      2. You need to download the SuperSu.zip file.
      3. Copy the downloaded SuperSu.zip file to the SD card of your Galaxy Core.
      4. Once CWM is installed, boot into CWM recovery on your phone now. To do so, turn off your device completely, now turn it on by pressing and holding Volume Up + Home Button + Power Key and you will be in the recovery mode. In case this method fails, try one of the methods listed here.
      5. Once in CWM, select “Install>Choose Zip from SD card > SuperSu.zip > Yes”.
      6. This will flash SuperSu in your device, wait till it completes.
      7. As soon as flashing ends, reboot your device.
      8. Find SuperSu installed in app drawer.
      9. Install “Root Checker App” from Google Play Store now to verify root access.
      10. That’s All!

That’s All! We hope that you found this guide of much help. In case you got any queries or face any difficulties regarding this guide, don’t hesitate to stop by the comment box below and leave us your message. We will try our

How To Make iOS 7 Automatically Change Wallpaper At Regular Intervals

0
How To Make iOS 7 Automatically Change Wallpaper At Regular Intervals

Everone likes to Customize their device, the only reason why colored cases sell so well and why we are so eager to buy a new Smartphone as it arrives in Market. Despite nothing new arrives in modern smartphones and even if the new Smartphone features something new, it is something that we might have seen many times in the past. What actually makes everyone believe that they have bought a new thing is because they think that they have bought a new device. Even if the color of the device is perfect according to design, still we want to put different cases on it to make it look different to feel we got something new.

Now if we talk about the Software despite the update doesn’t bring anything new, we still believe that it is better than before, even if it contains only fixes. We keep trying new Custom ROMs just to make ourself think that we have got something new. The same case is with Wallpapers, we have such Huge collections of Wallpapers and we want to try everyone of them and it is quite a tiresome job try them one-by-one and especially doing it manually.

maxresdefault

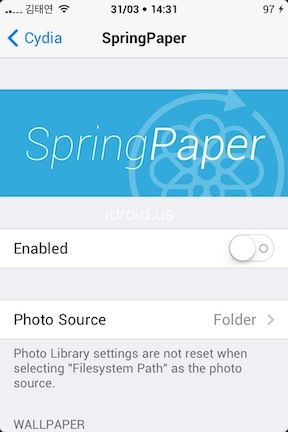
If you want to try different wallpapers on your device, but don’t have time to do it yourself, Worry not, SpringPaper is here to save your day, but as long as you got an iPhone which is Jailbroken. SpringPaper is available for only $1.99 at Cydia Store and can be immediately downloaded from BigBoss repository. The only thing this Tweak do is to make a Cycle of Wallpapers keep changes your Home-Screen Background from your Collection, either Automatically or At Will.

download

You can choose Wallpapers from your Library or from any Other Folder. SpringPaper can be set to automatically Cycle through them at a Pre-Set Interval, if you can’t decide which one you want to look at today, this is going to be a real good thing for you. On the other hand, you can force it to change the Wallpaper, you can set the transition speed, Shuffle the Wallpaper, even set the Transition effect.

We often get confused in what wallpaper we should choose to set on our device, in these situations, applications like SpringPaper come in handy, so without any further ado, let’s see how we can install SpringPaper on an iOS 7 device.

Jailbreak your iOS Device.

Since the following tutorial needs an iOS device which is Jailbroken, you need to Jailbreak your device. If your device is still in its normal condition. Follow our Jailbreak Section to find out how to Jailbreak your device

Add BigBoss Repo To Cydia:

  • BigBoss Repo can’t be add using the same old method.
  • Open iFile and Navigate to /etc/apt/sources.list.d/
  • Add a File name bigboss.list
  • Within the File Add the Following:

# do not edit this file to add your own custom sources
# this file is subject to be upgraded as part of a package
# either add your own .list file to /etc/apt/sources.list.d
# or add your entry to the global /etc/apt/sources.list file deb

http://apt.thebigboss.org/repofiles/cydia/ stable main

  • Close the iFile and Respring, Restart the device.
  • Open Cydia and Let it refresh.

Download SpringPaper:

springpaper-deb-cydia

  1. Open Cydia.
  2. Search for SpringPaper .
  3. Tap SpringPaper once the search is over.
  4. Tap Purchase on the top right corner and make the Payment
  5. Tap Install on the top right corner.
  6. Tap Confirm.
  7. Restart your device

Install CWM 6 Recovery on Samsung Galaxy Core I8260 and I8262 [How To – Guide]

Install CWM 6 Recovery on Samsung Galaxy Core I8260 and I8262 [How To – Guide]

Another mid-range Galaxy device by world’s top smartphone manufacturer Samsung, the Galaxy Core sports a very nice 4.3 inches TFT Capacitive touch screen display with 217 ppi. To power up the device, Samsung has used a Qualcomm Snapdragon Dual-core 1.2 GHz Cortex-A5 Chipset accompanied by Adreno 203 GPU while the RAM is ranged at 1 GB. At the back Samsung has used a 5 MP camera sensor while there is a VGA camera on the front for video calling. A battery of 1800 mAh is there to add life to the Galaxy Core. Galaxy Core runs on Android 4.1.2 Jelly Bean out of the box, the device is widely used because of it’s low price and the specs it has to offer in this price range and also it’s other Dual Sim variant has won some pockets as well.

That’s enough talking about the phone I guess, let’s get back to the topic now. Galaxy Core owners can also go beyond the boundaries on their device, doesn’t matter if it’s a low-end device but still it runs on Android and there is no cage on Android. You are free to do whatever tweaks you want to make to your device. To perform these out of boundaries operations, you probably will need a custom recovery. To overcome this need, we’ll be installing ClockworkMod 6 recovery on the Galaxy Core I8260 and I8262 (Dual SIM) in a few minutes. All you need to do is, move ahead and follow each and every step carefully. Before we proceed with the instructions, I’m assuming that some of you might be first timers and have no idea about what is a custom recovery and why you should install it. To make it clear, we will first have a look on a brief introduction of custom recovery, that is CWM 6 in our case.

Galaxy Core CWM 6

A custom recovery allows you to install custom roms, mods etc. Along with these, you can make a Nandroid backup, this helps you a lot as you can move back to the previous working state of your phone at any time you want if you have backed up your current system. In some cases, to root the phone you need to flash SuperSu.zip file in the custom recovery, having installed the recovery may help you while in some cases to install the recovery easily, you need to have the phone rooted. You can also wipe cache and dalvik cache of your phone using a custom recovery. One of the advantages is mounting the sdcards, this option is handy when you want to access your device’s internal memory while you’re in recovery mode.

Pre-Installation Instructions:

    1. This guide is only for Samsung Galaxy Core I8260 and I8262. Check your device’s model number in Settings > More > About Device.
    2. Download the file carefully for your device.
    3. Make sure that your device’s battery is charged over at least 60%. Highly recommended in order to prevent any mishap during the recovery installation process.
    4. Make sure that you backup your important media content, ContactsCall Logs & Messages. This is highly recommended just in case something goes wrong and you need to reset your phone.
    5. Use only OEM data cable to establish connection between your phone and PC. Turn off your Anti Virus and Firewall to prevent any connection issues. Also enable USB debugging mode on your phone if you face connection issues.
    6. Make sure that your laptop has enough battery charged to perform the operations, if you’re using a PC then make sure that it has appropriate power supply.
    7. Recovery works well for Galaxy Note 3 running on all Android versions, no need to worry about the Android version.
    8. Follow the installation instructions carefully, proceed only if you’ve read properly.
Disclaimer: The methods involved in flashing custom roms and rooting your phone is highly custom and may result in bricking your device, and has nothing to do with Google or the device manufacturer that is SAMSUNG in our case. Also rooting your device will void its warranty and you will be no longer eligible for any kind of free device services by the manufacturers/warranty providers. In case of any mishap we may not be held responsible. Follow these instructions to the letter to avoid any mishap or bricking. Make sure that whatever you do, you are doing it at your own responsibility.

Pre – Requisites:

      • Download and Install Samsung USB drivers – Get Here.
      • Download and Extract Odin3 v3.09 – Get Here
      • Enough confidence to flash a recovery :-)!
      • Download Philz Advanced CWM 6 Recovery .tar.md5 file [The same file will work for I8262 & I8260]


How To Install CWM 6 on Galaxy Core I8260/I8262:

  1. Download the file for your variant carefully.
  2. Open Odin3.exe.
  3. Put your phone in download mode, to do so, turn it off completely. Now turn it on by pressing and holding Volume Down + Home Button + Power Key, you should see a warning now, press Volume Up to continue.
  4. In case the download mode method doesn’t work for your device, try one of the methods from this guide.
  5. Connect your phone to your PC.
  6. The ID:COM box in Odin should turn blue now, that means your phone is connected properly in download mode.
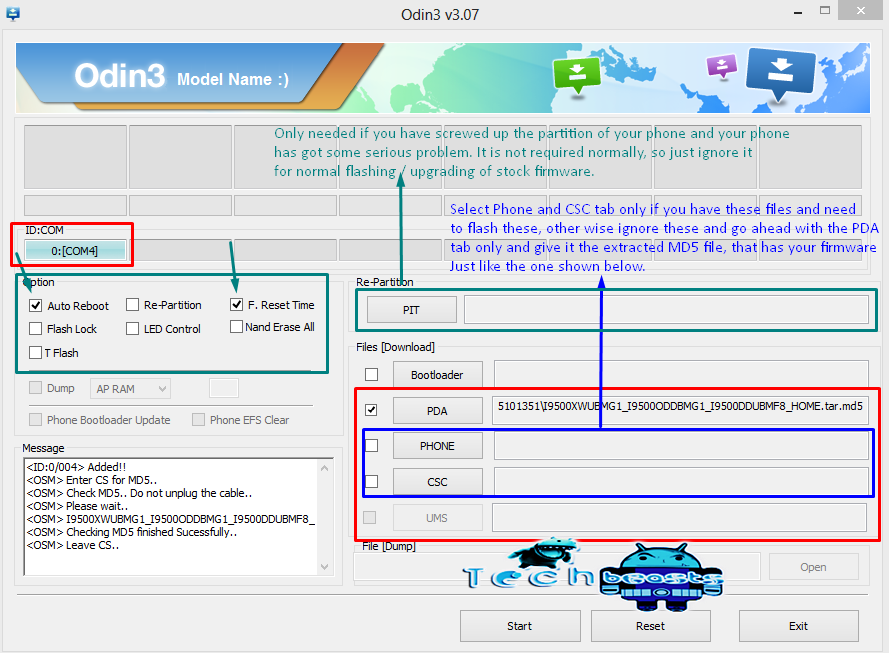
  7. Click the PDA tab in Odin and select the downloaded Recovery.tar file and let it load. Your Odin should look exactly as shown below, make sure that no extra options are selected.odin_explained
  8. Hit start now and sit back, it will take a few seconds to flash the recovery and your device will reboot.
  9. Press and hold Volume Up + Home Button + Power Key to access the CWM 6 Recovery that you just installed.
  10. You can backup your current ROM and do a lot of other things using the options in CWM 6 Recovery.
  11. That’s All.

In case you got any queries or you are facing any difficulties regarding this post, please feel free to stop by the comment box below and drop us your words. We will get back to you as soon as possible. Thanks All!

Root and Install CWM 6 Recovery on Sony Xperia M C1904/C1905 Running 15.4.A.0.23 Firmware

Root and Install CWM 6 Recovery on Sony Xperia M C1904/C1905 Running 15.4.A.0.23 Firmware

Sony has updated both variants of its Xperia M to the latest Android 4.3 Jelly Bean just as it promised the users for. The new updates pack up lots of bug fixes, new camera effects, some minor UI changes for some media apps, performance enhancements and few other changes here and there. You may update your device through OTA, through Sony PC companion or manually using and FTF file and flash it using Sony Flashtool.

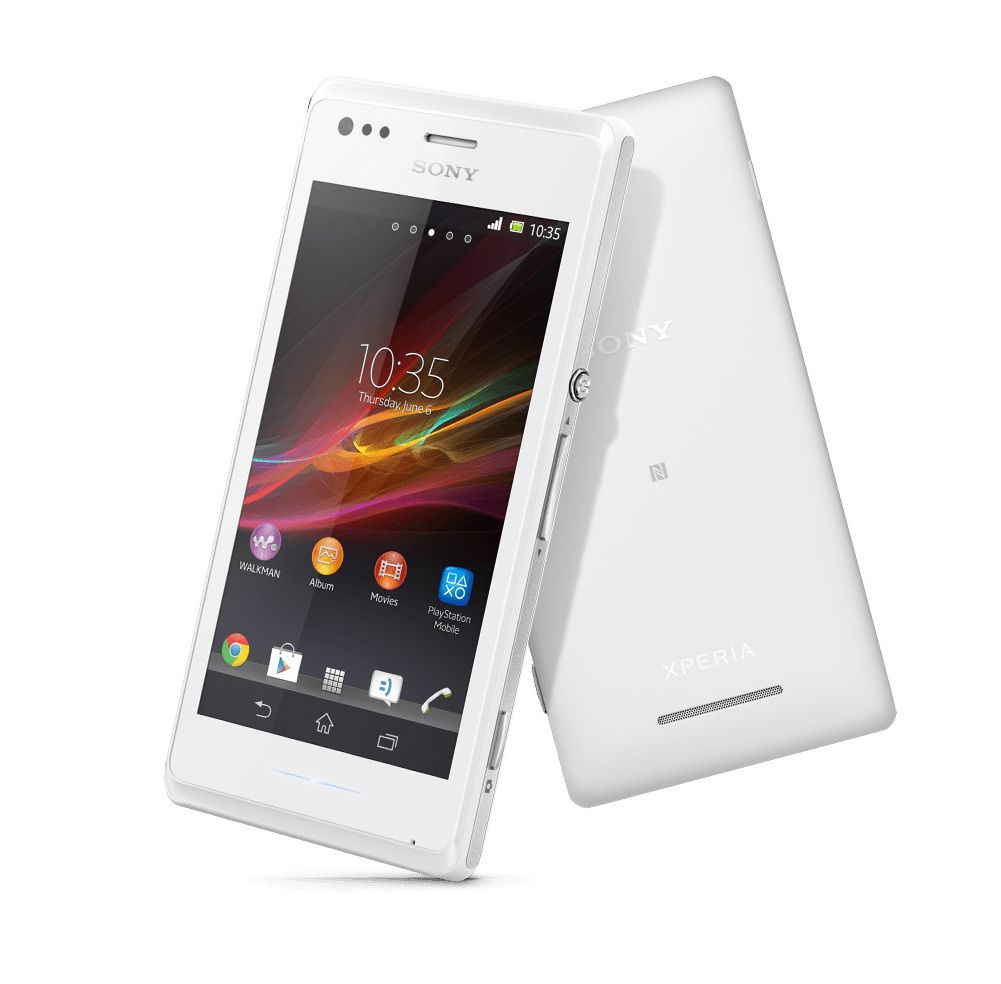
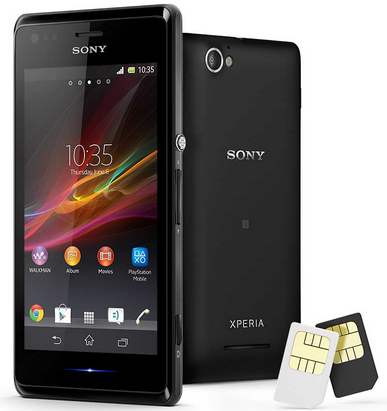
Xperia M

Earlier we posted the root and custom recovery installation guide for Sony Xperia M Dual, but Xperia M single SIM variants C1904 and C1905 were in que. So here they are now, ClockworkMod 6.0.4.7 is available for Xperia M C1904/5 running latest Android 4.3 Jelly Bean based on build number 15.4.A.0.23 and can be flashed now. Once you’ve flashed the recovery, you can easily root your device as well. If you’ve just updated your device and you just started looking out for the methods, you may stop here as this post is going to help you. Before we head towards the recovery installation and rooting instructions, I’m assuming that some of you might be the first timers here and might not even not be familiar with the root access. To make it clear, we’ll first have a look at a brief introduction of custom recovery and advantages of rooting an Android smartphone.


A custom recovery allows you to install custom roms, mods etc. Along with these, you can make a Nandroid backup, this helps you a lot as you can move back to the previous working state of your phone at any time you want if you have backed up your current system. In some cases, to root the phone you need to flash SuperSu.zip file in the custom recovery, having installed the recovery may help you while in some casesto install the recovery easily, you need to have the phone rooted. You can also wipe cache and dalvik cache of your phone using a custom recovery.Rooting your phone gives you complete access over all the data which is apparently locked by the manufacturers. This includes removal of the factory restrictions and making changes to the internal system and the operating system. Gaining the root access gives you the privileges to install various applications to enhance the performance of your device, allows you to remove the built-in applications/programs, helps you to upgrade the battery life of your device & install the apps which require the root access for the proper functionality and modify your device in so many other ways e.g using mods and custom roms. By installing custom recovery, you can flash custom roms in the phone easily. Custom recovery also let’s you backup your current rom and restore it in case of any mishap. There is a laundry list of things you can do after having your device rooted and installed the custom recovery, now once you’re rooted and have installed custom recovery, go ahead and enjoy it on your phone. Here’s our collection of 10 Best Root Apps.


Pre Requisites:

      1. The CWM recovery is only for Xperia M Dual C1904 and C1905 running latest Android 4.3 Jelly Bean 15.4.A.0.23 firmware. Check your firmware version in Settings > About Device and make sure that it matches the one mentioned here.
      2. You must have installed Android ADB & Fastboot drivers. Follow the quick guide here.
      3. Your device must have an unlocked bootloader. Follow our full guide here in order to unlock.
      4. Please make sure that your phone’s battery is charged at least over 60%. This is highly recommended in order to prevent any power issues during the recovery flashing process.
      5. Backup each and everything on your Android phone as follows:
      6. Backup all your important contacts, find the full guide here.
      7. Backup all your important sms messages, find the full guide here.
      8. Backup all your important call logs, find the full guide here.
      9. Backup all your important media content manually. (Copy to your PC.)
      10. Backup your current system using a custom recovery (CWM or TWRP) if you’ve flashed one. This is recommended in case something goes wrong with CWM installation, you can use the custom recovery and return to the old working state of your system.
      11. Enable USB debugging mode on your device.  Get it in Settings > Developer Options > USB Debugging mode.
      12. Use only OEM data cable to establish connection between your PC and Phone.
      13. Alright! Follow this guide to the letter now.

If you want to root your device without unlocking the bootloader, check out this post.

Disclaimer: The methods involved in flashing custom roms and rooting your phone is highly custom and may result in bricking your device, and has nothing to do with Google or the device manufacturer that is SONY in our case. Also rooting your device will void its warranty and you will be no longer eligible for any kind of free device services by the manufacturers/warranty providers. In case of any mishap we may not be held responsible. Follow these instructions to the letter to avoid any mishap or bricking. Make sure that whatever you do, you are doing it at your own responsibility.


How To Install CWM 6.0.4.7 Recovery on Xperia M 15.4.A.0.23 Firmware:

      1. Download 4.3-boot.img file
      2. Rename the downloaded .img file to boot.img
      3. Place the downloaded boot.img file in the Minimal ADB & Fastboot folder that you created using our ADB & Fastboot Quick Setup Guide.
      4. If you are using Android ADB & Fastboot full package, you can place the downloaded and renamed boot.img file in the Fastboot folder or in the Platform-tools folder.
      5. Open the folder where you placed the boot.img  file. E.g Minimal ADB & Fastbootor Fastboot or Platform Tools.
      6. Press and hold the shift key and right click on an empty area within the folder, and click on “Open Command Window Here”.
      7. Turn off your Xperia M completely.
      8. Now press the Volume Up Key and while keeping it pressed plug in the USB cable.
      9. You should see a blue light in the notification light of your phone, that means your device is now connected in Fastboot mode.
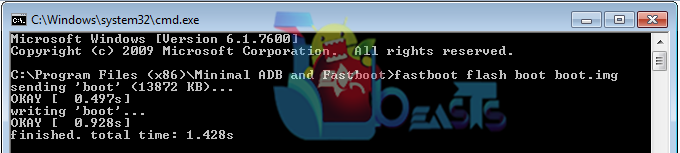
      10. Now type the following command:

         fastboot flash boot boot.img

      11. Hit Enter and it will quickly flash CWM 6.0.4.7 recovery in your Xperia M.
      12. Once recovery is flashed, now issue this command

        “fastboot reboot”

      13. In case this doesn’t work, you may reboot the device manually.
      14. Your device will reboot now, as soon as you see the Sony logo,  and the pink LED, press Volume Up key to enter recovery.
      15. Congrats! You should now see the custom recovery.
      16. That’s all.

Screenshot_1

 How To Root Xperia M Running Latest 15.4.A.0.23 Firmware:

      1. You need to install CWM recovery first using the above instructions.
      2. Download Supersu.zip file now.
      3. Place the downloaded Supersu.zip file on your phone’s external sd card.
      4. Now boot into CWM recovery on your phone. To do so, turn off your device first. Now turn it on, as soon as you see the Pink LED, press the Volume Up Key rapidly.
      5. You should see the CWM recovery interface shortly.
      6. Once in CWM, select “Install Zip > Choose Zip from SDcard > Select SuperSu.zip > Yes”.
      7. This will flash SuperSu.zip file, once flashing is complete, reboot your device.
      8. Find SuperSu in app drawer now. You can also install Root Checker app from Play Store to check root.
      9. Congrats! You’re rooted now!SuperSu

That’s All! In case you got any queries or you face any difficulties regarding this post, please feel free to stop by the comment box below and drop us your words. We will get back to you as soon as possible. Thanks All!

Credits

Install CWM Recovery & Root Sony Xperia M Dual C2004/C2005 Running 15.5.A.0.18 Firmware

Install CWM Recovery & Root Sony Xperia M Dual C2004/C2005 Running 15.5.A.0.18 Firmware

Few days back Sony updated it’s mid-range device Xperia M to latest Android 4.3 Jelly Bean firmware as it promised its users. Sony has adapted a very nice nature of not delaying the Android updates anymore and it’s taking lead over other smartphone manufacturers in this department. The Software department of Sony is quite active and is also paving ways for the developers to stay even more active. There’s a plenty of device which got updated to the latest versions of Android exactly as Sony scheduled and told the people earlier in 2013.

Xperia M Dual

The new firmware for Sony Xperia M Dual is based on the build number 15.5.A.0.18. You can either update your device via OTA, through Sony PC Companion or manually using Sony Flashtool and FTF files. Once you update, you may want to install CWM recovery on your Sony Xperia M Dual and gain root access. If you haven’t started looking out much yet, this post might be able to save some precious minutes of yours. We’ll be install ClockworkMod 6.0.4.7 on Sony Xperia M Dual C2004/C2005 running latest Android 4.3 Jelly Bean 15.5.A.0.18 firmware and also how you can root it. All you need to do is, you got to move ahead with us and follow this step by step guide carefully.

Before we head towards the installation instructions, I’m assuming that some of you might be new to a custom recovery installation and might not be even familiar with its use. To overcome this, we will first have a look on a brief introduction of a custom recovery that is CWM in our case and also we’ll be over-viewing the advantages and use of root access.

A custom recovery allows you to install custom roms, mods etc. Along with these, you can make a Nandroid backup, this helps you a lot as you can move back to the previous working state of your phone at any time you want if you have backed up your current system. In some cases, to root the phone you need to flash SuperSu.zip file in the custom recovery, having installed the recovery may help you while in some casesto install the recovery easily, you need to have the phone rooted. You can also wipe cache and dalvik cache of your phone using a custom recovery.

Rooting your phone gives you complete access over all the data which is apparently locked by the manufacturers. This includes removal of the factory restrictions and making changes to the internal system and the operating system. Gaining the root access gives you the privileges to install various applications to enhance the performance of your device, allows you to remove the built-in applications/programs, helps you to upgrade the battery life of your device & install the apps which require the root access for the proper functionality and modify your device in so many other ways e.g using mods and custom roms. By installing custom recovery, you can flash custom roms in the phone easily. Custom recovery also let’s you backup your current rom and restore it in case of any mishap. There is a laundry list of things you can do after having your device rooted and installed the custom recovery, now once you’re rooted and have installed custom recovery, go ahead and enjoy it on your phone. Here’s our collection of 10 Best Root Apps.


Pre Requisites:

      1. The CWM recovery is only for Xperia M Dual C2004 and C2005 running latest Android 4.3 Jelly Bean 15.5.A.0.18 firmware. Check your firmware version in Settings > About Device and make sure that it matches the one mentioned here.
      2. You must have installed Android ADB & Fastboot drivers. Follow the quick guide here.
      3. Your device must have an unlocked bootloader. Follow our full guide here in order to unlock.
      4. Please make sure that your phone’s battery is charged at least over 60%. This is highly recommended in order to prevent any power issues during the recovery flashing process.
      5. Backup each and everything on your Android phone as follows:
      6. Backup all your important contacts, find the full guide here.
      7. Backup all your important sms messages, find the full guide here.
      8. Backup all your important call logs, find the full guide here.
      9. Backup all your important media content manually. (Copy to your PC.)
      10. Backup your current system using a custom recovery (CWM or TWRP) if you’ve flashed one. This is recommended in case something goes wrong with CWM installation, you can use the custom recovery and return to the old working state of your system.
      11. Enable USB debugging mode on your device.  Get it in Settings > Developer Options > USB Debugging mode.
      12. Use only OEM data cable to establish connection between your PC and Phone.
      13. Alright! Follow this guide to the letter now.
Disclaimer: The methods involved in flashing custom roms and rooting your phone is highly custom and may result in bricking your device, and has nothing to do with Google or the device manufacturer that is SONY in our case. Also rooting your device will void its warranty and you will be no longer eligible for any kind of free device services by the manufacturers/warranty providers. In case of any mishap we may not be held responsible. Follow these instructions to the letter to avoid any mishap or bricking. Make sure that whatever you do, you are doing it at your own responsibility.


How To Install CWM 6.0.4.7 Recovery on Xperia M Dual 15.5.A.0.18 Firmware:

      1. Download boot_CWM_Dual_4.3.img file
      2. Rename the downloaded .img file to boot.img
      3. Place the downloaded boot.img file in the Minimal ADB & Fastboot folder that you created using our ADB & Fastboot Quick Setup Guide.
      4. If you are using Android ADB & Fastboot full package, you can place the downloaded and renamed boot.img file in the Fastboot folder or in the Platform-tools folder.
      5. Open the folder where you placed the boot.img  file. E.g Minimal ADB & Fastbootor Fastboot or Platform Tools.
      6. Press and hold the shift key and right click on an empty area within the folder, and click on “Open Command Window Here”.
      7. Turn off your Xperia M completely.
      8. Now press the Volume Up Key and while keeping it pressed plug in the USB cable.
      9. You should see a blue light in the notification light of your phone, that means your device is now connected in Fastboot mode.
      10. Now type the following command:

         fastboot flash boot boot.img

      11. Hit Enter and it will quickly flash CWM 6.0.4.7 recovery in your Xperia M Dual
      12. Once recovery is flashed, now issue this command

        “fastboot reboot”

      13. In case this doesn’t work, you may reboot the device manually.
      14. Your device will reboot now, as soon as you see the Sony logo,  and the pink LED, press Volume Up key to enter recovery.
      15. Congrats! You should now see the custom recovery.
      16. That’s all.

Screenshot_1

 How To Root Xperia M Dual Running Latest 15.5.A.0.18 Firmware:

      1. You need to install CWM recovery first using the above instructions.
      2. Download Supersu.zip file now.
      3. Place the downloaded Supersu.zip file on your phone’s external sd card.
      4. Now boot into CWM recovery on your phone. To do so, turn off your device first. Now turn it on, as soon as you see the Pink LED, press the Volume Up Key rapidly.
      5. You should see the CWM recovery interface shortly.
      6. Once in CWM, select “Install Zip > Choose Zip from SDcard > Select SuperSu.zip > Yes”.
      7. This will flash SuperSu.zip file, once flashing is complete, reboot your device.
      8. Find SuperSu in app drawer now. You can also install Root Checker app from Play Store to check root.
      9. Congrats! You’re rooted now!SuperSu

That’s All! In case you got any queries or you face any difficulties regarding this post, please feel free to stop by the comment box below and drop us your words. We will get back to you as soon as possible. Thanks All!

Credits

Simpsons : Tapped Out for PC – Windows XP/7/8/8.1 & MAC

0
Simpsons : Tapped Out for PC – Windows XP/7/8/8.1 & MAC

The type of game Simpsons is, is actually what everyone loves to play these days. Such games are full of activities and make you addictive in no time. You got to do lots of tasks to earn some bucks in the game and give your game characters a life. Simpsons prompts the users to make the Springfield of their own choice. There are different characters involved in different activities in the game e.g. going down for parties, working at bakeries, working at farms etc. There are neighbors in the game whom you can visit and play pranks on their Springfield and a lot more is there that you may explore upon playing this game.

Simpsons Tapped Out for PC

You can easily play Simpsons on your Android device, the game is absolutely free. But how about playing the same game on your desktop PC or a MAC? sounds different? Well, you can actually play Simpsons: Tapped Out on your Windows XP/7/8/8.1 powered PC or a MAC. The method is quite easy and we’ll be going through it in a while. Before we head towards the SImpsons: Tapped Out installation instructions on PC, we will first have a look on the official features of the game.

Description:

1. First, you can get it for free!
2. Make Springfield just like you want it.
3. Help Homer find Marge, Bart, Lisa, and the rest of his family and friends! (Ned Flanders, too.)
4. Complete tasks to earn… mmm, donuts!
5. Make Apu work ridiculously long shifts at Kwik-E-Mart.
6. Grow and harvest Tomacco on Cletus’s Farm.
7. Party down with Duffman at Duff Brewery.
8. See how your Indolence, Consumerism,and Gluttony stack up on the Conform-o-meter.
9. Enjoy exclusive animated scenes sure to please fans of TV’s longest-running comedy.
10. Visit your friends’ Springfields, play pranks, and collect cash.

How to Install & Play Simpsons: Tapped Out on PC:

      1. You need an Android emulator to run this game on your Windows PC or MAC. We recommend using Bluestacks. Use our guide to install it on your PC.
      2. After downloading and installing Bluestacks, Simpsons: Tapped Out APK file
      3. Open the downloaded APK file now, and let Bluestacks install it.
      4. Open BlueStacks now > All Apps > Simpsons: Tapped Out.
      5. The game will start now, follow the on screen instructions.
      6. Follow the initial screen,  you’ll be able to play it.
      7. Enjoy endless fun!

How to Restore & Install Stock Firmware on Samsung Galaxy Gear SM-V700

1
How to Restore & Install Stock Firmware on Samsung Galaxy Gear SM-V700

Samsung’s very first smartwatch, the Galaxy Gear runs on Android 4.2.2 Jelly Bean. The only reason behind the charm of the Galaxy Gear is the Android operating system, world most widely used, open source and fully customizable operating system that ever popped up. Although Samsung plugged in few limitations on the Galaxy Gear, but all these limitations get fainted when you know that the developers around can do anything with this operating system.

Custom ROMs, Custom Recovery and other tweaks/mods are already up for the Galaxy Gear 1 (SM-V700) and you can easily go beyond the boundaries on this little gadget but while you tweak it, you may keep one thing in mind and that is the chance of getting it bricked. Android devices easily get soft-bricked when we try to flash any custom ROMs or any such thing, the only possible way to get the device back to life is to flash a stock firmware or flash a Nandroid backup using a custom recovery, sometimes a factory data reset is enough to get you out of the bootloops or unstuck the boot screen, but most probably a stock firmware will be able to help you in this case. If you’re facing such an issue with your Galaxy Gear SM-V700 and you’re looking for a guide to help you with the stock firmware restore or installation, then this post is definitely for you. In the following post we will be install stock Android 4.2.2 Jelly Bean firmware on Galaxy Gear. All you need to do is, move a little forward with us and follow this step by step guide carefully.

Pre-Installation Instructions & tips:

      1. This firmware/guide is only for Samsung Galaxy Gear SM-V700. Do not try this on any other device. To check your device’s model number, swipe through the right on your Galaxy Gear and tap on Settings > About Gear > Model Number.
      2. Make sure that your Galaxy Gear is charged enough, at least 80% so that the installation process doesn’t get interrupted.
      3. Make sure that the laptop/computer you’re using has enough battery or appropriate power connection to complete the installation process.
      4. Take a backup of images/videos stored on your Galaxy Gear. Use our guide to do so.
      5. You need a datacable to connect your Galaxy Gear to your PC. Use any of your Samsung device’s datacable for the purpose.
      6. Your Galaxy Gear’s cradle should be perfectly working.
      7. The following firmware is completely stock/official. It won’t cause any harm to your device.
      8. Follow this guide carefully to avoid any mishap.

Here are the firmware details:

      • Device Name: Galaxy Gear
      • Model Number: SM-V700
      • Version: V700XXUBNC1
      • OS: Android 4.2.2 Jelly Bean
      • Build Date: 17.03.2014
      • Changelist: 2373480
      • Region: ITV (Italy)

Required Programs & Files:

    1. Download Odin PC and extract it. – Get it Here
    2. Download and install Samsung USB Drivers – Get Here
    3. Download Android 4.2.2 Jelly Bean Firmware File.

How To Install the Firmware on Galaxy Gear:

      1. Download the firmware file and extract it, you will get a .tar.md5 file.
      2. Run Odin3.exe file from the Odin extracted folder.
      3. Put your Galaxy Gear in download mode now. In order to do so, turn it off completely, now turn it on and as soon as you see the Galaxy Gear logo, press the power key quickly for 5-6 times and you should be able to see the download mode. Or else try the universal Android ADB & Fastboot method from this guide.
      4. Once in download mode, insert your Galaxy Gear in it’s cradle and connect it to your PC using your Samsung device’s datacable.
      5. As soon as your PC detects your Gear, the ID:COM box in Odin should turn blue now or yellow depending on your Odin version.
      6. The only options selected in your Odin3 should be F.Reset Time and Auto Reboot. Make sure that all other options are unchecked/unticked.
      7. Now in Odin, click on PDA/AP tab and select the .tar.md5 file that you extracted from the firmware.zip file.
      8. It will take a while to load the firmware package in Odin, you might notice Odin getting hanged, wait a few seconds while it loads.odin_explained
      9. As soon as the firmware has loaded, click on the “Start” button in Odin in order to install the firmware.
      10. Wait till the firmware completely gets flashed, as soon as it’s done, your Gear will reboot.
      11. Once rebooted, it will complete the initial process and then take you to your newly installed firmware screen.
      12. That’s All!

Check out our Galaxy Gear Hub to explore more about Gear’s tweaks and other stuff available around.

That’s all with the Stock Firmware installation on your Galaxy Gear. In case you got any queries or you face any difficulties with the installation, please feel free to stop by the comment box below and drop us your words. We will get back to you as soon as possible. Thanks All!

How To Connect Galaxy Gear With Galaxy S4

0
How To Connect Galaxy Gear With Galaxy S4

After the release of Android 4.3, the support of Galaxy Gear was introduced for Galaxy S4, Note 2 and Galaxy S3. Not all of the functions are working, but the necessary and Basci functions are working fine. In the future, almost all the Flagship devices will support Galaxy Gear and may be rather than Samsung Flagship devices, some others from different OEMs might start supporting it too. Well you only need a Galaxy Gear Manager, find the Apk and give it a try, who know it starts working on HTC One M8. But there is one thing that happens for sure, other than Samsung devices, Galaxy Gear will support basic functions only, like Calling and Showing notifications.

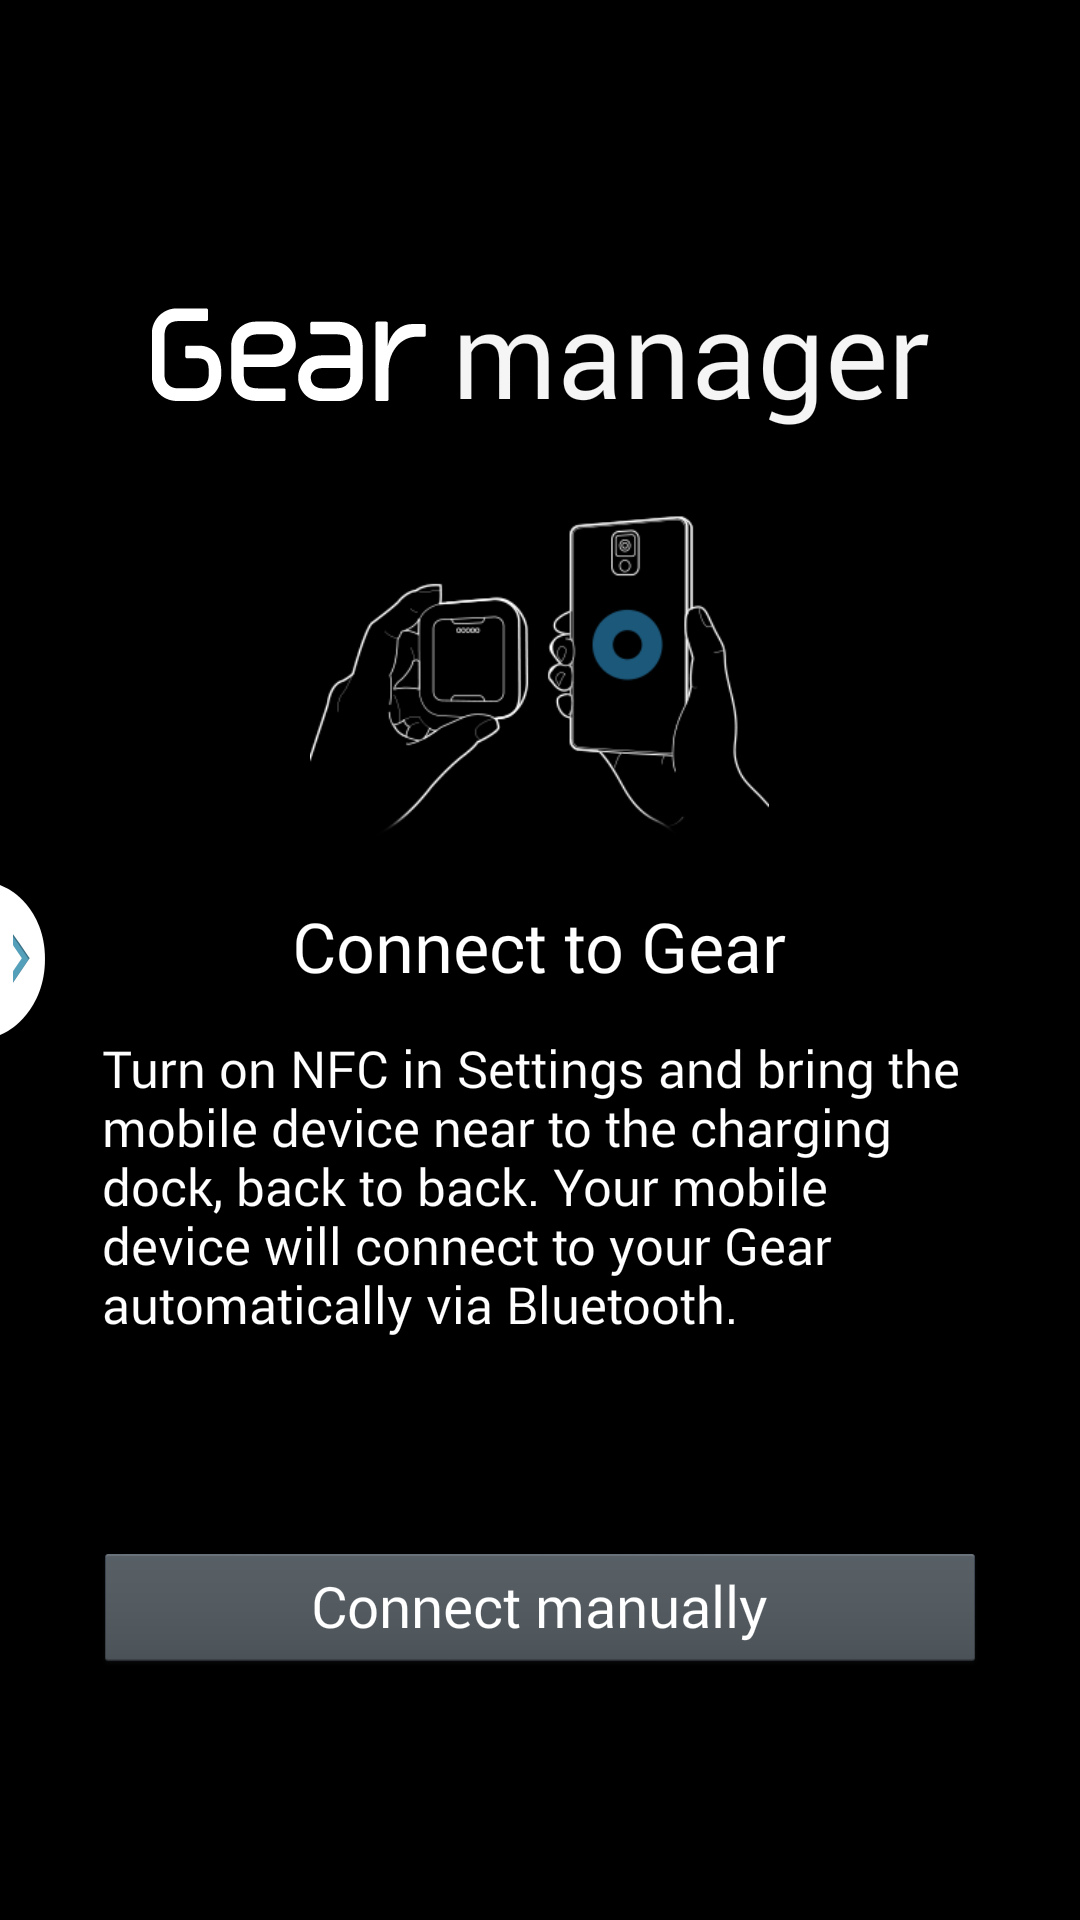
Screenshot_2014-04-06-23-58-53

If you have a Galaxy Gear and by any chance you have rooted it, then you can try it on different devices. A non-rooted device can only be connected to Samsung devices only, you can even install a Custom ROM on Galaxy Gear to get a little bit more out of this device. For Samsung mentioned devices, Galaxy Gear even takes photos and sync it with the device, Perfect for Spying. Without any further ado, let’s find out how to connect Galaxy Gear with Galaxy S4.

How To Connect Galaxy Gear With Galaxy S4

  1. Open NFC and Bluetooth on your Galaxy S4.
  2. Tap the Back of Galaxy Gear and Galaxy S4
  3. You will see a Screen Promoting to install Galaxy Gear Manager.
  4. Install Galaxy Gear Manager and you are ready to use Galaxy Gear with Galaxy S4.


How To Save Battery Life In Verizon HTC One M8 By Enabling Power Saving Mode

0
How To Save Battery Life In Verizon HTC One M8 By Enabling Power Saving Mode

Verizon was the First US carrier to release a Carrier bounded HTC One M8 on their Website. This new smartphone is taking a lot of popularity because of its premium feel and amazing design. If you are not sure about which carrier HTC One M8 you should purchase, then you have no problem at all, they all have the same specs,Snapdragon 801 Quad-core 2.3GHz processor, 5” Full-HD 1080p Corning Gorilla glass display, Ultra pixel Duo camera, Bluetooth 4.0 and latest Androidsoftware support with Sense UI 6 based on KitKat 4.4.2. The only thing you need to look is the Carrier which you are using, choose the one who gives you the most benefit.

Now If I can purchase a Carrier bounded HTC One M8, I would love to Go after the Verizon HTC One M8 not because of their offers.,but recently I have learn how to enable Power Saving Mode in it. HTC has never been good when it comes to battery life and if you get a chance to save battery in HTC devices, go after it without thinking. The Battery saving mode in Android devices is a default option put in there by the OEMs, but unfortunately in US Power saving and Wi-Fi tethering is prohibited or hidden in US carrier devices. If you want to enable Power Saving in HTC One M8, follow the tutorial below.

Verizon-HTC-One-M8-Power-Save-Mode

Root Your Android Device:

Follow Root Verizon HTC One M8 With WeakSauce Apk to root your HTC One M8.

How To Enable Power Saving Mode.

  1. Download SQLite Editor From Google Play Store: Link
  2. After the Installation, open the app.
  3. Go to Settings Storage > Settings.db > Secure.
  4. Look For the Following Entry: hide_ui_user_powersave and hide_ui_powersaver_connectivity
  5. Now Long Press the Current Value ‘1’ and change it to ‘0’
  6. Save the Changes, Exit the app and Reboot your Phone.
  7. That is it, you will now be able to Start the Power Saving mode in HTC One M8


Assign Multiple Passcodes To iOS Lock Screen With MultiPass – How To

0
Assign Multiple Passcodes To iOS Lock Screen With MultiPass – How To

In Old Days the only thing that were private and should be protected were messages, but as the time passed Cameras were installed in Mobile Phones giving them the power to store personal photos in them too. In Today’s modern world almost every sort of personal data is stored in smartphones, thus arising a situation for all the security conscious people out there to secure their data more and more and it is also a good practice applying as much as security as possible, but not much to start getting on your nerve. In Apple device, such security is offered native Passcode and with the help of Cydia Tweak, MultiPass, the security can be extended to the limit which is a demand from many users.

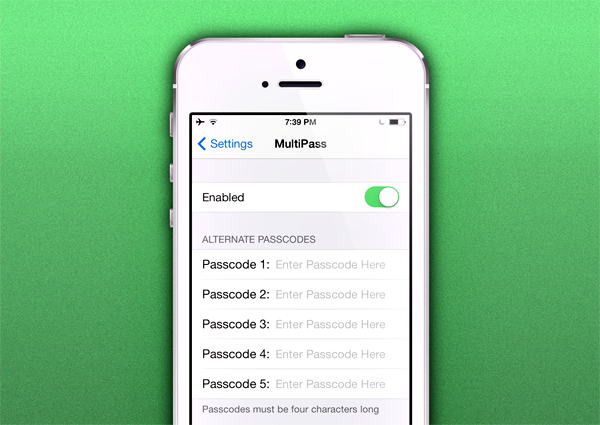
But what exactly does MultiPass do? what type of features does it offer to any Jailbroken user to save its precious data without any problem at all. Installing this app will not increase the security of iOS, I mean a person with good bypassing knowledge can easily break it, but it does give you the power to put more than one Bypass code, that sure put “that”person in great anger. It is fair to say that a large portion of smartphone owners undoubtedly have a number of numerical combinations or Passwords that they use to authenticate themselves.

Photo-Apr-06-3-52-24-AM

We think it is also fair to say that we put different passcodes at different positions to save our data and private stuff and it is a fair practice that users put wrong password many times just to remember the right one and in the meantime the device mostly stop the passcode option for a little time, so we can think of if. But MultiPass gets rids of such issue by giving the option of setting multiple passcode, anyone can be used to unlock the device when prompted for authentication.

Like all the great tweaks MultiPass also have a toggle button to turn the Option On and Off with just one single tap. This is really important when the app misbehaves or for troubleshooting an unexpected behaviour when multiple packages from Cydia is installed. If you are using a Jailbroken device and forgets the 4-digit code, then this option will be the best thing for you.Multipass is totally free to download and install after adding the Big Boss respo to Cydia and of course you will need a Jailbroken device.

Jailbreak your iOS Device.

Since the following tutorial needs an iOS device which is Jailbroken, you need to Jailbreak your device. If your device is still in its normal condition. Follow our Jailbreak Section to find out how to Jailbreak your device

Add BigBoss Repo To Cydia:

  • BigBoss Repo can’t be add using the same old method.
  • Open iFile and Navigate to /etc/apt/sources.list.d/
  • Add a File name bigboss.list
  • Within the File Add the Following:

# do not edit this file to add your own custom sources
# this file is subject to be upgraded as part of a package
# either add your own .list file to /etc/apt/sources.list.d
# or add your entry to the global /etc/apt/sources.list file deb

http://apt.thebigboss.org/repofiles/cydia/ stable main

  • Close the iFile and Respring, Restart the device.
  • Open Cydia and Let it refresh.

Download MultiPass:

  1. Open Cydia.
  2. Search for MultiPass.
  3. Tap MultiPass once the search is over.
  4. Tap Install on the top right corner.
  5. Tap Confirm.
  6. Restart your device

How To Use MultiPass:

  1. Open MultiPass.
  2. Enable it.
  3. Enter the Passcodes below, all Passcodes must be 4-digit long.
  4. Enjoy!