Home Blog Page 462

How To Install Windows 8.1 With Windows 8 Key

How To Install Windows 8.1 With Windows 8 Key

For all the Windows 8 users, Windows 8.1 is a free upgrade, but under normal circumstances you cannot install Windows 8.1 simply using Windows 8 Product key. However in the world of tech, things like this are not a big deal at all, as if one can put restrictions on it, another one can remove it as well, its just like “If a Law Is Written, Certainly It Can Be Unwritten”. However, Microsoft only allows Windows 8.1 Media downloading through Windows 8.1 Key, but there are tricks to bypass even such an act. But what is the actual problem, allow me to explain it a little:

In general life, Keys are made for specific locks only, however, a universal key can be created, if the lock is created after the Key. Same is the case here, Windows 8.1 product key is different from Windows 8, you cannot just enter the Windows 8 Product key into Windows 8.1 installer this won’t work, but Windows 8.1 is not much different than Windows 8, only a couple of tricks can make the old key work like a Charm.

Windows-8-1

On the other hand, to save it from Piracy, only those who have purchased the Windows 8 from Microsoft store area  are able to download Windows 8.1, but Windows 8.1 installer won’t accept the Windows 8 key. However, Windows 8.1 will accept the same key if you enter it on Desktop after installing the Windows, now we have no idea why it works, but it works, all it need is to modify the installation media a bit.

Download the Windows 8.1:

Another problem arises here is that Microsoft only allows Media Download if you use the Windows 8.1 Key, fortunately, there is a way to bypass that too. Visit the Upgrade Windows with only a product key page and click the Install Windows 8 button and start downloading the installation media, Run the download tool and enter the product key and after the download begins, close the tool.

Again visit the same page and click the Install Windows 8.1 and run the downloaded tool. The tool won’t prompt any Key entering message instead it will start the downloading of Windows 8.1. Select the Install by Creating Media option after it completes, either choose USB installation media or ISO file, as USB installation media is better and easy, let’s presume that you will do that.

download-windows-8.1-installation-media-with-windows-8-product-key

Modify The Installation Media:

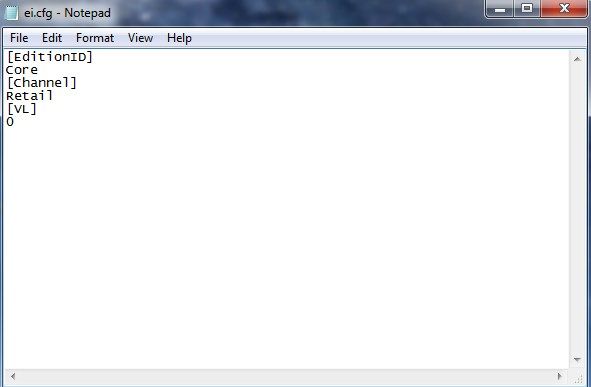
If you go on ahead and try to install the Windows without any modification, you will see an error, thus forcing you to abort the installation. Therefore, we must modify a little before starting the process, as I said above USB installation media is easy to modify, Open the USB drive and navigate to the Source folder inside it. Right click anywhere in the source folder and create a new Text file and name it ei.cfg, just make sure that the file is .cfg not .cfg.txt.
Screenshot_8

Open the ei.cfg file in any Text editor and copy the following text into it:

[EditionID]
Core
[Channel]
Retail
[VL]
0

If you have the professional windows, just change the word Core with Professional, save the file and close the Folder

Install The Windows Like Normal and Enjoy
enter-windows-8-product-key-on-windows-8.1

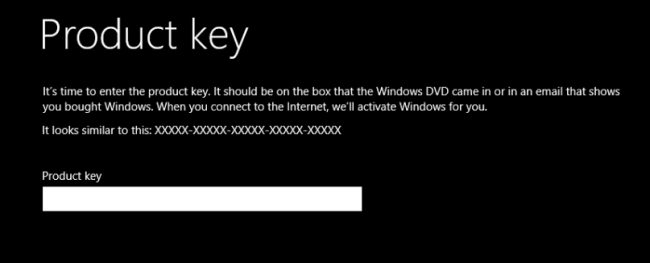
Now continue with the installation, you won’t be promoted for any installation key while in the process. After the installation is completed, you will see a window promoting to put the Product Key. Here you can enter the Windows 8 Product key and Windows 8.1 will accept it. You can use the same media to install Windows 8.1 on any PC, until the users has the CD key, do not put yours there.

Avril Lavigne HD Wallpapers Free – Download Here

0
Avril Lavigne HD Wallpapers Free – Download Here

Everyone love celebrities, undoubtedly they are lovable and endearing. Everyone follow their styles, looks, fashion, hairstyles, dress and Makeup, in short everything. So those who love  Avril Lavigne and are her big fans, I have collected the best HD Wallpapers just for you all. Those who cherish her, get one and set as wallpaper on your desktop. I have also collected Wide Desktop Wallpapers, Mobile HD Wallpapers, Macbook Wallpaper and now Celebrities HD Wallpapers. So Enjoy!

Avril Lavigne HD Wallpapers:


c768982d93da6eabe52819273bdccca6_large
Avril Lavigne HD Wallpapers
avrillavignewallpaper
Avril Lavigne HD Wallpapers
avril-lavigne-wallpapers-4
Avril Lavigne HD Wallpapers
Avril-Lavigne-Wallpaper-PC-Computer
Avril Lavigne HD Wallpapers
avril-lavigne-wallpaper-2011-hd-152-230x130
Avril Lavigne HD Wallpapers
avril_lavigne_what_the_hell-1600x1200
Avril Lavigne HD Wallpapers
avril-avril-lavigne-8410779-1024-768-299x224
Avril Lavigne HD Wallpapers
Avril-Lavigne-gangster-girl-30638851-1600-1200
Avril Lavigne HD Wallpapers
Avril-Lavigne-HD-Wallpapers-2012-02-299x224
Avril Lavigne HD Wallpapers
Avril-Lavigne-Nice  

Nexus 5 HD Wallpapers for Free – Download Here

0
Nexus 5 HD Wallpapers for Free – Download Here

Nexus 5 is the latest Google flagship, it has beaten up many big giants like iPhone 5s, Samsung Galaxy S4, HTC one and LG G2 on comparison with performance, browsing, speed and much more. I am in love with this device, that’s why I have collected HD Wallpapers for Nexus 5. Use a high definition wallpapers on your Nexus 5 and enjoy the Kitkat. You can check my Desktop Wallpapers and Mobile Wallpapers galleries as well. Just have a look at some of my colorful collection right below for Nexus 5.

Nexus 5 HD Wallpapers for Free :

1-13102Q10P8

787373KitKatWallpaper03copie

hgAwSFc

Nexus-5-Wallpaper-HD-Smartphone

nexusae0_default_wallpaper_thumb1

nexusae0_default_wallpaper

nexusae0_wallpaper_22

qviAxbspbPtpBANfOBQUTuaZeO4CXk4sWpmPeYMh3neRrvk7cU68UkO6VJeigpR1

Simple Background Nexus 5 Wallpapers HD 84

wallpaper_nexus5_2160

How To Transfer Text Messages From Mobile To PC

0
How To Transfer Text Messages From Mobile To PC

While using an Android device, there is one thing whose Back-up is more necessary to create than any other thing. Messages are the most important part of communication, where some of the apps offers creating a Back-up, yet most of the users don’t want to use any other app than default messaging app offered by the OEM and all of them doesn’t even offer any Back-up and Restore option, users have to rely on 3rd party apps to make a back-up of their messages and save them to their PC’s or upload it anywhere to use it afterwards, mostly for restoring.

While there are so many great apps offering such facility, still not all of them works properly and isn’t reliable. In this matter, SMS To Text is the best applications to choose from any other app. You can filter Messages by Converstaions, Types and By Date, you can save the files in normal Text or CVS format, you can filter the SMS, In SMS, Out SMS and Draft SMS and even save it to an external storage.

unnamed

For Restoring the Messages, all you need is the Back-up made from SMS To Text, just Tap the Restore option and locate where you have saved the files in your Mobile phone, confirm the Process and let it restore the Back-up, all of your messages till the Back-up date will be restored in a matter of seconds. It supports Windows, Unix, Mac plain text new line format. You can download this app from Play Store, but if we don’t post the apk file along with installation process, there is no use of this post.

Necessary Preparations:

  1. Download Apk File Of SMS To Text: Link 
  2. Allows your device to Install from Unknown Sources. Go to Settings > Securityand Tap Unknown Source.

Screenshot_7

How To Install SMS To Text On Android.

  1. Download the Above file.
  2. Connect your Device with PC.
  3. Copy the Apk file to your device.
  4. Disconnect the Device.
  5. Install the Apk like normal file, just tap the Apk File and Confirm the installation.
  6. While installing, if ask for any Installation Process, Choose “Package Installer and if there is a Pop-Up Choose Decline”

How To Use SMS To Text

  1. Open the App after the installation.
  2. You will see a screen showing filtration of messages, choose what you like by taping it.
  3. Once done, Tap Export button and select the name to start the exporting.

How To Install Flash Player On Android 4.2.2 and Above

1
How To Install Flash Player On Android 4.2.2 and Above

Since Flash Player support has officially been ended for the newer versions of Android and further release of Androids won’t have the Flash Player installed in it. Play Store has many browsers to offer that runs Online videos without any need of Flash player, but still to enjoy them at best quality and especially to play games on Browsers and also to run videos from those sites, whose app is unavailable for Android, Flash Player is a necessity. Time and again we have been requested to post a guide about how to install Flash Player on Android 4.2 and Above, and today we are about to show you how.

However, Flash Player is not available on Google Play Store we are going to use an Apk file available at Adobe homepage. We are also going to show you how you can install an Apk file and what are the necessary requirements to install them. You will need a File manager for such a thing, ES File Manager is recommended as it is the best one available on Play Store, but you can try any other you like.

flash-player-android-logo-jelly-bean

Necessary Preparations:

  1. Download Apk File Of Flash Player: Link ,  and scroll down to Flash Player for Android 4.0 archives, download the latest version and copy it to your phone.
  2. Allows your device to Install from Unknown Sources. Go to Settings > Security and Tap Unknown Source.

How To Install Flash Player On Android.

  1. Download the Above file.
  2. Connect your Device with PC.
  3. Copy the Apk file to your device.
  4. Disconnect the Device.
  5. Install the Apk like normal file, just tap the Apk File and Confirm the installation.
  6. While installing, if ask for any Installation Process, Choose “Package Installer and if there is a Pop-Up Choose Decline”

How To Use Flash Player On Android.

In order to use Flash Player to run flash content on Mobile phone, you need a browser that supports Flash Player, Google Chrome does not support a Flash Player, but alternates like Mozilla Firefox and Dolphin Browser supports such thing. FireFox won’t need anything once the app is installed, however, on Dolphin Browser you need to enable the flash plugin, Open Dolphin Settings > Flash Player > Always On.

How to enable iOS 7 AirDrop on your iPhone, iPad or iPod Touch

0
How to enable iOS 7 AirDrop on your iPhone, iPad or iPod Touch

When Apple released iOS 7 it came up with new and improved features like Airplay, Airdrop etc. The one feature I like the most is “Airdrop”, a file sharing feature. As we all know in the past, Apple was known as a non-user friendly device, whereas Samsung, Nokia, HTC and many other brands gave free access to users to do anything  they want, also connect with any device and share. Users of Android can share files through Bluetooth and NFC easily, but not an iPhone user. But when they introduced Airdrop, sharing got more easy. So that’s why today I’ve prepared a guide on How to enable iOS 7 AirDrop on your iPhone, iPad or iPod Touch. Enjoy the guide below.

To use AirDrop you have enable both bluetooth and Wifi. Bluetooth ( for broadcast, discover, and set connection) and Wi-Fi ( for  transfer the data). Maximum range for Air Drop is approximately 30 feet.

AirDrop on iOS7

How to enable iOS 7 AirDrop on your iPhone, iPad or iPod Touch:

  • Make sure you are logged into iCloud.
  • Now Bring up the control by swiping your finger upwards from the bottom of your iPhone.
  • If you want to share files then make sure Wifi and Bluetooth both are on.
  • Tap in AirDrop to enable it.
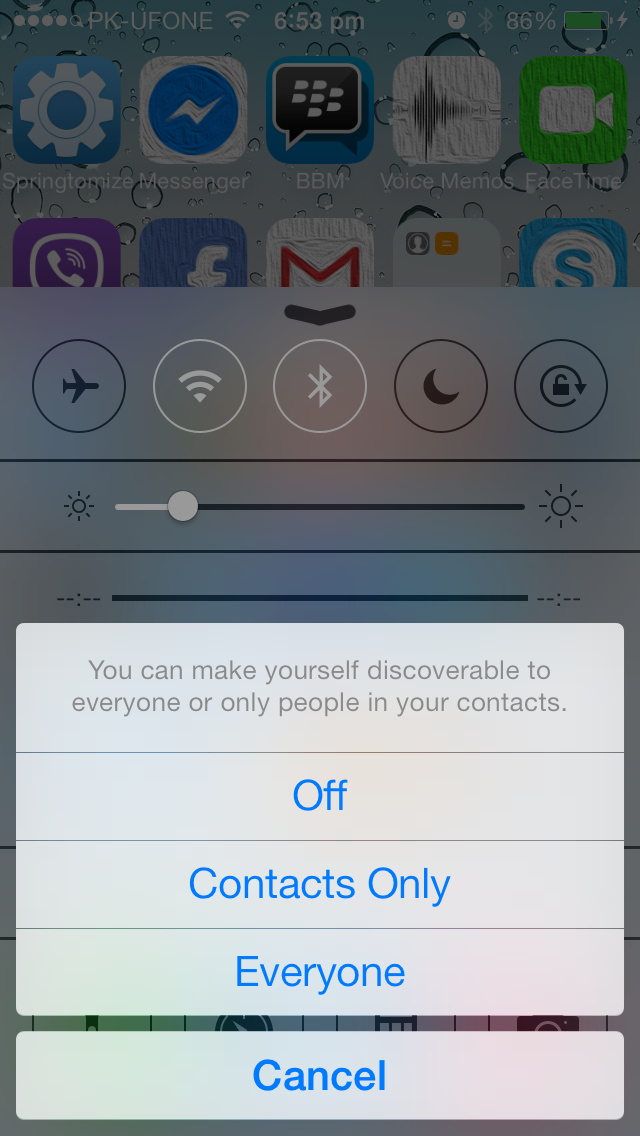
  • After taping on AirDrop you will get 3 options. Off – Contacts Only – Everyone.

2014-04-25 18.53.28

  • Select which one you want if you want to beam files only with contacts the select Contacts only, If you want to share files with anybody select Everyone.

Most Popular HD Wallpapers For Your Desktop – Free Download

0
Most Popular HD Wallpapers For Your Desktop – Free Download

Just a few days back I have posted Wide Desktop Wallpaper for Free. Today, I’ve collected some of the Most Popular HD Wallpapers For Your Desktop. Good thing is that they are all free, so choose the best one you like and add as a wallpaper on your Desktops, Laptops, Mac and iMac. Style your screen live and colorful with the amazing collection. Do check my Wallpaper Gallery and all are free. I also have a beautiful collection of Smartphone Wallpapers, so please do check them here [ Mobile HD Wallpapers ].

3367d61d3a1c646b2869d3478c932921

Most Popular HD Wallpapers For Your Desktop

Do check my Wallpaper Gallery and all are free. You can find more exciting a hd wallpapers for your mobile devices and Desktop PC/Mac.

Root Samsung Galaxy Note 2 Running Android 4.4.2 KitKat [All Variants]

Root Samsung Galaxy Note 2 Running Android 4.4.2 KitKat [All Variants]

Samsung has started rolling out the long awaited Android 4.4.2 KitKat for the Galaxy Note 2 with lots of performance enhancements, bug fixes, UI changes, some new additions in the feature list and a lot more. In case you have updated your device and you are looking for a method to root your device running the latest and greatest version of Android, your search may come to and end once you’re here at the right spot. In the following post we are going to root all the variants of the Galaxy Note 2 running Android 4.4.2 KitKat.Root Note 2 KitKat

Before we move any further, I’m assuming that not all of you are familiar with the root access and have no idea about why you should gain the root access on your device. To make it clear and remove all the confusions for the first timers, we will be going through a brief introduction of the root access first and then proceed with the method.

Rooting your phone gives you complete access over all the data which is apparently locked by the manufacturers. This includes removal of the factory restrictions and making changes to the internal system and the operating system. Gaining the root access gives you the privileges to install various applications to enhance the performance of your device, allows you to remove the built-in applications/programs, helps you to upgrade the battery life of your device & install the apps which require the root access for the proper functionality and modify your device in so many other ways e.g using mods and flashing custom recoveries and custom ROMs. There is a laundry list of things you can do after having your device rooted and installed the custom recovery, now once you’re rooted and have installed custom recovery, go ahead and enjoy it on your phone. Here’s our collection of 10 Best Root Apps.

Here are the pre-installation instructions:

  1. This guide is only for  Samsung Galaxy Note 2, the variants that are listed below. Do not try this on any other device, please check your device’s model number in Settings > General > About Device.
  2. Your phone’s battery must be charged at least over 60%. This is highly recommended in order to prevent any power issues during the flashing process.
  3. Make sure that you backup your important media content, Contacts, Call Logs & Messages. This is highly recommended just in case something goes wrong and you need to reset your phone.
  4. Use only OEM data cable to establish connection between your phone and PC. Turn off your Anti Virus and Firewall to prevent any connection issues. Also enable USB debugging mode on your phone if you face connection issues.
  5. Your device must be running Android 4.4.2 KitKat.
  6. Alright! Go ahead, follow this guide to the letter.
Disclaimer: The methods involved in flashing custom ROMs and rooting your phone are highly custom and may result in bricking your device, and has nothing to do with Google or the device manufacturer that is SAMSUNG in our case. Also rooting your device will void its warranty and you will be no longer eligible for any kind of free device services by the manufacturers/warranty providers. In case of any mishap we may not be held responsible. Also, if your device comes with Knox Security, you will result in voiding it after you root your device and the Knox counter cannot be reset. Follow these instructions to the letter to avoid any mishap or bricking. Make sure that whatever you do, you are doing it at your own responsibility. 

We’ll be going through two different methods to root Samsung Galaxy Note 2, Pick up the one that suites the best to you.

Root Galaxy Note 2 Using TWRP Recovery:

  1. Install the latest TWRP Recovery on your Galaxy Note 2.
  2. Download the  SuperSu.zip file.
  3. Place the downloaded file on your phone’s sd card.
  4. Open TWRP Recovery and select Install > SuperSu.zip and flash it.
  5. Reboot your device and find SuperSu in app drawer.
  6. Congrats! You’re now rooted as well.

Root Galaxy Note 2 using Cf-Autoroot:

Files you need to download: 

  1. Download and extract Odin PC – Get it here
  2. Download and Samsung USB Drivers – Get here

Download and extract Cf-Autoroot.zip file for your Galaxy Note 2:

  1. Open Odin3.exe from the extracted folder.
  2. Put your Galaxy Note 2 in download mode by pressing and holding Volume Down + Home + Power key at the same time, you should get a screen showing a warning and asking to continue, press Volume Up to continue.
  3. Now your phone should be in downloading mode. Connect your phone to your PC.
  4. As soon as Odin detects your phone the ID:COM box will turn light blue.
  5. Click on the PDA tab and select the CF-autoroot file that you extracted above.
  6. In case you’re using Odin v3.09, you will put the .tar.md5 file in the “AP” tab, rest of the settings should remain untouched in Odin v3.09 as well.
  7. Your Odin screen should look like exactly as shown below.
  8. odin_explained
  9. Click Start and the root process should start showing you a process bar in the first box above ID:COM.
  10. The process is quite fast and will finish in a few seconds, as soon as it ends, your phone will restart and you’ll see the CF Auto root installing SuperSu on your phone.
  11. Congratulations you have your Samsung Galaxy Note 2 rooted now!

How to check if the device is properly rooted or not?

  1. To do so, go to Google Play Store on your Galaxy S5.
  2. Find “Root Checker” and install it.
  3. Open Root Checker.
  4. Tap “Verify Root”.
  5. It will ask you for SuperSu rights, tap “Grant”.
  6. It should show you Root Access Verified Now!
  7. That’s All!

1560688_10202529514651766_2061540064_n

That’s all. In case you have some queries or you’re facing some issues regarding this post, feel free to stop by the comment box below and drop us your words. We surely will get back to you as soon as possible. Thanks all.

How to Update Samsung Galaxy Note 2 to Android KitKat Firmware

How to Update Samsung Galaxy Note 2 to Android KitKat Firmware

Samsung has suddenly surprised the Galaxy Note 2 users by rolling out the Android 4.4.2 KitKat update today. It’s been pretty long since the Galaxy Note 2 owners were waiting for the update and some were surely disappointed by Samsung for this much delay in the update, but it surely was there to roll out and finally, it did.

The new update packs up lots of performance enhancements, bug fixes, there are some UI changes e.g. the Music Player on Lock Screen, white icons in the notifications, transparent status bar, the addition of Samsung Wallet and Knox in the phone, wireless printing, NFC tap-to-pay support and some others that you may experience upon installing the new update on your device.

The current update is based on the build number XXUFND3 and is available only for International Galaxy Note 2 GT-N7100, but other variant owners may keep patience as Samsung has given a good sign and other variants will surely follow the update soon.

As of now, the update is rolling out for France region, but the Android enthusiasts from other regions, who can’t wait to get their hands on the latest and greatest version of Android running on their device may not be able to receive OTA updates or update the device through Samsung Kies. In the aforementioned case, you may not worry as we already have the solution for you.

In the following post, we are going to install Android 4.4.2 KitKat XXFUND3 firmware on the Galaxy Note 2 GT-N7100 using Odin3, Samsung’s tool for flashing the firmware manually. This is the official firmware, so it won’t void your phone’s warranty or cause any harm and it doesn’t matter from which country you are, you can run this firmware on your Galaxy Note 2 GT-N7100 flawlessly. All you need to do is, follow this step-by-step guide carefully and taste the KitKat on your SGN 2.

Here are the firmware details:

  • Device Model: GT-N7100
  • Region: XEF (France)
  • Version: N7100XXUFND3
  • OS: Android 4.4.2 KitKat
  • Build Date: 08.04.2014
  • Changelist: 1280411

Here are the pre-installation instructions:

  • Make sure that your phone’s battery is charged at least over 60%.
  • Use the original data cable for establishing the connection between your PC and phone.
  • Turn off / disable Samsung Kies while using Odin3.
  • Turn of any Anti Virus software while using Odin3.
  • Backup all your important data on internal storage, also backup your important ContactsCall Logs & MessagesThis is important as you will have to wipe your factory data after flashing this firmware. It is not necessary but it is highly recommended to achieve the best performance results.
  • If you’ve flashed a custom recovery, it is suggested that you create a Nandroid Backup.
  • Don’t forget to make EFS backup before flashing this firmware.
  • If your device is rooted, you may use Titanium Backup to back up each and everything on your phone.
  • Although it is not necessary to wipe your phone before flashing this firmware but to achieve the best performance, it is recommended that you perform a factory reset before flashing this firmware.

Things you need to download:

    1. Download Odin – Get it HERE.
    2. Download and Install Samsung USB drivers – Get HERE.
    3. Download and extract the Android 4.4.2 KitKat XXFUND3 Firmware for Galaxy Note 2 GT-N7100 – Get it HERE.

How to Install Android 4.4.2 KitKat on Galaxy Note 2 GT-N7100:

    1. Open Odin.
    2. Put your phone in download mode. To do so, turn it off and wait for 10 seconds. Turn it on by pressing and holding Volume Down + Home Button + Power Key simultaneously, You should see a warning, press Volume Up to continue.
    3. Connect your phone to your PC.
    4. As soon as Odin detects your phone, the ID: COM box should turn blue.  Make sure that you’ve installed Samsung USB drivers before connecting.
    5. Hit the PDA tab, for Odin 3.09 hit the AP tab. Select the extracted firmware file, that should be in .tar.md5 format.
    6. Make sure that the options selected in your Odin are exactly as shown in the pic.
    7. odin_explained
    8. Hit start and wait till the firmware flashing is complete, as soon as your device restarts, remove it from PC.
    9. Congrats! You’ve installed the latest Android 4.4.2 KitKat on your Galaxy Note 2 GT-N7100.

Galaxy Note 2 KitKat Galaxy Note 2 KitKat2 Galaxy Note 2 KitKat3

Got any problems? Feel free to leave us a comment, we will try our best to help you out. Thank you.

Image Source

How To Solve Play Store Instant Crash Error

0
How To Solve Play Store Instant Crash Error

Play Store is the only reason why most of the people turned to Android from any other OS, why? because it has so many apps to offer, that one can feel himself lost in that world of apps. Other Platforms have their own Markets too, but what Play Store has to offer can’t be equalized by anyone else. But no matter how we look at it, Google Play store app available for Android is just like other apps, and whenever one tries to bring huge changes in any app, the app is sure to show errors and crashes on the startup or when you try to open up the app. It usually crashes, because your current ROM is not supporting the Play Store version, or upon the update, some script even goes missing.

uploadfromtaptalk1365528879549

Upon seeing this error, mostly users reboot their device over and over again, and if that still doesn’t work, they even try to install an apk file of it. Usually installing an Apk  works, but not all the times. Sometimes, what you need to do is, some manual coding or need to change some of the settings. For this what you need to do, is about to be shared below. But first lets see what the actual problem is:

Most of the users have complained, that when they try to open the Play Store,  it crashes and this happens again and again, even after several reboots, it doesn’t work.  Here is the Solution to that:

  1. Open Settings.
  2. Scroll down until you Find Google Play Store.
  3. Open it.
  4. Now Tap Clear Cache, and Clear data.
  5. Restart your device and run the App again, see if that works

Untitled-1

In most of the cases,  going through this process solves the problem, but if the problem still continues to occur, follow the rest of the guide to see how you can fix it. Installing Google Apps for your Android version can solve this problem, here is how you can Flash them.

Requirements:

  • A rooted device.
  • Custom Recovery.
  • Appropriate Google Apps.zip: Link

How To Flash Google Apps

  1. Download and Copy the Google Apps Zip to the root of your sdcard.
  2. Boot into Recovery.
  3. First Select Wipe Cache.
  4. Navigate to advance, and Select Wipe Devlik Cache.
  5. Then go to Install Zip from Sd card.
  6. Tap Choose Zip from Sd card.
  7. Select Google Apps.zip file and confirm the installation.
  8. Wait for it to over and Select reboot system now


Download Gyro for PC – Windows XP/7/8/8.1 & MAC

0
Download Gyro for PC – Windows XP/7/8/8.1 & MAC

Another amazing game that we got out hands on, is Gyro, a simple, funny and addictive game. The game prompts the players to rotate a circle having three different colors and match with the incoming balls of the same colors. Hitting the right colored ball with the right color on the circle increases the speed of your game, and the incoming balls come at a more faster speed. Gyro is addictive enough to keep your playing this game for hours. The game is available in the Google Play Store for free but also offers in-app purchases.

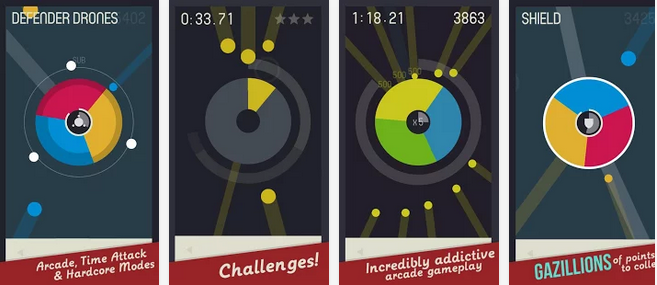
Gyro

Some of you might have played Gyro on your Android devices, but some of you may not. For those who haven’t played it yet but want to experience it, will need an Android device but if you don’t have any? Well, that’s what we are here for today. In the following post we are going to install Gyro on a Windows XP/7/8/8.1 powered PC or a MAC. All you got to do is, move a little forward with us and get it installed on your computer.

How to Download & Install Gyro on PC or MAC:

  1. You need an Android emulator to run this game on your Windows PC or MAC. We recommend using BluestacksUse our guide to install it on your PC.
  2. After downloading and installing Bluestacks, download Gyro APK.
  3. Open the downloaded APK file now, and let Bluestacks install it.
  4. Open BlueStacks now > All Apps > Gyro APK.
  5. The game will start now, follow the on screen instructions.
  6. Follow the initial screen,  you’ll be able to play it.
  7. Use your mouse’s left click to rotate your circle and spin it to match the colors.
  8. Enjoy endless fun!

Gyro APK v2.01

0
Gyro APK v2.01

While finding something new on the Google Play Store to have fun on my phone, I came across an amazing and simply addictive game with a completely different and awesome concept. Gyro, as the name suggests, is a minimalist game consisting of a circle at the center, that you got to rotate and match with the incoming colors. The circle sports a combination of three different colors, there are small balls coming from all the sides matching with the colors, matching the right color will earn you points, and matching the wrong colors will result in taking your game to an end.Gyro

What’s even more cool about Gyro is, the game’s graphics are way too cool and are not eye-distractive. As your game move forwards, it gets even more faster and the incoming balls are thrown in a massive number at a high speed, in short, it becomes quite challenging. After listening all this about Gyro, I’m sure that many of you would surely like to play this game, so, to make the search easier, we’ve linked in the APK file of Gyro v2.01 right here at the bottom of this post. All you got to do is, go ahead download the APK and follow the instructions to get it running on your Android device, but let’s first have a look on the game’s feature and description by the developer.

Features:

– Beautifully simple controls and design
– Incredibly addictive arcade gameplay
– Gazillions of points to collect
– Arcade, Time Attack, Hardcore and Challenges game modes
– Unlockable color sets and 8-bit sound set
– Swarm-supported online leaderboards (optional)

How to download & Install Gyro v2.01 with APK:

  1. Download Gyro v2.01 APK file.
  2. Copy the downloaded APK file to your phone or download it directly to your phone.
  3. Now locate the downloaded / copied APK file on your phone and tap it.
  4. Proceed with the installation, select “Package Installer” if prompted.
  5. Allow Unknown Sources if required, it should be in Settings > Security > Unknown Sources > Tick it.
  6. Proceed and complete the APK’s installation.
  7. Once done, access the installed game from the app drawer.
  8. Play the challenging game and have fun.
  9. Enjoy!