Home Blog Page 458

Install CWM Recovery and Root Samsung Galaxy S4 Mini Dual GT-I9192 [How To – Guide]

Install CWM Recovery and Root Samsung Galaxy S4 Mini Dual GT-I9192 [How To – Guide]

Samsung Galaxy S4 Mini’s dual SIM variant came out around July, 2013. The device sported nothing different from its siblings except for its dual SIM slots.  While the device has been there for quite a long time now, its development has also started and there are custom ROMs, Mods and tweaks that you may apply to your device and enjoy the open nature of Android. The very basic thing you may require to go beyond the walls is a custom recovery. ClockworkMod 6.0.4.6 is available for the Galaxy S4 Mini Dual GT-I9192 now, you may install this recovery and root your device. Wondering how? well, follow us.

Samsung-Galaxy-S4-mini2

As you scroll down, you will find a detail and comprehensive guide to install CWM 6.0.4.6 recovery on your Galaxy S4 Mini Dual GT-I9192 and also how you can root it. Before we head towards the cwm and root instructions, I’m assuming that not all of you are familiar with a custom recovery and the root access. To make the things clear, we will go through a brief intro of the root access and a custom recovery.

Custom Recovery [ClockworkMod]:

A custom recovery allows you to install custom roms, mods etc. Along with these, you can make a Nandroid backup, this helps you a lot as you can move back to the previous working state of your phone at any time you want if you have backed up your current system. In some cases, to root the phone you need to flash SuperSu.zip file in the custom recovery, having installed the recovery may help you while in some cases to install the recovery easily, you need to have the phone rooted. You can also wipe cache and dalvik cache of your phone using a custom recovery

Root Access:

Rooting your phone gives you complete access over all the data which is apparently locked by the manufacturers. This includes removal of the factory restrictions and making changes to the internal system and the operating system. Gaining the root access gives you the privileges to install various applications to enhance the performance of your device, allows you to remove the built-in applications/programs, helps you to upgrade the battery life of your device & install the apps which require the root access for the proper functionality and modify your device in so many other ways e.g using mods and flashing custom recoveries and custom ROMs. There is a laundry list of things you can do after having your device rooted and installed he custom recovery, now once you’re rooted and have installed custom recovery, go ahead and enjoy it on your phone. Here’s our collection of 10 Best Root Apps.

Here are the pre-installation instructions:

  1. This guide is only for  Samsung Galaxy S4 Mini GT-I9190, GT-I9192, GT-I9195. Do not try this on any other device, please check your device’s model number in Settings > General > About Device.
  2. Your phone’s battery must be charged at least over 60%. This is highly recommended in order to prevent any power issues during the flashing process.
  3. Make sure that you backup your important media content, ContactsCall Logs & Messages. This is highly recommended just in case something goes wrong and you need to reset your phone.
  4. Use only OEM data cable to establish connection between your phone and PC. Turn off your Anti Virus and Firewall to prevent any connection issues. Also enable USB debugging mode on your phone if you face connection issues.
  5. Alright! Go ahead, follow this guide to the letter.
Disclaimer: The methods involved in flashing custom ROMs, recoveries and rooting your phone are highly custom and may result in bricking your device, and has nothing to do with Google or the device manufacturer that is SAMSUNG in our case. Also rooting your device will void its warranty and you will be no longer eligible for any kind of free device services by the manufacturers/warranty providers. In case of any mishap we may not be held responsible. Also, if your device comes with Knox Security, you will result in voiding it after you root your device and the Knox counter cannot be reset. Follow these instructions to the letter to avoid any mishap or bricking. Make sure that whatever you do, you are doing it at your own responsibility. 

How Install CWM 6.0.4.6 Recovery on Samsung Galaxy S4 Mini Dual:

Files you need to download: 

  1. Download and extract Odin PC – Get it here
  2. Download and Samsung USB Drivers – Get here
  3. Download and extract the ClockworkMod-Recovery.tar.zip file, you will get a .tar.md5 file.

Procedure:

  1. Open Odin3.exe from the extracted folder.
  2. Put your Galaxy S4 Mini Dual I9192 in download mode by pressing and holding Volume Down + Home + Power key at the same time, you should get a screen showing a warning and asking to continue, press Volume Up to continue. If this method doesn’t work, try one from this guide.
  3. Now your phone should be in downloading mode. Connect your phone to your PC.
  4. As soon as Odin detects your phone the ID:COM box will turn light blue.
  5. Click on the PDA tab and select the Recovery.tar.md5  file that you downloaded.
  6. In case you’re using Odin v3.09, you will put the .tar.md5 file in the “AP” tab, rest of the settings should remain untouched in Odin v3.09 as well.
  7. Your Odin screen should look like exactly as shown below.
  8. odin_explained
  9. Click Start and the flashing process should start showing you a process bar in the first box above ID:COM.
  10. Congratulations you have successfully install  CWM recovery on your Galaxy S4 Mini Dual.

Don’t forget to create a Nandroid Backup once you’ve installed CWM recovery.

How to Root:

  1. You need to install CWM recovery first using the above instructions.
  2. Download S4 Mini Rootkit v2.zip file now.
  3. Place the downloaded Supersu.zip file on your phone’s external sd card.
  4. Now boot into CWM recovery on your phone.
  5. Once in CWM, select “Install Zip > Choose Zip from SDcard > Select S4 Mini RootKit v2.zip > Yes”.
  6. This will flash SuperSu.zip file, once flashing is complete, reboot your device.
  7. Congrats! You’re rooted now!


That’s all. In case you got any queries or facing any problems regarding this post, feel free to stop by the comment box below and reach us. We will respond you as soon as possible. Thanks all.

Credits: Arco68

Install Philz Advanced CWM Recovery on Samsung Galaxy S4 Mini [How To – Guide]

Install Philz Advanced CWM Recovery on Samsung Galaxy S4 Mini [How To – Guide]

CWM Advanced Edition by famous XDA developer Philz3579 is the modified version of the original ClockworkMod Recovery. The Advanced Edition by Philz is the touch recovery, with a number of features atop and a very cool UI. Philz Advanced CWM is compatible with a hefty list of devices including Samsung Galaxy S4 Mini’s 3 variants GT-I9190, GT-I9192 and GT-I9195. If you’ve been looking for this recovery for your Galaxy S4 Mini, you’ve spotted the right place now.Galaxy S4 Mini Philz Advanced CWM

As you scroll down, you will find a comprehensive guide to install Philz Advanced CWM Recovery on your Samsung Galaxy S4 Mini GT-I9190/I9192 or I9195. The current available version of Philz Advanced CWM at the time of writing this post for Galaxy S4 Mini is 6.26.6 that is based on ClockworkMod 6 recovery. Before we head towards the instructions, I’ll assume that not all of you’re familiar with the custom recoveries and some might be the newbies. In order to remove any existing confusions and to make it more clear, we will first go through a brief introduction of the custom recoveries and also know that why you should install a custom recovery on your device.

A custom recovery allows you to install custom roms, mods etc. Along with these, you can make a Nandroid backup, this helps you a lot as you can move back to the previous working state of your phone at any time you want if you have backed up your current system. In some cases, to root the phone you need to flash SuperSu.zip file in the custom recovery, having installed the recovery may help you while in some cases to install the recovery easily, you need to have the phone rooted. You can also wipe cache and dalvik cache of your phone using a custom recovery

Here are the pre-installation instructions:

  1. This guide is only for  Samsung Galaxy S4 Mini GT-I9190, GT-I9192, GT-I9195. Do not try this on any other device, please check your device’s model number in Settings > General > About Device.
  2. Your phone’s battery must be charged at least over 60%. This is highly recommended in order to prevent any power issues during the flashing process.
  3. Make sure that you backup your important media content, ContactsCall Logs & Messages. This is highly recommended just in case something goes wrong and you need to reset your phone.
  4. Use only OEM data cable to establish connection between your phone and PC. Turn off your Anti Virus and Firewall to prevent any connection issues. Also enable USB debugging mode on your phone if you face connection issues.
  5. Alright! Go ahead, follow this guide to the letter.
Disclaimer: The methods involved in flashing custom ROMs, recoveries and rooting your phone are highly custom and may result in bricking your device, and has nothing to do with Google or the device manufacturer that is SAMSUNG in our case. Also rooting your device will void its warranty and you will be no longer eligible for any kind of free device services by the manufacturers/warranty providers. In case of any mishap we may not be held responsible. Also, if your device comes with Knox Security, you will result in voiding it after you root your device and the Knox counter cannot be reset. Follow these instructions to the letter to avoid any mishap or bricking. Make sure that whatever you do, you are doing it at your own responsibility. 

How Install Philz Advanced CWM Recovery on Samsung Galaxy S4 Mini:

Files you need to download: 

  1. Download and extract Odin PC – Get it here
  2. Download and Samsung USB Drivers – Get here
  3. Download the Recovery.tar.md5 file for your variant:

Procedure:

  1. Open Odin3.exe from the extracted folder.
  2. Put your Galaxy S4 Mini in download mode by pressing and holding Volume Down + Home + Power key at the same time, you should get a screen showing a warning and asking to continue, press Volume Up to continue. If this method doesn’t work, try one from this guide.
  3. Now your phone should be in downloading mode. Connect your phone to your PC.
  4. As soon as Odin detects your phone the ID:COM box will turn light blue.
  5. Click on the PDA tab and select the Recovery.tar.md5  file that you downloaded.
  6. In case you’re using Odin v3.09, you will put the .tar.md5 file in the “AP” tab, rest of the settings should remain untouched in Odin v3.09 as well.
  7. Your Odin screen should look like exactly as shown below.
  8. odin_explained
  9. Click Start and the flashing process should start showing you a process bar in the first box above ID:COM.
  10. Congratulations you have successfully install Advanced CWM recovery on your Galaxy S4 Mini

Don’t forget to create a Nandroid Backup once you’ve installed CWM recovery.

How to Root:

  1. You need to install CWM recovery first using the above instructions.
  2. Download file now.
  3. Place the downloaded Supersu.zip file on your phone’s external sd card.
  4. Now boot into CWM recovery on your phone.
  5. Once in CWM, select “Install Zip > Choose Zip from SDcard > Select SuperSu.zip > Yes”.
  6. This will flash SuperSu.zip file, once flashing is complete, reboot your device.
  7. Congrats! You’re rooted now!

Check out the best 10 root apps.

Also check:

That’s all. In case you got any queries or facing any problems regarding this post, feel free to stop by the comment box below and reach us. We will respond you as soon as possible. Thanks all.

How to Set & Trigger Location On Your iPhone Based On Reminders [ Easy Guide ]

0
How to Set & Trigger Location On Your iPhone Based On Reminders [ Easy Guide ]

In today’s life, time passes by so fast that we forget to do most of things. Everyone is busy in their work as life never stops. People do so many things to remember things like, they use Sticky Notes, dairies and reminders. Even some people ask their colleagues to kindly remind them that they have to do this today. Well I am gadget’s geek so, I have found a geeky solution. I like to add reminder on my iPhone with the help of stock reminder app, it helps me a lot but not all the time, so with the help Neil Gonzalez writer at Wonder how to, now I can set location trigger on my reminder’s app, means whenever I go to a place for e.g a Shopping Mall  and  I have added a reminder like  ( Buy Samsung Galaxy S5 ) so I’ll get notified. Cool isn’t it, so no I am going to tell you how to Set & Trigger Location On Your iPhone Based On Reminders.

How to Set & Trigger Location
©Techbeasts.com

How to Set & Trigger Location On Your iPhone Based On Reminders [ Easy Guide ]:

  • First tap on reminder apps on your home screen.
  • Now add a new reminder and pressing the blank line. 


Screen Shot 2014-05-03 at 09.21.20

  • Now tap on the circled icon to edit.

Screen Shot 2014-05-03 at 09.23.26


  • After tapping on a circled icon you’ll be in reminder options.

Screen Shot 2014-05-03 at 09.30.11

  • From here enable remind me at location -> Tap Location. Now you can enter the desired location.

Screen Shot 2014-05-03 at 09.24.12

  • After selecting location you’ll get two options. When I arrive and When I leave. Choose what ever you want.

Now go back to details and tap on done. Your location based reminder will be added. Do tell me in the comments if you face any issues regarding this guide.


How To Enable USB Debugging on Samsung Galaxy S5 [ Easy Guide ]

How To Enable USB Debugging on Samsung Galaxy S5 [ Easy Guide ]

USB Debugging is very useful on Android devices, it help us to connect with PC to transfer and share files and images. It also help  us to Flash firmwares through Odin, but if  USB Debugging option is not enable you cannot connect with Odin. You can enable this option through developer options. Ok let’s tell you how to enable USB Debugging on Samsung Galaxy S5.

USB Debugging on S5
©Techbeasts

How To Enable USB Debugging on Samsung Galaxy S5:

  • Goto Main menu and launch quick settings.
  • Now go to About Device Menu.
  • Now go to Build Number.
  • Then tap on the build number 7 times.
  • After the 7th tap you’ll get the message that now you are a developer.
  • Now press back button, now you shall see Developer option.
  • Go to developer menu and enable USB Debugging.

Now that USB Debugging option is enable I hope that you don’t have any issue connecting through USB on PC and if any problem still exist please make sure that you are using original USB cable of Samsung Galaxy S5.

Also Check:

How to Turn on Screen Mirroring on Samsung Galaxy S5 and Connect With SmartTV

How to Turn on Screen Mirroring on Samsung Galaxy S5 and Connect With SmartTV

For the past few days, I have been posting about Samsung Galaxy S5 guides. My recent posts were about Baby Monitor, Mobile HotSpot, Private Mode and Measure Heart Rate. Today, I will tell you how to Turn on Screen Mirroring on Samsung Galaxy S5. You can share your Phone’s Screen to the TV or Laptop. Screen Mirroring is not a new feature added in Samsung Galaxy S5 it is also present in Samsung Galaxy S4 and Note 3.

Samsung Galaxy S5 Techbeasts
Samsung Galaxy S5 Quick Setting ©Techbeasts

Before Starting following are the external devices that you’ll be needing.

  • AllShare Cast Wireless Hub.
  • HomeSync.
  • Miracast.
  • HDMI Cable.

How To Enable screen mirroring on Samsung Galaxy S5:

  • Goto quick setting.
  • Tap on Screen mirroring icon and enable it.

Now in the following steps you’ll find out how you can enable screen mirroring with AllShare Cast Wireless Hub, HomeSync, Miracast and HDMI Cable.

How to screen mirror from Samsung Galaxy S5 to a TV using AllShare Cast:

  • Turn on your television.
  • Power on your AllShare Cast though charger.
  • Connect your TV with AllShare Cast with HDMI Cable.
  • Kindly properly put HDMI Cable in the right port.
  • Now wait for the light to get blue from red on your AllShare Cast device.
  • Your TV is connected with AllShare Cast.
  • Now go to Samsung Galaxy s5 quick setting and tap on screen mirroring and first turn off then turn on it again.
  • After turning on Screen mirroring you will get a list of available devices. Select AllShare Cast’s dongle and enter the PIN as showed on TV.
  • Your Samsung Galaxy S5 is connected with your TV through AllShare Cast.

How to screen mirror from Samsung Galaxy S5 to a Samsung Smart TV:

  1. Press Input from your Samsung SmartTV remote.
  2. Select Screen Mirroring from your Smart Tv screen.
  3. Now go to your Galaxy S5 quick setting tap on Screen Mirroring.
  4. Your Phone will list all the available device available for Screen Mirroring.
  5. Select Samsung Smart TV. That’s all.

How To Fix Problems With Moto G

0
How To Fix Problems With Moto G

Moto G is an amazing smartphone and delivers great specs in a reasonable price, but no matter which device you are using, it is sure to cause some problems, it is just that we don’t notice much of them. But there are those who love to explore the whole device and these are the ones who find most of these problems and also share their solutions. Overall, this is not something that a normal user should keep in mind, but these type of tutorials help them is solving such problems that they are facing but have no idea about it. Today we will cover a topic related with some of the problems with Moto G and how to fix them.

moto-g-review-5

As Always Battery Issues:

I don’t know, form the release of Razer MAX most of the Motorola users stopped complaining about the issues with Battery Life. But we are not talking about battery life here, Moto G has some unique type of battery issue, something never seen in any of the Motorola devices. Here you are sitting with your device with 50% battery and boom! all of a sudden your battery level is at 1%, yet your device lives on. However, after a little time your battery level reaches the same level as before, this is called Battery calibration error.

It is quite simple to solve, just let your battery be discharge fully, then recharge it fully while your device is Off and then use it. If it doesn’t solve the problem, repeat the process till you are satisfied.

SIM Not Detected:

Some of the users complained about their Moto G, that it is dropping signals. Here is what happened, you put a SIM card in your device, let’s say after an hour, your Moto G stop showing the signals. Here are some solutions, you might have been using a Nano SIM card adaptor, Moto G supports Micro SIM or you might have a damaged SIM. Try another card, and see if that works.

Camera App Fail To Launch:

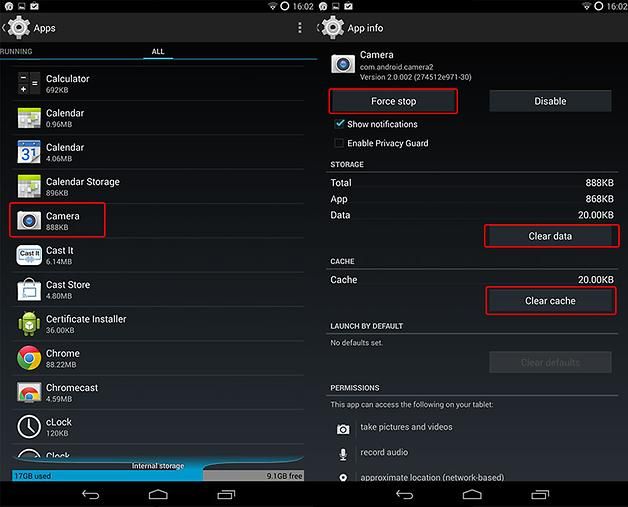
After upgrading their device to Android 4.4 Kit-Kat, most of the users have complained about their Camera app failed to launch, the easiest and quickest way to solve this problem is to go to Settings > App Manager and search for the Camera app, tap it and first Force Stop, Clear data and Cache. This solves the issue most of the times, but if the problem still occurs, use a 3rd party camera app.

motog2

Reboots and Lockups:

Random Restarts and Frozen Screen is the most searched issue in Moto G, users complained that the screen of their Device freeze time to time and then their device reboots. Sometimes it happens because of 3rd party applications, network issues and some other factors.

Here is a permanent solution to this problem:

Start your device in Safe Mode, Restart your device and once you see the Logo, Press and hold the Home button till you see the Home-Screen.

Then if you know which app is causing the problem, simply uninstall it, but if you have no idea which app is it, then Just go to the Settings > Back-up and Restore > Factory Data Reset.

motog1

Problems With Charging:

If your device restarts while charging or it is taking forever to charge fully. If so, then you must have been using a Faulty Charging Cable or should I say USB cable. Never use a Plug which provide less than 500mA and more than 1.5A for Moto G.

Dropped Wi-Fi Connection:

The problem with dropped Wi-Fi connection in any Android device with Android 4.4.2 Kit-Kat is not unique, you will experience it time to time. On Jelly Bean 4.3, this issue was completely resolved, but in Kit-Kat it has arrived again. Here are a couple of things you should do, if you are tired from turning it On and Off again and again.

  1. Go to Settings.
  2. Tap the 3 dots on the Top and Choose Advance Settings.
  3. Check the Keep On Wi-Fi During Sleep.

motog5

LED Notificaion Not Working:

Well I have experienced this Problem in HTC Sensation, Downloaded a Couple of LED notification apps from Play Store and everything was back in action. In the case of Motorola, it is even easier as they have their own Widget to control LED Notifications. Head over to the Play Store and search for Light Notification Widget. Just Install it and you’ll be able to enable the LED lights again, afterwards even if you delete this app, the LED lights will work as normal.

Update Samsung Galaxy Note 2 N7100 to Indian Android 4.4.2 KitKat Firmware

Update Samsung Galaxy Note 2 N7100 to Indian Android 4.4.2 KitKat Firmware

Samsung recently rolled out Android 4.4.2 KitKat for its former flagship Note, Galaxy Note 2. The new update packs up minor UI changes e.g white notification icons at the top, transparent status bar, camera shortcut on lockscreen and other changes here and there. Besides these, KitKat adds to the performance of the device, bugs have been fixed and the update is stable. Earlier this update was available for the France region only, just today, Samsung has started rolling out the KitKat update to the Indian users as well.

For some reason, Indian firmware is always said to be one of the most stable firmwares for Samsung Galaxy devices. The firmware isn’t locked for the Indian region only, but the users from other regions may also install this firmware and enjoy the latest and greatest version of Android. Users living in India will be able to update their device through OTA updates or through Samsung Kies, but those living in other regions, or even those who didn’t receive the OTA updates, they can install Android 4.4.2 KitKAt XXUFND3 firmware for INU region manually using Odin3 on your Samsung Galaxy Note 2 GT-N7100. In the following post we are going to have a look on the method that will help you to do so.

Let’s have a look on the firmware details:

  • Device Model: GT-N7100

  • Region: INU (India)

  • Version: N7100XXUFND3

  • OS: Android 4.4.2 KitKat

  • Build Date: 08.04.2014

  • Changelist: 1280411

Here are the pre-installation instructions:

  • Make sure that your phone’s battery is charged at least over 60%.
  • Use the original data cable for establishing the connection between your PC and phone.
  • Turn off /disable Samsung Kies while using Odin3.
  • Turn of any Anti Virus softwares while using Odin3.
  • Backup all your important data on internal storage, also backup your important ContactsCall Logs Messages. This is important as you will have to wipe your factory data after flashing this firmware. It is not necessary but it is highly recommended to achieve the best performance results.
  • If you’ve flashed a custom recovery, it is suggested that you create a Nandroid Backup.
  • Don’t forget to make EFS backup before flashing this firwmare.
  • If your device is rooted, you may use Titanium Backup to backup each and everything on your phone.
  • Although it is not necessary to wipe your phone before flashing this firmware, but to achieve the best performance, it is recommended that you perform a factory reset before flashing this firmware.
  • A clean install is always preferred for the best results from the new firmware. It is recommended that you wipe your phone from the recovery using “Factory Data Reset” option and then install this firmware.
  • Alright. Follow the instructions carefully.

Things you need to download:

    1. Download Odin – Get it HERE.
    2. Download and Install Samsung USB drivers – Get HERE.
    3. Download and extract the Android 4.4.2 KitKat XXFUND3 Firmware for Galaxy Note 2 GT-N7100 – Get it HERE.

How to Install Android 4.4.2 KitKat on Galaxy Note 2 GT-N7100:

    1. Open Odin.exe.
    2. Put your phone in download mode. To do so, turn it off and wait for 10 seconds. Turn it on by pressing and holding Volume Down + Home Button + Power Key simultaneously, You should see a warning, press Volume Up to continue.
    3. Connect your phone to your PC.
    4. As soon as Odin detects your phone, the ID:COM box should turn blue.  Make sure that you’ve installed Samsung USB drivers before connecting.
    5. Hit the PDA tab if you’re using Odin 3.07, for Odin 3.09 hit the AP tab. Select the extracted firmware file, that should be in .tar.md5 format.
    6. Make sure that the options selected in your Odin are exactly as shown in the pic.
    7. odin_explained
    8. Hit start and wait till the firmware flashing is complete, as soon as your device restarts, remove it from PC.
    9. Congrats! You’ve installed the latest Android 4.4.2 KitKat on your Galaxy Note 2 GT-N7100.

Galaxy Note 2 KitKat


That’s all. In case you got any queries or you face any difficulties regarding this post, feel free to reach us through the comment box below. We will try our best to help you out. Thanks all.

How To Enable and Use Samsung Galaxy S5 As a Baby Monitor

How To Enable and Use Samsung Galaxy S5 As a Baby Monitor

Samsung has added many new things in Galaxy S5 like Private Mode, Heart Monitor, Finger Print Scanner and Baby Monitor. I’ve told you how to use private mode and Heart Monitor. Now the best feature of all that helps us a lot more than a Nanny. Baby Monitor a unique feature in no other smartphone, can help you while you are working and your baby is sleeping or playing in another room. So today I’ve prepared a guide in which will tell you how to enable and use Samsung Galaxy S5 as a baby monitor.

samsung Galaxy s5


Use Samsung Galaxy S5 as a “baby crying detector”:

Before starting keep these things in mind. You need a Galaxy Gear because you’ll be notified on Galaxy Gear when your baby is crying. Connect your Galaxy Gear with Galaxy S5 which must be in a 1 meter range from your child, make sure you’ve placed your phone in a silent room where there is no other noise.

  • First go to setting in Samsung Galaxy S5.
  • Now tap on my devices and select Accessibility.
  • In Accessibility select Hearing options.
  • Now from Hearing option choose baby crying monitor.
  • Now Agree to Samsung’s disclaimer.


How To Measure Heart Rate On Samsung Galaxy S5

How To Measure Heart Rate On Samsung Galaxy S5

Samsung has added new features in Galaxy S5 including “S – health Application” through which you can monitor your heart rate, count the number of steps and mange your work routine as well. So, Samsung Galaxy S5 is not only your life companion but it also helps you to take care of your precious health. I know that most of you know how to Measure Heart Rate On Samsung Galaxy S5. But for those who don’t know can follow our guide below.

Also See: Create Tethering and Wi-Fi Hotspot on Samsung Galaxy S5

samsung Galaxy s5
©Techbeasts

How to measure the heart rate using Samsung Galaxy S5:

  • Press App menu icon on your Samsung Galaxy S5 home screen.
  • Now find S-Healt App tap on the S-Healt icon. As shown in the picture.

S Health


  • First when open S-Health you have to set up the App settings.
  • After setting up the S-Health now tap on the Heart Monitor.
  • Now on the next page you will get instruction to enable Heart Monitor.

How_to_Set_Up_S_Health_on_Samsung_Galaxy_S5_picture_15

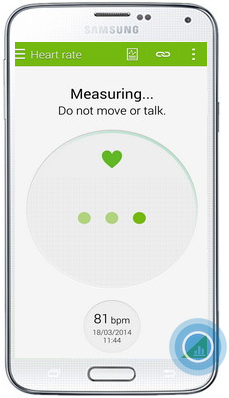
  • Now after enabling Heart Monitor place your finger on heart rate sensor below your camera. Wait for the device to show your heart beat per minute.

How_to_Set_Up_S_Health_on_Samsung_Galaxy_S5_picture_17

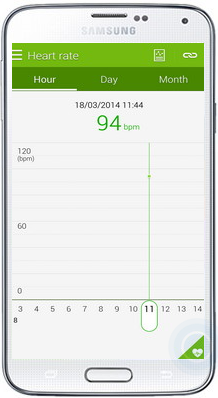
  • Now press on the graph on lower right corner. After pressing the graph you’ll see your heart beat result.

How_to_Set_Up_S_Health_on_Samsung_Galaxy_S5_picture_18

How To Create Tethering and Wi-Fi Hotspot on Samsung Galaxy S5

Samsung’s new flagship of Galaxy S series is in the markets and no doubt it’s an awesome device. Whenever a new device is released it comes with a lot of new features with different setting from the previous version, not all the people know how to work out with such things and enable things like Private Mode, Wifi Hotspot, USB debugging mode and enable finger print sensor. No need to worry here I will tell you every possible detail of  How to use  Samsung Galaxy S5, just as I told you in my last article on how to hide files in private mode of Samsung Galaxy S5.

samsung Galaxy s5

How to Turn Your Samsung Galaxy S5 Into a WiFi Hotspot:

  • First go to setting of your device either through menu or from status bar by swipe your finger down.
  • Samsung Galaxy comes with TouchWiz that’s why its setting will be changed from pervious devices.
  • Now scroll down and find Network Connections tab select Tethering and Wi-Fi Hotspot.
  • After select Tethering and Wi-Fi Hotspot you’ll get two option then Mobile Hotspot and USB Tethering. Tap on Mobile Hotspot.
  • Now Tap on Off to enable your Mobile Hotspot.
  • Now you will see your device name and images of Mobile and System, Tap on menu located on top right corner and select Advance options. From here you add devices whom you want to give permission to use Wi-Fi Hotspot.
  • To configure your Mobile Hotspot setting tap again on menu located on top right. Select configure top setup the preferences. You can add your network name, Security type and Password. After adding all the required information tap on Save.
  • All Now your Samsung Galaxy S5 is a Wifi HotSpot,  Share your Internet With others.


Got A Frozen/Bricked Nexus, Here Is How You Can Fix It

0
Got A Frozen/Bricked Nexus, Here Is How You Can Fix It

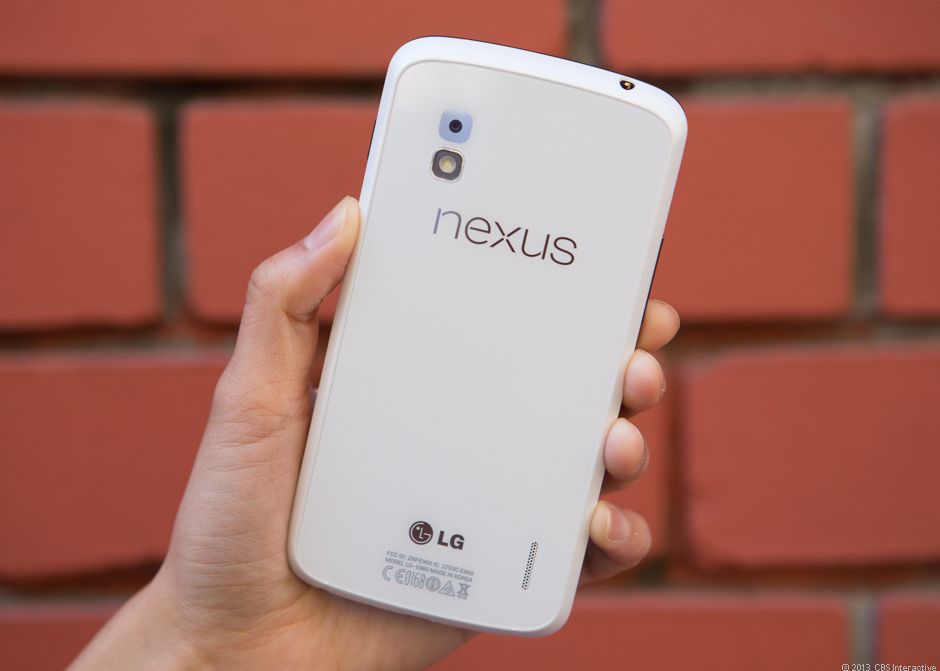
Owning an Android device and didn’t even try any different mods and tweaks on it, now that is something which is unacceptable. However, if you are going towards such things, then there is something you should always consider that installing customization sometimes lead to Device bricking and if your device is Soft-bricked then the solution is easy, but if your device is Hard Brick, then that is a Goodbye, the only thing you can do is either save it for parts or give it to some repairing center, who knows they might be able to help you. In a Soft Brick, your device will respond but you won’t see a thing, while in Hard Brick your device won’t even respond from the start.

Now in Samsung devices, Soft-Brick can be solved easily as the Official ROMs are available in bulks and flashing is not difficult either. All you have to do is to download Odin and Proper Firmware file and Flash it via Odin, but in other devices finding the official Firmware files is not that easy and Flashing them is not simple either but that is the reason why we are here. If you have a Frozen Nexus 7 or Nexus 5, then follow ahead to learn how to Bring them back to working condition.

nexus5

Getting Prepared:

  • Download and Install Nexus USB Drivers: Link
  • Set-up Fastboot and ADB: Link 
  • Since your device is already out of condition, I presume that you are fine if all of your data is erased
  • Charge your Phone, Just in case

How To Unbrick Your Nexus:

Nexus5Nexus7FactoryImage

  1. Download the Official Firmware for your Nexus device and Extract it.
  2. Turn Off your Device.
  3. Now go to Bootloader/Fastboot mode, Press and hold Power + Volume Down Buttons till you see some text on-screen
  4. Connect your device with PC.
  5. Open the Extracted folder and Double Click the flash-all.bat file, if you are using Windows, If you are on Mac or Linux, then run the flash-all.sh, It will flash necessary Bootloader and Firmware files.
  6. Grab yourself some Tea and wait for it to finish, there is no reason to fret.
  7. Once the process is complete, you will find yourself in Fastboot mode, use Volume buttons and Choose Recovery.
  8. Do a Factory Reset From Recovery, then Wipe Cache and Devlik Cache too.
  9. Reboot your device and after a successful reboot, your device will be working again without any problem.

Update Sony Xperia P to Android 4.4.2 KitKat With CM 11 Custom ROM

Update Sony Xperia P to Android 4.4.2 KitKat With CM 11 Custom ROM

Sony stopped its Xperia P’s Android updates at Android 4.1.2 Jelly Bean. This thing maybe a little disappointing for the users who always love to try out the latest and greatest version of Android on their device, but Xperia P might not be capable of running the stock KitKat. To overcome this drawback of old Android devices, CyanogenMod has always played a great role and given lives to the devices forgotten by the manufacturers.

sony xperia p manual

CyanogenMod 11 is based on unofficial Android 4.4.2 KitKat and is available for a lot of devices at the moment. Xperia P’s CyanogenMod 11 custom ROM has also landed on the XDA developers forum, so it’s a great chance for those waiting to get their device a KitKat, but it will be unofficial. In the following post we will be installing this CM 11 custom ROM on Xperia P, the only thing you should keep in mind is, this ROM is not official firmware, and there are high chances of bugs, so it may not be kept for everday use on your Android device. Also, proceed only if you’re actually familiar with these firmwares and you know how to handle em’. Let’s move forward now.

Installation Instructions:

  1. Make sure that your phone is Xperia P LT22i. Do not try this on any other phone.
  2. Make sure that your phone’s bootloader is unlocked, if not then unlock it here.
  3. Please make sure that your phone’s battery is charged at least over 60%. This is highly recommended in order to prevent any power issues during the recovery flashing process.
  4. Backup each and everything on your Android phone as follows:
  5. Backup all your important contacts, find the full guide here.
  6. Backup all your important sms messages, find the full guide here.
  7. Backup all your important call logs, find the full guide here.
  8. Backup all your important media content manually. (Copy to your PC.)
  9. Backup all your apps / data. If you’ve rooted your device, use Titanium Backup to do so. Follow the full guidehere.
  10. Backup your current system using a custom recovery (CWM or TWRP) if you’ve flashed one. This is recommended in case something goes wrong with rooting your phone, you can use the custom recovery and return to the old working state of your system.
  11. Keep in mind that this is a custom ROM and may contain bugs. We do not guarantee that everything will be perfect and up to the mark. Flash it only if you’re familiar with custom ROMs and you actually know what you’re going to do.
  12. Make sure that you read the instructions carefully and applied all precautionary measures. Let’s go ahead

How to flash Android 4.4.2 KitKat CM 11 Custom ROM on Sony Xperia P LT22i:

  1. Download the ROM’s zip file from Here .
  2. Download the Google Gapps for Android 4.4 KitKat Custom ROM.
  3. Copy the ROM.zip file and Gapps.zip file on your phone’s internal or external sd card.
  4. Open the downloaded .zip on your PC and extract the kernel.elf / Boot.img or / Boot.elf  file only.
  5. Download Android ADB and Fastboot driversfollow our full guide here to make it easy.
  6. Now place the kernal file that is boot.img or kernel.elf file that you extracted from the zip folder in the fastboot folder that you downloaded from the guide linked above.
  7. After placing the kernel file in the fastboot folder, open the fastboot folder. Press shift and then Right click on any empty area inside the folder, now select “Open command prompt here“. flash it using the command

    fastboot flash boot boot.img”.  or use “fastboot flash boot kernel.elf” In case you are confused, follow the Android ADB & Fastboot drivers guide carefully.

  8. Boot into CWM recovery. To do so, turn off your device, now turn it on and quickly press volume up and down keys, you will get the CWM interface.
  9. In CWM wipe the cache and dalvik cache.
  10. Now select “Install Zip>Choose Zip from Sd card / external Sd card”.
  11. Select the ROM.zip file that your placed on your phone’s Sd card.
  12. It should take a few mins to flash the ROM, now once again select “Install Zip>Choose Zip from Sd card / external Sd card”.
  13. Choose the Gapps.zip file this time and flash it.
  14. As soon as done flashing, clear cache and dalvik cache again.
  15. Reboot system now, you should see the CM logo on the boot screen now, it may take upto 10 minutes in order to boot into home screen.
  16. Congrats! Enjoy unofficial Android 4.4.2  KitKat custom ROM on your Sony Xperia P now.

That’s all for now. Do tell us about your experience with this ROM. In case you got any queries or you face any difficulties, feel free to stop by the comment box below. We will try our best to help you out. Thanks all!