Home Blog Page 457

Update Sprint Samsung Galaxy S4 Mini to Android 4.4.2 KitKat with CM 11 Custom ROM

0
Update Sprint Samsung Galaxy S4 Mini to Android 4.4.2 KitKat with CM 11 Custom ROM

Samsung Galaxy S4 Mini is in the que to get Android 4.4.2 KitKat update, but there isn’t any official release date available for the next version of Android on this device. It is always hard for the Android enthusiasts to wait for the updates, if you’re on of those and you own a Sprint Galaxy S4 Mini SPH-L520, you won’t be able to do so as well. While Samsung is busy cooking up the update, you can also update your device to Android 4.4.2 KitKat using a custom ROM.Samsung-Galaxy-S-IV-mini-Sprint-SPH-L520P

Wondering how is that possible? well, the famous CyanogenMod 11 custom ROM based on unofficial Android 4.4.2 KitKat is available for this device now. In the following post, we are going to install Andorid 4.4.2 KitKat CM 11 custom ROM on the Sprint Samsung Galaxy S4 Mini SPH-L520. All you need is, follow the guide carefully and before you head towards the installation instructions, make sure that you’re familiar with the custom ROMs and you have a good idea of what you’re going to do with your device. As custom ROMs are not the official builds, there is a high chance of bugs in these and these may not be kept for every day  use. Let’s move forward now.

Installation Instructions:

Pre-Installation Instructions:

  1. This ROM is only for Sprint Samsung Galaxy S4 Mini SPH-L520. Do not try this on any other device, please check your device’s model in Settings > About Device > Model.
  2. Your device must have a custom recovery installed, in case you’re missing it you may Follow our full guide here to install CWM.
  3. Your device’s battery should be charged at least over 60%. This is highly recommended in order to prevent any power issues during the flashing process.
  4. Make sure that you backup your important media content, ContactsCall Logs & Messages. This is highly recommended just in case something goes wrong and you need to reset your phone.
  5. If you already have rooted your device, use Titanium Backup to back up all your important apps + system data. Also if you are using a custom recovery, it is recommended that you backup your current system using that first. [Just for the sake of safety]. Here’s our full Nandroid Backup guide.
  6. You will have to go through Data Wipes during installation of this ROM, so make sure that you have backed up all the mentioned data.
  7. Make  EFS backup of your phone before you flash this ROM.
  8. You need enough confidence to flash this ROM.
  9. Alright! Go ahead and flash the custom firmware, follow this guide to the letter.
Disclaimer: The methods involved in flashing custom roms and rooting your phone are highly custom and may result in bricking your device, and has nothing to do with Google or the device manufacturer that is SAMSUNG in our case. Also rooting your device will void its warranty and you will be no longer eligible for any kind of free device services by the manufacturers/warranty providers. In case of any mishap we may not be held responsible. Follow these instructions to the letter to avoid any mishap or bricking. Make sure that whatever you do, you are doing it at your own responsibility.

How to Install CyanogenMod 11 Android 4.4.2 KitKat on Sprint Samsung Galaxy S4 Mini SPH-L520:

  • Download CyanogenMod 11 Android 4.4.2 KitKat ROM .zip file.
  • Download Google Gapps for Android 4.4.2 KitKat.zip file.
  • Connect your phone to your PC now.
  • Copy both the .zip files to the storage of your phone.
  • Now disconnect your phone and turn it off complete.
  • Boot into CWM recovery now, in order to do so, turn it on by pressing and holding Volume Up + Home Button + Power Key. You should see the recovery mode in a while.
  • Now in CWM recovery, wipe cache, factory data reset and advanced options > dalvik cache.
  • After wiping all these three, select “Install” option.
  • Now select “Install > Choose Zip from SD card > Select cm-11-20140319-UNOFFICIAL-serranoltespr.zip
    file > Yes”.
  • This will flash the ROM in your phone.
  • Once again in CWM select “Install > Choose zip from SD card > Google Gapps.zip file > Yes”.
  • This will flash Gapps in your phone.
  • Reboot your device.
  • You should see the CyanogenMod 11 ROM running on your device in a while.
  • That’s all!

In case your device is stuck at the boot screen, try wiping cache and dalvik cache from the recovery and then restart your device. In case of any mishap, you may restore the Nandroid or simply flash a stock firmware to bring your device back in the previous working stat. Here’s the guide on How to Install Stock Firmware on Samsung Android Smartphones

How To Hard Reset Samsung Galaxy S5 Guide

How To Hard Reset Samsung Galaxy S5 Guide

The new Samsung Galaxy S5 comes with Qualcomm MSM8974AC Snapdragon 801 chipset and processor Quad-core 2.5 GHz Krait 400. That makes it better in performance from other mobiles, but there comes a time over devices get laggy and glitchy. You can find many guides on how to improve your performance etc. But the last and easy way is hard reset so today i’ll tell how you can perform a Hard reset Samsung on Galaxy S5.

Hard reset Samsung Galaxy S5©Techbeasts

How To Hard Reset Samsung Galaxy S5 Guide:

Follow all the steps carefully in order to perform Hard Reset on Samsung Galaxy S5. Please first make sure you’ve backup all your important data.

  • Turn your Samsung Galaxy S5 off and remove battery.
  • Insert back your battery in Galaxy S5.
  • Now Press and hold volume up, home and power buttons.
  • When you feel vibration first time release power button but keep pressing home and volume up button.
  • Now you’ll be in Android system recovery.
  • Use volume down button to navigate and select wipe data/ factory reset. Press power button to select.
  • Now navigate down and select “yes delete all user data“. Press power button to select.
  • After the process is complete go back and reboot your device.

How to Enable Download Booster on Galaxy S5

0
How to Enable Download Booster on Galaxy S5

Over the past few years, Samsung have introduced best performance based devices but never worked on their interface, even their developers add few new things to interface. But the thing I like about Samsung devices is that they always give a unique feature that make their device better then any other. Samsung Galaxy S5 came with many new features like Baby Monitor, Private Mode and Download Booster. I have earlier posted about How to enable baby monitor and how to enable private mode.

Samsung Galaxy S5 Techbeasts


How to Enable Download Booster on Galaxy S5:

  1. First of all download a third party launcher like Nova or whatever you like.
  2. Now set the launcher as default.
  3. Goto home screen and tap and hold home screen and select Shortcuts.
  4. Select Activities from the shortcuts.
  5. In Activities select ->Settings>Download Booster.
  6. Now go to the settings and enable the Download Booster.


For More Information follow: XDA

Fix iMessage “Waiting for Activation” Error on iPhone

0
Fix iMessage “Waiting for Activation” Error on iPhone
iMessage “Waiting for Activation” ©Techbeasts

There are many solution for iMessage activation and most of them are not working. I’ve tried many solutions to get it fixed but most of the time it won’t work so, I tried different methods not usual one. So today, I’ll be sharing a working method with you but before starting the process, let me tell you if you are running in iOS 6 then the best solution is to upgrade to iOS 7. Because this is what Apple center representative will tell you.

iMessage “Waiting for Activation” ©Techbeasts

Also See: How To Fix FaceTime Issues on iOS 6 – iOS 7.

How to Fix iMessage “Waiting for Activation” Error on iPhone:[iOS 6 ]

  • First go to your settings on iPhone.
  • Enable Airplane mode.
  • All your connections will be disabled.
  • Turn off your iMessage and FaceTime.
  • Now Enable Wi-Fi.
  • Go back to Messages and turn on iMessages.
  • Add your Apple id.
  • You will get a pop-up saying ” Your carrier may charge for SMS ” Tap ok.
  • iMessage should get activated.

Fix iMessage “Waiting for Activation” Error Through Apple ID Sign-out, Sign-in:

  • Go to setting then tap on Messages.
  • Now tap on Send & Receive.
  • On next page tap on your Apple id.
  • A Popup will appear with 4 options Change location, View Account, Sign Out and Cancel.
  • Select Sign Out.
  • Now Turn Off iMessages.
  • Wait for a while then login again with your Apple id.
  • Enable iMessages.
  • It’ll work.

If none of this work for you then reset your location setting and if the problem is still there, then reset your iPhone.

Fix iMessage Waiting for Activation in iOS 7:

Following guide is for both iMessages and FaceTime. Don’t try this on iOS 6 its only for iOS 7.Follow all the steps carefully in order to get rid of this Waiting for Activation.

  • Deselect, Turn off and Re-activate your Apple id.
  • Change Networks and Try activating iMessages.
  • Reset Network Settings ( Settings -> General -> Reset  Select Network settings. )
  • Turn off your devices, remove your sim wait for a while then insert sim again and try activating iMessages.

If none of this work then I suggest you should go to Apple service center and replace your device.

Turn your Mac’s internet connection into a Wi-Fi hotspot

0
Turn your Mac’s internet connection into a Wi-Fi hotspot

Now-a-days everybody has a Wi-Fi connection at home or at office, because in our daily life we can’t live without internet. You’ll get Wi-Fi in hotels, Malls, Airplane and Airport etc. It’s a good thing but you’ll not get it for free, you’ve to pay a penny or dime to get a Wi-Fi connection. Then there will be a limit and of course, different prices for different speed. So, today I’ll tell you how you can save money and use one connection for your Macbook and Smartphones.

Screen Shot 2014-05-07 at 05.05.15

How to share your Mac’s internet connection with your iPhone:

  • Click on the  menu on your Macbook.
  • Now select System Preferences.
  • Click on Sharing Icon.
  • Now Select Wi-Fi from checkmark list.
  • From sidebar list at your left tick Internet Sharing.
  • Now click on start when a pop-up appear on your screen.

Now your Macbook will be working as a Hotspot, you can connect your iPhone, iPad and other devices on which you can use Wi-Fi. Even you can connect your Macbook to this connection, here you do not need for an extra connection and you can change your Macbook name for the menu setting. When you’ll search for Wi-Fi your Macbook name will appear as a connection just select it. Your device will be connected in a few seconds. If you face any kind of issue please do tell me in comments. Also See:

How To Fix Wi-Fi problems on your Mac running OS X Mavericks

0
How To Fix Wi-Fi problems on your Mac running OS X Mavericks
Wi-Fi Problems On Mac Running OS X Mavericks©Techbeasts

I’ve heard from many of our reader’s talking about the Wi-Fi problems on Mac. Well at first I didn’t get the heat of this matter because frankly speaking, I never faced such kind of issue but after getting a sting of Wi-Fi problem, I started to work on it. Well I have got a solution and it is working, so those who are having Wi-Fi problems on your Mac running OS X Mavericks. Here’s how you can fix. First let me tell you what are the problems coming on OS X Mavericks. I have to reconnect manually every time after waking from sleep, I even have to on/off Wi-fi get the networks list.

Wi-Fi Problems On Mac Running OS X Mavericks©Techbeasts

How To Fix Wi-Fi problems on your Mac running OS X Mavericks:

When I started working on solutions to fix Wi-Fi problem on Mac, I came to know a Bluetooth preference file was doing all problems. Lets start the process now.

  • Go to your Finder on Mac.
  • Click on the file and select New Finder Window.
  • Click on Mac icon in devices on your left side bar.
  • Now Open Macintosh HD.
  • In Macintosh HD open Library.
  • Now open Preferences.
  • Now in preferences find the file named as “com.apple.Bluetooth.plist“.
  • Copy that file to your desktop.
  • Remove the file from the Preferences by daring it to trash.
  • You’ll get a message that Finder wants to make changes. Add your password and press OK.
  • Restart your Mac.

Done! Now you will not be facing any kind of problem with your Wi-Fi on Mac running OS X Mavericks.

Easily Restore or Reset Jailbroken iPhone, iPad or iPod Touch to factory settings

0
Easily Restore or Reset Jailbroken iPhone, iPad or iPod Touch to factory settings

Personally, I to like Jailbreak my iPhone, iPad and iPod Touch so that I can customize, add third party apps, themes, change the colors and replace the stock apps. A bad thing about Jailbreak is that the tweaks keep crashing like winter board or any thing crashes so we have to restart our device every time. So today, let me tell you people how can you easily Restore or Reset Jailbroken iPhone, iPad or iPod Touch to factory settings.

IMG_0206

Important Thing Before Restoring Factory Settings:

  • Latest Version Of iTunes.
  • Back Up your device using iTunes.
  • Disable activation lock.

How To Restore or Reset Jailbroken iPhone, iPad or iPod Touch to factory settings.

  • Connect your iPhone, iPad or iPad touch with PC/Mac.
  • Open iTunes there you’ll see you device connected.
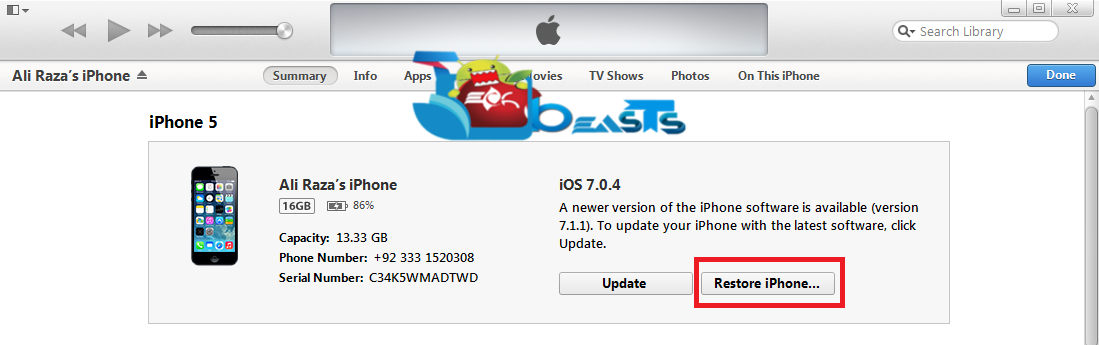
  • Now Press the restore iPhone Button in your iTunes.

restore iphone,ipad and ipodtouch


  • Now you’ll get a pop-up asking. If you’re sure you want to restore your iPhone to Factory setting. Click the restore button.

restore iphone,ipad and ipodtouch to factory settings

  • After your device is restored to factory settings, it will restart.

All Done, now your Jailbreak iPhone, iPad or iPod Touch is restored to factory settings.

Install CWM 6 Recovery and Root Sprint Samsung Galaxy S4 Mini SPH-L520

Install CWM 6 Recovery and Root Sprint Samsung Galaxy S4 Mini SPH-L520

Sprint’s Samsung Galaxy S4 Mini soon followed its siblings and came up modeled as SPH-L520. To enjoy the open nature of Android and go beyond the boundaires on your Sprint Samsung Galaxy S4 Mini, you surely would like to flash custom ROMs, mods and other stuff available around, but you will need a custom recovery to pave a way for these things on your Sprint Mini S4. In case you own this device and you’ve been looking for a method to install CWM recovery on this device, you’re on the right place at the moment as in the following post we are going to install ClockworkMod 6.0.4.7 and root this device.Root-Samsung-Galaxy-S4-Mini-Sprint

Before we head towards the guide to install CWM 6.0.4.7 recovery and root your Sprint Galaxy S4 Mini SPH-L520, I am assuming that not all of you’re familiar with a custom recovery and the root privileges. To remove any confusions and to make it crystal clear for the newbies, we will first go through brief introduction of the custom recoveries and the root access on an Android device.

Custom Recovery [ClockworkMod]:

A custom recovery allows you to install custom roms, mods etc. Along with these, you can make a Nandroid backup, this helps you a lot as you can move back to the previous working state of your phone at any time you want if you have backed up your current system. In some cases, to root the phone you need to flash SuperSu.zip file in the custom recovery, having installed the recovery may help you while in some cases to install the recovery easily, you need to have the phone rooted. You can also wipe cache and dalvik cache of your phone using a custom recovery

Root Access:

Rooting your phone gives you complete access over all the data which is apparently locked by the manufacturers. This includes removal of the factory restrictions and making changes to the internal system and the operating system. Gaining the root access gives you the privileges to install various applications to enhance the performance of your device, allows you to remove the built-in applications/programs, helps you to upgrade the battery life of your device & install the apps which require the root access for the proper functionality and modify your device in so many other ways e.g using mods and flashing custom recoveries and custom ROMs. There is a laundry list of things you can do after having your device rooted and installed he custom recovery, now once you’re rooted and have installed custom recovery, go ahead and enjoy it on your phone. Here’s our collection of 10 Best Root Apps.

Here are the pre-installation instructions:

  1. This guide is only for  Sprint Samsung Galaxy S4 Mini SPH-L520. Do not try this on any other device, please check your device’s model number in Settings > General > About Device.
  2. Your phone’s battery must be charged at least over 60%. This is highly recommended in order to prevent any power issues during the flashing process.
  3. Make sure that you backup your important media content, ContactsCall Logs & Messages. This is highly recommended just in case something goes wrong and you need to reset your phone.
  4. Use only OEM data cable to establish connection between your phone and PC. Turn off your Anti Virus and Firewall to prevent any connection issues. Also enable USB debugging mode on your phone if you face connection issues.
  5. Alright! Go ahead, follow this guide to the letter.
Disclaimer: The methods involved in flashing custom ROMs, recoveries and rooting your phone are highly custom and may result in bricking your device, and has nothing to do with Google or the device manufacturer that is SAMSUNG in our case. Also rooting your device will void its warranty and you will be no longer eligible for any kind of free device services by the manufacturers/warranty providers. In case of any mishap we may not be held responsible. Also, if your device comes with Knox Security, you will result in voiding it after you root your device and the Knox counter cannot be reset. Follow these instructions to the letter to avoid any mishap or bricking. Make sure that whatever you do, you are doing it at your own responsibility. 

How Install CWM 6.0.4.7 Recovery on Sprint Samsung Galaxy S4 Mini SPH-L520

Files you need to download: 

  1. Download and extract Odin PC – Get it here
  2. Download and Samsung USB Drivers – Get here
  3. Download ClockworkMod-Recovery.tar.md5 file.

Procedure:

  1. Open Odin3.exe from the extracted folder.
  2. Put your Sprint Samsung Galaxy S4 Mini SPH-L520 in download mode by pressing and holding Volume Down + Home + Power key at the same time, you should get a screen showing a warning and asking to continue, press Volume Up to continue. If this method doesn’t work, try one from this guide.
  3. Now your phone should be in downloading mode. Connect your phone to your PC.
  4. As soon as Odin detects your phone the ID:COM box will turn light blue.
  5. Click on the PDA tab and select the Recovery.tar.md5  file that you downloaded.
  6. In case you’re using Odin v3.09, you will put the .tar.md5 file in the “AP” tab, rest of the settings should remain untouched in Odin v3.09 as well.
  7. Your Odin screen should look like exactly as shown below.
  8. odin_explained
  9. Click Start and the flashing process should start showing you a process bar in the first box above ID:COM.
  10. The process should finish in a few seconds, once done unplug your device.
  11. Congratulations you have successfully install  CWM recovery on your Sprint Samsung Galaxy S4 Mini.

Don’t forget to create a Nandroid Backup once you’ve installed CWM recovery.

How to Root Sprint Samsung Galaxy S4 Mini SPH-L520:

  1. You need to install CWM recovery first using the above instructions.
  2. Download SuperSu.zip file now.
  3. Place the downloaded Supersu.zip file on your phone’s external sd card.
  4. Now boot into CWM recovery on your phone.
  5. Once in CWM, select “Install Zip > Choose Zip from SDcard > Select SuperSu.zip > Yes”.
  6. This will flash SuperSu.zip file, once flashing is complete, reboot your device.
  7. Congrats! You’re rooted now!

How to check if your device is rooted or not:

  1.  Download “Root Checker” app from the Google Play Store.
  2. Access the app from the App drawer and open it.
  3. Once opened press “Verify Root”.
  4. It should ask you for SuperSu permissions if your device is rooted, allow if it asks.
  5. Root Checker should show you “Congrats Message” if you’re properly rooted.
  6. That’s all.

That’s all. In case you got any queries or facing any problems regarding this post, feel free to stop by the comment box below and reach us. We will respond you as soon as possible. Thanks all.

Download SoundCloud Tracks On Android With SoundCloud Mate [How to – Guide]

0
Download SoundCloud Tracks On Android With SoundCloud Mate [How to – Guide]

SoundCloud Downloader for AndoridJust yesterday we posted a guide to download complete SoundCloud playlists on a desktop PC, but missed the solution to download your favorite tracks from SoundCloud straight to your Android smartphone. Although SoundCloud’s app for Android is pretty much good, and the streamed songs work like charm when you have no internet access, but sometimes the streaming limit is crossed and results in wiping the previously streamed songs as you play more and more songs on your SoundCloud app in your Android device.

In this case, you would like to have your previous songs downloaded so that you don’t always have to stream them online and then save to play later on. Google Play Store is full of SoundCloud downloaders and you may not be able to find an application that actually works, most of the downloaders are just spam and don’t work at all. To minimize your search and make it easy for you guys, We’ve found something. While looking out for a solution I came across SoundCloud Mate, a cool application that allows the users to download music tracks from SoundCloud on their Android device.  SoundCloud Mate is a free application with a very simple and understandable UI. As you move forward in the following post, you will find a complete and comprehensive guide to install and use SoundCloud Mate on your Android device and download your favorite MP3 tracks from SoundCloud.

How to Download SoundCloud Tracks on Android with SoundCloud Mate:

  1. Download Soundcloud Mate APK file. You may download this file either to your Android device or copy it to your Android device after downloading it on your PC.
  2. Once placed on phone, locate the APK file on your phone and tap to begin installation.
  3. Select “Package Installer” if prompted. Allow “Unknown Sources” if asked.
  4. Proceed and complete the installation.
  5. Once the installation is done, access the app from the app drawer.
  6. In the search box, type the artist’s name, songs’ title or whatever do you want to search.
  7. Once you see your desired music in the search result, tap to open it.
  8. On the upper right corner, tap download to start downloading your desired track.
  9. Download will begin and the songs will be saved to your device’s storage.
  10. That’s all with the SoundCloud Mate! Enjoy!

SoundCloud Download - 3 SoundCloud Download-1SoundCloud Download -2

Watch TV shows and movies for free on your Android [ Easy Guide ]

0
Watch TV shows and movies for free on your Android [ Easy Guide ]
All New Movies ©Techbeasts

Ever wondered that you can Watch your favorite TV Shows and movie on your smartphone without using Netflix. On Netflix you have pay subscription fee to watch TV shows, Drama, Movies and events. Yes, you can watch TV shows and movies free on your Android smartphones. Now you are wondering how to watch you favorite shows, so let me tell you how you can easily watch TV Shows and movies free on Android devices.

All New Movies ©Techbeasts

How To Watch TV Shows and Movies Free On Android:

First I’m not telling you any hack or tools to watch free movies on Android. There is an app called Show Box you have to download that app and install it. Show box was available on play store from sometime but was taken off some reason. But you can download it from developer website.

  • First download ShowBox on your PC.
  • Connect your device with PC and copy the downloaded file to your SD card.
  • Now go to file manager and go to location where you’ve placed the ShowBox apk, tap on showbox file  (make sure you’ve enabled unknown source). Select Package Installer.
Show Box Installation Process ©Techbeasts
  • After the installation is completed tap on ShowBox icon. It will take some time loading, when you first open the app. ShowBox will update the list of movies and TV shows.
  • Now after the loading is completed, you’ll see all the latest movies and TV Show on main screen.
  • Select the one you want to see tap on it. On the next page you’ll get 3 options for video quality Medium, High and HD. Select one of them and tap on watch now.
Watch Movies Free On Android ©Techbeasts

All Done! Now you can Watch TV shows and movies for free on your Android.

How to protect your Mac using FileVault 2 [ Easy Guide ]

0
How to protect your Mac using FileVault 2 [ Easy Guide ]
FileVault 2 on Mac /©Techbeasts

Everyone wants to keep their PC, Laptops, Mac’s, Cell Phone and their mails to be secure. It’s a good thing to have safety precautions beforehand, well today I will tell you how you can protect your Mac Using FileVault 2. It isn’t a third party app and you don’t have to download it from an App Store. FireVault 2 is sort of built-in Function added in OS X Lion 10.7 or later. Here is how you can enable it.

FileVault 2 on Mac /©Techbeasts

How to Enable and Protect your Mac using FileVault 2:

  • Click on the  menu.
  • Then Select System Preferences.
  • Click on Security & Privacy.
  • Here you’ll get 4 tabs General, File Vault, Firewall and Privacy. Select File Vault.
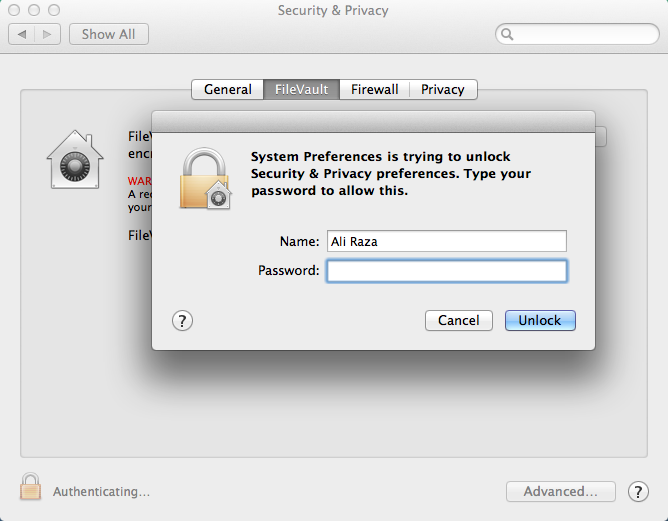
  • Now click on Padlock located on the lower left corner.
  • Now enter your system password and enable the FileVault.
Screen Shot 2014-05-04 at 06.08.53
Enter Password to Unlock ©Techbeasts
  • After you enable the FileVault you’ll be provided with a recovery key. Save it somewhere you can easily find so that if anything goes wrong, recovery key is the only thing that can get you the access back.
  • Now restart your Macbook, activate FileVault and begin the encryption process.

15 HD Wallpapers for Mother’s Day 2014 – Download Here

0
15 HD Wallpapers for Mother’s Day 2014 – Download Here

EveryBody love his/her mother every where that’s why we’ve dedicated 11 May as Mother’s Day. To tell our mother’s how much we love them. People all around the world celebrate Mother’s Day by giving their Mother’s gift’s , Cards, and thing we can give her to express our love for her. To make your Mother’s Day more special i’ve collected 15 HD Wallpapers for Mother’s Day 2014. Enjoy my collection and please do tell your mother how much you love her.

2014-Happy-Mothers-Day-Quote-Wallpapers

happy-mothers-day-2013-greetings-mom-day-wallpaper

Happy-Mothers-Day-2014-A
Happy-Mothers-Day-2014-Flowers

Happy-Mothers-Day-HD-wallpapers-2014

happy-mothers-day-poems-wallpapers-1024x768

Happy-Mothers-Day

I-love-you-Mother-s-day-2014-8-March

Mother-quote-for-Mother-s-day-2014

Mothers-Day-HD-Wallpapers-2014

MothersDay-e1392750727520-300x244