Home Blog Page 445

Add Multiple DropBox Accounts In Android Device

0
Add Multiple DropBox Accounts In Android Device

DropBox is one of the best Online Service to storage data and even better you can access the data from anywhere. The Service is free and totally reliable, despite that it has a lot of privacy and security, when it comes to the pro level, it is still far behind. I mean if someone wants to keep some folder in the Computer, he can use the Selective Sync Feature, but the problem is that anyone who will use that computer can have the access to those folders too.

The main reason why Office Workers must have Two DropBox accounts, One for Office Use and One For Personal Use, Yeahhh!, the problem is solved, well not exactly, you can’t just add Two different Dropbox accounts in a Single App. The Official app allows you to add only one account at a time, so how to use more than one account at the same time, the answer is quite simple. ES File explorer is no doubt the best File Explorer of all times, and we will use this amazing app to add more than one DropBox account.

esuslogo101409

Add More than One DropBox Account Using ES File Explorer:

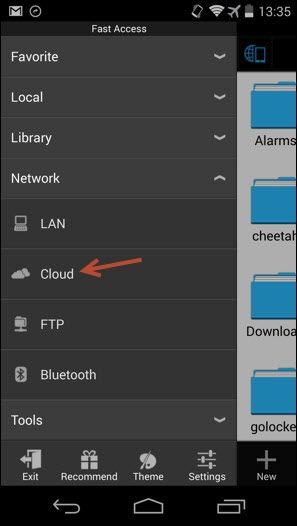
Screenshot_2014-06-04-13-35-22-BorderMaker

  1. Launch the App and Tap the Phone + Network icon on the Left side.
  2. A Side bar will pop-up, Select Cloud from there.
  3. Now in the New Screen, Tap the + icon in bottom left.
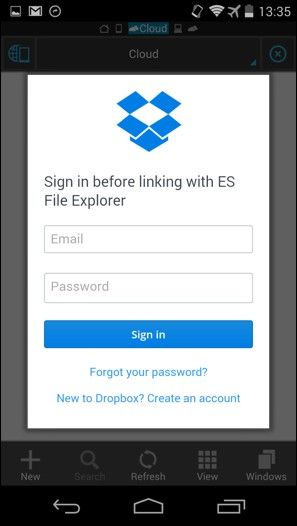
  4. A Pop-up with DropBox login screen will appear.
  5. Enter the Credentials and on the Next Screen Tap Allow

Screenshot_2014-06-04-13-35-57-BorderMaker

How To Root your Xperia Z2 with locked bootloader

0
How To Root your Xperia Z2 with locked bootloader

Well when ever we have to root HTC and Sony mobiles specially high end device we have to unlock bootloader first then fastboot and much more although its not that difficult. Well leave it today i’ve some good new for Xperia Z2 owners now they can root Xperia Z2 with locked bootloader. Special thanks to team Xperia blog for this working method and main credit goes to XDA developers DooMLoRDnorti and xsacha.

sony-xperia-z2-mwc-2014

After the latest Xperia Z2 firmware build (17.1.1.A.0.402) the exploit use to root Xperia z2 was patched so this method will not work on latest firmwares. You can only use this method on those device who are running firmware with build numbers 17.1.A.2.55 and 17.1.A.2.69.

Rooting your phone gives you complete access over all the data which is apparently locked by the manufacturers. This includes removal of the factory restrictions and making changes to the internal system and the operating system. Gaining the root access gives you the privileges to install various applications to enhance the performance of your device, allows you to remove the built-in applications/programs, helps you to upgrade the battery life of your device & install the apps which require the root access for the proper functionality and modify your device in so many other ways e.g using mods and custom roms. By installing custom recovery, you can flash custom roms in the phone easily. Custom recovery also let’s you backup your current rom and restore it in case of any mishap. There is a laundry list of things you can do after having your device rooted and installed the custom recovery, now once you’re rooted and have installed custom recovery, go ahead and enjoy it on your phone. Here’s our collection of 10 Best Root Apps.

Here are pre-rooting instructions:

  1. This guide is only for Sony Xperia Z2. Do not try this on any other model, please check your device’s mode in Settings > About Device.
  2. The Root instructions are only for Sony Xperia Z2 running firmware with build numbers 17.1.A.2.55 and 17.1.A.2.69. Check your firmware version in Settings > About Device and make sure that it matches the one mentioned here.
  3. Please make sure that your phone’s battery is charged at least over 60%. This is highly recommended in order to prevent any power issues during the recovery flashing process.
  4. Backup each and everything on your Android phone as follows:
  5. Backup all your important contacts, find the full guide here.
  6. Backup all your important sms messages, find the full guide here.
  7. Backup all your important call logs, find the full guide here.
  8. Backup all your important media content manually. (Copy to your PC.)
  9. Backup all your apps / data. If you’ve rooted your device, use Titanium Backup to do so. Follow the full guide here.
  10. Backup your current system using a custom recovery (CWM or TWRP) if you’ve flashed one. This is recommended in case something goes wrong with rooting your phone, you can use the custom recovery and return to the old working state of your system.
  11. Make sure that you read the instructions carefully and applied all precautionary measures. Let’s go ahead.

Disclaimer: The methods involved in flashing custom roms and rooting your phone are highly custom and may result in bricking your device, and has nothing to do with Google or the device manufacturer that is SONY in our case. Also rooting your device will void its warranty and you will be no longer eligible for any kind of free device services by the manufacturers/warranty providers. In case of any mishap we may not be held responsible. Follow these instructions to the letter to avoid any mishap or bricking. Make sure that whatever you do, you are doing it at your own responsibility.

How To Root your Xperia Z2 with locked bootloader:

Follow all the steps very carefully in order to root your Xperia Z2 with locked bootloader. Try not to miss any step and if by chance this method is not working please give a try again.

  • Download Xperia Z2 Rooting Toolkit for here.
  • After downloading Toolkit extract it on your PC.
  • Before starting goto your settings and enable USB Debugging from developer options.
  • Now connect your Xperia Z2 with computer using USB cable.
  • Now run the Toolkit double click on ‘runme.bat’ from the files that you’ve extracted in 2nd step.
  • Now you see in CMD windows that process will start  Installing exploit app. Don’t do anything wait the process to be completed.
  • After a while you’ll see a message saying ” Copying BIG file “. Still don’t do anything let the script his working.
  • Now wait for few seconds and the when you see the following message appears that means you have to crash your service menu on  your device. Access your phone and you’ll notice script has opened a service menu on your Xperia Z2. All you have to do is click on Service Info > Configuration. Now press any key to continue.


Root Xperia Z2 with lock bootloader

  • Now after successfully crashing the service menu first time you have to do it again when see the same message again on your Command prompt screen.
  • If your both steps has successfully completed then you’ll see this message Removing exploit app”.
  • Now disconnect your device from your computer.
  • Reboot it and all done. Your Xperia Z2 is successfully rooted with lock Bootloader.

Credit: XperiaBlog

One-Click Root For LG G3 All Variants [How To – Guide]

10
One-Click Root For LG G3 All Variants [How To – Guide]

Planning to get your hands on LG’s latest beast LG G3? Well, if you’re going for one, that’s just great. With G3, LG has simply outdated the devices by all of its rival manufacturers. G3 is cool enough to win LG some respect, the device is beautiful, its brushed metallic alike plastic body adds charm to its look and makes it feel premium. G3 comes with a QHD display, while other specs are also the highest on the list, the special feature in this smartphone is it’s laser auto focus that enhances the photography with LG G3 greatly.

That was about the device, let’s get back to our target now. Once you get your hands on this device, you may want to go beyond the boundaries settled by the manufacturer and test the limitations of your device by using different applications or apply different mods with applications. The very basic thing you need to break the walls on your device is the root access. While the device is new, you may not be able to easily find a working method. To make it easy for you guys, we’ve found something that works perfectly. In the following post we are going to Root LG G3 using One-Click tool named as IOroot. Thanks to XDA developer Autoprime for bringing up this great tool, that is capable of rooting so many LG devices and the recent update now roots LG G3 as well.182140-lgg3colors

Before we head towards the working and functionality of this tool, let’s have a look on a brief intro of the root access in order to clear any confusions that the newbies may have regarding root privileges.

Rooting your phone gives you complete access over all the data which is apparently locked by the manufacturers. This includes removal of the factory restrictions and making changes to the internal system and the operating system. Gaining the root access gives you the privileges to install various applications to enhance the performance of your device, allows you to remove the built-in applications/programs, helps you to upgrade the battery life of your device & install the apps which require the root access for the proper functionality and modify your device in so many other ways e.g using mods and custom roms. By installing custom recovery, you can flash custom ROMs in the phone easily. Custom recovery also let’s you backup your current rom and restore it in case of any mishap. There is a laundry list of things you can do after having your device rooted and installed the custom recovery, now once you’re rooted and have installed custom recovery, go ahead and enjoy it on your phone. Here’s our collection of 10 Best Root Apps.


Early Preparations:

  1. This method is only on for LG G3, for the variants listed below. Do not try this on any other device as it may result in bricking it.
  2. You must have installed LG USB drivers.
  3. Your device must be charged at least 80%. This is highly recommended in order to prevent any power issues during the rooting process.
  4. Enable USB debugging mode on your device. You can turn on developer options by tapping build number 7 times in about device, and after that enable USB debugging.
  5. Enable Flight Mode on your LG G3, Verizon LG G3 users should use Ethernet mode instead.
  6. Remove any PIN/Pattern lock from your LG G3, change the screen on time to 4 – 5 minutes from display settings.
  7. Use only on OEM datacable to establish connection between your PC and your phone.
  8. Disable any anti-virus / firewalls if activated on your PC.
  9. Make sure that your PC / Laptop has appropriate power connection or battery.
  10. IOroot works well on Windows, MAC and Linux, you don’t need to worry about that.

IOroot tool works with:

      • International LG G3 D855.
      • Canadian LG G3 D852
      • Korean LG G3 F400/400K/400L

Check out this to root Verizon, Sprint, AT&T or T-Mobile LG G3

Root LG G3 using IOroot:

  1. Follow the above instructions carefully at first.
  2. Download IOroot.zip file and extract it on your desktop.
  3. Connect your LG G3 to your PC now.
  4. Run the root.bat or root.sh from the extracted .zip file.
  5. Once the CMD appears and your phone is properly connected, hit the Enter key or any other key.
  6. Wait and the tool will do rest of the job.
  7. That’s all!

IOroot_LG G3

Just in case you’re struck with something regarding this post, please feel free to stop by the comment box below and drop us your query. We will get back to you as soon as possible. Thank you!

 

Download OnePlus One Stock Wallpapers

Download OnePlus One Stock Wallpapers

The OnePlus One has won the premium space in the air,  since the time it made its way to the rumor mills, first for being some new high end smartphone, and then for breaking the trend pricing the smartphones at a higher cost. OnePlus One sports the top-notch specifications that anyone would easily fall for, the device is beautiful as well. Usually, the more beautiful the smartphone is, and the more top-notch specs it has, manufacturers are known for pricing the device at maximum, but OnePlus One has done the opposite here.

OnePlus one sports a 5.5 inches full HD display (1920 x 1080p). To power up the device, the manufacturer has used Qualcomm Snapdragon 801 Quad Core CPU clocked at 2.5 GHz that is accompanied by Adreno 330 GPU while the RAM is ranged at 3 GB. The device comes with either 16 GB internal storage or 64 GB internal storage. There’s a 13 MP shooter at the back and a 5 MP shooter on the front while a massive battery of 3100 mAh is placed under the hood. These are quite impressive specs, aren’t they? Well, these definitely will leave you in shock when you come to know the price OnePlus is demanding. The 16 GB variant costs just $300, 64 GB variant costs $350.

To add charm to OnePlus One’s display, the manufacturer has loaded the device with some eye-catching and beautiful wallpapers. Just in case you come across these wallpapers, you may want to download em’ and set em’ up on your Android device. Before you start looking out for these, we’ve already finished your job, and collected the stock wallpapers of OnePlus One. Just go ahead, and pick up your favorite wallpaper, save it and set on your phone, or download all the wallpapers from our all in one file linked below.

Lock Screen Wallpapers:

OnePlusOne_LockScreen (1)OnePlusOne_LockScreen (10)OnePlusOne_LockScreen (11)OnePlusOne_LockScreen (12)OnePlusOne_LockScreen (13)OnePlusOne_LockScreen (14)OnePlusOne_LockScreen (9)OnePlusOne_LockScreen (8)OnePlusOne_LockScreen (7)OnePlusOne_LockScreen (6)OnePlusOne_LockScreen (5)OnePlusOne_LockScreen (2)OnePlusOne_LockScreen (1)OnePlusOne_LockScreen (3)OnePlusOne_LockScreen (4)


Home Screen Wallpapers:

HomeScreen_OnePlusOne Stock (1)HomeScreen_OnePlusOne Stock (2)HomeScreen_OnePlusOne Stock (3)HomeScreen_OnePlusOne Stock (4)HomeScreen_OnePlusOne Stock (5)

Download All Wallpapers


How To Lock and Unlock Samsung Galaxy S5 Using the Fingerprint Scanner

0
How To Lock and Unlock Samsung Galaxy S5 Using the Fingerprint Scanner

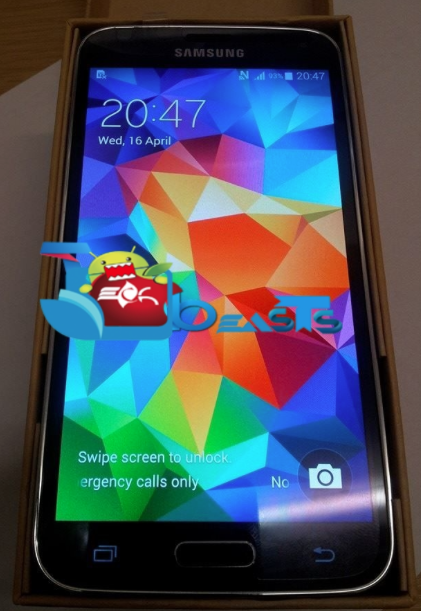
Samsung Galaxy S5 came with many new features like Baby Monitor, Quick Connect, Download Booster and Fingerprint Scanner. Fingerprint Scanner was first introduced in iPhone 5s after that now Samsung is second to introduce such feature. Toady i’ll tell you how to lock and unlock Samsung Galaxy S5 using the Fingerprint Scanner.

Samsung Galaxy S5 Techbeasts

How To Lock and Unlock Samsung Galaxy S5 Using the Fingerprint Scanner:

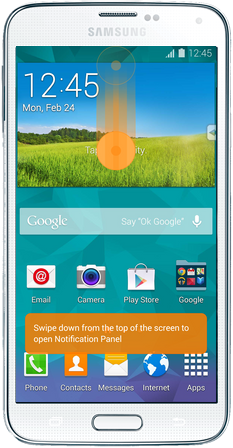
  • Pull down the notification bar form home screen by swiping your finger’s down.

How To Lock and Unlock Samsung Galaxy S5 Using the Fingerprint Scanner

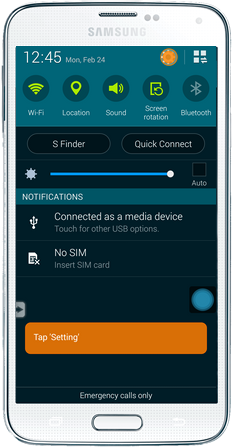
  • After getting in to notification bar select setting.

How To Lock and Unlock Samsung Galaxy S5 Using the Fingerprint Scanner1

  • Now tap on Finger Scanner.
  • Now Tap on Fingerprint Manager.

How To Lock and Unlock Samsung Galaxy S5 Using the Fingerprint Scanner2

  • After taping the Fingerprint Manager you’ll have to register first time. Follow all the instruction as show in the image.

How To Lock and Unlock Samsung Galaxy S5 Using the Fingerprint Scanner4

  • All you have to do is hold your finger on screen and slowly move your finger down-words. You have to swipe 8 time to get it done.
  • When the process is completed you’ve to add an alternative method for emergency incase fingerprint scanner is not working.
  • All Done you’ve successfully enabled the fingerprint scanner on your Samsung Galaxy s5.

Setup Fingerprint Lock on Samsung Galaxy S5:

  • Pull down the notification bar form home screen by swiping your finger’s down.

How To Lock and Unlock Samsung Galaxy S5 Using the Fingerprint Scanner

  • After getting in to notification bar select setting.

How To Lock and Unlock Samsung Galaxy S5 Using the Fingerprint Scanner1

  • Now tap on Finger Scanner.

How To Lock and Unlock Samsung Galaxy S5 Using the Fingerprint Scanner2

  • After going into FingerPrint Scanner select Screen lock.

Setup Fingerprint Lock on Samsung Galaxy S51

  • Now from the screen lock select touch Fingerprint.
  • All done you’ve successfully setup Fingerprint lock on Samsung Galaxy S5.

Root Sony Xperia SP C5302/C5303 12.1.A.1.205 Firmware [How To – Guide]

39
Root Sony Xperia SP C5302/C5303 12.1.A.1.205 Firmware [How To – Guide]

Sony Xperia SP has been updated to a new firmware based on the build number 12.1.A.1.205, while the core remains the same as Android 4.3 Jelly Bean. The new update fixes some performance and stability issues, battery charging time has been improved, screen flickering and some other bugs have been fixed. If you happen to be  Xperia SP owner and an Android power user, who recently updated to this latest firmware, you might be wondering how you can gain the root access on this new firmware and make your Xperia SP fly high once again.

Well, that’s what we are here for. In the following post we are going to gain root Sony Xperia SP C5302/C5303 running latest Android 4.3 Jelly Bean 12.1.A.1.205 firmware. You just need to follow this comprehensive guide carefully and break the jails on your device. Before we head towards the rooting instructions, let’s first go through a brief introduction of the root access in order to clear the confusions that the newbies may have.Xperia SP

Rooting your phone gives you complete access over all the data which is apparently locked by the manufacturers. This includes removal of the factory restrictions and making changes to the internal system and the operating system. Gaining the root access gives you the privileges to install various applications to enhance the performance of your device, allows you to remove the built-in applications/programs, helps you to upgrade the battery life of your device & install the apps which require the root access for the proper functionality and modify your device in so many other ways e.g using mods and custom roms. By installing custom recovery, you can flash custom roms in the phone easily. Custom recovery also let’s you backup your current rom and restore it in case of any mishap. There is a laundry list of things you can do after having your device rooted and installed the custom recovery, now once you’re rooted and have installed custom recovery, go ahead and enjoy it on your phone. Here’s our collection of 10 Best Root Apps.

Here are pre-rooting instructions:

  1. This guide is only for Sony Xperia SP C5303 or C5302. Do not try this on any other model, please check your device’s mode in Settings > About Device.
  2. The Root instructions are only for Sony Xperia SP C5303 or C5302 running latest Android 4.3 Jelly Bean 12.1.A.1.205 firmware. Check your firmware version in Settings > About Device and make sure that it matches the one mentioned here.
  3. Please make sure that your phone’s battery is charged at least over 60%. This is highly recommended in order to prevent any power issues during the recovery flashing process.
  4. Backup each and everything on your Android phone as follows:
  5. Backup all your important contacts, find the full guide here.
  6. Backup all your important sms messages, find the full guide here.
  7. Backup all your important call logs, find the full guide here.
  8. Backup all your important media content manually. (Copy to your PC.)
  9. Backup all your apps / data. If you’ve rooted your device, use Titanium Backup to do so. Follow the full guide here.
  10. Backup your current system using a custom recovery (CWM or TWRP) if you’ve flashed one. This is recommended in case something goes wrong with rooting your phone, you can use the custom recovery and return to the old working state of your system.
  11. Make sure that you read the instructions carefully and applied all precautionary measures. Let’s go ahead.

Disclaimer: The methods involved in flashing custom roms and rooting your phone are highly custom and may result in bricking your device, and has nothing to do with Google or the device manufacturer that is SONY in our case. Also rooting your device will void its warranty and you will be no longer eligible for any kind of free device services by the manufacturers/warranty providers. In case of any mishap we may not be held responsible. Follow these instructions to the letter to avoid any mishap or bricking. Make sure that whatever you do, you are doing it at your own responsibility.

How To Root Xperia SP C5302/C5303 Running 12.1.A.1.205 Firmware:

  1. Open Sony Flashtool now.
  2. Connect your Xperia SP to your PC now. Make sure that the connection is up to the mark.
  3. Hit the smart lightening button on the right upper left side and select “Fastboot Mode.”.
  4. On the right side, click on “Reboot Device into Fastboot Mode.”
  5. If this doesn’t work for you, manually put your device into Fastboot Mode and connect it to your PC. To do so, turn off your Xperia device and now connect to your PC while keeping the Volume Up key pressed. As soon your PC detects your device,the blue LED will turn on showing fastboot mode.
  6. Now click on “Select Kernel to flash”.
  7. In the format selection, by default it will be “*.sin”. Change it to *.elf.
  8. Now select the DoomLord Advanced Stock Kernel.elf file that you downloaded first of all and flash it.
  9. This kernel will flash CWM recovery in your device. Disconnect your device now.
  10. Turn it on, as soon as you see the Sony Logo, press Volume – Key 5 to 6 times and you should see the CWM recovery interface now.
  11. Go to Mount/Storage and press Mount System if required.
  12. As soon as the system is mounted, choose install zip > choose zip from sd card > SuperSu.zip that you placed on your phone in the 2nd step and flash it.
  13. As soon as SuperSu.zip is flashed, turn off your device by keeping the power key pressed for a while or pulling out the battery. Don’t reboot it. [v.important]
  14. Now connect your device in fastboot mode once again.
  15. Open Flashtool once again > Click on small lightening button > Fastboot mode > Select Kernel to Flash.
  16. By default it will be *.sin format, so locate the file Stock Kernel.sin file for your device  that you downloaded and flash it.
  17. Once kernel flashing is complete, reboot your device.
  18. Phewww! You’re rooted, locate SuperSu in app drawer.
  19. You can also verify root access by installing Root Checker app from Google Play store.
  20. That’s all!

We hope that you find this guide helpful. In case you got any queries or you are facing any difficulties, feel free to stop by the comment box below and drop us your words. We will get back to you as soon as possible. Thanks all!

How To Sync Microsoft Outlook 2010 Contacts to Samsung Galaxy S5

0
How To Sync Microsoft Outlook 2010 Contacts to Samsung Galaxy S5

Samsung Galaxy S5 is the latest flagship from Samsung and no doubt Samsung has our done this time. As in the past i’ve posted many general guides on Samsung Galaxy s5 because of its new Touch-Wiz interface. People find it difficult on setting up things also Galaxy S5 came with many new features. Today i’ll tell you how to Sync Microsoft Outlook 2010 Contacts to Samsung Galaxy S5.

Also See: add Microsoft exchange email account on galaxy s5

How To Sync Microsoft Outlook 2010 Contacts to Samsung Galaxy S5

How To Sync Microsoft Outlook 2010 Contacts to Samsung Galaxy S5:

Follow all the steps carefully in order to Sync Microsoft Outlook 2010 Contacts to Samsung Galaxy s5. Once your contacts are synced you can easily send and receive mail through Mail app.

  • Open Microsoft Outlook  on your Pc.
  • Goto file menu and select “Import and Export”.
  • Now you’ll be in “Import and Export” menu from here select “Comma Separated Values”.
  • Now select the contacts that you want to export after selecting the contacts save the file as CSV format on your desktop.
  • After the file is saved open your Web browser and open Gmail.
  • Login into your gmail account goto left top corner click on Gmail a drop down menu will appear select contacts.

Also See: unroot Samsung Galaxy S5 all variants.

  • Now click on more a drop down menu will appear select import from the list. Now you’ll see a pop-up ” We support importing CSV files from Outlook, Outlook Express, Yahoo! Mail, Hotmail, Eudora and some other apps. We also support importing vCard from apps like Apple Address Book. ” 
  • Now click on choose file and select the CSV file that you saved in 4th step. Click on OK!
  • Wait for few seconds your contacts will be added now. Once done goto your phone settings then Accounts->Google->Gmail and tap on Sync now.
  • Wait for Sync to be completed. When its done goto your contacts on your Samsung Galaxy S5 there you’ll see all your Microsoft Outlook 2010 contacts.

Download Google Play services 4.4.52 apk [ 1174655-034 ]

Download Google Play services 4.4.52 apk [ 1174655-034 ]

Google Play services are used to update apps from Play Store on Android devices. Basic we need Google Play Services so that we sync our gmail account with PlayStore, easily access PlayStore on custom Roms. If Google Play services are not installed on your device you can face issue like authentication and synchronized.

Download Google Play services 4.4.52 apk [ 1174655-034 ]

Main Features of Google Play Services:

  • Update Google apps.
  • Authentication to your Google services.
  • Synchronized contacts.
  • Access to all the latest user privacy settings.
  • Enhances your app experience.
  • Speeds up offline searches.
  • Immersive maps.
  • Improves gaming experiences.

Google Play Services come pre-installed on Android device but if you root you device and install a custom rom on it then you might need to install Google Play Services on your device otherwise you cannot download and install apps.

Download Google Play services 4.4.52 (1174655-034) APK for Android

Download Angry Birds Epic apk for Android

Download Angry Birds Epic apk for Android

Form the creators of the top best game ( Angry Birds ) of both Android and iOS playStore gives us a new and unique RPG experience. Rovio Mobile Ltd released a new Angry Birds part named as Angry Birds Epic. In the past we use to throw birds on pigs and then we got new birds with different qualities, in every new version we got new features but this time Angry Birds can use anything as a weapon dosen’t matter what it is.

Also See: Angry Birds Epic for pc

angry birds epic apk for andorid

  • This Angry birds developer added alot of new features that make Angry Birds Epic more interesting. Following are the main features of the Angry Birds Epic.
  • You have to fight battles with Angry birds old enemies Green means Piggys. Main advantage is that you can hit them with anything you can get ahold of.
  • Explore a fantasy Piggy Island with everything from tribal villages and frosty mountains to tropical beaches and mysterious caves.
  • You’ll have heroes like Join Red, Chuck, Bomb and other famous characters to face King Pig, Wiz Pig, Prince Porky and many more villains.
  • When ever you win a battle your level goes up and you can upgrade your armor and weapons.
  • You’ll have weapons like wooden sword, frying pan or stick thingy with a sponge on top to win the battles.

This game includes paid commercial content from select partners. We have no rights to add or modified the Angry Birds Epic. We are only providing apk for those who have lower end Android devices.

Screen Shot 2014-06-15 at 17.53.11

Download Angry Birds Direct from Google PlayStore because its free or You can download Angry Bird Epic apk from here .

Angry Birds Epic for Pc ( Windows XP/7/8/Vista and Mac )

0
Angry Birds Epic for Pc ( Windows XP/7/8/Vista and Mac )

Rovio Mobile Ltd has given us many addictive games like Angry birds, Angry Birds Space, Angry Birds Rio and now Angry Birds Epic. Just image first we have to through birds on Pigges then we got new birds that do different things, then we get cars for Angry Birds to race with enemies. In Angry Birds Epic you’ve got weapons for your birds or what ever they can use a weapons. You have to take your birds army into battle and fight with green snout-nosed scoundrels, for those who love to play Angry birds new version but don’t have Android device i can help them to play Angry Birds Epic on Pc. Follow my guide on how to download and install Angry Birds Epic for Pc and play it on Windows 7,XP,8,Vista.

Also See: Top 10 Android Apps for PC

Angry Birds Epic for Pc ( Windows XP:7:8:Vista and Mac )

Angry Birds Epic for Pc ( Windows XP/7/8/Vista and Mac ) Features:

Following features are from Google play store that are posted by game developers.

EPIC BATTLES! Turn-based battles between our heroic flock of warriors and those green snout-nosed scoundrels! It’s easy to play, but difficult to master!

EPIC WORLDS! Explore a fantasy Piggy Island with everything from tribal villages and frosty mountains to tropical beaches and mysterious caves!

EPIC CHARACTERS! Join Red, Chuck, Bomb and the other heroes as they face King Pig, Wiz Pig, Prince Porky and many more villains!

EPIC UPGRADES! Level up your characters, armor, weapons and potions to become a legendary hero ready to take on the mightiest pig warrior!

EPIC WEAPONS! Craft amazing battle-winning weapons like a wooden sword, frying pan or stick thingy with a sponge on top!

EPIC HUMOR! Plenty of offbeat humor and tons of quirky characters dressed in awesomely silly costumes – like a prickly cactus hat and a matching sword.

Download and Install Angry Birds Epic for Pc ( Windows XP/7/8/Vista and Mac ):

  1. You need an Android emulator to run this game on your Windows PC or MAC. We recommend using BluestacksUse our guide to install it on your PC.
  2. After downloading and installing Bluestacks, Download Angry Birds Epic APK file.
  3. Also See: Install Family Guy for PC .
  4. Open the downloaded APK file now, and let Bluestacks install it.
  5. Open BlueStacks now > All AppsAngry Birds Epic.
  6. The game will start now, follow the on screen instructions.
  7. Follow the initial screen,  you’ll be able to play it.
  8. Tap the screen by clicking inside the game frame.
  9. Enjoy the most tough game ever!
  10. Don’t forget to let us know about your high score.
  11. That’s All!

Update Sony Xperia SP C5302/C5303 To Latest Official 12.1.A.1.205 Firmware

7
Update Sony Xperia SP C5302/C5303 To Latest Official 12.1.A.1.205 Firmware

Sony recently rolled out a new update for its mid-range device, the Xperia SP. The update fixes some minor bugs, performance and stability have been enhanced. The device now gets charged even faster, the performance of the Mobile Bravia Engine 2 has been enhanced as well. Besides this, the screen flickering issue has been resolved, LED does not stay on while you’re on call, overheating issue has been fixed to some extent, screen visibility has been improved and the RAM management in the newer firmware is much better than that in the .201 firmware.

The update, as always, is on a slow rollout and will hit the different regions after specific intervals of time. If you’re tired with your device’s old firmware and you can’t keep patience for the OTA updates or for Sony PC Companion to perform this update for you, you may look out for a way to get this update manually on your device. If that’s the case with you, you’ve spotted the right place. In the following post, we are going to update Sony Xperia SP C5302 and C5303 to latest stock Android 4.3 Jelly Bean 12.1.A.1.205 firmware using Sony Flashtool. All you need to perform this update is, you need to follow this guide being very careful. Let’s head towards the installation instructions.Xperia-SP-red-

Update Sony Xperia SP C5302/C5303 To Latest Official 12.1.A.1.205 Firmware

Pre-Installation Instructions:

  1. As mentioned, this firmware is only for Xperia SP C5302/C5303. Do not try this on any other phone, that may result in bricking your device. Check your device’s model number in Settings > About device.
  2. You must have installed the Sony Flashtool. Find the full guide here.
  3. After installing Sony Flashtool, open the Flashtool folder from the drive where you installed it.
  4. Now open Flashtool>Drivers>Flashtool-drivers.exe and install the Flashtool, Fastboot & Xperia SP drivers from the list. [Important]
  5. Your phone must be charged at least over 60%. This is highly recommended in order to prevent any power issues during the flashing process.
  6. Enable USB debugging mode on your device. To do so, tap settings>developer options>USB debugging. If you can’t find developer options in settings, then tap settings > about device and tap “Build Number” 7 times and you’ll get em’ activated under settings.
  7. Make sure that you back up all your important media content,  contacts, call logs and text messages. This is highly recommended and important in case something goes wrong during the flashing process in case you select the data to wipe option before flashing. You can easily restore whenever you need.
  8. To flash this firmware, you do not need to root your device, you do not need to unlock the bootloader. All you need is, your device must be the one mentioned and must be running on Android 4.2.2 or 4.3 Jelly Bean.
  9. Download the firmware file properly.
  10. Use the OEM data cable to connect your phone to your PC. Using any other data cable might cause connection problems.
  11. This firmware can be flashed on Xperia SP in any region/any country.
  12. Alright! Follow this guide to the letter in order to prevent any mishap.

How to Install Android 4.3 Jelly Bean 12.1.A.1.205 on Xperia SP:

  1. Before moving forward, please make sure that you’ve read the pre requisites and ensure that you are set to go ahead.
  2. Download the latest Android 4.3 Jelly Bean 12.1.A.1.205  FTF file.
    1. For Xperia SP C5302 [Generic]
    2. For Xperia XP C5303[Generic]
  3. Extract the downloaded RAR file and you will get the FTF.
  4. Copy the file and paste in Flashtool>Firmwares folder.
  5. Open Flashtool.exe now.
  6. Hit the small lightning button on the top left corner and select Flashmode.
  7. Select the FTF firmware file that you placed in the Firmware folder. 
  8. From the right side, select what do you want to wipe. Data, cache and apps log, all wipes are recommended, however, you may select if you don’t want.
  9. Click on OK, and it will start preparing the firmware for flashing. This may take a little while to load.
  10. As soon as the firmware is loaded, it will prompt you to attach the phone by turning it off and keeping the back key press.
  11. For Xperia SPVolume Down key will do the job of back key, just turn off your phone, keep the Volume Down key pressed and plug in the data cable.
  12. As soon as the phone is detected in Flashmode, the firmware will start flashing, Do not leave the Volume Down key until the process is complete.
  13. As soon as you see “Flashing ended or Finished Flashing” leave the Volume Down key, plug the cable out and reboot.
  14. That’s All! Congrats! You’ve installed latest Android 4.3 Jelly Bean on your Xperia SP C5302/C5303. Enjoy

In case you got any queries or face any problems regarding this guide, please feel free to stop by the comment box below and let us know. We will get back to you as soon as possible. Thanks all!