Home Blog Page 419

iPhone 6 Comparison With Lumia 1020, HTC One and Lumia 1520

0
iPhone 6 Comparison With Lumia 1020, HTC One and Lumia 1520

I am not a big fan of Windows Phone nor HTC but if i talk generally they are doing their best and people are getting more attractive to Lumia new devices. iPhone 6 is released everyone is comparing it with Samsung Galaxy Note 4 , Samsung Galaxy S5 , HTC One M8, LG G3 and Xperia Z3, but today i thought lets give it a try with Windows top devices to check where iPhone 6 is holding his position. First its a spec comparison chart and after that there is a video of all these devices. Read and carefully check every bit of these devices before going to purchase any of these smartphones.

iPhone_6_versus_Best_Windows_Phones

Following are the specs comparison of iPhone 6, iPhone 6 Plus, Lumia 1020, HTC One and Lumia 1520. Since iPhone 6 is the latest flagship so you should know that are you buying the best whats out there.. !

Iphone_6_specs_vs_Windows_Phone_Ultra

iPhone 6 Comparison With Lumia 1020, HTC One and Lumia 1520

Source: Wpcentral

Root Galaxy S4 Mini LTE I9195 on Android 4.4.2 Kit-Kat XXUCNH5 Official Firmware

3
Root Galaxy S4 Mini LTE I9195 on Android 4.4.2 Kit-Kat XXUCNH5 Official Firmware

Now that you have rooted your device to Android 4.4.2 Kit-Kat XXUCNH5 Official Firmware, if not then follow the link in post below to do soand as per rule of Updating your device to Official Firmware, you are sure to loose the root of your device, this leaving your device un-rooted and waiting for your too root it again. The only option left right now, is to root your device again, if you want to use your device with the same things you had before the update. It doesn’t matter if the update was really small in size or a huge one, if you have made amendments in the Stock system, you won’t be able to receive the OTA update and files are too big to leave any sort of root access or Stock recovery, you might be able to flee if only you receive the OTA file, nonetheless, let’s proceed and see how we can root the device again

If your must know that, Rooting allows you to get full control over your device, Stock apps and mods are good, but installing Custom Mods gives you better support and great battery life, you might need to delete some Stock apps from the device, a non-rooted device can’t do that, but a rooted one has the power to remove stock apps too.

s4-mini-ger

If you are familiar with Odin and it’s working, then this tutorial might not be difficult for you. Otherwise read the whole tutorial first before trying it on your device. In this Article, we will show you How To Root Galaxy S4 Mini LTE I9195 on Android 4.4.2 Kit-Kat XXUCNH5 Official Firmware,But before we begin, Make sure that:

  1. Update Your Device To Android 4.4.2 Kit-Kat:Link
  2. That you have a Well Charged Battery, 60%-80% is better.
  3. Back-Up all your important ContactsCall Logs & Messages.It is highly recommended in case of any mishap or data loss to back up all your important data.
  4. Back-Up your Mobiles EFS DataHow To Restore and Back-Up EFS Data On Samsung Galaxy Devices.
  5. Check your device model, Go To Setting > About and Make sure that it is I9195 .
  6. Do-not try this tutorial on any other device
  7. Back-Up all Your apps: Link

Disclaimer:

The methods involved in flashing custom roms and rooting your phone is highly custom and may result in bricking your device,and has nothing to do with Google or the device manufacturers which is Samsung in our case. In case of any mishap we may not be held responsible. Follow these instructions to the letter to avoid any mishap or bricking. Make sure that whatever you do, you are doing it at your own responsibility.

How To Root The Device.

odin_explained6

  1. Download CF-Auto-Root Android 4.4.2 Package For your Galaxy S4 Mini to your computer and extract the zip file.
  2. Download Odin.
  3. Turn off your Phone and Turn it On While Pressing, Power + Volume Down + Home button until you see some text on-screen, Press Volume Up to continue.
  4. Make Sure that the USB drivers are installed.
  5. Open Odin in Computer and connect your device to PC, while it is in the Download mode.
  6. If your Phone is successfully connected to PC, the Odin port will turn Yellow with COM port number.
  7. Now Click on PDA and select the File ‘CF-Auto-Root-serranolte-serranoltexx-gti9195.tar.md5
  8. In Odin, Check Auto reboot  Option.
  9. Now Click the start button and wait for the process to complete.
  10. After the installation is complete you device will restart and once you see the Home Screen and get the “Pass” Message on Odin, unplug the cable

Diamond Digger Saga for PC ( Windows 8.1, 8, 7 and Mac )

0
Diamond Digger Saga for PC ( Windows 8.1, 8, 7 and Mac )

Diamond Digger Saga is available for Pc ? Yes with the help of third party emulator we can download and install all Android apps and games on our PC running Windows 8.1, 8, 7, Xp and Mac. Diamond Digger Saga is the sequel of Candy Crush saga and its the same as all their parts. Before starting the guide on how to install Diamond Digger Saga for PC, let me give you a overview of Diamond Digger Saga.

Diamond Digger Saga for PC

About Diamond Digger Saga:

This game has same concepts like candy crush saga. You have to complete the task in order to get to next level. You have to help Diggy as you dig through diamonds and unearth special treasures. Use the water to make your way through the rooms and discover treasures. Following are the more features that are added in Diamond Digger Saga.

● Bright and colorful graphics
● Friendly and fascinating characters living in a fantasy world
● Color bursts, line blasts and dynamite to lend a helping hand
● Unlock boosters and special treasures hidden beneath the ground tiles!
● Easy and fun to play, challenging to master
● Over 50 levels to complete filled with wondrous delights!
● Leaderboards to watch your friends and competitors!
● Easily sync the game between devices and unlock full game features when connected to the internet

Download and Install Beach Buggy Racing on PC:

  1. To download Diamond Digger Saga for PC, you will need an Android emulator like Bluestacks. If you do not have it already, you can download it from the website Bluestacks.com.
  2. Open Bluestacks and search for Diamond Digger Saga using search tool on the top of the homepage.
  3. Click on install button. The game will automatically download and install.
  4. Once the app has been installed, go to My Apps in Bluestacks homepage.
  5. The icon for the game will appear in My Apps.
  6.  Click on this icon to open Diamond Digger Saga.

Now, you can start playing the game any time on your Pc simply by opening it from My Apps. Get mesmerized by the amazing graphics of the game.

Hopefully, you will be able to install the game easily on your PC through this guide. If you still have any issues, please let us know and we will help you solve them. Enjoy !

Download Beach Buggy Racing for PC ( Windows and Mac )

0
Download Beach Buggy Racing for PC ( Windows and Mac )

Beach Buggy Blitz was a big hit back in days and its was downloaded by 50 Million people. Now creator of Beach Buggy Blitz have introduced a new version of racing game ” Beach Buggy Racing “.  Beach Buggy Racing is racing is totally different from Beach Buggy Blitz and its loaded with a hell of new stuff. In Beach Buggy Racing you’ll experience action-packed, surprise-filled world of off-road racing. Before starting the guide on download Beach Buggy Racing for PC, let give an overview of this game.

Beach Buggy Racing for PC

About Beach Buggy Racing:

  • Beach Buggy Racing is a is the official sequel Beach Buggy Blitz and its totally free.
  • You’ll get a chance to experience of an action-packed, surprise-filled world of off-road kart racing mayhem.
  • You’ve to race against the different rivals with unique personalities and special abilities.
  • Build a collection of crazy powerups, like Dodgeball Frenzy, Fireball, and Oil Slick. These powerups will help you to fight against other racers.
  • Chance to drive on 6 different game modes on 12 imaginative 3D race tracks.

For more visit Google Play Store:

Download and Install Beach Buggy Racing on PC:

  1. To download Beach Buggy Racing for PC, you will need an Android emulator like Bluestacks. If you do not have it already, you can download it from the website Bluestacks.com.
  2. Open Bluestacks and search for Beach Buggy Racing using search tool on the top of the homepage.
  3. Click on install button. The game will automatically download and install.
  4. Once the app has been installed, go to My Apps in Bluestacks homepage.
  5. The icon for the game will appear in My Apps.
  6.  Click on this icon to open Beach Buggy Racing.

Now, you can start playing the game any time on your Pc simply by opening it from My Apps. Get mesmerized by the amazing graphics of the game.

Hopefully, you will be able to install the game easily on your PC through this guide. If you still have any issues, please let us know and we will help you solve them. Enjoy !

Download Amazing Thief for PC Free ( Windows and Mac )

0
Download Amazing Thief for PC Free ( Windows and Mac )

The best time pass in todays world is mobile games and apps. People are madly addict to these games and no doubt creator of these are adding new and new features to make it more irresistible. Thanks to third party emulators like BlueStacks we can play mobile games on PC. That means now you can play mobile games on big screens ( Desktop, Laptop and Macbook ) and as far as I’ve experienced it feels more comfortable while playing it on PC. A new game Amazing Thief is getting viral on both PlayStores, in this  you have to do is jump on the roofs, from building to building, don’t let police catch you. In this guide I’ll tell you how to download Amazing Thief on PC. It will be more easy to play Amazing Thief on PC.

Amazing Thief for game pc

About Amazing Thief:

  1. Its a simple game with high graphics.
  2. All you have to do is jump on the roofs, from building to building.
  3. Tap one time for a single jump and double tap for double jump.
  4. Main theme is like Flappy bird you have to tap and jump, don’t jump too high you’ll die.

Download and Install Amazing Thief on PC:

  1. To download Amazing Theif  for PC, you will need an Android emulator like Bluestacks. If you do not have it already, you can download it from the website Bluestacks.com.
  2. Open Bluestacks and search for Amazing Theif using search tool on the top of the homepage.
  3. Click on install button. The game will automatically download and install.
  4. Once the app has been installed, go to My Apps in Bluestacks homepage.
  5. The icon for the game will appear in My Apps.
  6.  Click on this icon to open Amazing Theif

Now, you can start playing the game any time on your Pc simply by opening it from My Apps. Get mesmerized by the amazing graphics of the game.

Hopefully, you will be able to install the game easily on your PC through this guide. If you still have any issues, please let us know and we will help you solve them. Enjoy !

How To Root Sony Xperia Z,ZR,ZL 10.5.1.A.0.283 Android 4.4.4 KitKat [Locked/Unlocked BL]

138
How To Root Sony Xperia Z,ZR,ZL 10.5.1.A.0.283 Android 4.4.4 KitKat [Locked/Unlocked BL]

The very first siblings of the Xperia Z family, the Xperia Z, ZR and ZL received Android 4.4.4 KitKat update few days back. The new update came with the build number 10.5.1.A.0.283 and packs up some enhancements here and there including battery charging time, performance, stability. Improvements to the software components including Email, SMS and some other apps have been made as well. Android power users, who had their devices rooted on earlier Android version, must have lost the root access after updating their device to this latest firmware.

If you’re looking out to gain the root access once again on your device, and you don’t want to touch the bootloader of your device, there’s a way to get around it and root your device without unlocking the bootloader. That means you won’t loose the warranty and you won’t loose the DRM keys, neither you will loose any bravia engine functionality. Wondering how? well, that’s what we are going to do in the following guide. As you move forward, you should come across a comprehensive guide to root your Sony Xperia Z C6602, C6603, Xperia ZR C5502, C5503 and Sony Xperia ZL C6502, C6503 running latest Android 4.4.4 KitKat 10.5.1.A.0.283 firmware. All you need is, you need to follow this guide carefully.Screenshot_11

Here are the early preparations:

1. This guide is only for Sony Xperia Z C6602/3, Xperia ZR C5502/2, Xperia ZL C6502/3!

Make sure that your device is exactly as mentioned above. To check out what device you have, go to Settings > More/General > About Device or Settings > About Device and match the model number. Be careful about the device model number, flashing a file on a device not listed here might result in bricking it up.

2. Battery should be charged at least 60%!

Your device’s battery shouldn’t be weak. In case your device goes dead during the flashing process, your device may get soft bricked and you might be in need of flashing stock firmware and that will ultimately result in wiping up your data as well. So, make sure that you charge your device before you start the flashing process.

3. Use the OEM datacable to establish connection!

Always use the original data cable to establish connection between your Android device and your computer / laptop. Using ordinary data cables might interrupt the flashing process, so to avoid any mishap, you need to meet this requirement as well.

4. Enable USB debugging

Your phone must have the USB debugging enabled. In order to enable it, go to Settings > About device > tap the build number for 7 times. The developer options will be enabled, now go back to the menu screen in settings and open developer options. Once opened, enable USB debugging from within the developer options.

5. Backup everything!

Just to be on the safe side, you may consider backing up each and everything from your Android device. This is highly recommended so that in case anything goes wrong, you still have the access to all of your data and you can restore it immediately. You may backup everything as listed below.

Backup SMS Messages
Backup Call Logs
Backup Contacts
Backup Media – Copy your files manually to your PC or Laptop.
Titanium Backup – If already rooted, use Titanium Backup to backup all of your apps, system data and other important content.
Backup Nandroid – If CWM  or TWRP installed previously, otherwise skip this step and perform this at the end of flashing.

6. Install and setup Sony Flashtool.

You must have installed Sony Flashtool. Find the full guide here. After installing Sony Flashtool, open the Flashtool folder from the drive where you installed it.Now open Flashtool>Drivers>Flashtool-drivers.exe and install the Flashtool, Fastboot & Xperia Z,ZR,ZL drivers from the list. [Important]

7. Disclaimer

The methods involved in flashing custom recoveries, roms and rooting your phone are highly custom and may result in bricking your device, and has nothing to do with Google or the device manufacturer that is SONY in our case. In case you’re not going to unlock the bootloader of your device, you may not worry about this. Also rooting your device will void its warranty and you will be no longer eligible for any kind of free device services by the manufacturers/warranty providers. In case of any mishap we may not be held responsible. Follow these instructions to the letter to avoid any mishap or bricking. Make sure that whatever you do, you are doing it at your own responsibility.

Downloads required:

Download .230 firmware for Xperia Z Download Latest .283 firmware for Xperia Z

Download .230 firmware for Xperia ZR C5503 |.230 firmware for For C5502 Download Latest .283 firmware for Xperia ZR

Download .230 firmware for Xperia ZL Download Latest .283 firmware for Xperia ZL

How to Root:

  1. First of all, download the .230 firmware ftf file for your Xperia Z/ZR/ZL.
  2. Copy the downloaded firmware ftf file to firmware folder, which can be located under the Flashtool installation directory.
  3. Open Flashtool.exe now.
  4. Hit the small lightening button on the top left corner and select Flashmode.
  5. Select the FTF firmware file that you placed in the Firmware folder.
  6. From the right side, exclude everything except kernel, as shown below.Screenshot_10
  7. Do not touch anything else on this screen, and click on Flash.
  8. It will start preparing the firmware (kernel) for flashing. This may take a little while to load.
  9. As soon as the firmware is loaded, it will prompt you to attach the phone by turning it off and keeping the back key press.
  10. For Xperia Z/ZR/ZL, Volume Down key will do the job of back key, just turn off your phone, keep the Volume Down key pressed and plug in the data cable.
  11. As soon as the phone is detected in Flashmode, the firmware will start flashing the kernel, Do not leave the Volume Down key until the process is complete.
  12. As soon as you see “Flashing ended or Finished Flashing” leave the Volume Down key.
  13. Once the kernel is flashed, make sure that you’ve enabled USB debugging on your phone.
  14. Download the latest One Click Root Tool and extract it.
  15. From the extracted files, execute the Run.bat file now.
  16. A command prompt will open up requiring you to connect your device to your PC now.
  17. Having the USB debugging enabled, connect your device.
  18. Follow the on-screen instructions unless your phone is rooted.
  19. Once rooted, disconnect your phone and turn it off.
  20. Now follow flash the .283 kernel using step 2-12 in order to get your device’s original kernel back
  21. That’s all! Enjoy!

Wondering what to do once you’re rooted? Here’s the answer.

Rooting your phone gives you complete access over all the data which is apparently locked by the manufacturers. This includes removal of the factory restrictions and making changes to the internal system and the operating system. Gaining the root access gives you the privileges to install various applications to enhance the performance of your device, allows you to remove the built-in applications/programs, helps you to upgrade the battery life of your device & install the apps which require the root access for the proper functionality and modify your device in so many other ways e.g using mods and flashing custom recoveries and custom ROMs. Here’s our collection of 10 Best Root Apps.

If you face any issues or difficulties regarding this guide, make sure that you drop your queries in the comment box below. We will get back to you as soon as we get it.

How To Install iOS 8 On Your iPhone, iPad Or iPod Touch [Through OTA,iTunes, IPSW]

0
How To Install iOS 8 On Your iPhone, iPad Or iPod Touch [Through OTA,iTunes, IPSW]

This has been a great year for Apple so far,  we’ve seen massive improvements from Apple in both the departments, Software and Hardware. At first we saw great iterations in the history of iOS, and then we saw Apple coming with completely revamped iPhone(s), the iPhone 6 and iPhone 6 Plus. Today might be the greatest one for Apple this year so far as it is rolling out the 2nd biggest iteration of iOS, the iOS 8 on a roll out to the users around the world and you surely won’t like to wait to get this update running greatly on your compatible Apple device right away.

iOS 8 packs up a number of improvements over the iOS 7.x. There are UI enhancements, Apple has introduced so many new frameworks in order to help the developers get their hands on innovative applications. Notification Center widgets and new custom keyboard styles have been caught up the in the wild for iOS 8 in the Appstore. iOS 8’s final build is up now and can be installed on iPhone 6 Plus, iPhone 6, iPhone 5S, iPhone 5C, iPhone 5, iPhone 4S,  iPad 4, iPad 3, iPad 2, Retina iPad Mini, iPad Air, iPad Mini 1,  and iPod Touch 5. We have a complete guide here that will help you to update your Apple device to the latest and greatest version of iOS, the iOS, straightaway as soon as the firmware update starts rolling out. Let’s go through and update your device right now.iPhone-6-iOS-8

Update to Latest iTunes

The latest version of iTunes comes with iOS 8 support. Make sure that you’ve installed it on your windows PC or MAC before you go for installing the iOS 8 using your computer. Download iTunes 11.4 here.

Backup your device

Before you perform any update, it is always recommended that you backup all of your important data. A clean install is always recommended, you might have to wipe your device so make sure that you’ve backed up all of your important stuff. You can backup your iOS device using iTunes or iCloud.

10668736_10205042703816828_151985274_n

Clean-up your device – Delete unused applications – Free up space

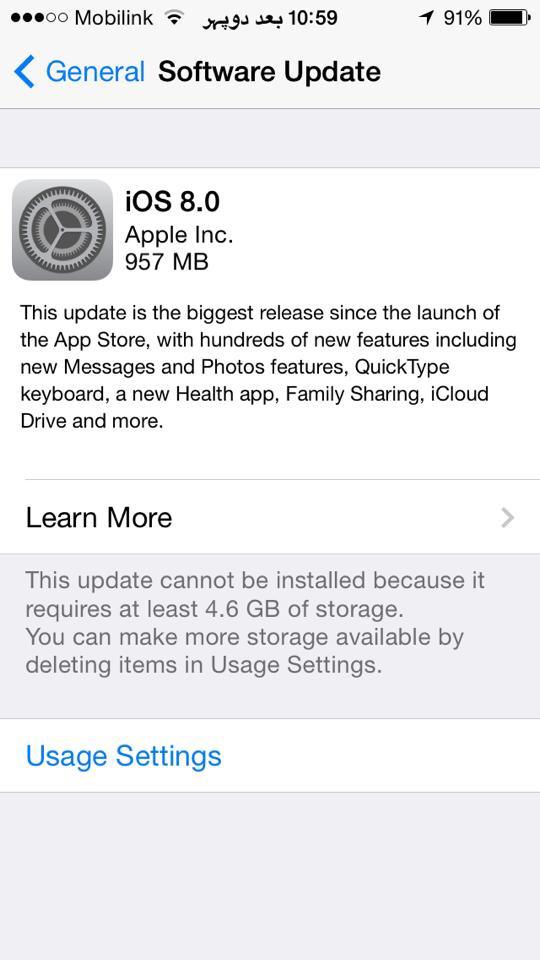
It is always recommended to wipe up the applications you merely use. Since you’re going to have a completely new iOS running on your device, you won’t like any old applications putting any burden on your device’s latest and greatest iOS. You may delete all unnecessary files from your Apple device as well. iOS 8’s installation would require at least 1 GB of free space, so if you’re running low on space, make sure that you clear it up before you begin installing iOS 8.

Jailbreakers

Jailbreakers definitely enjoy a completely different world of apps and features on their Apple device and if you happen to be one jailbreaker, it won’t be comforting for you to update to iOS 8 right now. There’s no telling about the arrival of Jailbreak for iOS 8 anytime soon, the firmware just came out today and there’s no idea when the developers come up with the tweaks made to this latest version of iOS. Also, once you update your device to iOS 8’s very first build, you won’t be able to downgrade your device to iOS 7.x in order to gain the jailbreak privileges back on your device, so it is advised that jailbreak lovers stay away from the iOS 8 update for now.

Install iOS 8

Through OTA Update

  1. Make sure that your Apple device is charged good enough to perform this whole action, which will take around 1 hour.
  2. Turn on WiFi on your Apple device now.
  3. Go to Settings > General > Software Updates.
  4. Your device will automatically check for iOS update, if the update is found tap on “Download” to download the iOS 8 update.
  5. Once the update is downloaded, your device will leave a notification, you can go to Settings > General > Software Update > Install it.
  6. It will install iOS 8 on your device in a few minutes.

10711390_10205042849660474_1056264377_n10708090_10205043141827778_2037976857_n
If you’ve used evasi0n or pangu to jailbreak your device in the past, you won’t be able to update through OTA, which is a bit useful as well as it won’t let your jailbreak privileges go away easily. Also, if you want to jailbreak your device in future, it is advised to avoid OTA updates.

Through iTunes

Updating your device using iTunes is pretty much easy and useful as well. You might be facing internet connectivity issues with your WiFi, and you may want to use your PC connected through a LAN cable that can perform the download way faster than your Apple device. You can simply plugin the USB cable in your device and begin the update process. Here’s how to do that.

  1. Download and install iTunes 11.4 from the link attached above.
  2. Once iTunes is installed, plug-in your Apple device.
  3. Now open iTunes and wait for it to detect your device.
  4. As soon as your device is detected, click on “Check for updates”.
  5. If the update is available through iTunes, it will begin downloading and install it once done.
  6. That’s all.

If both of the above options do not work…

Just in case the update isn’t available through OTA or through iTunes, you can simply download the IPSW file and install it manually on your device using iTunes. Here’s how to do it.

Download the iOS 8 update IPSW file for your iPhone, iPad or iPod.

iPhone(s)

iPad(s)

iPod(s)
iPod touch (5th generation)

How to update to iOS 8 using .IPSW file

10435870_10205042755898130_6883284237758660532_n


  1. Once downloaded, open iTunes 11.4 on your MAC or PC now.
  2. Connect your Apple device to your PC now.
  3. Once connected and detected in iTunes, click on “Restore iPhone/iPad/iPod”.
  4. It will let you select the .IPSW file, select and sit back.
  5. Once installed, unplug your device and enjoy iOS 8 running greatly on your device!

Download and Install iOS 8 Final On iPhone 5s, 5c, 5, 4S, iPad, iPod touch

0
Download and Install iOS 8 Final On iPhone 5s, 5c, 5, 4S, iPad, iPod touch

iOS 8 final version links are available for download for iPhone 5s, 5c, 5, 4S, iPad, iPod touch, this build is full and final with bundle of new features are added as shown in keynote event. The following guide will help you download and install iOS 8 Final version On iPhone 5s, 5c, 5, 4S, iPad, iPod touch. Before proceeding with the installation process please confirm that iOS 8 only supports Phone 5s, iPhone 5c, iPhone 5, iPhone 4S, iPad Air, Retina iPad mini, iPad mini 1, iPad 4, iPad 3, iPad 2 and iPod touch 5.

ios8-logo-dark

Download and Install iOS 8 Final On iPhone 5s, 5c, 5, 4S, iPad, iPod touch:

  1. First Download iTunes 11.4 for Windows or Mac.
  2. I would recommend that clean install by restoring your device through iTunes.
  3. Before installing iOS 8 on your device kindly take a complete backup your device.
  4. Now download iOS 8 for your device. ( Links are not added yet ).
  5. Launch iTunes on you Mac or Windows.
  6. Connect your device with iTunes ( Press hold the Alt key for Mac ) ( Press and hold Shift key on Windows ) and click on restore.
  7. Now select the iOS 8 downloaded file from your Mac or PC.
  8. Just sit back and wait for installation to be completed.

All Done.

iOS 8 OTA Update:

You can check OTA update by going to Settings > General > Software Update and you’ll be good to go. Today Apple will roll out iOS final version OTA update for Phone 5s, iPhone 5c, iPhone 5, iPhone 4S, iPad Air, Retina iPad mini, iPad mini 1, iPad 4, iPad 3, iPad 2 and iPod touch 5.

iOS 8 Worldwide Release Time [Chart]:

iOS-8-release-time-zones

How To Stop Wallpaper Resize and Zoom in iOS 7 [ Guide ]

0
How To Stop Wallpaper Resize and Zoom in iOS 7 [ Guide ]

I am still using iOS 7 on my iPhone 5s and I love to try new wallpapers daily but iOS 7 has an issue it automatically resize and zoom wallpaper, I hate it so much. After working for an hour finally i found a way to fix it through a simple option. Many users of iPhone also want to get rid of this issue this why I’ve prepared a step by step guide to stop Wallpaper Resize and Zoom in iOS 7.

fixing-ios-7-wallpaper-woes-scale-crop-align-design-perfect-iphone-background.w654

How To Stop Wallpaper Resize and Zoom in iOS 7 [ Guide ]

Following are simple steps to stop wallpapers resize and zoom in iOS 7. You can try this on all device who support iOS 7 ( iPhone 5s, iPhone 5, iPhone 5c, iPhone 4s and iPad ).

Stop-Automatic-Wallpaper-Resize-and-Zoom-in-iOS-7

  1. First Open Settings
  2. Now tap on General.
  3. Select Accessibility
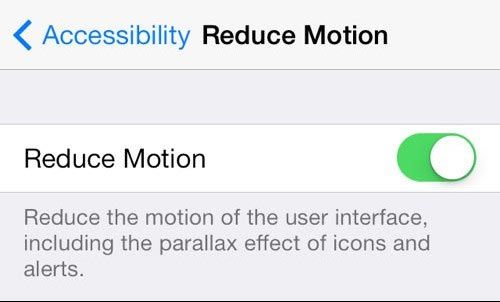
  4. Tap on Reduce Motion
  5. Now turn ON the Reduce Motion switch.

After turning reduce motion on, the automatic wallpaper resize and zoom on iOS 7 will be stoped. The main issue of this error was parallax effect. When ever you set a wallpaper it has to be set for parallax, it means wallpaper has to stretch for outside the iPad/iPhone home screen.

Following are the resolution dimensions for iPhone screens:

  • iPhone 5s/5c/5 – 640×1136 px (portrait)
  • iPad 4/3 – 1536×2048 px (portrait)
  • iPhone 4s – 640×960 px (portrait)

Credit: igeekblog

Easily Stop WhatsApp from Auto-downloading Photos on iPhone

0
Easily Stop WhatsApp from Auto-downloading Photos on iPhone

Whatsapp is best cross messaging platform for smartphones and its also top number 1 but unfortunately, there is an issue with Whatsapp while using on iPhone. Whatsapp starts auto downloading photos on iPhone i don’t like this, but  after the recent update of Whatsapp now you can prevent photos and videos from auto-downloading. In the following guide I’ll guide you how you can Easily Stop WhatsApp from Auto-downloading Photos on iPhone.

Screen Shot 2014-09-17 at 01.16.40

How To Stop WhatsApp from Auto-downloading Photos on iPhone:

  1. First of all Open AppStore on your iPhone.
  2. Now tap on Updates tab.
  3. Find Whatsapp in the list tap on update.
  4. Wait for Update to be complete.
  5. Now open Whatsapp on your iPhone.
  6. Tap on setting of Whatsapp.
  7. Select Chat Settings.
  8. Now tap on Media Auto-Download.
  9. For each option ( Images, Video and Audio ) select Never, Wifi, Wi-Fi and Cellular.

How To Turn off Auto-Download in WhatsApp:

Whatsapp-Auto-Download-Images-Option-for-iPhone


Please do tell me if you face any kind of issue regarding this guide. This guide will help you to stop WhatsApp from Auto-downloading Photos on iPhone.

Easily hide the free U2 album on iPhone, iPad, and iTunes

0
Easily hide the free U2 album on iPhone, iPad, and iTunes

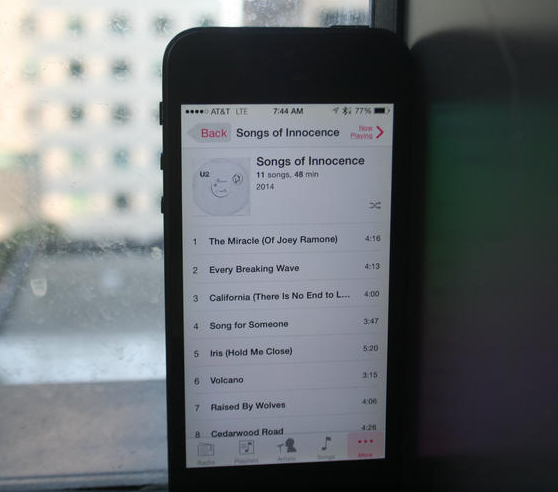
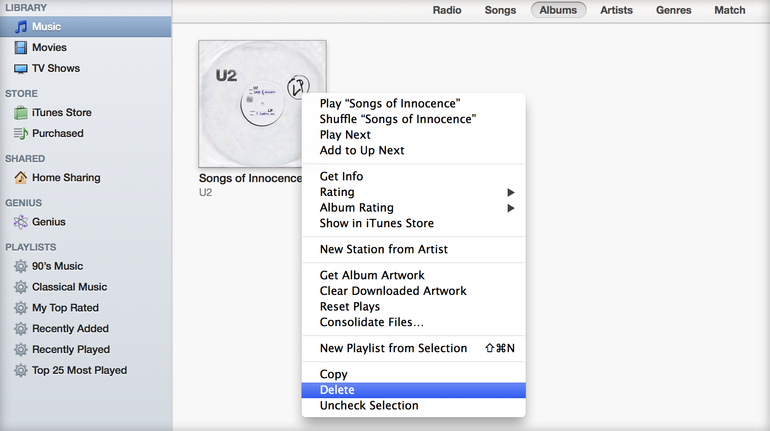
U2 is the famous band who performed on Apple latest Keynote event and when their performance was over, Tim Cook told that you can access to their new album, Songs of Innocence, for free. Yaaayyy !! but not for all most of the Apple users were happy to get the U2 new album they even asked how to download it, but not everyone was happy with that so they want to know how to remove free U2 album on iPhone, iPad, and iTunes.

Easily hide the free U2 album on iPhone, iPad, and iTunes

Hide the free U2 album in iTunes and on your iPhone and iPad [ Guide ]:

Screen Shot 2014-09-16 at 01.46.59


  1. First of all open iTunes on Computer on Mac.
  2. Connect your device with iTunes.
  3. Now click on iTunes store on the top right corner.
  4. On the right side of navigation you’ll see quick links. Click on it and choose purchase.
  5. Now click on recent purchase there you’ll find the ablums.
  6. Just simply click the X next to the U2 album.
  7. A pop-up will appear click on hide button.

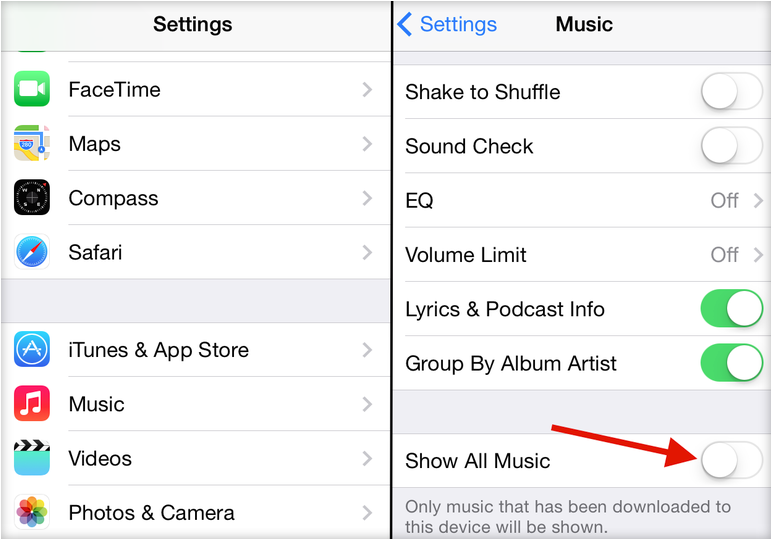
Hide the free U2 album on your iPhone.

Screen Shot 2014-09-16 at 02.05.15


  1. Goto Settings.
  2. Now Select Music.
  3. toggling the “Show All Music” switch to off.
  4. Done.

Image Credit: Cnet

How To Install Official Android 4.4.2 KitKat On At&t Galaxy S3 Mini SM-G730A

5
How To Install Official Android 4.4.2 KitKat On At&t Galaxy S3 Mini SM-G730A

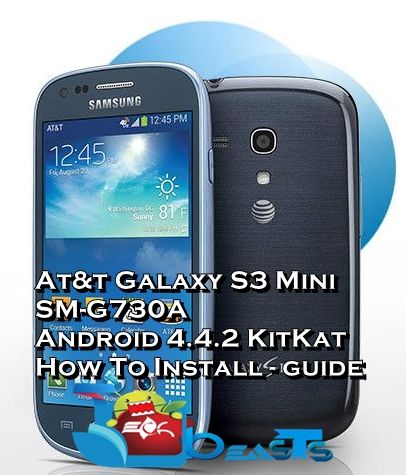
While no one expected the very first mini device by Samsung to receive the latest and greatest version of Android, Android 4.4.2 KitKat, At&t made a nice move and updated its Galaxy S3 Mini modeled as SM-G730A to Android 4.4.2 KitKat. The device sports almost same specifications to that of the ordinary Galaxy S3 Mini which includes a 4.0-inch Super AMOLED dispaly, 1 GB RAM, 8 GB internal storage, 2000 mAh battery, 5 MP cam at the back and a VGA cam for secondary video on the front. This device is also powered up with a 1.2 GHz Dual Core CPU. Initially the At&t Galaxy S3 Mini also ran on Android Jelly Bean, but the device has now taken the lead it’s the only Mini S3 running on Android 4.4.2 KitKat.

The update packs up new UI for some of the applications. White icons atop of the transparent notification bar, new music widget on the lock screen and so many new features have been added. There’s a number of bugs fixed in this update, performance and stability enhancements have been made. At&t has rolled out the latest update based on the build UCUBNG3, the update will reach different users through Samsung Kies or through OTA, but just in case you haven’t received this update and you’re impatient to run Android 4.4.2 KitKat on your At&t Galaxy S3 Mini, you may consider updating your device manually.

Before you wonder how you can do so, we’ve already done the job for you. As you move forward in the succeeding guide, you will find a comprehensive guide that will help you to update your At&t Galaxy S3 Mini SM-G730A to Android 4.4.2 KitKat UCUBNG3 official firmware using Odin3. All you need is, you need to follow this guide being very careful. galaxy_s3_mini_att-600x600

Here are the firmware details:

  • Device: At&t Galaxy S3 Mini SM-G730A
  • OS: Android 4.4.2 KitKat
  • Region: At&t
  • Build: G730AUCUBNG3
  • Changelist: 1670137
  • Build Date: 24/7/2014

Early Preparations:

1. This guide is only for At&t Samsung Galaxy S3 Mini SM-G730A!

Make sure that your device is exactly as mentioned above. To check out what device you have, go to Settings > More/General > About Device or Settings > About Device and match the model number. Be careful about the device model number, flashing a file on a device not listed here might result in bricking it up. In that case, we may not be held responsible.

2. Battery should be charged at least 60%!

Your device’s battery shouldn’t be weak. In case your device goes dead during the flashing process, your device may get soft bricked and you might be in need of flashing stock firmware and that will ultimately result in wiping up your data as well. So, make sure that you charge your device before you start the flashing process.

3. Use the OEM datacable to establish connection!

Always use the original data cable to establish connection between your Android device and your computer / laptop. Using ordinary data cables might interrupt the flashing process, so to avoid any mishap, you need to meet this requirement as well.

4. Backup everything!

Just to be on the safe side, you may consider backing up each and everything from your Android device. This is highly recommended so that in case anything goes wrong, you still have the access to all of your data and you can restore it immediately. Also, clean install is always recommended, that means you will probably have to wipe your device to install the new firmware. So, you may backup everything as listed below.

5. Turn off Samsung Kies and other softwares while using Odin3!

Make sure that you turn off Samsung Kies while using Odin3 flashtool. Samsung Kies will interrupt Odin3 and will result in causing errors and may not let you flash your desired firwmrae. Also, make sure that you turn off any antivirus software you’ve installed and also disable firewall to avoid any connection and flashing issues.

How To Install Official Android 4.4.2 KitKat On At&t Galaxy S3 Mini SM-G730A

Downloads Required:

  1. Download and extract Odin3 v3.09.
  2. Download and Install Samsung USB drivers .
  3. Download and extract firmware file ATT-G730AUCUBNG3-20140912202239.zip

Method:

  1. Wipe your device complete in order to attain a neat installation.
  2. Open Odin3.exe.
  3. Put your At&t Galaxy S3 Mini in download mode. To do so, turn it off and wait for 10 seconds. Turn it on by pressing and holding Volume Down + Home Button + Power Key simultaneously, You should see a warning, press Volume Up to continue. In case this method doesn’t work for you, try one from this guide.
  4. Connect your device to your PC.
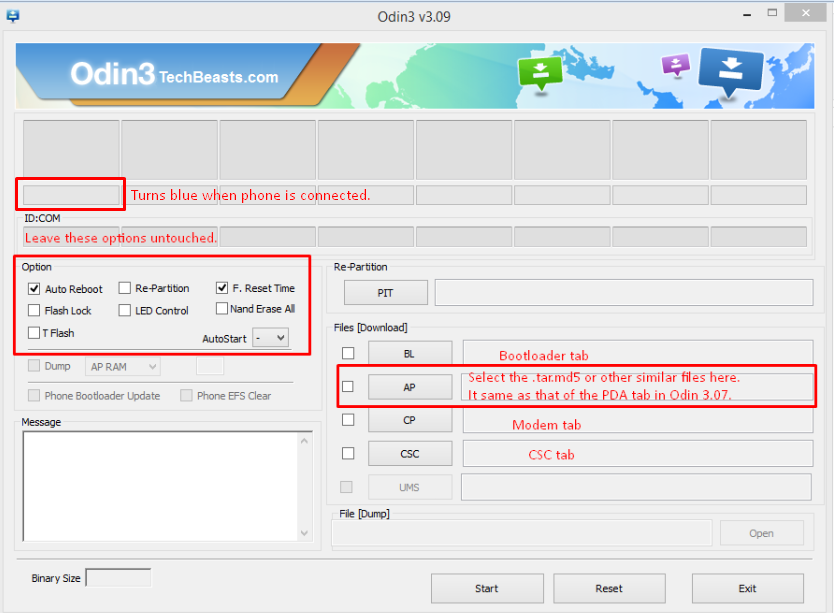
  5. As soon as Odin detects your phone, the ID:COM box should turn blue.  Make sure that you’ve installed Samsung USB drivers before connecting.
  6. For Odin 3.09 hit the AP tab. Select the firmware.tar.md5 or firmware.tar, that you downloaded and extracted above.
  7. If you’re using Odin 3.07, you will select “PDA” tab instead of the AP tab, rest of the options remain untouched.
  8. Make sure that the options selected in your Odin are exactly as shown in the pic.Odin-3.09-explained.-2
  9. Hit start and wait till the firmware  flashing is complete, as soon as your device restarts, remove it from PC.
  10. Wait for your device to reboot, as soon as it reboots check out the new firmware!
  11. That’s all!

We hope that this guide worked perfectly for you. In case you are stuck with something or you are facing any issues regarding this post, make sure that you leave the comments below. We will get back to you immediately. Thank you.