Home Blog Page 405

Use Volume Button to Lock Android Apps with Oops! AppLock
0
Use Volume Button to Lock Android Apps with Oops! AppLock

Despite that every device and every OS has some unique way of providing the Security, even the Pattern Lock is more than enough, but there comes a alot of times when you just can’t keep your device lock from other people, especially when the little ones wants to play games on it and you have no other choice except to let them play. On the other hand, sometimes on of your relatives wants to use your device, just to check how it works, at that time you have to unlock the device and then gives it to the person, so if you have some sensitive type of data in it, that you don’t want others too see, you have to make sure that no one opens that App, let’s say you have some private messages and you don’t want anyone to see it, just lock the Messages app and you are good to go.

In the Past, we have seen a lot of apps, that allows you to put a Pin or a Password to lock your apps, this way not only you have an extra layer of security, but also, you don’t have to worry about your Privacy any-more. There were some apps that even hide the Original app from the App Drawer and put a fake app there, that crashes every time one taps it. However, let’s talk a little different here. Oops! AppLock is an app that allows you to Lock your apps, but in quite a different way, any typical app will put a Password or a Pin-code to protect the app, but here the case is a little different.

bloqueo-volumen-app

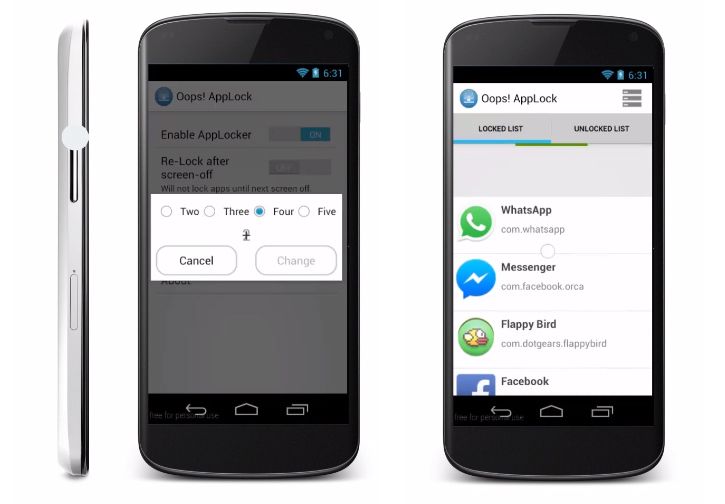
Instead of putting the Pin-code or a Pass-code, this app allows you to unlock and lock the apps using the Volume Up/Down Combination, sounds exciting and unique. Once you put the Combination, that app will be secured and if anyone tried to open it, it will show them a screen, telling them that this is a Fake Application, put the Volume Combination to open the app. The default combination is the Volume Up button 3 times.

Once you are done with opening the app, you can change the Combination to Two, Three, Four or Five times, then Re-Confirm the Combination to secure it. Now all you need is to visit the Unlocked List and Choose the apps you want to lock, once you choose the apps, they are all secured with the Volume Keys Combination that you just choose above. The user with no knowledge about this thing won’t even know what is going on, he will just considered it as a Frozen app. If you want to remove any app from the Lock-list, just visit the Lock-list and Un-check the app. We are providing you the Apk of Oops! AppLock, so if you don’t want to visit the Play Store, download it from here.

Download and Install Oops! AppLock Apk:

    1. Download Oops! AppLock
    2. Connect your phone to your laptop or PC now.
    3. Copy the APK file to your phone’s SD card.
    4. Disconnect your phone.
    5. Locate the Oops! AppLock file on your phone now and tap to install it.
    6. If prompted to select installer, then select “Package Installer”.
    7. Allow “Unknown Sources” from Settings > Security if prompted.
    8. Proceed with the installation and complete it.
    9. That’s all!

Root Nexus 4 on Android 5.0 Lollipop using CF-Auto Root

0
Root Nexus 4 on Android 5.0 Lollipop using CF-Auto Root

Android 5.0 Lollipop Factory Images are available for the whole Nexus line, the Nexus devices released in 2012 and afterwards, along with that Chainfire was busy rooting all the Nexus devices running Android 5.0 Lollipop, although it was a little disappointment to see that Nexus 4 and Nexus 7 2102 users have to wait for 2 more days to get the Official Images of Android 5.0 Lollipop, but Chainfire is not doing the same thing, he has been releasing the rooting method for all Lollipop updated Nexus devices using a tool of its own, CF-Auto Root Tool. This Root Tool is far better than a lot of rooting tools and even better than the CF-Auto Root itself, with this tool your device is rooted with just one click, no need to go through complex steps to root your device again.

Furthermore, the root tool is available exclusively for all the Nexus devices, this root tool uses the fastboot commands and do everything in front of you while you just press a key and wait. It doesn’t matter whether your device has locked Bootloader or Un-locked Bootloader, this root tool will work on both devices, but the thing is that it will unlock the bootloader, which unfortunately erases all of your data. For a typical Android user, everything is simple and quick, but for a new user the process might be a little tricky, but don’t you worry, we got your back as we will provide you the whole process. Let’s go through the Preparations and get ready to root your device.

Root Nexus 4 on Android 5.0 Lollipop using CF-Auto Root

Early Preparations:

1. This is only for Nexus 4!

This custom ROM is only for the device mentioned above. Make sure that your model number matches the one listed above. To do so, go to Settings > About Device on your device and see your model number. Flashing this ROM on any other device will result in bricking it so make sure that you meet this requirement first of all.

2. Battery should be charged at least over 60%

Make sure that your battery is charged enough to complete the flashing process. In case your battery is low and your device goes dead during the flashing process, you may end up soft bricking your device as it won’t complete the flashing process.

3. Backup everything!

Just to be on the safe side, you may consider backing up each and everything from your Android device. This is highly recommended so that in case anything goes wrong, you still have the access to all of your data and you can restore it immediately. You may backup everything as listed below.

4. Update your device to Android 5.0 Lollipop!

Since this rooting method ia only for Android 5.0 Lollipop, you’ll need to update your device to Android 5.0 Lollipop, follow the link to do so: Link

5. Disclaimer

The methods involved in flashing custom recoveries, roms and rooting your phone are highly custom and may result in bricking your device, and has nothing to do with Google or the device manufacturer that is Google in our case. Also rooting your device will void its warranty and you will be no longer eligible for any kind of free device services by the manufacturers/warranty providers. In case of any mishap we may not be held responsible. Follow these instructions to the letter to avoid any mishap or bricking. Make sure that whatever you do, you are doing it at your own responsibility.

Downloads Required:

CF-Auto One Click Tool: Link

How To Root Nexus 4:

Screenshot_10

  1. Open your device Settings.
  2. Navigate to Developer Options
  3. Tick the OEM Unlock.
  4. Now Reboot your device to Bootloader mode.
  5. Connect your device with PC and Make sure it is detected.
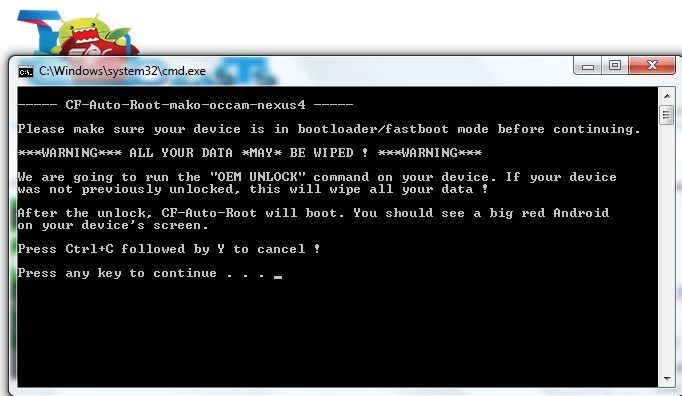
  6. Now Simply Launch the Script based on your OS, for Windows, launch: root-windows.bat
  7. Follow on-Screen Instructions.
  8. That is it, sit back and relax while it is all done for you

How To Fix Wi-fi Dropping Problem On Nexus 9

0
How To Fix Wi-fi Dropping Problem On Nexus 9

Nexus 9 was released last month and this time Google added very power hardware in their latest tablet. As we all know that Nexus 7 was a successor with great display, awesome design and good performance but nothing is perfect. Nexus 7 faced many issues and we were there to give you solutions. Nexus 9 is also facing the same problems, few days back we have posted about how to fix Nexus 9 slow charging issue. Today i’ll help you how to fix Wi-Fi dropping on Nexus 9 please follow all the steps carefully.

Also See: How To Fix Nexus 9 Slow Charging issue.

How Tp Fix Nexus 9 WiFi dropping issue

How To Fix Wi-fi Dropping Problem On Nexus 9:

Step 1: Check your date and time, make sure they are correct.

Step 2: Turn off the NFC by going in Settings > More, and uncheck the box.

Step 3: Turn the Wi-fi option off/on your Nexus 9.

Step 4: Restart your WiFi router.

Step 5: Try connecting your Nexus 9 with another WiFi network.

Step 6: Remove the back cover of your nexus 9 and properly put it back. [ Sometimes antenna on back is detached from the main points. ]

Also See: How To Unlock Nexus 9 Bootloader and Root it.

If none of this work for you I would suggest that you should head back to the Google store and try replacing it or may give to check what is wrong with your Nexus 9.

If you face any kind of issue regarding this guide please do tell me in comments so that I can help you with it. 🙂

Fix Samsung Galaxy S5 Slow Text Message Issue [ How To ]

1
Fix Samsung Galaxy S5 Slow Text Message Issue [ How To ]

I just got my Samsung Galaxy S5 few days back and after using it for a while I found out that Galaxy S5 has slow text messaging issue. Let me explain this issue. When you receive a text message it takes a while to show up ( 30 seconds ) same goes when you are typing text message but after 20 seconds or more the text field will be filled. This is really an annoying bug. let’s Fix Samsung Galaxy S5 Slow Text Message Issue.

Samsung-Galaxy-S5-Slow-Text-Message

How To Fix Samsung Galaxy S5 Slow Text Message Issue:

Step 1: Open Settings on your Samsung Galaxy S5.

Step 2: Now open Application Manager.

Step 3: First clear your Keyboard app cache.

Step 4: Now clear your Messaging app cache and also clear data.

Solution No 2.

Step 1: Try a 3rd party launcher on Samsung Galaxy S5.

Step 2: Settings > Transition effect > None. Then open Settings > Lock screen > Unlock effect and then set it to None. [ Sometimes live wallpapers are running in background makes process slow. ]

Step 3: Turn off background syncing Settings > Accounts or going to individual apps.

Hope so after applying these steps your slow text messaging issue on Samsung Galaxy S5 is gone for good. If you face any kind of issue regarding this guide please do tell me in comments.

You May Also Like:

* How To Backup Data on Samsung Galaxy S5

How To Fix Samsung Galaxy S5 Camera Failed Issue.

Transform Galaxy Note 3 N9005 Into Galaxy Note 4 [How To]

37
Transform Galaxy Note 3 N9005 Into Galaxy Note 4 [How To]

Note 3The Galaxy Note 3 sure was a beast, but now that Samsung has unboxed the Galaxy Note 4, the device has caught all the eyes. Galaxy Note 4 packs up a lot of goodies in it’s software, that are not available in the previous Galaxy Note device, and that might be the only thing where this device takes a lead (only if the hardware specifications are kept aside). Galaxy Note 4 runs on Android 4.4.4 KitKat out of the box with Samsung’s latest TouchWiz UI, which was introduced in the Galaxy S5. The latest UI is pretty much colorful and smooth, Samsung has introduced a new Launcher, a new System UI, new messaging app UI, new contacts app UI, new phone app UI and almost all other applications have been revamped. There are new wallpapers and new lockscreen effects as well.  While all these goodies are only exclusive to the Galaxy S5 or the Galaxy Note 4, the previous Galaxy owners might be in a bit of disappointment, but wait, there’s something that might cheer you up.

The great developer community working over the XDA forums has always brought us up something cool, and this time for our beloved Galaxy Note 3, XDA senior member g00h has come up with his Tweaked S5 BASE / Fully N4 Style ROM. The ROM is based on the Galaxy S5’s firmware and contains almost all the features from the Galaxy Note 4. Apart from the Galaxy Note 4 features, this ROM is heavily modified and packs up some cool features that you won’t be able to find in any stock firmware. The ROM also promises stability and flawless performance. We will be having a look on the features of this ROM and then head towards the installation guide in order to transform your Samsung Galaxy Note 3 N-9005 into a Galaxy Note 4.

g00h_zpsc15163b9

ROM details:

  • Tweaked, Stock Ported From Galaxy S5.
  • COMPLETLEY Based on: KOT49H.G900SKSU1ANI1
  • G900S Korean S5 Official FIRMWARE.


S5 Based Tweaked ROM, N4 Features
Launcher Note 4 Style
Weather Widget Note 4 Style
SystemUI Note 4 Style
Hancom Office Viewer from Note 4
My Files Note 4 Style
Calculator Note 4 Style
Message App Note 4 Style
Contact App Note 4 Style
Dialer Note 4 Style
Task Manager Note 4 Style
Settings App Note 4 Style
Easy Settings Note 4 Style
Easy Launcher Note 4 Style
Easy Dialer Note 4 Style
Lockscreen Note 4 Style
Clock Note 4 Style
Original S Voice from Note 4
Original S Note from Note 4
Videos App Note 4 Style
Music Player and Widget Note 4 Style
Original S Health App from Note 4
Original Scrappbook from Note 4
First Setup Note 4 Style
Incallui Note 4 Style
memo App from Note 4
Original Note 4 Wallpapers
Original Galaxy Note 4 Lockscreen EffectsNetwork Indicator
New Toggles:
Flashlight – 1 press turns it on, long press flashlight settings
Battery – 1 press battery status , long press battery information
Camera – Take a QUICK Shots with “Shoot-it”.
Music Control next / Previous with Volume buttons
4 Way Reboot Menu
Native MultiWindows All Apps Support
Battery Style Settings
Themes Support
Developer Options Enabled by Default
Video Call Button from Contact Log details and Contact List contact details and Dialer Completley removed
ALL HIDDEN SETTINGS Widgets are ENABLED
New Autostart Apps Option Control all apps including System Apps
Note 4 AIR COMMANDS INCLUDING Direct Input
Facelock Option
THE NEWEST HOST file for Ad Blocking
ALL SAMSUNG APPS UPDATED TO LATEST
Integrated BetterBatteryStats & XPOSED, Greenify into SecSettings.apk under G00H Tweaking ZONE
Message Button INSTEAD OF Videotelephony Button in Dialer
Popup Browser
On/Off Animations [CRT/FADE/NONE] Battery Cover & Charging Cover Toasts DISABLED
CALL & MSG BLOCKING ENABLED
WiFi & USB Tethering (HOTSPOT) ENABLED
ANIMATION SCALES 0.25 by DEFAULT NOW PHONE IS INSANELY FAST
KEYBOARD SWITCHER NOTIFICATION ENABLED AGAIN
SCROLLING CACHE DISABLED FOR FASTER SCROLLING
Xposed Modules will not Overwrite our Ultimate favorite CSC tweaks in Feature.xml again ( Feature.xml has been renamed to g00h.xml)
Call Recording Enabled
ExtSD write permission
Up to 100+ famousest Apps are Supported in S Pen Drawer Window and Multi Window.
ALL fingerprint Services are cleaned and removed from System
Quickconnect & Sfind from Pulldown REMOVED
Sfind shortcut from StatusBar REMOVED
Private Mode REMOVED .
Multi Window HIDDEN FEATURES, Floating Apps! Quad View! are Enabled.
App Ops Permissions.
Screen Mirroring fixed
Top right Lockscreen – TOP Left Home
Modified STOCK Launcher with Theme Chooser Support / Pull Up & Left & App,Widgets Tab are enabled.
RAM USAGE REDUCED
Speed improvement.
Ultimate Build.prob Tweaks to:
Better Responsiveness & Speed
Battery save
3G Signal Optimization Tweaks
Better Image & Audio Quality
Improves Camera & Video Results
More RAM
Reduce Boot-Time
Internet Speed
Miscellaneous Android Logging Stuff are Disabled.
Modified Messages apk :
Increased SMS/MMS recipient limit to (1000)
Increased SMS/MMS hour limit to (1000)
Disabled SMS to MMS auto-converting
Disabled SMS / MMS log history in call logsA Ton of CSC Features like :
Added shutter sound menu in Camera
Sending/receiving MMS without data on
Added “Exit Internet” option to Samsung stock browser
Added call button in Phone Logs
More Toggles in Statusbar are Enabled.

Early Preparations:

1. This Guide Is Only For Galaxy Note 3 SM-N9005

This custom ROM is only for the device mentioned above. Make sure that your model number matches the one listed above. To do so, go to Settings > About Device on your device and see your model number. Flashing this ROM on any other device will result in bricking it so make sure that you meet this requirement first of all.

2. Battery should be charged at least over 60%

Make sure that your battery is charged enough to complete the flashing process. In case your battery is low and your device goes dead during the flashing process, you may end up soft bricking your device as it won’t complete the flashing process.

3. Flash a Custom Recovery

A custom recovery is required for flashing this ROM. You may use our guide to install CWM 6.0.4.7 on your Galaxy Note 3 SM-N9005.

4. Backup everything!

Just to be on the safe side, you may consider backing up each and everything from your Android device. This is highly recommended so that in case anything goes wrong, you still have the access to all of your data and you can restore it immediately. You may backup everything as listed below.

  1. Backup SMS Messages
  2. Backup Call Logs
  3. Backup Contacts
  4. Backup Media – Copy your files manually to your PC or Laptop.
  5. Backup EFS
  6. Titanium Backup – If already rooted, use Titanium Backup to backup all of your apps, system data and other important content.
  7. Backup Nandroid – You can do this using CWM recovery.

5. Disclaimer

The methods involved in flashing custom recoveries, ROMs and rooting your phone are highly custom and may result in bricking your device, and has nothing to do with Google or the device manufacturer that is SAMSUNG in our case. Also rooting your device will void its warranty and you will be no longer eligible for any kind of free device services by the manufacturers/warranty providers. In case of any mishap we may not be held responsible. If your device has the Knox counter on the bootloader, it will be tripped and you won’t be able to reset it ever. Follow these instructions to the letter to avoid any mishap or bricking. Make sure that whatever you do, you are doing it at your own responsibility.

How To Transform Galaxy Note 3 Into Galaxy Note 4

  1. Before you flash this ROM, you need to make sure that you’ve read and applied all the guidelines explained above.
  2. Download the ROM [S5Base_N4Style_by_g00h_V7.zip] and place it on your phone’s sd card.
  3. Now boot into CWM recovery, to  do so, turn off your device and then turn it on by pressing and holding Volume Up+ Home Button + Power Key. Select Advanced > Wipe Cache and Dalvik Cache, and Data, a factory reset is recommended.
  4. In the recovery mode, now select install zip > S5Base_N4Style_by_g00h_V7.zip file and flash it.
  5. The ROM will take a while to get flashed. As soon as the installation is done, wipe cache and dalvik cache.
  6. Reboot now and setup your new ROM in order to enjoy the features from the Galaxy Note 4.
  7. That’s all.

7092f4d9bd5e00f27c86ab9b6625122b d2d825d529d9e03eccd2ebf2b66d7a04 Screenshot_2014-09-30-00-07-11
That’s all. Don’t forget to donate to the original developer if the ROM worked great for you. In case of any queries, use the comment box below to reach us. We would love to help you immediately. Thank you all.

Nexus 4 Android 5.0 “Lollipop” Factory Image as LRX21T [ Download ]

0
Nexus 4 Android 5.0 “Lollipop” Factory Image as LRX21T [ Download ]

Here you go all Nexus 4 users who were waiting for their Android 5.0 update to roll out, we got you Nexus 4 Android 5.0 “Lollipop” Factory Image with the build number LRX21T. You can download the Nexus 4 Android 5.0 LRX21T factory image from the following link. Every body else can download their Android 5.0 OTA update for Nexus 5, Nexus 7 and more from here.

nexus2cee_20121029T014923

Those who cannot wait for OTA update to hit their Nexus 4 they can install Android 5.0 Factory image on there Nexus4. The size of the file is 471MB and it has everything you need to get Android 5.0 flashed on your Nexus 4. The good thing is that you don’t have to perform a wipe user data. If you are new the flashing then you can follow the steps mentioned in the following guide.

Downloads:

Installation Process:

  • Download and extract all the files to Android SDK/Platform Tools.
  • Switch Off your device.
  • Now go to Bootloader/Fastboot mode, Press and hold Power + Volume Down Buttons till you see some text on-screen –
  • Once the Menu is loaded, connect your device with PC.
  • From the Fastboot directory, run the following according to your OS:
  • On Windows: Run the file “flash-all.bat”.
  • On Mac: Run the file “flash-all.sh” using Terminal.
  • On Linux: Run the file “flash-all.sh”.
  • Once the process is done and update is installed. Highlight Reboot System now and Enjoy the Android 5.0 Lollipop.

nexus2cee_2014-11-14-13_55_04-Factory-Images-for-Nexus-Devices-Android-Google-Developers_thumb

You May Also Like:

  1. How to root Nexus 5 on Android 5.0
  2. How to root Nexus 7 on Android 5.0

Update Xperia L To Android 5.0 Lollipop Using CyanogenMod 12 Custom ROM

19
Update Xperia L To Android 5.0 Lollipop Using CyanogenMod 12 Custom ROM

1756_01Sony’s Xperia L seems to be way lucky these days. The device at first tasted the AOSP based Android 5.0 Lollipop ROM, and the developer who was behind the AOSP ROM for this device, has today brought us all a CyanogenMod 12 based Android 5.0 Lollipop custom ROM for our beloved Xperia L. CyanogenMod 12 is under works at the moment, but some quick developers have started bringing the Android fans a feel of Android 5.0 Lollipop packed up unofficial builds. The Xperia L originally is stuck at Android Jelly Bean and the device shall never see any further official update by Sony, so just in case you’re an Xperia L owner and you’re looking to get your device the sweetness of Lollipop, right now, this might be the  best chance to do so.

Just to have a recap let’s learn something about Android 5.0. Android 5.0 Lollipop is Google’s latest iteration in it’s Android OS. The new OS contains a lot of improvements, bug fixes and features as compared to the previous versions of Android. Notable changes are in the graphics department. The Android 5.0 Lollipop has a completely revamped UI, named as Material Design, which is way flat, smooth, neat. Other then that, Android 5.0 comes with some great battery life enhancements, a new way for the notifications to appear on the lockscreens has been introduced as well. There are so many other new features that you may come across once you install this firmware.

The ROM has been compiled up by XDA recognized developer varun.chitre15. The very first build of CM 12 for Xperia L seems to be working fine, there haven’t been any bugs reported so far in the official thread, but this work is still under progress, we suspect that there might be some bugs tinkering around. While we are going to install this ROM in a while, we must tell you that this ROM isn’t intended for everyday use. If you aren’t well aware of custom ROMs, you may keep yourself away from this at the moment. We only recommend Android power users to go ahead and flash this ROM. Let’s head towards our guide for updating Sony Xperia L to Android 5.0 Lollipop using CyanogenMod [CM]  12 custom ROM.

Early Preparations:

1. This is only for Sony Xperia L!

This custom ROM is only for the device mentioned above. Make sure that your model number matches the one listed above. To do so, go to Settings > About Device on your device and see your model number. Flashing this ROM on any other device will result in bricking it so make sure that you meet this requirement first of all.

2. Battery should be charged at least over 60%.

Make sure that your battery is charged enough to complete the flashing process. In case your battery is low and your device goes dead during the flashing process, you may end up soft bricking your device as it won’t complete the flashing process.

3. Unlock Bootloader.

Your device’s bootloader must be unlocked in order to flash this custom ROM. You can unlock it by using our Sony bootloader unlock  guide.

4.Install Custom Recovery

A custom recovery is required for installing this ROM. You may install Philz advanced touch using this thread.

5. Backup everything!

Just to be on the safe side, you may consider backing up each and everything from your Android device. This is highly recommended so that in case anything goes wrong, you still have the access to all of your data and you can restore it immediately. You may backup everything as listed below.

Backup SMS Messages
Backup Call Logs
Backup Contacts
Backup Media – Copy your files manually to your PC or Laptop.
Titanium Backup – If already rooted, use Titanium Backup to backup all of your apps, system data and other important content.
Backup Nandroid – If CWM  or TWRP installed previously, otherwise skip this step and perform this at the end of flashing.

6. Disclaimer

The methods involved in flashing custom recoveries, roms and rooting your phone are highly custom and may result in bricking your device, and has nothing to do with Google or the device manufacturer that is Sony in our case. Also rooting your device will void its warranty and you will be no longer eligible for any kind of free device services by the manufacturers/warranty providers. In case of any mishap we may not be held responsible. Follow these instructions to the letter to avoid any mishap or bricking. Make sure that whatever you do, you are doing it at your own responsibility.

How To Update Xperia L To Android 5.0 Lollipop Using CyanogenMod 12 Custom ROM

  1. Download latest CM 12 build.zip file for Xperia L
  2. Download Gapps.zip file for Android 5.0 Lollipop.
  3. Copy both the .zip files to the internal storage of your phone.
  4. Turn off your phone now and boot into Philz advanced touch recovery. To do so, turn on your phone and then quickly press the Volume Up Key.
  5. Now that you’re in recovery mode, wipe your phone completely (factory reset).
  6. Now tap “install zip > choose zip from sd card > select CM 12 build.zip file > yes”.
  7. Once you’ve flashed the CM 12 file, now flash the Gapps file similarly.
  8. Now wipe cache and dalvik cache from the recovery mode.
  9. Reboot your Xperia L now.
  10. The first boot may take up to 10 minutes, hold on tighter unless you see the CM logo.
  11. That’s all.

device_2014_11_14_213548 device_2014_11_14_213709 Screenshot_4
We hope that you find this guide helpful. If you’re stuck with anything or you got any queries regarding this post, make sure that you reach us by using the comment box below. We would love to help you out immediately. Thank you all.

Update Nexus 4 With Android 5.0 Lollipop Unofficial CM 12 Custom ROM

0
Update Nexus 4 With Android 5.0 Lollipop Unofficial CM 12 Custom ROM

Google’s Nexus 4 is all set to get the Android 5.0 Lollipop update, but just in case it’s getting hard for you to wait for the official Lollipop update to hit your device, you may want to taste Lollipop on your device with this latest unofficial CyanogenMod 12 Custom ROM. If you’re not familiar with CyanogenMod, you may want to know that among so many custom ROMs, CyanogenMod  is the best one and a choice for millions of users. CyanogenMod’s 12th version, that will be based on Android 5.0 Lollipop will be out very soon, but since the sources are already out, the developers are always able to come up with the unofficial builds of the custom firmware, and one for the Nexus 4 got outed a few days ago.

This unofficial build of CyanogenMod 12 has been compiled up by XDA member AndroGeek974. In the following post we are going to have a look on a guide that will explain you how you can install this unofficial CM 12 Android 5.0 Lollipop on your Nexus 4. If you are not pretty much familiar with the use of custom ROMs, you may not install this as this firmware is not recommended to be kept for everyday use. There’s a high chance of instability and bugs in this custom ROM, so proceed at your own risk keeping everything in mind.20121029T014923

Early Preparations:

1. This is only for LG Nexus 4!

This custom ROM is only for the device mentioned above. Make sure that your model number matches the one listed above. To do so, go to Settings > About Device on your device and see your model number. Flashing this ROM on any other device will result in bricking it so make sure that you meet this requirement first of all.

2. Battery should be charged at least over 60%.

Make sure that your battery is charged enough to complete the flashing process. In case your battery is low and your device goes dead during the flashing process, you may end up soft bricking your device as it won’t complete the flashing process.

3. Install a Custom Recovery

You need a custom recovery to flash this ROM. TWRP is recommended for install this CM 12 ROM, you may install it using our One-Click tool for nexus devices guide. 

4. Backup everything!

Just to be on the safe side, you may consider backing up each and everything from your Android device. This is highly recommended so that in case anything goes wrong, you still have the access to all of your data and you can restore it immediately. You may backup everything as listed below.

5. Disclaimer

The methods involved in flashing custom recoveries, roms and rooting your phone are highly custom and may result in bricking your device, and has nothing to do with Google or the device manufacturer that is Google in our case. Also rooting your device will void its warranty and you will be no longer eligible for any kind of free device services by the manufacturers/warranty providers. In case of any mishap we may not be held responsible. Follow these instructions to the letter to avoid any mishap or bricking. Make sure that whatever you do, you are doing it at your own responsibility.

How To Update Nexus 4 With Android 5.0 Lollipop Unofficial CM 12 Custom ROM

  1. Download cm-12-20141113-UNOFFICIAL-mako.zip.
  2. Download Gapps.zip file for Android 5.0 Lollipop.
  3. Copy both the .zip files to the internal storage of your phone.
  4. Now turn off your phone and boot into TWRP recovery. To do so, turn on your phone by pressing and holding Power + Volume Down Key. Once you’re in bootloader, select recovery mode.
  5. Perform a factory reset (wipe everything) from the recovery mode. [Make sure that you’ve backed up everything before this].
  6. Once wiped, tap “Install” in TWRP recovery and choose the cm-12-2014113-UNOFFICIAL-mako.zip file.
  7. Once flashed, go back to the main menu in recovery and tap “Install” once again. This time select the Gapps.zip file and flash it.
  8. Once flashed, wipe cache and dalvik cache from wipe options.
  9. Reboot your device.
  10. You should find CM 12 running on your device now.
  11. The first boot might take up to 10 minutes, so hold on a little tighter.
  12. That’s all.

1415725005-screenshot-2014-11-11-18-37-13Screenshot_2
We hope that you find this guide helpful. If you’re stuck with anything or you got any queries regarding this post, make sure that you reach us by using the comment box below. We would love to help you out immediately. Thank you all.

How To Root Nexus 5 on Android 5.0 Lollipop

0
How To Root Nexus 5 on Android 5.0 Lollipop

Now that Chainfire is out there bringing root methods for all the Nexus devices, then why will he wait to release root method for the most powerful and famous Nexus 5. Now I have used Nexus 5 for almost 3 months, afterwards I switched to Galaxy S4, one of the biggest mistakes I have ever made, because on Galaxy S4, I loved to use the Mahdi ROM, but what is the meaning of using such Simple ROM on a device full with features that one must try for a moment. However, the Nexus 5 was such a fast device that I despised the Galaxy S4 instantly. Everything in Nexus 5 was pure awesomeness, it never lagged for a single moment, except when I tried to install the OmniROM on it, which was quite stupid, thus forced me to try the MahdiROM, and My GOD! that Rom was something out of the world, so much customization and such a fast ROM, it was a delight to use such thing.

Coming back to the topic, Nexus 5 was the very first device to receive the Factory Images of Lollipop, and now perhaps the last one to receive the Root access on Lollipop. Chainfire has developed a simple tool, that will root your Lollipop device, the Old rooting method won’t work because of the 64-bit binaries of Android 5.0 Lollipop, till the Super SU.zip or CF-Auto Root will be updated for Lollipop, you can use this Root toll to Root your device running Android 5.0, even better, he has made exclusive root tool for every device. The good news about this method is that, it will root your device with just one-click, thus eliminating the danger of going through complex steps to root the device. Now that you have made your mind, let’s go through the preparations and rooting method of this device.

Nexus5-Android50-front

Early Preparations:

1. This is only for Nexus 5!

This custom ROM is only for the device mentioned above. Make sure that your model number matches the one listed above. To do so, go to Settings > About Device on your device and see your model number. Flashing this ROM on any other device will result in bricking it so make sure that you meet this requirement first of all.

2. Battery should be charged at least over 60%

Make sure that your battery is charged enough to complete the flashing process. In case your battery is low and your device goes dead during the flashing process, you may end up soft bricking your device as it won’t complete the flashing process.

3. Backup everything!

Just to be on the safe side, you may consider backing up each and everything from your Android device. This is highly recommended so that in case anything goes wrong, you still have the access to all of your data and you can restore it immediately. You may backup everything as listed below.

4. Update your device to Android 5.0 Lollipop!

Since this rooting method ia only for Android 5.0 Lollipop, you’ll need to update your device to Android 5.0 Lollipop, follow the link to do so: Link

5. Disclaimer

The methods involved in flashing custom recoveries, roms and rooting your phone are highly custom and may result in bricking your device, and has nothing to do with Google or the device manufacturer that is Google in our case. Also rooting your device will void its warranty and you will be no longer eligible for any kind of free device services by the manufacturers/warranty providers. In case of any mishap we may not be held responsible. Follow these instructions to the letter to avoid any mishap or bricking. Make sure that whatever you do, you are doing it at your own responsibility.

Downloads Required:

CF-Auto One Click Tool: Link

How To Root Nexus 5:

Screenshot_6

  1. Open your device Settings.
  2. Navigate to Developer Options
  3. Tick the OEM Unlock.
  4. Now Reboot your device to Bootloader mode.
  5. Connect your device with PC and Make sure it is detected.
  6. Now Simply Launch the Script based on your OS, for Windows, launch: root-windows.bat
  7. Follow on-Screen Instructions.
  8. That is it, sit back and relax while it is all done for you

How To Root Nexus 7 (2012,2013) Wi-Fi on Android 5.0 Lollipop

0
How To Root Nexus 7 (2012,2013) Wi-Fi on Android 5.0 Lollipop

The factory images of Android 5.0 Lollipop are available for almost all the Nexus devices, including the Tablets. It is quite exciting to see these devices being updated to Android 5.0 Lollipop, prior to the OTA that will be available in near future, as the very first Android 5.0 Lollipop device was 64-bit and all the previous devices are running on 32-bit binaries, the only way every device can receive this Lollipop update, if all of them are coded on 32-bit binaries, which is good when it comes to factory images but not OK, when it comes to OTA update and as I mentioned earlier, the better the response of factory images will be the earlier the update will be released as an OTA and since it is Google, they wanted to make sure that the final update will be stable.

The other exciting thing today is that, Chainfire is quite busy in rooting all the devices running Android 5.0 Lollipop, first Nexus 9 was rooted, then we saw the Moto X 2014 being rooted on Android 5.0 Lollipop OTA. Yesterday, the Nexus 7 2012 Wi-Fi received the Factory Images of Android 5.0 Lollipop and today, once again thanks to Chainfire, both Nexus 7 2012 and Nexus 7 2013 (Wi-Fi) are being rooted via a very Simple One Click Auto Root Tool.The good news about this method is that, it will root your device with just one-click, thus eliminating the danger of going through complex steps to root the device. Now that you have made your mind, let’s go through the preparations and rooting method of this device.

supersu-logo

Early Preparations:

1. This is only for Nexus 7 Wi-Fi!

This custom ROM is only for the device mentioned above. Make sure that your model number matches the one listed above. To do so, go to Settings > About Device on your device and see your model number. Flashing this ROM on any other device will result in bricking it so make sure that you meet this requirement first of all.

2. Battery should be charged at least over 60%

Make sure that your battery is charged enough to complete the flashing process. In case your battery is low and your device goes dead during the flashing process, you may end up soft bricking your device as it won’t complete the flashing process.

3. Backup everything!

Just to be on the safe side, you may consider backing up each and everything from your Android device. This is highly recommended so that in case anything goes wrong, you still have the access to all of your data and you can restore it immediately. You may backup everything as listed below.

4. Update your device to Android 5.0 Lollipop!

Since this rooting method ia only for Android 5.0 Lollipop, you’ll need to update your device to Android 5.0 Lollipop, follow the link to do so: Link

5. Disclaimer

The methods involved in flashing custom recoveries, roms and rooting your phone are highly custom and may result in bricking your device, and has nothing to do with Google or the device manufacturer that is Google in our case. Also rooting your device will void its warranty and you will be no longer eligible for any kind of free device services by the manufacturers/warranty providers. In case of any mishap we may not be held responsible. Follow these instructions to the letter to avoid any mishap or bricking. Make sure that whatever you do, you are doing it at your own responsibility.

Downloads Required:

CF-Auto One Click Tool: Link (2013) | Link (2012)

How To Root Nexus 7:

Screenshot_6

  1. Open your device Settings.
  2. Navigate to Developer Options
  3. Tick the OEM Unlock.
  4. Now Reboot your device to Bootloader mode.
  5. Connect your device with PC and Make sure it is detected.
  6. Now Simply Launch the Script based on your OS, for Windows, launch: root-windows.bat
  7. Follow on-Screen Instructions.
  8. That is it, sit back and relax while it is all done for you

Android 5.0 Lollipop OTA Update for Nexus 5, Nexus 7, Nexus 10, and Nexus 4 [ Download Here ]

0
Android 5.0 Lollipop OTA Update for Nexus 5, Nexus 7, Nexus 10, and Nexus 4 [ Download Here ]

All Nexus users are the lucky ones who get their hands on first Android 5.0 Lollipop official update through OTA. Google Nexus 6 and Nexus 9 come with pre-loaded with Android 5.0, but other devices like Nexus 5, Nexus 7, Nexus 10, and Nexus 4 got Android 5.0 update through OTA. It will take time to cover up all the devices all over the world those who can’t wait for OTA update they can download Android 5.0 Lollipop OTA Update for Nexus 5, Nexus 7, Nexus 10, and Nexus 4 from the following links. We have posted a guide on how to install Android 5.0 Lollipop OTA Update for Nexus devices do check it.

android-5.0-ota

After installing this update on your Nexus devices you may face few bugs, but no need to worry you’ll get new batch updates after installing the Android 5.0. Google roll out updates in batches so that they can know what problems you people are facing, because if they start rolling out update all over the world at once they’ll compromise millions of devices.

Download Android 5.0 Lollipop OTA Update for Nexus 5, Nexus 7, Nexus 10, and Nexus 4:

Following are the links of Android 5.0 Lollipop OTA Update for Nexus 5, Nexus 7, Nexus 10, and Nexus 4. You can download the specific file for your device.

Download

You can use our guide how to install Android 5.0 Lollipop OTA update for Nexus 5, Nexus 7, Nexus 10 and Nexus 4. [ See here ]

VIA

How To Root Moto X 2014 on Android 5.0 Lollipop

0
How To Root Moto X 2014 on Android 5.0 Lollipop

Moto X was undoubtedly yet surprisingly the very first device to receive the OTA update of Android 5.0 Lollipopwhile Google own Nexus line is waiting for the Android 5.0 Lollipop update, this device has already running such version. The update was rolled out for 2nd GEN Moto X, means Moto X 2014, by Motorola a couple of days ago with the model number XT1095, for all the users, luckily we have XDA to grab and post such things on without even asking. The XDA member, graffixnyc grabbed and Mirrored to OTA, so every one else can enjoy this update too. However, since this was an official update, your device must be un-rooted and running the Stock Firmware on your Moto X 2014thus turning your device to completely stock and left you to search for rooting method for this device again.

The only device which received the rooting method while running Android 5.0 Lollipop was Nexus 9, by the inventor of all Rooting, Chainfire. Now once again, Motorola has won the race as Moto X 2014 has received the rooting method on Android 5.0 Lollipop, once again Chainfire has provided his services and rooted this device too, however in a complete different way, The good news about this method is that, it will root your device with just one-click, thus eliminating the danger of going through complex steps to root the device. Now that you have made your mind, let’s go through the preparations and rooting method of this device.

Moto-X

Early Preparations:

1. This is only for Moto X 2014!

This custom ROM is only for the device mentioned above. Make sure that your model number matches the one listed above. To do so, go to Settings > About Device on your device and see your model number. Flashing this ROM on any other device will result in bricking it so make sure that you meet this requirement first of all.

2. Battery should be charged at least over 60%

Make sure that your battery is charged enough to complete the flashing process. In case your battery is low and your device goes dead during the flashing process, you may end up soft bricking your device as it won’t complete the flashing process.

3. Backup everything!

Just to be on the safe side, you may consider backing up each and everything from your Android device. This is highly recommended so that in case anything goes wrong, you still have the access to all of your data and you can restore it immediately. You may backup everything as listed below.

4. Update your device to Android 5.0 Lollipop!

Since this rooting method ia only for Android 5.0 Lollipop, you’ll need to update your device to Android 5.0 Lollipop, follow the link to do so: Link

5. Disclaimer

The methods involved in flashing custom recoveries, roms and rooting your phone are highly custom and may result in bricking your device, and has nothing to do with Google or the device manufacturer that is Motorola in our case. Also rooting your device will void its warranty and you will be no longer eligible for any kind of free device services by the manufacturers/warranty providers. Incase of any mishap we may not be held responsible. Follow these instructions to the letter to avoid any mishap or bricking. Make sure that whatever you do, you are doing it at your own responsibility.

Downloads Required:

CF-Auto One Click Tool: Link

How To Root Moto X 2014:

Screenshot_6

  1. Open your device Settings.
  2. Navigate to Developer Options
  3. Tick the OEM Unlock.
  4. Now Reboot your device to Bootloader mode.
  5. Connect your device with PC and Make sure it is detected.
  6. Now Simply Launch the Script based on your OS, for Windows, launch: root-windows.bat
  7. Follow on-Screen Instructions.
  8. That is it, sit back and relax while it is all done for you