Home Blog Page 404

How To Downgrade iOS 8.1.1 To iOS 8.1 on iPhone, iPad and iPod Touch

0
How To Downgrade iOS 8.1.1 To iOS 8.1 on iPhone, iPad and iPod Touch

Apple released the final version of iOS 8.1.1 and millions of devices updated to the latest version of iOS. Apple has added and patched Pangu Jailbreak in iOS 8.1.1, so people who love to Jailbreak their devcies i would suggest that you stick to iOS 8.1. Those who updated their devices to iOS 8.1.1 follow my guide on how to downgrade iOS 8.1.1 to iOS 8.1 on iPhone, iPad and iPod Touch.

Also See: Download iOS 8.2 beta links.

iOS-81.1

How To Downgrade iOS 8.1.1 To iOS 8.1 on iPhone, iPad and iPod Touch:

Step 1: Download iOS 8.1 ISPW Firmware for your device.

Step 2: Install the latest version of iTunes on your PC.

Step 3: Make complete backup of your device . Navigate to Settings > iCloud > Backup

Step 4: You can make backup using your iTunes.

Step 5: Connect your device running iOS 8.1.1 with system.

Step 6: Open iTunes and click on your device.

Step 7: Hold down the Alt/Option’ key on Mac or left ‘Shift’ key on Windows.

Step 8: Now click on ‘Restore iPhone / iPad’ button.

Step 9: Choose the iOS 8.1 firmware from the PC.

Step 10: Now a pop-up shows up click on Yes to verify.

All Done ! Wait for the process to completed don’t unplug your device until you’ll see a message saying ” Your iPhone is restored “. If you face any issue regarding this guide do tell me in comments.

Download iOS 8.2 ISPW Firmware Beta For iPhone, iPad, iPod touch

0
Download iOS 8.2 ISPW Firmware Beta For iPhone, iPad, iPod touch

Apple is rolling out updates after very short time period and it’s a good thing. Few days back, Apple rolled out final version of iOS 8.1.1. Today Apple released iOS 8.2 beta for iPhone, iPad and iPod Touch and now its getting more clear that Apple Watch is ready to hit the Web. Well, we have to wait for it as Tim Cook has mentioned at Apple iPhone 6 event that Apple Watch will hit market in 2015. You can download iOS 8.2 Beta ISPW Firmware from the following links.

ios-8-2-logo

Download iOS 8.2 ISPW Firmware Beta For iPhone, iPad, iPod touch:

iOS 8.2 Beta is especially released for developers so that they can work for Apple Watch apps, because with the release of iOS 8.2 beta Apple has added adds support for WatchKit, the developer SDK for the Apple Watch. You can download iOS 8.2 Beta ISPW Firmware from the following links, but first you need to register as an Apple developer.

How to Unlock Bootloader of Nexus 6

0
How to Unlock Bootloader of Nexus 6

Nexus 6 is the latest flagship from Google, and as usual, Google has done something extreme in it and this device is more than enough to beat any flagship out there. In terms of both money and Specifications, although Moto X 2104 is cheaper when it comes to speed, support, and availability, Nexus 6 is everywhere, while Moto X is nowhere to be found, and if we compare it with Samsung or Xperia devices, they are no match for this Beast.

No matter how many unique features were to be found in Samsung and Xperia devices, if the device lags and show performance issues, all the features that make the device exclusive, have no use at all. I mean like in Galaxy S4, if the Air View lags and takes time to show, what is the need of it then, anyhow, this article is exclusive for Nexus 6 and let’s make it to Nexus 6 only.

Motorola Nexus 6 has arrived with some of the most amazing specs seen this year with 5.9-inch display showing 1440 x 2560 resolution having 493 ppi pixel density, this device can sure show some quality detail, having 3GB of RAM available in both 32/63GB capacity variant, 13MP of rear camera and 2MP of front camera, a Qualcomm Snapdragon 805 Quad-Core Krait processor, clocked at 2.7GHz with Adreno 240 GPU and power to make a 2160P resolution video, this device can sure to pack some awesome and powerful Punch, however, with just stock ROM and Stock features, using such a device is stupidity, if you really want to unleash the beast inside Nexus 6, you need to get out of the Stock side of this device.

nexus2cee_n6lf3

And the very first step towards customization is the unlocking of Bootloader, well not for Samsung, but for all the other devices. Despite the fact that there is no official thread related to this topic, but it is typical that every Nexus device Bootloader can be unlocked the same way.

The official thread about this device will be available when the rooting method will be available, till the just unlock the bootloader and wait for rooting. Without further ado, let’s continue towards the preparations and unlocking tutorial.

Early Preparations:

1. This is only for Nexus 6!

This custom ROM is only for the device mentioned above. Make sure that your model number matches the one listed above. To do so, go to Settings > About Device on your device and see your model number. Flashing this ROM on any other device will result in bricking it so make sure that you meet this requirement first of all.

2. Battery should be charged at least over 60%

Make sure that your battery is charged enough to complete the flashing process. In case your battery is low and your device goes dead during the flashing process, you may end up soft bricking your device as it won’t complete the flashing process.

3. Backup everything!

Just to be on the safe side, you may consider backing up each and everything from your Android device. This is highly recommended so that in case anything goes wrong, you still have the access to all of your data and you can restore it immediately. You may backup everything as listed below.

4. Disclaimer

The methods involved in flashing custom recoveries, roms and rooting your phone are highly custom and may result in bricking your device, and has nothing to do with Google or the device manufacturer that is Google in our case. Also rooting your device will void its warranty and you will be no longer eligible for any kind of free device services by the manufacturers/warranty providers. Incase of any mishap we may not be held responsible. Follow these instructions to the letter to avoid any mishap or bricking. Make sure that whatever you do, you are doing it at your own responsibility.

How To Unlock Bootloader of Nexus 6

First Visit the Link to download and Configure Fastboot and ADB: Link

  1. Now Open your Device Settings.
  2. Navigate to Developer Options.
  3. Tick the Enable OEM unlock.
  4. Also, Enable the USB Debugging mode.
  5. Open Command Prompt in Fastboot folder.
  6. Boot your Device in Bootloader mode, Power Off your device and then press and Hold Power + Vol. Down, until you are in bootloader mode.
  7. Connect your device with PC.
  8. Once the connection is successful, Type: fastboot oem unlock
  9. Press Volume up to continue, when prompted.
  10. That is it, all your data is erased and Bootloader is unlocked

How to add slow motion effects to videos on the HTC One (M8)

0
How to add slow motion effects to videos on the HTC One (M8)

Technology is getting more advanced day by day and our smartphones are getting best of it. Once there was a time when phone are used only for calls and messaging. Nowadays, thanks to advancing technology, we get to do more than we need. There are hundreds of features in smart phones. We can take photos, make videos, edit them, share with friends and family, all thanks to social media apps. Today I am going to  tell you what you can do more with your HTC Camera. We have different options in it when we are making a video, but this time HTC added a new feature called slow motion in their camera. We all know what can we do with this slow motion feature, but there are other who don’t know how to add slow motion effects to videos on the HTC One (M8). Those who don’t know they can follow my guide in which I’ll tell you how to apply slow motion effects to videos on the HTC One (M8).HTC-One-M8

How to add slow motion effects to videos on the HTC One (M8):

Step 1: Open camera app on HTC One M8.

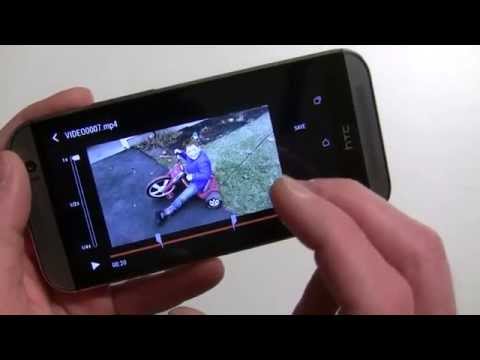
Step 2: Now record a video with moving object e.g kid riding bicycle, someone playing football.

Step 3: Open your video that you recorded.

Step 4: Now play the video in default HTC player.

Step 5: Tap on 3 dots on your screen.

Step 6: Select edit form the list.

Step 7: Now tap on adjust playback speed.

Step 8: You’ll be in editing mode, now select the main time frame whom you want to be in slow motion.

Step 9: Select the start part and then end part by dragging the white icon from both sides.

Step 10: Save the video. All Done.

YouTube Preview Image

You can see in the following video how apply slow motion effects to videos on the HTC One M8. If you face any issue regarding this guide let me know in the comments.

How To Close Recent Applications In Samsung Galaxy Note 4

1
How To Close Recent Applications In Samsung Galaxy Note 4

Samsung revamped it’s TouchWiz UI with the launch of the Galaxy S5, and all devices that came out after the Galaxy S5 have this new TouchWiz. The functionality of keys has been changed in this new UI, and it might confuse some users. Earlier, the recent apps menu came up by long pressing the Home key [the only hard key in the center-bottom of the screen], while the menu key – left to the Home button opened up options for any application or any on-going process. The functionality of these keys is changed now, long pressing the Home button no longer opens the recent apps menu, but the Menu key does this job now.

Now that the Galaxy Note 4 is also out and it has the same interface atop of Android 4.4.4 KitKat, it has the same functionality in those keys and it’s confusing the Galaxy Note 4 owners who are not aware of this change. To help those, we’ve made this little single step guide.

How To Close Recent Applications In Samsung Galaxy Note 4Screenshot_5

Press the Menu key on your Galaxy Note 4, the recent apps panel will open up. Now you can either press the cross button on the bottom right to close all recent applications or you can press the circle on the bottom left to access Active Applications and kill all the running applications.

10647701_10204649944581189_464648368_n 10805032_10204649944341183_1723030531_n

That’s all. We hope that this guide helps those who were not able access the task manager. Let us know if you should require any further help.

How To Turn Onn & Use Multi Window / Pop-Up View In Galaxy Note 4

0
How To Turn Onn & Use Multi Window / Pop-Up View In Galaxy Note 4

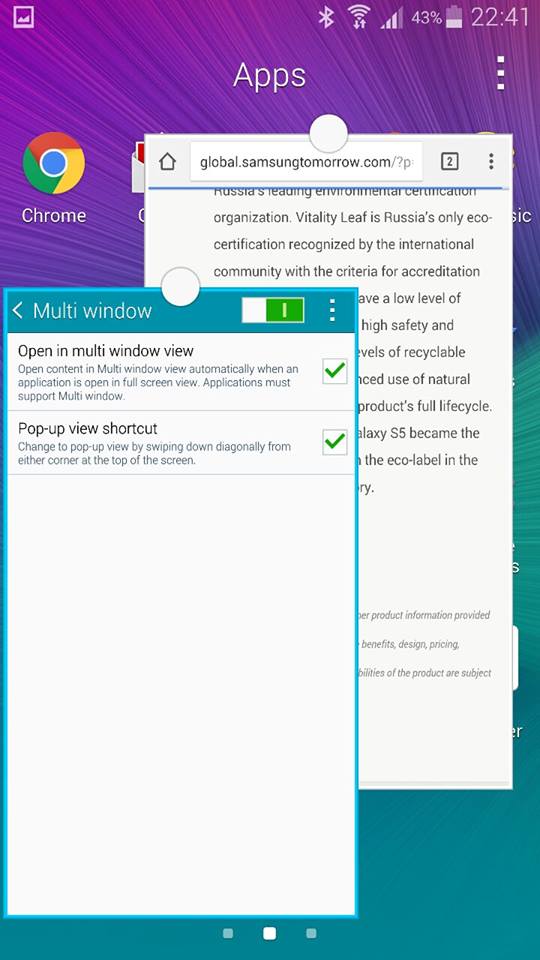
Have you just got your hands on the mighty Galaxy Note 4? Well, you must be wondering what features your device packs up and which ones are new, that really are worth using. The one among them is the new Pop-Up view in the Multi-Window. Samsung has just enhanced the multi-tasking experience, the applications can be switched into a pop-up view and you can resize the popped up window according to your liking. Minimizing the application creates a circled icon so that you may access it anytime in the pop-up view. Atop of the beastly hardware specs of the Galaxy Note 4, Multi-Window feature works very flawlessly unlike previous devices. If you’re unable to find and turn on this feature, we’ve made a guide here for you.

  1. Open Settings on your Galaxy Note 4
  2. Locate and tap “Device” in settings.
  3. Now in Device, the 4th option should be “Multi window” tap to open it.
  4. Now enable Multi window by switching on the button at the top.
  5. Also enable “Pop-view shortcut”.
  6. Now to open multiple windows and pop-view, open any application and swipe down diagonally from left or right corner at the top of the screen.
  7. You can tap the circle at the center of the popped-up application to adjust size, move or minimize or close it.
  8. That’s all.

Techbeasts (1)  Techbeasts (4)
Techbeasts (4)Techbeasts (3)>

How To Completely Migrate & Transfer Data From Apple iPhone To Samsung Galaxy

0
How To Completely Migrate & Transfer Data From Apple iPhone To Samsung Galaxy

Samsung, sure, has given the users so many reasons to leave their Apple iPhone(s) and transfer to its Galaxy line of smartphones. iPhone is the choice for millions of users, but when it comes to freedom, ease of access, unleashing the operating system’s potential, and using your device the way you want, you may want to leave your iPhone as it doesn’t let the people customize the iOS it in a great way, there are so many software limitations that do not let you breath easily. This is where Samsung steps in, having a vast range of Galaxy devices running on Android, that is also very affordable, Samsung is quickly taking over the smartphone world. It’s not hard at all to find one Samsung Galaxy device that perfectly fits your needs, and Samsung Galaxy devices, for no doubts are way better then those Apple iPhone(s). Over the past few years, Android’s use has grown at a great level, and there are more users on Android today then there are on iOS. Although the Galaxy devices are a lot different from the iPhone(s) but if you’re looking for the biggest reason to migrate from iPhone to Galaxy, that might be Android.

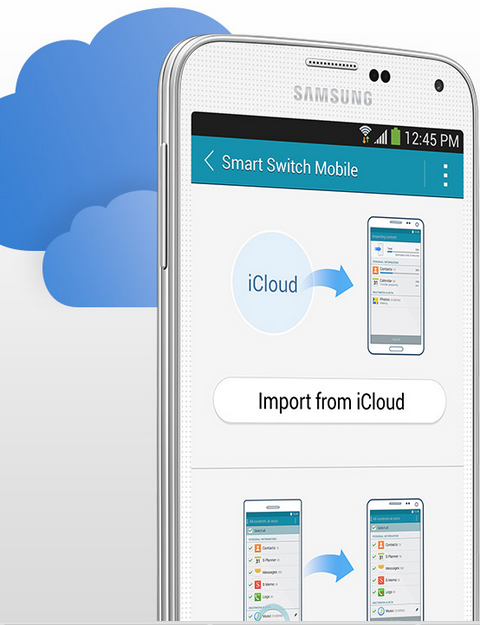
Let’s get back to our topic now. Recently on our Galaxy Note 4 community, a lot of people have been shifting from their iPhone to the Galaxy Note 4 and the very question we came across was how to transfer their data from iPhone to Galaxy Note 4, or how to shift from Apple iPhone to Samsung Galaxy, how to move audio, photos, videos, contacts, call history from iPhone to Samsung Galaxy. After going through a lot of questions and answers, we came across Samsung Smart Switch, Samsung’s very own application that helps the users to make a complete migration from their iPhone(s) to their new Galaxy smartphone. Samsung Smart Switch is pretty easy to use and Samsung has a pretty nice tutorial up on their site already, but the users are still unaware of this application, we found it necessary to have a detailed and comprehensive guide right here. Let’s go through the guide now and begin with the migration from your iPhone to Android.Screenshot_2

Migrating & Transferring Data From Apple iPhone To Samsung Galaxy Using PhonesSamsung SmartSwitch

  1. Disable iMessage from settings on your iPhone first of all. You can also do this by deregistering your iMessage on Apple site.
  2. Now, you need to backup each and everything to your iCloud account using your iPhone. You can backup your contacts, calendar, photos, alarm, WiFi settings, call history, browser bookmarks and application list.
  3. Once backed up, remove your Apple ID from your iPhone & iCloud. [Skip if done]
  4. Also remove your SIM card from your iPhone [Make sure that you disabled iMessages]. [Skip if you’ve already done it]
  5. Now insert your SIM card in your Samsung Galaxy Smartphone. [Skip if you’ve already done it]
  6. Once you’ve turned on and passed the setup on your Samsung Galaxy Smartphone, Open Google Play Store.
  7. Now on Google Play Store, look for Samsung Smart Switch and install it.
  8. Once installed, access the application from app drawer.
  9. Now in Samsung Smart Switch, tap “Import from iCloud“.
  10. If you have backed up content from multiple devices on your iCloud account, you need to select the source device, the one from which you want to transfer the content.
  11. Now choose the content that you want to transfer and tap “Let’s start the transfer”.
  12. It will begin the transfer and you will have all of your important data on your new Galaxy smartphone.
  13. You can transfer your music and videos using the method explained below.
  14. That’s all, let’s head towards another method now.

Migrating & Transferring Data From Apple iPhone To Samsung Galaxy Using PC/MAC

  1. Disable iMessage by deregistering your iMessage on Apple site.
  2. Make sure that you’ve installed iTunes on your PC / MAC, now connect your iPhone with your PC / MAC.
  3. Now backup your iPhone’s content using iTunes.
  4. Now download and install Samsung Smart Switch on your PC / MAC. Download for PC | Download for MAC
  5. Now launch Samsung Smart Switch.
  6. Connect your Galaxy device to your PC / MAC now.
  7. Select the device from which you want to transfer the data, right now it should be Apple. Samsung Smart Switch will automatically detect the backup in this step.
  8. Now select the content you want to transfer.
  9. Click on “Transfer” and transfer will begin.
  10. To transfer your apps, you need to install Smart Switch on your phone and find your missing applications from Google Play Store.
  11. That’s all.

Screenshot_1

That’s all. We hope that you find this guide helpful. In case you get stuck with anything regarding this, make sure that you use the comment box below to reach us. We will get back to you immediately and try our best to help you out. Thank you all.


Get Amazing Wallpapers Automatically with 500 Firepaper

0
Get Amazing Wallpapers Automatically with 500 Firepaper

500px is the biggest Photography blog of all times. For all those who own an iPhone 6, they must know that that the default wallpaper on their device is from 500px.com, 500px is one of the most active platform when it comes to purchasing and selling of Photos, if you like one just license it and you will be the owner of that photo. At first, 500px was restricted to Desktop and Browsers only, but now the official app is available for both the iOS and Android and not only that, 500 Firepaper is another app that allows you to change the wallpaper automatically from the best Photos available at 500px.com, and mark my words the Popular and Editors Choice category of 500px is filled with the best Photos of all times.

Now you don’t have to look at your boring wallpapers again, and you don’t even have to change the wallpapers.Changing is something else, you don’t even have to choose the wallpapers for you as this app will keep rotating the wallpapers for you, from the best collection of all times. However, the higher resolution images and Animations will take a little more time and a little more memory, so basically this app was aimed for High-end devices. We are providing you the Apk of 500 Firepaper, so if you don’t want to visit the Play Store, download it from here.

500px-banner-logo-640-630x308

Download and Install 500 Firepaper:

    1. Download 500 Firepaper
    2. Connect your phone to your laptop or PC now.
    3. Copy the APK file to your phone’s SD card.
    4. Disconnect your phone.
    5. Locate the 500 Firepaper file on your phone now and tap to install it.
    6. If prompted to select installer, then select “Package Installer”.
    7. Allow “Unknown Sources” from Settings > Security if prompted.
    8. Proceed with the installation and complete it.
    9. That’s all!

How to easily activate silent mode in Android 5.0 Lollipop [ Guide ]

0
How to easily activate silent mode in Android 5.0 Lollipop [ Guide ]

I was shocked when I updated my Nexus 5 to Android 5.0 there was no silent mode option the Android 5.0 Lollipop. This issue went unnoticed for a while. Those who have Nexus 6 and update to the latest update they can check there is no silent mode option. Users of Nexus 5 who updated their devices through OTA or Flashed factory image of Android 5.0 Lollipop also can see there is no silent mode. There is a trick to get it working, so let’s activate silent mode in Android 5.0 Lollipop.

how to activate silent mode on Android lollipop 5.0

When we first hold and press down our volume button our device goes into silent mode, but now when we press down our volume button your least volume will be 1 means no silent mode. If you again hit volume down button your device will get on vibrate mode. In the following guide I’ll explain how to activate silent mode on Android devices running Android 5.0 Lollipop.

How to easily activate silent mode in Android 5.0 Lollipop:

Step 1: First turn the volume all the way down to activate the vibrate mode.

Step 2: Now tap on the volume to set the volume level to 1.

Step 3: Reboot your Nexus 5.

Step 4: Wait for the device to turn on.

Step 5: When the device boots up your Nexus 5 will be in silent mode.

Method # 2

Step 1: Open settings on your Nexus 5.

Step 2: Open notifications settings.

Step 3: Now set notification mode to the None settings.

Step 4: Reboot your device.

We also have video tutorial on how to activate silent mode in Android 5.0 Lollipop, this video is posted by Motorola but you can use this trick on other Nexus devices.

Source: AndroidPolice

How To Fix Gps Not Working Problem On Nexus 9

0
How To Fix Gps Not Working Problem On Nexus 9

Nexus 9 is the latest flagship of Google tablets, Google has improved all the specs and features of Nexus 9. Nexus 9 is getting an awesome response better then Nexus  7 and i think its better then Nexus 7 in many ways. But its same in one way Nexus 9 is facing same issues what we have faced on Nexus 7. Today i’ll tell you how to fix GPS not working problem on Nexus 9.

How Tp Fix Nexus 9 WiFi dropping issue

Also See: How to fix slow charging on Nexus 9

I’ve seen many many people reporting about GPS is not working on Nexus 9, i mean that is not good because People who like to travel a lot they really need a working GPS connection. So lets fix GPS not working on Nexus 9. Please follow all the steps carefully in order to fix the GPS issue on Nexus 9.

How To Fix Gps Not Working Problem On Nexus 9:

Step 1: Make sure your Nexus 9 is running on the latest OS.

Step 2: If your device is rooted then install stock rom.

Step 3: Update your GPS app if there is an new version.

Step 4: Try uninstalling the GPS app and then install it again.

Step 5: Hard reboot your Nexus 9.

Step 6: Perform a factory reset on your Nexus 9.

Step 7: Try other GPS apps other than stock apps.

Step 8: You can get a new device in replacement.

Please tell me in comments this guide help you and also you can tell me what problems your facing on Nexus 9 so that i can help you out with them.

Install CWM Recovery on Nexus 4 running Android 5.0 Lollipop

0
Install CWM Recovery on Nexus 4 running Android 5.0 Lollipop

Now that Chainfire is done with rooting all the Nexus devices running Android 5.0 Lollipop, it is time that Nexus owners should get the CWM Recovery back on their devices. Although we have seen TWRP recovery arriving at flagship devices first, but we are talking about a new OS here. Since the Android 5.0 Factory Images were leaked, all those who updated their device to Android 5.0 Lollipop have been gone to stock side of their device, from firmware to Recovery, everything is stock and those who can’t live a single day without customizations, must have been looking for the Custom Recovery. Since the Rooting method is already available for all the updated Nexus devices, all there is left is the Custom Recovery and we are here to solve that for you.

CWM Recovery is my Favourite Recovery, although I prefer to use the PhilZ Touch, but still I prefer this one over the TWRP recovery, simply because I love it. The interface is quite easy, the working is quite fast. Since it is always released after quite a time, it is free of bugs and other stuff, not recommended by a lot of developers, yet I never had any type of bad experience with it. Even those ROMs which are not supported by this recovery were still flashed by CWM recovery and they worked flawles. If you have a Nexus 4 and updated it to Android 5.0 Lollipop, keep reading the guide to flash this Recovery. Below are given some pre-requisites.

nexus-4-1-620x465


Early Preparations:

1. This is only for Nexus 4!

This custom ROM is only for the device mentioned above. Make sure that your model number matches the one listed above. To do so, go to Settings > About Device on your device and see your model number. Flashing this ROM on any other device will result in bricking it so make sure that you meet this requirement first of all.

2. Battery should be charged at least over 60%

Make sure that your battery is charged enough to complete the flashing process. In case your battery is low and your device goes dead during the flashing process, you may end up soft bricking your device as it won’t complete the flashing process.

3. Backup everything!

Just to be on the safe side, you may consider backing up each and everything from your Android device. This is highly recommended so that in case anything goes wrong, you still have the access to all of your data and you can restore it immediately. You may backup everything as listed below.

4. Update your device to Android 5.0 Lollipop!

Since this rooting method ia only for Android 5.0 Lollipop, you’ll need to update your device to Android 5.0 Lollipop, follow the link to do so: Link

5. Disclaimer

The methods involved in flashing custom recoveries, roms and rooting your phone are highly custom and may result in bricking your device, and has nothing to do with Google or the device manufacturer that is Google in our case. Also rooting your device will void its warranty and you will be no longer eligible for any kind of free device services by the manufacturers/warranty providers. In case of any mishap we may not be held responsible. Follow these instructions to the letter to avoid any mishap or bricking. Make sure that whatever you do, you are doing it at your own responsibility.


Downloads Required:

CWM Recovery.img: Link

How To Flash CWM Recovery:

  1. Download the CWM Recovery Image
  2. Rename it to recovery and paste it in the Fastboot folder
  3. Turn Off your Device
  4. Now go to Bootloader/Fastboot mode, Press and hold Power + Volume Down Buttons till you see some text on-screen
  5. Now Open Command prompt in Fastboot Folder.  How? Hold Shift Key and Right Click anywhere in the Fastboot folder.
  6. Connect your Device with PC.
  7. Now Type fastboot flash recovery recovery.img to flash the CWM Recovery on your device
  8. Type fastboot reboot, to reboot your device
  9. After a proper reboot, your device will be running CWM Recovery