Home Blog Page 356

Fix iCloud Backup Not Working in iOS 9 [ Tips ]

0
Fix iCloud Backup Not Working in iOS 9 [ Tips ]

After upgrading to iOS 9 many users have reported several issue that they are facing e.g iCloud Backup Not Working, 3G/LTE is not working, Wi-Fi is not working and wrong iOS version showing. I will help you fix all the issues but today we’ll tell you how to fix Fix iCloud Backup Not Working in iOS 9.

12092465_10207763560710330_547554248_n

How To Fix iCloud Backup Not Working in iOS 9:

Step#1: First you have to do go to settings and then iCloud-> Sign Out-> Sign In again.

Step#2: Reset Network Settings.

  • Settings
  • General
  • Reset
  • Reset Network Settings

Step#3: Delete the old iCloud Backups.

  • Settings
  • iCloud
  • Storage
  • Manage Storage
  • Tap on old backups you want to delete.
  • Tap on delete.

Step#4: Disable automatic backup of apps.

  • Settings
  • iCloud
  • Storage
  • Manage Storage
  • Check the backups of the apps.
  • Go back to iCloud settings.
  • Tap on the apps which are using extra space, toggle off.
  • Go back and tap in photos.
  • Toggle off all the three options.

After trying all these steps still you iCloud backup is not working then you should update your iPhone and iPad to the latest iOS 9.0.2.

Install Galaxy Note 5’s Screen Off Memo On Your Note 3, Note 4 & Note Edge

4
Install Galaxy Note 5’s Screen Off Memo On Your Note 3, Note 4 & Note Edge

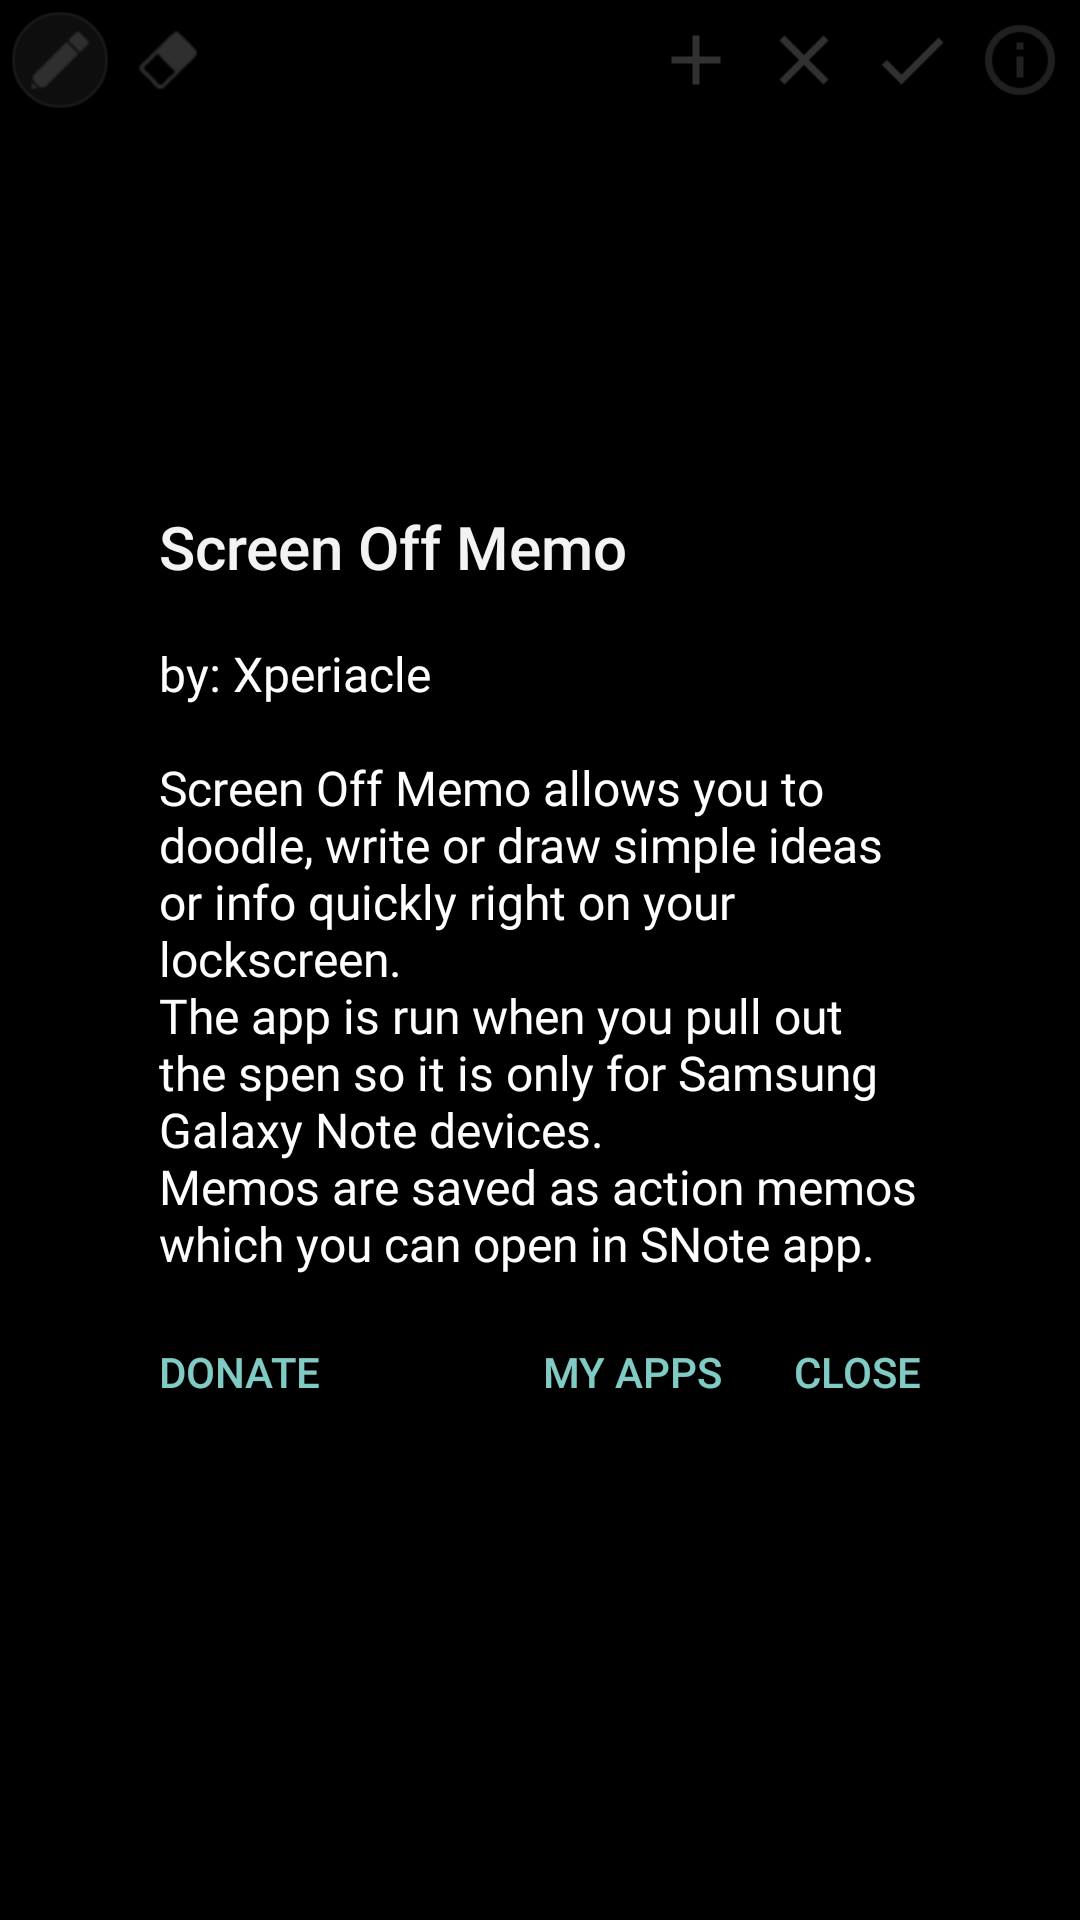
Samsung released the Galaxy Note 5 in August at an event held in New York. Galaxy Note 5 sure brought a number of new useful features, it turned out to be a great addition to the Note family. One of the most useful features that the Galaxy Note 5 carries is the Screen Off Memo. If your phone is locked and you pull out the S Pen, you will get a Screen Off Memo on the screen, you can directly use the S Pen on your phone while the screen is off and you can also save the Memos. This feature is liked by the Note freaks, and many users who own a Galaxy Note 3 or Galaxy Note 4, they wanted to grab this feature from the mighty Note 5. Since these devices are Android based, anything is possible. Whenever a new device gets some space in the hands of a developer, we see the stuff getting ported to the same device’s younger siblings, and the same has happened in the case of Note 5. Screen Off Memo from the Galaxy Note 5 has already been ported to the Galaxy Note 3 and the Galaxy Note 4, Note Edge. If you’ve been willing to get this feature on your Note, this may be the right time for you.

Let’s put our conversation to end and go ahead to install the Galaxy Note 5’s Screen Off Memo on our beloved Galaxy Note 3, Note Edge and Galaxy Note 4. Before we go ahead, we would like to thank xperiacle for porting this cool feature to the younger siblings of the Galaxy Note 5.

How To Install Galaxy Note 5’s Screen Off Memo On Your Note 3, Note 4 & Note Edge

Step#1: Download Screen Off Memo APK file.

Step#2: Download the file on your phone or copy it to your phone after downloading on your PC.

Step#3: Now open a file manager on your Galaxy Note 3, Note 4 or Note Edge and locate the downloaded APK file of Screen Off Memo.

Step#4: Tap the APK file and follow on-screen instructions to install it.

Step#5: Once the application has been installed, open it once from the app drawer. This is important to run this application on your phone.12162417_10207019829106821_1379997482_o

Step#6: Now turn off your phone’s screen, and pull out the S Pen. You will have the Screen Off Memo working on your Note 3, Note 4 & Note Edge.

Step#7: To make sure that the application also works while your device is protected by a password or pattern, go to  Settings>Security>Device Administrator and activate Screen Off Memo.

Step#8: That’s all. Best of luck 🙂

12116474_10207019828586808_58110315_o

Got any questions? Feel free to reach us out through the comment box below.

Install CWM Recovery & Root Galaxy Note 5 N920S, N920K & N920L

Install CWM Recovery & Root Galaxy Note 5 N920S, N920K & N920L

In August, 2015 Samsung released the 5th player of Galaxy Note series. Galaxy Note 5 flaunts a beautiful 5.65 inch QHD display with a resolution of 2560 x 1440 pixels. Samsung used its very own Exynos 7420 Octa Core 64-bit chipset in this device. A RAM of 4 GB and 32 GB internal storage can be found in this device. we have a 16 MP shooter at the back of the Galaxy Note 5 and a 5 MP shooter on the front. Galaxy Note 5 can be found running on Android 5.1.1 Lollipop. Apart from the upgraded hardware, design and build, Samsung added a number of new features like new Air Command and Screen Off Memo. samsung-galaxy-note-5-1

As usual, Samsung released this device under different model numbers. Galaxy Note 5 comes as N920I, N920C, N920K, N920S and N920L. There are other variants as well, but those might be coming under the umbrella of different carriers, the ones listed above are not bound to any carrier at all. Devices like Galaxy Note 5 are meant to be for power users, so in case you own it, you can unleash the true power of your Note 5 beast by rooting it and then flashing a custom recovery on it.  Earlier, we posted the guides to install CWM and root Galaxy Note 5 N920I and N920C, and today we have the method for N920K, N920S & N920L.

In case you’re willing to root & install CWM on your Galaxy Note 5 N920K, N920L and N920S, you may have spotted the right place. In the on-going guide we will first show you how you can install a CWM (Philz Advanced CWM) and then flash SuperSu to root your Galaxy Note 5 N920K, N920L & N920S.

Preparations

  • This guide is only for Galaxy Note 5 N920S, N920L and N920K. Do not try this on any other device.
  • Charge your device up to 50%.
  • Use original data cable to establish connection between your PC and your phone.
  • Backup your important data as a safety measure.
  • Follow this guide to the letter to avoid any mishap.

Disclaimer: Flashing custom recovery and rooting the device void its warranty. In case of a mishap, TechBeasts or Samsung may not be held responsible. Make sure that you’re doing everything at your own risk and with your full understanding.

Required Downloads:

Install Philz Advanced CWM & Root Galaxy Note 5 N920I/N29C

  1. Open Odin3 V3.10.6.exe that you extracted on your PC.
  2. Enable OEM Unlock on your phone. To do so on your phone, go to settings > about device > tap the build number for 7 times to enable developer options. Get back to the settings and open developer options. Under developer options turn on “OEM unlock.
  3. Put your Note 5 in download mode now. To do so, turn it off completely. Now turn it on by pressing and holding Volume Down + Home + Power Key. Once your phone boots up, press the Volume Up key to continue.
  4. Connect your phone to your PC now. The ID:COM box in the top-left corner of Odin3 should  turn blue. This indicates that your phone is connected properly.
  5. Now click the “AP” tab in Odin and select the philz advacned cwm.tar file that you downloaded. It will take a second or two for Odin3 to load this file.
  6. Make sure that your Odin3 looks like this. The only option ticked should be F. Reset Time.
  7. Odin 3.10.6 Explained_Techbeasts
  8. Now you’re all set to flash the recovery. Just click the start button in Odin3 and sit back.
  9. Once the process box above ID:COM box shows green light and flashing process is finished, disconnect your device. Reboot it into recovery mode manually now.
  10. Turn off your device properly as we are going to boot into recovery mode.
  11. Now turn it on by pressing and holding Volume Up + Home + Power Key. This will boot your device in recovery mode. It should be CWM recovery that you just installed.
  12. Now in CWM recovery, select Install zip > Choose Zip from SD card > locate the Arter97 Kernel file and flash it.
  13. Once flashed, Once again in CWM recovery, select Install zip > Choose Zip from SD card > locate the SuperSu.zip file this time and flash it.
  14. Once done, reboot your device using recovery.
  15. As it boots up, checkout the SuperSu in application drawer. Also install BusyBox from Play Store.
  16. Verify root access using Root Checker.
  17. That’s all. You’re now set to unleash the open source nature of Android.

Stuck with anything? Reach us out through the comment box below!


Update Xperia Z3 Compact D5803, D5833 To Android 5.1.1 23.4.A.1.232 Firmware

1
Update Xperia Z3 Compact D5803, D5833 To Android 5.1.1 23.4.A.1.232 Firmware

Xperia Z3 Compact is now seeing a new Android 5.1.1 Lollipop update. The new update shifts the build number to 23.4.A.1.232. There are no apparent changes in this update, but one of the biggest issues, the famous Stagefright bug has been patched by Sony in this update completely. In the earlier Android 5.1.1 update, the device was vulnerable to the Stagefright fix, so we are seeing this new update as a result of what Sony missed previously.At the time of writing this post, this update is rolling out through OTA or through Sony PC Companion. Just in case you’re not willing to wait for OTA update to reach your device, you may want to find out a manual method to get rid of Stagefright right now by flashing the update on your own.

We are going to help you to install/flash Android 5.1.1 Lollipop 23.4.A.1.232 Firmware on Xperia Z3 Compact D5803, D5833  using Sony flashtool. Let’s go ahead without any further ado and get it done.

Early Preparations:

1. This is only for Sony Xperia Z3 Compact D5803, D5833

This ROM is only for the device mentioned above. Make sure that your model number matches the one listed above. To do so, go to Settings > About Device on your device and see your model number. Flashing this firmware on any other device will result in bricking it so make sure that you meet this requirement first of all.

2. Battery should be charged at least over 60%.

Make sure that your battery is charged enough to complete the flashing process. In case your battery is low and your device goes dead during the flashing process, you may end up soft bricking your device as it won’t complete the flashing process.

3. Backup everything!

Just to be on the safe side, you may consider backing up each and everything from your Android device. This is highly recommended so that in case anything goes wrong, you still have the access to all of your data and you can restore it immediately. You may backup everything as listed below.

4. Enable USB Debugging Mode on your device.

Enable USB debugging mode on your device. To do so, tap settings>developer options>USB debugging. If you can’t find developer options in settings, then tap settings > about device and tap “Build Number” for 7 times and you’ll get em’ activated under settings.

5. Install and setup Sony Flashtool.

You must have installed Sony Flashtool.  Find the full guide here. After installing Sony Flashtool, open the Flashtool folder from the drive where you installed it.Now open Flashtool>Drivers>Flashtool-drivers.exe and install the Flashtool, Fastboot & Xperia Z3 Compact drivers from the list. [Important]

6. Use OEM data cable to establish connection.

Make sure that you use the phone’s original data cable to establish connection between your phone and the PC. Using a different data cable might result in interrupting the firmware installation.

How To Update Sony Xperia Z3 Compact D5803, D5833 To 23.4.A.1.232 Android 5.1.1 Firmware

 Before moving forward, please make sure that you’ve read the pre requisites and ensure that you are set to go ahead.

  1. Download the latest firmware Android 5.1.1 Lollipop 23.4.A.1.232 FTF file.
    1. For Xperia Z3 Compact D5803 [Generic/Unbranded] Firmware 1  or Create your own FTF using this guide.
    2. For Xperia Z3 Compact D5833 [Generic/Unbranded] Firmware 1 or Create your own FTF using this guide.
  2. Copy the file and paste in Flashtool>Firmwares folder.
  3. Open Flashtool.exe now.
  4. Hit the small lightening button on the top left corner and select Flashmode.
  5. Select the FTF firmware file that you placed in the Firmware folder.
  6. From the right side, select what do you want to wipe. Data, cache and apps log, all wipes are recommended, perhaps you may select if you don’t want.
  7. Click on OK, and it will start preparing the firmware for flashing. This may take a little while to load.
  8. As soon as the firmware is loaded, it will prompt you to attach the phone by turning it off and keeping the back key press.
  9. For Xperia Z3 Compact, Volume Down key will do the job of back key, just turn off your phone, keep the Volume Down key pressed and plug in the data cable.
  10. As soon as the phone is detected in Flashmode, the firmware will start flashing, Do not leave the Volume Down key until the process is complete.
  11. As soon as you see “Flashing ended or Finished Flashing” leave the Volume Down key, plug the cable out and reboot.
  12. That’s All! Congrats! You’ve installed latest Android 5.1.1 Lollipop on your Xperia Z3 Compact. Enjoy

In case you got any queries or face any problems regarding this guide, please feel free to stop by the comment box below and let us know. We will get back to you as soon as possible. Thanks all!


Update Xperia Z3 Compact, Update Xperia Z3 Compact D5803, Update Xperia Z3 Compact D5833, Android 5.1.1 Lollipop, 23.4.A.1.232, .232 FTF,Download .232 FTF For Xperia Z3 Compact

Update Xperia Z3, Z3 Dual To Android 5.1.1 23.4.A.1.232 Firmware

3
Update Xperia Z3, Z3 Dual To Android 5.1.1 23.4.A.1.232 Firmware

cA couple of days ago Sony pushed a new update for Sony Xperia Z2 and Z3 family. Xperia Z3, Z3 Compact, Z3 Dual and Z3 Tablet Compact are the Z3  family members that are seeing this new update. The new update stays on Android 5.1.1, the only new thing is the complete removal of Stagefright vulnerability from the firmware. New firmware for Xperia Z3 moves the build number to 23.4.A.1.232. The update is available for almost all variants of Xperia Z3 and Xperia Z3 Dual. At the time of writing this post, this update is rolling out through OTA or through Sony PC Companion. Just in case you’re not willing to wait for OTA update to reach your device, you may want to find out a manual method to get rid of Stagefright right now by flashing the update on your own.

We are going to help you to install/flash Android 5.1.1 Lollipop 23.4.A.1.232 Firmware on Xperia Z3 D6603, D6643, D6653 and Xperia Z3 Dual D6633 using Sony flashtool. Let’s go ahead without any further ado and get it done.

Early Preparations:

1. This is only for Sony Xperia Z3 D6603, D6653, D6633

This ROM is only for the device mentioned above. Make sure that your model number matches the one listed above. To do so, go to Settings > About Device on your device and see your model number. Flashing this firmware on any other device will result in bricking it so make sure that you meet this requirement first of all.

2. Battery should be charged at least over 60%.

Make sure that your battery is charged enough to complete the flashing process. In case your battery is low and your device goes dead during the flashing process, you may end up soft bricking your device as it won’t complete the flashing process.

3. Backup everything!

Just to be on the safe side, you may consider backing up each and everything from your Android device. This is highly recommended so that in case anything goes wrong, you still have the access to all of your data and you can restore it immediately. You may backup everything as listed below.

4. Enable USB Debugging Mode on your device.

Enable USB debugging mode on your device. To do so, tap settings>developer options>USB debugging. If you can’t find developer options in settings, then tap settings > about device and tap “Build Number” for 7 times and you’ll get em’ activated under settings.

5. Install and setup Sony Flashtool.

You must have installed Sony Flashtool.  Find the full guide here. After installing Sony Flashtool, open the Flashtool folder from the drive where you installed it.Now open Flashtool>Drivers>Flashtool-drivers.exe and install the Flashtool, Fastboot & Xperia Z3 drivers from the list. [Important]

6. Use OEM data cable to establish connection.

Make sure that you use the phone’s original data cable to establish connection between your phone and the PC. Using a different data cable might result in interrupting the firmware installation.

How To Update Sony Xperia Z3 D6603, D6653, D6643 To 23.4.A.1.232 Android 5.1.1 Firmware

 Before moving forward, please make sure that you’ve read the pre requisites and ensure that you are set to go ahead.

  1. Download the latest firmware Android 5.1.1 Lollipop 23.4.A.1.232 FTF file.
    1. For Xperia Z3 D6603 [Generic/Unbranded] Firmware 1
    2. For Xperia Z3 D6643 [Generic/Unbranded] Create your own FTF using this guide.
    3. For Xperia Z3 D6653 [Generic/Unbranded] Firmware 1 Create your own FTF using this guide.
    4. For Xperia Z3 D66333 [Generic/Unbranded] Firmware 1
  2. Copy the file and paste in Flashtool>Firmwares folder.
  3. Open Flashtool.exe now.
  4. Hit the small lightening button on the top left corner and select Flashmode.
  5. Select the FTF firmware file that you placed in the Firmware folder.
  6. From the right side, select what do you want to wipe. Data, cache and apps log, all wipes are recommended, perhaps you may select if you don’t want.
  7. Click on OK, and it will start preparing the firmware for flashing. This may take a little while to load.
  8. As soon as the firmware is loaded, it will prompt you to attach the phone by turning it off and keeping the back key press.
  9. For Xperia Z3, Volume Down key will do the job of back key, just turn off your phone, keep the Volume Down key pressed and plug in the data cable.
  10. As soon as the phone is detected in Flashmode, the firmware will start flashing, Do not leave the Volume Down key until the process is complete.
  11. As soon as you see “Flashing ended or Finished Flashing” leave the Volume Down key, plug the cable out and reboot.
  12. That’s All! Congrats! You’ve installed latest Android 5.1.1 Lollipop on your Xperia Z3. Enjoy

In case you got any queries or face any problems regarding this guide, please feel free to stop by the comment box below and let us know. We will get back to you as soon as possible. Thanks all!

Update Xperia Z2 D6502/D6503 To Android 5.1.1 23.4.A.1.232 Firmware

0

Sony has rolled out a new firmware update for the Xperia Z2 and Xperia Z3 family. The new firmware moves the build number to 23.4.A.1.232. Although Android 5.1.1 Lollipop was available for the Xperia Z2 and Z3 family earlier, but Sony didn’t fix the Stagefright bug completely in the earlier update. The new update seems to have fixed the Stagefright bug completely, and the device is not vulnerable to this annoying bug anymore. Sony has rolled out this update through OTA and Sony PC Companion. In case you’re not willing to wait for OTA or Sony PC Companion update to reach you out, you can flash this update manually as well.

We are going to help you to install/flash Android 5.1.1 23.4.A.1.232 Firmware on Xperia Z2 D6502, D6503, D6543 using Sony flashtool. Let’s go ahead without any further ado and get it done.

Early Preparations:

1. This is only for Sony Xperia Z2 D6503, D6502 & D6543

This ROM is only for the device mentioned above. Make sure that your model number matches the one listed above. To do so, go to Settings > About Device on your device and see your model number. Flashing this firmware on any other device will result in bricking it so make sure that you meet this requirement first of all.

2. Battery should be charged at least over 60%.

Make sure that your battery is charged enough to complete the flashing process. In case your battery is low and your device goes dead during the flashing process, you may end up soft bricking your device as it won’t complete the flashing process.

3. Backup everything!

Just to be on the safe side, you may consider backing up each and everything from your Android device. This is highly recommended so that in case anything goes wrong, you still have the access to all of your data and you can restore it immediately. You may backup everything as listed below.

4. Enable USB Debugging Mode on your device.

Enable USB debugging mode on your device. To do so, tap settings>developer options>USB debugging. If you can’t find developer options in settings, then tap settings > about device and tap “Build Number” for 7 times and you’ll get em’ activated under settings.

5. Install and setup Sony Flashtool.

You must have installed Sony Flashtool.  Find the full guide here. After installing Sony Flashtool, open the Flashtool folder from the drive where you installed it.Now open Flashtool>Drivers>Flashtool-drivers.exe and install the Flashtool, Fastboot & Xperia Z2 drivers from the list. [Important]

6. Use OEM data cable to establish connection.

Make sure that you use the phone’s original data cable to establish connection between your phone and the PC. Using a different data cable might result in interrupting the firmware installation.

How To Update Sony Xperia Z2 D6503, D6502 & D6543 To 23.4.A.1.232 Android 5.1.1 Firmware

 Before moving forward, please make sure that you’ve read the pre requisites and ensure that you are set to go ahead.

  1. Download the latest firmware Android 5.1.1 Lollipop 23.4.A.1.232 FTF file.
    1. For Xperia Z2 D6503 [Generic/Unbranded] Link 1 |  Create your own FTF using this guide
    2. For Xperia Z2 D6543 [Generic/Unbranded]  Create your own FTF using this guide.
    3. For Xperia Z2 D6502 [Generic/Unbranded] Link 1  Create your own FTF using this guide.
  2. Copy the file and paste in Flashtool>Firmwares folder.
  3. Open Flashtool.exe now.
  4. Hit the small lightening button on the top left corner and select Flashmode.
  5. Select the FTF firmware file that you placed in the Firmware folder.
  6. From the right side, select what do you want to wipe. Data, cache and apps log, all wipes are recommended, perhaps you may select if you don’t want.
  7. Click on OK, and it will start preparing the firmware for flashing. This may take a little while to load.
  8. As soon as the firmware is loaded, it will prompt you to attach the phone by turning it off and keeping the back key press.
  9. For Xperia Z2, Volume Down key will do the job of back key, just turn off your phone, keep the Volume Down key pressed and plug in the data cable.
  10. As soon as the phone is detected in Flashmode, the firmware will start flashing, Do not leave the Volume Down key until the process is complete.
  11. As soon as you see “Flashing ended or Finished Flashing” leave the Volume Down key, plug the cable out and reboot.
  12. That’s All! Congrats! You’ve installed latest Android 5.1.1 Lollipop on your Xperia Z2. Enjoy

In case you got any queries or face any problems regarding this guide, please feel free to stop by the comment box below and let us know. We will get back to you as soon as possible. Thanks all!

Install Android 6.0 Marshmallow Factory Images On Google Nexus 5, 6, 7, 9 & Nexus Player

0
Install Android 6.0 Marshmallow Factory Images On Google Nexus 5, 6, 7, 9 & Nexus Player

Marshmallow-Nexus-980x537Nexus fans are given a treat from Google in the form of official roll out of Android 6.0 Marshmallow. The firmware is now available for Google Nexus 5, Google Nexus 6, Nexus 7 and Nexus 9. Nexus Player is also seeing this update. Google has published the factory images of the very first full official build of Android 6.0 Marshmallow for all these devices. Earlier, Google has been rolling out developer preview images since it announced the Android 6.0. The firmware debuted alongside the Nexus 5X and Nexus 6P and just today Google has started updated other members of Nexus family to this latest firmware.

Android 6.0 Marshmallow brings a number of core enhancements. You may want to know about Android 6.0 Marshmallow goodies here. Being a Nexus freak, it won’t be wrong to say that its quite hard for Nexus fans to wait for the OTA update. It’s time for Android power users to roll the sleeves up and get ready to flash the all new Android 6.0 Marshmallow on their device. The manual method will help you to update your device immediately, you won’t have to wait for OTA, you can get this firmware running on your device right now.

In the on-going guide we are going to show you how you can install Android 6.0 Marshmallow factory images on your Google Nexus 5, Nexus 6, Nexus 7 2013 (WiFi & LTE), Nexus 9 (WiFi & LTE) and Nexus Player. Let’s put a full stop to our discussion here and get the task done right away.

Here are some pre-requisites in order to make this installation safe and secure

  1. This guide is only for Google Nexus 5, 6,7, 9 and Nexus Player. Do not try this tutorial on any other device. It may result in bricking it.
  2. Your phone’s battery should be charged at least over 50%. This is recommended in order to avoid power issues during the flashing process.
  3. Enable USB debugging mode on your device. You have to enable developer options first. You can do so by going in to settings > tap build number for 7 times. Now you will have developer options in settings. Open developer options > Enable USB debugging.
  4. Backup all your important contacts, text messages and call logs. Also copy your media content to your PC. Backup is recommended as your device will be wiped during the flashing process.
  5. Download and install latest Google USB drivers. Installation of these drivers will be a little different. Download the file from the attached link and unzip it. Now connect your phone to your PC. Right click “Computer or This PC > Click on Manage > Device Manager > Find your device i.e. Nexus 5 or Nexus 6 > Right click Update driver > Browse My Computer For Driver Software > Locate and select the Google USB folder that you got after unzipping > select install now”.
  6. Once the installation has been completed, your device will be shown as Android  Composite ADB Interface.
  7. Download and install Minimal Android ADB & Fastboot drivers on your computer.

Download Android Marshmallow 6.0 factory image file according to your phone.

Extract the downloaded image file to get the following files:

  • flash-base.sh
  • flash-all.sh
  • flash-all.bat
  • bootloader
  • radio

How To Install Android Marshmallow 6.0 On Your Google Nexus Device Now:

  1. Copy all the .img files from the extracted folder to Minimal ADB & Fastboot Folder in C>Program Files > Minimal ADB & Fastboot folder.
  2. Now connect your Nexus device to your PC. Make sure that you’ve followed all the pre-requisites prior to this step.
  3. Now open Minimal ADB & Fastboot.exe file from the shortcut on your desktop or from the Minimal ADB & Fastboot folder under program files in your Windows drive.
  4. To verify your device’s connection with your PC issue this command:

    adb devices

  5. It should show you the list of attached devices followed by a code.
  6. Once you’ve verified the connection, issue the following command and press enter: adb reboot-bootloader
  7. Your Nexus will now reboot into bootloader mode.
  8. Once done, navigate to the folder where you extracted the contents of downloaded zip file.
  9. From the extracted files, run the script “flash-all.bat”.
  10. Follow on-screen instructions and sit back while it flashes Android M Preview 3 on your Nexus.
  11. That’s all. Your Nexus will now boot into the newly installed Android Marshmallow 6.0.

How to switch from 32-bit to 64-bit version of Windows 10 [Guide]

0
How to switch from 32-bit to 64-bit version of Windows 10 [Guide]

Following are the instruction on how to switch from 32 bit to 64 bit version on Windows 10. When you update your Windows from any older version to newer Microsoft automaticlly give you the same version on which previously your computer is running, e.g like if you are running 32-bit version of Windows 8, it will be upgraded to 32-bit version of Windows 10 automatically. In the following guide i will tell you how to switch from 32-bit to 64-bit version of Windows 10.

disbale windows 10 automatic app updates

REQUIREMENTS:

  • First check your Pc dose support 64-bit processer.
  • If your computer only support 32-bit processer then you cannot run 64-bit version of Windows.
  • Download CPU-Z from this page and run it in order to complete the 64-bit version of Windows 10 to run on your Pc.

How to switch from 32-bit to 64-bit version of Windows 10:

  1. First backup all of your files and delete all the programs you have installed.
  2. Now you have to install a clean Windows 10 version in order to switch to 64-bit CPU version.
  3. Use upgrade tool to update your Pc to Window 10, if you were running 32-bit version before then automactically you’ll the 32-bit version.
  4. Download the media creation tool, if you are  running 32-bit version then you must download the 32-bit version of the media creation tool.
  5. Run the media creation tool and select “Create installation media for another PC” option. Install the media on USB or Disk.
  6. Once the process start, you’ll be asked whether you want to create 32-bit or 64-bit media. Choose 64-bit installation.
  7. Now reboot the system from the installation media.
  8. When your system boots up choose the “Custom install” when installing Windows 10.
  9. After the installation process is started you’ll be asked to enter a product key, skip this step and continue.
  10. All Done !


Need for Speed No Limits Online for Pc – Windows and Mac

0
Need for Speed No Limits Online for Pc – Windows and Mac

Following are the instructions on how to install Need for Speed No Limits for Pc, this game is basically designed for iOS and Android but we can install Need for Speed™ No Limits for Pc using third party emulators like BlueStacks and Andy. Before going any further let me give you an overview on main features of Need for Speed™ No Limits.

Need for Speed No Limits Online for Pc

Main Features:

Pick up the real-world cars you’ve always wanted, from the Subaru BRZ to the BMW M4, McLaren 650s, Porsche 911, and more. Then trick them out with the hottest customization system on mobile, from spots like the Mod Shop and the Black Market, giving you over 2.5 million custom combos to play with. Your rides are waiting – take them to the stages or streets to go head-to-head versus the competition and prove yourself.

Steer onto the streets of Blackridge, driving reckless and juiced as sparks fly. Accelerate over jumps and around debris, into traffic, against walls, and through high-speed Nitro Zones. Flip on the nitrous and thrust yourself into another level of adrenaline-fueled driving and drifting. Around every corner is a fresh race as you clash with local crews and local cops. It’s a world full of wannabe drivers – can you stay in front and earn respect?

Never back down as you race anyone crazy enough to take you on, leave them gapped, and increase your rep. Dig, drift, drag, and roll your ride to wins with police on your tail, hitting each inch of the map hard by the time you reach the big end. Burn rubber in over 1,000 challenging races – and that’s just the starting line. Be notorious, own the streets, and score the world’s best cars. Because one ride is never enough!

for more Google Play.

How To Install Need for Speed No Limits For PC or MAC Using BlackStacks

Method 1:

  1. Install Bluestacks on your PC or MAC.
  2. Download Need for Speed No Limits Apk on your PC.
  3. Make sure that you have installed Bluestacks. Double-click the downloaded Need for Speed No Limits Apk toinstall it.
  4. The APK will be installed through Bluestacks, once the notification pop-ups determining the installation completion, open Bluestacks.
  5. Now click on My Apps and then click on Need for Speed No Limits.
  6. The application will open up. Now follow on-screen instructions to Need for Speed No Limits.

Method 2:

  1. Install Bluestacks on your PC or MAC.
  2. Open Bluestacks and setup your Google Play Store account.
  3. Now open Google Play Store and search for “Need for Speed No Limits“.
  4. Once found, install Need for Speed No Limits.
  5. Now click on My Apps and then click on Need for Speed No Limits.
  6. The game will open up. Now follow on-screen instructions to Play Need for Speed No Limits.

How To Install Need for Speed No Limits For PC or MAC Using Andy OS

  1. Download and install Andy OS on your Windows PC or MAC.
  2. Once downloaded, open Andy OS.
  3. Setup Google Play Account on it.
  4. Now open Apps > Google Play Store and search for “Need for Speed No Limits“.
  5. Install Need for Speed No Limits and wait for it to finish the installation.
  6. Once done, open “Uncategorized” portion in Andy and click on Need for Speed No Limits to play it.
  7. That’s all.

Install CWM & Root Galaxy Note 5 N920I/N920C

Install CWM & Root Galaxy Note 5 N920I/N920C

Its been quite a while since the Galaxy Note 5 is out. Galaxy Note 5 is available almost all across the world now. Two of the popular variants of this device are N920I and N920C joining majority of the regions this time. Samsung has put a lot of effort into making the Galaxy Note 5 a great device. The Note 5 sports a 5.7-inch display with a 5 MP selfie shooter on the top, there’s a 16 MP shooter at the back. Samsung equipped the device with its very own Exynos 7420 Octa core CPU and a RAM of 4 GB. We have 32 GB on-board storage and there’s no external SD card slot on the Note flagship this time. We have a 3000 mAh battery under the hood. Galaxy Note 5 can be found running Android 5.1.1 Lollipop out of the box.samsung-galaxy-note-5-1

Samsung made the Galaxy Note 5 a perfect device for Android power users. You can do a lot of stuff using this device which you ordinarily won’t be able to do using any normal smartphone. Galaxy Note 5’s heavy spec-sheet and cool features make it worth tweaking and checking out the real potential of this device. Galaxy Note 5 owners, who have already got their hands on this device, they may want to unleash the true power of their device by means of root specific applications or by flashing MODs through recovery. Methods to root this device and also to install a custom recovery are already available, you’re all set to go ahead and customise your device the way you want. In case you’re wondering what you will be able to do after root access, you may like knowing that you will be able to install root-specific applications which will help you to enhance the performance and battery life of your device. Using a custom recovery you can flash custom files, create and restore Nandroid backup, wipe cache and dalvik cache etc.

If you’ve been looking for a way to gain root access and install custom recovery on your Galaxy Note 5 N920I or N920C, you may have spotted the right place. In the on-going place we will be showing you the procedure. Lets put a full stop to our conversation here and go ahead to install the custom recovery and root the device now.

Preparations

  • This guide is only for Galaxy Note 5 N920I and N920C. Do not try this on any other device.
  • Charge your device up to 50%.
  • Use original data cable to establish connection between your PC and your phone.
  • Backup your important data as a safety measure.
  • Follow this guide to the letter to avoid any mishap.

Disclaimer: Flashing custom recovery and rooting the device void its warranty. In case of a mishap, TechBeasts or Samsung may not be held responsible. Make sure that you’re doing everything at your own risk and with your full understanding.

Required Downloads:

Install Philz Advanced CWM & Root Galaxy Note 5 N920I/N920C

  1. Open Odin3 V3.10.6.exe that you extracted on your PC.
  2. Enable OEM Unlock on your phone. To do so on your phone, go to settings > about device > tap the build number for 7 times to enable developer options. Get back to the settings and open developer options. Under developer options turn on “OEM unlock.
  3. Put your Note 5 in download mode now. To do so, turn it off completely. Now turn it on by pressing and holding Volume Down + Home + Power Key. Once your phone boots up, press the Volume Up key to continue.
  4. Connect your phone to your PC now. The ID:COM box in the top-left corner of Odin3 should  turn blue. This indicates that your phone is connected properly.
  5. Now click the “AP” tab in Odin and select the philz advacned cwm.tar file that you downloaded. It will take a second or two for Odin3 to load this file.
  6. Make sure that your Odin3 looks like this. The only option ticked should be F. Reset Time.

  7. Odin 3.10.6 Explained_Techbeasts
  8. Now you’re all set to flash the recovery. Just click the start button in Odin3 and sit back.
  9. Once the process box above ID:COM box shows green light and flashing process is finished, disconnect your device.
  10. Now turn off your device properly as we are going to boot into recovery mode.
  11. Now turn it on by pressing and holding Volume Up + Home + Power Key. This will boot your device in recovery mode. It should be CWM recovery that you just installed.
  12. Now in CWM recovery, select Install zip > Choose Zip from SD card > locate the Arter97 Kernel file and flash it.
  13. Once flashed, Once again in CWM recovery, select Install zip > Choose Zip from SD card > locate the SuperSu.zip file this time and flash it.
  14. Once done, reboot your device using recovery.
  15. As it boots up, checkout the SuperSu in application drawer. Also install BusyBox from Play Store.
  16. Verify root access using Root Checker.
  17. That’s all. You’re now set to unleash the open source nature of Android.

Stuck with anything? Reach us out through the comment box below!


PewDiePie Legend of Brofist Online for Pc – Windows and Mac

0
PewDiePie Legend of Brofist Online for Pc – Windows and Mac

Following are the instruction on how to download and install PewDiePie Legend of Brofist for Pc, this game is basically designed for iOS and Android. There is no Pc version available for PewDiePie Legend of Brofist, but still we can install PewDiePie Legend of Brofist for Pc using third party emulators. Before going any further let me tell you the main features of PewDiePie Legend of Brofist.

PewDiePie-Legend-of-Brofist-for-PC-Windows-7810-and-Mac

Main Features;

⋆ COLLECT BROCOINS to buy new CHARACTERS, ATTACKS and DEFENSES!
⋆ UNLOCK ALL THE YOUTUBE STARS and try to beat the game as PewDiePie, Marzia, CinnamonToastKen, JackSepticEye, Cryaotic, Markiplier and more!
⋆ REAL VOICE ACTING by the YouTubers!
⋆ FIGHT EPIC BOSSES to save your fans!
⋆ BEAT ALL DIFFICULTY LEVELS and prove that you are a hardcore gamer!
⋆ CHALLENGE YOUR FRIENDS in the survival arena and brag about your score on Facebook!
⋆ COLLECT ALL THE SECRETS hidden in the stages.
⋆ AMAZING CHIPTUNE MUSIC by RUSHJET1!

For more visit Google Play.

How To Install PewDiePie Legend of Brofist For PC or MAC Using BlackStacks

Method 1:

  1. Install Bluestacks on your PC or MAC.
  2. Download PewDiePie Legend of Brofist Apk on your PC.
  3. Make sure that you have installed Bluestacks. Double-click the downloaded PewDiePie Legend of Brofist Apk toinstall it.
  4. The APK will be installed through Bluestacks, once the notification pop-ups determining the installation completion, open Bluestacks.
  5. Now click on My Apps and then click on PewDiePie Legend of Brofist.
  6. The application will open up. Now follow on-screen instructions to PewDiePie Legend of Brofist.

Method 2:

  1. Install Bluestacks on your PC or MAC.
  2. Open Bluestacks and setup your Google Play Store account.
  3. Now open Google Play Store and search for “PewDiePie Legend of Brofist“.
  4. Once found, install PewDiePie Legend of Brofist.
  5. Now click on My Apps and then click on PewDiePie Legend of Brofist.
  6. The game will open up. Now follow on-screen instructions to Play PewDiePie Legend of Brofist.

How To Install PewDiePie Legend of Brofist For PC or MAC Using Andy OS

  1. Download and install Andy OS on your Windows PC or MAC.
  2. Once downloaded, open Andy OS.
  3. Setup Google Play Account on it.
  4. Now open Apps > Google Play Store and search for “PewDiePie Legend of Brofist“.
  5. Install PewDiePie Legend of Brofist and wait for it to finish the installation.
  6. Once done, open “Uncategorized” portion in Andy and click on PewDiePie Legend of Brofist to play it.
  7. That’s all.

Here Are Nexus 6P & 5X Official Camera Samples

0
Here Are Nexus 6P & 5X Official Camera Samples

Google just announced its latest flagship devices i.e. Nexus 6P and Nexus 5X today. The Nexus 6P comes under the umbrella of Huawei while the Nexus 5X comes under the umbrella of LG. Google has put a lot of effort on the camera of both these devices. Both these smartphones have a 5 MP selfie shooter on the front and a 12.3 MP shooter powered up with Sony’s imaging sensor having 1.5µm pixels. The new camera on these phones brings the all new Camera app based on the latest Camera 3.0 API which has tons of new features and improvements.Screenshot at Sep 30 00-31-36

The new 12.3 MP camera comes with a larger sensor having f/2.0 apertur which is way large then that of the other flagship smartphones by different manufacturers. You can create funny GIFs using the new burst shot mode. On the Nexus 6P you can record the slow motion videos at 240 fps, while on the Nexus 5X you can record the slow motion videos at 120 fps. To show of the potential of Camera of these devices, Google has posted some official samples. Let’s have a look on some photographs shot by Nexus 6P and Nexus 5X to determine what potential these new Google shooters have got.

Nexus-5X-and-6P-official-camera-samples (1) Nexus-5X-and-6P-official-camera-samples (2) Nexus-5X-and-6P-official-camera-samples (3) Nexus-5X-and-6P-official-camera-samples (4) Nexus-5X-and-6P-official-camera-samples (5) Nexus-5X-and-6P-official-camera-samples (6) Nexus-5X-and-6P-official-camera-samples (7) Nexus-5X-and-6P-official-camera-samples (8) Nexus-5X-and-6P-official-camera-samples