Home Blog Page 342

How To Root Samsung Galaxy Core Prime on Android 5.1.1 Lollipop [All Variants]

0
How To Root Samsung Galaxy Core Prime on Android 5.1.1 Lollipop [All Variants]

Galaxy Core Prime is an entry level smartphone by Samsung. Galaxy Core Prime first appeared back in November, 2014. We witnessed a 4.5-inch 480p display on this device with a pixel density of 207 ppi. Galaxy Core Prime was powered up with Snapdragon 410 CPU clocked at 1.2 GHz alongside Adreno 306 GPU. A RAM of 1 GB was fixed inside and the internal storage was 8 GB while there was an option for microSD card present on-board. Galaxy Core Prime hosted a 5 MP rear shooter and a 2 MP front-facing shooter. It ran on Android 4.4.4 KitKat out of the box and it was updated to Android 5.1.1 Lollipop later on.

Although the Galaxy Core Prime is a low-end Android smartphone, but there’s a lot more that you can do on this device then it is supposed to. To do so, you need root access on your device. If your’e running Android 5.1.1 Lollipop on your Galaxy Core Prime, then rooting it may have become a dream by now. If so, then you it may be the time for us to turn your dream into a reality today. A while ago, famous developer Chainfire announced the updated version of his rooting tool CF-Auto-Root. CF Auto Root now supports over 300 new devices powered up with Android 5.1.1 Lollipop and Android 6.0.1 Marshmallow. Since the Galaxy Core Prime runs on Android 5.1.1 Lollipop, it successfully joins the league.Harga-Samsung-Galaxy-Core-Prime

As you scroll down, you will find a step-by-step method to root your Galaxy Core Prime SM-G360G, G360GY, G360T, G360T1, G361H and G361HU running Android 5.1.1 Lollipop.

In case you’re not finding yourself confident enough or convinced enough to root your Galaxy Core Prime, you may want to have a look on 10 reasons why you should root your Android. You may also want to go through some benefits of root access, so have a look on the 10 best applications for rooted phones to enhance the functionality of your phone after rooting it.

Here are some early preparations to make sure that nothing goes wrong

  1. This method only works with Galaxy Core PrimeSM-G360G, G360GY, G360T, G360T1, G361H and G361HU. Your device must be running Android 5.1.1 Lollipop. Check your device’s model number and Android version in Settings > About device section.
  2. Enable USB debugging on your Galaxy Core Prime. To do so, go to Settings > About device > tap the build number for 7 times. This will enable developer options in settings. Once enabled, open developer options and enable USB debugging.
  3. Enable OEM unlock on your Galaxy Core Prime if available. If OEM unlock doesn’t appear in developer options, skip this step.
  4. Backup your important contacts, call logs, sms messages and important media content.
  5. Charge your phone up to 50% to avoid and power issues during the flashing process.
  6. Turn off windows firewall, also disable or delete Samsung Kies while you’re using Odin3.
  7. Use your phone’s original data cable to establish connection between your phone and your desktop PC.
  8. Follow this guide to the letter to avoid any mishap.

DISCLAIMER: ROOTING PROCESS IS HIGHLY CUSTOM AND INVOLVES CERTAIN RISKS. ROOTing YOUR SAMSUNG GALAXY WILL VOID ITS WARRANTY. IF YOUR DEVICE HAS A KNOX COUNTER ON THE BOOTLOADER, ROOTING IT WILL TRIP THE COUNTER AND YOU WON’T BE ABLE TO RESET KNOX AFTER THAT. IN CASE OF ANY MISHAP, TECHBEATS, SAMSUNG OR CHAINFIRE MAY NOT BE HELD RESPONSIBLE. MAKE SURE THAT YOU’RE ROOTING YOUR PHONE AFTER UNDERSTANDING EACH AND EVERYTHING, AND YOU’RE DOING IT AT YOUR OWN RISK.

Required downloads:

  • Download and install Samsung USB drivers
  • Download and extract Odin. [Recommended Odin v3.09]
  • Open the following page: CF-Auto-Root
  • Once you’re on the CF Auto Root page, press Control + F or Command + F. After the search bar appears, type your phone’s model number to locate its Auto Root file. Download CF-Auto-Root file according to your device very carefully and extract it once only to get the .tar.md5 or .tar file.

How To Root Samsung Galaxy Core Prime on Android Lollipop using CF Auto Root

  1. Open Odin.exe from the folder you extracted.
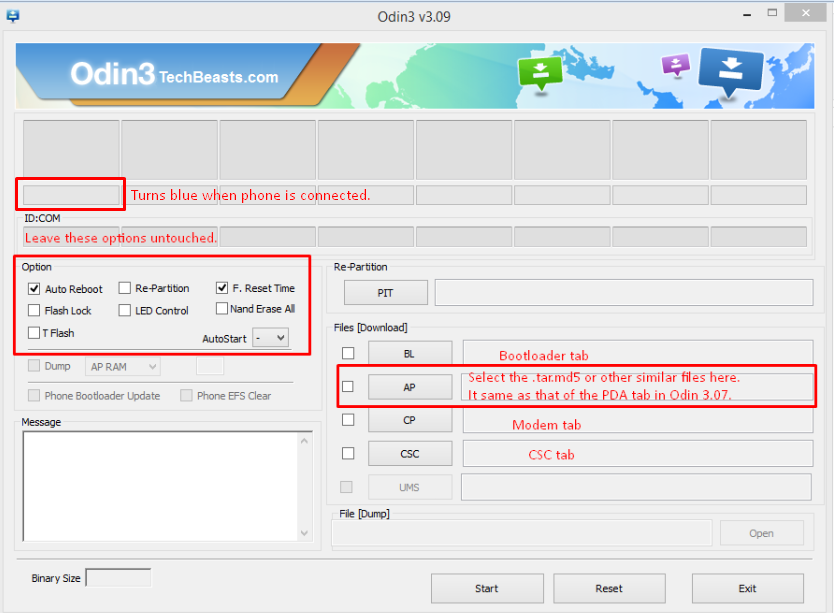
  2. Click on “PDA” / “AP” tab and select the unzipped CF-Autroot.tar file that you download and extracted in the third step in required downloads. If you’ve already downloaded the CF-Auto-Root file in .tar format, you do not need to extract it.
  3. Do not touch any other option in Odin. The only options ticked should be F.Reset Time and Auto-Reboot. Leave all other options as it is.
  4. Now put your Galaxy Core Prime in download mode and connect it to your PC. To put it in download mode, turn it off completely. Now turn it on by press and holding Volume Down + Home + Power Key. It will boot up with a warning. Press Volume Up to continue. You should be in download mode now. If this combination doesn’t work, here’s How to Boot Samsung Galaxy Devices into Download & Recovery Mode
  5. Now connect it with your PC and let Odin detect it. As soon as Odin detects your phone, it will show you a blue or yellow indicator in the ID:COM box.Odin-3.09-explained.-2
  6.  As your device has been connected, click the “Start” button now.
  7.  Odin will now flash CF-Auto-Root. Once done, it will reboot your device.
  8. Disconnect your device, let it turn on completely and check SuperSu in app drawer once it boots up.
  9. You can verify root access by installing Root Checker application from Google Play Store.

Device booted up but not rooted? Here’s what to do

If your device isn’t rooted even after flashing CF-Auto-Root, you may try doing this.

  1. Follow the guide step and 2 from the guide above.
  2. Now in the third step, untick Auto-Reboot, the only ticked option should be F.Reset.Time.
  3. Follow the above guide from step 4 – 6.
  4. Once CF-Auto-Root has been flashed, reboot your device manually by either pulling out the battery or using the button combo.
  5. Verify root access as explained above.

How to Unroot your Galaxy Core Prime now?

You can unroot your device and revert back to the stock condition of your phone by flashing stock firmware. Here’s How To Flash Stock Firmware On Samsung Galaxy With Odin,

Got any issues? Reach us out through the comment box below.

How To Root Samsung Galaxy Grand Prime on Android 5.1.1 Lollipop [All Variants]

5
How To Root Samsung Galaxy Grand Prime on Android 5.1.1 Lollipop [All Variants]

Samsung Galaxy Grand Prime brought a lot of respect in Samsung’s house. The Galaxy Grand Prime by Samsung happens to be a mid-ranger that touts a very nice selfie shooter, which was also advertised by Samsung as the selling point of the Galaxy Grand Prime. Galaxy Grand Prime flaunts a beautiful 5.0-inch 540×960 pixels display with 220 ppi. Under the hood we found a Snapdragon 410 CPU clocked at 1.2 GHz accompanied by Adreno 306 GPU. An 8 MP shooter at the back and a 5 MP shooter on the front were the Camera components of this phone. Galaxy Grand Prime originally ran on Android 4.4.4 KitKat out of the box. Samsung rolled out Android 5.0.2 Lollipop update for this device as well. Since the Galaxy Grand Prime one of the host selling devices, Samsung also updated it to Android 5.1.1 Lollipop and that’s where this devices is resting for now.

As long as the Galaxy Grand Prime was running on Android 4.4.4 KitKat, it was easy for the users to root his device and unleash its real power. The pain started as soon as Samsung updated it to Android 5.0 Lollipop. It was nearly impossible for the developers to come up with a method to root the Galaxy Grand Prime running Android Lollipop. It’s been long since the users have been anxiously waiting for a method to root their Galaxy Grand Prime. The good news landed in today when Chainfire announced an updated version of his all-time famous CF-Auto-Root to work with over 300 new devices running Android 5.1.1 Lollipop and Android 6.0.1 Marshmallow. The Galaxy Grand Prime is one of those lucky devices.83201521051PM_635_samsung_galaxy_grand_prime_4G_grey

Those of you who’ve been eagerly looking for way to root their Grand Prime on Android Lollipop, they may do so using the following guide. Let’s have a look on a step-by-step set of instructions to root Galaxy Grand Prime SM-G530P, G530R4, G530T, G530W and G530Y.

In case you’re not finding yourself confident enough or convinced enough to root your Galaxy Grand Prime, you may want to have a look on 10 reasons why you should root your Android. You may also want to go through some benefits of root access, so have a look on the 10 best applications for rooted phones to enhance the functionality of your phone after rooting it.

Here are some early preparations to make sure that nothing goes wrong

  1. This method only works with Galaxy Grand Prime SM-G530P, G530R4, G530T, G530W and G530Y. Your device must be running Android 5.1.1 Lollipop. Check your device’s model number and Android version in Settings > About device section.
  2. Enable USB debugging on your Galaxy Grand Prime. To do so, go to Settings > About device > tap the build number for 7 times. This will enable developer options in settings. Once enabled, open developer options and enable USB debugging.
  3. Enable OEM unlock on your Galaxy Grand Prime if available. If OEM unlock doesn’t appear in developer options, skip this step.
  4. Backup your important contacts, call logs, sms messages and important media content.
  5. Charge your phone up to 50% to avoid and power issues during the flashing process.
  6. Turn off windows firewall, also disable or delete Samsung Kies while you’re using Odin3.
  7. Use your phone’s original data cable to establish connection between your phone and your desktop PC.
  8. Follow this guide to the letter to avoid any mishap.

DISCLAIMER: ROOTING PROCESS IS HIGHLY CUSTOM AND INVOLVES CERTAIN RISKS. ROOT YOUR SAMSUNG GALAXY WILL VOID ITS WARRANTY. IF YOUR DEVICE HAS A KNOX COUNTER ON THE BOOTLOADER, ROOTING IT WILL TRIP THE COUNTER AND YOU WON’T BE ABLE TO RESET KNOX AFTER THAT. IN CASE OF ANY MISHAP, TECHBEATS, SAMSUNG OR CHAINFIRE MAY NOT BE HELD RESPONSIBLE. MAKE SURE THAT YOU’RE ROOTING YOUR PHONE AFTER UNDERSTANDING EACH AND EVERYTHING, AND YOU’RE DOING IT AT YOUR OWN RISK.

Required downloads:

  • Download and install Samsung USB drivers
  • Download and extract Odin. [Recommended Odin v3.09]
  • Open the following page: CF-Auto-Root
  • Once you’re on the CF Auto Root page, press Control + F or Command + F. After the search bar appears, type your phone’s model number to locate its Auto Root file. Download CF-Auto-Root file according to your device very carefully and extract it once only to get the .tar.md5 or .tar file.

How To Root Samsung Galaxy Grand Prime on Android Lollipop using CF Auto Root

  1. Open Odin.exe from the folder you extracted.
  2. Click on “PDA” / “AP” tab and select the unzipped CF-Autroot.tar file that you download and extracted in the third step in required downloads. If you’ve already downloaded the CF-Auto-Root file in .tar format, you do not need to extract it.
  3. Do not touch any other option in Odin. The only options ticked should be F.Reset Time and Auto-Reboot. Leave all other options as it is.
  4. Now put your Galaxy Grand Prime in download mode and connect it to your PC. To put it in download mode, turn it off completely. Now turn it on by press and holding Volume Down + Home + Power Key. It will boot up with a warning. Press Volume Up to continue. You should be in download mode now. If this combination doesn’t work, here’s How to Boot Samsung Galaxy Devices into Download & Recovery Mode
  5. Now connect it with your PC and let Odin detect it. As soon as Odin detects your phone, it will show you a blue or yellow indicator in the ID:COM box.Odin-3.09-explained.-2
  6.  As your device has been connected, click the “Start” button now.
  7.  Odin will now flash CF-Auto-Root. Once done, it will reboot your device.
  8. Disconnect your device, let it turn on completely and check SuperSu in app drawer once it boots up.
  9. You can verify root access by installing Root Checker application from Google Play Store.

Device booted up but not rooted? Here’s what to do

If your device isn’t rooted even after flashing CF-Auto-Root, you may try doing this.

  1. Follow the guide step and 2 from the guide above.
  2. Now in the third step, untick Auto-Reboot, the only ticked option should be F.Reset.Time.
  3. Follow the above guide from step 4 – 6.
  4. Once CF-Auto-Root has been flashed, reboot your device manually by either pulling out the battery or using the button combo.
  5. Verify root access as explained above.

How to Unroot your Galaxy Grand Prime now?

You can unroot your device and revert back to the stock condition of your phone by flashing stock firmware. Here’s How To Flash Stock Firmware On Samsung Galaxy With Odin,

Got any issues? Reach us out through the comment box below.

How To Root Samsung Galaxy E7 on Android 5.1.1 Lollipop

1
How To Root Samsung Galaxy E7 on Android 5.1.1 Lollipop

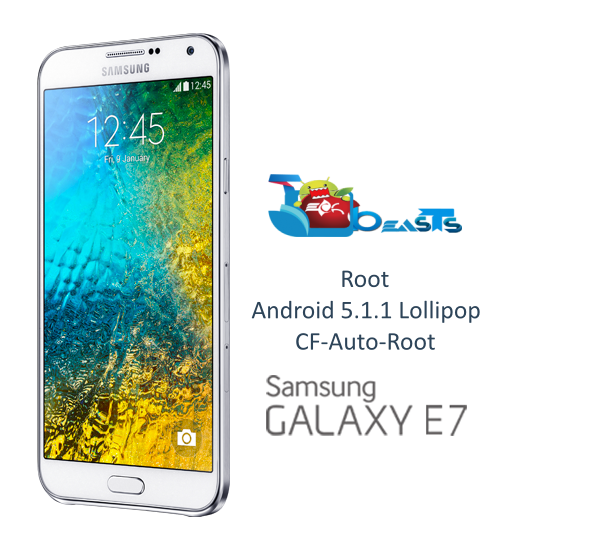
Android 5.1.1 Lollipop update for the Galaxy E7 appeared back in November, 2015. While this update cheered up many Android users, at the same time it disappointed Android power users who lost root access immediately after updating to Android 5.1.1 Lollipop. The disappointment increased when they couldn’t root their Galaxy E7 running Android 5.1.1 Lollipop anymore. This happened due to the changes that Samsung made in the core of Android Lollipop and made the device resistant to any root exploits. Since then, all eyes were waiting for Chainfire, the guy behind root for many Galaxy devices, to come up with a patch and root Galaxy E7 on Android Lollipop. Galaxy E7 users have been heard and the milestone has been achieved today. Chainfire just updated his CF-Auto-Root tool to work with a plethora of devices running Android Lollipop and Marshmallow. Our beloved Galaxy E7 is one of those lucky devices to get the blessing of root access.Samsung_GALAXY_E7

In the succeeding post you will learn to root your Galaxy E7 E700H running Android 5.1.1 Lollipop. Let’s go ahead now and get it done.

In case you’re not finding yourself confident enough or convinced enough to root your Galaxy E7, you may want to have a look on 10 reasons why you should root your Android. You may also want to go through some benefits of root access, so have a look on the 10 best applications for rooted phones to enhance the functionality of your phone after rooting it.

Here are some early preparations to make sure that nothing goes wrong

  1. This method only works with Galaxy E7 E700H Your device must be running Android 5.1.1 Lollipop. Check your device’s model number and Android version in Settings > About device section.
  2. Enable USB debugging on your Galaxy E7. To do so, go to Settings > About device > tap the build number for 7 times. This will enable developer options in settings. Once enabled, open developer options and enable USB debugging.
  3. Enable OEM unlock on your Galaxy E7 if available. If OEM unlock doesn’t appear in developer options, skip this step.
  4. Backup your important contacts, call logs, sms messages and important media content.
  5. Charge your phone up to 50% to avoid and power issues during the flashing process.
  6. Turn off windows firewall, also disable or delete Samsung Kies while you’re using Odin3.
  7. Use your phone’s original data cable to establish connection between your phone and your desktop PC.
  8. Follow this guide to the letter to avoid any mishap.

DISCLAIMER: ROOTING PROCESS IS HIGHLY CUSTOM AND INVOLVES CERTAIN RISKS. ROOT YOUR SAMSUNG GALAXY WILL VOID ITS WARRANTY. IF YOUR DEVICE HAS A KNOX COUNTER ON THE BOOTLOADER, ROOTING IT WILL TRIP THE COUNTER AND YOU WON’T BE ABLE TO RESET KNOX AFTER THAT. IN CASE OF ANY MISHAP, TECHBEATS, SAMSUNG OR CHAINFIRE MAY NOT BE HELD RESPONSIBLE. MAKE SURE THAT YOU’RE ROOTING YOUR PHONE AFTER UNDERSTANDING EACH AND EVERYTHING, AND YOU’RE DOING IT AT YOUR OWN RISK.

Required downloads:

How To Root Samsung Galaxy E7 on Android Lollipop using CF Auto Root

  1. Open Odin.exe from the folder you extracted.
  2. Click on “PDA” / “AP” tab and select the unzipped CF-Autroot.tar file that you download and extracted in the third step in required downloads. If you’ve already downloaded the CF-Auto-Root file in .tar format, you do not need to extract it.
  3. Do not touch any other option in Odin. The only options ticked should be F.Reset Time and Auto-Reboot. Leave all other options as it is.
  4. Now put your Galaxy E7 in download mode and connect it to your PC. To put it in download mode, turn it off completely. Now turn it on by press and holding Volume Down + Home + Power Key. It will boot up with a warning. Press Volume Up to continue. You should be in download mode now. If this combination doesn’t work, here’s How to Boot Samsung Galaxy Devices into Download & Recovery Mode
  5. Now connect it with your PC and let Odin detect it. As soon as Odin detects your phone, it will show you a blue or yellow indicator in the ID:COM box.Odin-3.09-explained.-2
  6.  As your device has been connected, click the “Start” button now.
  7.  Odin will now flash CF-Auto-Root. Once done, it will reboot your device.
  8. Disconnect your device, let it turn on completely and check SuperSu in app drawer once it boots up.
  9. You can verify root access by installing Root Checker application from Google Play Store.

Device booted up but not rooted? Here’s what to do

If your device isn’t rooted even after flashing CF-Auto-Root, you may try doing this.

  1. Follow the guide step and 2 from the guide above.
  2. Now in the third step, untick Auto-Reboot, the only ticked option should be F.Reset.Time.
  3. Follow the above guide from step 4 – 6.
  4. Once CF-Auto-Root has been flashed, reboot your device manually by either pulling out the battery or using the button combo.
  5. Verify root access as explained above.

How to Unroot your Galaxy E7 now?

You can unroot your device and revert back to the stock condition of your phone by flashing stock firmware. Here’s How To Flash Stock Firmware On Samsung Galaxy With Odin,

Got any issues? Reach us out through the comment box below.

How To Root Samsung Galaxy E5 on Android 5.1.1 Lollipop

10
How To Root Samsung Galaxy E5 on Android 5.1.1 Lollipop

Galaxy E5 was updated to Android 5.1.1 Lollipop back in August, 2015. Since then, the device became resistant to root access. Because of Samsung’s changes in Android 5.1.1 Lollipop system, it wasn’t easily possible to get beyond the boundaries and root any Samsung Galaxy powered up with this version of Android. It took quite a while for developers to get a work-around on this. Just today, Chainfire, the famous developer behind many Android milestones updated his rooting tool to work with Android devices running Android 5.1.1 Lollipop and 6.0.1 Marshmallow. Chainfire’s root tool CF-Auto-Root tool can now easily root Galaxy E5 running Android 5.1.1 Lollipop.

Those of you who have been looking for a way to root their Galaxy E5 on Lollipop, they may do so now. In the on-going guide you will learn to root your Galaxy E5 E500F and E500H running Android 5.1.1 Lollipop. Let’s go ahead and do it now.Samsung-Galaxy-E5

In case you’re not finding yourself confident enough or convinced enough to root your Galaxy E5, you may want to have a look on 10 reasons why you should root your Android. You may also want to go through some benefits of root access, so have a look on the 10 best applications for rooted phones to enhance the functionality of your phone after rooting it.

Here are some early preparations to make sure that nothing goes wrong

  1. This method only works with Galaxy E5 E5 E500F and E500H Your device must be running Android 5.1.1 Lollipop. Check your device’s model number and Android version in Settings > About device section.
  2. Enable USB debugging on your Galaxy E5. To do so, go to Settings > About device > tap the build number for 7 times. This will enable developer options in settings. Once enabled, open developer options and enable USB debugging.
  3. Enable OEM unlock on your Galaxy E5 if available. If OEM unlock doesn’t appear in developer options, skip this step.
  4. Backup your important contacts, call logs, sms messages and important media content.
  5. Charge your phone up to 50% to avoid and power issues during the flashing process.
  6. Turn off windows firewall, also disable or delete Samsung Kies while you’re using Odin3.
  7. Use your phone’s original data cable to establish connection between your phone and your desktop PC.
  8. Follow this guide to the letter to avoid any mishap.

DISCLAIMER: ROOTING PROCESS IS HIGHLY CUSTOM AND INVOLVES CERTAIN RISKS. ROOT YOUR SAMSUNG GALAXY WILL VOID ITS WARRANTY. IF YOUR DEVICE HAS A KNOX COUNTER ON THE BOOTLOADER, ROOTING IT WILL TRIP THE COUNTER AND YOU WON’T BE ABLE TO RESET KNOX AFTER THAT. IN CASE OF ANY MISHAP, TECHBEATS, SAMSUNG OR CHAINFIRE MAY NOT BE HELD RESPONSIBLE. MAKE SURE THAT YOU’RE ROOTING YOUR PHONE AFTER UNDERSTANDING EACH AND EVERYTHING, AND YOU’RE DOING IT AT YOUR OWN RISK.

Required downloads:

How To Root Samsung Galaxy E5 on Android Lollipop using CF Auto Root

  1. Open Odin.exe from the folder you extracted.
  2. Click on “PDA” / “AP” tab and select the unzipped CF-Autroot.tar file that you download and extracted in the third step in required downloads. If you’ve already downloaded the CF-Auto-Root file in .tar format, you do not need to extract it.
  3. Do not touch any other option in Odin. The only options ticked should be F.Reset Time and Auto-Reboot. Leave all other options as it is.
  4. Now put your Galaxy E5 in download mode and connect it to your PC. To put it in download mode, turn it off completely. Now turn it on by press and holding Volume Down + Home + Power Key. It will boot up with a warning. Press Volume Up to continue. You should be in download mode now. If this combination doesn’t work, here’s How to Boot Samsung Galaxy Devices into Download & Recovery Mode
  5. Now connect it with your PC and let Odin detect it. As soon as Odin detects your phone, it will show you a blue or yellow indicator in the ID:COM box.Odin-3.09-explained.-2
  6.  As your device has been connected, click the “Start” button now.
  7.  Odin will now flash CF-Auto-Root. Once done, it will reboot your device.
  8. Disconnect your device, let it turn on completely and check SuperSu in app drawer once it boots up.
  9. You can verify root access by installing Root Checker application from Google Play Store.

Device booted up but not rooted? Here’s what to do

If your device isn’t rooted even after flashing CF-Auto-Root, you may try doing this.

  1. Follow the guide step and 2 from the guide above.
  2. Now in the third step, untick Auto-Reboot, the only ticked option should be F.Reset.Time.
  3. Follow the above guide from step 4 – 6.
  4. Once CF-Auto-Root has been flashed, reboot your device manually by either pulling out the battery or using the button combo.
  5. Verify root access as explained above.

How to Unroot your Galaxy E5 now?

You can unroot your device and revert back to the stock condition of your phone by flashing stock firmware. Here’s How To Flash Stock Firmware On Samsung Galaxy With Odin,

Got any issues? Reach us out through the comment box below.

How To Root Samsung Galaxy J7 on Android 5.1.1 Lollipop

0
How To Root Samsung Galaxy J7 on Android 5.1.1 Lollipop

Samsung brought this mid-ranger Galaxy J7 out of the curtains back in June, 2015. On the front of this device we found a 5.5 inch 720p display with a pixel density of 267 ppi. Samsung used Qualcomm Snapdragon 615 CPU in this device. Samsung accompanied this CPU with Adreno 405 GPU and a RAM of 1.5 GB. Internal storage of the Galaxy J7 started from 16 GB and it also supports a microSD card. Galaxy J7 has a 13 MP camera shooter fixed at the back and a 5 MP shooter on the front for selfie freaks. Galaxy J7 runs on Android 5.1.1 Lollipop out of the box.

Although Galaxy J7 is a mid-ranger, but it still has got a lot of potential that you may discover only once you’re rooted. So far it wasn’t possible to root the Galaxy J7 because of the Android 5.1.1 Lollipop firmware running on it. Samsung’s security patches on the Android 5.1.1 Lollipop put the developers in a tough time rooting any Samsung Galaxy running Android Lollipop. Just today, Chainfire breached all these security patches set by Samsung and managed to update his famous rooting tool CF-Auto-Root for a number of devices running Android Lollipop and Marshmallow. Our beloved Galaxy J7 is one of those devices.Samsung-Galaxy-J7-SM-J700F

So it means, if you’re owning a Galaxy J7 running Android 5.1.1 Lollipop, you can easily root it now. The following guide will help you to root your Galaxy J7 J7008, J700F, J700H and J700M running Android 5.1.1 Lollipop. Let’s go ahead and get it done now.

In case you’re not finding yourself confident enough or convinced enough to root your Galaxy J7, you may want to have a look on 10 reasons why you should root your Android. You may also want to go through some benefits of root access, so have a look on the 10 best applications for rooted phones to enhance the functionality of your phone after rooting it.

Here are some early preparations to make sure that nothing goes wrong

  1. This method only works with Galaxy J7 J7008, J700F, J700H and J700M. Your device must be running Android 5.1.1 Lollipop. Check your device’s model number and Android version in Settings > About device section.
  2. Enable USB debugging on your Galaxy J7. To do so, go to Settings > About device > tap the build number for 7 times. This will enable developer options in settings. Once enabled, open developer options and enable USB debugging.
  3. Enable OEM unlock on your Galaxy J7 if available. If OEM unlock doesn’t appear in developer options, skip this step.
  4. Backup your important contacts, call logs, sms messages and important media content.
  5. Charge your phone up to 50% to avoid and power issues during the flashing process.
  6. Turn off windows firewall, also disable or delete Samsung Kies while you’re using Odin3.
  7. Use your phone’s original data cable to establish connection between your phone and your desktop PC.
  8. Follow this guide to the letter to avoid any mishap.

DISCLAIMER: ROOTING PROCESS IS HIGHLY CUSTOM AND INVOLVES CERTAIN RISKS. ROOT YOUR SAMSUNG GALAXY WILL VOID ITS WARRANTY. IF YOUR DEVICE HAS A KNOX COUNTER ON THE BOOTLOADER, ROOTING IT WILL TRIP THE COUNTER AND YOU WON’T BE ABLE TO RESET KNOX AFTER THAT. IN CASE OF ANY MISHAP, TECHBEATS, SAMSUNG OR CHAINFIRE MAY NOT BE HELD RESPONSIBLE. MAKE SURE THAT YOU’RE ROOTING YOUR PHONE AFTER UNDERSTANDING EACH AND EVERYTHING, AND YOU’RE DOING IT AT YOUR OWN RISK.

Required downloads:

  • Download and install Samsung USB drivers
  • Download and extract Odin. [Recommended Odin v3.09]
  • Open the following page: CF-Auto-Root
  • Once you’re on the CF Auto Root page, press Control + F or Command + F. After the search bar appears, type your phone’s model number to locate its Auto Root file. Download CF-Auto-Root file according to your device very carefully and extract it once only to get the .tar.md5 or .tar file.

How To Root Samsung Galaxy J7 on Android Lollipop using CF Auto Root

  1. Open Odin.exe from the folder you extracted.
  2. Click on “PDA” / “AP” tab and select the unzipped CF-Autroot.tar file that you download and extracted in the third step in required downloads. If you’ve already downloaded the CF-Auto-Root file in .tar format, you do not need to extract it.
  3. Do not touch any other option in Odin. The only options ticked should be F.Reset Time and Auto-Reboot. Leave all other options as it is.
  4. Now put your Galaxy J7 in download mode and connect it to your PC. To put it in download mode, turn it off completely. Now turn it on by press and holding Volume Down + Home + Power Key. It will boot up with a warning. Press Volume Up to continue. You should be in download mode now. If this combination doesn’t work, here’s How to Boot Samsung Galaxy Devices into Download & Recovery Mode
  5. Now connect it with your PC and let Odin detect it. As soon as Odin detects your phone, it will show you a blue or yellow indicator in the ID:COM box.Odin-3.09-explained.-2
  6.  As your device has been connected, click the “Start” button now.
  7.  Odin will now flash CF-Auto-Root. Once done, it will reboot your device.
  8. Disconnect your device, let it turn on completely and check SuperSu in app drawer once it boots up.
  9. You can verify root access by installing Root Checker application from Google Play Store.

Device booted up but not rooted? Here’s what to do

If your device isn’t rooted even after flashing CF-Auto-Root, you may try doing this.

  1. Follow the guide step and 2 from the guide above.
  2. Now in the third step, untick Auto-Reboot, the only ticked option should be F.Reset.Time.
  3. Follow the above guide from step 4 – 6.
  4. Once CF-Auto-Root has been flashed, reboot your device manually by either pulling out the battery or using the button combo.
  5. Verify root access as explained above.

How to Unroot your Galaxy J7 now?

You can unroot your device and revert back to the stock condition of your phone by flashing stock firmware. Here’s How To Flash Stock Firmware On Samsung Galaxy With Odin,

Got any issues? Reach us out through the comment box below.

How To Root Samsung Galaxy J5 on Android 5.1.1 Lollipop

0
How To Root Samsung Galaxy J5 on Android 5.1.1 Lollipop

Samsung’s mid-range Galaxy J series has become popular now. Galaxy J series recently saw two new phones, the Galaxy J5 and Galaxy J7. Both these smartphones were well-received by the users and found some place in pockets of many users. The Galaxy J5 has 5.0-inch display with 720P resolution. This device is powered up with Qualcomm Snapdragon 410 CPU alongside Adreno 306 GPU and 1.5 GB RAM. Samsung has given the users an internal storage choice between 8 and 16 GB and the smartphone also supports microSD card slot. Galaxy J5 has a 13 MP shooter on its rear and a 5 MP shooter placed on the top of its display. Galaxy J5 runs on Android 5.1 Lollipop out of the box.

If you’re one luck Galaxy J5 owner, you may be looking for a way to unleash the real power of your device. In order to checkout the real potential that your device has got, you got to gain root access on it. Since the Galaxy J5 ran on Android 5.1 Lollipop, it wasn’t easily possible for developers to root this smartphone until today. All eyes were stuck on the root maestro Chainfire since then. Just today, the root God Chainfire updated his CF-Auto-Root script / tool and it now supports over 300 new devices running Android Lollipop or Marshmallow. The Galaxy J5 is one of those lucky devices to receive root support via CF Auto Root.samsung-galaxy-j5_074cb8fc07c4a2c1_450x400

So, it’s time to root your Galaxy J5 now and checkout its potential. Let’s go ahead and root your Galaxy J5 J5008, J500F, J500FN, J500G, J500H, J500M, J500N0, J500Y running Android 5.1.1 Lollipop using CF Auto Root.

In case you’re not finding yourself confident enough or convinced enough to root your Galaxy J5, you may want to have a look on 10 reasons why you should root your Android. You may also want to go through some benefits of root access, so have a look on the 10 best applications for rooted phones to enhance the functionality of your phone after rooting it.

Here are some early preparations to make sure that nothing goes wrong

  1. This method only works with Galaxy J5 J5008, J500F, J500FN, J500G, J500H, J500M, J500N0, J500Y. Your device must be running Android 5.1.1 Lollipop. Check your device’s model number and Android version in Settings > About device section.
  2. Enable USB debugging on your Galaxy J5. To do so, go to Settings > About device > tap the build number for 7 times. This will enable developer options in settings. Once enabled, open developer options and enable USB debugging.
  3. Enable OEM unlock on your Galaxy J5 if available. If OEM unlock doesn’t appear in developer options, skip this step.
  4. Backup your important contacts, call logs, sms messages and important media content.
  5. Charge your phone up to 50% to avoid and power issues during the flashing process.
  6. Turn off windows firewall, also disable or delete Samsung Kies while you’re using Odin3.
  7. Use your phone’s original data cable to establish connection between your phone and your desktop PC.
  8. Follow this guide to the letter to avoid any mishap.

DISCLAIMER: ROOTING PROCESS IS HIGHLY CUSTOM AND INVOLVES CERTAIN RISKS. ROOT YOUR SAMSUNG GALAXY WILL VOID ITS WARRANTY. IF YOUR DEVICE HAS A KNOX COUNTER ON THE BOOTLOADER, ROOTING IT WILL TRIP THE COUNTER AND YOU WON’T BE ABLE TO RESET KNOX AFTER THAT. IN CASE OF ANY MISHAP, TECHBEATS, SAMSUNG OR CHAINFIRE MAY NOT BE HELD RESPONSIBLE. MAKE SURE THAT YOU’RE ROOTING YOUR PHONE AFTER UNDERSTANDING EACH AND EVERYTHING, AND YOU’RE DOING IT AT YOUR OWN RISK.

Required downloads:

  • Download and install Samsung USB drivers
  • Download and extract Odin. [Recommended Odin v3.09]
  • Open the following page: CF-Auto-Root
  • Once you’re on the CF Auto Root page, press Control + F or Command + F. After the search bar appears, type your phone’s model number to locate its Auto Root file. Download CF-Auto-Root file according to your device very carefully and extract it once only to get the .tar.md5 or .tar file.

How To Root Samsung Galaxy J5 on Android Lollipop using CF Auto Root

  1. Open Odin.exe from the folder you extracted.
  2. Click on “PDA” / “AP” tab and select the unzipped CF-Autroot.tar file that you download and extracted in the third step in required downloads. If you’ve already downloaded the CF-Auto-Root file in .tar format, you do not need to extract it.
  3. Do not touch any other option in Odin. The only options ticked should be F.Reset Time and Auto-Reboot. Leave all other options as it is.
  4. Now put your Galaxy J5 in download mode and connect it to your PC. To put it in download mode, turn it off completely. Now turn it on by press and holding Volume Down + Home + Power Key. It will boot up with a warning. Press Volume Up to continue. You should be in download mode now. If this combination doesn’t work, here’s How to Boot Samsung Galaxy Devices into Download & Recovery Mode
  5. Now connect it with your PC and let Odin detect it. As soon as Odin detects your phone, it will show you a blue or yellow indicator in the ID:COM box.Odin-3.09-explained.-2
  6.  As your device has been connected, click the “Start” button now.
  7.  Odin will now flash CF-Auto-Root. Once done, it will reboot your device.
  8. Disconnect your device, let it turn on completely and check SuperSu in app drawer once it boots up.
  9. You can verify root access by installing Root Checker application from Google Play Store.

Device booted up but not rooted? Here’s what to do

If your device isn’t rooted even after flashing CF-Auto-Root, you may try doing this.

  1. Follow the guide step and 2 from the guide above.
  2. Now in the third step, untick Auto-Reboot, the only ticked option should be F.Reset.Time.
  3. Follow the above guide from step 4 – 6.
  4. Once CF-Auto-Root has been flashed, reboot your device manually by either pulling out the battery or using the button combo.
  5. Verify root access as explained above.

How to Unroot your Galaxy J5 now?

You can unroot your device and revert back to the stock condition of your phone by flashing stock firmware. Here’s How To Flash Stock Firmware On Samsung Galaxy With Odin,

Got any issues? Reach us out through the comment box below.

Root Galaxy A8 A8000 on Android 5.1.1 Lollipop

0
Root Galaxy A8 A8000 on Android 5.1.1 Lollipop

Samsung introduced the Galaxy A8 back in August, 2015. Galaxy A8 happens to be 2nd biggest variant in the Galaxy A series. Samsung equipped the Galaxy A8 with a 5.7-inch 1080P display. Under the hood Samsung planted a Qualcomm Snapdragon 615 Quad Core CPU accompanied by Adreno 405 GPU alongside a RAM of 2 GB and internal storage of 32 GB. Galaxy A8 hosts a 16 MP shooter at the back and a 5 MP shooter on the front. Samsung also equipped the the Galaxy A8 with a whopping 3050 mAh battery. Galaxy A8 runs on Android 5.1.1 Lollipop out of the box.Galaxy-A8-01

It’s been quite a while since the Galaxy A8 is out now. Because the Galaxy A8 ran on Android 5.1.1 Lollipop, the device couldn’t get rooted until today. This happened because of Samsung’s new security patches in the Android Lollipop firmware for Galaxy series. Just today, this restriction was put to dust by XDA recognised developer Chainfire. Chainfire updated his famous CF Auto Root script for over more then 300 devices running Android Lollipop and Marshmallow. Galaxy A8 A8000 is one of those lucky devices to receive the blessing of root access by means of CF Auto Root.

So, just in case you’ve got your hands on the Galaxy A8 and you’re looking for a way to root it, this may be the right time for you to do so. Go ahead and root your Galaxy A8 A8000 running Android 5.1.1 Lollipop using CF Auto Root now.

Here are some early preparations to make sure that nothing goes wrong

  1. This method only works with Galaxy A8 A8000. Your device must be running Android 5.1.1 Lollipop. Check your device’s model number and Android version in Settings > About device section.
  2. Enable USB debugging on your Galaxy A8. To do so, go to Settings > About device > tap the build number for 7 times. This will enable developer options in settings. Once enabled, open developer options and enable USB debugging.
  3. Enable OEM unlock on your Galaxy A8 if available. If OEM unlock doesn’t appear in developer options, skip this step.
  4. Backup your important contacts, call logs, sms messages and important media content.
  5. Charge your phone up to 50% to avoid and power issues during the flashing process.
  6. Turn off windows firewall, also disable or delete Samsung Kies while you’re using Odin3.
  7. Use your phone’s original data cable to establish connection between your phone and your desktop PC.
  8. Follow this guide to the letter to avoid any mishap.

DISCLAIMER: ROOTING PROCESS IS HIGHLY CUSTOM AND INVOLVES CERTAIN RISKS. ROOT YOUR SAMSUNG GALAXY WILL VOID ITS WARRANTY. IF YOUR DEVICE HAS A KNOX COUNTER ON THE BOOTLOADER, ROOTING IT WILL TRIP THE COUNTER AND YOU WON’T BE ABLE TO RESET KNOX AFTER THAT. IN CASE OF ANY MISHAP, TECHBEATS, SAMSUNG OR CHAINFIRE MAY NOT BE HELD RESPONSIBLE. MAKE SURE THAT YOU’RE ROOTING YOUR PHONE AFTER UNDERSTANDING EACH AND EVERYTHING, AND YOU’RE DOING IT AT YOUR OWN RISK.

Required downloads:

  • Download and install Samsung USB drivers
  • Download and extract Odin. [Recommended Odin v3.09]
  • Download the following file for A8000: CF-Auto-Root
  • Extract the downloaded CF-Auto-Root file once only to get the .tar.md5 or .tar file.

How To Root Samsung Galaxy A8 on Android Lollipop using CF Auto Root

  1. Open Odin.exe from the folder you extracted.
  2. Click on “PDA” / “AP” tab and select the unzipped CF-Autroot.tar file that you download and extracted in the third step in required downloads. If you’ve already downloaded the CF-Auto-Root file in .tar format, you do not need to extract it.
  3. Do not touch any other option in Odin. The only options ticked should be F.Reset Time and Auto-Reboot. Leave all other options as it is.
  4. Now put your Galaxy A8 in download mode and connect it to your PC. To put it in download mode, turn it off completely. Now turn it on by press and holding Volume Down + Home + Power Key. It will boot up with a warning. Press Volume Up to continue. You should be in download mode now. If this combination doesn’t work, here’s How to Boot Samsung Galaxy Devices into Download & Recovery Mode
  5. Now connect it with your PC and let Odin detect it. As soon as Odin detects your phone, it will show you a blue or yellow indicator in the ID:COM box.Odin-3.09-explained.-2
  6.  As your device has been connected, click the “Start” button now.
  7.  Odin will now flash CF-Auto-Root. Once done, it will reboot your device.
  8. Disconnect your device, let it turn on completely and check SuperSu in app drawer once it boots up.
  9. You can verify root access by installing Root Checker application from Google Play Store.

Device booted up but not rooted? Here’s what to do

If your device isn’t rooted even after flashing CF-Auto-Root, you may try doing this.

  1. Follow the guide step and 2 from the guide above.
  2. Now in the third step, untick Auto-Reboot, the only ticked option should be F.Reset.Time.
  3. Follow the above guide from step 4 – 6.
  4. Once CF-Auto-Root has been flashed, reboot your device manually by either pulling out the battery or using the button combo.
  5. Verify root access as explained above.

How to Unroot your Galaxy A8 now?

You can unroot your device and revert back to the stock condition of your phone by flashing stock firmware. Here’s How To Flash Stock Firmware On Samsung Galaxy With Odin,

Got any issues? Reach us out through the comment box below.

How To Root Samsung Galaxy A7 on Android Lollipop using CF Auto Root

0
How To Root Samsung Galaxy A7 on Android Lollipop using CF Auto Root

Good day for Galaxy A7 users. If you’re a Galaxy A7 owner running Android 5.0.2 Lollipop and you also happen to be an Android power user, you must have spent the last few months in a lot of pain. Ever since Samsung started updating its devices to Android 5.0 Lollipop, it made it hard for the developers to gain root access on this firmware. Users had to use complex methods to gain root access on their smartphones, and those devices which did not come in limelight, those had to stay without the blessing of root. Galaxy A5 and Galaxy A7 users suffered the most as there were no methods available to root these smartphones running Android Lollipop.1122015103924AM_635_samsung_galaxy_a7

Just today, XDA recognised developer Chainfire came up with an update for his all-time famous rooting tool CF-Auto-Root. CF Autoroot now supports over 300 new devices running Android Lollipop or Android Marshmallow. CF Auto Root for Galaxy A5 and Galaxy A7 is also available. If you own the Galaxy A7 with the model number A700F, A700FD, A700H, A700K, A700L or A700S running Android 5.0.2 Lollipop, you can easily root it. Let’s go ahead now and root our beloved Galaxy A7 running Android 5.0.2 Lollipop.

Here are some early preparations to make sure that nothing goes wrong

  1. This method only works with Galaxy A7 A700F, A700FD, A700H, A700K, A700L or A700S. Your device must be running Android 5.0.2 Lollipop. Check your device’s model number and Android version in Settings > About device section.
  2. Enable USB debugging on your Galaxy A7. To do so, go to Settings > About device > tap the build number for 7 times. This will enable developer options in settings. Once enabled, open developer options and enable USB debugging.
  3. Enable OEM unlock on your Galaxy A7 if available. If OEM unlock doesn’t appear in developer options, skip this step.
  4. Backup your important contacts, call logs, sms messages and important media content.
  5. Charge your phone up to 50% to avoid and power issues during the flashing process.
  6. Turn off windows firewall, also disable or delete Samsung Kies while you’re using Odin3.
  7. Use your phone’s original data cable to establish connection between your phone and your desktop PC.
  8. Follow this guide to the letter to avoid any mishap.

DISCLAIMER: ROOTING PROCESS IS HIGHLY CUSTOM AND INVOLVES CERTAIN RISKS. ROOT YOUR SAMSUNG GALAXY WILL VOID ITS WARRANTY. IF YOUR DEVICE HAS A KNOX COUNTER ON THE BOOTLOADER, ROOTING IT WILL TRIP THE COUNTER AND YOU WON’T BE ABLE TO RESET KNOX AFTER THAT. IN CASE OF ANY MISHAP, TECHBEATS, SAMSUNG OR CHAINFIRE MAY NOT BE HELD RESPONSIBLE. MAKE SURE THAT YOU’RE ROOTING YOUR PHONE AFTER UNDERSTANDING EACH AND EVERYTHING, AND YOU’RE DOING IT AT YOUR OWN RISK.

Required downloads:

  • Download and install Samsung USB drivers
  • Download and extract Odin. [Recommended Odin v3.09]
  • Open the following page: CF-Auto-Root
  • Once you’re on the CF Auto Root page, press Control + F or Command + F. After the search bar appears, type your phone’s model number to locate its Auto Root file. Download CF-Auto-Root file according to your device very carefully and extract it once only to get the .tar.md5 or .tar file.

How To Root Samsung Galaxy A7 on Android Lollipop using CF Auto Root

  1. Open Odin.exe from the folder you extracted.
  2. Click on “PDA” / “AP” tab and select the unzipped CF-Autroot.tar file that you download and extracted in the third step in required downloads. If you’ve already downloaded the CF-Auto-Root file in .tar format, you do not need to extract it.
  3. Do not touch any other option in Odin. The only options ticked should be F.Reset Time and Auto-Reboot. Leave all other options as it is.
  4. Now put your Galaxy A7 in download mode and connect it to your PC. To put it in download mode, turn it off completely. Now turn it on by press and holding Volume Down + Home + Power Key. It will boot up with a warning. Press Volume Up to continue. You should be in download mode now. If this combination doesn’t work, here’s How to Boot Samsung Galaxy Devices into Download & Recovery Mode
  5. Now connect it with your PC and let Odin detect it. As soon as Odin detects your phone, it will show you a blue or yellow indicator in the ID:COM box.Odin-3.09-explained.-2
  6.  As your device has been connected, click the “Start” button now.
  7.  Odin will now flash CF-Auto-Root. Once done, it will reboot your device.
  8. Disconnect your device, let it turn on completely and check SuperSu in app drawer once it boots up.
  9. You can verify root access by installing Root Checker application from Google Play Store.

Device booted up but not rooted? Here’s what to do

If your device isn’t rooted even after flashing CF-Auto-Root, you may try doing this.

  1. Follow the guide step and 2 from the guide above.
  2. Now in the third step, untick Auto-Reboot, the only ticked option should be F.Reset.Time.
  3. Follow the above guide from step 4 – 6.
  4. Once CF-Auto-Root has been flashed, reboot your device manually by either pulling out the battery or using the button combo.
  5. Verify root access as explained above.

How to Unroot your Galaxy A7 now?

You can unroot your device and revert back to the stock condition of your phone by flashing stock firmware. Here’s How To Flash Stock Firmware On Samsung Galaxy With Odin.

Got any issues? Reach us out through the comment box below.

How To Root Samsung Galaxy A5 on Android Lollipop using CF Auto Root

0
How To Root Samsung Galaxy A5 on Android Lollipop using CF Auto Root

Samsung updated the Galaxy A5 to Android 5.0.2 Lollipop quite a while ago. With the release of Android Lollipop for Samsung devices, Samsung introduced some new security patches which made it harder to root the device. For a long time, there was no method to root the devices like Galaxy A5, Galaxy A7 running Android Lollipop. This new change by Samsung caused a lot of hardships for Android power users. Android enthusiasts having their Galaxy A5 updated to Android 5.0.2 Lollipop had to live without root access for the past few months. It looks like the users do not have to live without root access anymore.Samsung-Galaxy-A5_7

Just today, XDA senior recognised developer and root God Chainfire updated his all-time famous CF-Auto-Root for over 300 devices running Android 5.0.2, Android 5.1.1 or Android 6.0.1 Marshmallow. The new update is also available for Galaxy A5 A500F, A500FU, A500G, A500H, A500K, A500S, A500Y, A500YZ and A500L. That means now you can easily root your Galaxy A5 running Android 5.0.2 Lollipop in just a few clicks. Let’s go ahead now and root our beloved Galaxy A5 A500 via Cf Auto Root.

In case you’re not finding yourself confident enough or convinced enough to root your Galaxy A5, you may want to have a look on 10 reasons why you should root your Android. You may also want to go through some benefits of root access, so have a look on the 10 best applications for rooted phones to enhance the functionality of your phone after rooting it.

Here are some early preparations to make sure that nothing goes wrong

  1. This method only works with Galaxy A5 A500F, A500FU, A500G, A500H, A500K, A500S, A500Y, A500YZ and A500L. Your device must be running Android 5.0.2 Lollipop. Check your device’s model number and Android version in Settings > About device section.
  2. Enable USB debugging on your Galaxy A5. To do so, go to Settings > About device > tap the build number for 7 times. This will enable developer options in settings. Once enabled, open developer options and enable USB debugging.
  3. Enable OEM unlock on your Galaxy A5 if available. If OEM unlock doesn’t appear in developer options, skip this step.
  4. Backup your important contacts, call logs, sms messages and important media content.
  5. Charge your phone up to 50% to avoid and power issues during the flashing process.
  6. Turn off windows firewall, also disable or delete Samsung Kies while you’re using Odin3.
  7. Use your phone’s original data cable to establish connection between your phone and your desktop PC.
  8. Follow this guide to the letter to avoid any mishap.

DISCLAIMER: ROOTING PROCESS IS HIGHLY CUSTOM AND INVOLVES CERTAIN RISKS. ROOT YOUR SAMSUNG GALAXY WILL VOID ITS WARRANTY. IF YOUR DEVICE HAS A KNOX COUNTER ON THE BOOTLOADER, ROOTING IT WILL TRIP THE COUNTER AND YOU WON’T BE ABLE TO RESET KNOX AFTER THAT. IN CASE OF ANY MISHAP, TECHBEATS, SAMSUNG OR CHAINFIRE MAY NOT BE HELD RESPONSIBLE. MAKE SURE THAT YOU’RE ROOTING YOUR PHONE AFTER UNDERSTANDING EACH AND EVERYTHING, AND YOU’RE DOING IT AT YOUR OWN RISK.

Required downloads:

  • Download and install Samsung USB drivers
  • Download and extract Odin. [Recommended Odin v3.09]
  • Open the following page: CF-Auto-Root
  • Once you’re on the CF Auto Root page, press Control + F or Command + F. After the search bar appears, type your phone’s model number to locate its Auto Root file. Download CF-Auto-Root file according to your device very carefully and extract it once only to get the .tar.md5 or .tar file.

How To Root Samsung Galaxy A5 on Android Lollipop using CF Auto Root

  1. Open Odin.exe from the folder you extracted.
  2. Click on “PDA” / “AP” tab and select the unzipped CF-Autroot.tar file that you download and extracted in the third step in required downloads. If you’ve already downloaded the CF-Auto-Root file in .tar format, you do not need to extract it.
  3. Do not touch any other option in Odin. The only options ticked should be F.Reset Time and Auto-Reboot. Leave all other options as it is.
  4. Now put your Galaxy A5 in download mode and connect it to your PC. To put it in download mode, turn it off completely. Now turn it on by press and holding Volume Down + Home + Power Key. It will boot up with a warning. Press Volume Up to continue. You should be in download mode now. If this combination doesn’t work, here’s How to Boot Samsung Galaxy Devices into Download & Recovery Mode
  5. Now connect it with your PC and let Odin detect it. As soon as Odin detects your phone, it will show you a blue or yellow indicator in the ID:COM box.Odin-3.09-explained.-2
  6.  As your device has been connected, click the “Start” button now.
  7.  Odin will now flash CF-Auto-Root. Once done, it will reboot your device.
  8. Disconnect your device, let it turn on completely and check SuperSu in app drawer once it boots up.
  9. You can verify root access by installing Root Checker application from Google Play Store.

Device booted up but not rooted? Here’s what to do

If your device isn’t rooted even after flashing CF-Auto-Root, you may try doing this.

  1. Follow the guide step and 2 from the guide above.
  2. Now in the third step, untick Auto-Reboot, the only ticked option should be F.Reset.Time.
  3. Follow the above guide from step 4 – 6.
  4. Once CF-Auto-Root has been flashed, reboot your device manually by either pulling out the battery or using the button combo.
  5. Verify root access as explained above.

How to Unroot your Galaxy A5 now?

You can unroot your device and revert back to the stock condition of your phone by flashing stock firmware. Here’s How To Flash Stock Firmware On Samsung Galaxy With Odin,

Got any issues? Reach us out through the comment box below.

Download Viber Wink APK

0
Download Viber Wink APK

Viber Wink is a new Viber companion application from the developers of Viber. Viber Wink adds some new amazing functionality to Viber. You can now share the photos and video clips with your friends, that are on your Viber contact list. As soon as your friends have viewed your shared the video or photo, the media will disappear from the recipient’s screen. That’s it. Some of you may wonder about the similarity of Viber Wink with Snapchat. Well, Viber Wink does nothing new. The concept of Viber Wink is as same as that of Snapchat, but Viber Wink sure is going to be a great rival of Snapchat. Viber Wink basically works with your Viber messenger. Once you’ve installed Viber Wink, you can snap pictures or videos and then share them immediately with anyone on your Viber contact list. So, in order to use Viber Wink, you must have Viber installed on your Android smartphone or if you’re using an emulator, you must have installed Viber on it.Viber Wink for PC Image

Viber Wink is pretty new. This application may not be visible to many users in the Google Play Store all across the world. Some of you may not be able to access Play Store, so for users who are having a little difficulty getting their hands on Viber Wink, we’ve pulled the APK file of Viber Wink from the Google Play Store. You can download the Viber Wink APK from the link attached below. Instructions to install Viber Wink APK are also explained below. Go ahead now and get your hands on Viber Wink.

Viber Wink APK and How to Install

  1. Make sure that you have Viber installed on your Android device before you install Viber Wink.
  2. Download Viber Wink APK
  3. Download the file to your phone straight away, or copy it to your phone from your PC.
  4. Now on your phone, go to settings > security > allow unknown sources > check this.
  5. Now using a file manager, locate the APK file that your just copied or downloaded.
  6. Tap the APK file and finish installation using the on-screen instructions.
  7. Once installed, access the newly installed app through app drawer.
  8. That’s all. Enjoy Viber Wink!

How Black Wallpaper Can Save Your Android Battery [ Tips ]

0
How Black Wallpaper Can Save Your Android Battery [ Tips ]

It is obvious that your Android wallpaper can contribute a lot to the battery usage. You must have noticed that the battery starts to drain out really fast if you put up a live wallpaper and to avoid that you might have just reset it to an ordinary still wallpaper. What you probably do not know is that your Wallpaper may also help you with your Android battery life and can prove to be quite significant. The fact is that putting up dark colored wallpaper, especially black, can help you save your Android battery. In the following steps i’ll explain How Black Wallpaper can Save Your Android Battery.

How Back Wallpaper Save Your Android Battery

Here is an explanation to this phenomenon according to different aspects of technology.

The smartphone displays come in two different types; LCD and AMOLED.

  • LCD or Liquid Crystal Display is known to be quite power hungry. It comprises of crystals that are lit getting light from a source placed behind them. That is the reason why LCD’s demand more power whenever you are using the display. Moreover, as the crystals are unable to emit their own light, the LCD screens do not display pure black even though it might look like. LCD is the same display that is being used in your home televisions and computers. Now let’s move on to second kind displays being used.
  • AMOLED or Active-Matrix Organic Light-Emitting Diode and OLED displays are electroluminescent which means that they are made up of materials that are able to emit light of their own. So, whenever current passes through the material, light is produced. There is no need for an individual light source at the back and hence, they are capable of reflecting pure black color. Also, these kind displays consume lesser power in general and go easy on the battery. To sum it up, AMOLED displays are more likely to save battery life if
  • To sum it up, AMOLED displays are more likely to save battery life if black wallpaper is used. Whereas, in case of LCD, black wallpaper can not contribute much in saving battery life as there is an existing back light source that is bound to lit whenever you use the display. The only that can be helpful in terms of battery life is to turn on the power saving mode, keep the brightness to low and keep the screen timeout min so that the screen does not keep lit unnecessarily when not in use.
  • If you are using AMOLED display, here are some other helpful tips to maximize battery life. You can set the app themes in darker colors. Setting the wallpaper alone to black will not do much. Your goal will be to minimize battery consumption for as long as you are using your phone and wandering about into the apps. That is why it is suggested to keep the app themes to dark as well along with the wallpaper.

Besides setting app themes and wallpapers to black, you can also keep the background of your text messengers and emails to black. If you want to keep a record of the battery consumption by display, go to Settings>Device Settings> Battery. You will be able to see the difference in battery consumption after you have applied the black wallpaper trick on your mobile device.

Download Happy New Year 2016 Full HD Wallpapers for Free

0
Download Happy New Year 2016 Full HD Wallpapers for Free

Just a few days to bringing in a Happy New Year 2016 and everyone is getting fired up for this ecstatic and joyous Happy New Year 2016. This New Year 2016 will be considered as an end to this year and a fresh and new beginning. People are gathering up their celebration spirits at this time to welcome Happy New Year 2016 with open arms, outdoor celebrations, fireworks all around the world, light shows and exchange kisses as the clock will strike 12.

Happy New Year 2016

If you have started to plan how to welcome the New Year 2016, you can begin with setting up nice Happy New Year 2016 Wallpaper. Afterall, when everything reflects colors, why should your desktop be blank? Finding perfect Happy New Year 2016 Wallpaper can be a challenge but, to make things simpler for you, here are some amazing and most suitable Happy New Year 2016 Wallpapers with vibrant colors that reflect Happy New Year 2016 messages and most importantly your feelings. No matter what age group you belong to, you can find the best wallpaper to add to the decoration in your surroundings and will help you set an aura of joy and celebration.

Happy New Year 2016

Happy New Year 2016 will be seen by most people as a way to start their lives in a better way and hence will come up with their New Year 2016 Resolutions. If you have not been so satisfied with this year, see it as coming to an end and consider the coming one as an opportunity to gather more cherish able memories. New Year 2016 will come only once so, do not miss this chance to make it memorable for you. With the party dresses, party shoes and hats on, you should also show your New Year 2016 celebrations right at display through these Happy New Year 2016 Wallpapers. Afterall, when it comes to celebrating, sky is the limit.

Happy New Year 2016

Happy New Year 2016
Happy New Year 2016 replace 2015 concept on the sea beach

Happy New Year 2016 Happy New Year 2016 Happy New Year 2016 Happy New Year 2016 Happy New Year 2016 Happy New Year 2016 Happy New Year 2016 Happy New Year 2016 Happy New Year 2016 Happy New Year 2016 Happy New Year 2016 Happy New Year 2016 Happy New Year 2016 Happy New Year 2016