Home Blog Page 316

How To Change User Agent in Google Chrome

How To Change User Agent in Google Chrome

Today I’ll tell you how you can change User Agent in Google Chrome, Now most of you wondering what is the user agent. Before moving on to the method, First let me tell you what is User Agent in Chrome.

What is a “User Agent”?

A User Agent is a short string that web browsers and other applications send to identify themselves to web servers. Unfortunately, most browsers falsify part of their User-Agent header in an attempt to be compatible with more web servers.

Now that you know what is user agent string, let’s start the method on how to change User Agent String in Google Chrome.

Following are some examples of User Agent String:

Android:

Mozilla/5.0 (Linux; U; Android 2.2; en-us; Nexus One Build/FRF91) AppleWebKit/533.1 (KHTML, like Gecko) Version/4.0 Mobile Safari/533.1

Chrome:

Mozilla/5.0 (Windows NT 6.3; WOW64) AppleWebKit/537.36 (KHTML, like Gecko) Chrome/33.0.1750.117 Safari/537.36

How To Change User Agent in Google Chrome:

Option 1 – Install User-Agent Switcher

  • Open this link ( User-Agent Switcher at the Chrome Web Store ) and click on “Add to Chrome” button.
  • Now open a new tab in chrome and right click on the blank area, then choose “User-Agent Switcher“.
  • Choose the desired user agent.

Option 2 – From Developer Tools

Now before we move on, let me tell you that this method is a bit complex, but i find this one more effective.

  1. First, Select the “Menu”>Tools” > “Developer tools“ or [ Ctrl + Shift + I ] . Mac users can use Command + Option + I.
  2. Now select the  “Show console” icon.
  3. In next windows select the “Emulation“tab.
  4. Maybe by default “Emulation is currently disabled, you can enable it by clicking on phone icon next to the word “Toggle“.
  5. Now you’ll be in the developer console, Select  “Network” on the left panel.
  6. In there you can easily set the “Spoof user agent” box to the User Agent you wish to use.

This is all, now you know how you can change the user agent string in Google chrome and other browsers.

Online and Offline Diep.io for PC

0
Online and Offline Diep.io for PC

Slither.io’s success dropped a new trend in the arcade gaming world of Android. Following the footsteps of Slither.io, a new game landed in the Google Play Store and is named as Diep.io. Where you played with Snakes in Slither.io, you have to play with tanks in this game instead. Control your tank and destroy every single thing that comes around. There are blocks floating around and there are tanks of other players moving around. Everyone is trying to destroy as many blocks as possible and also all the tanks around, so make sure that you have a good control on your tank and you end up saving it having destroyed a huge number of objects. Keep a track of your health bar before it ends up and your game comes to an end. Diep.io is a multiplayer game which means all the players are in the multiplayer mode to fight against each other. It’s an absolutely free to play game and you can get it from the Play Store to start having endless fun.

Those of you willing to play Diep.io for PC can get it on their computers now. Diep.io for PC can be downloaded and played on a Windows XP/7/8/8.1/10 desktop PC/Laptop and MacOS or Mac OS X. You only need an Android emulator like BlueStacks, Andy OS or Remix OS to play Diep.io for PC. You can play both Online and Offline Diep.io for PC. It’s completely up to you whether you want to play it online on their website or you want to play it offline in your computer. Let’s have  a look on the method to start playing Diep.io on computers now.

How to play Online Diep.io for PC

  1. Make sure that you’re connected to the internet.
  2. Open any browser on your computer.
  3. Now open the Diep.io website.
  4. Enter your name and start playing this game now.
  5. Simply moving your fingers on your trackpad or simple moving your mouse will move your Snake.
  6. That’s all.

Download and install Offline Diep.io for PC (Windows and Mac)

Diep.io for PC can be played on Windows XP, Windows 7, Windows 8, Windows 8.1, Windows 10 and Mac OS X powered Macbook Pro, Macbook Air and iMac.

  1. Download Diep.io APK
  2. Download and install Bluestacks: Bluestacks Offline Installer | Rooted Bluestacks | Bluestacks App Player | Rooted BlueStacks 2
  3. Once you’ve installed Bluestacks, double click the downloaded Diep.io APK.
  4. The APK will be installed using Bluestacks, once installed open Bluestacks and locate the recently installed Slither.io.
  5. Click the Diep.io icon to open it, follow the on-screen instructions to play it.

You can also use Andy OS or Remix OS to install Apps for PC such as Slither.io, here’s the tutorial:  How To Run Android Apps On Mac OS X With Andy | How to launch Remix OS for PC and install Apps for PC via Remix OS.

The Andy OS and Remix OS tutorial explains how to play a game on your Mac OS X, but the same guide will also work for a Windows PC.

That’s all. In case you’re stuck with anything, reach us out through the comment box below.

How To Enable/Disable Pop-up Blocker in Safari

How To Enable/Disable Pop-up Blocker in Safari

In this post, I’ll tell you how to enable and disable Pop-up Blocker in Safari on Windows, Mac OS, and iOS devices. It’s a simple guide just follow the steps mentioned below.

Enable/Disable Pop-up Blocker in Safari

How To Enable/Disable Pop-up Blocker in Safari:

Windows and OS X Version

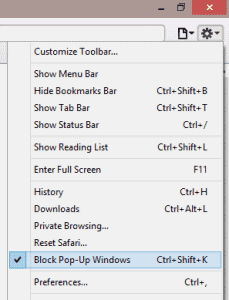
  1. Open Safari on your Windows PC, -> Setting icon.
  2. A drop down menu will appear, Select “Block Pop-Up Windows“.
  3. Now if the option is checked that means Block Pop-up option is enabled and if not that means it’s disabled. 

Enable/Disable Pop-up Blocker in Safari

Option 2:

  • You can use this command to enable/disable Block Pop-up Windows. ( Press “Ctrl” + “Shift” + “K” in Windows ).
  • Mac users can use this command ( “Command” + “Shift” + “K” ).

Option 3:

This method is for both Windows and Mac.

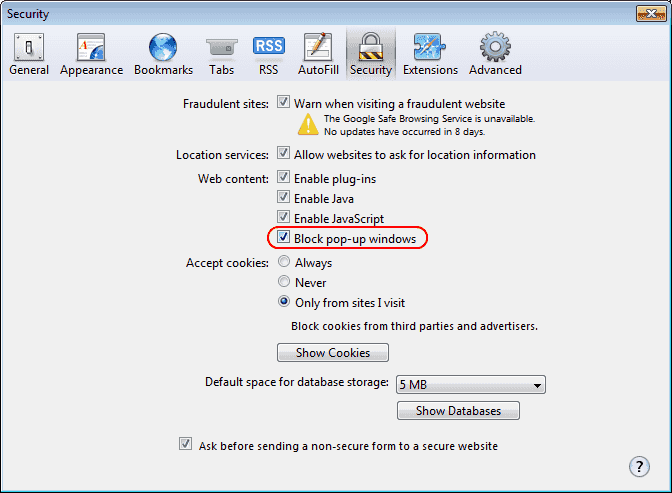
  1. Windows users select the gear icon to access Settings->Preferences“. Mac users “Safari” > “Preferences“.
  2. In Preferences tab click on “Security”.
  3. Click on “Block pop-up windows” to enable this feature. Uncheck it to disable it.

iOS Version

  • Open Settings on your iOS device.
  • Scroll down and tap on Safari.
  • In General section you’ll see Block Pop-ups” silde it to turn on and if it’s already turned on then Slide it disable it.

This all, See it’s very easy to Enable/Disable Pop-up Blocker in Safari on Windows PC, Laptop, Mac and iOS devices.

How To Import Outlook Contacts Into Windows Live Mail

How To Import Outlook Contacts Into Windows Live Mail

If you are looking a way to import Outlook contacts into Windows Live Mail, then you have come to the right place. In this post, I’ll tell you how you can import all of your Outlook Contacts Into Windows Live Mail. Outlook is used by the millions of people in a working environment but now people are moving to cloud services. Let’s start the method how to import Outlook contacts into Live Mail.

Also See: How to easily transfer your Gmail Contacts to Outlook.com

Import Outlook Contacts Into Windows Live Mail

See more: How To Import Contacts To a Windows 8.1 Device

How To Import Outlook Contacts Into Windows Live Mail:

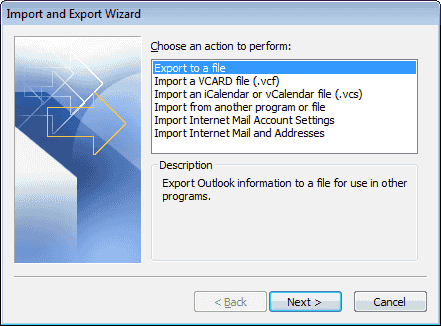
  • Open Outlook on your PC, select “File” > “Open & Export” > “Import/Export“.
  • Now you’ll be in import and export wizard, Click on the Next.

Import Outlook Contacts Into Windows Live Mail

  • Click on the “Comma Separated Values (DOS)“, then select “Next“.

How To Import Outlook Contacts Into Windows Live Mail

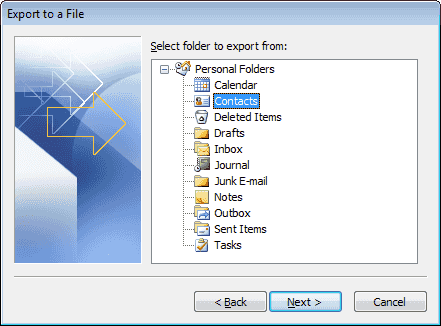
  • Now in the next windows, you have selected the folder from which you want to export the contacts. Click on “Contacts” in the list, then select “Next“.

How To Import Outlook Contacts Into Windows Live Mail

  • Here in this step, you have to give the location where you want to save the file, Click the “Browse”, Select the folder and click Next.
  • Select “Finish“.

Windows Live Mail Import Steps

  • Open Internet Explorer and Login into your Windows Live Mail.
  • Once logged in, Click on Apps located at the top left corner->“People“.
  • Select “Manage” > “Add People“.
  • Click on “Start import“.
  • Select Choose “Other“.
  • Now click “Choose File” and select the file you exported in the first method.
  • All you have to do now is Click on “Upload“.

Transfer Songs From CD to iPod, iPhone, or iPad [ How To ]

0
Transfer Songs From CD to iPod, iPhone, or iPad [ How To ]

Now if you bought a new CD and want to transfer all the tracks over to your Apple iPod, iPhone, or iPad you’ll have to import it into iTunes first. Most of you may know how to do it, but not all of you know that. In this post, I’ll tell you how to Transfer Songs From CD to iPod, iPhone, or iPad. Since it’s an Apple device so you cannot do it the easy way, it’s a bad thing that we have to use iTunes for everything, when it comes to transferring Songs, add videos, make backups, add new photos etc. No need to worry that’s why we are here, to help you with everything we can.

iTunes: Fix iPhone or iPod Not Detected in Windows 10-8

how to download cd to ipod

How To Transfer Songs From CD to iPod, iPhone, or iPad:

  • Open iTnues on your PC and insert the CD you wish to import.
  • You’ll get a prompt saying ” Would you like to import the CD into your iTunes library. If you want to import all the songs click on ” Yes “. But if you want to import specific songs, follow the steps.
  • Now in iTunes windows click on CD icon located at the top left corner.
  • You’ll see the list of all Songs in the CD, select the songs you want to import, then select “Import CD“.
  • In the next Windows you’ll be in import settings, change the settings you want. Then select “OK”.
  • Now if any of the Song is already in your iTunes library you’ll get a message to replace them, it’s totally on you what you want either choose “Replace Existing” or “Don’t Replace” as desired.
  • You have to wait now until all the music you have selected is ripped to your iTunes library.
  • Once the ripping process is done and all the songs are in your library, attach your device to the system.
  • Drag all the songs or album and drop it on left side of iTunes where a new tab will appear containing the music on your device.

All Done.

Soft & Hard Reset Kindle Fire [ How To ]

0
Soft & Hard Reset Kindle Fire [ How To ]

Today I’ll tell you, how to Soft & Hard Reset Kindle Fire. This is must thing to do while you are using any smartphone or tablet, a soft reset helps you fix bugs that are causing lags issues and more. A soft reset will only restart your device without doing anything to your data. On the other hand, if you hard reset your Kindle Fire then you’ll lose all your data and your device will be back in factory state.

reset-kindle-fire

How To Soft & Hard Reset Kindle Fire:

Soft Reset

5th Generation Models (HD8 & HD10)

  • Press and hold the “Volume Down” and “Power” buttons together for 10 seconds and when your device turns off, let go. Now wait for 4-5 minutes and after that turn on your device.

1st – 4th Generation Models (HD & HDX)

  • Press and hold the and “Power” button for 10 to 20 seconds, as you do with all of your devices to turn off.

Hard Reset

Now before moving on let me tell you one thing, a hard reset will take your device back to its factory settings, all of your data will be lost. Make sure your device is charged least a 30%.

3rd – 5th Generation Models:

  • Open Settings on your device.
  • Select Device Options.
  • Tap on Reset to Factory Defaults.
  • Now tap on Reset.

1st & 2nd Generation Models:

  • Tap on settings gear.
  • Tap on  More.
  • Select Device from the list.
  •  Tap on Reset to Factory Defaults.
  • Select Erase everything.

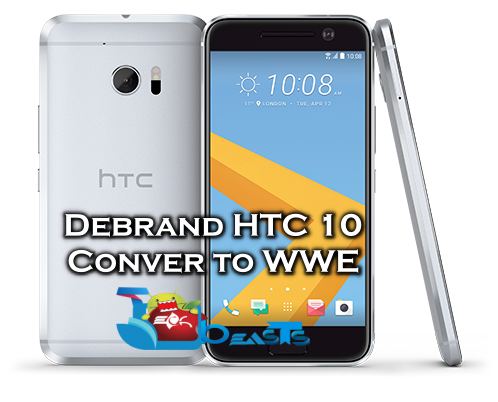
How to Debrand HTC 10 and Convert it to WWE

0
How to Debrand HTC 10 and Convert it to WWE

European variant of the HTC 10 is loaded up with lots of bloatware apps by the supported carriers. In case you want to get rid of the bloatware and use your European HTC 10 just like an international HTC 10, you will have to debrand it. Debranding your HTC 10 means removing all the traces of the carrier and converting it to a WWE (World Wide English) HTC 10. Once you have converted your HTC 10 to WWE, it will be no longer bound to any carrier and you will be free to remove all those annoying apps which have taken a major chunk of your phone’s internal storage.

A method to debrand the HTC 10 has already been discovered. The method was put up by XDA senior member 5m4r7ph0n36uru on the forum. We’ve got our hands on the method and explained it as much as possible to make it easy for all the European HTC 10 owners. In case you’re here to debrand your HTC 10 then let’s get to the work now and convert it to a WWE HTC 10.

Caution: The methods involved in flashing custom recoveries, rooting and unlocking the bootloader of your device are highly custom and are not recommended by the manufacturers. Just in case something goes wrong, TechBeasts or the device manufacturers may not be held responsible. Make sure that you’re doing everything at your own risk.

How to Debrand HTC 10 and Convert it to WWE

  1. Install and setup Minimal Android ADB and Fastboot drivers on your computer.
  2. Enable OEM unlocking and USB debugging mode on your HTC 10.
  3. You must unlock the bootloader of your HTC 10. Also, flash a TWRP recovery and create a Nandroid backup as stated in the guide linked next, root your HTC 10 and achieve S-Off. Here’s a complete guide on how to do it.
  4. Now making sure that you’ve created a Nandroid backup and also achieved S-Off, proceed to the next step.
  5. Download the attached Nandroid.zip file and copy it to the following folder in your HTC 10 external SD card: TWRP/Backup/SerialNo/BackupName (current version: 1.30.401.1).
  6. Also download the attached firmware.zip file and copy it to the Minimal ADB and Fastboot folder in your installation drive.
  7. Now boot your phone into TWRP recovery. To do so, turn off your phone completely. Now turn it on by press and holding Volume Up + Volume Down + Power Key. Once the phone boots up in bootloader, select recovery and it should take you into TWRP.
  8. In TWRP, tap Restore > Choose the Nandroid backup that you just downloaded and copied above.
  9. Once the restore has finished, go back to the main menu in TWRP and tap Wipe > Format Data.
  10. Now we have to convert the firmware to WWE to do so, follow the next few steps.
  11. Open the Minimal ADB and Fastboot.exe from your desktop shortcuts or by going into C: > Program Files > Minimal ADB and Fastboot.
  12. Connect your HTC 10 to your computer now using the OEM data cable.
  13. In the command window, issue the following commands one by one.
  14. adb reboot downloadIt will reboot the phone in download mode. Now issue the next command.
    1. fastboot getvar allThis command will show you the information about your device. You have to note down the original CID and MID of your device.
  15. Now we have to change the CID and MID of the device, to do so enter the following commands one by one
  16. fastboot oem writecid HTC_001
    1. fastboot oem writemid 2PS620000
    2. fastboot flash zip firmwarefile.zip
  17. Now in case you want to flash TWRP recovery and root your device, you can simply go back to the guide linked above and follow it to the recovery flashing and rooting point only.

Thats’ all. Your HTC 10 is a WWE HTC 10 now.

Install Android 6.0.1 Marshmallow LeeDrOiD Custom ROM on HTC 10

0
Install Android 6.0.1 Marshmallow LeeDrOiD Custom ROM on HTC 10

HTC 10’s Sense 8 UI’s stock features and UI might not be able to fulfil the thirst of an Android power user owning this device. The open source Android firmware’s notable beauty is that, users can always go out of the boundaries and pull in new features to get the most out of their devices. You can now do the same by means of the LeeDrOid Custom ROM and boost the performance of your HTC 10 running Android 6.0.1 Marshmallow having Sense 8 UI on the top.
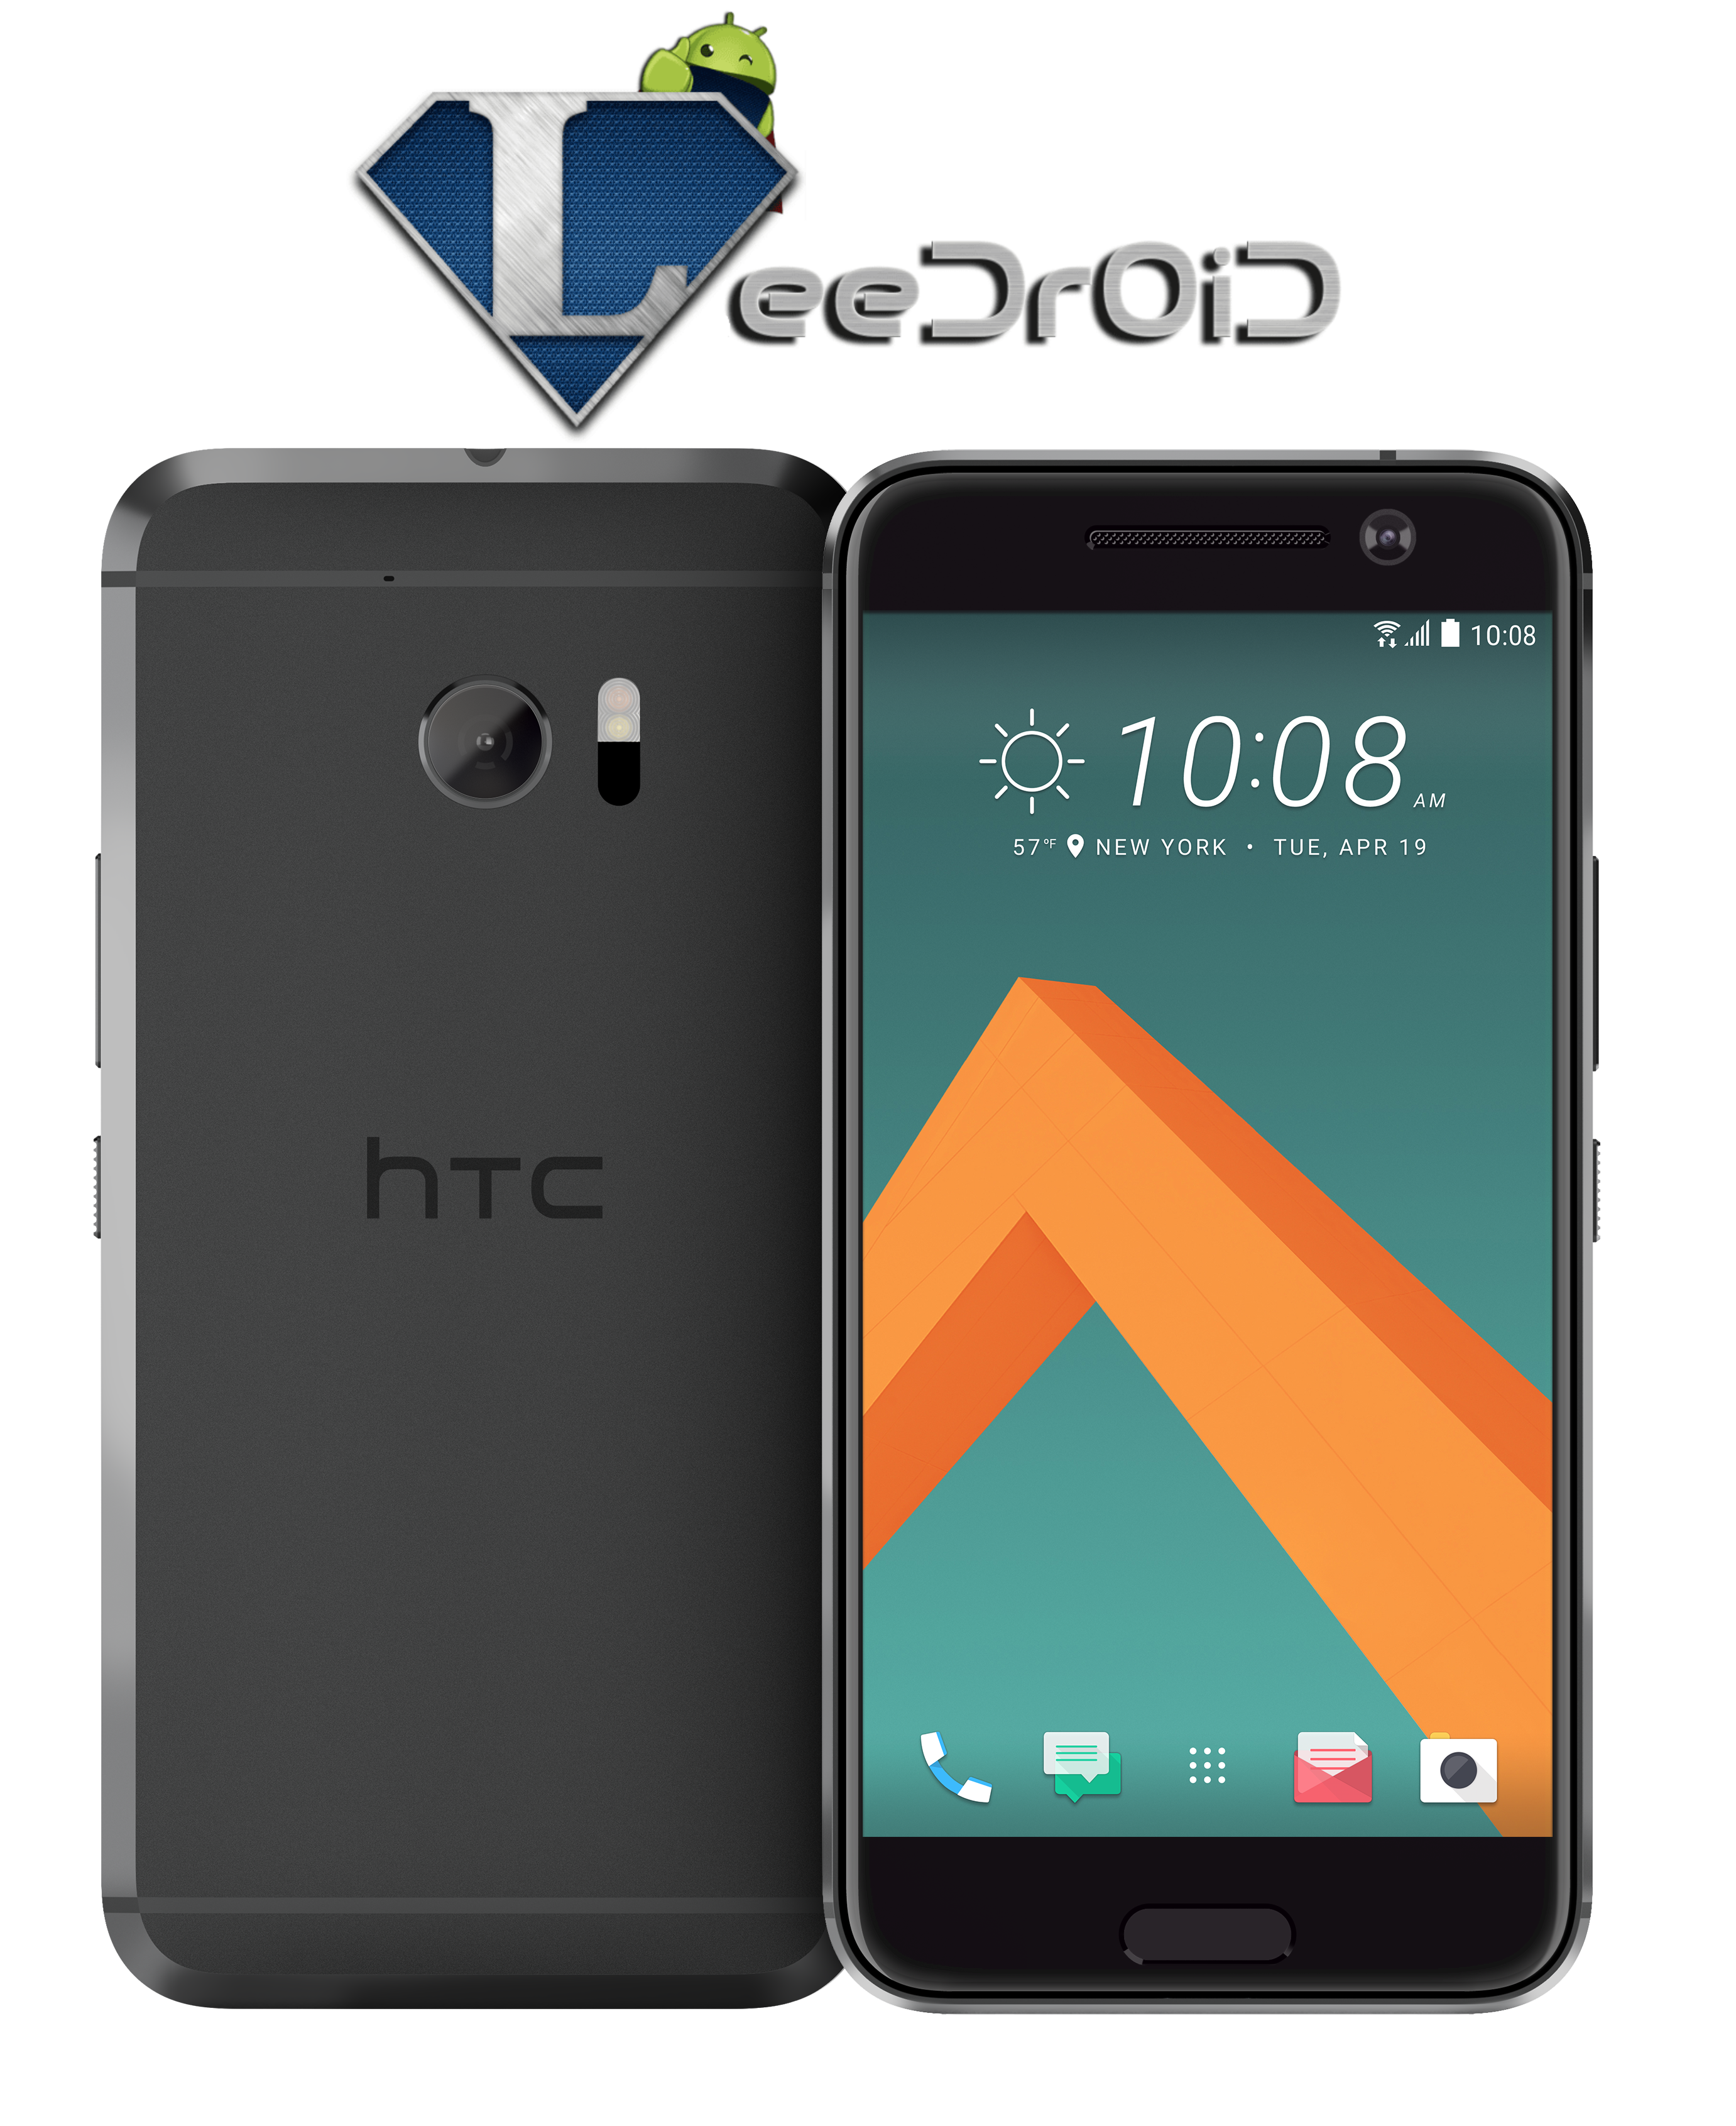
LeeDrOid Custom ROM is among the most popular custom ROM for HTC smartphones. LeeDrOid Custom ROM is available for a number of HTC smartphones and recently this ROM made its way to the all new HTC 10 as well. You can now flash the latest Android 6.0.1 Marshmallow LeeDrOiD custom ROM on your HTC 10 and get a hang of a tons of new features with the help of this ROM. LeeDrOid is basically a stock modified ROM carrying a number of handy tweaks and features. Current base of LeeDrOid is HTC Europe 1.80.401.10, it has the international base with T-Mobile US, Sprint, Verizon and also supports US Unlocked variants. In short, the LeeDrOid Custom ROM for the HTC 10 is compatible with all of its variants. To get a detailed idea of this ROM, have a look on the long list of features attached ahead.

[showhide type="link" more_text="LeeDroid Features" less_text="Hide....."]

  • The ROM
    • Current Base: HTC Europe 1.80.401.10
    • Android 6.0.1
    • HTC Sense 8
    • Rooted with the latest SuperSU 2.74 thanks to @Chainfire
    • International base with T-Mobile US, Sprint, Verizon Support & US Unlocked Support!
    • Optional Encryption!
    • De-odexed
    • Zip-aligned for improved performance
    • Partitions trimmed for improved performance
    • init.d & su.d support
    • Persistent ADB
    • Disable error reporting & hrdump
    • Stripped HTC logging & feedback
    • BusyBox, SQlite3, Bash & Nano shell
    • Package Signature Checking Disabled
    • Performance, battery life & memory improvements
    • Ambient display / Doze Support
    • Advanced Power Menu – Reboot, Recovery, Bootloader & Safe Mode
    • Improved battery statistics > settings power
    • SystemUI Tuner – long press settings icon in pull down to enable
    • Android Logo font pack
    • LeeDrOiD wallpapers
    • System clean-up’s
    • Additional HTC Widgets
  • HTC Gallery & Photo Editor
    • HTC Music
    • Custom LeeDrOiD Locales & Language support.
    • An awesome community & outstanding user support!
    • And so much more!
    • Aroma
    • Exchange mail admin hack
    • Customise your Applications & Widgets
    • Centre status-bar clock
    • Default Tweaks toggles
  • LeeDrOiD Tweaks
    UI Tweaks

    • Sense Launcher Landscape Support
    • Infinite Apps in Folders
    • Allow All Rotations
    • Enable APM (Advanced Power Menu)
    • China Sense Recent App Style (Includes a RAM usage monitor & kill-all button)
    • China Sense (Launcher without an app-drawer, alternative Telephone & Messages UI)
  • StatusBar
    • Right Corner Quick – Quick settings pull down
    • Traffic Indicator (Up-stream & down-stream data speed)
    • Traffic Indicator Colour
    • MIUI Battery MOD
    • Disable NFC Notification
    • Disable USB Debugging Notification
    • Disable Power Saving Notification
    • Disable Android Sync Notification
    • Disable MTP Notification
    • Hide BoomSound Notification
    • Disable Heads Up Notification
    • Blink LED on notification while charging
    • Hide StatusBar Clock
    • AM/PM Clock styles
    • QS pull down battery % display
    • Hide Battery Icon
  • Buttons
    • Enable Navigation Bar & Disable capacitive keys
    • Navigation Bar Size
    • Re-map recent apps key
    • Long press volume media controls / ambient pulse
    • Long press back button to kill foreground app
    • Double Tap Status Bar to put the device into sleep
    • Control keyboard cursor with volume keys
    • Enable flash-light on long press power button
  • Power
    • HTC Power Manager Toggle (pnpmgr)
    • Haptic feedback duration
    • Haptic feedback 2 duration
    • Ambient Display Settings toggle
    • Ambient Display on significant motion
    • Vibrate & ambient on significant motion
    • Ambient display duration
    • Ambient display brightness
    • Ambient display delay time
    • Ambient display fade intime
    • Ambient display fade out time
  • Networks
    • Large Caller Contact Picture
    • Hide Photo Mask for low-res pictures
    • 4G / LTE Notification Switch
    • Auto Record Incoming / Outgoing Calls
    • Disable SMS to MMS Converstion
    • Toggle Fast Dormancy
  • Misc
    • Force 100% Jpeg quality in Camera
    • Launch HTC Gallery + Editor or Google Photos from Camera
    • Launch Hidden Marshmallow Land Game
    • Toggle Boot Audio
    • Default USB Mode (ADB/ADB MTP)
    • Enhanced MM Permissions (More granular perms with a timer)
    • Default app install location
  • Kernel
    • Kernel Version
    • Sweep To Sleep configuration
    • Double Tap fingerprint to sleep
    • Double tap to sleep latency
    • Fingerprint vibration duration
    • Button Light Notifications
    • Button lights notification blink speed
    • System vibration voltage
  • Advanced
    • Fix Permissions
    • ZipAlign apks
    • Mount System RW / RO
    • Trim Partitions
    • Wipe Cache
    • Wipe Dalvik-cache
[/showhide]

As you’ve had a look on the features of LeeDrOid, we are sure that you will want to flash it on your HTC 10 right away. To fulfil your appetite, we have this tutorial here which will help you to install Android 6.0.1 Marshmallow LeeDrOid Custom ROM on all variants of the HTC 10. Let’s have a look on pre-requisites and then flash this ROM.

Pre-requisites

  1. Charge your phone up to 75% to avoid power issues during flashing process.
  2. Unlock Bootloader, Flash TWRP Recovery, Root and S-Off your HTC 10. Here’s a complete guide.
  3. Backup your important contacts, call logs, sms messages and also copy your media content to your PC. Here’s a complete guide to backup everything.
  4. Follow this guide to the letter to avoid any mishap.

Disclaimer: Unlocking bootloader, rooting and flashing custom recoveries, custom ROMS are highly custom processes. Doing any of these will result in voiding the warranty of your device. Ensure that you’re doing everything at your own risk. In case of a mishap, TechBeasts or the device manufacturer may not be held liable. 

How To Install Android 6.0.1 Marshmallow LeeDrOiD Custom ROM on HTC 10

  1. Download the latest build of LeeDrOiD custom ROM for your HTC 10.
  2. Copy the LeeDrOid Custom ROM.zip file to your HTC 10’s external or internal SD card.
  3. Make sure that you’ve unlocked the bootloader, flashed TWRP and also achieved S-Off on your HTC 10.
  4. Now boot your HTC 10 into TWRP recovery mode. To do so, turn off your HTC 1o completely and then turn it on by pressing and holding Volume Up + Down + Power Key. Once your phone is in bootloader mode, select recovery mode here and it will boot your phone into TWRP recovery. Make sure that you’re in Read Only mode in TWRP recovery.
  5. Create a Nandroid backup of your device’s system and boot.img under the Backup options in TWRP recovery.
  6. Now in the homescreen of TWRP, tap Reboot > Recovery and then swipe to allow modifications.
  7. Perform a factory reset using the Wipe options in TWRP and then get back to the main screen in recovery.
  8. Now tap Install > Locate the LeeDrOid Custom ROM.zip file > swipe to confirm ROM installation.
  9. Follow on-screen instructions and complete the installation.
  10. Once done, reboot your device to system and it should launch the newly installed LeeDrOid Custom ROM.

That’s all. If you are stuck with something, reach us out through the comment box or our contact us page.

Credits: LeeDrOid

VyprVPN Free VPN for PC – Windows and Mac

0
VyprVPN Free VPN for PC – Windows and Mac

Now a days people need VPN more for smartphones and less for PC, as mobile technology is evolving developer are working their best to give us perfect products. There are hundreds of VPNs available in Google Play and trust me they work really good, today I’ll tell you how to downlaod and install VyprVPN Free VPN for PC, basically its designed for smartphones but thanks to third-party emulator we can install Andorid Apps on our Computers and Mac.

VyprVPN Free VPN for PC

Before moving on let tell you one thing VyprVPN is specifically designed for smartphones and tablets, although you can install VyprVPN Free VPN for Pc running Windows XP/7/8/8.1/10 Desktop PC and Mac OS X Macbook, iMac. You will need to install an emulator like BlueStacks to use VyprVPN Free VPN for PC. 

Download VyprVPN Free VPN and Mac

  1. download VyprVPN Free VPN for Privacy_2.15.0_apk-dl.com.apk.
  2. Download and install Bluestacks: Bluestacks Offline Installer | Rooted Bluestacks |Bluestacks App Player | Rooted BlueStacks 2
  3. Once you’ve installed Bluestacks, double click the downloaded VyprVPN Free VPN APK.
  4. The APK will be installed using Bluestacks, once installed open Bluestacks and locate the recently installed VyprVPN Free VPN.
  5. Click the VyprVPN Free VPN icon to open it, follow the on-screen instructions to use it.

You can also use Andy OS or Remix OS to install VyprVPN Free VPN, here’s the tutorial: How To Run Android Apps On Mac OS X With Andy | How to launch Remix OS for PC and install Apps for PC via Remix OS.

The Andy OS and Remix OS tutorial explains how to play a game or use an App on your Mac OS X, but the same guide will also work for a Windows PC.

That’s all. In case you’re stuck with anything, reach us out through the comment box below.

Install iOS 10 Beta OTA Update Without Developer Account [ New Link Added ]

1
Install iOS 10 Beta OTA Update Without Developer Account [ New Link Added ]

Apple has released a new and improved iOS version for iPhone, iPad, and iPod Touch. This Apple really worked on things that users wants, right now Beta version of iOS 10 can be downloaded from Apple developers account. In this post, I’ll tell you how to install Install iOS 10 ‘Beta OTA Update Without Developer Account, shocked ? Let’s start the method to Install iOS 10 Beta OTA Update.

install-ios-10-beta-ota-configuration-profile-without-udid-developer-account-how-to-tutorial/

How To Install iOS 10 Beta OTA Update Without Developer Account:

Step 1: Open Safari on your iOS device and open this link http://www40.zippyshare.com/v/NhFcgsbn/file.html

Step 2: Tap on Download as a free member, this will download a profile for your device.

Step 3: Now once the profile is downloaded, you’ll be asked on which device would you like to install this profile? Select iPhone.

Step 4: Follow the instruction on the screen. After the profile is installed your device will reboot.

Step 5: Once your device is done with rebooting, Open Settings-> General-> Software update->here you’ll see  iOS 10 Developer Beta OTA update waiting for you there.

Step 6: Hit Download and Install, sit back and relax.

That’s All.

[HTC 10] How to Install TWRP Recovery, Root and Achieve S-Off

0
[HTC 10] How to Install TWRP Recovery, Root and Achieve S-Off

The all new HTC 10 has been rooted, blessed with a TWRP recovery and S-Off has been achieved as well. Android power users looking forward to get their hands on the HTC 10 will not have to wait for the root access or TWRP recovery to come out. You can now unlock the bootloader of your HTC 10, install a TWRP recovery and then root it. You can S-Off your HTC 10 once you’re rooted.

After getting beyond the boundaries on your HTC 10, you can start flashing custom ROMs, custom zip files, install applications like Greenify and Titanium Backup to improve battery life and backup your device. S-Off will allow you to flash custom ROMs safely and ensure permanent root on your HTC 10. Before you start flashing any custom operating system, you have to achieve a safe S-Off state. By default the device is set to S-On which prevents making any changes to the NAND partition of your device, ensures a signature check of the files being flashed and keeps the radio of your device intact. Trying to flash a custom ROM without achieving S-Off can result in a damage. Assuming that you are well aware of what we are going to do, we can now have a look on the procedure.

Preparations

  1. Charge your HTC 10 up to 75% to avoid power issues during this process.
  2. Backup your important contacts, call logs and sms messages. Copy your media content to your PC. We will have to unlock the bootloader of HTC 10  which will result in wiping the data. Make sure that you’ve backed up all the data.
  3. Enable OEM unlocking on your HTC 10. Also allow USB debugging mode. You can find both these options under the developer options in your HTC
  4. Download and install Minimal Android ADB and Fastboot drivers on your computer. Mac users can use this guide for Android ADB and Fastboot.
  5. Download and install HTC USB drivers on your PC.
  6. Unlock the bootloader of your HTC 10 now. Here’s a guide to do so.

Disclaimer: Unlocking bootloader, rooting and flashing custom recoveries are highly custom processes. Doing any of these will result in voiding the warranty of your device. Ensure that you’re doing everything at your own risk. In case of a mishap, TechBeasts or the device manufacturer may not be held liable. 

How to install TWRP recovery and Root HTC 10

  1. Download the latest TWRP recovery.img file for your HTC 10. Rename the downloaded file to only “twrp.img“.
  2. Copy the renamed twrp.img file to the ADB and Fastboot folder that you got in your Program files after installing ADB and Fastboot drivers using the link attached above.
  3. Now open the Minimal ADB and Fastboot tool. You can launch it either using the desktop shortcut or by going to Program files > Minimal ADB & Fastboot > Right click on an empty area while keeping the shift key pressed and click on “Open Command Window Here”. 
  4. Connect your HTC 10 to your PC now using the OEM data cable.
  5. Now in the opened command prompt, enter the following commands one by one.
    • adb reboot download

    • fastboot flash recovery twrp.img

    • fastboot reboot bootloader

  6. Now your device will reboot into bootloader mode. You may insert an SD Card as we are going to backup the entire system.
  7. In the bootloader, select the “recovery” option using Volume Up/Down and power key to make a selection.
  8. Your device will now boot into TWRP recovery.
  9. Now run TWRP recovery in read-only mode and backup all of your partitions except userdata. This is done in order to make a full backup of your stock system. Backup in the form of System Image.
  10. Now once again in the command window, enter the following command
    • adb reboot bootloader

  11. Once your device boots into bootloader, select “Boot into Recovery Mode”.
  12. Now download the modified SuperSu.zip file which will not decrypt the user data to make sure your radio keeps working fine. Copy this SuperSu.zip file to the Minimal ADB and Fastboot folder where you copied the twrp.img file.
  13. While you’re in the TWRP recovery, tap Advanced > Sideload option.
  14. Get back to the command window now and enter the following command
    • adb sideload supersu.zip

  15. This will root your device now.
  16. Verify root acceess using Root Checker now.

How to S-Off the HTC 10 now

Note: You will have to wipe your data for complete S-Off.

  1. Download and install SunShine app on your HTC 10.
  2. Open SunShine app from your app drawer.
  3. Accept the License agreement in SunShine app now.
  4. SunShine will require you to run the compatibility tests. Run the tests and give it root permission.
  5. Once it shows compatible message, tap the pay option in lower right corner of the screen. Now make the payment of USD 25 to generate the SunShine license and proceed. If you already have a code, you can use that to S-Off as well.
  6. Once done, it will reboot your device.
  7. Now we have to wipe the device since the S-Off has messed up the encryption of the device.
  8. Turn off the device completely now.
  9. Boot into bootloader mode now by pressing the Volume Up + Down + Power Key.
  10. Boot to recovery mode in bootloader now.
  11. As TWRP boots up, it will ask you to enter your encryption password. Tap Cancel and proceed to the TWRP.
  12. Now in TWRP tap Wipe > Wipe Encryption > Swipe finger on the screen to wipe.
  13. Once it has wiped encryption, reboot your device.
  14. It has also deleted the SuperSu from your phone, but your phone is actually rooted. You can download and install the SuperSu from the Google Play Store now.
  15. You won’t face the encryption lock anymore. That’s all.


How to Play Facebook Messenger’s Hidden Soccer Game

2
How to Play Facebook Messenger’s Hidden Soccer Game

Few months back Facebook introduced a hidden Basket Ball game in its Messenger app. Facebook just added another game to the Messenger today. A new Soccer game has made its way to the Messenger. Soccer in the Messenger is hidden just like the Basket Ball game. So, if you don’t have much to talk with your friends, you can now give them a Soccer challenge and check out who’s best at it.

The Soccer gameplay is much difficult and challenging as compare to the Basket Ball game. The Soccer game requires you to juggle the Soccer ball by tapping the ball. The ball shouldn’t fall down or else the game will be over. You’ve to juggle it as long as you can. One tap counts as 1 point and adds to your soccer. The more taps you make to juggle the ball without making it fall down, the more score you’re going to put on the scoreboard. The ball shoots so fast that it’s really difficult to put a high score in the start. You need to practice pretty hard to master this game. Soccer in Facebook Messenger turns out to be much more addictive as compared to the Basket Ball. Head towards the instructions to begin playing Facebook Messenger’s Hidden Soccer Game.

Here’s How to Play Facebook Messenger’s Hidden Soccer Game

  1. Download and Install Facebook Messenger on your Android phone or iPhone if y0u don’t have it already: Messenger in Play Store | Messenger in App Store.
  2. If you have an old version of Messenger installed, you need to update it first.
  3. Now open Messenger and open any chat in the Facebook Messenger.
  4. Now tap the “Emoji” button and tap the 4th Emoji which is a soccer, it will bring up the sports Emojis.
  5. Now tap the very first Emoji which is a Soccer ball, or simply copy it from here: and paste it in your Messenger.
  6. Once the Soccer Ball has been sent in the chat, tap the ball and it will start the Soccer. That’s all.