

In this guide, we will take a look at the method to enable Virtualization Technology (VT) for BlueStacks on Windows. The method will explain how to enable VT for BlueStacks on Windows 8, Windows 8.1, and Windows 10.
Intel Virtualization Technology, formerly known as Vanderpool, is a feature that enables a CPU to act as several independent computers. The same technology by ADM is known as AMD-V. The purpose of VT and AMD-V is exactly the same. Virtualization Technology is basically used for running several operating systems on a computer at the same time. You must have heard of virtualization software like VMWare. Such software triggers virtualization in a computer to run another OS without any hiccups. Virtualization Technology is useful for running Android Emulators on a computer as well. If you have ever wanted to run Android OS on your computer and you came across BlueStacks, you will definitely need VT enabled on the computer.
The latest version of BlueStacks, the BlueStacks 4.1 runs well on the Windows-powered computers. However, the emulator gets stuck at times and sometimes it just becomes too much slow. You can boost up the performance of BlueStacks 4.1 on your computer simply by enabling the virtualization technology. BlueStacks 4.1 is a huge software and it can potentially slow down the performance of your computer as well. You need a powerful computer in order to run software like BlueStacks 4.1. It’s very important to have VT enabled if you want to put the least amount of load on your CPU. Having VT enabled will make your CPU believe that there is another operating system that needs another computer to run. If you run BlueStacks 4.1 without VT, it will put all the load on the part of the CPU which is already handling your current operating system.
Let’s proceed with the guide to enable Virtualization Technology (VT) for BlueStacks 4.1 now.
Contents
How to check if your computer supports Virtualization Technology or not?
Intel Users
- First of all, you need to check whether your computer supports VT or not. Here’s how you can do so.
- Intel users can download the Intel Processor Identification Utility tool.
- Install and launch your installed tool now.
- If you have installed the Intel tool, open it and click on “CPU Technologies”.
- Under the CPU Technologies page, you will find the Intel Virtualization Technology with Yes written next to it.
- If it’s exactly the same as shown below, it means you can enable VT on your computer.
AMD Users
- AMD users can download the AMD-V Detection Utility tool.
- Launch the newly installed tool on your computer.
- The AMD tool will show you the message “This system is compatible with Hyper-V”. If it shows you this message, it means you can enable VT on your computer.
How to enable Virtualization Technology (VT) for BlueStacks
Now that you know your computer supports VT, it’s time to enable it.
Windows 10 Users:
-
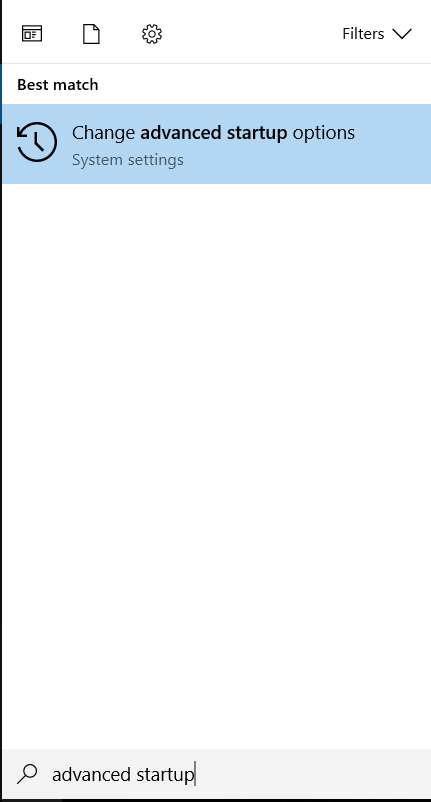
- On your computer, click on the search button appearing the taskbar and type “Advanced startup”.
- As soon as “Change advanced startup options” appears, click on it.
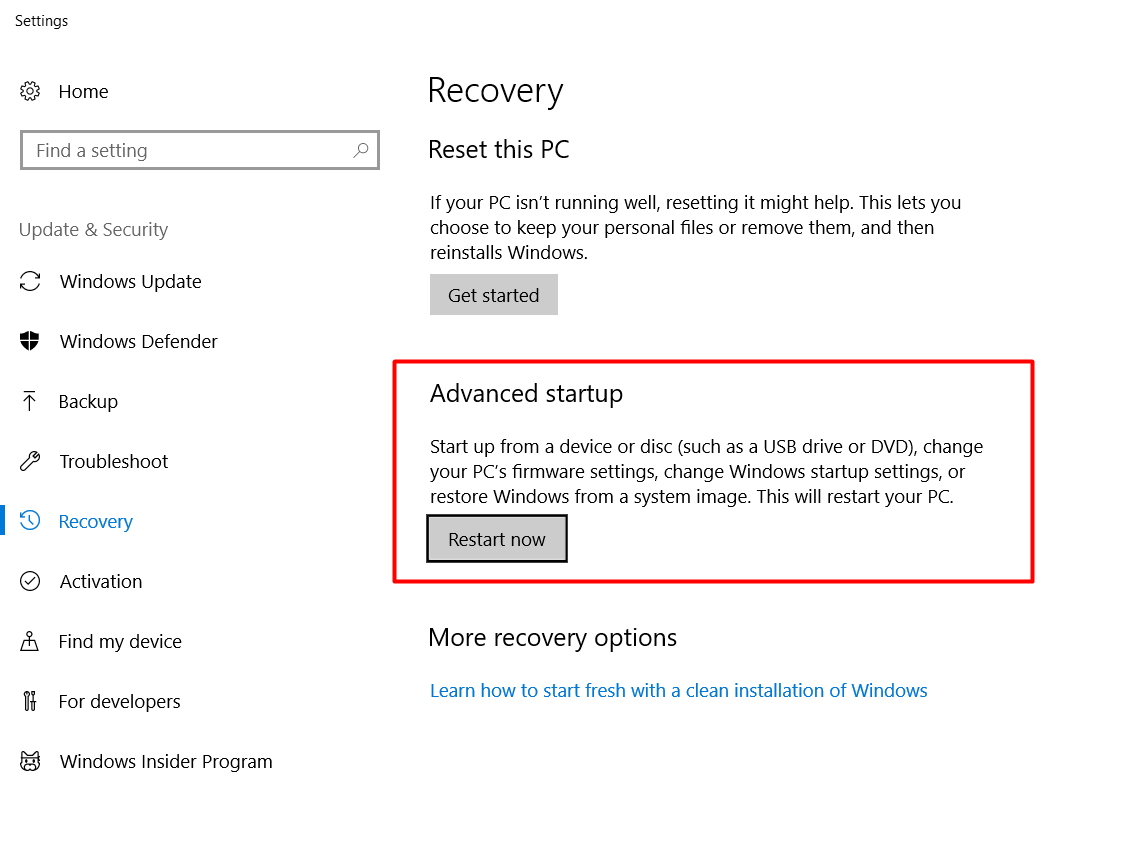
- Now click on Restart now.
- Click on Troubleshoot > Advanced options.
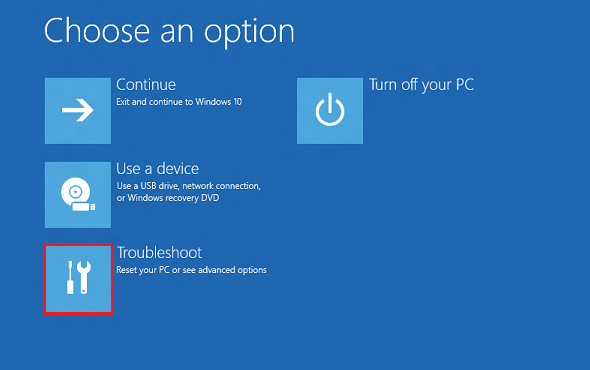

- Now under Advanced options > UEFI firmware settings > Restart to enter BIOS.
- Your computer will reboot and enter the BIOS now.
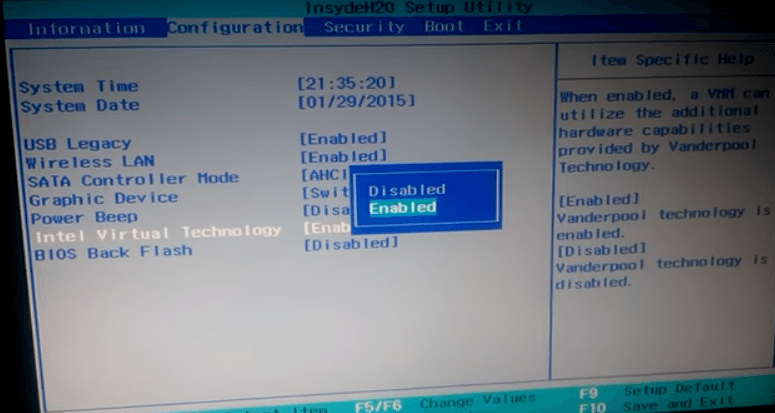
- In BIOS, use the arrow key to move to Configuration or System Configuration.
- Now use the arrow down key to select “Intel Virtualization Technology”.
- Press Enter and then use the arrow down key to select “Enabled”.
- Save the settings and restart your computer now.


Windows 8.1 & Windows 8 users:
- On your Windows 8.1 or Windows 8 computer, press the Windows key + I.
- It will open the PC settings.
- From the right side, click on “General”.
- Now in General, you will find Advanced startup.
- Under Advanced startup, click on Restart.
- Now under Restart > Troubleshoot > Advanced options.
- Under Advanced Options > UEFI Firmware Settings > Restart.
- Your computer will reboot and enter the BIOS now.
- In BIOS, use the arrow key to move to Configuration or System Configuration.
- Now use the arrow down key to select “Intel Virtualization Technology”.
- Press Enter and then use the arrow down key to select “Enabled”.
- Save the settings and restart your computer now.
Now launch BlueStacks after having the VT enabled. You will find it running smoothly this time. That’s all.


")


