We all love yo update our devices to the latest versions available or till date, sometimes we are so impatient to update our device that we don’t bother looking at the down side and after updating, the thing after regret the is search for a way to downgrade it back to the previous version. Samsung released the Lollipop update quite a time ago and it was great, both in term of speed and performance, although in terms of Battery timing, there was some problems there. Most of the users, include my Brother, even though using the Galaxy Note 4, complained that he battery timing is not as good as it as before, even I felt it a little using the Lollipop ROM on Nexus 4, on Mahdi Kit-Kat ROM the batter was awesome, however, in this Euphoria ROM it is not that good.
Now those who updated their device to Lollipop while owning a Samsung device are now looking for a way to downgrade the device to Kit-Kat, for the least, cause Jelly Bean is not available, unless you have downloaded it a long time ago, along with a way to flash that particular firmware on their device, cause in most cases you heard that the device might go brick if you downgrade it from Lollipop to Kit-Kat, however, that is all Bongus! and I can assure you that unless you are super unlucky, nothing wrong will happened to your device. Here is how you can downgrade your Galaxy Device back to Kit-Kat, without further ado, let us continue.
Contents
Early Preparations:
- You need to backup each and everything before you proceed. Use the following links to be on the safe side.
- Backup EFS
- Backup Nandroid
- Backup Media Content
- Backup Contacts
- Backup Call Logs
- Backup Text Messages
- Install USB Drivers
- Download and Extarct Odin
- Download and Extract the Firmware: Link
How to Downgrade Galaxy device:
- Make sure that you read the instructions listed above carefully and you’re all set to go ahead now.
- Wipe your device complete in order to attain a neat installation. You may boot into the recovery mode and perform a factory data reset.
- Open Odin3.exe.
- Put your Device in download mode. To do so, turn it off and wait for 10 seconds. Turn it on by pressing and holding Volume Down + Home Button + Power Key simultaneously, You should see a warning, press Volume Up to continue. In case this method doesn’t work for you, try one from this guide.
- Connect your device to your PC.
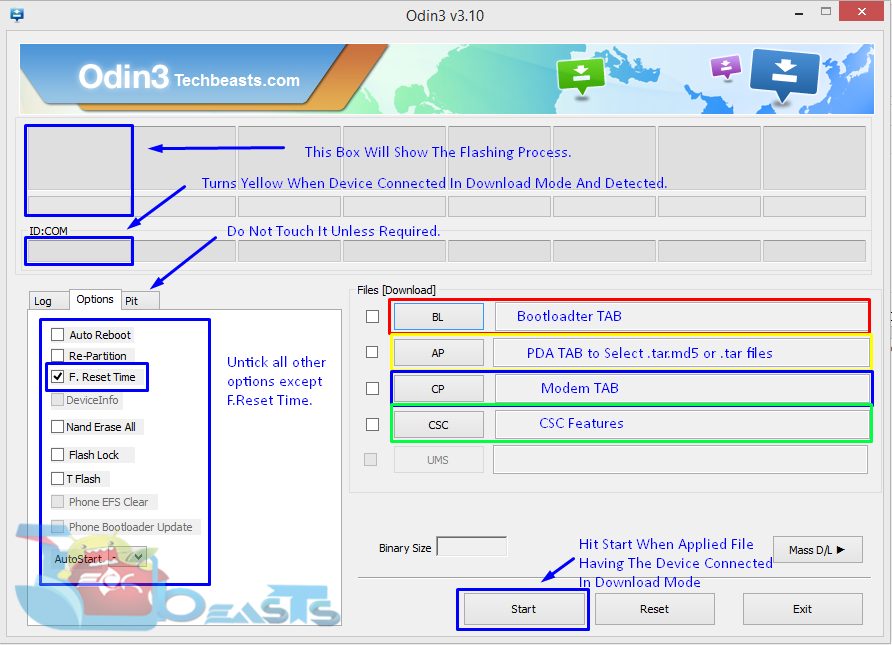
- As soon as Odin detects your phone, the ID:COM box should turn blue. Make sure that you’ve installed Samsung USB drivers before connecting.
- For Odin 3.09 or 3.10.6 hit the AP tab. Select the firmware.tar.md5 or firmware.tar, that you downloaded and extracted above.
- If you’re using Odin 3.07, you will select “PDA” tab instead of the AP tab, rest of the options remain untouched.
- Make sure that the options selected in your Odin are exactly as shown in the pic.
- Hit start and wait till the firmware flashing is complete, The flashing process box will turn green upon successful flashing.
- Once the flashing process has been completed successfully, disconnect your device and reboot it manually. You can pull out the battery, place it back and turn on.
- Once the device boots up, checkout the new firmware now.
- Your device will be running on any version before the Lollipop, most probably Android 4.4.4 Kit-Kat..
- That’s all!


