Home Blog Page 491

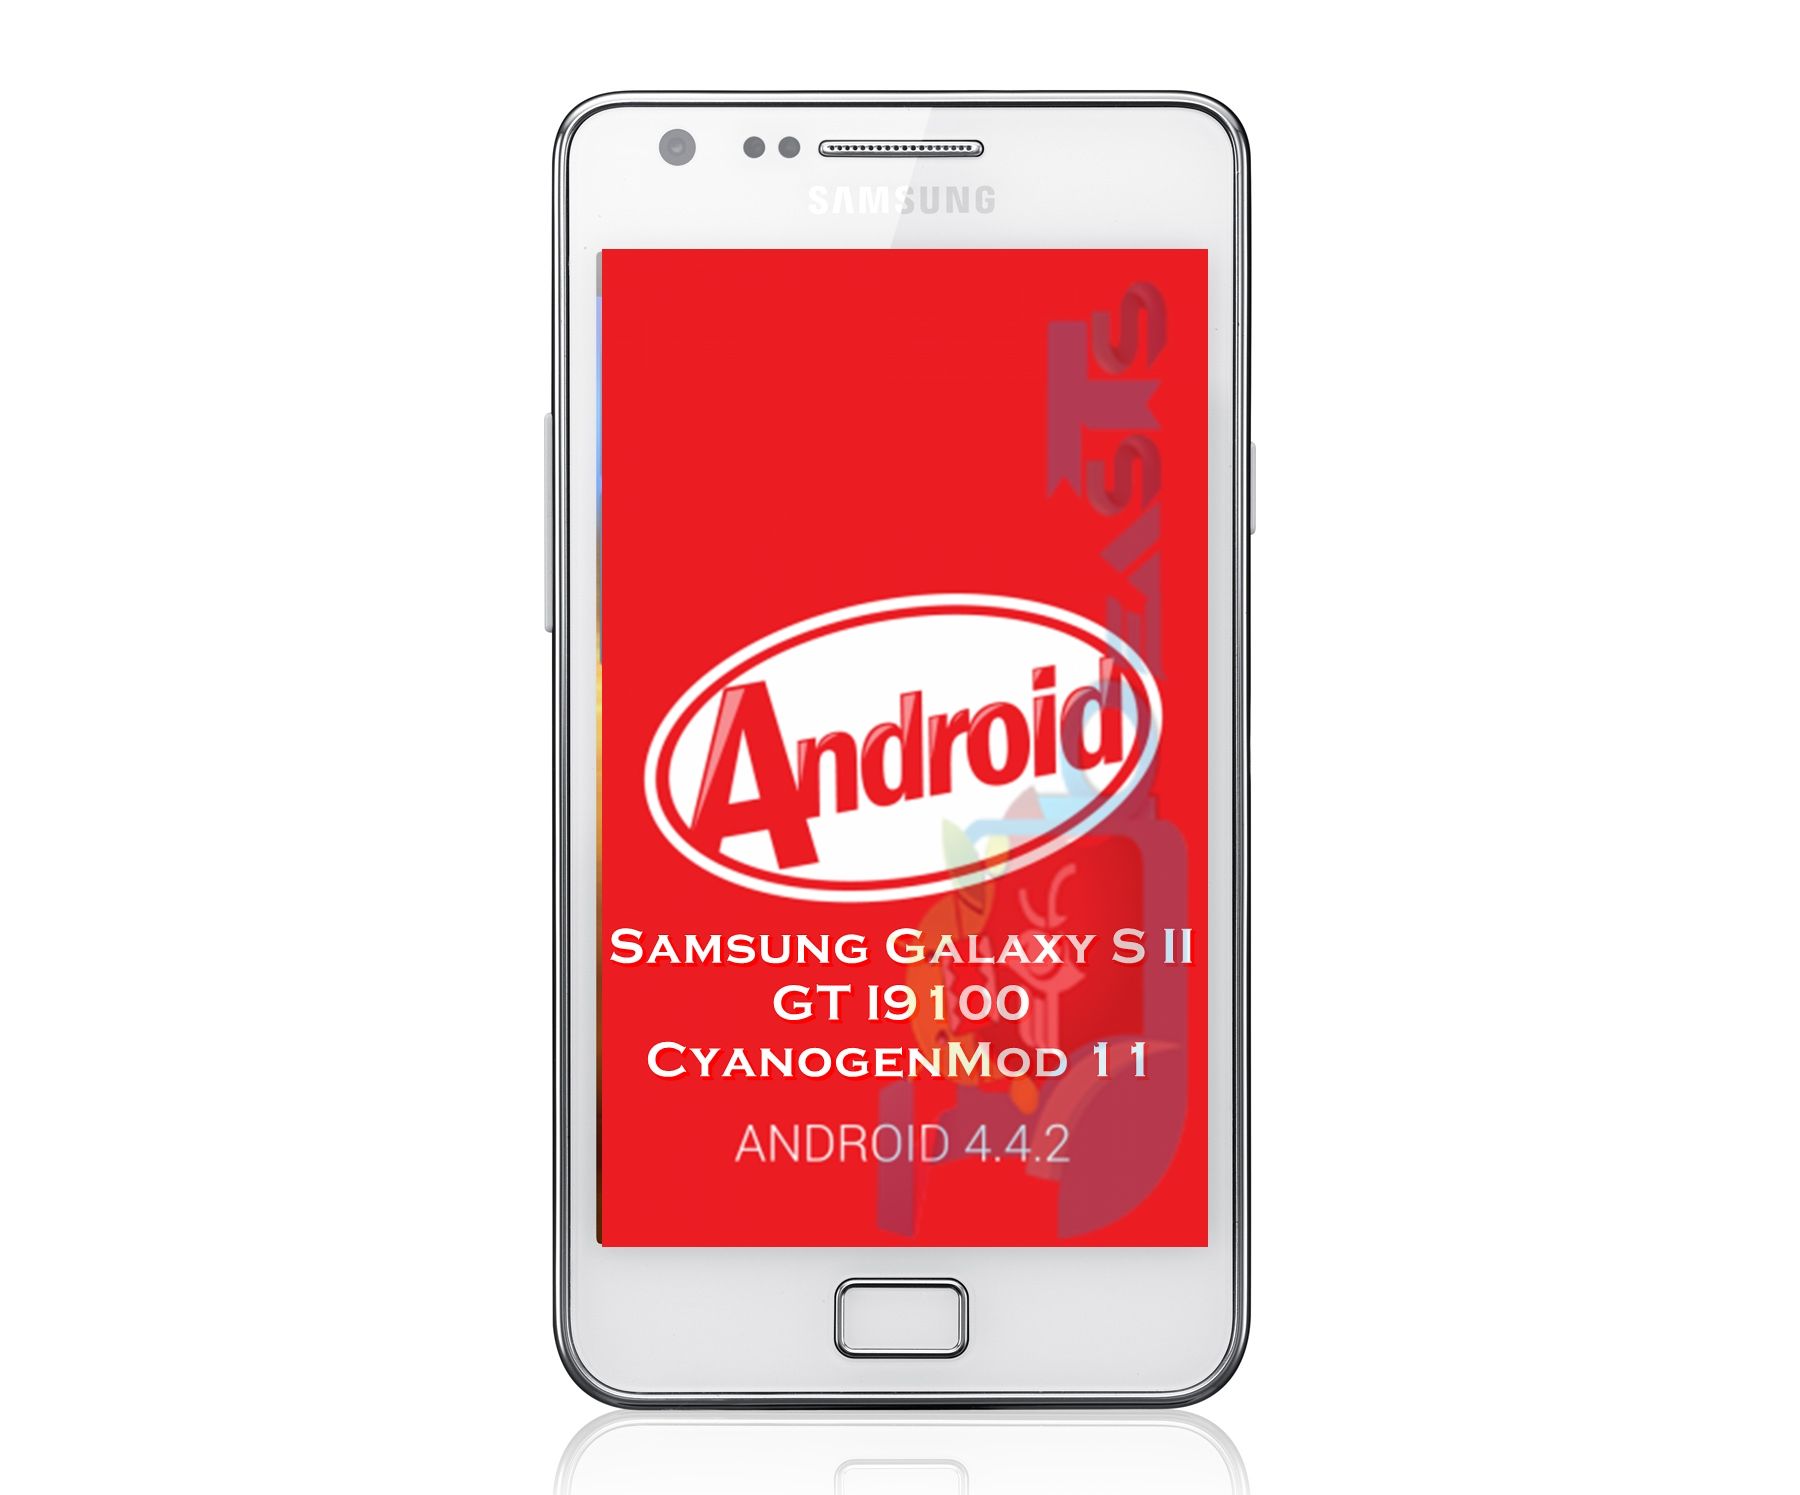
Install Android 4.4.2 KitKat on Galaxy S II using unofficial CM 11
7
Install Android 4.4.2 KitKat on Galaxy S II using unofficial CM 11

Samsung’s Galaxy S II is definitely one of the best Android devices available around still today. Samsung pushed  Android 2.3 Gingerbread in the device and brought it to the Android 4.1.2 Jelly Bean through OTA updates. The device stopped receiving further Android updates, Samsung has been pretty good with a device that’s way too old now. Perhaps this didn’t effect the device’s  charm as the development forums are full of Galaxy S II’s custom ROMs. So, just in case you’re looking for a higher Android version to install on your device, custom ROM may be the best choice.

Google has already pulled the curtains off from it’s Android 4.4 KitKat and many of you may be impatiently waiting to taste it. While you can’t have it officially on your Galaxy S II, we’ve found a suitable custom ROM that will allow you to do so. Before you head towards the ROM flashing guide, please keep in mind that this is a custom ROM based on unofficial CyanogenMod 11, and is a nightly build. There are higher chances of bugs and things may not work as expected, So, we recommend you to install this only if you’re familiar with custom ROM flashing and you actually know what you’re doing. Also, this ROM may not be kept for everyday’s use.Galaxy SII Android KitKat

Here are some instructions that you must follow in order to get this ROM installed.

      1. This ROM is only for Samsung Galaxy S II GT-I9100. Do not try this on any other device, please check your device’s model in Settings > About Device > Model.
      2. Your device must have a custom recovery installed. Follow our full guide here to install CWM.
      3. Your device’s battery should be charged at least over 60%. This is highly recommended in order to prevent any power issues during the flashing process.
      4. Backup everything as flashing this firmware will wipe your phone completely.
      5. Make sure that you backup your important media content, Contacts, Call Logs & Messages. This is highly recommended just in case something goes wrong and you need to reset your phone.
      6. If you already have rooted your device, use Titanium Backup to back up all your important apps + system data. Also if you are using a custom recovery, it is recommended that you backup your current system using that first. [Just for the sake of safety.]
      7. Make an EFS backup of your phone before you flash this ROM.
      8. You need enough confidence to flash this ROM.
      9. Alright! Go ahead and flash the custom firmware, follow this guide to the letter.


Disclaimer: The methods involved in flashing custom roms and rooting your phone are highly custom and may result in bricking your device, and has nothing to do with Google or the device manufacturer that is SAMSUNG in our case. Also rooting your device will void its warranty and you will be no longer eligible for any kind of free device services by the manufacturers/warranty providers. In case of any mishap we may not be held responsible. Follow these instructions to the letter to avoid any mishap or bricking. Make sure that whatever you do, you are doing it at your own responsibility.

Make sure that you read all the instructions carefully, let’s move forward to the 2nd page for ROM flashing guide.

Pages: Page 1 > Page 2

Root Galaxy S4 I9505 Running Leak Android 4.4.2 KitKat I9505XXUFNA1 Firmware

2
Root Galaxy S4 I9505 Running Leak Android 4.4.2 KitKat I9505XXUFNA1 Firmware

A leaked test firmware based on Android 4.4.2 KitKat build number I9505XXUFNA1 has just surfaced. A good sign for the Galaxy S4 owners as it suggests the arrival of official update anytime soon now. Check out our recently posted guide to update your Galaxy S4 GT-I9505 to leaked Android 4.4.2 KitKat. You may want to root your device on the newest leaked test firmware, so here’s our full guide to do so.

Before we head towards how to root the Galaxy S4 LTE running latest leaked Android 4.4.2 KitKat, you may want to know what is root access and why do we need it. Let’s have a look at the little intro to the root and also a custom recovery.Samsung-Galaxy-S-4-white-three-up-front-profile-back

Rooting your phone gives you complete access over all the data which is apparently locked by the manufacturers. This includes removal of the factory restrictions and making changes to the internal system and the operating system. Gaining the root access gives you the privileges to install various applications to enhance the performance of your device, allows you to remove the built-in applications/programs, helps you to upgrade the battery life of your device & install the apps which require the root access for the proper functionality and modify your device in so many other ways e.g using mods and custom roms. By installing custom recovery, you can flash custom roms in the phone easily. Custom recovery also let’s you backup your current rom and restore it in case of any mishap. There is a laundry list of things you can do after having your device rooted and installed the custom recovery, now once you’re rooted and have installed custom recovery, go ahead and enjoy it on your phone. Here’s our collection of 10 Best Root Apps.

 Here are some instructions that you must follow in order to gain root access on your Galaxy S4 I9505.

  1. This guide is only for Galaxy S4 LTE GT-I9505. Do not try this on any other device, please check your device’s model number in Settings > General > About Device.
  2. Your device must have  TWRP Recovery installed. Follow our full guide here to get it.
  3. Your device must be running on leaked firmware Android 4.4.2 KitKat I9505XXUFNA1 Firmware.
  4. Your phone’s battery must be charged at least over 60%. This is highly recommended in order to prevent any power issues during the flashing process.
  5. ake sure that you backup your important media content, ContactsCall Logs Messages. This is highly recommended just in case something goes wrong and you need to reset your phone.
  6. Use only OEM data cable to establish connection between your phone and PC. Turn off your Anti Virus and Firewall to prevent any connection issues. Also enable USB debugging mode on your phone if you face connection issues.
  7. Alright! Go ahead and flash the custom firmware, follow this guide to the letter.

Disclaimer: The methods involved in flashing custom roms and rooting your phone is highly custom and may result in bricking your device, and has nothing to do with Google or the device manufacturer that is SAMSUNG in our case. Also rooting your device will void its warranty and you will be no longer eligible for any kind of free device services by the manufacturers/warranty providers. In case of any mishap we may not be held responsible. Follow these instructions to the letter to avoid any mishap or bricking. Make sure that whatever you do, you are doing it at your own responsibility.

Make sure that you read all the instructions above carefully and let’s move forward to the 2nd page for the rooting guide.

Pages: Page 1 > Page 2

Install Leaked Android 4.4.2 KitKat I9505XXUFNA1 on Galaxy S4 GT-I9505

3
Install Leaked Android 4.4.2 KitKat I9505XXUFNA1 on Galaxy S4 GT-I9505

Brace yourself guys, KitKat is here! You heard it right. Android 4.4.2 KitKat has been leaked for Galaxy S4’s LTE brother, and the update is now available for download. If you have been eagerly waiting to receive the update and feeling jealous from Motorola for updating it’s Moto G to the KitKat Android, then it’s time to finish the grudge now and update your Galaxy S4 LTE to the latest Android 4.4.2 Leaked Test firmware. 

Android 4.4.2 KitKat is not so much changed from the previous versions of Android on the Galaxy S4, the update packs up performance enhancements, some minor UI changes, and stability improvements. While this is a test firmware and is in no way official, so this may contain minor bugs. As off now, the leaked firmware is working good and the hiccups are not too much irritating. We’re going to have a look on a method to install this leaked test firmware on our beloved LTE Galaxy S4 GT-I9505.Samsung-Galaxy-S-4-white-three-up-front-profile-back

Before head towards the flashing guide for this leaked firmware, here some important instructions that you must follow:

      1. This is a leaked / test firmware and is not official. Flashing this will not void your phone’s warranty and will not even raise the binary counter.
      2. This firmware is only for Galaxy S4 GT-I9505. Do not try this on any other device, check your device’s model in Settings > General > About Device.
      3. Your device’s battery should be charged at least over 60%. This is highly recommended in order to prevent any power issues during the flashing process.
      4. Backup everything as flashing this firmware will wipe your phone completely.
      5. Make sure that you backup your important media content, ContactsCall Logs & Messages. This is highly recommended just in case something goes wrong and you need to reset your phone.
      6. Use only OEM data cable to establish connection between your phone and PC. Turn off your Anti Virus and Firewall to prevent any connection issues. Also enable USB debugging mode on your phone if you face connection issues.
      7. If you already have rooted your device, use Titanium Backup to back up all your important apps + system data. Also if you are using a custom recovery, it is recommended that you backup your current system using that first. [Just for the sake of safety.]
      8. Using TWRP Recovery, please make an EFS backup before you flash this ROM.
      9. Alright! Go ahead and flash the custom firmware, follow this guide to the letter.

Make sure that you read everything explained above carefully. Also, make sure that you’re doing it at your own risk, in case of any mishap we may not be held responsible.

Alright, let’s move forward to the 2nd page for flashing this ROM:

Pages: Page 1 > Page 2

Install Android 4.4.2 KitKat CM 11 Custom ROM on Sony Xperia U

9
Install Android 4.4.2 KitKat CM 11 Custom ROM on Sony Xperia U

Sony’s low end Android device Xperia U runs on Android 2.3 Ginger Bread out of the box, Sony updated the device to Android 4.0.4 Ice Cream Sandwich and made no further updates neither there’s any official word about it anymore. While Google has already rolled out Android 4.4 KitKat and many of the Android devices have already received the update to the latest and greatest version of Android, Xperia U owners may be appetently waiting for  further updates to their device, while there are no chances of anything officially, it paves a way for the custom ROMs and the users still have a chance to enjoy the higher version of Android on their devices unofficially.

Android 4.4.2 KitKat custom ROM based on CyanogenMod 11 is available for our beloved Xperia U. In the following post we are going to have a look on the method to install this custom ROM on the device. As this is a nightly build, it may contain a lot of bugs and may note be suitable for everyday’s use, so make sure that you’re doing it at your own risk and you actually know what you’re doing. If you’re not good with custom ROMs and  don’t have sufficient knowledge about flashing custom ROMs we recommend you not to install this.sony-xperia-u-review

Here are some pre-requisites and pre-cautions that you must follow before installing this ROM:


      1. This guide is only for Sony Xperia U. Do not try this on any other device. Please check your device’s model number in Settings > About Device.
      2. You must have installed Sony Flash Tool, also using Flashtool install Fastboot drivers and drivers for Sony Xperia U. Follow our detailed guide here.
      3. Your device’s battery should be charged at least over 60%. This is highly recommended in order to prevent any power issues during the flashing process.
      4. Make sure that you backup your important media content, ContactsCall Logs & Messages. This is highly recommended just in case something goes wrong and you need to reset your phone.
      5. Use only OEM data cable to establish connection between your phone and PC. Turn off your Anti Virus and Firewall to prevent any connection issues.
      6. Enable USB debugging mode on your phone, to do so, open Settings > Developer Options > USB debugging mode > Check it.
      7. If you already have rooted your device, use Titanium Backup to back up all your important apps + system data. Also if you are using a custom recovery, it is recommended that you backup your current system using that first. [Just for the sake of safety.]
      8. We highly recommend you to wipe your phone’s data, cache and dalvik cache, a clean install is always expected to give the best results.
      9. Alright! Go ahead and flash the custom firmware, follow this guide to the letter.

Let’s move forward to the 2nd page for flashing Android 4.4 KitKat, make sure that you read all the instructions explained above carefully.

Disclaimer: The methods involved in flashing custom roms and rooting your phone is highly custom and may result in bricking your device, and has nothing to do with Google or the device manufacturer that is SAMSUNG in our case. Also rooting your device will void its warranty and you will be no longer eligible for any kind of free device services by the manufacturers/warranty providers. In case of any mishap we may not be held responsible. Follow these instructions to the letter to avoid any mishap or bricking. Make sure that whatever you do, you are doing it at your own responsibility.

Pages: Page 1 > Page 2
How To Delete Voicemails From iPhone One or Multiple At a Time.

0
How To Delete Voicemails From iPhone One or Multiple At a Time.

iPhone Voicemail is quite a nifty feature, that you ca actually listen to the message. But each Voicemail gets downloaded to your device first then you can listen to it. For some users, who don’t know about it, they can loose up-to 100MB of storage. And for those who frequently used Voicemail, they really have to be very careful, the download size can become a huge nuisance for them. Fortunately, deleting a Voicemail from iPhone or deleting a lot of Voicemails from iPhone is not a very difficult task and you can easily restore a lot of Phone storage.

phone-voicemail-20100607-1

How To Quickly Delete a VoiceMail from iPhone.

  • Open the app on iPhone and tap the Voicemail button.
  • Swipe Left to summon the Delete button, then tap on it to delete.

swipe-to-delete-voicemail-iphone

  • You can also choose the delete option after you read the message, but it is not fast enough.

How To Delete Multiple VoiceMails at once.

  • Open VoiceMail portion in the iPhone app.
  • Use Multiple Touch Points to Tap on Multiple Delete Buttons simultaneously, then Tap the Red Buttons to Delete the Mails

delete-multiple-voicemails-iphone

  • Deleting Voicemail from the Phone also deletes it from the server, so, only deletes those mails you have listened and and don’t want anymore.

How To Check Voicemail Storage Capacity Usage.

  • Head to the Settings > General > Usage.
  • Find the app Voicemail,a along with it you can see the Storage consumed by it.

voicemail-storage-usage-iphone


  • You can do anything about the Storage from here, but alteast you have the idea how much Storage it is eating.

How To Set Firmware Password On Mac OS X Mavricks.

0
How To Set Firmware Password On Mac OS X Mavricks.

Despite many Security Checks a Mac OS X provides, yet without a Firmware password, no one feels secure. Putting a Password on a Folder, only means that you have something dirty in here, though you don’t. Putting a Password for some Specific things also mean the same thing. So, in order to save yourself and your Mac from others to use, Put a firmware Password. Filevault is a suggestion but one it encrypts the data, it becomes impossible access it without Filevault.

Screenshot_26

But remember to choose a good Password, not too complex neither too easy for anyone to understand, make sure to put something you usually say in your daily life, but others don’t pay attention to it. A name of your Favorite Character, your Phone number with something different. Got the Password you will set, now let’s head towards the tutorial.

How To Set Firmware Password On Mac

  • Reboot Mac and hold down Command + R to boot into recovery mode.
  • At OSX utility splash screen, pull down utility menu bar and Click Firmware Password Utility.
  • Choose Turn On Firmware Password.


Screenshot_24

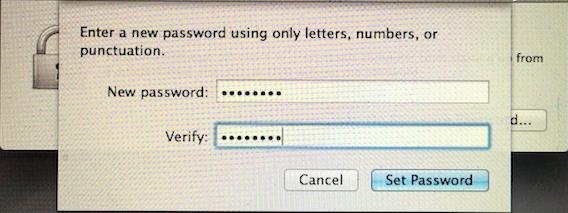
  • Enter the Password Twice to confirm, then Choose Set Password, and don’t forget this password under any circumstances.

Screenshot_23

  • Choose Quit Password Utility to set the EFI Password.

When the Password is Set, reboot mac like usual. Mac will boot into OS X.

Install Omega ROM v6.0 Android 4.3 on Galaxy Note 3 SM-N9005

0
Install Omega ROM v6.0 Android 4.3 on Galaxy Note 3 SM-N9005

Samsung’s latest flagship phablet Galaxy Note 3 is widely being used at the moment by both the developers and the users. The device comes branded as different variants i.e International, LTE and others where as the only thing differentiating these variants is the band frequency and the processing chip. Just in case you don’t know, Galaxy Note 3 sports a 5.7 inches full HD display with 386 ppi, Exynos 5 Octa processor clocked at 1.9 GHz or Qualcomm Snapdragon 800 processor clocked at 2.3 GHz, a RAM of 3 GB is placed under the hood, a 13 MP camera at the back and a 2 MP on the front while a massive battery of 3200 mAh is packed under the hood.

Out of the box, Galaxy Note 3 runs on Android 4.3 Jelly Bean and the device is set to receive Android 4.4 KitKat soon as well.While there is no further update available for the Note 3, custom ROMs maybe a best choice. The very well known Omega ROM is available now for Galaxy Note 3 SM-N9005 (LTE variant). Thanks to XDA recognized developer ::indie:: for creating this awesome ROM. Omega ROM v6 is based on Android 4.3 Jelly Bean XXUDML2 Stock firmware, and comes with a number of mods and performance enhancements, it’s pre-rooted and zipaligned as well. Before we head towards the installation instructions, let’s have a look at the features / mods offered by this ROM.Samsung-Galaxy-Note-3-front-back.jpg-640x488

Features:


Battery % mod
4-way reboot menu
Menu long press to kill app
Call Recording
Phone with no increasing ringtone
No sms to mms conversion
Unlimited contacts to sms – mms
sms/mms Group Messaging
sms/mms Backup – Restore
Disabled scrolling cache
Email with Exchange Security Disabled
Hide sms from call logs
TW Launcher with scrolling wallpaper
Join more unlimited contacts in the contacts
Enable sub Symbols on Stock Samsung keyboard
Exit button to stock browser
All supported languages enabled
All supported languages for Samsung Keyboard enabled
Camera shutter sound on-off
Task manager shortcut app by indie

 
Here are some pre-requisites and pre-cautions that you must follow:

      1. This ROM is only for Galaxy Note 3 SM-N9005. Do not try this on any other device, check your device’s model in Settings > General > About Device.
      2. You device must have a custom recovery installed. Follow our full guide here to install TWRP Recovery or find the CWM Recovery here.
      3. Your device’s battery should be charged at least over 60%. This is highly recommended in order to prevent any power issues during the flashing process.
      4. Make sure that you backup your important media content, ContactsCall Logs Messages. This is highly recommended just in case something goes wrong and you need to reset your phone.
      5. Use only OEM data cable to establish connection between your phone and PC. Turn off your Anti Virus and Firewall to prevent any connection issues. Also enable USB debugging mode on your phone if you face connection issues.
      6. If you already have rooted your device, use Titanium Backup to back up all your important apps + system data. Also if you are using a custom recovery, it is recommended that you backup your current system using that first. [Just for the sake of safety.]
      7. Using TWRP Recovery, please make an EFS backup before you flash this ROM.
      8. This firmware is pre-rooted, you may not need worry about root access later on.
      9. Alright! Go ahead and flash the custom firmware, follow this guide to the letter.

Let’s move forward to the ROM flashing process on the 2nd page.


Disclaimer: The methods involved in flashing custom roms and rooting your phone is highly custom and may result in bricking your device, and has nothing to do with Google or the device manufacturer that is SAMSUNG in our case. Also rooting your device will void its warranty and you will be no longer eligible for any kind of free device services by the manufacturers/warranty providers. In case of any mishap we may not be held responsible. Follow these instructions to the letter to avoid any mishap or bricking. Make sure that whatever you do, you are doing it at your own responsibility.

Pages: Page 1 > Page 2
Install Android 4.4 KitKat OmniROM on Samsung Galaxy Note GT-N7000

5
Install Android 4.4 KitKat OmniROM on Samsung Galaxy Note GT-N7000

The popular custom  OmniROM is now available for our beloved Samsung Galaxy Note GT-N7000. Thanks to the Senior XDA devleoper XpLoDWilD for packing up this great ROM for the Galaxy Note. Just in case you don’t know, Samsung’s very first phablet, Galaxy Note runs on Android 2.3 Ginger Bread out of the box, the phone received updates up to Android 4.1.2 Jelly Bean and stopped here. As off now, there is no official word by Samsung, no news or rumor anywhere about any further updates for the Galaxy Note. But that’s not a thing to worry about as long as we have the great developers working over the XDA community.

In the following post we’re going to have a look on a method to install this ROM on the Galaxy Note 1 GT-N7000. This is a nightly build, and may contain some bugs. In case of any mishap we may not be held responsible, also flash this ROM only if you’re familiar with the custom ROMs and you are good at flashing / tweaking.Samsung-Galaxy-Note

In case you don’t know what is OmniROM, have a look:

OmniROM is a free, community built, aftermarket firmware distribution of Android 4.4 (Kitkat), which is designed to increase performance, reliability and features over stock Android for your device.

Before heading towards the ROM flashing guide, here are some pre-requisites that you must follow:

      1. Your device must have a CWM recovery installed. Follow our full guide here to do so.
      2. This ROM is only for Samsung Galaxy Note GT-N7000. Do not try this on any other device. Check your device’s model in Settings > About Device.
      3. Your device’s battery should be charged at least over 60%. This is highly recommended in order to prevent any power issues during the flashing process.
      4. Make sure that you backup your important media content, ContactsCall Logs & Messages. This is highly recommended just in case something goes wrong and you need to reset your phone.
      5. Use only OEM data cable to establish connection between your phone and PC. Turn off your Anti Virus and Firewall to prevent any connection issues. Also enable USB debugging mode on your phone if you face connection issues.
      6. If you already have rooted your device, use Titanium Backup to back up all your important apps + system data. Also if you are using a custom recovery, it is recommended that you backup your current system using that first. [Just for the sake of safety.]
      7. We highly recommend you to wipe your phone’s data, cache and dalvik cache, a clean install always expected to give the best results.
      8. This firmware is pre-rooted, you may not need worry about root access later on.
      9. Alright! Go ahead and flash the custom firmware, follow this guide to the letter.

Let’s move forward to the next page for the ROM flashing guide.


Disclaimer: The methods involved in flashing custom roms and rooting your phone is highly custom and may result in bricking your device, and has nothing to do with Google or the device manufacturer that is SAMSUNG in our case. Also rooting your device will void its warranty and you will be no longer eligible for any kind of free device services by the manufacturers/warranty providers. In case of any mishap we may not be held responsible. Follow these instructions to the letter to avoid any mishap or bricking. Make sure that whatever you do, you are doing it at your own responsibility.


Pages: Page 1 > Page 2
Install Android 4.3 Jelly Bean XWUGML4 Firmware on Galaxy S3 I9300

0
Install Android 4.3 Jelly Bean XWUGML4 Firmware on Galaxy S3 I9300

Samsung has just started rolling out the Android 4.3 update for the International Galaxy S III. A good news for the users who have been waiting for the update eagerly. Samsung rolled out an update earlier to some regions, but unfortunately pulled it back due to the bugs in firmware. Users have been waiting for Android 4.2.2 update, but Samsung remained unfair with the update and wanted to surprise the users with the 4.3 update directly, that didn’t surprise em’ at all. Anyways, the update is available now for the Indian region (INS) and is expected to be much stable and faster, in the following post we’ll be having a look on the method to install this firmware manually on your Galaxy S III GT-I9300.

The new update packs up some new features like Galaxy Gear support, new Settings app layout, the launcher is same as the old one but there are some core UI changes. It is more stable, faster and comes with lots of bug fixes and last but not the least it is Android 4.3 Jelly Bean.Galaxy S3 Android 4.3

Before we head towards the flashing guide, here are some pre-requisites and pre-cautions to be followed:

      1. This guide is only for Samsung Galaxy S III GT-I9300. Do not try this on any other phone, check your phone’s model number in Settings > About Device.
      2. Download the firmware file carefully for your device.
      3. Make sure that your device’s battery is charged over at least 60%. Highly recommended in order to prevent any mishap during the recovery installation process.
      4. Make sure that you backup your important media content, ContactsCall Logs & Messages. This is highly recommended just in case something goes wrong and you need to reset your phone.
      5. Use only OEM data cable to establish connection between your phone and PC. Turn off your Anti Virus and Firewall to prevent any connection issues. Also enable USB debugging mode on your phone if you face connection issues.
      6. If you already have rooted your device, use Titanium Backup to back up all your important apps + system data. Also if you are using a custom recovery, it is recommended that you backup your current system using that first. [Just for the sake of safety.]
      7. We highly recommend you to wipe your phone’s data, cache and dalvik cache, a clean install always expected to give the best results.
      8. The update will wipe root access and cwm/twrp recovery if you have rooted and installed it.
      9. Alright! Go ahead and flash the newest firmware, follow this guide to the letter.

Also check out: Latest TWRP Recovery for Galaxy S3 GT-I9300

Let’s move forward to the 2nd Page for Flashing guide:

Pages: Page 1 > Page 2

Carbon for Twitter 2.0.8 APK – Download Here

0
Carbon for Twitter 2.0.8 APK – Download Here

Carbon for Twitter apk if you are twitter freak the you are familiar with TweetBot and other twitter clients but unfortunately they are not available for Android. But recently a app came up with a new update Carbon for twitter for Android. Carbon is a Twitter client, but unlike other Twitter clients. All of your Twitter content on one screen. A screen that doesn’t get you drilling down to many other screens to reach to what you want. Timelines, Lists, Favourites, Searches, Trends, Profiles, all there.

Carbon-Android-337x600

Also See:Framaroot v1.8.0 Apk – Universal One Click Root App

Main Features of Carbon for Twitter:

– Fresh new Design & Interface
– Brand new Timeline design & aesthetics
– Swipe-able Timeline, @Mentions, and Messages on Home.
– Quick Timeline, one Timeline for Searches, List, Favourites on your Home screen.
– Don’t Disturb Mode
– Oxide Mode for Grayscale Timeline experience
– Power Scroll: Scroll/Swipe up or down using Two fingers to jump to top or bottom of Timelines
– Tweet Quick Actions
– Configuratie Tweet Font Sizes
– Retweets Timeline
– In-App Browser
– In-App YouTube Player
– Vine Previews & Playback
– Rich Timelines with full inline images and videos
– Rich and elegant style for User Profiles
– Rich Conversation View
– Threaded Direct Messages
– Background updates with quick actions for Jelly Bean, per account
– Username Autocomplete
– Mutes/Filters for Hashtags, Users, and Keywords
– People Search
– Obviously Multi-account with simultaneous accounts tweets
– Profile Editor

What’s New:

Additions, Fixes & Changes, v.2.0.8
– Ability to change the Type style used on Tweets on Timeline
– Fixed bug that did not add newly accounts to the Home screen

Download Carbon for Twitter 2.0.8 Android APK:

Carbon for Twitter apk | Google Play

How to Install Carbon for Twitter for Android 2.0.8.0 APK on Your Android Device

Carbon-for-Twitter-Android2

Follow all the instruction carefully so that you can install Carbon for Twitter 2.0.8 APK on your Android devices.

Step 1: Download Carbon for Twitter apk on your PC or if you want to download directly on your phone.

Step 2: If you want to install apk files then you need a file manager so Download ASTRO File Manager .

Step 3: Apk files are considered third party apps because you are not downloading it through App store so you need to change few settings.

Step 4: Now go to Settings > Applications > check “Unknown sources” box. Tap ‘OK” on the warning.

Step 5: Now connect your device with and place Carbon for Twitter 2.0.8 APK file where ever you want in your SDcard.

Also See: Whatsapp plus apk

Step 6: Tap on the ” Carbon for Twitter 2.0.8 APK ” a pop-up will show select open App Manager.

Step 7: Now tap on the installation and follow the instruction and it will take few seconds to complete the installation.

Here you Carbon for Twitter is installed on your device. If you have any problem with installation please do tell me in comments.

How To Extract And Back-Up All Your Text Messages From Your iPhone To Mac.

0
How To Extract And Back-Up All Your Text Messages From Your iPhone To Mac.

Unlike Android, Apple make it difficult to Extract Text and Picture Messages form the iOS devices. We all want to make a Back-up of all the Data we can’t just directly saved into the Computer. While there are only a Handful of Third Party applications available to do this task, majority of them are paid or implement certain techniques which are shady. But Now Thanks to chelseybaker, you can easily Extract all the Text Messages from your iPhone and Save them in your Mac. if working with Codes sounds difficult to you, then don’t worry it is quite easy, Even if you have never seen a line of Code in your Life. Just Follow the Rest of the guide and Enjoy!

How To Save Messages From Your iPhone.

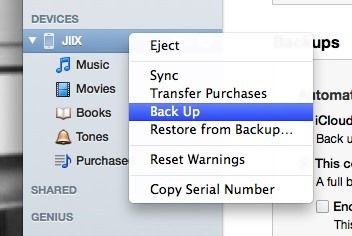
First Make a Back-up of all your Data, Using iTunes. Connect your device with iTunes, Right click the Name and Make Back-up.

extract-backup-all-your-text-messages-picture-messages-from-your-iphone-your-mac.w654

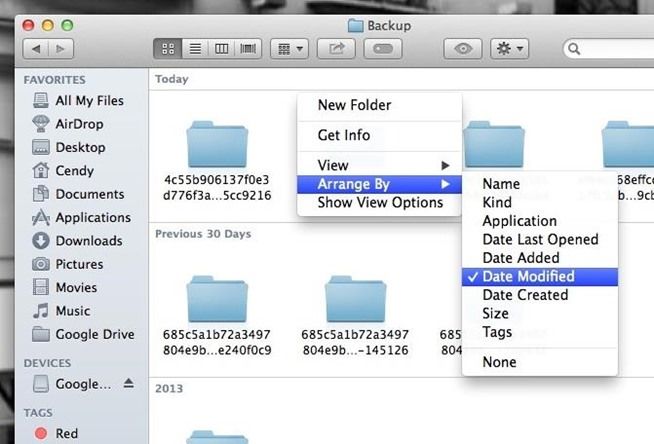
Now Find the Back-up folder in Mac, Navigate to Library > Application Support > Mobile Sync > Back-up. Arrange the icons by date modified, then you will find the Latest Back-up.

extract-backup-all-your-text-messages-picture-messages-from-your-iphone-your-mac.w654 (1)

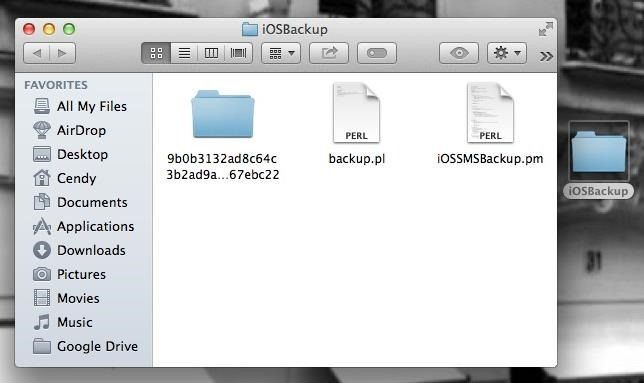
Create a folder on Desktop and name it iOSBack-up and Copy the Back-up folder in it.

Now Download iOS Message Export File. Open the Zip file and you will find Two Files in it.

1. backup.pl
2. iOSSMSBackup.pm

Copy both of them into iOSBack-up folder.

extract-backup-all-your-text-messages-picture-messages-from-your-iphone-your-mac.w654 (2)

Now Press Command + Space and Type Terminal and Type the Following Command:

cd ~/Desktop/iOSBackup

Now Type the following command but Replace the ‘<folder>’ with the name of your Back-Up folder.

perl backup.pl –directory_path <folder>/

extract-backup-all-your-text-messages-picture-messages-from-your-iphone-your-mac.w654 (3)

After You Press Enter, you will see the List of Phone Numbers, for all the Text Messages Conversation on your Phone.

extract-backup-all-your-text-messages-picture-messages-from-your-iphone-your-mac.w654 (4)

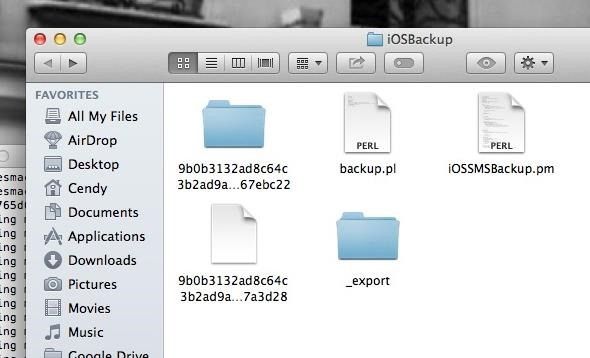
Now in your iOSBack-up folder, you will see another folder called export.

extract-backup-all-your-text-messages-picture-messages-from-your-iphone-your-mac.w654 (5)

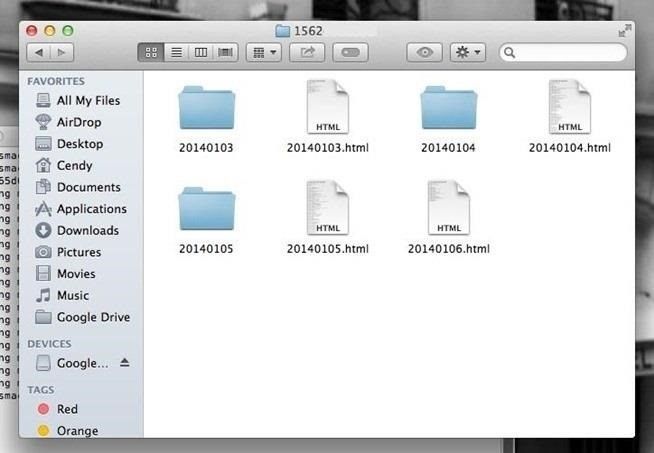
Open it and you will find, the list of all the Conversation you had in HTML files. You will find Multiple HTML files in folder, grouped with days.

 extract-backup-all-your-text-messages-picture-messages-from-your-iphone-your-mac.w654 (6)

If you Open the HTML files in your Browser, you will see the Conversation of the Certain day.

extract-backup-all-your-text-messages-picture-messages-from-your-iphone-your-mac.w654 (7)

How To Send Any Photo or Video Using SnapChat On Galaxy Note 3.

0
How To Send Any Photo or Video Using SnapChat On Galaxy Note 3.

SnapChat was the biggest hit of 2013, giving you a unique way of sending and receiving the images and videos. Without ant integration from Third-Part and with a lot of flaws, SnapChat grew into a Multibillion-Dollar company in just 12-Months. While it is entertaining to use, still like any other app there are restrictions. Till now you can only Upload Photos and Videos that are taken from SnapChat Camera, making it difficult to send other Photos and also viewing in Gallery.

Snapchat-flashy-features

But thanks to amcgavin, who actually resurrected SnapShare and like other Galaxy Device, Developed Xpose Module for Note 3 making it possible to send Timely Photos on SnapChat. Xpose requires a Rooted device and also a SnapChat application to work. We will show you how?

How To Send Any Photo or Video Using SnapChat On Galaxy Note 3.

  • First Download and Install Xpose
  • Now Install this Apk like a regular apk.
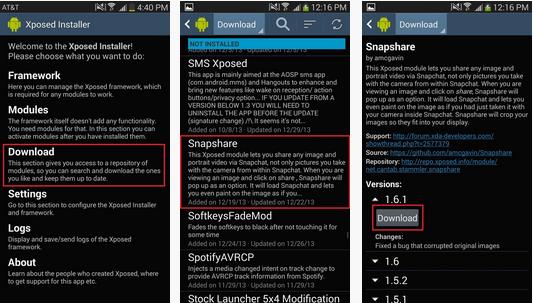
  • Open Xpose, and Download Snapshare from the Download Section.

Screenshot_20

  • Once it is done, go to Modules and Check the Box next to SnapShare.

Screenshot_21

  • Then Customize how images will look after the Upload. This is Optional, you don’t really need it.

Screenshot_22

  • Now Go to Gallery and Open any photo or video. Tap Share, and Select ShapShare, Depending on your setting you picture will be shown.
  • Do the necessary editing and Upload it.