Home Blog Page 465

Install PSP Emulator On iPhone and iPad And Play PSP Games On It

0
Install PSP Emulator On iPhone and iPad And Play PSP Games On It

Before Mobile phones, there were a lot of ways to play games on a portable device, and those devices include Gameboy, but that time has gone now, PSP has taken over all the portable gaming platforms, and even though Both Android and iOS provides and amazing game in terms of both graphics and story, still it is fun to play games on those old dusty Consoles, rather than that not all the games are provided by Android or iOS, that we have played on PSP. To run consoles games on PC or any other platform, an emulator is need, like to play Android games on PC you need an Emulator like Bluestacks.

PPSSPP, is an emulator available for both iPhone and iPad, that helps you run the PSP games on your mobile phone as smooth as it is running on a PSP. If you already own a PSP, and how seamless manner in which it runs, you will notice a lot of different optimizations and settings given to you, help you enjoy the best experience ever. The installation process is simple as any other jailbreak tweak.

IMG_0121

One of the best things about PPSSPP is the Save State, it allows you to save the game and then start form the same point, something that is rare to see in any console. It is a very useful tool,that is demanded by many gamers. I will be happy to play the game from the same point, where i defeated a boss instead to start the mission all over. Without any further ado, let’s see how to install PPSSPP on iPhone, iPad.

Jailbreak your iOS Device.

Since the following tutorial needs an iOS device which is Jailbroken, you need to Jailbreak your device. If your device is still in its normal condition. Follow our Jailbreak Section to find out how to Jailbreak your device

Add PPSSPP Repo To Cydia

IMG_0120

  1. Open Cydia.
  2. Tap Manage at the Bottom.
  3. Open Sources.
  4. Navigate to Edit at bottom.
  5. Tap on Add on the Left.
  6. Enter the Following in the Text Field,‘http://cydia.angelxwind.net, and hit Add Source.
  7. Return to Cydia

Download PPSSPP:

  1. Open Cydia.
  2. Search for PPSSPP.
  3. Tap PPSSPP once the search is over.
  4. Tap Install on the top right corner.
  5. Tap Confirm.
  6. Restart your device

How To Root T-Mobile Galaxy S5 G900T On Android 4.4.2 UVU1ANCH Kit-Kat Stock Firmware

0
How To Root T-Mobile Galaxy S5 G900T On Android 4.4.2 UVU1ANCH Kit-Kat Stock Firmware

It is a common observation to see that after a release of any flagship device, different carriers start selling it on contract of 12-24 months. Due to them, it becomes relatively easy to purchase these kinds of devices and since there is no difference is specs of either international or carrier bound device, users doesn’t feel much bad after purchasing a carrier lock device. The only let down is that you can’t use any network other than what the carrier provided with it and support to such devices by developers are not much, but who needs it anyway as usually these devices are purchased with kept in mind to claim warranty.

Again, we will be using CF-Auto Root method to root this device and as you all know, that CF-Auto root also installs Custom Recovery on your device and it is the most accomplished Rooting method. Rooting allows you to get full control over your device, Stock apps and mods are good, but installing Custom Mods gives you better support and great battery life, you might need to delete some Stock apps from the device, a non-rooted device cannot do that, but a rooted one has the power to remove stock apps too.

samsung-galaxy-s51-111

If you are familiar with Odin and it’s working, then this tutorial might not be difficult for you. Otherwise read the whole tutorial first before trying it on your device. In this Article, we will show you How To Root T-Mobile Galaxy S5 G900T On Android 4.4.2 UVU1ANCH Kit-Kat Stock Firmware.But before we begin, Make sure that:

  1. hat you have a Well Charged Battery, 60%-80% is better.
  2. Back-Up all your important ContactsCall Logs & Messages.It is highly recommended in case of any mishap or data loss to back up all your important data.
  3. Back-Up your Mobiles EFS Data. How To Restore and Back-Up EFS Data On Samsung Galaxy Devices.
  4. Check your device model, Go To Setting > About and Make sure that it is G900T.
  5. Do-not try it on SM-G900I, SM-G900F, G900M , G900A , G900H and G900V 
  6. Enable USB Debugging Mode
  7. Download USB Driver For Samsung Devices: Link

Disclaimer:

The methods involved in flashing custom roms and rooting your phone is highly custom and may result in bricking your device,and has nothing to do with Google or the device manufacturers which is Samsung in our case. In case of any mishap we may not be held responsible. Follow these instructions to the letter to avoid any mishap or bricking. Make sure that whatever you do, you are doing it at your own responsibility.

Here you will find the Step-by-Step Guide On How To Root Galaxy S5 SM-G900T. Before proceeding further, Let me Warn you that if you Get stuck in bootloop, after the installation(Possibilities are almost Zero), Here is the Process to get out of it.

If you stuck Into bootloop After the Installation Process.

  • Go to Recovery, Turn off your Phone and Turn it On While Pressing, Power + Volume Up + Home buttonuntil you see some text on-screen.
  • Navigate to Advance and Select Wipe Devlik Cache.

Screenshot_5

  • Go Back and Select Wipe Cache.

Screenshot_18

  • Select Reboot System Now.

How To Root It.

odin_explained6

  1. Download CF-Auro Root Package For your Galaxy S5 to your computer and extract the zip file.
  2. Download Odin.
  3. Turn off your Phone and Turn it On While Pressing, Power + Volume Down + Home button until you see some text on-screen, Press Volume Up to continue.
  4. Make Sure that the USB drivers are installed.
  5. Open Odin in Computer and connect your device to PC, while it is in the Download mode.
  6. If your Phone is successfully connected to PC, the Odin port will turn Yellow with COM port number.
  7. Now Click on PDA and select the File ‘CF-Auto-Root-k3g-k3gxx-smg900h.tar.md5
  8. In Odin, Check Auto reboot  Option.
  9. Now Click the start button and wait for the process to complete.
  10. After the installation is complete you device will restart and once you see the Home Screen and get the “Pass” Message on Odin, unplug the cable.

If You See “Fail” Instead Of “Pass”.

By Any Chance if you see Fail Message instead of Pass, Odin haven’t Rooted your device but Recovery has been installed. Go to Recovery HOW? Take out the Battery, Put it back after 3-4 seconds, Press and Hole Power + Volume Up + Home button until you are in Recovery mode. The rest of the process will automatically start there and Super SU will install on your device

That’s it your Samsung Galaxy S5 G900T has been Rooted On Android 4.4.2 Kit-Kat.Download any Root Checker app or See Super SU in app Drawer to Verify root access.

How To Root Galaxy S5 G900H On Android 4.4.2 XXU1ANCI Kit-Kat Stock Firmware

0
How To Root Galaxy S5 G900H On Android 4.4.2 XXU1ANCI Kit-Kat Stock Firmware

Previously we posted a tutorial about installing CWM Recovery on Samsung Galaxy S5, hence today it is fair to post something about rooting this device. No matter which build number you are using, all the Galaxy S4 have the same specs, the only difference is the connectivity. Let’s get a little bit around Galaxy S5, Galaxy S5 was announced in February, but released for the general public just in this same week and because of that, developers have gotten their hands on it and now we see rooting methods and custom recoveries for Galaxy S5 and it is not long before we start seeing Custom ROMs for Galaxy S5 too.

Now let’s get back to business, this is the CF-Auto Root method for Galaxy S5, not only will it root your device, but also it also installs CWM Recovery on it, but if you have any problem with installing recovery via CF-Auto Root, you can follow our Custom Recoveries Section to get the Recovery for your device. Rooting allows you to get full control over your device, Stock apps and mods are good, but installing Custom Mods gives you better support and great battery life, you might need to delete some Stock apps from the device, a non-rooted device cannot do that, but a rooted one has the power to remove stock apps too.

large_Samsung-Galaxy-S5-Raya

If you are familiar with Odin and it’s working, then this tutorial might not be difficult for you. Otherwise read the whole tutorial first before trying it on your device. In this Article, we will show you How To Root Galaxy S5 G900H On Android 4.4.2 XXU1ANCI Kit-Kat Stock Firmware.But before we begin, Make sure that:

  1. That you have a Well Charged Battery, 60%-80% is better.
  2. Back-Up all your important ContactsCall Logs & Messages.It is highly recommended in case of any mishap or data loss to back up all your important data.
  3. Back-Up your Mobiles EFS Data. How To Restore and Back-Up EFS Data On Samsung Galaxy Devices.
  4. Check your device model, Go To Setting > About and Make sure that it is G900H.
  5. Do-not try it on SM-G900I, SM-G900F, G900M , G900A , G900T and G900V 
  6. Enable USB Debugging Mode
  7. Download USB Driver For Samsung Devices: Link

Disclaimer:

The methods involved in flashing custom roms and rooting your phone is highly custom and may result in bricking your device,and has nothing to do with Google or the device manufacturers which is Samsung in our case. In case of any mishap we may not be held responsible. Follow these instructions to the letter to avoid any mishap or bricking. Make sure that whatever you do, you are doing it at your own responsibility.

Here you will find the Step-by-Step Guide On How To Root Galaxy S5 SM-G900H. Before proceeding further, Let me Warn you that if you Get stuck in bootloop, after the installation(Possibilities are almost Zero), Here is the Process to get out of it.

If you stuck Into bootloop After the Installation Process.

  • Go to Recovery, Turn off your Phone and Turn it On While Pressing, Power + Volume Up + Home buttonuntil you see some text on-screen.
  • Navigate to Advance and Select Wipe Devlik Cache.

Screenshot_5

  • Go Back and Select Wipe Cache.

Screenshot_18

  • Select Reboot System Now.

How To Root It.

odin_explained6

  1. Download CF-Auro Root Package For your Galaxy S5 to your computer and extract the zip file.
  2. Download Odin.
  3. Turn off your Phone and Turn it On While Pressing, Power + Volume Down + Home button until you see some text on-screen, Press Volume Up to continue.
  4. Make Sure that the USB drivers are installed.
  5. Open Odin in Computer and connect your device to PC, while it is in the Download mode.
  6. If your Phone is successfully connected to PC, the Odin port will turn Yellow with COM port number.
  7. Now Click on PDA and select the File ‘CF-Auto-Root-k3g-k3gxx-smg900h.tar.md5
  8. In Odin, Check Auto reboot  Option.
  9. Now Click the start button and wait for the process to complete.
  10. After the installation is complete you device will restart and once you see the Home Screen and get the “Pass” Message on Odin, unplug the cable.

If You See “Fail” Instead Of “Pass”.

By Any Chance if you see Fail Message instead of Pass, Odin haven’t Rooted your device but Recovery has been installed. Go to Recovery HOW? Take out the Battery, Put it back after 3-4 seconds, Press and Hole Power + Volume Up + Home button until you are in Recovery mode. The rest of the process will automatically start there and Super SU will install on your device

That’s it your Samsung Galaxy S5 G900H has been Rooted On Android 4.4.2 Kit-Kat.Download any Root Checker app or See Super SU in app Drawer to Verify root access.

How To Fix iTunes Error 3149 While Upgrading/Restoring iOS Version

2
How To Fix iTunes Error 3149 While Upgrading/Restoring iOS Version

Apple is full of errors, despite that they are so full of their Security in their devices, even if you are using their PC manager, a.k.a iTunes, you are most likely to encounter a lot of errors while installing or upgrading iOS firmware, mostly users faces errors to upgrade the firmware to the latest version, but that is not something you should be afraid of, the real problem starts, when you start see the iTunes Error 3149, there isn’t a proper way to fix this error, but there are several ways that you have to try and maybe one of them works for you.

If you have spend time on Apple Support page, then you might have know there isn’t much help there. Apple doesn’t like its users to Downgrade their Firmware, they want them to use the latest version whether it is good for them or not, like iOS 7 running on iPhone 4 is just like sending an 80-years old in a race. Now you will be lucky if you try to restore your device or updating it and doesn’t face any error at all. For the rest of users, here is the way to solve  iTunes Error 3149.

Screenshot_2

How To Fix iTunes Error 3149

  • Usually it happens because of the Hosts file, a little editing can solve this problem, if you are lucky.
  • Navigate to C:/Windows/System32/drivers/etc/ and locate the file name as hosts.
  • For Mac it is located in etc, just search for it
  • Open file in Notepad, with administrative rights.
  • Add the following line at the end: # 74.208.105.171 gs.apple.com

Screenshot_1

  • Save the File and then try to upgrade the iOS via iTunes.
  • In most cases this is enough to solve the problem

How To Fix iTunes Error 3149 For a Jailbroken Device

  1. Download the iOS file you need to upgrade or downgrade.
  2. Download TinyUmbrella.
  3. Connect iPhone to PC and Close iTunes if it pop-ups.
  4. Open TinyUmbrella and then click Start TSS Server.
  5. Put your iPhone in DFU mode.
  6. Now Upgrade or Downgrade the firmware like usual and hopefully the Error won’t occur while Resotring or updating the firmware.

If you face any kind of issue let me know in comments.

How To Install ClockworkMod Recovery 6 On Samsung Galaxy S5 G900F / G900H

How To Install ClockworkMod Recovery 6 On Samsung Galaxy S5 G900F / G900H

Samsung Latest Flagship device, Galaxy S5 is now available for the general public, and the first thing that every user wants to do with his new device is to root it and install Custom Recovery on it. Now that it is available for everyone, Custom ROMs for Galaxy S5 will be on the web very soon. We have provided te CF-Auto root method for Galaxy S5 SM-G900F, but there was a problem with it, it does root your device, but didn’t install CWM Recovery on it, so today we will provide you a way to install Custom Recovery on it. This tutorial will only install CWM Recovery on your Galaxy S5, not root it.

If you want to root your Galaxy S5 SM-G900F only, then follow: Root Galaxy S5 SM-G900F On Android 4.4.2 Kit-KatBut if you own a Galaxy S5 G900H, then the rooting method will be available soon, till then install CWM on your device and wait for the release of Super SU for it.

Samsung-Galaxy-S5

If you are familiar with Odin and it’s working, then this tutorial might not be difficult for you. Otherwise read the whole tutorial first before trying it on your device. In this Article, we will show you How To Install ClockworkMod Recovery 6 On Samsung Galaxy S5 G900F / G900H.But before we begin, Make sure that:

  1. That you have a Well Charged Battery, 60%-80% is better.
  2. Back-Up all your important ContactsCall Logs & Messages.It is highly recommended in case of any mishap or data loss to back up all your important data.
  3. Back-Up your Mobiles EFS Data. How To Restore and Back-Up EFS Data On Samsung Galaxy Devices.
  4. Check your device model, Go To Setting > About and Make sure that it is SM-G900F/ G900H.
  5. Do-not try it on SM-G900I, G900M , G900A , G900T and G900V 
  6. Enable USB Debugging Mode
  7. Download USB Driver For Samsung Devices: Link

Disclaimer:

The methods involved in flashing custom roms and rooting your phone is highly custom and may result in bricking your device,and has nothing to do with Google or the device manufacturers which is Samsung in our case. In case of any mishap we may not be held responsible. Follow these instructions to the letter to avoid any mishap or bricking. Make sure that whatever you do, you are doing it at your own responsibility.

Here you will find the Step-by-Step Guide On How To Install CWM Recovery Galaxy S5 SM-G900F/G900H. Before proceeding further, Let me Warn you that if you Get stuck in bootloop, after the installation(Possibilities are almost Zero), Here is the Process to get out of it.

If you stuck Into bootloop After the Installation Process.

  • Go to Recovery, Turn off your Phone and Turn it On While Pressing, Power + Volume Up + Home buttonuntil you see some text on-screen.
  • Navigate to Advance and Select Wipe Devlik Cache.

Screenshot_5

  • Go Back and Select Wipe Cache.

Screenshot_18

  • Select Reboot System Now.

How To Install CWM Recovery On It.

odin_explained6

Download Appropriate Package For your Galaxy S5 to your computer and extract the zip file.

  • Samsung Galaxy S5 G900F (LTE): g900f-cwm-recovery-6.0.4.7.tar
  • Samsung Galaxy S5 G900H (3G): g900h-cwm-recovery-6.0.4.7.tar
  1. Download Odin.
  2. Turn off your Phone and Turn it On While Pressing, Power + Volume Down + Home button until you see some text on-screen, Press Volume Up to continue.
  3. Make Sure that the USB drivers are installed.
  4. Open Odin in Computer and connect your device to PC, while it is in the Download mode.
  5. If your Phone is successfully connected to PC, the Odin port will turn Yellow with COM port number.
  6. Now Click on PDA and select the Recovery file according to your device.
  7. In Odin, Check Auto reboot  Option.
  8. Now Click the start button and wait for the process to complete.
  9. After the installation is complete you device will restart and once you see the Home Screen and get the “Pass” Message on Odin, unplug the cable.

Now all that is left is to see whether Custom Recovery is installed or not,Go to Recovery How? Turn off your Phone and Turn it On While Pressing, Power + Volume Up + Home button until you see some text on-screen. If you see the CWM Recovery, then everything went better than expected.

Doodle Basketball 2 For PC (Windows XP/7/8/8.1 & MAC)

0
Doodle Basketball 2 For PC (Windows XP/7/8/8.1 & MAC)

Doodle Basketball 2 is a causal Basketball shooting game, in which you need to throw Ball in the basket and make as much score as you can. Throw the ball from different places, from different angles and try to achieve maximum score as possible, just make sure that it lands in the basket. The game is built using real laws of physics, and develop within the Species of “Paper,” which add more creativity and an unforgettable atmosphere for your game, the numbers of balls are limited in the game, so pay more attention, as the balls decreased whenever you make a mistake.

If the ball lands directly in the Basket, without hitting or touching the Ring, then you get extra points and if it happens again without any interruptions, you get the score multiplier, the more points you score that way, the greater the score multiplier. Using Multiplayer mode, play with people all around the world to become the best player in the world.This game is available for Both Android and iOS and now you can play in on PC too. Just Follow our Guide and All is Well. However remember this is not an official release for PC, it is just being run on PC using a Third Party Emulator.

unnamed

Before We go any further, let’s look at the Features of Doodle Basketball 2:

  • User-friendly
  • Off-beat design and sounds
  • Bonuses and achievements
  • Game with friends on one device
  • Bluetooth game
  • Online multiplayer: play online with gamers from all over the world
  • Global leadership board

How to Download and Install Doodle Basketball 2 on PC:

  1. You need an Android emulator to run this game on your Windows PC or MAC. We recommend using Bluestacks. Use our guide to install it on your PC.
  2. After downloading and installing Bluestacks,Open it
  3. Download Apk Of Doodle Basketball 2 , Double click the Apk File and Bluestacks will install it automatically
  4. Open BlueStacks now > All Apps > Doodle Basketball 2
  5. The game will start now, follow the on screen instructions.
  6. Follow the initial screen,  you’ll be able to play it.
  7. Tap the screen by clicking inside the game frame.
  8. Enjoy rebuilding the Quahog.
  9. Don’t forget to let us know about your high score.
  10. That’s All!

Easily Lock and Protect Apps on Android with AppLock

2
Easily Lock and Protect Apps on Android with AppLock

Privacy and protection  is what a user demands and values higher than anything else on any platform, whether it’s something in the virtual world or in the real world. Similar is the case with Android, Android’s open nature has urged the developers to rush in the app stores with billions of apps. These apps, surely have helped the users to improve their lives in a number of ways, getting taught by their Android devices, and also given the world a whole new direction to move in. While you load your Android device with tons of apps, you also need to take care of what apps include the use of your private and personal data and what are the possibilities for your device to go in someone else’s hands and the chances of loosing your private data or getting it compromised with an unwanted or untrusted person.

To understand it in a better way, let’s go through an example. You’ve installed Facebook Messenger, WhatsApp or Viber on your Android device that contains chats with your friends and family, and you wouldn’t like anyone else to access any of your private talks. For some reason, your device goes in someone else’s hands, and he unintentionally or intentionally opens up any of your chat apps and reads your private talks. This will result in something annoying and will definitely cause so many problems. In aforementioned case, you would like to take preliminary actions and prevent any of your information from getting compromised or going beyond the walls in future. Now this is what we are here for at the moment.

As mentioned earlier, where there are billions of apps available for Android, and all the apps have something useful to go through, there are quite a few apps in these billions that also help you to keep your privacy and security atop, and protect from anything uncertain. One similar apps that I came across today is AppLock.

Loaded with tons of impressive features, AppLock is the best solution, that helps you to lock your desired Android applications, by setting a Pattern, Password or PIN. Once installed, you can lock your contacts, messages, phone, settings or any other applications you want. Upon tapping the app’s icon, the AppLock application will prompt the users to enter the password they set-up for AppLock profile. Not only it can lock and protect your applications, AppLock is also capable of protecting your photos and videos simply by hiding them. The very thing that impressed me in this application is, how secure the application itself is and how it can help the users to be sure of their application’s protection by leaving it on AppLock.

Security features in AppLock give the device owner, a full control of the app. Users can turn on the advanced options in the settings, these options do not allow any other person to uninstall this AppLock. That means no one else can neither open your apps, nor he can bypass the password by uninstall AppLock. This security system works based on an Add-on, that the app downloads itself when you turn on advanced options. Also, there is a hide option for AppLock, this hide option is not a normal when, using which you can simply hide or unhide any application. This hide option hides the application from your phone and it doesn’t appear in the hidden apps in the app drawer options menu. The only way to show this application again is either through the dialer or by accessing the app’s web address. These two features are enough for this application to win user’s trust and rely on it without any fears. Let’s have a look on this app’s features now. Let’s move forward.

Protects any apps using password or pattern
• Photo Vault, hide pictures
• Video Vault, hide videos
• Customize background, set your favorite photo
• Themes
• Fake cover
• Profiles, easy to change the locks
• Automatic lock at given time
• Automatic lock at given location
• Random keyboard
• Lock switch(WiFi,BT,3G/4G Data…)
• Widget for quick locking/unlocking
• Locks incoming or outgoing calls
• Lock system Settings
• Lock Google Play Store
• Quick lock switcher on status bar
• Re-lock policy: allow short exit, no need to unlock again
• Prevent apps from being uninstalled
• Hide AppLock’s icon from launcher
• AppLock can be prevented from being uninstall
• AppLock cannot be killed by task killers
• Little memory footprint and power-saving

How to use AppLock:

  1. Install the AppLock from Google Play Store (It’s Free).
  2. Once installed, open the app from app drawer.
  3. Setup your password and proceed.
  4. You will find three sections now; Advanced, Switch & General.
      1. Advanced: Keeps the phone’s processes e.g. Google Play Store, Incoming Calls, Install/Uninstall services,  Settings etc.
      2. Switch: Keeps the locks for switches e.g. WiFi, Bluetooth, Portable Hotspot, Auto Sync.
      3. General: Keeps the locks for all other applications running on your Android device.
  5. Tap the lock icon infront of the service/app name in order to lock it, and the app will be immediately locked.
  6. Now tap the locked app’s icon in the app drawer, and the AppLock will come up asking you for password.
  7. Enter the same password you entered in the 2nd step for setting up AppLock.

AppLock Settings / Options:

  1. Press the options icon on the top left corner in order to access AppLock Menu/Settings.
  2. You will find the following options:
      1. AppLock: Takes you to AppLock home screen.
      2. PhotoVault: Hides your desired photos.
      3. VideoVault: Hides your desired videos.
      4. Themes: Lets you change AppLock’s theme.
      5. Cover: Changes the cover that prompts asking for the pasword.
      6. Profiles: Helps you to create and manage AppLock profiles, also allows easy activation by just tapping the profile’s icon.
      7. TimeLock: Lock applications on and for your desired time.
      8. Location Lock: Lock applications on a specific location.
      9. Settings: AppLock Settings.
      10. About: About AppLock application.
      11. Uninstall: Uninstall AppLock, the only way to uninstall it if you have enabled advanced option in settings.
  3. In Settings, you can setup pattern lock if you wish.
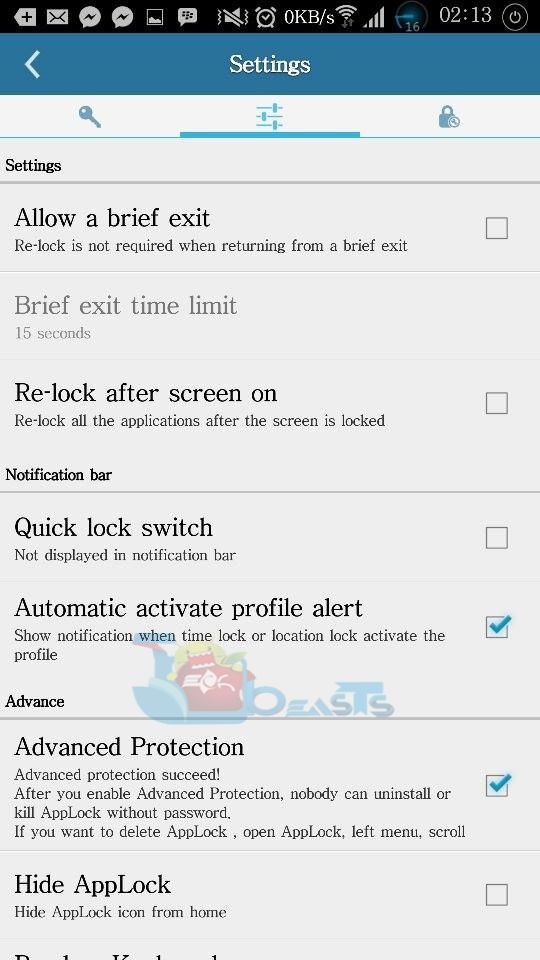
  4. Tapping the middle button in settings will take you to further options, including Advanced Protection, Hide AppLock etc.
  5. Advanced Protection installs an Add-on that prevents the app to be uninstalled by any other user, the only way to uninstall AppLock in this case is by using the Uninstall Option in the AppLock menu. You cannot remove this application by uninstalling from home screen or through application manager in your phone’s settings.
  6. Hide AppLock hides AppLock’s icon from the home screen. The only way to bring it back is either by typing the password followed by # key in the dialer or by typing AppLock’s web address in the browser.
  7. Other options include Random Keyboard, Hide from Gallery, Lock newly installed apps etc. You may select these depending upon your choice.
  8. The third button in AppLock settings allows the users to setup a security question and a recovery email address for AppLock so that in case you forgot your password, you can quickly recover it using recovery email or security question.
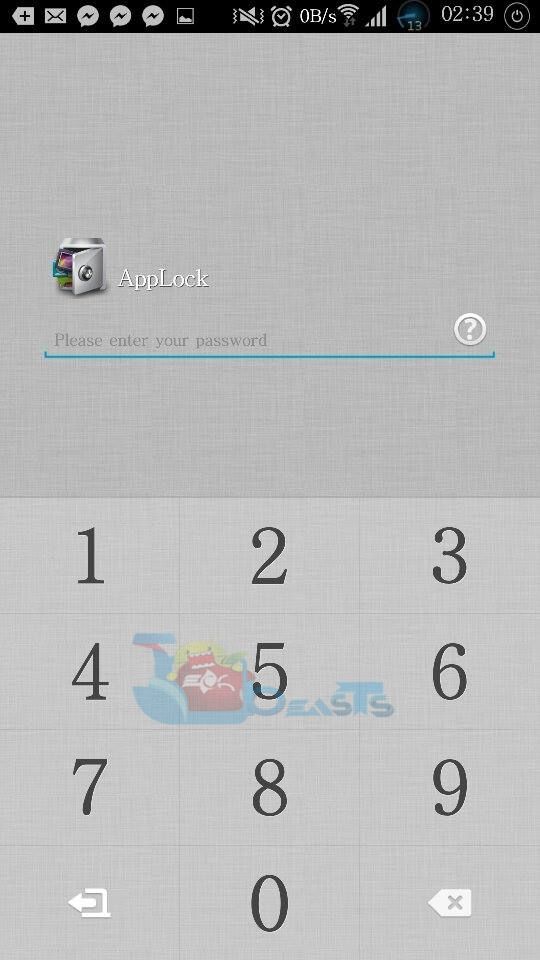
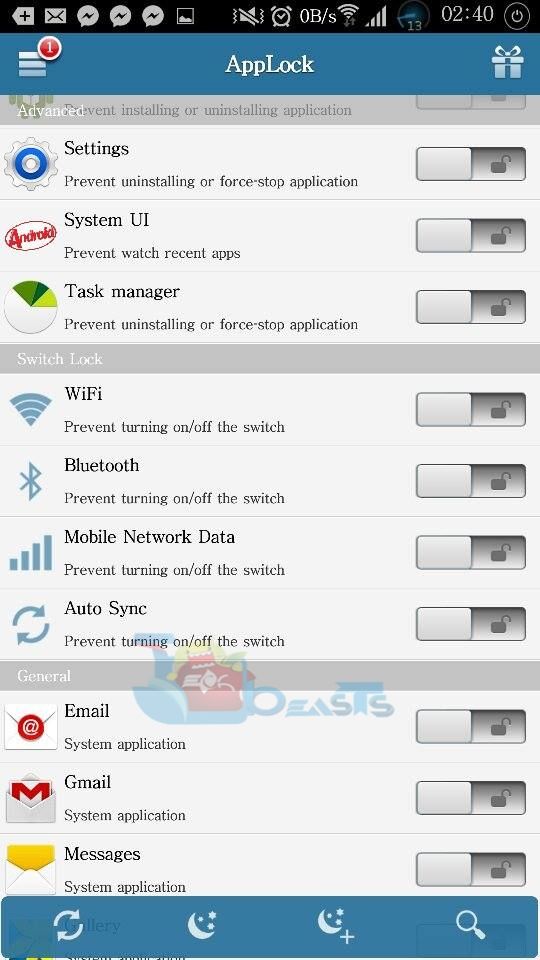
 

AppLock3AppLock2AppLock5Applock4   AppLock

There’s a lot more to discover about this application that you may do so upon installing it, or check out it’s official description in the Google Play Store. Don’t forget to share your experience about AppLock with us through the comment box below.

How To Download .DEB Files Directly From Cydia Of any Jailbreak Tweak

0
How To Download .DEB Files Directly From Cydia Of any Jailbreak Tweak

Any OS whether it is Android or iOS have an App Store from where a user can download different apps, Android because of is open Source, is weak when it comes to pirate apps, one can easily download Modded Apk files for both free and Paid apps, while on iOS there are a few ways to do such thing. But there is one thing that both of OS lack, that you need to download the apps again and again without any power to turn them into executable files, so once can use them afterwards without downloading them again, on Android such feature is available via different 3rd party apps, on Apple Store there is also a way to create IPA files, but most of them won’t work.

iOS also features Cydia store for Jailbroken devices, the problem also arises there, once you have un-installed Cydia Tweak, you need to download it again and that is the spot we all hate. However, there are users out there who doesn’t cry over such thing and try to find a way to create .DEB files of Cydia Tweaks by peeking into executable files, so without downloading them, they can use them afterwards and even share with others. If you want to know how to create .DEB files and use them instead of Cydia, follow the rest of the Post.

apt07strict

Jailbreak your iOS Device.

Since the following tutorial needs an iOS device which is Jailbroken, you need to Jailbreak your device. If your device is still in its normal condition. Follow our Jailbreak Section to find out how to Jailbreak your device

How To Download .DEB Files

  1. Open Cydia and Search For APT 0.7 Strict and Install if, if you can’t able to find it, try changing Cydia Settings to Developer.
  2. Locate any Cydia app,whose .DEB file you want to create, scroll down and note down the Bundle ID of the Package. Mostly written beneath Terms And Condition, Looks Like: com.developer.thePackageName
  3. Open your Favorite Terminal App and type in ‘su‘ to login as root, when prompted enter the Root password, if the Root password is never changes the default one is: alpine.
  4. After you are logged in, enter apt-get -d install (Bundle ID), the same one you see beneath terms and conditions. If you see any prompt window, read and accept by pressing ‘Y‘.
  5. Wait a little to let the Terminal app finish what it is doing, when the process is complete, you can access the .DEB file via iFile or nay other file Manager, by navigating the following directory: /var/cache/apt/archives.


How To Install .DEB Files

  1. Open iFile.
  2. Navigate to /var/cache/apt/archives.
  3. Tap on the Desired .DEB file.
  4. Tap Open in iFile, on the Top Right Corner.
  5. Tap Installer in the pop-up.
  6. Restart the Device if necessary

Create An Amusement Park Of Your Own With RollerCoaster Tycoon 4

0
Create An Amusement Park Of Your Own With RollerCoaster Tycoon 4

If you prefer iOS as a better gaming Platforma and Old Desktops are your preferred choice than Androiad and Laptops, then Atari has come up with a very good thing for you. This famous company has filled hearts of many gamer with joy with release of many games like Breakout and Centipede for small screen. Months ago they released many of their awesome games for free, but only for one day and today they have again outdone themselves with the release of RollerCoaster Tycoon 4 for iPhone and iPad.

The game is not much different from the previous versions of RollerCoaster Tycoon but on the same time it is not the same as any of the previous versions. Gamers are in charge of all the things whether it is management, creating or maintaining of the whole amusement Park, that will eclipse all the parks comes before you. The aim of creating this park is to build a huge RollerCoaster in the Middle of it, just make sure that it has many loops and dangerous turns in most of it. Other things include Riders of different, but great variations, a beautiful park layout, different stalls all comes together to create something to be proud of.

screen568x568-1

In the game, you will find 20 different layouts of RollerCoaster and 50 different things, which are useable throughout the park. The Space in Park is enough to built it beautiful and the Editor that will be used to build a park is extremely useful and powerful, that it will be helpful while choosing the design and building the main coaster. RollerCoaster Tycoon 4 has the same pattern as any other previous versions, but it requires users to progress and level up to unlock additional content.

Like all the modern games features social connectivity, so as RollerCoaster Tycoon 4 too, it can record and share game statistics to game center. The game is available of Apple Store for only $2.99, it won’t take long for you to collect this money and when you do, Atari offers two in-app purchases that allow you to load more coins to be purchased, to be exchanged for in-game items.

Downlaod RollerCoaster Tycoon 4

Family Guy For PC (Windows XP/7/8/8.1 & MAC)

0
Family Guy For PC (Windows XP/7/8/8.1 & MAC)

Playing games on a 5-inch screen is fun, but playing them on a 17-inch screen is more fun. Bluestacks provide such type of environment for all the Android users. It is a 3rd party Emualtor, which can play Android apps on PC, like No$Gba to play Nintendo DS games on PC or Neorage X to play NeoGeo games on PC. Using Bluestacks, you can play any Android game on PC, as ling as it doesn’t require to download extra data.

Family Guy:The Quest For Stuff is now available for both iOS and Android and now it can be played on PC too, it is totally free to download but you can purchase things in the game using real money. The main goal of this game is to find different things to complete the construction of Quahog, which was destroyed due to a fight between Peter Griffin and FOX President.This game is available for Both Android and iOS and now you can play in on PC too. Just Follow our Guide and All is Well. However remember this is not an official release for PC, it is just being run on PC using a Third Party Emulator.

Screenshot_2014-04-11-15-18-24

Before We go any further, let’s look at the Features of Family Guy: The Quest For Stuff:

  • It’s Free! Freakin’ free? Freakin’ sweet!
  • Create a living Quahog that fits enjoyably in your pants
  • Unlock hilarious outfits for your characters like Mermaid Peter, Bikini-Clad Quagmire, and Rambo Lois
  • Send your characters on ridiculous quests
  • Keep Quahog safe from pirates, evil chickens, and other invasions
  • Peterfy your town with decorations such as The Petercopter, The Peterdactyl, and The Hindenpeter
  • Unlock hundreds of brand new and classic animations

How to Download and Install Family Guy:The Quest For Stuff on PC:

  1. You need an Android emulator to run this game on your Windows PC or MAC. We recommend using Bluestacks. Use our guide to install it on your PC.
  2. After downloading and installing Bluestacks,Open it
  3. Download Apk Of Family Guy:The Quest For Stuff , Double click the Apk File and Bluestacks will install it automatically
  4. Open BlueStacks now > All Apps > Family Guy:The Quest For Stuff
  5. The game will start now, follow the on screen instructions.
  6. Follow the initial screen,  you’ll be able to play it.
  7. Tap the screen by clicking inside the game frame.
  8. Enjoy rebuilding the Quahog.
  9. Don’t forget to let us know about your high score.
  10. That’s All!

Family Guy:The Quest For Stuff Available For Both Android And iOS

0
Family Guy:The Quest For Stuff Available For Both Android And iOS

Games based on Cartoon Shows are not much common to be seen on any Platform, but there are some games released on the basis of a Cartoon or Movie. Family guy is a Cartoon show, doesn’t like by people that much but it was able to hit billion views in only one year and when they started a quest on People views,they said that these Cartoons are stupid, hilarious, but because of these things we love it. Toady, a game featuring the Characters and scenarios of Family Guy have been released for Both Android and iOS, same as Simpsons but with many new features.

It is rare to see so much popularity even before the release, as Family Guy created a hype in December 2013, and by the looks of the game, it is quite fun and exciting game, featuring Griffin Family on an entirely hilarious adventure, as they start their quest for, well, stuff. The story goes like this, Peter Griffin puts up a fight with his giant chicken, which results in a destruction of beautifully animated Quahog. Now it is the Job of you’re to find all the Stuff and build back the Quahog.

family-guy

The game has been created as part of Teamwork between FOX and TinyCo Studios, with much content being written by the Show Writers of the most popular TV Show themselves. The game follows the same pattern as any other studio game, it is free to download and play with in-app purchases. Completing specific tasks and hitting a milestone in the game will unlock Different Costumes for Peter Griffin along with some classic and newly created animations to entertain the player.

The best thing about this game is that the Characters is perfectly animated, the environment and representation of Quahog are amazing. The game features, Giant Chiken with scrupulous morals and many perils and Rebellious Pirates, it is totally free to download on both Platforms and contains some classy vehicles from the Series Such as The Petercopter and The HindenPeter.

Downlaod Family Guy:The Quest For Stuff (AndroidiOS)

How To Root And Install PhilZ Recovery 6 On Sony Xperia ZL C6502 / C6506 On Android 4.3 Jelly Bean

How To Root And Install PhilZ Recovery 6 On Sony Xperia ZL C6502 / C6506 On Android 4.3 Jelly Bean

PhilZ CWM Recovery is based on CWM Recovery, or should I say that it is a CWM Recovery with a lot of extra features and options, a Simple CWM Recovery has been modified, enhanced a lot, filled with more features and options, thus transformed into PhilZ Recovery. With this type of Recovery, one can Install Custom ROMs, Root the device with different but simple modifications, Install System Tweaks, make Complete Nandorid Back-up. This is the Only Recovery which is not free of bugs and support almost every ROM out there.

PhilZ Recovery 6 is available for Sony Xperia Zl and you can install it using our Tutorial below, furthermore we have provided the procedure to Root your Xperia ZL C6502 / C6506 .Rooting allows you to get full control over your device, Stock apps and mods are good, but installing Custom Mods gives you better support and great battery life, you might need to delete some Stock apps from the device, a non-rooted device can’t do that, but a rooted one has the power to remove stock apps too.

130108-sony-xperia-z-xperia-zl

In this Article, we will show you How To Root And Install PhilZ Recovery 6 On Sony Xperia ZL C6502 / C6506 On Android 4.3 Jelly Bean.But before we begin, Make sure that:

  1. That you have a Well Charged Battery, 60%-80% is better.
  2. Back-Up all your important ContactsCall Logs & Messages.It is highly recommended in case of any mishap or data loss to back up all your important data.
  3. Back-Up your Mobiles EFS Data.
  4. Check your device model, Go To Setting > About and Make sure that it is C6502 Or C6506.
  5. Do-not try this tutorial on any other device.
  6. Enable USB Debugging Mode
  7. Download USB Driver For Sony Devices: Link

Disclaimer:

The methods involved in flashing custom roms and rooting your phone is highly custom and may result in bricking your device, and has nothing to do with Google or the device manufacturers which is Sony in our case. In the case of any mishap we may not be held responsible. Follow these instructions to the letter to avoid any mishap or bricking. Make sure that whatever you do, you are doing it at your own responsibility.

Downloads Required:

Download PhilZ Recovery: Link 

Download Super SU: Link

How To Install PhilZ Recovery On Sony Xperia ZL

  1. Download and Extract the PhilZ Recovery Package.
  2. Open the Folder named “lockeddualrecovery”, which Contains the Package to install PhilZ Recovery.
  3. Connect your Device with PC.
  4. Now Run the Install.bat file and your phone will automatically boot into PhilZ Recovery.
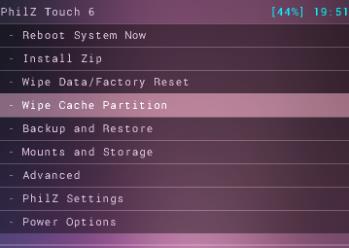
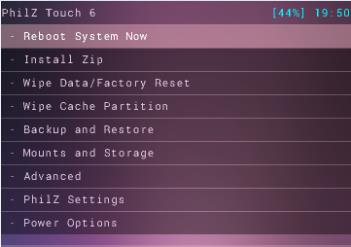
  5. Use Volume buttons to navigate to Reboot System Now and Press Power Button to Reboot it.
  6. After a proper reboot, your device will be running PhilZ Recovery 6

How To Root Sony Xperia ZL

  • Download and Copy the Super Su to the Root of your Sdcard.
  • Turn Off your Device
  • Switch OFF the phone and turn it ON again. When the phone is powering up, as soon as the green LEDturns on, press Volume Up for  PhilZ Recovery.
  • Navigate to ‘Install zip from sd card’ another windows will open in front of you.


Screenshot_2

  • Select ‘choose zip from sd card’ from the Options.

Screenshot_4

  • Select the Super SU.zip file and confirm the installation on next screen.
  • Once the Installation is Over, Select +++++Go Back+++++.
  • Select Reboot Now to Reboot the System.

Screenshot_6


That’s it your Sony Xperia ZL C6502 / C6506 has been Rooted On Android 4.3 Jelly Bean.Download any Root Checker app or See Super SU in app Drawer to Verify root access.