Home Blog Page 446

Download Assassin’s Creed Unity 2014 Wide Wallpapers

1
Download Assassin’s Creed Unity 2014 Wide Wallpapers

Assassin’s Creed is best action and adventure games and who love Assassin’s Creed i got a good new because a new version is coming ” Assassin’s Creed Unity 2014 “. Even official date is out October 28, 2014 you’ll get hands on Assassin’s Creed Unity and developers told that you can play Assassin’s Creed Unity on Microsoft Windows, PlayStation 4 and Xbox One. After watching its killer looks so i thought that fans should get Assassin’s Creed Unity 2014 Wide and HD Wallpapers. 

Also See: FIFA World Cup 2014 HD & Wide Wallpapers

495727

Source

495793

Source

495795

Source

496717

Source

assassin_creed___unity_wallpaper_by_rajivmessi-d7dqyim

Source

assassin_s_creed_unity_wallpaper_by_dylonji-d7b5al0

Source

assassin_s_creed_unity_wallpaper_by_vuleeee-d7bb8sn

Source

Assassins Creed Unity Wallpaper

Source

assassins_creed_screenshot_promo_wallpaper_by_santap555-d7bx71u

Source

assassins_creed_unity_102_-_PREVIEW

Source

assassins-creed-unity-2-3-s-307x512

Source

You can check our Wallpapers gallery for more HD & Wide Wallpapers for Desktop , Laptop, Macbook and Mobiles.

Install CWM 6 Recovery And Root Sony Xperia M Dual C2004/C2005 15.5.A.1.5 Firmware

Install CWM 6 Recovery And Root Sony Xperia M Dual C2004/C2005 15.5.A.1.5 Firmware

Sony Xperia M Dual’s current firmware is based on the build number 15.5.A.1.5. The new update rolled out a few days back and fixes some minor bugs and enhances the performance of the device and its battery. If you’ve already updated your device to this latest firmware and now wondering how you can take the maximum advantage of your device, and go beyond the boundaries, you will need a custom recovery and root access on your Sony Xperia M Dual running this latest Android version.

We’ve already found the latest working CWM recovery and a method to root Sony Xperia M Dual, so that just in case you’ve been looking around for this, you may stop it right now as you’re already on the right spot. In the following post, we will install CWM [ClockworkMod] 6.0.4.9 recovery and root Sony Xperia M Dual C2004/C2005 running 15.5.A.1.5 firmware. You just need to follow this guide carefully in order to get it done successfully. Before we head towards the installation instructions, it is important to wipe any confusions that the newbies may have while flashing a recovery. To do this, let’s go through a brief introduction of the custom recovery and the root access on an Android device.13_Xperia_M_Dual_Group_Black

Custom Recovery:

A custom recovery allows you to install custom roms, mods etc. Along with these, you can make a Nandroid backup, this helps you a lot as you can move back to the previous working state of your phone at any time you want if you have backed up your current system. In some cases, to root the phone you need to flash SuperSu.zip file in the custom recovery, having installed the recovery may help you while in some cases to install the recovery easily,You can also wipe cache and dalvik cache of your phone using a custom recovery. There is a number of other options available in the custom recoveries that pave way for the device’s tweaking and deal with the problems efficiently.

Rooting an Android device:

Rooting your phone gives you complete access over all the data which is apparently locked by the manufacturers. This includes removal of the factory restrictions and making changes to the internal system and the operating system. Gaining the root access gives you the privileges to install various applications to enhance the performance of your device, allows you to remove the built-in applications/programs, helps you to upgrade the battery life of your device & install the apps which require the root access for the proper functionality and modify your device in so many other ways e.g using mods and flashing custom recoveries and custom ROMs. There is a laundry list of things you can do after having your device rooted and installed the custom recovery, now once you’re rooted and have installed a custom recovery, go ahead and enjoy it on your phone. Here’s our collection of 10 Best Root Apps.

If you want to root your device without unlocking the bootloader, check out this post.

Install CWM 6 Recovery And Root Sony Xperia M Dual

Pre-Installation Instructions:

  1. The CWM  recovery is only for Xperia M C2004/C2005 running stock or stock based Android 4.3 Jelly Bean [15.5.A.1.5] Firwmare. Check your firmware version in Settings > About Device and make sure that it matches the one mentioned here.
  2. You must have installed Android ADB & Fastboot drivers. Follow the quick guide here.
  3. Your device must have an unlocked bootloaderFollow our full guide here in order to unlock.
  4. Please make sure that your phone’s battery is charged at least over 60%. This is highly recommended in order to prevent any power issues during the recovery flashing process.
  5. Backup each and everything on your Android phone as follows:
  6. Backup all your important contacts, find the full guide here.
  7. Backup all your important sms messages, find the full guide here.
  8. Backup all your important call logs, find the full guide here.
  9. Backup all your important media content manually. (Copy to your PC.)
  10. Backup all your apps / data. If you’ve rooted your device, use Titanium Backup to do so. Follow the full guide here.
  11. Backup your current system using a custom recovery (CWM or TWRP) if you’ve flashed one. This is recommended in case something goes wrong with CWM installation, you can use the custom recovery and return to the old working state of your system.
  12. Enable USB debugging mode on your device.  Get it in Settings > Developer Options > USB Debugging mode.
  13. Use only OEM data cable to establish a connection between your PC and Phone.
  14. Alright! Follow this guide to the letter now.
Disclaimer: The methods involved in flashing custom roms and rooting your phone is highly custom and may result in bricking your device, and has nothing to do with Google or the device manufacturer that is SONY in our case. Also rooting your device will void its warranty and you will be no longer eligible for any kind of free device services by the manufacturers/warranty providers. In case of any mishap we may not be held responsible. Follow these instructions to the letter to avoid any mishap or bricking. Make sure that whatever you do, you are doing it at your own responsibility.


How to Install CWM 6.0.4.9 Recovery on Xperia M Dual C2004/C2005:

  1. Download XM 4.3 CWM 6.0.4.9.img file.
  2. Rename the downloaded file to boot.img
  3. Place the renamed Boot.img file in the Minimal ADB & Fastboot folder that you created using our ADB & Fastboot Quick Setup Guide.
  4. If you are using Android ADB & Fastboot full package, you can place the downloaded Recovery.img file in the Fastboot folder or in the Platform-tools folder.
  5. Open the folder where you placed the Boot.img  file. E.g Minimal ADB & Fastboot or Fastboot or Platform Tools.
  6. Press and hold the shift key and right click on an empty area within the folder, and click on “Open Command Window Here”.
  7. Turn off your Xperia M Dual completely.
  8. Now press the Volume Up Key and while keeping it pressed plug in the USB cable.
  9. You should see a blue light in the notification light of your phone, that means your device is now connected in Fastboot mode.
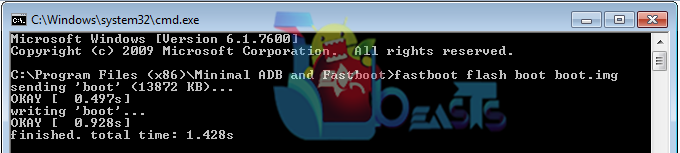
  10. Now type the following command: fastboot flash boot boot.img

  11. Hit Enter and it will quickly flash CWM 6.0.4.9 recovery in your Xperia M Dual.
  12. Once recovery is flashed, now issue this command “Fastboot reboot”
  13. Your device will reboot now, as soon as you see the Sony logo,  and the pink LED, press Volume Up key to enter recovery.
  14. Congrats! You should now see the custom recovery.

Screenshot_1


How To Root Xperia M Dual Running Android 4.3 15.5.A.1.5 Firmware:

    1. Download SuperSu.zip file.
    2. Copy the downloaded .zip file to your phone’s sd card.
    3. Boot into CWM recovery now using the method explained above.
    4. Once in recovery, select “Install >Choose Zip from SDcard > SuperSu.zip > Yes “.
    5. Wait for recovery to flash the SuperSu.zip file, once finished reboot your device.
    6. Check SuperSu in the app drawer now.
  1. SuperSu

How to install busybox now?

  1. Go to Google Play Store on your phone.
  2. Search for “Busybox Installter”.
  3. Once you find it, install it.
  4. Run the Busybox installer and proceed with the installation.
  5. That’s all!

How to check if the device is properly rooted or not?

  1. To do so, go to Google Play Store on your Xperia M Dual.
  2. Find “Root Checker” and install it.
  3. Open Root Checker.
  4. Tap “Verify Root”.
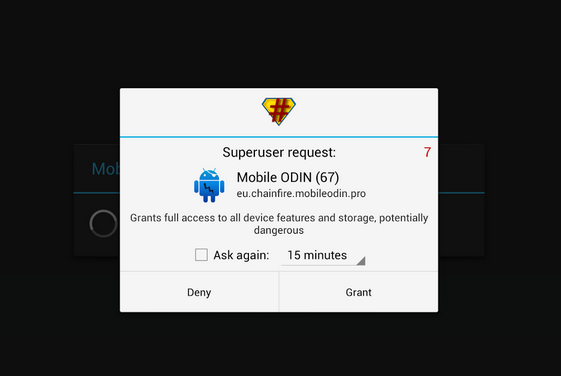
  5. It will ask you for SuperSu rights, tap “Grant”.
  6. It should show you Root Access Verified Now!
  7. That’s All!

1560688_10202529514651766_2061540064_n


That’s All with the recovery installation. In case you got any queries or face any difficulties regarding this post, please feel free to stop by the comment box below and let us know. We will get back to you as soon as possible. Thanks all.

Install CWM 6 Recovery And Root Sony Xperia M C1904/C1905 Running 15.4.A.1.9 Firmware

Install CWM 6 Recovery And Root Sony Xperia M C1904/C1905 Running 15.4.A.1.9 Firmware

A while ago we posted the guides to update Sony Xperia M C1904/C1905 to latest official Android 4.3 Jelly Bean firmware based on build number 15.4.A.1.9, that Sony rolled out a few days back. Just in case you have updated your device and you’re an Android power user, you might be wondering how you can go beyond the boundaries on your device running this latest firmware. Well, you may not worry about that as we already have the solution right here for you.

Thanks to XDA Member engineer_dhaval, who has brought up CWM 6.0.4.9 recovery for our beloved Sony Xperia M, and paved a way to break the jails on this device. In the following post we are going to install this CWM [ClockworkMod] 6 recovery and also root the Sony Xperia M C1904 and C1905 running latest Android 4.3 Jelly Bean 15.4.A.1.9 firmware. All you need is, you need to follow this guide carefully in order to get it done successfully. Before we head towards the installation instructions, let’s learn what is a custom recovery and why you should root your Android device (To help the newbies understand this in a better way).

sony-xperia-m-white-


Custom Recovery:

A custom recovery allows you to install custom roms, mods etc. Along with these, you can make a Nandroid backup, this helps you a lot as you can move back to the previous working state of your phone at any time you want if you have backed up your current system. In some cases, to root the phone you need to flash SuperSu.zip file in the custom recovery, having installed the recovery may help you while in some cases to install the recovery easily,You can also wipe cache and dalvik cache of your phone using a custom recovery. There is a number of other options available in the custom recoveries that pave way for the device’s tweaking and deal with the problems efficiently.

Rooting an Android device:

Rooting your phone gives you complete access over all the data which is apparently locked by the manufacturers. This includes removal of the factory restrictions and making changes to the internal system and the operating system. Gaining the root access gives you the privileges to install various applications to enhance the performance of your device, allows you to remove the built-in applications/programs, helps you to upgrade the battery life of your device & install the apps which require the root access for the proper functionality and modify your device in so many other ways e.g using mods and flashing custom recoveries and custom ROMs. There is a laundry list of things you can do after having your device rooted and installed the custom recovery, now once you’re rooted and have installed custom recovery, go ahead and enjoy it on your phone. Here’s our collection of 10 Best Root Apps.

Install CWM 6 Recovery And Root Sony Xperia M

Pre-Installation Instructions:

  1. The CWM  recovery is only for Xperia M C1904/C1905 running stock or stock based Android 4.3 Jelly Bean [15.4.A.1.9] Firwmare. Check your firmware version in Settings > About Device and make sure that it matches the one mentioned here.
  2. You must have installed Android ADB & Fastboot drivers. Follow the quick guide here.
  3. Your device must have an unlocked bootloaderFollow our full guide here in order to unlock.
  4. Please make sure that your phone’s battery is charged at least over 60%. This is highly recommended in order to prevent any power issues during the recovery flashing process.
  5. Backup each and everything on your Android phone as follows:
  6. Backup all your important contacts, find the full guide here.
  7. Backup all your important sms messages, find the full guide here.
  8. Backup all your important call logs, find the full guide here.
  9. Backup all your important media content manually. (Copy to your PC.)
  10. Backup all your apps / data. If you’ve rooted your device, use Titanium Backup to do so. Follow the full guide here.
  11. Backup your current system using a custom recovery (CWM or TWRP) if you’ve flashed one. This is recommended in case something goes wrong with CWM installation, you can use the custom recovery and return to the old working state of your system.
  12. Enable USB debugging mode on your device.  Get it in Settings > Developer Options > USB Debugging mode.
  13. Use only OEM data cable to establish connection between your PC and Phone.
  14. Alright! Follow this guide to the letter now.

If you want to root your device without unlocking the bootloader, check out this post.

Disclaimer: The methods involved in flashing custom roms and rooting your phone is highly custom and may result in bricking your device, and has nothing to do with Google or the device manufacturer that is SONY in our case. Also rooting your device will void its warranty and you will be no longer eligible for any kind of free device services by the manufacturers/warranty providers. In case of any mishap we may not be held responsible. Follow these instructions to the letter to avoid any mishap or bricking. Make sure that whatever you do, you are doing it at your own responsibility.


How to Install CWM 6.0.4.9 Recovery on Xperia M C1904/C1905:

  1. Download XM 4.3 CWM 6.0.4.9.img file.
  2. Rename the downloaded file to boot.img
  3. Place the renamed Boot.img file in the Minimal ADB & Fastboot folder that you created using our ADB & Fastboot Quick Setup Guide.
  4. If you are using Android ADB & Fastboot full package, you can place the downloaded Recovery.img file in the Fastboot folder or in the Platform-tools folder.
  5. Open the folder where you placed the Boot.img  file. E.g Minimal ADB & Fastboot or Fastboot or Platform Tools.
  6. Press and hold the shift key and right click on an empty area within the folder, and click on “Open Command Window Here”.
  7. Turn off your Xperia M completely.
  8. Now press the Volume Up Key and while keeping it pressed plug in the USB cable.
  9. You should see a blue light in the notification light of your phone, that means your device is now connected in Fastboot mode.
  10. Now type the following command: fastboot flash boot boot.img

  11. Hit Enter and it will quickly flash CWM 6.0.4.9 recovery in your Xperia M.
  12. Once recovery is flashed, now issue this command “Fastboot reboot”
  13. Your device will reboot now, as soon as you see the Sony logo,  and the pink LED, press Volume Up key to enter recovery.
  14. Congrats! You should now see the custom recovery.

Screenshot_1


How To Root Xperia M Running Android 4.3 15.4.A.1.9 Firmware:

    1. Download SuperSu.zip file.
    2. Copy the downloaded .zip file to your phone’s sd card.
    3. Boot into CWM recovery now using the method explained above.
    4. Once in recovery, select “Install >Choose Zip from SDcard > SuperSu.zip > Yes “.
    5. Wait for recovery to flash the SuperSu.zip file, once finished reboot your device.
    6. Check SuperSu in the app drawer now.
  1. SuperSu

How to install busybox now?

  1. Go to Google Play Store on your phone.
  2. Search for “Busybox Installter”.
  3. Once you find it, install it.
  4. Run the Busybox installer and proceed with the installation.
  5. That’s all!

How to check if the device is properly rooted or not?

  1. To do so, go to Google Play Store on your Xperia M.
  2. Find Root Checker” and install it.
  3. Open Root Checker.
  4. Tap “Verify Root”.
  5. It will ask you for SuperSu rights, tap “Grant”.
  6. It should show you Root Access Verified Now!
  7. That’s All!

1560688_10202529514651766_2061540064_n


That’s All with the recovery installation. In case you got any queries or face any difficulties regarding this post, please feel free to stop by the comment box below and let us know. We will get back to you as soon as possible. Thanks all.

Download FIFA World Cup 2014 HD Wallpapers

0
Download FIFA World Cup 2014 HD Wallpapers

FIFA World Cup 2014 is the biggest mega event of the year it’s live now, yesterday every saw the FIFA World Cup opening ceremony live on our television. I love football So this is why i’ve collected FIFA World Cup 2014 HD Wallpapers.

Also See: Most Popular HD Wallpapers

fifa_world_cup-t2

Source

Fifa-World-Cup-2014-101

Source

Fifa-world-cup-2014-ball-wallpaper-2

Source

Fifa-World-Cup-2014-Brazil-Wallpaper

Source

FIFA-World-Cup-2014-Desktop-Wallpaper

Source

FIFA-World-Cup-Trophy-2014-Wallpapers

Source

fifa-world-cup-wallpaper-hd

Source

fifa-world-cup-wallpaper-hd1

Source

france-vs-spain-world-cup-2014-brazil

Source

How To Update Sony Xperia M Dual C2004/C2005 To Latest 15.5.A.1.5 Firmware

6
How To Update Sony Xperia M Dual C2004/C2005 To Latest 15.5.A.1.5 Firmware

Recently, Sony updated the single sim variants of Xperia M to a new Android 4.3 Jelly Bean firmware based on the build number 15.4.A.1.9. While the users were thinking when the new stability update will arrive for the dual SIM variant, it just followed the former and the update is here based on the build number 15.5.A.1.5. The new update fixes some minor bugs, enhances the stability and performance of the device and battery life has got better now.

As always, these updates are region dependent and may take some time to hit your region. Just in case you can’t wait to get your hands on the latest firmware, or you just need to flash the stock firmware on your device, we have the complete method to update it manually right here. In the following post, we are going to update Sony Xperia M Dual C2004/C2005 to latest stock Android 4.3 Jelly Bean firmware based on 15.5.A.1.5 build number. The firmware is completely official, and there are no risks involved in flashing this through Sony Flashtool. All you need is, you need to follow this guide carefully.sony-xperia-m-white-

Pre-Installation Instructions:

  1. As mentioned, this firmware is only for Xperia M Dual C2004/C2005. Do not try this on any other phone, that may result in bricking your device. Check your device’s model number in Settings > About device.
  2. You must have installed Sony Flashtool. Find the full guide here.
  3. After installing Sony Flashtool, open the Flashtool folder from the drive where you installed it.
  4. Now open Flashtool>Drivers>Flashtool-drivers.exe and install the Flashtool, Fastboot & Xperia M drivers from the list. [Important]
  5. Your phone must be charged at least over 60%. This is highly recommended in order to prevent any power issues during the flashing process.
  6. Enable USB debugging mode on your device. To do so, tap settings>developer options>USB debugging. If you can’t find developer options in settings, then tap settings > about device and tap “Build Number” for 7 times and you’ll get em’ activated under settings.
  7. Make sure that you back up all your important media content,  contacts, call logs and text messages. This is highly recommended and important in case something goes wrong during the flashing process or in case you select the data wipe option before flashing. You can easily restore whenever you need.
  8. To flash this firmware, you do not need to root your device, you do not need to unlock the bootloader. All you need is, your device must be the one mentioned and must be running on Android 4.2.2 or 4.3 Jelly Bean.
  9. Download the firmware file properly.
  10. Use the OEM data cable to connect your phone to your PC. Using any other data cable might cause connection problems.
  11. This firmware can be flashed on Xperia M in any region/any country.
  12. Alright! Follow this guide to the letter in order to prevent any mishap.

How to Install Android 4.3 Jelly Bean 15.5.A.1.5 on Xperia M Dual C2004/2005:

  1. Before moving forward, please make sure that you’ve read the pre requisites and ensure that you are set to go ahead.
  2. Download the latest Android 4.3 Jelly Bean 15.5.A.1.5  FTF file.
    1. For Xperia M C2004 [Generic]
    2. For Xperia M C2005 [Generic]
  3. Extract the downloaded rar file and you will get the ftf.
  4. Copy the file and paste in Flashtool>Firmwares folder.
  5. Open Flashtool.exe now.
  6. Hit the small lightening button on the top left corner and select Flashmode.
  7. Select the FTF firmware file that you placed in the Firmware folder. 
  8. From the right side, select what do you want to wipe. Data, cache and apps log, all wipes are recommended, however you may select if you don’t want.
  9. Click on OK, and it will start preparing the firmware for flashing. This may take a little while to load.
  10. As soon as the firmware is loaded, it will prompt you to attach the phone by turning it off and keeping the back key press.
  11. For Xperia MVolume Down key will do the job of back key, just turn off your phone, keep the Volume Down key pressed and plug in the data cable.
  12. As soon as the phone is detected in Flashmode, the firmware will start flashing, Do not leave the Volume Down key until the process is complete.
  13. As soon as you see “Flashing ended or Finished Flashing” leave the Volume Down key, plug the cable out and reboot.
  14. That’s All! Congrats! You’ve installed latest Android 4.3 Jelly Bean on your Xperia M C2004/C2005. Enjoy

In case you got any queries or face any problems regarding this guide, please feel free to stop by the comment box below and let us know. We will get back to you as soon as possible. Thanks all!

Update Sony Xperia M C1904/C1905 To Latest 15.4.A.1.9 Firmware

19
Update Sony Xperia M C1904/C1905 To Latest 15.4.A.1.9 Firmware

Sony recently started rolling out a new update for it’s mid-range device Sony Xperia M. The new update is based on the build number 15.4.A.1.9. According to Sony, this update fixes some minor bugs and enhances the stability and performance of the device. User experience has been enhanced as well, and the battery performance is believed to get better in this update. 15.4.A.1.9 is the Android 4.3 Jelly Bean firmware.

As usual, these updates are always region specific. Just in case you haven’t received via OTA or via Sony PC Companion yet, you may consider updating your Xperia M to this latest firmware manually using Sony Flashtool. Flashing a firmware manually can also become handy when you’re stuck with your firmware and you have no other way to get rid of the problem except for flashing the stock firmware once again. In the following post we are going to update Sony Xperia M C1904/C1905 to latest stock Android 4.3 Jelly Bean 15.4.A.1.9 firmware. All you need is, you need to follow this guide being very careful.Xperia M

  1. As mentioned, this firmware is only for Xperia M C1904/C1905. Do not try this on any other phone, that may result in bricking your device. Check your device’s model number in Settings > About device.
  2. You must have installed Sony Flashtool. Find the full guide here.
  3. After installing Sony Flashtool, open the Flashtool folder from the drive where you installed it.
  4. Now open Flashtool>Drivers>Flashtool-drivers.exe and install the Flashtool, Fastboot & Xperia M drivers from the list. [Important]
  5. Your phone must be charged at least over 60%. This is highly recommended in order to prevent any power issues during the flashing process.
  6. Enable USB debugging mode on your device. To do so, tap settings>developer options>USB debugging. If you can’t find developer options in settings, then tap settings > about device and tap “Build Number” for 7 times and you’ll get em’ activated under settings.
  7. Make sure that you back up all your important media content,  contacts, call logs and text messages. This is highly recommended and important in case something goes wrong during the flashing process or in case you select the data wipe option before flashing. You can easily restore whenever you need.
  8. To flash this firmware, you do not need to root your device, you do not need to unlock the bootloader. All you need is, your device must be the one mentioned and must be running on Android 4.2.2 or 4.3 Jelly Bean.
  9. Download the firmware file properly.
  10. Use the OEM data cable to connect your phone to your PC. Using any other data cable might cause connection problems.
  11. This firmware can be flashed on Xperia M in any region/any country.
  12. Alright! Follow this guide to the letter in order to prevent any mishap.

How to Install Android 4.3 Jelly Bean 15.4.A.1.9 on Xperia M C1904/C1905:

  1. Before moving forward, please make sure that you’ve read the pre requisites and ensure that you are set to go ahead.
  2. Download the latest Android 4.3 Jelly Bean 15.4.A.1.9  FTF file.
      1. For Xperia M C1904 [Generic]
      2. For Xperia M C1905 [Generic]
  3. Extract the downloaded rar file and you will get the ftf.
  4. Copy the file and paste in Flashtool>Firmwares folder.
  5. Open Flashtool.exe now.
  6. Hit the small lightening button on the top left corner and select Flashmode.
  7. Select the FTF firmware file that you placed in the Firmware folder. 
  8. From the right side, select what do you want to wipe. Data, cache and apps log, all wipes are recommended, however you may select if you don’t want.
  9. Click on OK, and it will start preparing the firmware for flashing. This may take a little while to load.
  10. As soon as the firmware is loaded, it will prompt you to attach the phone by turning it off and keeping the back key press.
  11. For Xperia MVolume Down key will do the job of back key, just turn off your phone, keep the Volume Down key pressed and plug in the data cable.
  12. As soon as the phone is detected in Flashmode, the firmware will start flashing, Do not leave the Volume Down key until the process is complete.
  13. As soon as you see “Flashing ended or Finished Flashing” leave the Volume Down key, plug the cable out and reboot.
  14. That’s All! Congrats! You’ve installed latest Android 4.3 Jelly Bean on your Xperia M C1904/C1905. Enjoy

In case you got any queries or face any problems regarding this guide, please feel free to stop by the comment box below and let us know. We will get back to you as soon as possible. Thanks all!

How To Install TWRP 2.7 Recovery On Samsung Galaxy S3 Mini I8190/N/L

How To Install TWRP 2.7 Recovery On Samsung Galaxy S3 Mini I8190/N/L

Samsung’s very first mini device, the Galaxy S III Mini aka Samsung Golden is being kept alive by the developers, who have been bringing up something new every second day that allows the users to modify the device at their best. Samsung won’t be updating this device to any higher version of Android, that means where this device won’t be getting Android 4.2.2 or any higher updates. Flashing custom ROMs on the S3 Mini is the solution that can help to change the user’s taste. To pave way for all the nicer things on your device, you will definitely need a custom recovery.

Earlier we posted the guides to flash CWM recovery, but we have been missing TWRP recovery, that is even more cool with advanced options. As we have found it now, in the following post we are going to install TWRP 2.7 recovery on our beloved Samsung Galaxy S3 Mini I8190. All you need is, you need to follow this guide being very careful. Let’s go through a brief introduction of a custom recovery in order to clear any confusions that the newbies may have and then head towards the guide.galaxy-s3-mini

A custom recovery allows you to install custom roms, mods etc. Along with these, you can make a Nandroid backup, this helps you a lot as you can move back to the previous working state of your phone at any time you want if you have backed up your current system. In some cases, to root the phone you need to flash SuperSu.zip file in the custom recovery, having installed the recovery may help you while in some cases to install the recovery easily,You can also wipe cache and dalvik cache of your phone using a custom recovery. There is a number of other options available in the custom recoveries that pave way for the device’s tweaking and deal with the problems efficiently.

Here are the pre-installation instructions:

  1. This guide is only for Samsung Galaxy S3 Mini I8190/N/L. Before installing this, make sure that your device is listed below. Check your device’s model number in Settings > More > About Device.
  2. Download the file carefully for your device.
  3. Make sure that your device’s battery is charged over at least 60%. Highly recommended in order to prevent any mishap during the recovery installation process.
  4. Make sure that you backup your important media content, ContactsCall Logs & Messages. This is highly recommended just in case something goes wrong and you need to reset your phone.
  5. Use only OEM data cable to establish connection between your phone and PC. Turn off your Anti Virus and Firewall to prevent any connection issues. Also enable USB debugging mode on your phone if you face connection issues.
  6. Recovery works well for Galaxy S3 Mini running on all Android versions, no need to worry about the Android version.

Disclaimer: The methods involved in flashing custom roms and rooting your phone are highly custom and may result in bricking your device, and has nothing to do with Google or the device manufacturer that is SAMSUNG in our case. Also rooting your device will void its warranty and you will be no longer eligible for any kind of free device services by the manufacturers/warranty providers. If your device has knox counter on the bootloader, flashing recovery will trip the knox counter and you won’t be able to reset the counter. In case of any mishap we may not be held responsible. Follow these instructions to the letter to avoid any mishap or bricking. Make sure that whatever you do, you are doing it at your own responsibility.

Pre – Requisites:

  • Download and Install Samsung USB drivers – Get Here.
  • Download and Extract Odin3 v3.09 – Get Here
  • Enough confidence to flash a recovery :-)!
  • Download the TWRP 2.7 Recovery for Galaxy S3 Mini I8190

How to Install TWRP 2.7 Recovery on your Galaxy S3 Mini I8190:

  1. Download the file for your variant carefully.
  2. Open Odin3.exe.
  3. Put your phone in download mode, to do so, turn it off completely. Now turn it on by pressing and holding Volume Down + Home Button + Power Key, you should see a warning now, press Volume Up to continue.
  4. In case the download mode method doesn’t work for your device, try one of the methods from this guide.
  5. Connect your phone to your PC.
  6. The ID:COM box in Odin should turn blue now, that means your phone is connected properly in download mode.
  7. Click on the “AP” tab in Odin 3.09 and select the downloaded Recovery.tar file.
  8. In case you’re using Odin 3.07, click on the PDA tab in Odin and select the downloaded Recovery.tar file and let it load.
  9. Hit start now and sit back, it will take a few seconds to flash the recovery and your device will reboot.
  10. Press and hold Volume Up + Home Button + Power Key to access the TWRP 2.7 Recovery that you just installed.
  11. You can backup your current ROM and do a lot of other things using the options in TWRP Recovery.
  12. Make sure that you make Nandroid and EFS backup and save it on your PC as well. Find the option in TWRP 2.7 Recovery.
  13. That’s All.

How to Root:

  1. If you want to root your device now, you can download the SuperSu.zip file.
  2. Place the downloaded file on your phone’s sd card.
  3. Open TWRP 2.7 and select Install > SuperSu.zip and flash it.
  4. Reboot your device and find SuperSu in app drawer.
  5. Congrats! You’re now rooted as well.

That’s All! We hope that you found this guide of much help. In case you got any queries or face any difficulties regarding this guide, don’t hesitate to stop by the comment box below and leave us your message. We will try our best to help you out. Thanks All.

Root Galaxy NotePRO P905 Running Android 4.4.2 XXUANE1 Kit-Kat Official Firmware

Root Galaxy NotePRO P905 Running Android 4.4.2 XXUANE1 Kit-Kat Official Firmware

Previously we posted the updating tutorial of Galaxy NotePRO and as you might have guessed, installing an Official ROM removes the root access of your device. The only way yo get it back is to Root it again, using the same method or a different one, it is up-to you, we will show you how to root it using CF-Auto root via Odin. If you have updated your Galaxy NotePro to Android 4.4.2 Kit-Kat, you might want to root it again, now I don’t know why, but most users just want a Rooted device, that’s all, they don’t know what to do with it, its just they want it. Due to this specific thing, Rooting methods are coming out earlier than anyone can expect. Rooting allows you to get full control over your device, Stock apps and mods are good, but installing Custom Mods gives you better support and great battery life, you might need to delete some Stock apps from the device, a non-rooted device can’t do that, but a rooted one has the power to remove stock apps too.

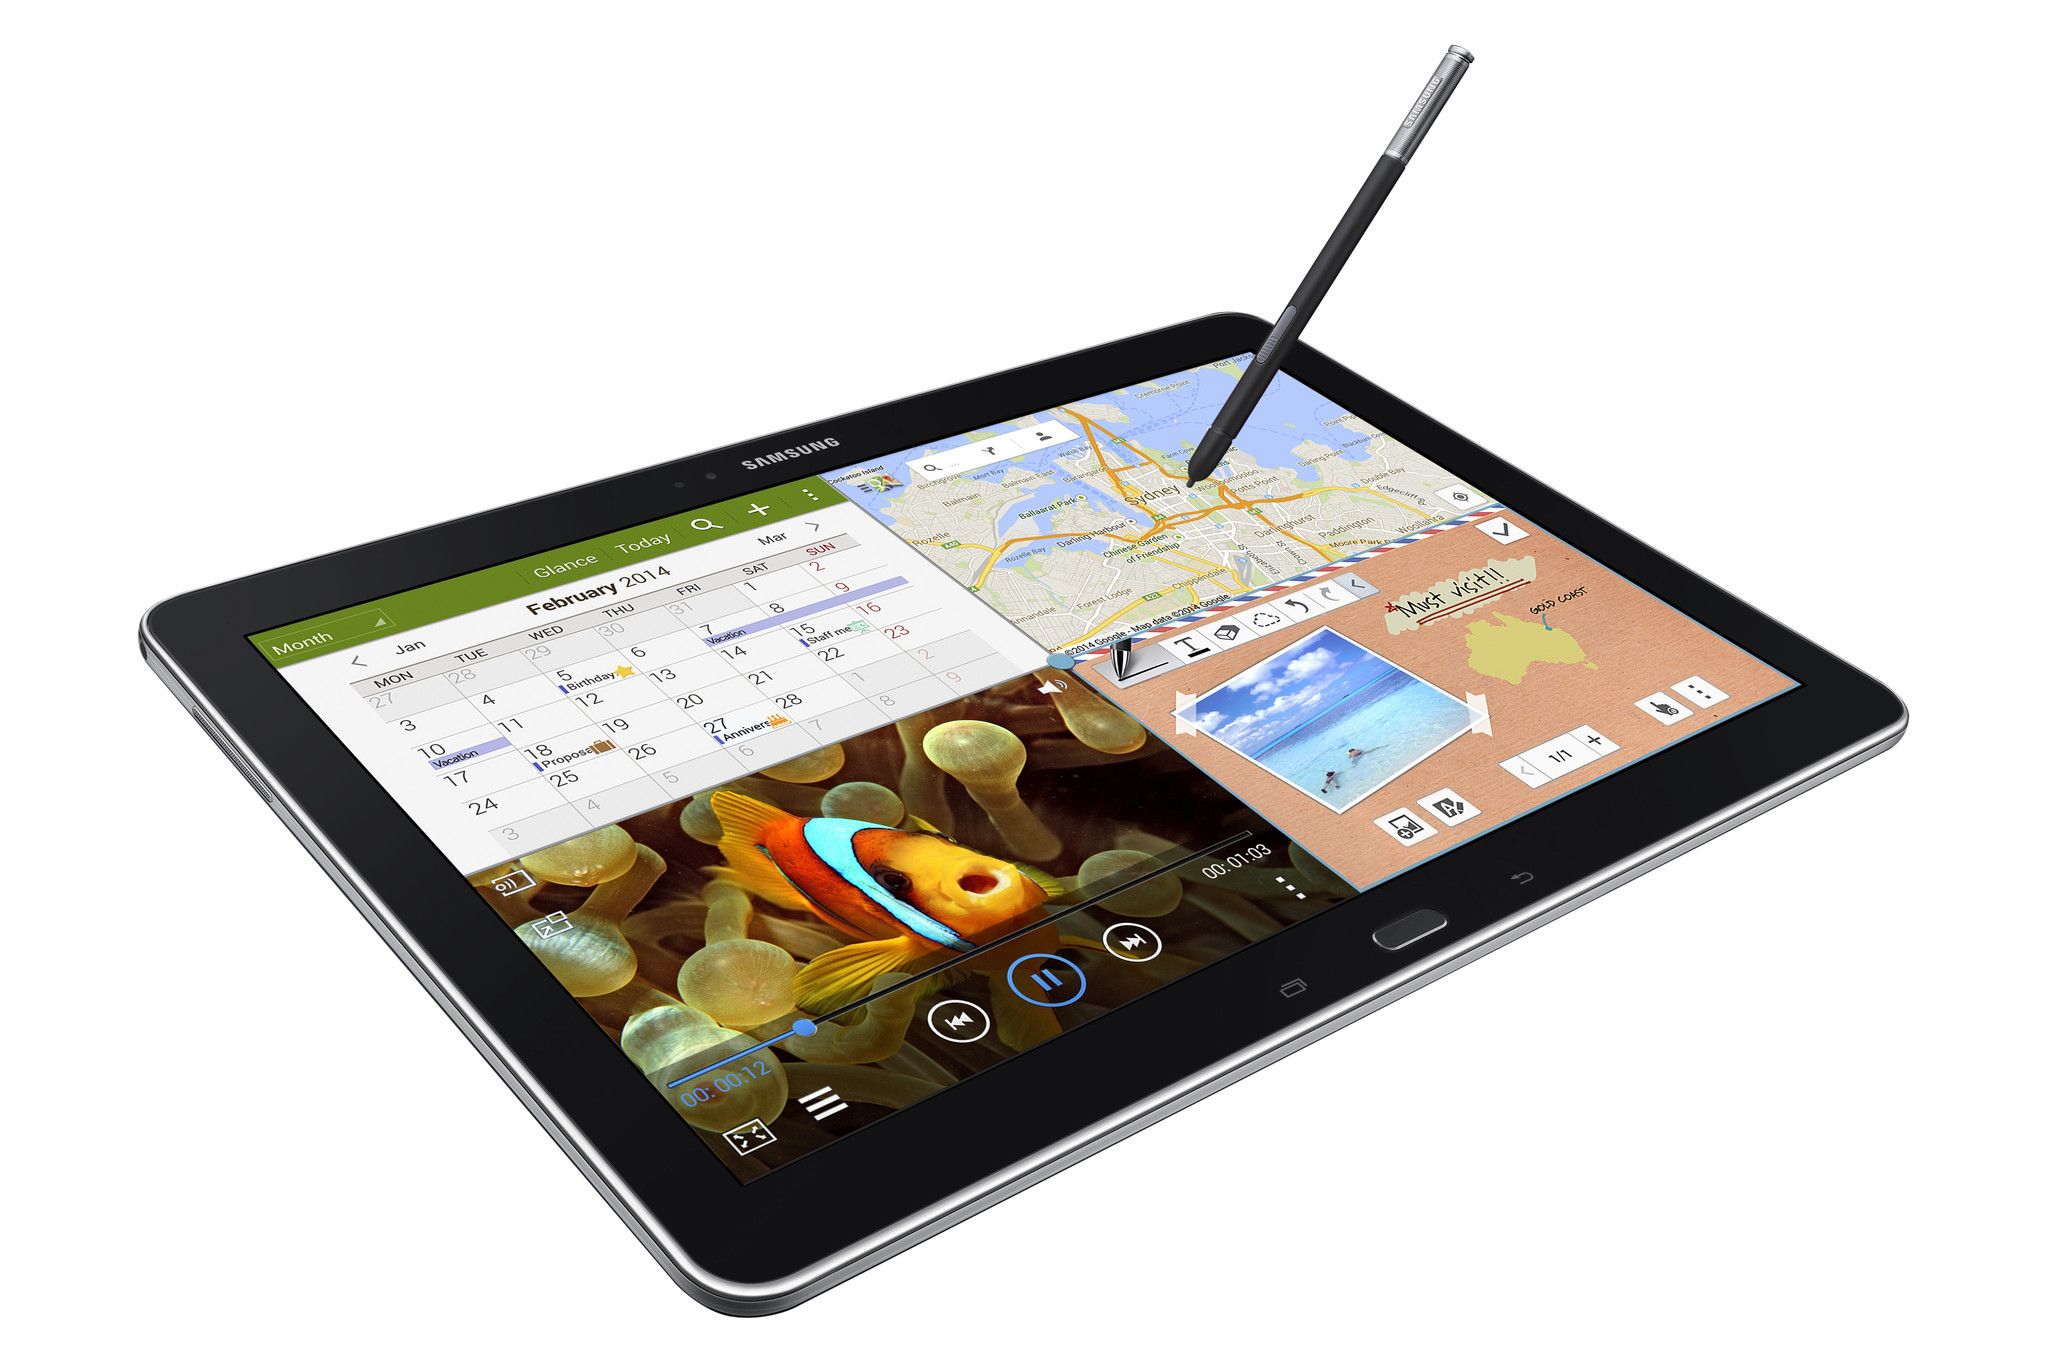
samsung-galaxy-note-pro-122

If you are familiar with Odin and it’s working, then this tutorial might not be difficult for you. Otherwise read the whole tutorial first before trying it on your device. In this Article, we will show you How To Root Galaxy NotePRO P905 Running Android 4.4.2 XXUANE1 Kit-Kat Official Firmware. But before we begin, Make sure that:

  1. That you have a Well Charged Battery, 60%-80% is better.
  2. Back-Up all your important ContactsCall Logs & Messages.It is highly recommended in case of any mishap or data loss to back up all your important data.
  3. Back-Up your Mobiles EFS DataHow To Restore and Back-Up EFS Data On Samsung Galaxy Devices.
  4. Check your device model, Go To Setting > About and Make sure that it is P905 .
  5. Do-not try this tutorial on any other device.

Disclaimer:

The methods involved in flashing custom roms and rooting your phone is highly custom and may result in bricking your device,and has nothing to do with Google or the device manufacturers which is Samsung in our case. In case of any mishap we may not be held responsible. Follow these instructions to the letter to avoid any mishap or bricking. Make sure that whatever you do, you are doing it at your own responsibility.

How To Install CWM Recovery..

odin_explained6

  1.  Downlaod CF-Auto Root For your Galaxy NotePRO to your computer and extract the zip file.
  2. Download Odin.
  3. Turn off your Phone and Turn it On While Pressing, Power + Volume Down + Home button until you see some text on-screen, Press Volume Up to continue.
  4. Make Sure that the USB drivers are installed.
  5. Open Odin in Computer and connect your device to PC, while it is in the Download mode.
  6. If your Phone is successfully connected to PC, the Odin port will turn Yellow with COM port number.
  7. Now Click on PDA and select the File ‘F-Auto-Root-viennalte-viennaltexx-smp905.tar.md5
  8. In Odin, Check Auto reboot  Option.
  9. Now Click the start button and wait for the process to complete.
  10. After the installation is complete you device will restart and once you see the Home Screen and get the “Pass” Message on Odin, unplug the cable.

Root Nexus 10 Running Android 4.4.3 Kit-Kat KTU84L Official Image

0
Root Nexus 10 Running Android 4.4.3 Kit-Kat KTU84L Official Image

Android 4.4.3 Kit-Kat has been released and most of the devices are already being upgraded to the latest version. As obvious, no matter which OEM release the official update, it will remove the root access of your device and those who are addicted to a rooted device, can never go back to an un-rooted device. In the world of Android devices, rooting methods are quite much the same for the Android versions even if they have been updated, the process must be same for the device. Nexus 10 however,  will be rooted through the old method, first Install Custom Recovery and then Flash Super SU for rooting. Since CF-Auto root will take a little time to be released for this version, till then Old is Gold and beside this is the best and perfect way which works every time.

Google_Nexus_10_leak

Here are a little something to consider before rooting:

  1. Your Device must be running Android 4.4.3 Kit-Kat, How Follow: Link
  2. Back-Up all your important ContactsCall Logs & Messages. It is highly recommended in case of any mishap or data loss to back up all your important data.
  3. Back-Up your Mobiles EFS Data. 
  4. Check your device model, Go To Setting > About and Make sure that it is Nexus 10
  5. Do-not try it on Nexus 5 or Nexus 4 or Nexus 7.
  6. Bootloader Must Be Unlocked.
  7. Enable USB Debugging Mode
  8. Download USB Driver For Nexus Devices: Link

Disclaimer:

The methods involved in flashing custom ROMs and rooting your phone is highly custom which may result in bricking of your device, and has nothing to do with Google or the device manufacturers . In case of any mishap we may not be held responsible. Follow these instructions to the letter to avoid any mishap or bricking. Make sure that whatever you do, you are doing it at your own responsibility

Downloads Required:

CWM Recovery + Super SU

Installation Process:

1. CWM Recovery:

  1. Download Super SU to the root of your SDcard.
  2. Download the CWM Recovery Image and paste it in the Fastboot folder
  3. Turn Off your Device
  4. Now go to Bootloader/Fastboot mode, Press and hold Power + Volume Down Buttons till you see some text on-screen
  5. Now Open Command prompt in Fastboot Folder.  How? Hold Shift Key and Right Click anywhere in the Fastboot folder.
  6. Connect your Device with PC.
  7. Now Type fastboot flash recovery recovery.img to flash the CWM Recovery on your device
  8. Type fastboot reboot, to reboot your device
  9. After a proper reboot, your device will be running CWM Recovery

2. Installing Super SU:

  1. Turn Off your Device again
  2. Now go to Bootloader/Fastboot mode, Press and hold Power + Volume Down Buttons till you see some text on-screen
  3. Choose Recovery From Bootloader
  4. Navigate to ‘Install zip from SDcard’ another windows will open in front of you.
  5. Select ‘choose zip from sd card’ from the Options.
  6. Select the Super SU.zip file and confirm the installation on next screen.
  7. Once the Installation is Over, Select +++++Go Back+++++.
  8. Select “Reboot System Now“,
  9. After the Reboot, check Super SU app in drawer or use any root checker app to verify root access.

Intel Devil’s Canyon Processor Core i7-4790k [ Review ]

0
Intel Devil’s Canyon Processor Core i7-4790k [ Review ]

Intel has introduced two new processors that mainly focus on overclockers and enthusiast community. The k series Haswell processors offer improved design, thermal interface and processors designed to boost up performance and overclocking.The processor known as devil’s Canyon (Intel Core i7-4790k) has come up with a few remarkable changes.

NGPTIM-645x429

Outstanding performance and Flexibility

It delivers upto 4 cores of 4GHz based frequency, providing outstandingly fast performance for demanding user. The multi tasking compute performance with 4 cores upto 8 threads which is  good news for gamers. Fully unlocked processor cores with independent base clock tuning improves ability to achieve to high core, graphics and memory frequencies without impacting other system components.
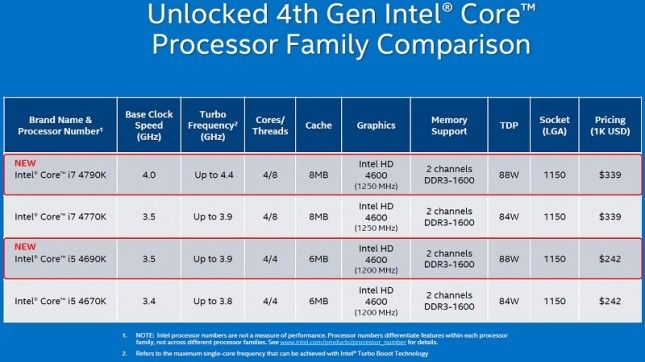
 devils-canyon-pricing-645x362

They changed the thermal interface material between the die and heat spreader which is now the “next generation polymer thermal interface material”. It works with existing cooling solutions enabling cooler and higher performing CPUs. Additional capacitors have been used to smooth power delivery to die with the hopes of higher clock speed.

The processor has 500 MHz of additional clock speed out of the box so the base clock speed is 4 GHz and turbo frequency is upto 4.4 GHz whereas i5-4690 had base clock speed of 3.9 GHz and Turbo frequency of upto 3.9.  This will resolve some significant performance advantages.

Voltage Regulator

The integrated voltage regulator which is typically seen on the motherboards has been shifted into the processor and is located on processor die. This will allow independent power consumption management for each core and the graphics core. This will prove to be beneficial in terms of efficiency and power consumption. The processor supports 8Mb of smart cache and Integrated Memory Control to support two channels of DDR3 memory.

Over Clocking

The overclocking has been given higher flexibility by fully unlocked core multiplier, power and DD3 memory. Moreover Graphics overclocking is enable to boost up graphic’s clock speed.

Haswell New Instructions

Haswell has introduced four new extensions called HNI. They include Advanced Vector Extensions 2 (AVX2), gather, bit manipulation and FMA3. AVX2 widens integer SIMD to 256 Vectors. AVX is advanced form of SSE and provides features and instructions. Haswell’s structure also includes built-in visual features, HD graphics, HD video, quick sync video technology and built-in visuals for 3D and HD.

Turbo 2.0

The processor has used Turbo 2.0 which makes turbo mode more dynamic. Four-core turbo runs on four independent dynamic threads and increases processor frequency on demand to boost up performance. In addition to that the Hyper- Threading technology allows each core processor to work on two tasks at the same time.

Cores 4
Threads 8
Base Clock Rate 4.0 GHz
Turbo frequency 4.4 GHz
Lithography 22nm
Max TDP 88W
Memory 32 GB
Processor Graphics HD graphics 4600

Overview

Intel Devil’s Canyon Processor Core i7-4790k proved to be very impressive showing massive performance boost. The processor truly compliments Maxwell’s structure. Even better the price tag of i7-4790k is said to be $339.

no sim card installed, Working Solution for iPhone 5

0
no sim card installed, Working Solution for iPhone 5

iPhone 5 is the best Apple device yet according to their reviews and analysis. But i found iPhone is really hard to fix if something goes wrong and on the other hand Android devices like Samsung, HTC and LG are easy to fix if we face software issue , sim issues, connectivity issues and more. Today i’ll tell you how you can fix ” no sim card installed ” on iPhone 5, 5s, 5c and iPhone 4s.

no sim card installed

How To Fix no sim card installed on iPhone 5:

  • Following are the possible working method that will help you to get rid of ” No Sm Card Installed ” on iPhone devices like iPhone 5, 5s, 5c and iPhone 4 and 4s.
  • Okay First thing you want to do is check that may because of your firmware. So update your device to latest iOS.
  • Do a hard reset by holding power and home button together for 5 seconds. It might be effective because your device may be getting this error cause of some bad apps or so.
  • This works for most of the people ” Toggle Airplane mode On and Off. “
  • before trying 2nd steps try this one first. Turn off your device and after few seconds turn it on.
  • Goto your settings->General->Reset->Reset Network Settings.
  • Put your device into recovery mode by turing off your device. Now connect it with your computer and keep pressing home button until you’ll see a message on iTunes. A device is found in recovery mode.
  • Check your sim and see if it’s broken or not ? Take out the sim and wait for fews to put it back.
  • Try another carrier sim to see may be your sim card is not working.

Related Topics:

Check Out Jailbreak Mods and Tweaks:


Global Call­ Skype Alternative [ Android ]

0
Global Call­ Skype Alternative [ Android ]

Android’s PlayStore is full of so many apps for making international calls. But the main reason they are rejected is that the users face problems like unclear voice, voice breakups, call drop, etc and if they support good voice quality they will have extremely high rates which normally people won’t like to spend. Global has made international calling very easy, fast and reliable. On top of that it offers the lowest possible call rates of $ 0.03/min so you can pay less and talk more.

Global Call Android App

Global call uses VoIP (voice over internet protocol) so that you can connect with your friends and family anywhere around the globe over 3G and Wi-Fi. To start with the app, you have to select your country and phone number. A message will be sent to your number with verification code. Just enter the code sent you in the app where it says verification code and you will be able to use the app.

To give users perfect calling experience Global call has introduced the following features.

  • Crystal Clear Voice

The most important thing that users demand for international calling is a clear voice with no interruption or connection problems and poor call quality. Global calling uses VoIP technology for best call quality. If somehow you don’t have a good network connection there is good news for you. Global call does not charge for lasting less than 6 seconds.

  • Low Call Rates

Global call offers the lowest possible calling rates for $ 0.03/min with no additional charges. You can check the regional rates before making a call. This is makes it an easy way to call.

  • Share Credit

You can gift credit to your friends or family members and help them out. Similarly, you can receive credit as a gift. Sending and receiving credit was never this easy.

  • Efficiency

The app is super easy to use with no complicated functions to master. You can start calling immediately after downloading the app. You are able to use phone’s directory to add and use numbers.

  • Credits

You can add credits directly from the app to your phone. You can use the prepaid system to make calls globally on landline and mobile numbers.

The app supports six different languages; English, Korean, Chinese, Japanese, Vietnamese and Indonesian. The customer is always there to help you out if you have any queries. The users currently using the app do not seem to have any problems regarding the app. If you are one amongst the people who want to give up on the calling cards and go for better quality and rates, give this app a try. The app is available in the Playstore for free download.