Home Blog Page 500

WinRAR for Mac OS X and Maverick – Download here

0
WinRAR for Mac OS X and Maverick – Download here

You can Download the latest version of WinRAR for Mac OS X for free. Use the download links below to directly download WinRAR for Mac OS X.

WinRar is yet another compressing and extracting tool like UnRarX but way faster and reliable, by constant creating small archives it is relatively faster than any other extracting software. This will not only save disk space but time and transmission cost as well. It can also Back-Up your data and reduce the size of E-Mail attachments, decompress RAR, ZIP, and other files.

WinRAR for Mac

Features:

  • It supports all popular compression formats (RAR, ZIP, CAB, ARJ, LZH, ACE, TAR, GZip, UUE, ISO, BZIP2, Z and 7-Zip).
  • This software is ideal for multimedia files. WinRAR automatically recognizes and selects the best compression method. The special compression algorithm compresses multimedia files, executables and object libraries particularly well.
  • It allows you to split archives into separate volumes easily, making it possible to save them on several disks for example.
  • WinRAR is also ideal, if you are sending data through the web. Its 128 bit password encryption and its authenticated signature technology will give you the peace of mind you have been looking for.
  • WinRAR is shareware, meaning you have the chance to thoroughly test it. The program can be used absolutely free of charge for 40 days!
  • WinRAR licenses are valid for all available language and platform versions. If you have purchased several licenses, you can even mix versions to meet your own personal needs.
  • WinRAR gives you all future UPDATES for FREE!

Note:

WinRAR for OS X is a command-line only application. If you want a GUI for your compressions/decompression needs we suggest you try UnRarX.


Download WinRAR for Mac From Here

UnRarX (Mac) – Download Here

1
UnRarX (Mac) – Download Here

UnRarX is a Mac OS X cocoa application that allows you to expand RAR archives and restore corrupted or missing archives using par 2.Universal Binary version of UnRarX is now available.Version 2.2 includes current universal binary versions of unrar and par2 command line applications. UnRarX now includes automatic update functionality thanks to Sparkle Framework by Andy Matuschak. Many thanks to Andy!

unrarx-07-700x502

UnRarX is quite a simple software, its easy to use via drag and drop and powerful enough to deal with almost any archive. All you need to do is to Drag and Drop into UnRarX interface and all your files will automatically be extracted. The main control of UnRarX are in thr Top-Right of the interface, these functions allows you to Browse for a file, Extract files and Test files to see whether they are corrupt and If your file is Password Protected, just click the Password button, Write it and extract the Archive.

You can download UnRarX in zip format by clicking on the icon or by clicking here.

Install Android 4.4 KitKat CyanogenMod 11 on Samsung Galaxy S II Sky Rocket

Install Android 4.4 KitKat CyanogenMod 11 on Samsung Galaxy S II Sky Rocket

Galaxy S II Sky Rocket is currently running on Android 4.1.2 Jelly Bean and there is no word about its further updates by Samsung. Thanks to the developers over XDA who are best known for always bringing up the best stuff for our beloved Android smartphones. Android 4.4. KitKat based  CyanogenMod 11 custom ROM for Galaxy S2 Sky Rocket is available now. A good choice for those who always like to get their hands on the latest and greatest version of Android using custom ROMs while its not available officially.

Well, CyanogenMod, the most popular custom ROM community is the aftermarket firmware distributor for Android that focuses on improving the stability and performance of the Android devices. In the following write up I’ve explained the method to install the Android 4.4 KitKat CyanogenMod 11 on Galaxy S II Sky Rocket by At&t and Rogers in simple and easy steps. Please keep in mind that this ROM is not for every day use, flash it only if you are familiar with Custom ROMs and if you know what you are actually doing. You just got to follow this guide to the letter.Root-Samsung-Galaxy-S2-Skyrocket-AT-T

Here are some pre requisites and pre cautions before we begin the flashing process…

Disclaimer: The methods involved in flashing custom roms and rooting your phone is highly custom and may result in bricking your device, and has nothing to do with Google or the device manufacturer that is Samsung in our case. Also rooting your device will void its warranty and you will be no longer eligiblefor any kind of free device services by the manufacturers/warranty providers. In case of any mishap we may not be held responsible. Follow these instructions to the letter to avoid any mishap or bricking. Make sure that whatever you do, you are doing it at your own responsibility.

Here are some pre requisites and pre cautions, that you need to have before installing this ROM.

      1. This ROM is only for Samsung Galaxy S2 Sky Rocket. Do not try this on any other device. Check your device’s model in Settings>About Device.
      2. You must have rooted your phone and have installed CWM recoveryFollow our full guide here to do so.
      3. Make sure that you backup your current ROM using the Backup option in the custom recovery.
      4. Make sure that you make EFS backup of your device as well.
      5. If you’ve rooted your phone, use titanium backup and backup all your applications with data and system data. This is useful in case you wipe your phone and want to restore each and everything exactly as it was before wiping.
      6. Make sure that you’ve backed up all your important media content, contactscall logs and text messages. This is highly recommended in case you need to wipe your phone during the installation process or something goes wrong.
      7. Make sure that your phone’s battery is charged at least over 60%. This is highly recommended in order to prevent any mishap during the flashing process.
      8. Alright! Once again, I insist that follow this guide to the letter in order to prevent any mishap.

How to Install Android 4.4 CM 11 Custom ROM on Galaxy S II Sky Rocket:

Install a Compatible Radio first:

  • Download Radio for AT&T (Skyrocket) SGH-I727UCMC1
  • Radio for Rogers (Skyrocket) SGH-I727RUXUMA7
    • Place the downloaded Radio file on your device’s sd card.
    • Boot into CWM recovery.
    • Select “Install>choose zip from sd/ext sd card>select the radio.zip file”.
    • Flash the file.

How to Flash the ROM:


  1. Download ROM CM 11.0 Android 4.4 KitKat
  2. Download Android 4.4 KitKat comaptible Gapps.zip file.
  3. Place the downloaded ROM.zip and Gapps.zip  file on your phone’s sd card.
  4. Boot into custom recovery. To do so, turn off your device completely. Now press and hold Volume Up + Home Button + Power Key, you should see the CWM recovery. Do not use any other recovery except the one we linked above.
  5. In CWM recovery wipe data-cache-dalvik cache.
  6. Now in CWM recovery select “Install Zip>Choose Zip from Sd/Ext Sdcard>Select the ROM.zip file”.
  7. Select “Yes” and let the installation proceed. It will finish in a while.
  8. Now Once again  in CWM recovery select “Install Zip>Choose Zip from Sd/Ext Sdcard>Select the Gapps.zip file”. It should flash Gapps in a few seconds.
  9. As soon as the installation is completed reboot your device.
  10. Phewww! You’ve successfully installed Android 4.4 KitKat CM 11.0 Alpha ROM on your Galaxy S II Sky Rocket.
  11. In case you are stucked on the boot screen, boot into cwm and wipe cache and dalvik cache and reboot.

That’s all. In case you got any queries or face any difficulties regarding the method explained above, feel free to stop by the comment box below. We will try our best to help you out.

How to Install TWRP/CWM Recovery and Root Samsung Galaxy S II Sky Rocket [Guide]

How to Install TWRP/CWM Recovery and Root Samsung Galaxy S II Sky Rocket [Guide]

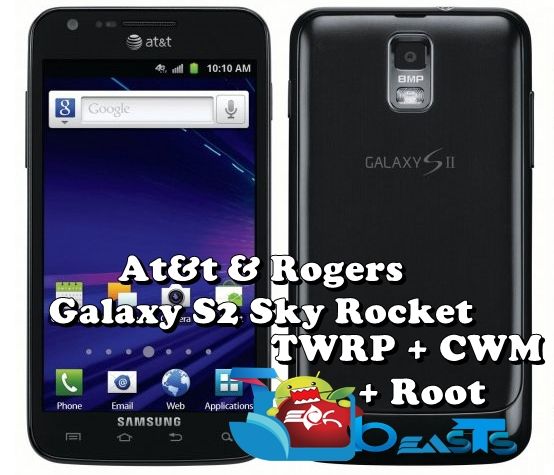
Following the release of Samsung’s second flagship device Galaxy S II, Galaxy S II Sky Rocket came out in October, 2011 under the title of At&t. Basically the Galaxy S II for At&t is called this Sky Rocket variant. A little changed and better  than the original Galaxy S II, Galaxy S II Sky Rocket sports a 4.5 inch Super AMOLED display with 207 ppi and Samsung’s own TouchWiz UI atop.  Galaxy S II Sky Rocket is powered up with Qualcomm’s Snapdragon Dual Core Scorpion Chipset clocked at 1.5 GHz, and a RAM of 1 GB under the hood. The battery is ranged at 1859 mAh, that’s a little better than the original Galaxy S II.

Well, Let’s get back to the topic, Galaxy S II Sky Rocket is much popular with the users. You may be owning one and looking out for a method to root your device and install a custom recovery either TWRP or CWM. To make it easier for you, I’ve compiled up the root and custom recovery method in the following post in simple and easy words. You just got to follow this guide to the letter, but before we move further, let’s first have a brief intro about the root access and custom recovery in case you don’t know it yet.
Root-Samsung-Galaxy-S2-Skyrocket-AT-T

Rooting your phone gives you complete access over all the data which is apparently locked by the manufacturers. This includes removal of the factory restrictions and making changes to the internal system and the operating system. Gaining the root access gives you the privileges to install various applications to enhance the performance of your device, allows you to remove the built-in applications/programs, helps you to upgrade the battery life of your device & install the apps which require the root access for the proper functionality and modify your device in so many other ways e.g using mods and custom roms. By installing the custom recovery, you can flash custom ROMs in the phone easily. Custom recovery also lets you backup your current ROM and restore it in case of any mishap. There is a laundry list of things you can do after having your device rooted and installed the custom recovery, now once you’re rooted and have installed the custom recovery, go ahead and enjoy it on your phone. Here’s our collection of 10 Best Root Apps.

Let’s move forward….

Disclaimer: The methods involved in flashing custom roms and rooting your phone is highly custom and may result in bricking your device, and has nothing to do with Google or the device manufacturer that is Samsung in our case. Also rooting your device will void its warranty and you will be no longer eligible for any kind of free device services by the manufacturers/warranty providers. In case of any mishap we may not be held responsible. Follow these instructions to the letter to avoid any mishap or bricking. Make sure that whatever you do, you are doing it at your own responsibility.

Before we go ahead, here are some pre-requisites that you need to follow:

      1. This guide is only for Galaxy S II Sky Rocket SGH I727 for At&t and SGH I727R for Rogers. Do not try this on any other device. Check your device’s model first under settings>about the device.
      2. Make sure that your phone’s battery is charged over at least 60%. This is highly recommended in order to prevent any power issues on the device during the flashing process.
      3. Make sure that you have backed up all your important ContactsCall Logs & Messages. It is highly recommended in case of any mishap or data loss to backup all your important data.
      4. Make sure that you use the original data cable to connect your device to your PC.
      5. In the case of USB connection problems, enable USB debugging mode on your device. To do so, openSettings>General>Developer Options.

***Post updated with latest recovery links***

How to install TWRP / Philz Advanced CWM Recovery on Samsung Galaxy S II SkyRocket:

      1. Download CWM or TWRP recovery according to your choice.
        1. Download TWRP Recovery for Galaxy S II SkyRocket: Latest TWRP 2.8.7.0 Link 1| Mirror
        2. Download CWM Recovery for Galaxy S II SkyRocket: Link 1| Mirror
      2. The downloaded file should be in .tar.md5 format.
      3. Open Odin.
      4. Put your phone in download mode. To do so, turn off your device completely, now turn it on by pressing and holding Volume Down + Home Button + Power Key. You should see a warning now, press Volume Up to continue.
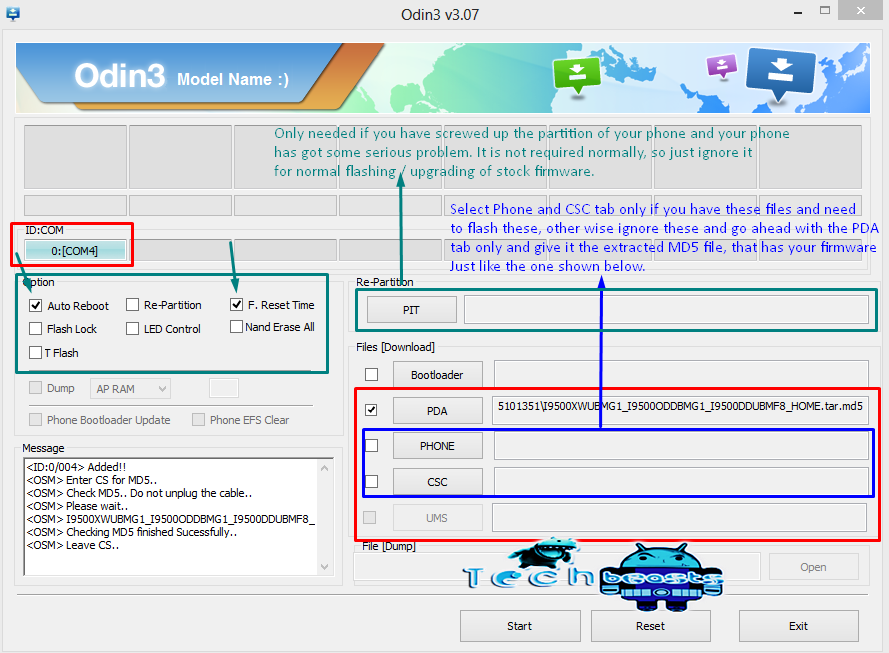
      5. Connect your phone to your PC now, the ID:COM box should turn blue now.
      6. Select the PDA tab in Odin3 and select the downloaded TWRP / Philz Advanced CWM recovery.tar.md5 file.
      7. Hit the Start button now. It will flash the TWRP/Philz Advanced CWM  recovery quickly, as soon as your phone reboots disconnect it from your PC.
      8. Congrats! You’ve successfully installed TWRP/Philz Advanced CWM recovery on your phone. You can access it now by pressing Volume Up + Home button + Power Key.odin_explained

How to Root Samsung Galaxy S II Sky Rocket:

      1. Download SuperSu from HERE.
      2. Place the downloaded.zip file on your phone’s SD card.
      3. Boot into TWRP/CWM recovery. To do so, turn off your device completely first. Now turn it on by pressing and holding Volume Up + Home Button + Power Key.
      4. Select “Install>Select the downloaded SuperSu.zip File” or “Install>Choose Zip From SD/Ext SD card>SuperSu.zip”.
      5. Proceed the installation. It will flash SuperSu.zip quickly in your phone now.
      6. As soon as the installation is finished, reboot your device and find SupeSu in the App Drawer.
      7. Congrats! You’ve successfully rooted your Galaxy S II Sky Rocket. You can now install Busy Box from the Google Play Store.

That’s all. We hope the guide works perfectly for you. In case you got any queries, or face any difficulties or got any suggestions, feel free to stop by the comment box below. We will respond at our best.

How To Turn Off Preview of Text Message in iOS.

0
How To Turn Off Preview of Text Message in iOS.

The real privacy is that even your Text Messages can’t be seen by your friends, iOS has a bit clumsy when it comes to Messages, especially the Text Message Preview on Home Screen. If you are getting tired of this preview, because of it your friends and family can read even if you don’t want them to. So,if you want to turn the Preview off, but did not able to find any way to do it, you are on the Exact right spot. We will show you how to turn Off message Preview in iOS.

th

How To Turn Off Preview of Text Message in iOS 4.

  1. Go To Settings.
  2. Navigate to Notification, then Messages.
  3. Turn Off ‘Show Preview”, doing this will no longer show the Message preview on Home Screen.

How To Turn Off Preview of Text Message in iOS 5.

  1. Go To Settings.
  2. Navigate to Notification, then  Messages.
  3. Open Show Preview then Turn it Off. Doing this will no longer show the Message preview on Home Screen.

How To Turn Off Preview of Text Message in iOS 7.

  1.  Go To Settings.
  2. Navigate to Notifications Center.
  3. Touch Include.
  4. Tap Messages.
  5. Then Tap ALERTS.
  6. Show Preview, Off (Not Green But Gray Switch).

WhatsApp for IOS 7 – Download Here.

0
WhatsApp for IOS 7 – Download Here.

Its been long since we all have been waiting for the latest and greatest version of the cross-platform messaging app, WhatsApp to come out for IOS 7. As there is a number of apps that are yet to receive the update for the all new IOS 7, WhatsApp was also one of those. Finally, the wait ends here as WhatsApp for IOS 7 has come out now with a whole new UI for IOS 7.

While we head towards the, it may be kept in mind that there is nothing new as such in this update. WhatsApp Inc has just worked on the facial side only, as the description suggest, its an update for IOS 7 User Interface with a few new features.

Prior to the UI, WhatsApp has got new notification sounds, you can simply set em’ by heading towards the Settings > Notifications > New Message. It now allows the users to set the text size, set it by tapping Settings > General > Text Size. Images can now be cropped before sending and the new interface is user friendly as well.

1450226_10202678775353874_296075642_n 1456137_10202678785714133_1179272082_n 1463122_10202678776113893_197703028_n 1477741_10202678798194445_1466669824_n 1483415_10202678775713883_537560420_n

Although the main work is done on the makeup, but the update is worth having it. It would not be wiser to waste the time now and download WhatsApp for IOS 7 from the link below.

Download WhatsApp for IOS7.

How To Lock Rotation in iOS 7 and Below.

0
How To Lock Rotation in iOS 7 and Below.

OK, so, for all those who are tired of screen rotation in their iPhone, that they want to read a book or a Comic or anything else, especially when they are lying or in the Bed, screen rotation sure tease me when it comes to reading in the Bed. iPhone devices doesn’t give you the option of stop the Screen Rotation, just like in Android, it’s hidden and of you haven’t able to find it yet, we are here to help you. We will tell you how to Lock Screen Rotation in iOS 7 and Versions below till iOS 4.

21

How To Lock Rotation is iOS 4- iOS 6.

  1. Double Click the Home button to bring the Multi Tasking Bar.
  2. Swipe right until the last set of icon is in front of you.
  3. A bit further to the Left will show you an Icon that looks like a Circular Arrow.
  4. Touch the Icon to Disable or Enable the Rotation Lock on iPhone.
  5. After that, A rotation Lock will appear in the Status bar, right next to the Battery icon when the Rotation Lock is Enabled.
  6. After Disabling the Rotation Lock, Apps will not respond to the accelerometer.

How To Lock Rotation in iOS 7.

In iOS 7, the rotation lock toggle has been moved to Control Center. It’s gotten quite easy to lock the rotation now, to do this Follow the Steps below.

  1. Bring up the Control Center by Swiping up the Screen from Bottom.
  2. The Top Row of control Center shows the five Circular Toggles.
  3. The furthest right icon looks like the Arrow Around the Padlock, touch on it will Enable or Disable the Rotation Lock on your Device.
  4. Swipe down to Dismiss the Control Center

Install Android 4.3 Omega v15 Custom ROM on Samsung Galaxy S4 I9500

Install Android 4.3 Omega v15 Custom ROM on Samsung Galaxy S4 I9500

Its been long since I’ve been waiting for the Omega ROM based on Android 4.3 Jelly Bean to come out. Finally after the stable update roll out by Samsung for the Samsung Galaxy S4 GT I9500, the developer has managed to bring up the lovely Omega ROM for the Exynos Galaxy S4. The ROM was available for GT I9505 earlier, but came out for Exynos one just today.

The reason I’ve been appreciating this ROM is, this ROM is one of the very best custom ROMs available around. Is highly modded, stable and fast. The installation of the ROM is also user customizable. Since it is based on official Android 4.3 Jelly Bean, its a good choice to go with having stock ROM on the core with a lot of mods that add charm to the functionality of your device. You must be familiar with this ROM if you’re one of the Android freaks who always love to play with custom ROMs. Well, let’s get back to the topic, since I told you guys that I’ve been waiting for this ROM so that I can install it on my phone, I also wanted to write the method in simple and easy words right here for you. You just got to follow this guide to the letter.

Samsung-Galaxy-S4-44358_2628

Based on firmware XXUEMJ9 Android 4.3

Mods, as stated by the developer:

Battery % mod
4-way reboot menu
Email with Exchange Security Disabled
Call Recording
Phone with no increasing ringtone
Hide sms from call logs
TorchLight on Lockscreen when long press volume up key while LCD is idle
TorchLight on Lockscreen on-off option at Settings>My Device>Display with on-off option at settings
Modded YouTube by rolle (can download videos) – available at Omega Files
Note II POPUP Browser – available at Omega Files
TW Launcher with scrolling wallpaper
Disable scrolling cache
Exit button to stock browser
Join more unlimited contacts in the contacts
Enable sub Symbols on Stock Samsung keyboard
Camera shutter sound on-off
Task manager shortcut app
Call Recording
Phone with no increasing ringtone
sms – mms original messaging time stamp
Increased sms hour limit to 1000
Unlimited contacts can be added to sms – mms
No sms to mms conversion
sms – mms backup and restore enabled

Disclaimer: The methods involved in flashing custom roms and rooting your phone is highly custom and may result in bricking your device, and has nothing to do with Google or the device manufacturer that is Samsung in our case. Also rooting your device will void its warranty and you will be no longer eligible for any kind of free device services by the manufacturers/warranty providers. In case of any mishap we may not be held responsible. Follow these instructions to the letter to avoid any mishap or bricking. Make sure that whatever you do, you are doing it at your own responsibility.

Here are some pre requisites and pre cautions, that you need to have before installing this ROM:

      1. This ROM is only for Samsung Galaxy S4 GT-I9500 . Do not try this on any other device. Check your device’s model in Settings>General>About Device.
      2. You must have rooted your phone and have installed TWRP or CWM recoveryFollow our full guide here to do so.
      3. Make sure that you backup your current ROM using the Backup option in the custom recovery.
      4. Make sure that you make EFS backup of your device as well.
      5. If you’ve rooted your phone, use titanium backup and backup all your applications with data and system data. This is useful in case you wipe your phone and want to restore each and everything exactly as it was before wiping.
      6. Make sure that you’ve backed up all your important media content, contactscall logs and text messages. This is highly recommended in case you need to wipe your phone during the installation process or something goes wrong.
      7. Make sure that your phone’s battery is charged at least over 60%. This is highly recommended in order to prevent any mishap during the flashing process.
      8. Alright! Once again, I insist that follow this guide to the letter in order to prevent any mishap.

How to Install Android 4.3 Omega ROM on Galaxy S4 I9500:

      1. Download Omega ROM v15 for Galaxy S4 I9500 : Deposit Files | Torrent
      2. Place the downloaded ROM.zip file to your phone’s sd card.
      3. Boot into custom recovery. To do so, turn off your device completely. Now press and hold Volume Up + Home Button + Power Key, you should see the custom recovery interface, depends on whether you’ve installed TWRP or CWM. We recommend CWM recovery.
      4. Please do not wipe cache or dalvik cache during the installation process from the recovery, the ROM installer will do this automatically.
      5. Now in CWM recovery select “Install Zip>Choose Zip from Sd/Ext Sdcard>Select the ROM.zip file”.
      6. Select “Yes” and let the installation proceed.
      7. In case you are using CWM recovery, disable recovery flash and fix root in case you’re asked. Otherwise selecting yes will break the root and cause various issues.
      8. It will start the installer now. You can select the options from the installer, The installer will also give you an option to wipe data.
      9. Although it is not needed to wipe data, but if your device has issues, we recommend you to wipe data using the installer.
      10. Let the installation process get completed, it may take a while.
      11. As soon as the installation is completed reboot your device.
      12. Phewww! You’ve successfully installed Omega ROM v15 on your Samsung Galaxy S4 I9500. Enjoy the mods now :)

That’s all. We hope that you will surely love this ROM, please consider a donation to the developer for his hardwork. In case you got any queries or face any issues, feel free to stop by the comment box below. We will try our best to help you out.

Install Android 4.3 Omega ROM v4.0 on Samsung Galaxy Note 3 LTE N9005

Install Android 4.3 Omega ROM v4.0 on Samsung Galaxy Note 3 LTE N9005

Omega ROM is one of the very popular ad very best custom ROMs among the Android freaks. The developer has started supporting the Galaxy Note 3 SM N9005, and the very first Omega Custom ROM based on Android 4.3 Jelly Bean is now available to install. If we go on the features of this custom ROM, it might take a long time to go through as the list is pretty hefty. If you’re looking for a stable/clean and faster ROM for your Samsung Galaxy Note 3 SM N9005, then this one is surely for you.

In the following post, I’ve explained the method to install the Omega ROM on Samsung Galaxy Note  3 SM N9005 in simple and easy words, you just need to follow this guide to the letter. The very thing I love about this ROM is, the installation is fully user customizable, so the user can select whatever he wants during the installation process and proceed accordingly. Before we head towards the post, let’s have a brief look on what this ROM offersamsung-galaxy-note-3.previews.

Based on Android 4.3 Jelly Bean XXUDMJ7 Firmware.

Mods, as stated by the developer:

Battery % mod
4-way reboot menu
Menu long press to kill app
Call Recording
Phone with no increasing ringtone
No sms to mms conversion
Unlimited contacts to sms – mms
sms/mms Group Messaging
sms/mms Backup – Restore
Disabled scrolling cache
Email with Exchange Security Disabled
Hide sms from call logs
TW Launcher with scrolling wallpaper
Join more unlimited contacts in the contacts
Enable sub Symbols on Stock Samsung keyboard
All supported languages enabled
All supported languages for Samsung Keyboard enabled
Camera shutter sound on-off
Task manager shortcut app by indie

Disclaimer: The methods involved in flashing custom roms and rooting your phone is highly custom and may result in bricking your device, and has nothing to do with Google or the device manufacturer that is Samsung in our case. Also rooting your device will void its warranty and you will be no longer eligible for any kind of free device services by the manufacturers/warranty providers. In case of any mishap we may not be held responsible. Follow these instructions to the letter to avoid any mishap or bricking. Make sure that whatever you do, you are doing it at your own responsibility.

Here are some pre requisites and pre cautions, that you need to have before installing this ROM:

      1. This ROM is only for Samsung Galaxy Note 3 LTE SM-N9005. Do not try this on any other device. Check your device’s model in Settings>General>About Device.
      2. You must have rooted your phone and have installed TWRP or CWM recovery. Follow our full guide here to do so.
      3. Make sure that you backup your current ROM using the Backup option in the custom recovery. You may find the method in our Galaxy Note 3 Ultimate Guide.
      4. Make sure that you make EFS backup of your device as well.
      5. If you’ve rooted your phone, use titanium backup and backup all your applications with data and system data. This is useful in case you wipe your phone and want to restore each and everything exactly as it was before wiping.
      6. Make sure that you’ve backed up all your important media content, contactscall logs and text messages. This is highly recommended in case you need to wipe your phone during the installation process or something goes wrong.
      7. Make sure that your phone’s battery is charged at least over 60%. This is highly recommended in order to prevent any mishap during the flashing process.
      8. Alright! Once again, I insist that follow this guide to the letter in order to prevent any mishap.

How to Install Android 4.3 Omega ROM on Galaxy Note 3 LTE SM N9005:

      1. Download Omega ROM v4.0 for Galaxy Note 3 SM N9005: Deposit Files | Torrent
      2. Place the downloaded ROM.zip file to your phone’s sd card.
      3. Boot into custom recovery. To do so, turn off your device completely. Now press and hold Volume Up + Home Button + Power Key, you should see the custom recovery interface, depends on whether you’ve installed TWRP or CWM. We recommend CWM recovery.
      4. Please do not wipe cache or dalvik cache during the installation process from the recovery, the ROM installer will do this automatically.
      5. Now in CWM recovery select “Install Zip>Choose Zip from Sd/Ext Sdcard>Select the ROM.zip file”.
      6. Select “Yes” and let the installation proceed.
      7. It will start the installer now. You can select the options from the installer, The installer will also give you an option to wipe data.
      8. Although it is not needed to wipe data, but if your device has issues, we recommend you to wipe data using the installer.
      9. Let the installation process get completed, it may take a while.
      10. As soon as the installation is completed reboot your device.
      11. Phewww! You’ve successfully installed Omega ROM v4.0 on your Samsung Galaxy Note 3 LTE SM N9005. Enjoy the mods now 🙂

N9005-01 N9005-02 N9005-06

That’s all. We hope that you will surely love this ROM, please consider a donation to the developer for his lovely hardwork. In case you got any queries or face any issues, feel free to stop by the comment box below. We will try our best to help you out.

23 Christmas Wallpapers for iPhone 5/5s, Download Here.

0
23 Christmas Wallpapers for iPhone 5/5s, Download Here.

Now I believe, iOS Parallax Effect is one of the best thing I have found in iOS 7, every wallpaper looks even amazing with it. Its just gives the display so beautiful composition that one who use it once can’t able to use its device without Parallax Effect. Christmas is coming and you have to make sure that everything is looking exactly as it should on Christmas. Decorating your house, buying new Clothes, decorating the Christmas Tree, getting Gifts for your Friends and not to mention Preparing to get Gifts from Santa, even keeping your Computer updated with the Christmas, in all that ruckus, don’t forget your Mobile Phone, If you happen to Own an iPhone 5 or 5S we are bringing the amazing collection of Christmas Wallpapers for you, Scroll Down, Enjoy and Download your Favorite ones.

2_christmasballiphonewallpaper_mp

3d-Pink-Heart-iPhone-5-Wallpaper

7

chrismasiphonwall62Santa_Claus (12)

christmas-iphone-4s-wallpaper-1

christmas-wallpaper-1

http://wallpaperz4iphone.blogspot.com

Christmas-Wallpapers-For-iPhone4

iPhone-Christmas-BG1

iphone-christmas-wallpaper7

iphone-christmas-wallpaper32

iphone-ipod-wallpaper-12

20 HD Christmas Wallpapers for Desktop Free – Download Here.

20 HD Christmas Wallpapers for Desktop Free – Download Here.

What do you Know, Christmas is here, well this year has passed with such speed, I mean last On 31, December 2012,  I clearly remember, that i watched Tangled on Star Movies and the next day I still remember, I went to a Cycle Trip with my Friends and it all seems like it happened yesterday. But that is none of our Concern, the Good news is that Christmas is coming and you have to make sure that you are prepared for it. You need to set everything according to the theme for Christmas, you need to decorate everything, since we can only help you in Wallpapers for your Desktop, in order to help you, we have created a good Collection of HD Christmas wallpapers, Scroll through the Pictures and Enjoy!

343

beautiful_christmas_tree-wide

Christmas-Tree-Wallpaper-christmas-8142630-500-375

christmas-wallpaper-1

christmas-wallpaper-3

christmas-wallpaper-10

christmas-wallpaper-1920x1080cozy-christmas-wallpapers-hd--1920x1080-px---cozy-christmas-cd-cyi33bdb

cute christmas wallpapers

desktop-christmas-wallpaper1

ff

high-quality-christmas-tree-illustration

jku

merry-happy-christmas-wallpapers

rt

Install Android 4.4 KitKat CM 11 Custom ROM on Samsung Galaxy S4 I9505

Install Android 4.4 KitKat CM 11 Custom ROM on Samsung Galaxy S4 I9505

Samsung’s latest flagship device Galaxy S4 runs on Android 4.2.2 Jelly Bean out of the box and Samsung recently updated the device to Android 4.3 with Knox implementation and Galaxy Gear support. According to the reports, Samsung has planned to update Galaxy S4 to Android 4.4 KitKat in January, 2014. What we have here for you today is the Android 4.4 KitKat based CyanogenMod 11 custom ROM.

Thanks to the developers over XDA forums for bringing us this custom ROM. If you are one of the Android enthusiast and custom ROM freaks, you must be familiar with the CyanogenMod, the best custom ROM available around. Do you wish to taste the Android 4.4 KitKat on your LTE Galaxy S4 before it actually comes out officially? Well, if so then this post is surely for you, but the KitKat ROM is CyanogenMod 11 based as mentioned above.Samsung-Galaxy-S4-44358_2628

Disclaimer: The methods involved in flashing custom roms and rooting your phone is highly custom and may result in bricking your device, and has nothing to do with Google or the device manufacturer that is Samsung in our case. Also rooting your device will void its warranty and you will be no longer eligible for any kind of free device services by the manufacturers/warranty providers. In case of any mishap we may not be held responsible. Follow these instructions to the letter to avoid any mishap or bricking. Make sure that whatever you do, you are doing it at your own responsibility.

Before head towards the flashing method, here are some pre-requisites and pre-cautions:

  1. This method is only for Samsung Galaxy S4 LTE GT I9505. Do not try this on any other device, it may result in bricking.
  2. Your phone must be rooted and have a custom recovery installed. Follow our full guide here to root and flash a custom recovery.
  3. Using the custom recovery, backup your current ROM. This is highly recommended in case something goes wrong during the flashing process, or the custom ROM doesn’t work fine for you.
  4. Make sure that you’ve backed up all your contactscall logs and text messages.  Also backup your important media content. This is highly recommended in case you need to wipe your phone before or after the installation of custom ROM.
  5. Make sure that your phone’s batter is charged at least over 60%. This is highly recommended in order to prevent any mishap during the flashing process.
  6. Alright! Follow this guide to the letter.

Files you need to download:

Download CM 11 Android 4.4 KitKat based Custom ROM

Download Gapps for Android 4.4 KitKat 

How to Install Android 4.4 KitKat CM 11 Custom ROM on Galaxy S4 LTE I9505:

  1. Make sure that you’re rooted and have installed a custom recovery using the link attached above.
  2. Place both the downloaded .zip files on your phone’s SD card.
  3. Boot into the custom recovery. To do so, turn off your device completely. Then turn it on by pressing and holding Volume Up + Home Button + Power Key simultaneously. You should see the custom recovery interface now.
  4. Select wipe, and wipe cache and dalvik cache now.
  5. Now select “Install>Choose Zip from sd/ext sd card>Select the downloaded CM 11 ROM.zip file”.
  6. Proceed the ROM installation, as soon as it ends, once again select “Install>Choose Zip from sd/ext sd card>Select the downloaded Gapps.zip file”.
  7. Complete the Gapps.zip file installation.
  8. Now again wipe cache and dalvik cache in recovery.
  9. Reboot.
  10. Phewww! You should now see the CM logo on the bootscreen. It may take upto 10 minutes in order to show you the home screen. Wait patiently.

All the credit goes the developer for this ROM. If you like the ROM please consider him a donation.

That’s all. In case you have any queries or face any difficulties, feel free to stop by the comment box below. We will try our best to help you out.