Home Blog Page 476

How to Transfer your Photos and Videos from iPhone to Android

0
How to Transfer your Photos and Videos from iPhone to Android

The best move you will ever make while using a smartphone is, moving to an Android device from Apple’s iPhone. A bitter truth, but Android has taken over iOS since it became popular. The open nature of Android has done the impossible things on a small sized device, there is no break on the developments and something interesting and exciting is out there every second. Apple’s restriction may force you to change your mind and get your hands on an Android device that comes with no restrictions at all, and even if it does, you can easily root it and break the jails installed by the manufacturers.

The only problem you may face while moving to an Android device from iPhone is transferring all of your important data from iPhone to Android. This may bring some confusion for in case you’re not familiar with this type of migration. In the following post we’ll be going through the method to transfer all of your photos and videos from an iPhone to an Android smartphone easily.

How to Transfer Photos & Videos from iPhone to Android:

For Windows PC:

      1. Connect your iPhone to your Windows PC using the original data cable.
      2. Open My Computer now.
      3. Find your iPhone’s folder in My Computer and right click it.
      4. Click on “Explore” here.
      5. The Photos might be in the folder named DCIM and videos in videos folder.
      6. Copy or Cut all the photos and videos from your iPhone’s folder and paste it  somewhere in your Computer.
      7. Connect your Android device to your Windows PC now.
      8. Copy all the copied photos and videos from your Computer to your Android device now.
      9. That’s All!

For MAC:

  1. Connect your iPhone to your MAC.
  2. Open the application named “Image Capture” on your MAC.
  3. Create a new folder on your MAC’s desktop as the destination folder.
  4. Click on “Download All”.
  5. This will transfer your photos or videos from iPhone to MAC.
  6. Connect your Android device to your MAC now.
  7. Copy all the downloaded videos and photos to your Android device now.
  8. That’s All!

Completely Close Applications In iOS To Save Battery – How To

0
Completely Close Applications In iOS To Save Battery – How To

Unlike in Android, iOS devices doesn’t have a Back Button, upon pressing the Home button the whole thing gets minimized, all the apps, all the open windows. All those who are new to this device thinks that the Apps are closed and will not bother them again. But what they don’t know is that all those apps are running in the Back-ground and constantly eating the Battery in secret. What you need do is to exit these apps completely and Free some RAM and save some of the battery too.

completely-close-out-running-applications-iphone-ios-7-save-battery.w654 (1)

The process is really really simple, you will either get angry at me or starting to laugh so hard even your neighbors will arrive at your house to know what happened. iOS 7 offers an even simpler way to exit apps completely than iOS 6 or below. If you start to fell bad after doing this procedure, don’t be because many doesn’t know about it as then think it as another thing, they usually think that it will close the app only not going to stop the Background Process. Here is how you can do it

How To Force-Close Applications in iOS 7

completely-close-out-running-applications-iphone-ios-7-save-battery.w654

  1. Double Press the Home Button, located in the Bottom Center of your iOS device.
  2. You will see some cards that will show you both recent and currently running applications.
  3. You can swipe left and right to scroll through the Cards.
  4. Swipe Up will close the app completely or if app is unresponsive, it will Force-close it.
  5. You can even Close Three apps at once by Using 3 fingers to swipe 3 cards at once.
  6. That is it.

How To Force-Close Applications in iOS 6 and below

ios_42_ipad_home_fast_app_killer

  1. Double Press the Home Button, located in the Bottom Center of your iOS device.
  2. You will see some cards that will show you both recent and currently running applications
  3. Now tap and hold onto an App icon until there is a Red cross appears at the Icon.
  4. Tap the Red Cross to close the application completely.
  5. That’s all.

How To Disable Unread Number On Mail Icon in iOS

0
How To Disable Unread Number On Mail Icon in iOS

There is one thing that I hate the most about E-Mail apps, despite that they give us an easy way to reach our Mails and remain updated with latest events, but there is a little problem in almost all of these apps no matter which OS you are using, the app keeps showing the number of unread E-mails on top of it, but only this won’t be a problem, all those things which are synced with E-Mail also keeps showing these notifications, teasing as a Headache.

img_52f1320bc6248

If you have tried everything else like Log-out then Log-in again or Clean your inbox or Select them all and mark as read, if not then we can provide you another way, the best way is to just Hide the counter. The following process will work on any app in iOS, instead of Mail if you are tired from any other app, you can do the same with it.

How To Disable Icon Counter Number

  1. Open Settings.
  2. Open Notification Center.
  3. Find the App you want to Clean Counter Of.
  4. Find the Badge App Icon slider on the left corner of Screen and Flip it off.
  5. Using this way you can Turn off the Counter.

How To Add New Dynamic Wallpapers in iOS 7

0
How To Add New Dynamic Wallpapers in iOS 7

Dynamic wallpapers in iOS 7 are just like Live Wallpapers in Android, but not the exact thing, they just move that is it. You can’t add mush things into it and even worse you can’t add new Dynamic wallpapers in your device, you are stuck with the ones that are pre-loaded into iOS 7, well of course, if your device is not Jailbroken. Thanks to Jailbreak Tweaks you can add new Dynamic Wallpapers to your iOS 7 device, currently the amount is limited but as the time will pass, they are sure to add more Wallpapers into it. Here is how you can install this Tweak and Use it on your device.

Dynamic-Wallpapers

Jailbreak your iOS Device.

Since the following tutorial needs an iOS device which is Jailbroken, you need to Jailbreak your device. If your device is still in its normal condition. Follow our Jailbreak Section to find out how to Jailbreak your device

Download iDynamic:

  1. Open Cydia.
  2. Search for iDynamic.
  3. Tap iDynamic once the search is over.
  4. Tap Install on the Top Right corner
  5. Tap Confirm.
  6. Restart your device

How To Use iDynamic

  1. Open iDynamic App.
  2. Select the Collection of Wallpapers you want to Download.
  3. Tap Download.
  4. Tap Respring.
  5. Now Go To Settings.
  6. Tap on Wallpaper and Brightness > Choose Wallpaper > Dynamic Wallpaper.
  7. Choose a Wallpaper from the New collection.
  8. Tap Set and Choose, whether for Home Screen or Lock Screen or for Both.
  9. Repeat the Above steps to set more Wallpapers.

Return To Default Wallpapers

  1. Open iDynamic App.
  2. Tap on the latest collection at the bottom for the original iPhone Dynamic Wallpapers or the second from the bottom for the original iTouch Dynamic Wallpapers.
  3. Tap Download.
  4. Tap Respring.
  5. Now Go To Settings.
  6. Tap on Wallpaper and Brightness > Choose Wallpaper > Dynamic Wallpaper.
  7. Choose a Wallpaper from the New collection.
  8. Tap Set and Choose, whether for Home Screen or Lock Screen or for Both.


How To Root LG G Flex (All Carriers)

0
How To Root LG G Flex (All Carriers)

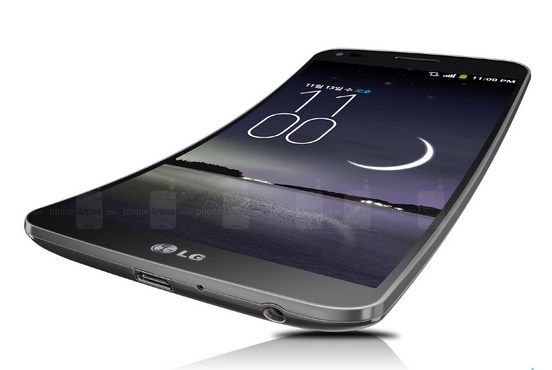
We have posted rooting tutorial of almost all the latest Flagship from LG and today we will show you how to Root LG G Flex. The same method can be used on all the carriers. Not sure whether to root your device or not, here are some words to give you a little bit of ease and confidence.Rooting your Android device allows you to get full control over it, allows you to install Custom Recoveries and ROMs on it along with many more tweaks and other stuff. It allows you to change settings of your hardware too, like you can over clock you CPU. GPU and RAM, but all of it will heat up your device and not suggested from many officials. If you have an LG G Flex and want to root it follow the tutorial ahead and get what you want.

Screenshot_10

The tool we are going to use is not the new one, it is like a universal Rooting tool for various LG devices like LG G2, G Pro 2, Optimus G, etc. Yup the  autoprime famous IOroot tool can now root your LG G Flex and variants like

  • F340 series – All
  • AT&T D950 – All
  • D955 series – All
  • D956 series – All
  • D958 series – All
  • D959 series – All
  • Sprint LS995 – All

if you won anyone of the above mentioned Variants, get ready to root it. The IOroot tool will create a backup of your EFS data and you can restore it afterwards, so no need to worry about EFS as Rooting mostly damages it

Disclaimer:

The methods involved in flashing custom roms and rooting your phone is highly custom and may result in bricking your device,and has nothing to do with Google or the device manufacturers which is LG in our case. In case of any mishap we may not be held responsible. Follow these instructions to the letter to avoid any mishap or bricking. Make sure that whatever you do, you are doing it at your own responsibility.

Warning:

Rooting an Android device Voids Manufacturers Warranty, this Rooting method for LG G Flex is tested and Found Working. If you don’t follow the Procedure as we instructed, You only are responsible for your device. We won’t be liable if any damage occurs to your device and/or its components.

Preparations:

  1. Download ioroot22.zip.
  2. Enable USB debugging mode.
  3. Install LG USB Drivers

How To Root LG G Flex

  • Connect your LG G Pro 2 with PC.
  • Unzip IOroot file and open the extracted folder.
  • Right click the Run.bat file and choose run as admin, For Mac choose root-mac.sh and for Linux chooseroot-linux.sh
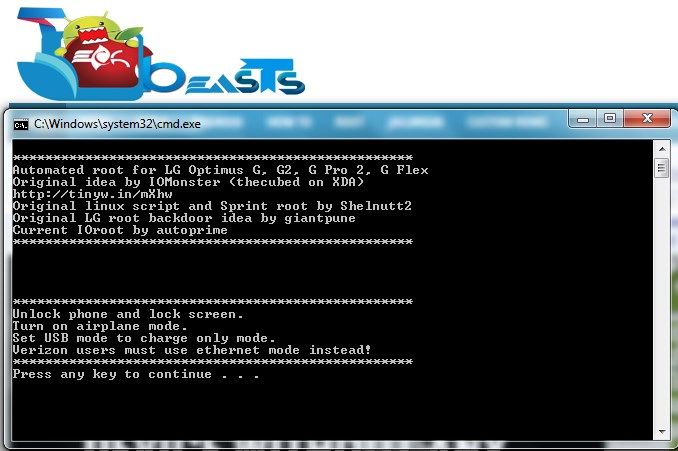
  • A cmd window will appear and all you have to do is to press any Key

Screenshot_91

  • In only a matter of Seconds, your LG G Flex will be rooted.
  • That’s all

How to Create and Restore Nandroid Backup on Android

18
How to Create and Restore Nandroid Backup on Android

Are you an Android power user, or an Android enthusiast who keeps coming across flashing new ROMs / MODs / Recoveries or tweaking the system in any other way? If say then you must have heard of the term “Nandroid Backup”. A very important thing to keep in mind before you do anything with your device regarding flashing, you have to make sure that you have backed up Nandroid and you’re safe to go with it. Well, in case you’re not familiar with Nandroid Backup, you may not need to worry about anymore as we will thoroughly go through Nandroid Backup’s introduction and then have a look on how to create and restore it on an Android device in a few minutes.

So, what is Nandroid Backup?

Android’s open nature has allowed the developers to do the impossible things on a very small sized device. It takes a few minutes to change the whole system of the device,  there is a plenty of tweaks that can be made to the device, a number of custom ROMs comes out every second and a number of MODs is there that adds charm to the functionality of a device running Android OS. One can backup all the apps, apps with data, media content, contacts, call logs, sms messages and anything else on an Android device easily. There are third party apps to perform these tasks, like Titanium Backup, Contacts, SMS backup and restore, Call logs backup and restore, Helium and others that have made the lives of Android users easier more than a lot. Users do not need to worry about any data loss and they can tweak their device the way the want because it’s easy to get their data back within no time.

Well, that was one part of backing up some data from an Android device, but how about backing up the whole system? Whole system means, the operating system of an Android device, including all the system data, system apps, system settings, each and everything and that’s called Nandroid Backup. In short, the backup of the Android operating system in a device is called Nandroid Backup. The very advantage of this Backup is, once you’ve made it and you tweaked / flashed your device  and something goes wrong during this process and ends up soft bricking your device, you’re safe even now because you’ve created a Nandroid Backup and flashing Nandroid Backup will take you to the last working state of your Android device within a few seconds. Nandroid Backup is also useful if you’re phone has got some radio issues after flashing something weird, the old system will definitely bring back the working Radio that was present in the device at that time and give your device it’s life back. Now the point comes how you can create this Backup and how you can restore it and where is it store on your device, well let’s discuss it now. One of the greatest discoveries to come out in the world of Android were the custom Recoveries, and these recoveries actually boosted up the Android development. Custom Recoveries (TWRP / CWM) actually allow creating the Nandroid Backup. It is created in the form of a zip file or an image file that can be flashed using the same custom recovery. Nandroid Backup doesn’t backup data stored on the internal sd card of your device because it, itself is stored on the sd card however as explained it backs up the whole system. In the following post we’ll be having a look on the steps that will help you even more to create and restore Nandroid Backup easily. Let’s go through these methods.

Using TWRP Recovery:

Team Win Recovery Project is by far the most easy to use, and simple recovery available for Android devices. Might not be the best choice for many, but it really impressed me with it’s UI. TWRP Recovery allows you to backup Nandroid easily, you simply need to follow these steps.

      1. Install TWRP Recovery on your Android device.
      2. Once installed, open TWRP Recovery on your Android device using the method for your device specifically.
      3. Once in TWRP Recovery, tap “Backup”.
      4. You will find the following options in the Recovery now:
          • Boot
          • Recovery
          • System
          • Data
          • Cache
          • EFS
      1. all these will be followed by their size, select the options you want to backup.
      2. You will also find compression options, enable if you want.
      3. Below these options, there will be the storage location shown as well, tapping the location will allow you to pick up your desired storage location (Internal or External SD if your device supports).
      4. Wipe to Back Up.
      5. As soon as you swipe, the Backup process will start and complete in a few minutes.
      6. Once complete, you may copy the Nandroid Backup to your PC for safety measures.
      7. You can flash the same Nandroid Backup using the Install option in the recovery.
      8. That’s All!

TWRP Backup Option

Using ClockworkMod [CWM] Recovery:

  1. Install CWM Recovery on your device, you may use ROM Manager to install it or install manually. Find here for your device.
  2. Once installed, boot into CWM Recovery on your device using the method specifically for the device you own.
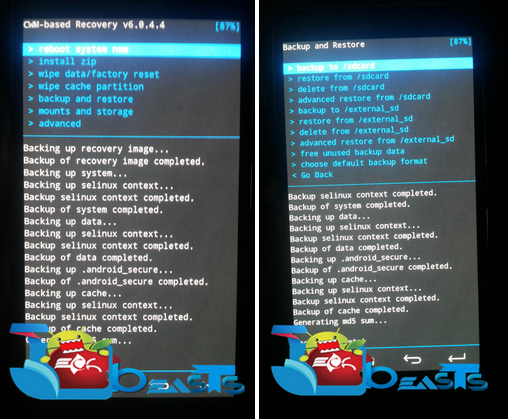
  3. Once in CWM, you will find a number of options, select “Backup and Restore” from the list and get in it.
  4. Once in the Backup and Restore option, you will find the following sub-options.
      • Backup to /sdcard: Creates Nandroid Backup on internal sd card of your device.
      • restore from /sdcard: Restores Nandroid Backup from internal sd card if you’ve created one on this location.
      • delete from /sdcard: Deletes Nandroid Backup from this location if you’ve created one.
      • advanced restore from /sdcard: Advanced restore option restores the files quickly, has some enhanced functionalities.
      • backup to /storage/extSdcard: Creates Nandroid Backup on external sd card of your device.
      • restore from /storage/extSdcard: Restores Nandroid Backup from external sd card if you’ve created one on this location.
      • delete from /storage/extSdcard: Deletes Nandroid Backup from this location if you’ve created one.
      • advanced restore from /storage/extSdcard: Advanced restore option restores the files quickly, has some enhanced functionalities.
      • free unused backup data: frees up unsued backup data, saves enough space on your phone’s Sdcard.
      • choose default backup format: You can choose the format for the backup, for example, you may choose .tar or tar + gzip or dup format for the backup. Go Back.
  5. Select your desired option, whether you want to backup or restore and proceed.
  6. That’s all with CWM recovery.

Nandroid Backup

In case using a recovery is a bit hard for you, you may try using Online Nandroid Backup application that requires only root access on your Android device.

To install custom recovery on your phone, check out our custom recovery section. In case you’re unable to find one for your phone, request us in the comment box below and we will find it and make a guide.

Note: The options appearing in the recovery may differ from the ones mentioned above, however the functionality will be the same. In case of any discrepancies, feel free to let us know and we’ll surely have a look on the suggestions and answer the queries. Thanks all.

AutoFill Password On Your iPhone 5s Using FingerPrint Scanner – How To

0
AutoFill Password On Your iPhone 5s Using FingerPrint Scanner – How To

When Apple introduced Touch ID, many thought that they will get some premium use with it, like using your fingerprint to fill Password fields in different forms and Sites. But after the arrival of iPhone 5S, all those fantasies were done. You can use that fingerprint scanner to unlock your device or purchase Apps in App Store. A lot of people mentioned, why there is no option of using your fingerprint scanner to put Password, but for an instance they should give an option to use it that way.

Input-Passwords-with-Touch-ID

If you have a Jailbroken device and looking for such solution, we have a great answer for you. There is an app called iTouchSecure, that allows you to fill password fields using your fingerprint.It’s a welcomed expansion of Touch ID’s functionality and I, for one, love it. Let’s find out how we can put it to proper use.

Jailbreak your iOS Device.

Since the following tutorial needs an iOS device which is Jailbroken, you need to Jailbreak your device. If your device is still in its normal condition. Follow our Jailbreak Section to find out how to Jailbreak your device

Download iTouchSecure:

  1. Open Cydia.
  2. Search for iTouchSecure.
  3. Tap iTouchSecure once the search is over.
  4. Tap Purchase in the top right corner.
  5. Pay and Close it and then Tap install.
  6. Tap Confirm.
  7. Restart your device

How To Use iTouchSecure

  1. Once the device opens up and the app is installed.
  2. Open Safari or any other password putting app, if you are already logged-in you need to log-out first, then log-in again to make it remember your password.
  3. Type in the Password and log-in.
  4. Now the next time you don’t need to write your password, just a simple scan will be enough.

Get iOS 6 App Switcher On iOS 7 – How To

0
Get iOS 6 App Switcher On iOS 7 – How To

iOS 7 brought many new Features and new Stylish things and also many enhancements over previous versions, but not everyone liked it. Over concern here is the new App switcher in iOS 7, those cards stacks were liked by many, but on the other hand, those who don’t like it have many reasons why? There are less apps shown in the new switcher and it is not very fast in terms either and the cards are just a flashy new icon since they aren’t even live.

iOS-6-Switcher

If you are one of those people. who don’t like iOS 7 app switcher and wishes to go back to the previous way, we have a great solution for them. There is a Jailbreak tweak called Classic Switcher. Classic Switcher brings back the old App switcher that was last seen in iOS 6.

Jailbreak your iOS Device.

Since the following tutorial needs an iOS device which is Jailbroken, you need to Jailbreak your device. If your device is still in its normal condition. Follow our Jailbreak Section to find out how to Jailbreak your device

Download Classic Switcher:

  1. Open Cydia.
  2. Search for Classic Switcher.
  3. Tap Classic Switcher once the search is over.
  4. Tap Purchase in the top right corner.
  5. Pay and Close it and then Tap install.
  6. Tap Confirm.
  7. Restart your device

How To Enable/Disable Classic Switcher

  1. Go To Settings.
  2. Tap on Classic Switcher.
  3. Here you can change options like, How many Rows you want, ability to quit all apps.

Sync and Backup All Your Apps and Their Data in Android – How To

0
Sync and Backup All Your Apps and Their Data in Android – How To

Android is a platform full of possibilities and there is no doubt about it. But there was one problem for me whenever i tried to install a Custom ROM on my device. All the apps that I installed were removed but also all their data too was eliminated from the device. As far as the apps are concerned, I am fine with it, but in some apps you can’t sync your achievements, thus loosing everything and need to start from the scratch. Now that was the problem I hate from the start. I search a lot for this and finally came to a conclusion that only Helium can help me in this matter. Helium Helium is available on Google Play Store, both Free and Paid, Paid one allows you to Sync data over Cloud storage. You can back-up both your apps and App data using Helium and its easy to use interface helps way too much in this matter. So, without any further ado, let’s look at how we can install and use Helium.

Root Your Device:

Since the following tutorial needs an Android device which is Rooted, you need to Root your device. If your device is still in its normal condition. Follow our Root Section to find out how to Root your device

Download Helium:

  1. Open Google Play Store.
  2. Search For Helium.
  3. Once the results are displayed, Tap Helium.
  4. Tap Install and wait for the download and installation.
  5. Once it is downloaded, you are ready to go.

How To Use Helium(Back-up)

  1. Open Helium.
  2. Tap Log-in and use your Google Account to log-in.
  3. Tap OK.
  4. Tap Grant for the Super SU permissions.
  5. Select the apps you want to Back-up and Tick the App Data only, if you want to Back-up apps data, not the apps.
  6. Once you are done selecting, select a name for the Group.
  7. Tap Back-up.
  8. Choose where you want to save this back-up.
  9. Wait for it to finish.

How To Use Helium(Restore)

  1. Install Helium, if you haven’t already.
  2. Tap on Restore and Sync on the Top right corner.
  3. Browse where you have saved the Back-ups.
  4. Tap the Whole Group or Select the Individual Apps, if you want to.
  5. Tap Restore, Wait for it to finish.
  6. Restart your Device (Optional)

Add Live Weather Wallpaper In iOS 7 – How To

0
Add Live Weather Wallpaper In iOS 7 – How To

Learning about weather is one of the most important things now a days, a simple change in weather can change your plans. Using a simple weather widget can give you information about all the changes in weather. Since iOS does not support widgets, they have given the option for you to look for weather by scrolling down. Now thing like that is teasing, I mean every time you need to see a weather change, you have to Swipe down.

Forecast

A jailbroken iOS device can give its user something worth trying, Forecast is an application that changes the wallpaper on both your Lock-Screen and Home-Screen to an animated representation of Current Weather situation in your Area. With only $0.99 you can buy this app as an Apple user can easily afford such amount of money. It is incredibly easy to use as Apple made this tweak itself, which is not for real.

Jailbreak your iOS Device.

Since the following tutorial needs an iOS device which is Jailbroken, you need to Jailbreak your device. If your device is still in its normal condition. Follow our Jailbreak Section to find out how to Jailbreak your device

Download Forecast:

  1. Open Cydia.
  2. Search for Forecast.
  3. Tap Fancy once the search is over.
  4. Tap Purchase in the top right corner.
  5. Pay and Close it and then Tap install.
  6. Tap Confirm.
  7. Restart your device

Configure Forecast:

  • Once your device restarts, Forecast will automatically start displaying the Weather data on your Lock-Screen and Home-Screen.
  • You can swipe right to check the Forecast of your City.
  • Swipe left to access the default lock screen and unlock your phone.
  • Tap Settings > Forecast.
  • Tap switcher to enable/disable any options

How To Add Color To iOS 7

0
How To Add Color To iOS 7

iOS 7 is full of new features and new things to explore, but the thing is, it’s not colorful, its basic color is just a see-through and its not even quite your cup of tea, you might like to splash a little bit hue into the UI  to make it your own Ya? Well if you have a device running iOS 7 and it is Jailbroken, you can add a lot of different colors to completely change the UI of iOS 7. A tweak called Fancy describe itself as ‘easiest way to add color iOS’, its slick UI and ease of use make it a great way to throw colors to iOS and completely renovate it. All ready to go, let’s find out how.

Add-Color-to-UI

Jailbreak your iOS Device.

Since the following tutorial needs an iOS device which is Jailbroken, you need to Jailbreak your device. If your device is still in its normal condition. Follow our Jailbreak Section to find out how to Jailbreak your device

Download Fancy:

  1. Open Cydia.
  2. Search for Fancy.
  3. Tap Fancy once the search is over.
  4. Tap Install in the top right corner.
  5. Tap Confirm.
  6. Restart your device

How To Set-up Fancy:

1.Go to Settings.

2.Tap Fancy.

3.Change the Global color settings to change the accent color through out the entire UI or you can change the Individual settings in the individual section of UI.

  • Global Tint Color – Choose whatever color you want using the RGB sliders and choose the transparency (alpha) using the A slider.
  • Global Options – Select whether you want to tint the keyboard or navigation bar or darken the keyboard.

4.Enjoy!

Root Galaxy Note 3 LTE N9005 On Android 4.4.2 XXUENB7 Kit-Kat Official Firmware[Guide]

0
Root Galaxy Note 3 LTE N9005 On Android 4.4.2 XXUENB7 Kit-Kat Official Firmware[Guide]

Before going any further, Follow the link to update your Galaxy Note 3 LTE N9005 to XXUENB7 Android 4.4.2 Kit-Kat:

Update Galaxy Note 3 LTE N9005 To Android 4.4.2 XXUENB7 Kit-Kat

Now that you have Updated your device to Android 4.4 Kit-Kat and as per rule of installing Official Firmware, your device will loose its root access. The only way to get it back, is by rooting it again. Rooting allows you to get full control over your device, Stock apps and mods are good, but installing Custom Mods gives you better support and great battery life, you might need to delete some Stock apps from the device, a non-rooted device can’t do that, but a rooted one has the power to remove stock apps too.

note-3-lte-i9005

If you are familiar with Odin and it’s working, then this tutorial might not be difficult for you. Otherwise read the whole tutorial first before trying it on your device. In this Article, we will show you How To Root Galaxy Note 3 LTE N9005 On Android 4.4 XXUENB7 Kit-Kat Official Firmware.But before we begin, Make sure that:

  1. That you have a Well Charged Battery, 60%-80% is better.
  2. Back-Up all your important ContactsCall Logs & Messages.It is highly recommended in case of any mishap or data loss to back up all your important data.
  3. Back-Up your Mobiles EFS DataHow To Restore and Back-Up EFS Data On Samsung Galaxy Devices.
  4. Check your device model, Go To Setting > About and Make sure that it is SM-N9005.
  5. Do-not try it on N900a, N9002, N900t, N9002 and N9000

Disclaimer: 

The methods involved in flashing custom roms and rooting your phone is highly custom and may result in bricking your device,and has nothing to do with Google or the device manufacturers which is Samsung in our case. In case of any mishap we may not be held responsible. Follow these instructions to the letter to avoid any mishap or bricking. Make sure that whatever you do, you are doing it at your own responsibility.

Warning:

Rooting an Android device Voids Manufacturers Warranty, this Rooting method for Galaxy Note 3 LTE N9005 is tested and Found Working. If you don’t follow the Procedure as we instructed, You only are responsible for your device. We won’t be liable if any damage occurs to your device and/or its components.

All done and good, let’s head towards the Next page to See, How you can Root Samsung Galaxy Note 3 LTE N9005.

Pages: Page 1 | Page 2