

In this guide, we will take a look at the problems of Galaxy Note 8 after Android Pie update. We will also take a look at the solutions to fix Galaxy Note 8 problems after Android Pie update. Let’s learn more about Android Pie update before we fix Galaxy Note 8 issues.
A couple of days back, Samsung updated the Galaxy Note 8 to official Android Pie. The final update takes place after 4 beta versions of Android Pie. The Android Pie update brings a lot of goodies on-board. Even though this update came after 4 beta builds, it still has a number of bugs. Since this is the very first final build of Android Pie, a few bugs were definitely expected. A few Galaxy Note 8 owners have already decided to switch back to Android Oreo from Android Pie. If you have also updated recently, and now you are facing problems, but you don’t want to go back to Android Oreo, then here is the guide you need.
Android Pie for Galaxy Note 8 and its problems
Android Pie update carries the version 9. The Android 9 brings major UI changes for the Note 8. It has got the latest One UI. Settings application along with some other apps has got a whole new design. Notification panel and status bar are completely redesigned. Samsung has added new features like the Night Mode, Adaptive Battery, Native DNS Support, Navigation Gestures, Samsung DeX support without the dock, etc.
While updating the UI and adding new features, Samsung shifted some settings here and there. Samsung also made it more difficult to disable features like the Google Assistant. The phone was supposed to get a boost in its battery life and performance, but for some users, things went on the opposite side. A number of Galaxy Note 8 owners reported poor battery life, lag in performance, unable to disable a few features, and many other problems. This pushed a few Note 8 owners to downgrade the phone to Android Oreo as well, but downgrading is not the best option here.
The best thing is to fix all the problems on your Note 8 after Android Pie. You should not just downgrade since there’s always a solution to every single problem. Also, the latest Android Pie update comes with the latest security patch, which means that this firmware is more secure. Now comes the real question, how are you going to fix all those Galaxy Note 8 issues? Well, that is exactly what we are supposed to do here. As you scroll down, you will find a list of the most common Galaxy Note 8 problems. Multiple fixes to each problem are listed next to it. You can apply the solutions one by one to find out the one that works for you. Let’s start now.
Galaxy Note 8 Problems After Android Pie Update
There is a plethora of solutions given below. At times, you will find one same solution fixing many problems, and many solutions fixing one problem. The solutions are given at the bottom of this guide just to avoid repetition. Follow these simple steps to fix all those Galaxy Note 8 Problems after Android Pie update.
Galaxy Note 8 Reboots Randomly or Reboots on its own after updating to Android Pie
So, right after updating your Note 8 to Android Pie, it started randomly rebooting. Why is it happening? Well, you have to check a few things. The very first thing is whether you performed a clean installation or not. This means if you factory reset your Galaxy Note 8 prior to installing the Android Pie update or you flashed it over your previously filled Galaxy Note 8. In case you dirty-flashed the Android Pie, you should go ahead and perform a clean ROM installation. In case your ROM was installed on a fresh Note 8, follow the solutions given below.
- Clear the Cache of your Note 8.
- If cache clearing doesn’t work, boot Note 8 into Safe Mode. Check the phone now if it works fine or not.
- Factory reset your Galaxy Note 8 before clean ROM installation.
- In case the solutions given above do not work, go ahead and perform a new ROM installation all over again.
Galaxy Note 8 is stuck in the boot loop after flashing Android Pie
Now if your phone is stuck in a boot loop right after installing Android Pie, you might be having trouble with the cache of your device. Here are the possible solutions.
- Simply boot your phone into the recovery mode. Clear the cache of your phone and reboot it.
- If clearing cache doesn’t help, go into recovery again and perform a factory reset.
- If the phone is still not working fine, go ahead and install the Android Pie firmware manually once again.
Lock Screen Notifications are gone after Android Pie
If you are unable to find the lock screen notifications on your phone, we would like to tell you that Samsung has messed them up. Samsung has changed the settings for the view style of lock screen notifications. Here is how you wll get them back now.
- On your Note 8, go to Settings > Notifications.
- In Notifications, click on View Style > Detailed.
- Lock the phone and check the notifications on screen now.
Night Mode does not stay on all the time
If you try enabling the Night Mode on your Note 8 from the Developer options, it will not stay on all the time. It will stay on for a while and go off on its own. To make sure that the Night Mode doesn’t turn off on its own, you will have to disable it from Developer Options and enable it from the Night Mode settings. To disable it from the Developer Options, do this:
- Open Developer Options > Night Mode > Switch it off.
How to disable Google Assistant after updating to Android Pie
The method to disable Google Assistant has changed now. Those of you who are facing trouble to disable it on Android Pie, they can follow these steps.
- Go to Settings and open Apps.
- Click on the three-dotted (hamburger) icon on the top-right.
- Now tap Default Apps > Device Assistant > Choose None.
- This will completely disable the Google Assistant.
How to disable Bixby on Note 8 Android Pie
You can disable Bixby on Note 8 powered by Android Pie via BxActions application. Install the application and remap the Bixby button or completely disable it. The choice is yours.
Unable to turn off Battery Saver after installing Android Pie
A few users have reported that they were unable to turn off the Battery Saver after enabling it once. To disable the battery saver, go to Settings and enable the High-Performance mode on your Note 8. After this, click on the Optimized Mode once again. Doing this will disable the Battery Saver on your phone.
Poor Battery Performance on Android Pie – Battery Drains faster
On a new firmware, the battery sometimes gets extremely awkward. At first, it takes a little bit of time for the battery to calibrate itself. If you think that the poor battery life of your Note 8 on Android Pie is due to the battery calibration, you can try calibrating it on your own. If the calibration does not work fine, you can move on to the other solutions. Follow the steps given below calibrate battery first. The other solutions are also listed next to it.
Calibrate Galaxy Note 8 Battery on Android Pie
- First of all, let your phone discharge to 0. Do not charge it in between.
- As the phone goes dead, put it on charging and charge it to 100%.
- After this, use the phone again and let it die at 0.
- Charge the phone to 100% again.
- Repeat this cycle for 4-5 times.
- The battery will be calibrated now.
- Check the battery life of your phone now.
Other solutions for Poor Battery life
- First of all, you can try turning on the adaptive battery on your Note 8.
- If this does not help, go ahead and clear the cache of your phone.
- Clearing cache didn’t work? Okay, go ahead and boot into the Safe Mode. Check if the phone works better without apps or not. If it works better, you need to find and delete the trouble-making app.
- Factory resetting the Note 8 should be your next option.
- If all these options fail, go ahead and perform a whole new clean ROM installation.
Phone lags, poor performance after installing Android Pie on Note 8
You expected the phone to become as smooth as a cream after Android Pie, but it became laggier, the performance became poor. What to do now? Follow these steps.
- First of all, make sure that you did not touch the Window Animation Scales under Developer Options. If you have changed anything, go back and switch them to their original state.
- Now boot your Note 8 into the Safe Mode and check how it works without Apps. If it works fine, find the culprit app and delete it.
- Safe Mode didn’t help, go ahead and clear the cache of your phone.
- Clearing cache failed too? Go ahead and perform a factory data reset to give your phone a whole new life.
- If these solutions fail to work, the last option is to perform a clean ROM installation.
Not registered on network error right after flashing Android Pie
Believe me, this is the most annoying error to occur on any Android smartphone. This error is actually much more common on the Samsung Galaxy handsets. It does have a number of reasons to pop up. If you have started seeing this error on your Note 8 after Android 9
Pie installation, there might be something wrong with your network settings. Here are your options to fix this problem.
- Open Settings and go to Connections > Mobile Networks > Network Mode > It should be set to “Auto Connect”.
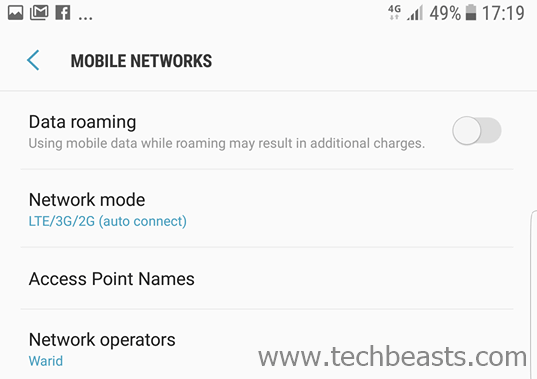
- The second option is to choose your network. Open Settings > Connections > Mobile Networks > Network Operators > Search Network Operators > Choose your operator from the list.
- The last option to fix this problem is by resetting the network settings. To do this, go to Settings > About phone > Reset > Reset Network Settings > Reset Settings. Done.

Galaxy Note 8 WiFi problems on Android 9 Pie
WiFi is not working fine after updating the phone? You need to go through a few steps to fix this problem. Follow these steps to fix Galaxy Note 8 WiFi problems after the Android Pie update.
- Open Settings > Connections > WiFi > Choose your connection > Forget it.
- Connect to the network again and see if it works fine.
- If it still does not work fine, check your router on another device. If the other device is having the same issue, you need to fix the router. Try restart the router or completely resetting it.
- Make sure that your Mobile Data is disabled while you try to connect to WiFi.
- Enable Airplane Mode and disable it and then see the WiFi.
- In the end, call your ISP and ask if something is wrong with the internet in your area.
- If none of this helps, install the firmware once again to see if the WiFi works fine on a new firmware.
- Still failed? Time to take your Note 8 to the Samsung Service Center.
Galaxy Note 8 Camera crashing on Android 9 Pie
Samsung has enhanced the Camera app in the Android Pie update. The phone now has a handful of new options in the camera application. Unfortunately, the Camera app is not working up to the mark for some users. Here is what you can do.
- First of all, try clearing the Cache of the Camera app. Reboot your phone after this.
- If clearing Camera Cache helps, you should be fine. In case it doesn’t, try clearing the cache of your phone.
- In case both these solutions do not work, check the error you are getting and see if its related to the hardware.
- If the problem is hardware-related, you need to get your phone checked from the nearest Samsung Service Center.
Clear Galaxy Note 8 Cache
- First of all, shut down your Note 8 by pressing the power button for about 5 seconds.
- Now press and hold Volume Up + Bixby + Power button to boot the phone.
- As soon as you see the logo on the screen, let the keys go.
- Your phone will take you into the recovery mode now. In recovery, press Volume Down to highlight “wipe cache partition”.
- Press the Power button to wipe cache. Now press Volume Down once again to select “Yes” and press Power button to make a selection.
- Reboot your Galaxy Note 8 after this. The cache will be wiped.
Clear Galaxy Note 8 App Cache
- On your phone, open Settings > App Settings/Apps/Application Manager.
- Go to All Apps.
- Now select the application who’s cache you want to clear.
- In the App Settings, go to Storage.
- Now click on Clear Cache.
- Reboot your phone after this.
- Run that application again.
Boot Galaxy Note 8 into Safe Mode
- Turn off your Note 8.
- Turn on the Note 8 again.
- While the phone is booting up, press and hold Volume Down key.
- Keep the key pressed unless you see the Home Screen.
- As you see the screen, you will see “Safe Mode” watermark on the lower left corner.
- Leave the key now.
- Your Note 8 is in Safe Mode. All Apps are disabled.
Run your phone without apps now to see if the issue has been resolved or not. If your phone still got the problem you are trying to solve, then it is not related to any application. If the phone is not having any issues now, reboot your phone again and check all the apps you installed recently. Delete the application that you think is causing trouble.
Factory Reset Galaxy Note 8
- Turn off the Galaxy Note 8.
- While the phone is off, press and hold Volume Up + Bixby + Power button to go into recovery.
- As soon as you see the logo on the screen, release the keys.
- Your phone will take you into the recovery mode now.
- In recovery, press Volume Down to highlight “factory data reset”.
- Press the Power button to perform a factory data reset.
- Now press Volume Down to highlight “Yes” and then press the Power button.
- Reboot your Galaxy Note 8 after this. Your Note 8 has been reset to factory settings.
Clean Android Pie Installation on Galaxy Note 8
- Open this guide to install Android Pie on Note 8.
- Download and extract the firmware.
- While adding files to Odin, add the CSC file in the CSC tab. CSC file will wipe your phone completely. DO NOT select the HOME_CSC file as that does not clean install the ROM.
- Install the firmware by following the steps given in that guide.
- After flashing the new firmware, clear the cache of your phone by following the steps given above.
- That’s all. You have a clean Android Pie ROM now. This should fix any issue on your phone.
Wrap Up
That’s all folks. I hope that your Galaxy Note 8 is running well on the Android Pie now. If you are facing any other issues, feel free to reach out to us. We will try our best to find the solutions to your problem. Stay connected.


")


