
Moto G5 and Moto G5 Plus are Motorola’s players for the year 2017. Motorola launched these smartphones just a few months ago. Both these phones have nice specifications. The difference between Moto G5 and G5 Plus are in the display, CPU, RAM and battery departments. Both these phones run on Android 7.0 Nougat out of the box. Motorola’s phones have proved to be good enough for customizations. Users have been heavily tweaking their Moto smartphones in the past. Customizing your phone begins with the installation of a custom recovery and the root access. To install a custom recovery, you must first unlock the bootloader of your phone.
Moto G5 and G5 Plus’s bootloader can be easily unlocked. An unofficial build of TWRP recovery has made its way to the device. It means that you can install the TWRP on your device as well. You can also disabled forced encryption on your Moto device and the best part is, you can now root the phones. Rooting hasn’t been achieved by SuperSU this time. Magisk, a new player in the world of Android tweaks has rooted these phones. Magisk roots the phones systemless-ly, which means you will not be touching the system partition of your device.
In this guide, we will first have a look at the method to unlock the bootloader, install a custom recovery i.e. TWRP recovery and then, in the end, we will root the Moto G5 and G5 Plus using Magisk. The steps given below will make it extremely easy for you to unlock the bootloader, install TWRP and root Moto G5 and G5 Plus.
Note: Follow this procedure at your own risk as it can void your phone’s warranty. In case of a mishap, TechBeasts or the recovery/root developers may not be held responsible.
Contents
Unlock Bootloader, Install TWRP and Root Moto G5 and G5 Plus
- Download and extract the ADB and Fastboot package on your computer’s desktop.
- Enable USB Debugging on your phone.
- Enable OEM Unlocking on your phone.
- Install Motorola USB drivers on your computer.
- Backup your contacts, call logs, SMS messages and media content.
- Use OEM data cable to establish a connection between your PC and your phone.
Unlock Moto G5/G5 Plus Bootloader
- Open the extracted platform-tools folder. Press and hold the shift key on the keyboard and then right-click on an empty area within the platform-tools folder. From the menu that will open up, click on “Open command window here”.
- Connect your phone to your PC now.
- In the command window, enter the following commands one by one.
- adb devices
- Press enter, this command should return a small code verifying your connection.
- adb reboot bootloader
- Press enter, this command will reboot your phone into the bootloader mode.
- fastboot devices
- Press enter, this command will verify if your phone is connected properly in fastboot mode or not.
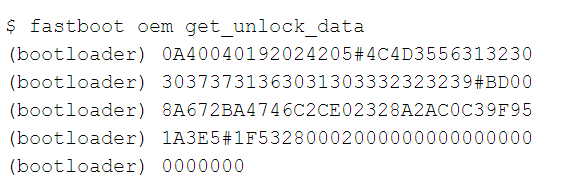
- fastboot oem get_unlock_data
- Press enter, you will get a string which will be used to unlock the bootloader. Select the string while pressing and holding right click of the mouse and dragging it through the string. Then press Control + C to copy the code. Paste this code in notepad for a while. Your code should look like this.


- adb devices
- Now open Motorola’s web page and sign into it using your Google or Motorola account.
- Scroll all the way down and paste the copied string where it says to check if your device can be unlocked.
- After pasting the string, click “Can my device be unlocked“?

- If the device is unlockable, you fill find a REQUEST UNLOCK KEY button at the bottom.
- Check the “I Agree” button in the agreement given below and click the REQUEST UNLOCK KEY button.
- Motorola will send you an Unlock Key through email to your registered email address.
- Open your email inbox now and copy this key.
- Now get back to the command window where you were pushing all the commands.
- Enter this command now.
- fastboot oem unlock UNLOCK-KEY
- replace Unlock Key with the key you just copied from your email and hit enter.
- fastboot oem unlock UNLOCK-KEY
- Now your phone’s bootloader will be unlocked in a few seconds.


Note: This will wipe your phone’s internal storage, so don’t panic.
Install TWRP recovery and Root Motorola G5/G5 Plus
Required downloads:
- no-verity-opt-encrypt-5.1.zip
- Download latest Magisk
- Download TWRP Recovery.img for your device.
- Copy the TWRP Recovery.img file to the platform-tools folder that you extracted to your desktop. Turn on your phone and enable USB debugging, also enable OEM unlocking on your phone once again.
- Turn on your phone and enable USB debugging, also enable OEM unlocking on your phone once again.
- Now connect your phone to your PC.
- Open the platform-tools folder and then open the command window again just as you did in step 1 above.
- Now in the command window, enter the following commands one by one.
- adb devices
- Press enter and it should return a code to verify the connection.
- adb reboot bootloader
- Press enter, this will reboot your device into bootloader mode.
- fastboot devices
- Press enter to verify connection in fastboot mode.
- fastboot flash recovery recovery.img
- Press enter to flash the recovery now.
- fastboot boot recovery.img
- Press enter to boot your phone into TWRP recovery. Do not use any other method to boot into TWRP as you may end up bricking your phone.
- adb devices
- As your phone boots up asking whether you want to allow modifications in TWRP or not, swipe your finger over the option “Swipe to allow modifications”.
- Now in the TWRP recovery, tap Wipe > Factory data reset your device.
- Now get back to the main menu in TWRP and tap Reboot > Recovery.
- This will reboot your device into TWRP recovery mode, allow the modifications once again.
- In the TWRP recovery, tap Mount > Mount the storage now and connect your phone to your PC.
- Copy the Magisk installer and no-verity.zip files to your phone’s internal storage now.
- Disconnect the phone from your PC.
- Tap the install button in TWRP, in the install option, tap Install Zip > Locate and select no-verity-opt-encrypt-5.1.zip > Swipe to flash.
- After flashing this file, once again tap Install > Install Zip > Locate and select Magisk.zip file > Swipe to flash.
- After flashing Magisk, reboot your phone into the system now. It should have the Magisk SU installed in it. That’s all.
Conclusion
That’s all with unlocking the bootloader, installing TWRP recovery and rooting your Moto G5 or G5 Plus. If you are wondering why there was no mention of the SuperSU or Phh’s SuperSU throughout this process, you may be interested in knowing that both of those modules are not working and they are breaking the system. For this reason, Magisk is the best choice to go with as it won’t touch your system partition. In case you are stuck with something, feel free to reach us out through the comments section.


