Let us just assume, (although if I had been in your place my device might have been running Android 5.0 Lollipop already), that you have updated your Sprint Galaxy S5 to Android 5.0 Lollipop leaked firmware. If not then we will provide the Download and installation link below, you don’t have to worry about that. The real thing to worry about is how you can root your device after updating it to Android 5.0 Lollipop? A question that has been asked by a lot of people and this time Chainfire has once again provided his services and mirrored the CF-Auto root for this build too. CF-AutoRoot is one of the best and easiest ways to root your device. It will do the whole process for you and all you have to do is to wait for it to complete the rooting process itself.
Rooting allows you to get full control over your device. Stock apps and mods are good, but installing Custom Mods gives you better support and great battery life. You might want to delete some Stock apps from the device and a non-rooted device can’t do that, but a rooted one has the power to remove stock apps too. Once again, we are going to use Odin to Flash this CF-Auto root file on your device. For those who are not familiar with the CF-Auto root being installed via Odin, just follow the post carefully. Without further ado, let’s begin with How To Root Verizon Galaxy S5 on Android 5.0 Lollipop via CF-Auto Root.
Early Preparations:
1. This guide is only for Sprint Galaxy S5 SM-G900P!
Make sure that your device is exactly as mentioned above. To check out what device you have, go to Settings > More/General > About Device or Settings > About Device and match the model number. Be careful about the device model number, flashing a file on a device not listed here might result in bricking it up. In that case, we may not be held responsible.
2. Battery should be charged at least 60%!
Your device’s battery shouldn’t be weak. In case your device goes dead during the flashing process, your device may get soft bricked and you might be in need of flashing stock firmware and that will ultimately result in wiping up your data as well. So, make sure that you charge your device before you start the flashing process.
3. Use the OEM data-cable to establish connection!
Always use the original data cable to establish connection between your Android device and your computer / laptop. Using ordinary data cables might interrupt the flashing process, so to avoid any mishap, you need to meet this requirement as well.
4. Backup everything!
Just to be on the safe side, you may consider backing up each and everything from your Android device. This is highly recommended so that in case anything goes wrong, you still have the access to all of your data and you can restore it immediately. Also, clean install is always recommended, that means you will probably have to wipe your device to install the new firmware. So, you may backup everything as listed below.
- Backup SMS Messages
- Backup Call Logs
- Backup Contacts
- Backup Media – Copy your files manually to your PC or Laptop.
- Backup EFS
- Titanium Backup – If already rooted, use Titanium Backup to backup all of your apps, system data and other important content.
- Backup Nandroid – If CWM or TWRP installed previously.
5. Turn off Samsung Kies and other softwares while using Odin3!
Make sure that you turn off Samsung Kies while using Odin3 flashtool. Samsung Kies will interrupt Odin3 and will result in causing errors and may not let you flash your desired firmware. Also, make sure that you turn off any antivirus software you’ve installed and also disable firewall to avoid any connection and flashing issues.
6. Update your Device to Android 5.0 Lollipop!
Since this rooting method is only support the Android 5.0 Lollipop LRX21T, there is now way will it work on any other build, so update your device to Android 5.0 Lollipop first, Follow the link to do so : Link
How To Root Sprint Galaxy S5 on Android 5.0 Lollipop!
Downloads Required:
- Download and extract Odin3 v3.09.
- Download and Install Samsung USB drivers .
- Download the CF-Auto Root.zip: Link
Method:
- Wipe your device completely in order to attain a neat installation.
- Open Odin3.exe.
- Put your Galaxy S5 in download mode. To do so, turn it off and wait for 10 seconds. Turn it on by pressing and holding Volume Down + Home Button + Power Key simultaneously, You should see a warning, press Volume Up to continue. In case this method doesn’t work for you, try one from this guide.
- Connect your device to your PC.
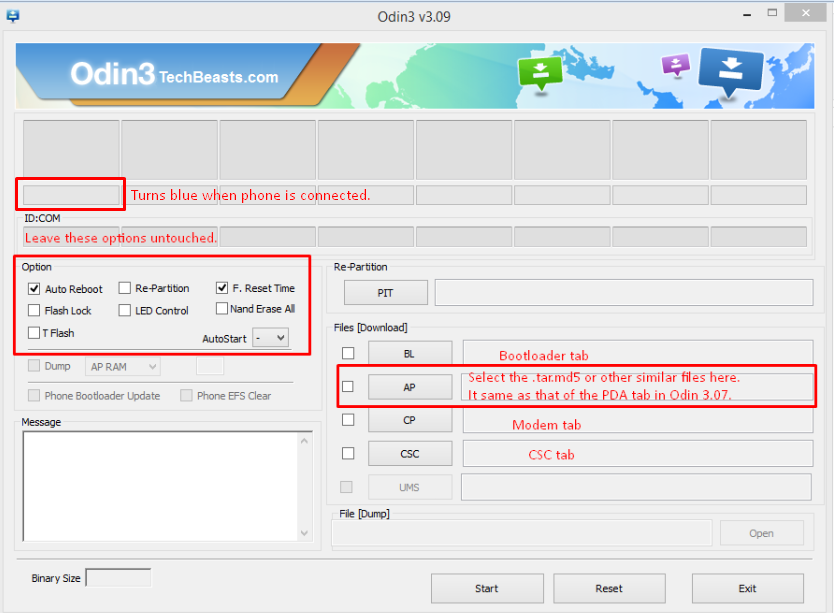
- As soon as Odin detects your phone, the ID:COM box should turn blue. Make sure that you’ve installed Samsung USB drivers before connecting.
- For Odin 3.09 hit the AP tab. Select the firmware.tar.md5 or firmware.tar, that you downloaded and extracted above.
- If you’re using Odin 3.07, you will select “PDA” tab instead of the AP tab, rest of the options remain untouched.
- Make sure that the options selected in your Odin are exactly as shown in the pic.
- Hit start and wait till the CF-AutoRoot flashing is complete, as soon as your device restarts, remove it from PC.
- Wait for your device to reboot, as soon as it reboots check out the root access!
- That’s all!


