Good day for Galaxy A7 users. If you’re a Galaxy A7 owner running Android 5.0.2 Lollipop and you also happen to be an Android power user, you must have spent the last few months in a lot of pain. Ever since Samsung started updating its devices to Android 5.0 Lollipop, it made it hard for the developers to gain root access on this firmware. Users had to use complex methods to gain root access on their smartphones, and those devices which did not come in limelight, those had to stay without the blessing of root. Galaxy A5 and Galaxy A7 users suffered the most as there were no methods available to root these smartphones running Android Lollipop.
Just today, XDA recognised developer Chainfire came up with an update for his all-time famous rooting tool CF-Auto-Root. CF Autoroot now supports over 300 new devices running Android Lollipop or Android Marshmallow. CF Auto Root for Galaxy A5 and Galaxy A7 is also available. If you own the Galaxy A7 with the model number A700F, A700FD, A700H, A700K, A700L or A700S running Android 5.0.2 Lollipop, you can easily root it. Let’s go ahead now and root our beloved Galaxy A7 running Android 5.0.2 Lollipop.
Here are some early preparations to make sure that nothing goes wrong
- This method only works with Galaxy A7 A700F, A700FD, A700H, A700K, A700L or A700S. Your device must be running Android 5.0.2 Lollipop. Check your device’s model number and Android version in Settings > About device section.
- Enable USB debugging on your Galaxy A7. To do so, go to Settings > About device > tap the build number for 7 times. This will enable developer options in settings. Once enabled, open developer options and enable USB debugging.
- Enable OEM unlock on your Galaxy A7 if available. If OEM unlock doesn’t appear in developer options, skip this step.
- Backup your important contacts, call logs, sms messages and important media content.
- Charge your phone up to 50% to avoid and power issues during the flashing process.
- Turn off windows firewall, also disable or delete Samsung Kies while you’re using Odin3.
- Use your phone’s original data cable to establish connection between your phone and your desktop PC.
- Follow this guide to the letter to avoid any mishap.
DISCLAIMER: ROOTING PROCESS IS HIGHLY CUSTOM AND INVOLVES CERTAIN RISKS. ROOT YOUR SAMSUNG GALAXY WILL VOID ITS WARRANTY. IF YOUR DEVICE HAS A KNOX COUNTER ON THE BOOTLOADER, ROOTING IT WILL TRIP THE COUNTER AND YOU WON’T BE ABLE TO RESET KNOX AFTER THAT. IN CASE OF ANY MISHAP, TECHBEATS, SAMSUNG OR CHAINFIRE MAY NOT BE HELD RESPONSIBLE. MAKE SURE THAT YOU’RE ROOTING YOUR PHONE AFTER UNDERSTANDING EACH AND EVERYTHING, AND YOU’RE DOING IT AT YOUR OWN RISK.
Required downloads:
- Download and install Samsung USB drivers
- Download and extract Odin. [Recommended Odin v3.09]
- Open the following page: CF-Auto-Root
- Once you’re on the CF Auto Root page, press Control + F or Command + F. After the search bar appears, type your phone’s model number to locate its Auto Root file. Download CF-Auto-Root file according to your device very carefully and extract it once only to get the .tar.md5 or .tar file.
How To Root Samsung Galaxy A7 on Android Lollipop using CF Auto Root
- Open Odin.exe from the folder you extracted.
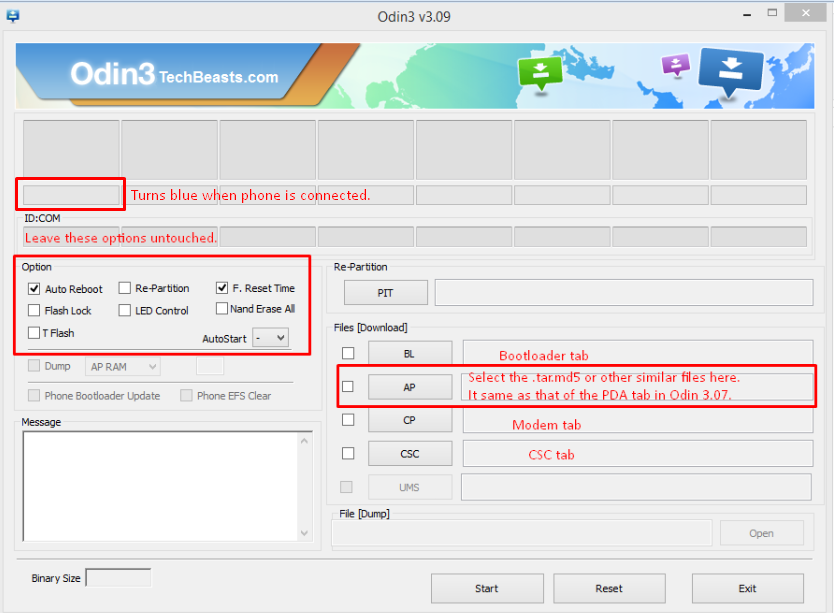
- Click on “PDA” / “AP” tab and select the unzipped CF-Autroot.tar file that you download and extracted in the third step in required downloads. If you’ve already downloaded the CF-Auto-Root file in .tar format, you do not need to extract it.
- Do not touch any other option in Odin. The only options ticked should be F.Reset Time and Auto-Reboot. Leave all other options as it is.
- Now put your Galaxy A7 in download mode and connect it to your PC. To put it in download mode, turn it off completely. Now turn it on by press and holding Volume Down + Home + Power Key. It will boot up with a warning. Press Volume Up to continue. You should be in download mode now. If this combination doesn’t work, here’s How to Boot Samsung Galaxy Devices into Download & Recovery Mode
- Now connect it with your PC and let Odin detect it. As soon as Odin detects your phone, it will show you a blue or yellow indicator in the ID:COM box.
- As your device has been connected, click the “Start” button now.
- Odin will now flash CF-Auto-Root. Once done, it will reboot your device.
- Disconnect your device, let it turn on completely and check SuperSu in app drawer once it boots up.
- You can verify root access by installing Root Checker application from Google Play Store.
Device booted up but not rooted? Here’s what to do
If your device isn’t rooted even after flashing CF-Auto-Root, you may try doing this.
- Follow the guide step and 2 from the guide above.
- Now in the third step, untick Auto-Reboot, the only ticked option should be F.Reset.Time.
- Follow the above guide from step 4 – 6.
- Once CF-Auto-Root has been flashed, reboot your device manually by either pulling out the battery or using the button combo.
- Verify root access as explained above.
How to Unroot your Galaxy A7 now?
You can unroot your device and revert back to the stock condition of your phone by flashing stock firmware. Here’s How To Flash Stock Firmware On Samsung Galaxy With Odin.
Got any issues? Reach us out through the comment box below.


