
Google is always trying to keep its phones updated to the latest version of Android. Recently, Google released Android 7.1.2 Nougat for the Pixel smartphones. Google also released the new Android 8 named as Android O in the developer preview form. The developer preview is meant to give the users a glimpse of what the new OS is going to look like. It doesn’t contain complete features of the upcoming operating system, it has most of the features missing in the preview form. The developer view of Android O can be installed only on a few devices, it doesn’t even run on older Google Nexus devices. Luckily, it can be installed on both the Google Pixel and Google Pixel XL.
Google Pixel and Pixel XL are the pure beasts if you wish to customize them and unleash their potential. Without root, these phones may seem incomplete to many. It was quite hard to root these phones running Android O Developer Preview 1. A method came up earlier, but that rooted the Nexus 5X and Nexus 6P only. The Google Pixel and Pixel XL were not rooted so far.
XDA member Sachi315 discovered a method to root both the Pixel and Pixel XL running Android O. The method runs Android 7.1.2 Nougat on one slot and runs the Android O in the other slot. It makes the use of both these OS to achieve root on the O. In order to make it happen, users need to download the 7.1.2 images and modify them, they need to add a few lines of codes to the flash files, and then flash those files on the phone leading towards the root access.
Here in this post, I have tried, to sum up, the entire method in a few easy steps. You can follow the steps now to Root Google Pixel Android O Developer Preview 1.
Contents
Root Google Pixel Android O Developer Preview 1
Pre-requisites:
- Your Google Pixel’s bootloader must be unlocked.
- Enable OEM Unlocking on your phone.
- Enable USB debugging on your phone.
- Backup your data as this process will wipe it.
- Use OEM data cable to establish a connection with your PC.
- Follow this procedure at your own risk.
Required downloads:
- Download Android 7.1.2 for Google Pixel XL: N2G47E
- Download Android 7.1.2 for Google Pixel: N2G47E
- Download Android O Developer Preview for Google Pixel and Pixel XL: Android O Developer Preview
- Download SuperSU RS4 2.79
- Download TWRP: TWRP for Pixel | TWRP for Pixel XL
- Download and install latest Google ADB and Fastboot binaries
Modifying the images
- Now extract the Android 7.1.2 Nougat and Android O developer preview factory images.zip file that you downloaded above. Extract it for your device only.
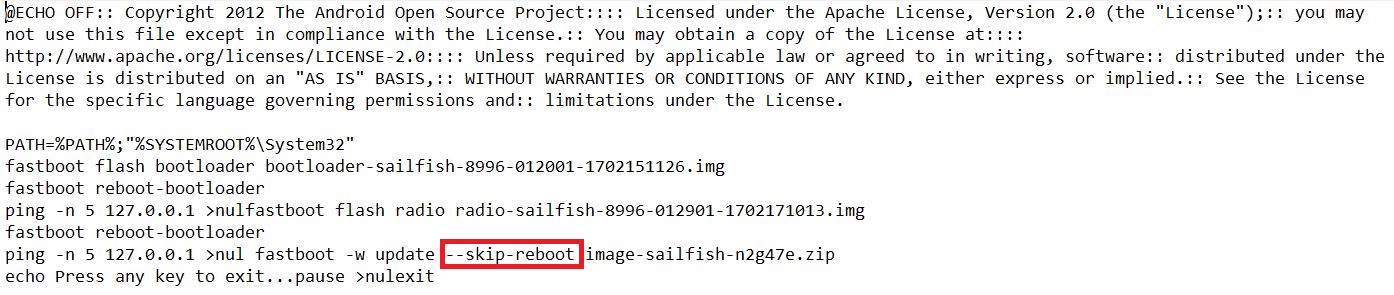
- From the extracted contents of Android 7.1.2 Nougat file, right click on the “flash-all.bat” file and then click on “Edit”.
- Now have a look at the screenshot below, add spaces to where the spaces are added in the screenshot and add this “–skip-reboot” exactly where it is shown in the screenshot.

- Now save this file. After saving this file, scroll down a little further.
- Now you have to add “–slot” lines to this file just as they are added in the screenshots below.

- Once you have added these –slot lines, you also have to add –skip-reboot between update and image-sailfish-n2g47e.zip line.
- Save the file once again and you are done.
- Now similarly, open the extracted Android O Developer Preview folder, find flash-all.bat in it, right click on it and then click on Edit.
- Here in the flash-all.bat file of Android O, we have to add the slot_b lines instead of slot_a. Have a look at the screenshot below and apply changes to your flash-all.bat file in the same manner.


Flashing modified images
- Now reboot your Google Pixel phone into the bootloader mode.
- Connect your phone to your computer now.
- Open the extracted ADB and Fastboot folder which should be named as platform-tools.
- In the platform-tools folder, press and hold the shift key on your keyboard and then right-click on an empty area with this folder. A menu will pop up, click on “open command window here”.
- This will open the command window, now in the command prompt, enter these commands one by one.
- fastboot –slot _a -w
- This command will wipe everything on your device.
- fasboot –slot _b -w
- This will also clean the device.
- fastboot –set-active=_b
- fastboot reboot-bootloader
- After entering all these commands, close the command window and open the extracted Android O folder.
- From Android O folder, run the flash-all.bat file and let it flash the firmware.
- Once done, open the Android 7.1.2 extracted folder and run the flash-all.bat file from it.
- After flashing both these, open the command window from the platform-tools folder once again and in the command window enter these commands.
- fastboot –set-active=_a
- fastboot reboot-bootloader
How to flash TWRP and Root Pixel, Pixel XL on Android O now
- Now we have to boot the phone into TWRP recovery. For this, you need to confirm that your phone is in slot A. You can verify this by rebooting your phone. At the bottom of the screen, your phone should show slot A.
- Reboot into recovery mode on your phone and then wipe > advanced wipe > select the internal storage > wipe it.
- Disconnect your phone from your PC and connect it to your PC again now. You should be able to find your internal storage in This PC or My Computer.
- Now copy the TWRP RC2 and the SuperSU.zip file to your Google Pixel or Pixel XL.
- Boot your Pixel into TWRP recovery now. Tap the Install button > Install Zip > Select TWRP RC2 > swipe finger to flash.
- Once the recovery has been installed, you need to switch to slot b in TWRP. After that reboot > recovery.
- Now your phone will reboot to TWRP recovery RC2. You just need to make sure that it booted up in slot B.
- After verifying that you are in slot B, tap Install > Install Zip > Select SuperSU.zip > swipe to flash.
- Reboot your phone to the system now.
- Upon rebooting into Android O, you can find SuperSU in your apps list.
- That was it, your Google Pixel or Pixel XL is rooted now.


