
Samsung Galaxy S5 Neo owners can finally make the Galaxy S5 owners jealous. The Galaxy S5 Neo has been updated to Android 7.0 Nougat. Quite surprising, isn’t it? Well, the update happened just today. Galaxy S5 Neo’s Nougat update was in the rumors for a while. Now you can enjoy all the new goodies of Android Nougat in you pretty-old Galaxy S5 Neo.
Galaxy S5 Neo was introduced by Samsung in August 2015. This variant of the Galaxy S5 was equipped with almost the same specifications as that of the original Galaxy S5. S5 Neo has a 5.1-inch 1080P display with 432 PPI. Exynos 7580 CPU is powering up this phone and a RAM of 2 GB is there inside. Internal storage of the Galaxy S5 Neo is 16 GB and it also supports external SD card. Galaxy S5 Neo ran on Android 5.1.1 Lollipop out of the box. The phone can be updated to Android 7.0 Nougat successfully.
As far as the new features of the Nougat firmware are concerned, you are going to get a brand new UI on your phone. The notification bar and the toggles menu have been completely changed. You will also find new icons in the settings application and in the app drawer of your phone. Android 7.0 Nougat for the Galaxy smartphones brings performance and battery boosts as well. The update has made its way to several regions. It will take some time for Samsung to cook this update for all the regions. You can check your phone’s OTA update settings to see if the update is available at your end. In case there is no Android Nougat OTA at your end, you can follow this guide to flash Android 7.0 Nougat on the Galaxy S5 Neo using Samsung’s Odin3 Tool.
Here is a complete step-by-step tutorial to install Galaxy S5 Neo Android 7.0 Nougat CQH4 Update.
Contents
Download and Install Galaxy S5 Neo Android 7.0 Nougat CQH4 Update
Early Preparations
- Make sure that your device is exactly as mentioned above. To check out what device you have, go to Settings > More/General > About Device or Settings > About Device and match the model number. Be careful about the device model number, flashing a file on a device not listed here might result in bricking it up. In that case, we may not be held responsible.
- Your device’s battery should not be weak. In case your device goes dead during the flashing process, your device may get soft bricked and you might be in need of flashing stock firmware and that will ultimately result in wiping up your data as well.
- Always use the original data cable to establish a connection between your Android device and your computer/laptop. Using ordinary data cables might interrupt the flashing process, so to avoid any mishap, you need to meet this requirement as well.
- Backup everything!
Backup SMS Messages
Backup Call Logs
Backup Contacts
Backup Media – Copy your files manually to your PC or Laptop.
Backup EFS – If rooted, otherwise skip this step. - Make sure that you turn off Samsung Kies while using Odin3 flash-tool. Samsung Kies will interrupt Odin3 and will result in causing errors and may not let you flash your desired firmware. Also, make sure that you turn off any antivirus software you’ve installed and also disable firewall to avoid any connection and flashing issues.
Required Downloads & Installations
- Download and install Samsung USB Drivers on your PC.
- Download and extract Odin3 v3.12.3
- Firmware for Galaxy S5 Neo: Download Android 7 Nougat for N903W
- Extract the downloaded firmware file to get the .tar.md5 files.
-

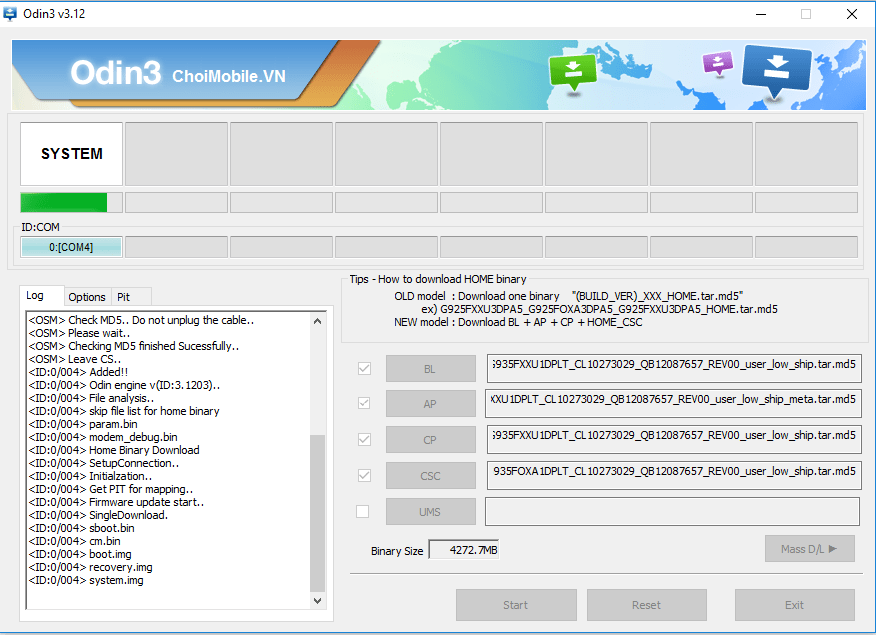
Image only used for reference here.

How to Install Official Android 7.0 Nougat on Galaxy S5 Neo
- Make sure that you read the instructions listed above carefully and you’re all set to go ahead now.
- Wipe your device complete in order to attain a neat installation. You may boot into the recovery mode and perform a factory data reset.
- Open Odin3.exe.
- Put your Galaxy S5 Neo in download mode. To do so, turn it off and wait for 10 seconds. Turn it on by pressing and holding Volume Down + Home Button + Power Key simultaneously, You should see a warning, press Volume Up to continue. In case this method doesn’t work for you, try one from this guide.
- Connect your device to your PC.
- As soon as Odin detects your phone, the ID: COM box should turn blue.
- Now in Odin, selects the files one by one as shown in the picture.
- Select BL tab and select the BL file in it.
- Select AP tab and select the PDA or AP file in it.
- Select CP tab and select the CP file in it.
- Select CSC tab and select HOME_CSC file in it.

- Make sure that the options selected in your Odin are exactly as shown in the pic.
- Hit start and wait till the firmware flashing is complete, The flashing process box will turn green upon successful flashing.
- Once the flashing process has been completed successfully, disconnect your device and reboot it manually.
- Once the device boots up, check out the new firmware now.
- Your device will be running on official Android 7.0 Nougat firmware.
- Once updated to stock, do not try to downgrade, or else you will result in messing up EFS partition of your device.
- That’s all!
Got any queries? Make sure that you drop em’ in the comment box below. Good Luck!


")


