
Samsung is in a good mood these days, at least with the software updates. Samsung has updated a handful of its mid-range smartphones to the Android 7.0 Nougat in the recent days. Galaxy J7 Prime is also among the lucky devices to get the Android Nougat update. Galaxy J7 Prime ran on Android Marshmallow out of the box. Since the Galaxy J7 Prime has already been updated to Android Nougat, Samsung decided to update the Prime variant as well.
If you don’t already know about the J7 Prime, then let us have a recap. Galaxy J7 Prime sports a 5.5-inch Full HD display. The J7 Prime is based on the Exynos 7870 SoC. Under the hood, you can find a RAM of 3 GB and the storage options of 16 and 32 GB. The phone has a 13 MP camera at its back and an 8 MP on the front for the selfie freaks. Samsung Galaxy J7 Prime is among the most popular mid-range smartphones in the Indian, Pakistani and other such markets.
So, if you have a Galaxy J7 Prime lying around, it’s time to pick it up and flash a brand new firmware on it. The Android 7.0 Nougat has started hitting the device in several regions all across the world. Android 7.0 Nougat will bring significant changes on your Galaxy J7 Prime. The firmware comes with a completely revamped UI. There are new features like Recent Files menu in the file manager, battery optimisation in the settings, new icons in the settings application and in the application drawer. Samsung has also improved the overall performance and battery life of all the smartphones that have got the latest Android 7.0 Nougat update.
You can check your phone for the OTA update first of all. If there is an OTA update available, you can immediately update your phone without going through any kind of complex method. If the OTA update isn’t available in your region, the 2nd best option is to go with a manual flashing procedure. The following guide will take you through a comprehensive and a step-by-step guide to install Galaxy J7 Prime Android Nougat Official Update.
Contents
Install Galaxy J7 Prime Android Nougat Official Update through OTA
- On your Galaxy J7 Prime, go to Settings.
- In Settings, go to About Device.
- In About device > Software update.
- Check for new update now. If there is an update available, update your phone right away.
OTA update is the safest method to update any Android smartphone. However, if the update hasn’t hit your region, you may opt for a manual method to update your phone. Samsung has its own tool called Odin3 which can be used to flash the firmware files manually on your smartphone. Scroll down to update your Galaxy J7 Prime to Android 7.0 Nougat manually.
Install Galaxy J7 Prime Android Nougat Official Update [Odin Method]
Early Preparations
-
Make sure that your device is exactly as mentioned above. To check out what device you have, go to Settings > More/General > About Device or Settings > About Device and match the model number. Be careful about the device model number, flashing a file on a device not listed here might result in bricking it up. In that case, we may not be held responsible.
-
Your device’s battery should not be weak. In case your device goes dead during the flashing process, your device may get soft bricked and you might be in need of flashing stock firmware and that will ultimately result in wiping up your data as well.
-
Always use the original data cable to establish a connection between your Android device and your computer/laptop. Using ordinary data cables might interrupt the flashing process, so to avoid any mishap, you need to meet this requirement as well.
-
Backup everything!
Backup SMS Messages
Backup Call Logs
Backup Contacts
Backup Media – Copy your files manually to your PC or Laptop.
Backup EFS – If rooted, otherwise skip this step. -
Make sure that you turn off Samsung Kies while using Odin3 flash-tool. Samsung Kies will interrupt Odin3 and will result in causing errors and may not let you flash your desired firmware. Also, make sure that you turn off any antivirus software you’ve installed and also disable firewall to avoid any connection and flashing issues.
Required Downloads & Installations
- Download and install Samsung USB Drivers on your PC.
- Download and extract Odin3 v3.12.3
- Firmware for Galaxy J7 Prime: Firmware for G610F
- Extract the downloaded firmware file to get the .tar.md5 files.
-

Image only used for reference here.

How to Install Official Android 7.0 Nougat on Galaxy J7 Prime
- Make sure that you read the instructions listed above carefully and you’re all set to go ahead now.
- Wipe your device complete in order to attain a neat installation. You may boot into the recovery mode and perform a factory data reset.
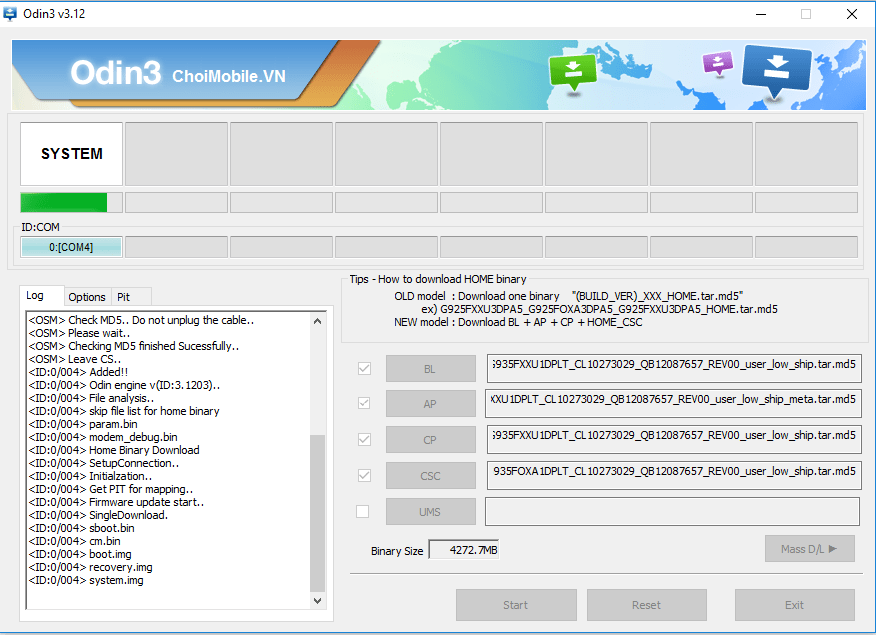
- Open Odin3.exe.
- Put your Galaxy J7 Prime in download mode. To do so, turn it off and wait for 10 seconds. Turn it on by pressing and holding Volume Down + Home Button + Power Key simultaneously, You should see a warning, press Volume Up to continue. In case this method doesn’t work for you, try one from this guide.
- Connect your device to your PC.
- As soon as Odin detects your phone, the ID: COM box should turn blue.
- Now in Odin, selects the files one by one as shown in the picture.
- Select BL tab and select the BL file in it.
- Select AP tab and select the PDA or AP file in it.
- Select CP tab and select the CP file in it.
- Select CSC tab and select HOME_CSC file in it.

- Make sure that the options selected in your Odin are exactly as shown in the pic.
- Hit start and wait till the firmware flashing is complete, The flashing process box will turn green upon successful flashing.
- Once the flashing process has been completed successfully, disconnect your device and reboot it manually.
- Once the device boots up, check out the new firmware now.
- Your device will be running on official Android 7.0 Nougat firmware.
- Once updated to stock, do not try to downgrade, or else you will result in messing up EFS partition of your device.
- That’s all!
Got any queries? Make sure that you drop em’ in the comment box below. Good Luck!


")


I am From Nepal, i recently Buy a New J7 Prime , Before 1 Day ago,
Can I Upgrade My J7 Prime , Using Indian Firmware,
Will this kill my warranty? pls help
@bilgehanku:disqus No it will not.
@@usamamujtaba:disqus
Yar custom firware se masla tu nahi hoga
ma ny lg g4 ko kia aur mobile he poora kar dia
safe hai na j7prime ma custom firmware dalna
Same question
https://uploads.disquscdn.com/images/21d859d5c1da862bc3f3d54f46df81c59cbe91c064910a40d2bc8d25e994fc91.jpg
Stuck While Upgrading J7 Prime Rom Nougat through Odin
Please Help me Odin stuck for last 2-3 Hour during installation…..
You`re using old version of odin
Download the newest one 🙂
Can anyone tell me, when I get this in Bangladesh?
Phone model number: SM-G610F
I did it once after flashing my phone to 7.0 my screen use to blink while using youtube
can this work on J7 Prime g610y
Same question here
No ota updates in Sri Lanka so far for j7 prime. Still running on android 6