
At times you have to install the Google Play Services manually on your smartphone. In order to perform a manual installation of the Play Services, you have to be sure about 2 things. You must know what architecture your phone is running and what’s the DPI. Google Play Services come in different packages. The packages are build based on the architecture and DPI of an Android phone. Especially, if you have an old Android phone, you definitely have to take the DPI and architecture into account since those phones ran on old architectures.
Now if you are thinking why you would want to install the Play Services manually, let’s take a look at the answer to this question. At times, you come across Android phones that do not have anything called Google inside. This is the case most of the times happening with the Custom ROM freaks. The AOSP ROMs do not have the Google Apps present inside. Also, the Chinese Android handsets that belong to the Chinese region, they do not have any Google Apps inside. At times, the Google Play Services start crashing on an Android phone. In such a case, you either have to update the Google Play Services or you have to reinstall them. These are a few cases where you will be installing them manually.
To install the Google Apps, you have to install the Google Framework. Google Play Services is the most important part of the Google Framework. For example, if you have all the Google Apps installed, but not the Google Play Services, you will not be able to run those apps. Google Play Services lay out the basis for all other Google Apps to work on an Android phone.
Follow this tutorial to identify correct architecture and DPI for Google Play Services. The guide will first explain how the ARM and ARM64 architectures work and then what’s the role of DPI. In the end, you will find a list of CPUs based on the architectures.
Contents
The Architectures: ARM, ARM64, and X86

- There are three basic frameworks that exist in the world of Android. The very first is x86, which is basically Google’s version to run Android on a computer. x86 is not based on the ARM platform.
- Then comes the ARM platform which is also known as the ARM-v7a. This is the 32-bit platform which powers low-end and mid-range smartphones. It was popular back in the day. Nowadays, most of the smartphones run on the ARM64 architecture.
- ARM64 is currently the most popular platform. It is the 64-bit system. As the CPUs for smartphones evolved, ARM64 became a norm. Most of the high-end smartphones today are powered by ARM64.
The architectures are backward compatible, here is how they will work.
- ARM or ARM-v7a apps on ARM-v7a will work.
- ARM or ARM-v7a apps on ARM64 or ARM-v8a will work.
- The ARM64 or ARM-v8a apps on ARM64 or ARM-v8a will work.
- The ARM64 or ARM-v8a apps on ARM or ARM-v7a will not work.
DPI Values [Software Density]
Similarly, following are the DPI ranges that we currently have.
- 160dpi
- 240dpi
- 320dpi
- 480dpi
- nodpi
Now the DPI has more to do with the UI. It basically makes the UI of an application compatible with the UI of your phone. For example, if your phone has 160dpi, you will install an application having 160dpi on it. If you install an application of 240dpi on your 160dpi smartphone, the UI will be messed up.
When the DPI range of your phone does not match any given DPI of an application, you can simply install the nodpi version. In fact, installing the nodpi version is always better since it automatically sets the DPI of an application according to your phone.
When it comes to Google Play Services, we have various versions of DPI. If your phone’s DPI matches any version of Play Services, you can pick that version, otherwise, there is a nodpi version of Play Services which you can always install.
DPI is not backward compatible, however, it works in different ranges. This is how it works.
- Your phone’s DPI: 1×0 – 160dpi apps compatible.
- Phone’s DPI: 2×0 – 240dpi apps compatible.
- Your phone’s DPI: 3×0 – 320dpi apps compatible.
- Phone’s DPI: 4×0 – 480dpi apps compatible.
Now comes the main question, how to determine what Architecture is powering up your phone and what’s the Software Density i.e. DPI? Well, follow these steps.
Identify Correct Architecture and DPI for Google Play Services
- Download and install Droid Hardware Info application on your phone.
- Open the application from the app drawer on your phone.
- The application will take you into the “Device” tab by default.
- At the bottom of this page, you will find “Software Density” provided by a DPI value. Write down this value.
- Now tap the “System” tab which is next to the Device tab.
- On this tab, the 6th line is “Instruction Sets” stating the architecture of your phone, it should be something like arm-v7a or arm64-v8a.
- Note down the value of Instruction Sets as well.
- Also, not down the Android Version of your phone. You must be sure what Android your phone is running on.

- Now look for your required Google Play Services APK and install it.
- Your installation should be going smoothly now. That’s all.
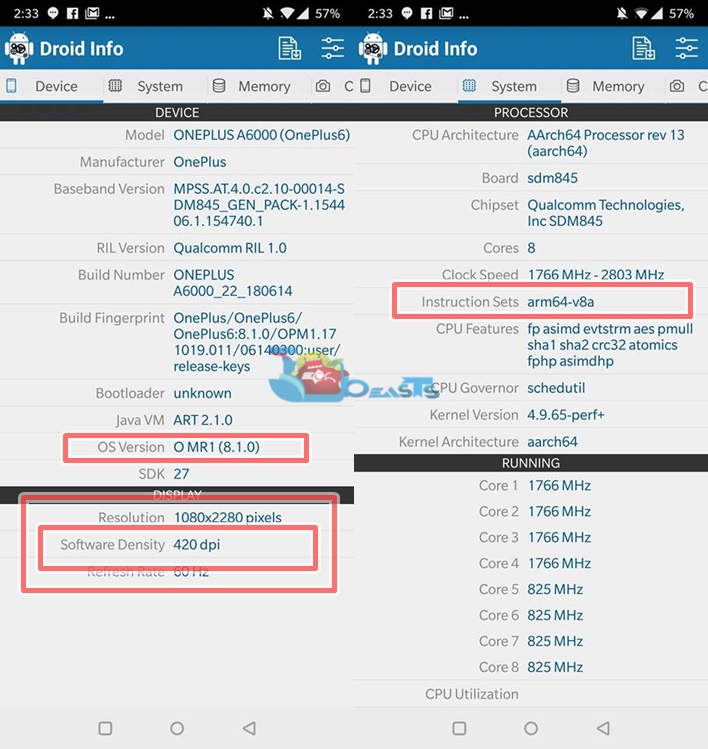
In the screenshot above, the DPI of my phone is 420 and its architecture is arm64-v8a. It means I can install both the ARM and ARM64 apps on it, but I have to install the Play Services APK either having 480dpi or nodpi. Going below this will crash the Play Services on my phone.
You can always check the CPU of your phone at the back of your phone’s box or even using Droid Info application. Just so you know, here are the CPUs that are based on ARM-v7a and ARM-v8a architectures:
CPUs based on ARM-v7a
Samsung Exynos
Exynos 3 3110, 3250, 3470, 3475
The Exynos 4 4210, 4212, 4412, 4415
Exynos 5 5250, 5260, 5410, 5420, 5422, 5580
Qualcomm Snapdragon
Qualcomm Snapdragon S1, S2, S3
Snapdragon S4 Play, S4 Plus, S4 Pro
The Snapdragon 200, 205, 208, 210, 212
Snapdragon 400, 410, 412, 415
Huawei HiSilicon
K3V2
→ K3V2E
Kirin 910, 910T, 920, 925 and 928
CPUs based on ARM-v8a
Samsung Exynos
Exynos 7 5433
Also, Exynos 7 7420, 7570, 7580, 7870, 7 7880, 7872, 7885
Exynos 7 8890, 8895
Also, Exynos 7 9610, 9810
Qualcomm Snapdragon
Snapdragon 425,427, 430, 435
Also, Snapdragon 610, 615, 616, 617, 625, 626, 650 or 618, 652 or 620, 653, 630, 636, 640, and 670
Furthermore, Snapdargon 800, 801, 805, 820, 821, 835, 845 and 850
Huawei HiSilicon
Kirin 620, 650, 655, 658, 659
Also, Kirin 930, 935, 950, 955, 960, and 970
Conclusion
That’s all for now. I hope that you find this guide helpful. If you have any kind of queries, feel free to reach out to me through the comments section below.


