
How to Unlock HTC One Bootloader, Root and Install Custom Recovery. HTC One is the world’s most beautiful smartphone and HTC’s best flagship smartphone. The phone came up with a 4.7 Inches Full HD Display, Quad Core 1.7 GHz Krait 300 Processor, 2 GB RAM and 4 MP Ultrapixel camera at the back. The phone left the factory gates having Android 4.1.2 installed inside.
Since Android is an open source there is no limit on its development and it’s used. Having root access on an Android smartphone adds charm to its functionality, but gaining root access on HTC devices is not possible until and unless you have the bootloader unlocked. So if you are looking how you can gain root access on your HTC One, you have spotted the right place. We will learn today how we can unlock the bootloader and gain root access and how we can install a custom recovery on the HTC One. Custom recoveries basically allow the users to flash mods, custom roms in the smartphone so it is necessary to have it installed if you are looking to play with your phone.
Contents
Before we begin here are some important guidelines.
- As soon as you unlock the bootloader of your device, the warranty of your device will be void. You may not be able to get your device repaired for free in case of any damage happens, perhaps you can get it repaired upon paying.
- Make sure that you’ve battery charged over atleast 60%. In case of low battery your phone might turn off and you might end up having your device soft bricked.
- Make sure that you backup all your important contacts, messages, call logs and all other media content as unlocking the bootloader will completely wipe your phone.
- Make sure that you’ve installed all the HTC Drivers and HTC Sync Manager – Download Here.
- Enable USB debugging mode on your phone. In order to do so go to Settings > Developer Options > Enable USB Debugging. If you couldn’t find the developer options in settings then you need to activate the dev options first. In order to do so go to Settings > About and tap the ”Build Number” 7 times and your developer options should appear now.
- After having the bootloader unlocked you may not install any OTA updates, as updating the phone might brick your device. Simply deny the update as soon as it appears.
- Disable your windows firewall and any anti-virus programs if installed in order to prevent any interruption.
- Use your device’s genuine data cable to connect it to your computer.
- Download and extract Fastboot folder on your computer’s desktop –Download it here.
Here is how you can download the zip file having all the four files in it.
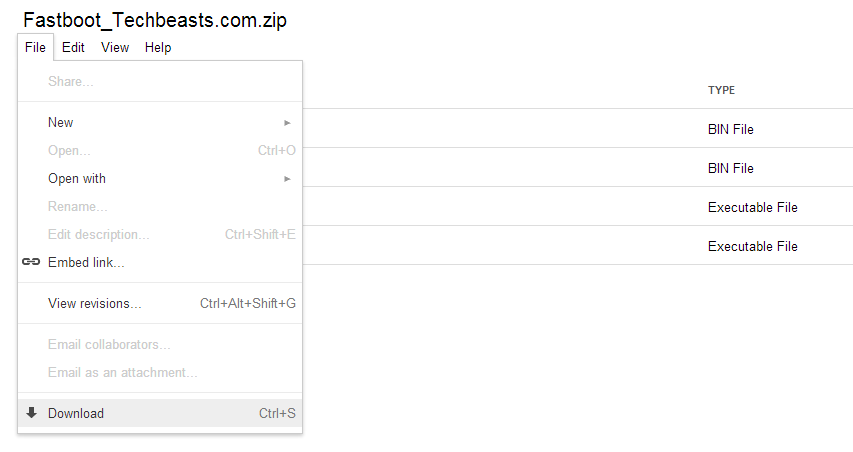
- The extracted folder should have 4 files in it Fastboot, adb, adbwinusbapi & adbwinapi.
- Ok now before we head up to the procedure and start unlocking make sure once that you’ve read and implemented the guidelines as explained.
Here’s how you can unlock HTC One bootloader now.
- First of all, go to the Htcdev.com and log in. If you don’t have an existing account then create one by pressing the ”register button”, verify your account through the verification mail and log in.
- Now open the Bootloader Unlock page: Htcdev.com/bootloader and select your device here if your device is not listed here then select ”All other supported devices” and press begins unlocking. A pop will appear asking you if you wish to continue or not, hit yes in the next step another popup will appear, here you need to accept legal terms and conditions and hit Proceed to unlock instructions.
- Ok now the HTCDev will give you step by step Unlocking Bootloader Instructions. In the very first step, you need to boot your phone into the Hboot Mode. In order to do so turn off your phone by long pressing the power key, as soon as it turns off wait for 30 seconds. Now long press the Volume Down + Power key. Your phone will now boot into the Hboot mode. Here you can move between the options by press volume up and down keys, and to make a selection you need to press the power key. Highlight the ”Fastboot” option by moving up and press the power key.
- After selecting Fastboot connect your HTC One to your PC.


- Scroll down to the bottom on HTCdev page and hit Proceed to Step 5.
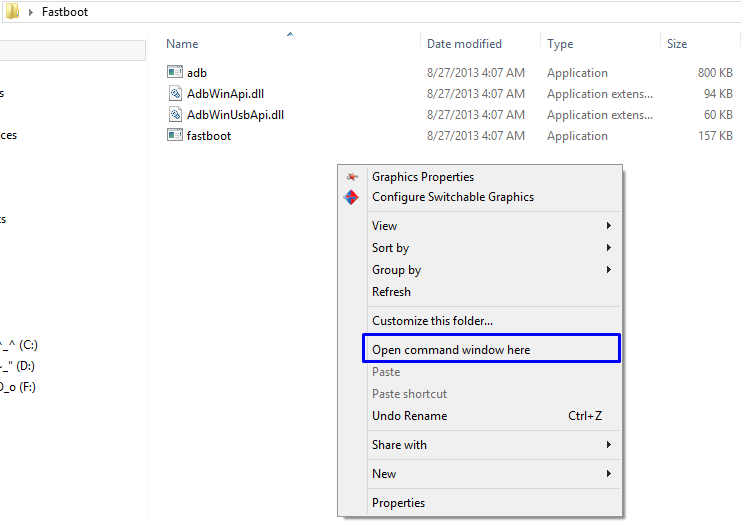
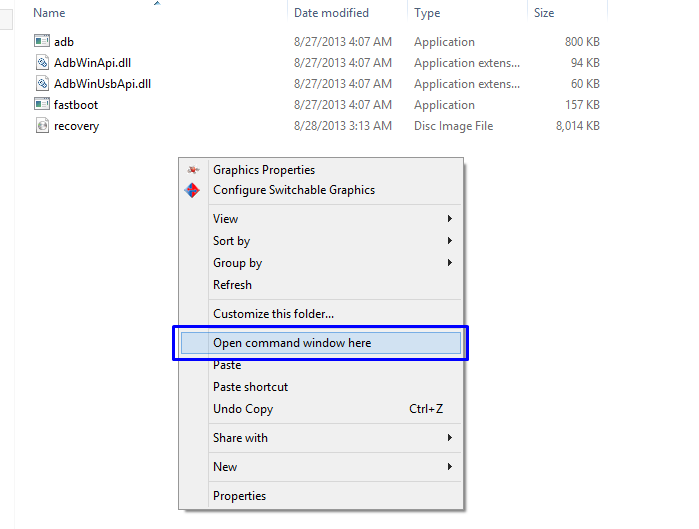
- Ok so, now you don’t need to do anything here on the HTCdev’s 2nd page. Get back to the download Fastboot_Techbeasts.zip file and extract it once on your desktop, you should get a folder now named ‘‘Fastboot”. Open this folder and on the blank area hold down the shift key + press the right mouse button and click on ”Open command window here”.
- Command window will now open from the fastboot directory. You need to enter the following command here: fastboot devices
- This command will tell you if your devices have been detected by your PC or not. If your device is not detected it will not show you any info and you will be forced to re-install HTC Sync manager and reboot your computer and start this whole process from the start. In case your device is detected it will show you the info and you can proceed to the next step.
- Now scroll down to the bottom of the HTCDev’s 2nd page and hit Proceed to step 8 button.
- Now on the 3rd page, you need to follow all the instructions i.e
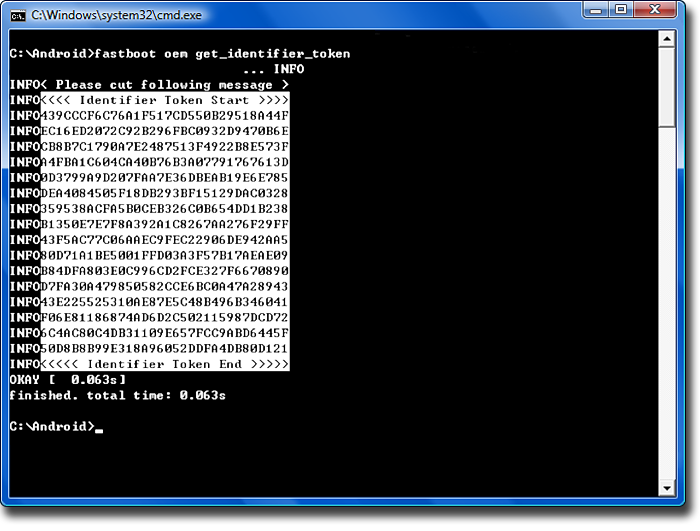
- Type the following command in the command prompt: fastboot OEM get_identifier_token.
- You’ll see a long block of text in the command prompt. Copy the log starting from ”<<<< Identifier Token Start >>>> to <<<< Identifier Token End >>>>”. The long block will appear in the form of one of the following two screens.

- Now paste the copied token code in the box titled “My Device Identifier Token:” on the HTCDev’s 3rd page and hit the Submit button.
- As soon as you press the submit button you’ll get an email from the HTCDev having a file attached named as ‘Unlock_code.bin”. Download the file and copy it in the Fastboot folder which you extracted on your desktop.
- Get back to the Command Prompt and type the following command in order to get your HTC One’s bootloader unlocked: fasboot flash unlocktoken Unlock_code.bin
- Now your HTC One will show a request to unlock the bootloader. You simply need to press the Volume Up Key and Select Yes and confirm it using the Power Key.
- As soon as you press the Power Key, your HTC One will now restart and it will complete the Factory Reset process. You can disconnect it now from your PC.
That’s All! Congrats, you have the bootloader unlocked now on your HTC One. You can now root your phone and flash custom mods / roms on your phone.
In order to root, flash custom ROMs and mods you need to have a Custom Recovery installed on your HTC One. We will learn now how we can install a custom recovery on the HTC One.
How to Root & Install TWRP:
- First of all, you need to download the latest TWRP recovery file. Download it here
- Rename the downloaded file to ”recovery” for your ease of access.
- Copy and paste the renamed recovery file to your Fastboot folder.
- Now open the command prompt here in the Fastboot folder.
In the command prompt type the following command in order to flash the custom recovery: Fastboot Flash Recovery Recovery.img
That’s all, this will install a custom recovery on your HTC One.
Backup Stock Rom:
- Long press power key to turn off your phone, long press and hold down Volume Down
- + Power key in order to boot into HBoot mode. Select Bootloader and press the power key, in Bootloader select recovery and press Power key to enter into TWRP recovery.


- Tap backup here, this backup can become handy in case of any mishap. You can simply restore your phone’s stock rom by pressing restore in the TWRP.
Rooting HTC One:
In TWRP’s main screen tap ”reboot”, it will tell you that you’re not rooted and you need to install SuperSu first, swipe confirm. When your phone is rebooted you may find a notification that you need to install the SuperSu app from the Play Store. Open the notification and select TWRP since the app from Google Play only works with S-Off.
That’s all you’ve rooted your phone now as well. We hope that you guys find this guide easy to use. Got any queries? Feel free to leave a comment below and we will try our best to help you out.


