
We’ve been talking about what is root access and the benefits of it since a quite long time now. It’s time to learn how to gain root access on a new device today that is Galaxy S2 this time. You might be owning a Galaxy S2 device and looking to play with your device beyond the boundaries. Galaxy S2 is no doubt, one of the awesome devices ever developed by Samsung have a 1.2 dual core processor, 1 GB RAM, 4.3” Super AMOLED display and 1650 mAh battery inside. You’ve spotted the right place in order to gain the root access on your phone.
Contents
How to Root and Install CWM Recovery on Samsung Galaxy S2 GT-I9100
First of all, you need to take some precautions to avoid any mishap. These include:
Before we begin, make sure that you have the battery charged over 60 % and have backed up all your important Contacts, Call Logs & Messages. It is highly recommended in case of any mishap or data loss to backup all your important data.
- Download and Unzip Odin PC – Get it here
- Download & Install Samsung USB Drivers – Get here
- Download & Unzip Cf Auto Root Package file once on your desktop
- Download the Cf-Root (Root Package File) matching your baseband version from HERE.
Method 1: For Android Gingerbread (2.3.x) and Ice Cream Sandwitch (4.0.x)
- In order to check your Kernel version open Settings > About Phone > Kernel Version. See the Kernel Version number here and match it with the root packages available on the attached link above. Download your phone’s kernel’s rooting package file and unzip it once on the desktop of your computer.
- Put your phone in download mode. In order to do so turn it off first of all by pulling out the batter, or by long pressing the power key. Wait for 30 seconds and then press Home + Voume Down + Power Key simultaneously. It should now ask you for a warning, press the Volume Up key in order to continue.

- Open Odin and attach your phone to your PC using the original data cable.
- The ID:COM at the top left should turn blue or yellow depending upon your odin version as soon as your phone is detected.

- Click PDA tab in odin and select the extracted Cf Root package file, which you downloaded in step 4 above and extracted in step 1 in below.
- Click on Start button in odin. Make sure that the options selected in your odin are exactly as shown above. Your CF Root file will be a different one as the pic above is for Galaxy S4 (Just to give you an idea of odin it is attached here). The process is quite fast and it will flash a kernel in your phone in order to give it root access and install CWM recovery. As soon as it is finished, your phone will restart automatically. Disconnect it from the PC now and check that you have SuperSU installed in the apps.


Congratulations! You have gained the root access on your phone now having Android Gingerbread or Android Ice Cream Sandwitch firmware.
Method 2: For Android 4.0.x Ice Cream Sandwitch & Android 4.1.2 JellyBean (Recommended)
Since this method is not suitable for a device running on Android Gingerbread, you may not try this method if you have Android 2.3.x installed on your phone.
- First of all you need to download the Rooting Package file for your phone’s Kernel Version
- Check your phone’s kernel version in Settings > About > Kernel version.
- Download the file for your device’s kernel below.
| Download for ICS – Android 4.0.x | Download for JB – Android 4.1.2 |
|
- If the file for your device’s Kernel version is not attached above, try finding it on the official thread HERE.
- Download the .zip file and place it on your phone’s sd card storage.
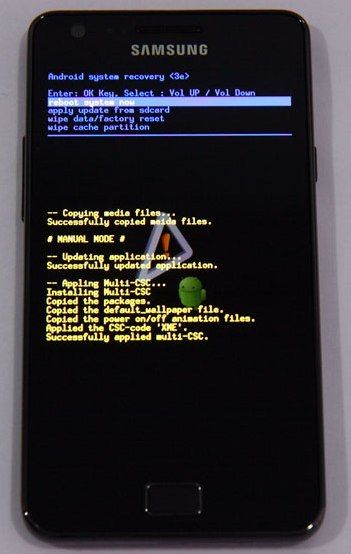
- Turn off your phone by holding the power button or by pulling out the battery, wait for 30 seconds and turn it on into recovery mode. In order to do so press Home + Volume Up + Power Key simultaneously. Your phone should show you the recovery menu now.

- You can move between the options here by pressing volume up and down keys, in order to make a selection press power or home key one of these will work.
- Here select install update from sd card and select the .zip file you placed on your phone’s sd card.
- Confirm the process by pressing yes in between a lot of nos and the .zip file should begin the installation.
- As soon as the installation is finished your phone will reboot.
PHewww you have the root access now, you can check the SuperSu app in the apps menu. You also have installed the CWM recovery with the .zip package.
Enjoy!
Now wondering what to do with your rooted phone?
Here’s the answer for you!
Rooting your phone gives you complete access over all the data which is apparently locked by the manufacturers. This includes removal of the factory restrictions and making changes to the internal system and the operating system. Gaining the root access gives you the privileges to install various applications to enhance the performance of your device, allows you to remove the built-in applications/programs, helps you to upgrade the battery life of your device & install the apps which require the root access for the proper functionality and modify your device in so many other ways e.g using mods and custom roms.
How to keep Root after OTA Updates
The OTA updates rolled out by the manufacturers wipe the root access on your phone. In case you don’t know how you can restore the root access after OTA update, you’ll have to root your phone once again, but there is no need to do it as you can restore it using the OTA Rootkeeper App which is available in the Google Play Store. The app creates backup of your root and simply restores it after any OTA update.
While rooting your phone, please keep it in mind that the Root Process isn’t official and has nothing to deal with Google Inc and the device manufacturer, which is Samsung in our case. Follow the guide carefully to prevent any damages to the device as the method is completely custom.
Credits: Chainfire – Recognized Developer XDA
Credits: Phil3759 – Recognized Developer XDA
Got any questions? Feel free to leave a comment below, we’ll try our best to help you out ![]() Good Luck
Good Luck


")


Thank you verymuch, it’s working. keep up the good job 😀
thanks